


Table of contents:
Key takeaways:
- Get the most out of videos with good editing: Video editing is key to helping your video look more professional and engaging your intended audience.
- Editing makes videos more interesting: Cutting your footage, keeping things dynamic, and ensuring high video and audio quality can go a long way to creating a solid video edit.
- Find a powerful and easy-to-use editor: Riverside’s intuitive interface and automated tools can help make video editing easier and more fun.
The difference between a good and great video is often how well it has been edited. No matter how interesting the conversation or visuals are, editing can mean the difference between highly engaging and forgettable content.
Trust me when I say that video editing can make a massive difference in the quality of your content. Thanks to focusing on improving my video editing, I was able to grow my YouTube channel to 100K subscribers in just two years.
That’s why I’ve put together my top 10 video editing tips. They’ll help you expand your skills and achieve a level of video production quality that can help you grow and retain your audience.
Why is video editing important?
Hundreds of thousands of new videos are uploaded to YouTube daily. How can yours stand out? With great editing.
Recording video footage is the first step to telling a story or spreading a message. Every editing decision you make, from making a cut to adding background music, can enhance the viewing experience and, with a bit of practice, can help you create more compelling and engaging video content.
10 best video editing tips for beginners
If you’re just learning how to edit videos, these video editing tips and tricks will help you make the most out of your footage and set you on a path toward creating video content that audiences can’t look away from.
1. Always capture high-quality audio and video
Capturing high-quality audio and video at the outset is essential because the quality of your raw footage directly impacts your final product. Even the most advanced editing software can only do so much to fix poor-quality audio or blurry video. Starting with great footage saves time, reduces frustration, and gives you more creative flexibility during editing.
With high-quality footage, you have more room to play. Cropping, zooming, or color grading is far easier when your footage has a higher resolution. Similarly, clean audio simplifies adjusting levels, removing background noise, or adding effects without distortion.
Low-quality recordings often require extra effort in post-production to fix issues like audio distortion, echoes, or grainy video. Starting with quality content means less time spent troubleshooting and more time spent enhancing your story.
What to do
Riverside enables you to record professional-grade audio and video without needing an elaborate studio setup. The platform records audio locally for each participant, ensuring it’s unaffected by Internet glitches. This means you get uncompressed, studio-quality sound, perfect for podcasts, interviews, or video content.
The platform supports 4K video recording, so everyone’s video is captured at the highest possible quality, whether you're recording solo or with guests. Riverside also records separate tracks for each participant, allowing you to make precise edits in post-production. You can adjust audio levels or video frames individually, which is particularly helpful for multi-guest setups.
Here’s how it works:
When you’re ready to record, click Join Studio and select whether or not you are wearing headphones. If you or your guest are not wearing headphones, Riverside will enable the Echo Canceling feature to minimize unwanted noise.
If you are recording with guests, invite your guests to join you.
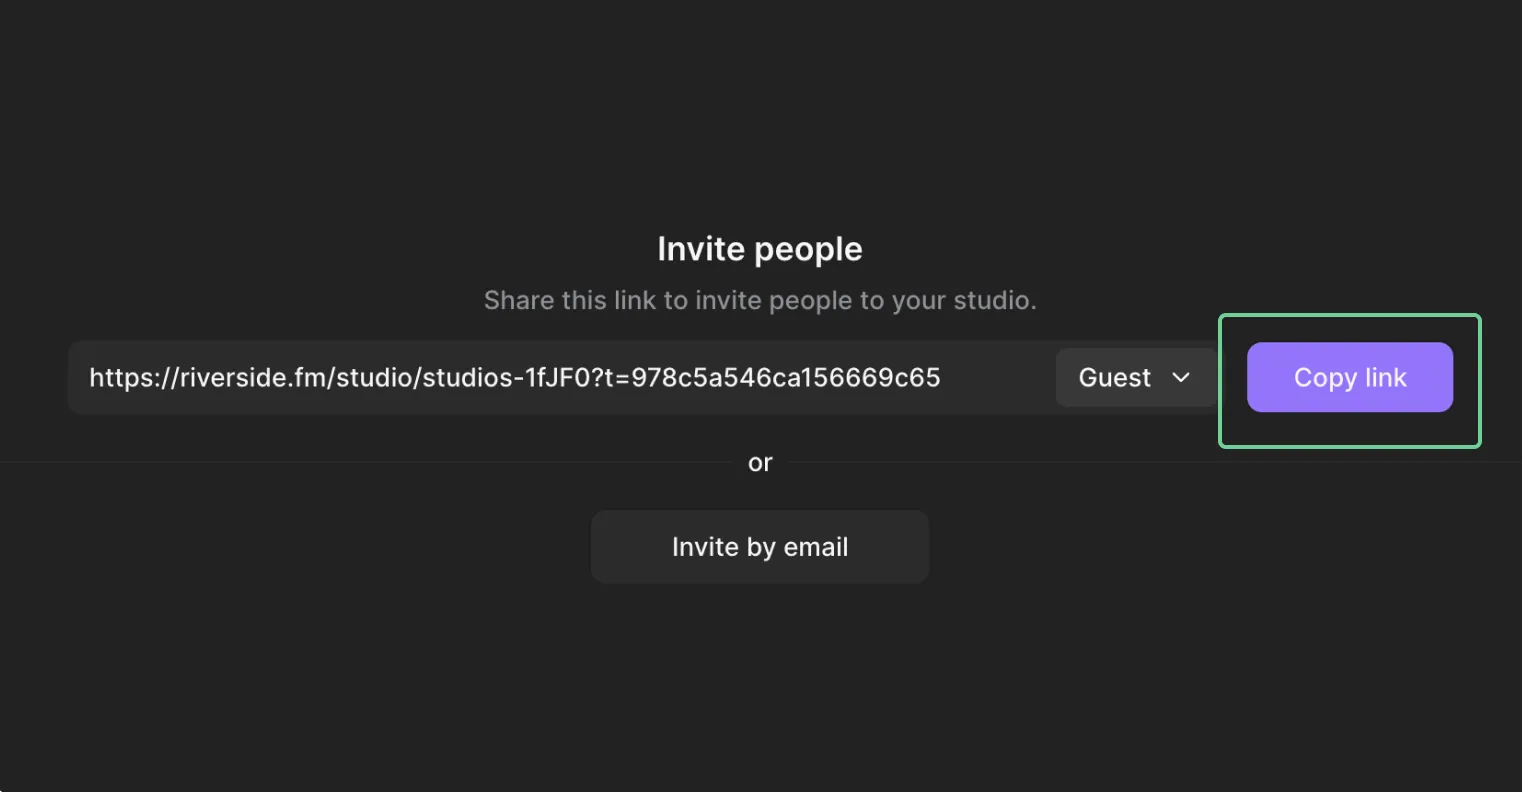
When your guests have joined, start recording by clicking the red record button at the bottom.

You can see the upload status of your recording in the top right corner throughout the session. When you’re done recording, click the red record button again.
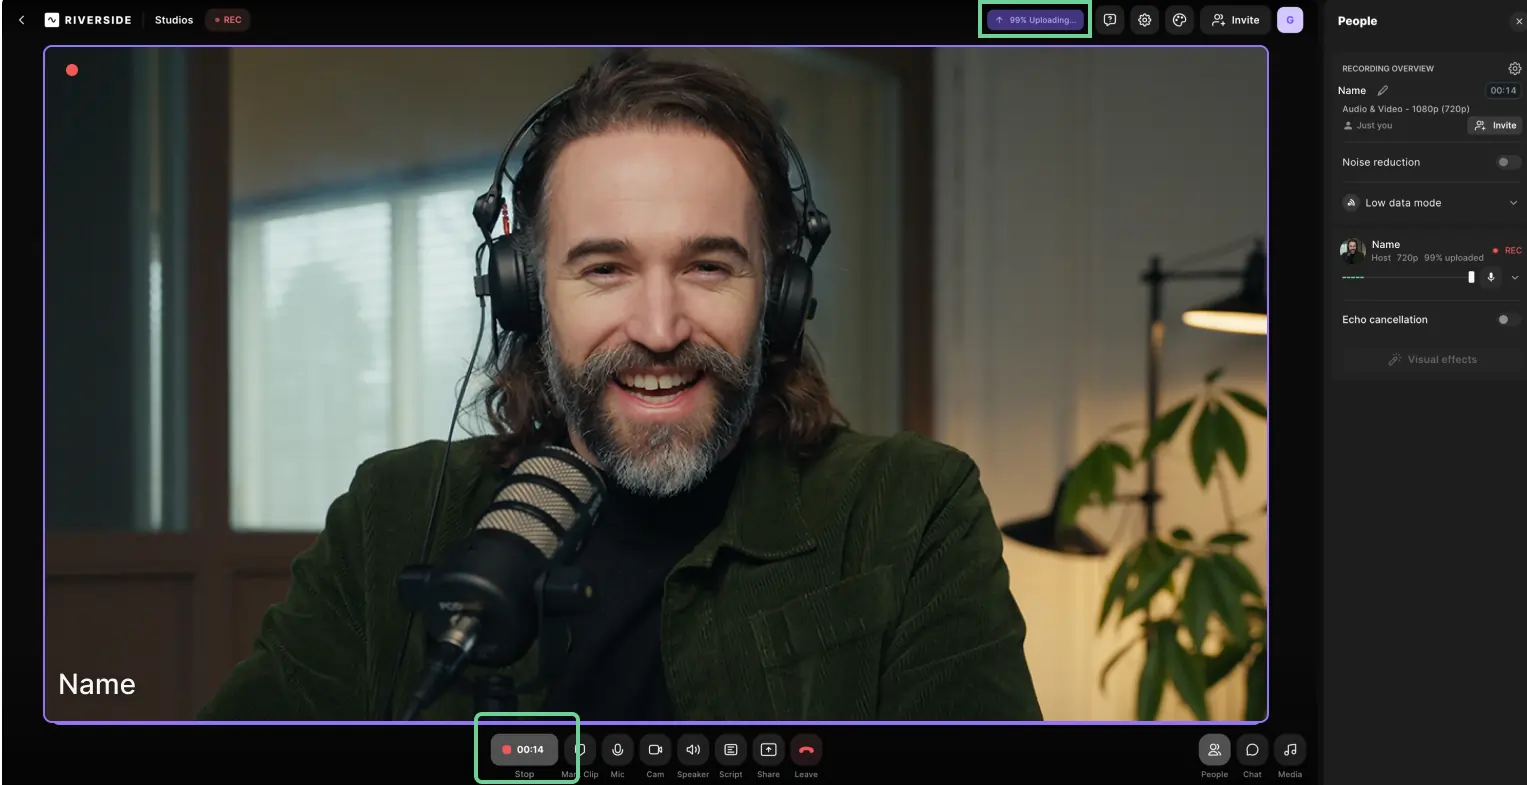
Once the recording has been uploaded fully, click the “leave” button (red phone receiver icon) to leave the studio and end the session.
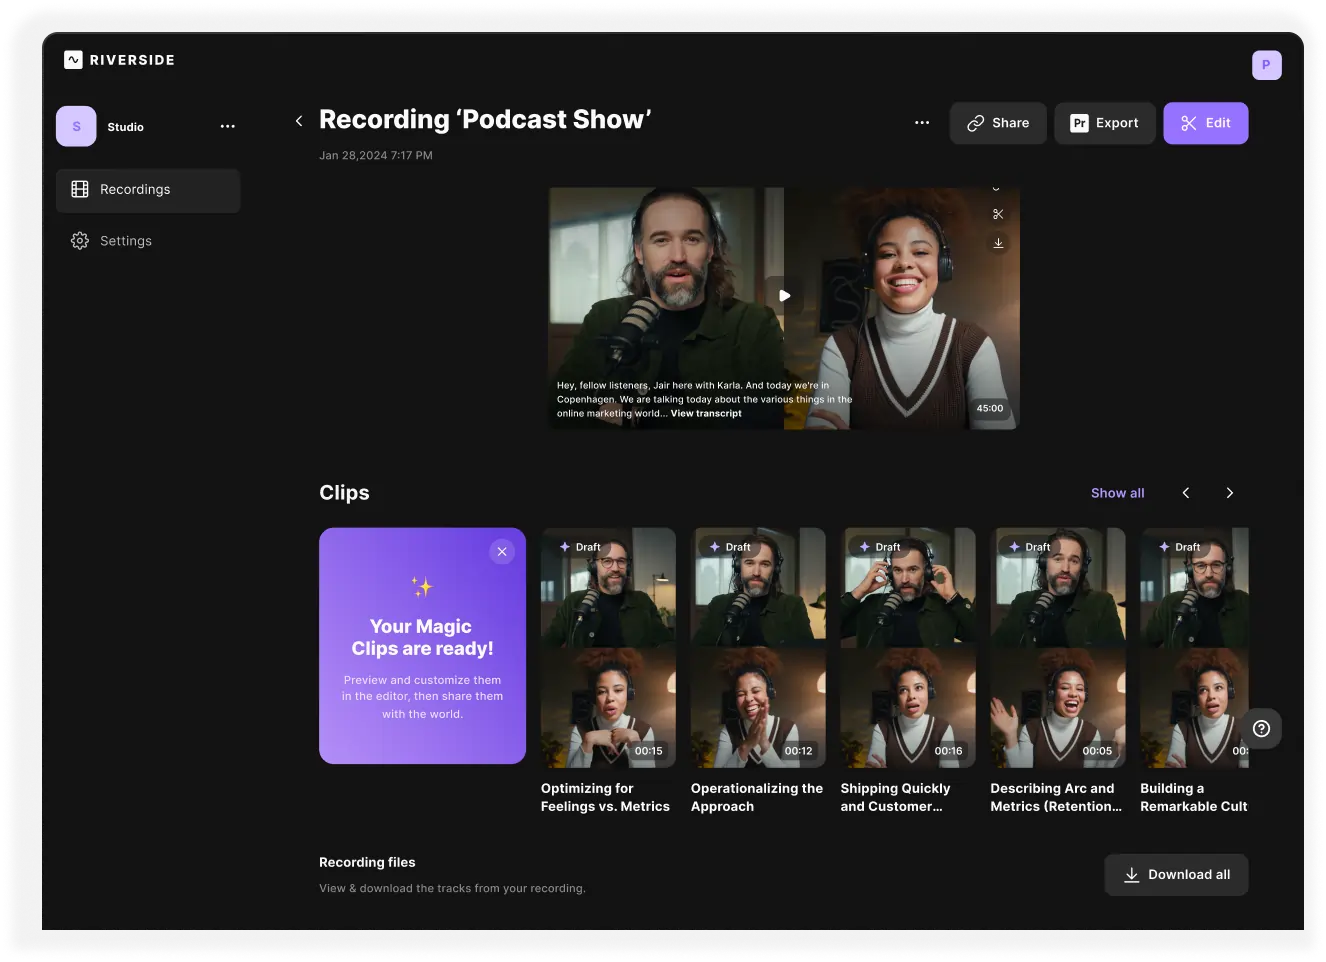
When you're done recording, you can view all your studio-quality recordings and head to the Riverside editor to edit your video without leaving the platform.
2. Remove unusable footage
You don’t have to use everything you record. Unusable footage includes everything from mistakes like misspoken words to shots where the background noise is too loud to hear the speaker.
Although you can sometimes save footage with editing, cutting sections that weren’t recorded well is usually the best solution. After all, you don’t want a few low-quality sections to detract from the rest of your well-edited footage.
What to do
Video editing software will allow you to cut out sections of your video or trim the beginning or end of your footage. With Riverside’s text-based editor, cutting out footage is as easy as cutting words from a text document. Riverside automatically transcribes your content while you’re recording. Then, all you have to do is delete words from your transcript to say bye-bye to the corresponding sections of your video.
The result? A cleaner, more professional video.
Here’s how you can use Riverside for text-based editing:
Record your video with Riverside. Once it has been downloaded, you can click on it to view it.
Transcription happens automatically in Riverside with every recording.
Open the editor by clicking the “Edit” button above your video.
You’ll see your transcript on the left and a preview of your video on the right.
If you want to delete a section of your video, highlight the text and hit “Delete” on your keyboard.
When the text is deleted, that portion of the waveform (and the video) disappears. It’s that easy.
3. Edit audio and video tracks separately first
Whether you have two people or 9 in your video, record each person’s audio and video individually. This is called multitrack recording, and it gives you more editing flexibility. This results in a higher-quality, more professional-looking video.
What to do
Riverside always records each speaker on a separate track. When it comes time to edit your recording, individual speakers, music, and sound effects are all represented separately on the editing timeline.
This lets you easily adjust the volume and other settings, ensuring they line up. With Riverside, you can do this automatically. Using the Magic Audio tool, you can use the sound equalizer to automatically adjust the levels of frequency bands and the audio among separate audio tracks.

Read more: Audio Cleanup Tutorial for Beginners
4. Focus on pacing
A common problem video makers face is balancing their video’s pace, or the speed and consistency of your video. While it’s natural for a video to be faster in some places and slower in others, a constantly changing pace is uncomfortable to watch.
Proper pacing helps maintain a steady flow of conversation, avoids long silences or rushed transitions, and allows key points to resonate with your audience without dragging on.
What to do
You can create a sense of pace by using cuts. When you’re editing, consider the rhythm and atmosphere of your video. You should aim to move viewers smoothly from one scene to the next. The speed of each scene should match its tone, such as a fast clip for an urgent message.
In addition to using Riverside’s text-based editor to cut from one scene to the next, Riverside’s Set Pace tool can automatically smooth out the pace of your conversations by finding the pauses in your content and removing them with a click.
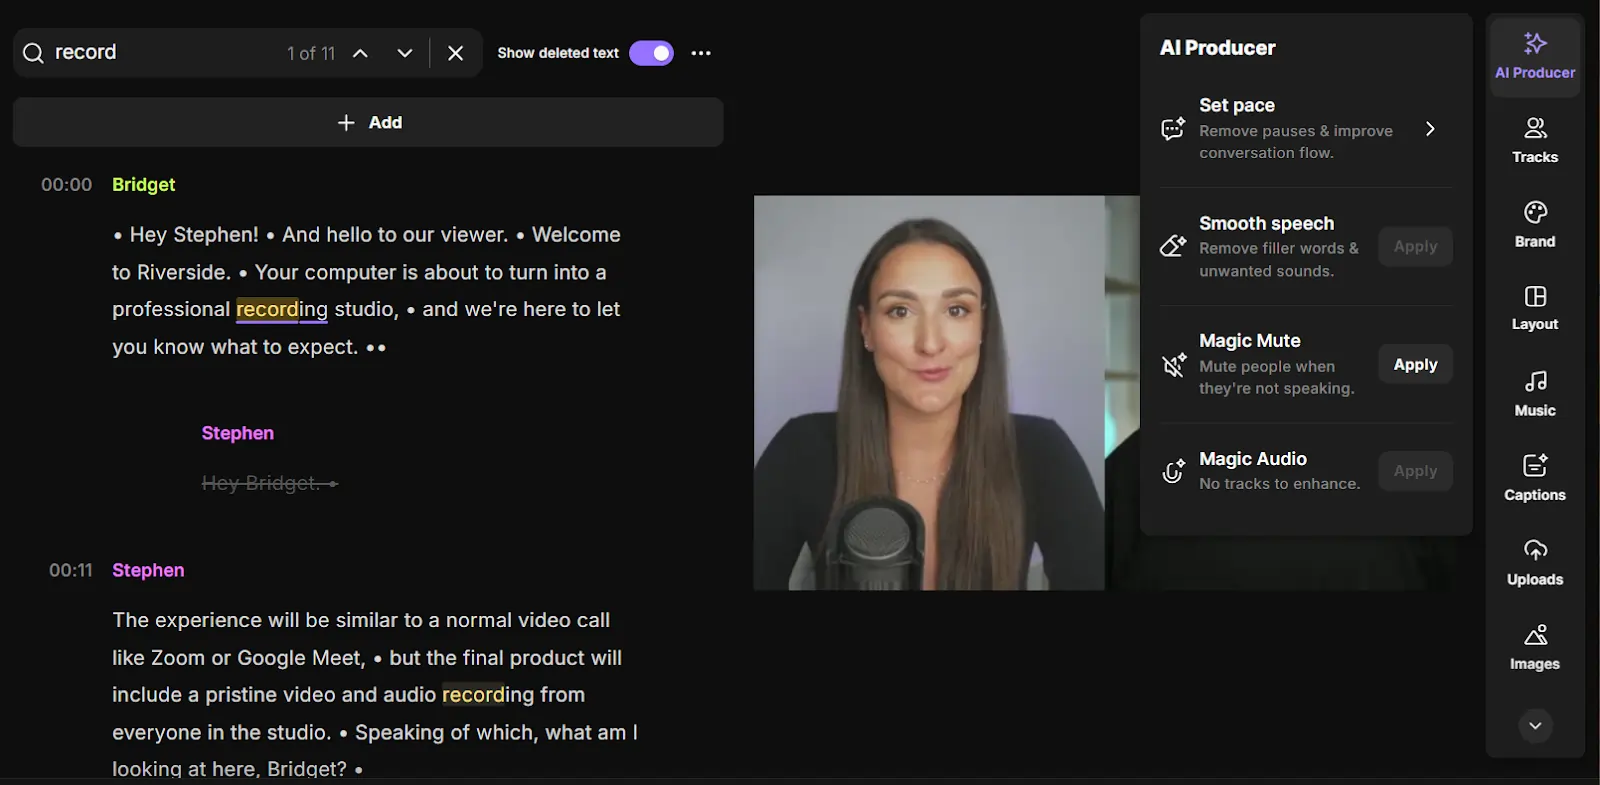
Click “AI Producer” in the right-hand menu, then select “Smooth speech.”
Filler words like “um” and “ah” will be highlighted for you, after which, you can choose to delete them or not.

To remove or reduce silences, return to “AI Producer” and click “Set pace.” Use the slider to adjust whether the pauses in your dialog are reduced a little or a lot depending on the pace and tone you are going for with your content.

Just like with your "ums" and "ahs" you can see the proposed changes and edit the silences further if you need to create a more natural flow. You can choose to remove them all or correct each individually if necessary.
5. Add dynamics with cutaways
Cutaways are when one shot changes to another to show a different person or location. They are one of the most common effects used by editors to alter the pace of a scene, draw attention to something, or keep a viewer’s attention. They will be an essential part of your editing toolkit.
What to do
You can also create and pull together other complimentary footage easily with Riverside.
Go to your Riverside studio, select the recording you want to edit, and click the “+” icon in your editor.
You can choose another Riverside recording or upload footage from your computer.
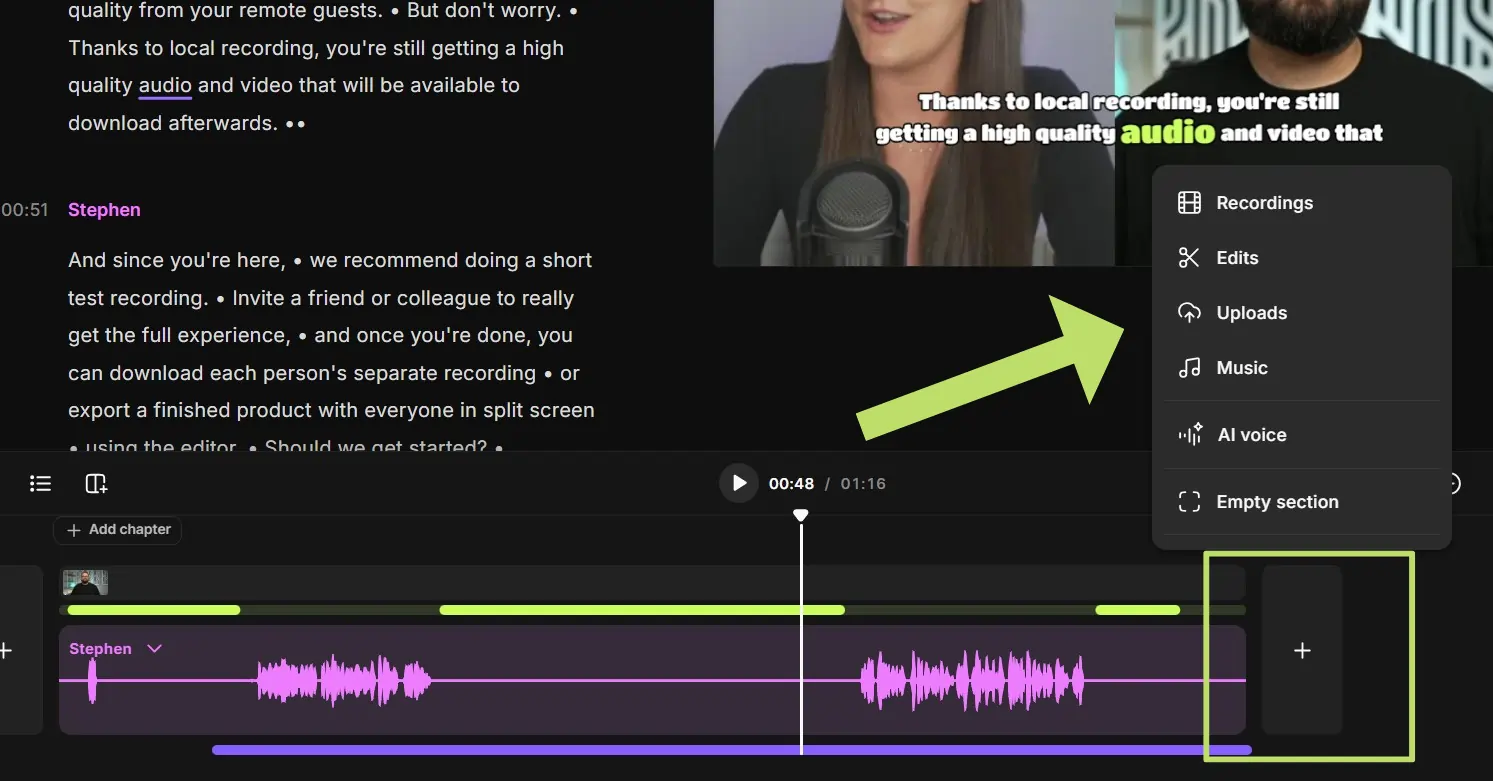
Then, trim your clip as needed and move that footage to the desired spot on your editing timeline.
Need an example of this in action? Check out how top YouTuber Alex Hormozi uses cutaways to keep things interesting. Many top social media personalities use this technique because they know it keeps people watching longer.
6. Trim out the fluff
Trimming a video clip means removing unwanted portions from the beginning or end of the clip. Clips that are too long can have the unfortunate effect of losing viewers’ attention.
But finding the ideal video length isn’t so simple. According to Sean Cannell, a top YouTuber, speaker, and coach, videos ranging in length from 7-second YouTube Shorts to multi-hour compilations can all “crush” if they’re done well and meet your audience’s needs.
This highlights the importance of tailoring your video’s length to its purpose and audience, ensuring that every second adds value and keeps viewers engaged.
What to do
Before starting to trim your videos, here are some best practices to keep in mind:
- Have a plan: Before trimming, identify the core message or goal of your video. Knowing what you want to communicate helps you eliminate anything that doesn’t serve that purpose.
- Focus on flow: Ensure that your edits maintain a smooth narrative flow. Avoid abrupt jumps by using transitions or cutaways to bridge gaps if necessary.
- Eliminate repetition: Remove redundant clips or repeated ideas to keep your content concise and engaging.
No matter how long your run time is, you don’t want to give your viewers reasons to click away from your content.
Keep footage essential to your video's pace, story, or atmosphere. Anything else you should trim away? You can do this quickly and easily using Riverside. Check out this quick tutorial I created that explains the trimming and cutting process in Riverside.
7. Add Captions
You’ve probably seen them a lot, but captions are textual representations of the audio content in a video. There are a few good reasons to add captions to your video.
They make your content more accessible to those who speak other languages or are hard of hearing. They help clarify speech in your video if the speakers have strong accents or are in noisy locations.
They can also make your video’s message more memorable.
What to do
You can add captions to your videos quickly and easily with the help of Riverside’s video editor. It transcribes your recordings automatically, so you’ll have all spoken text ready as soon as your recording is finished. Then, choose a caption style using the “Captions” tool in the Riverside editor.
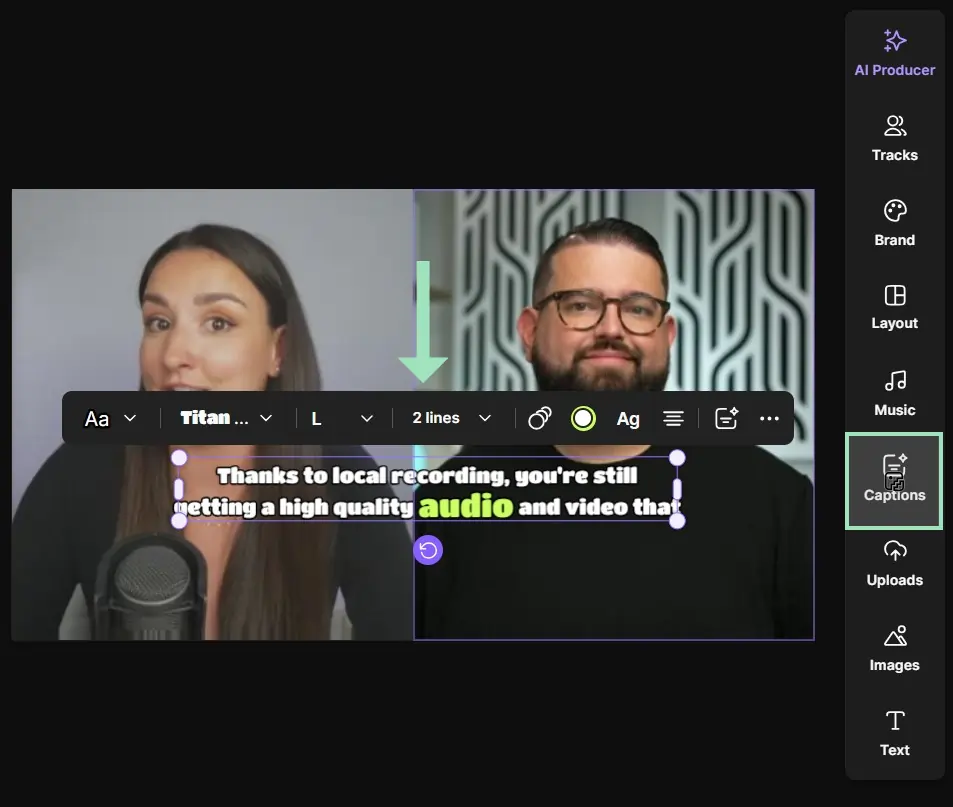
You can add captions using our captions tool, change the font, style, and size, and you can even change the positioning just by dragging up and down on those captions.
Another important thing to focus on is accuracy. While Riverside's transcriptions are very accurate, you should still check your captions once they have been generated to see if they are correct.
If you notice that a particular word is constantly being captioned incorrectly, you can easily fix that in Riverside by searching the transcript and making corrections.
If you want to search for a specific word or phrase, you can input them into the search box at the top-left of your screen. This will highlight every time that word or phrase is spoken in your video.
8. Diversify your shots and angles
Diversifying shots and angles in your video editing is key to keeping your audience visually engaged and enhancing storytelling. Using a mix of wide shots, close-ups, and dynamic angles can add depth, emphasize important details, and create a more immersive viewing experience.
It also helps maintain a sense of energy and flow, preventing your video from feeling static or monotonous. Strategically switching perspectives can reinforce key points, evoke emotions, and guide viewers’ attention to where you want it most.
What to do
Filming multiple shots usually entails setting up multiple cameras. But I have a simple tip for setting this up: Use Riverside’s mobile app to turn your phone into a second webcam. This way, you can easily record from your computer’s webcam and via your phone simultaneously, giving you at least two angles you can use in the final footage.
Here’s a video where I explain how to do this:
However, you should be careful when using this tip. Switching shots too many times can create an uncomfortable, dizzying effect. To keep your video slick and exciting, use varied shots sparingly.
9. Edit sound effects and music into your videos
Adding sound effects and music to your videos can elevate them from ordinary to extraordinary. Sound is a powerful tool that supports the visuals and adds an emotional and dynamic layer to your content.
Whether it's subtle background music or impactful sound effects, incorporating audio elements can make your videos more engaging, professional, and memorable.
Music and sound effects can evoke emotions, set the mood, and immerse viewers in your story. Similarly, sound effects—like the rustling of leaves or the click of a door—add realism and depth.
Music can also help establish a rhythm, guiding viewers through your content. It can smooth transitions between scenes or provide an auditory cue for key moments to keep the flow of your video seamless and engaging.
What to Do
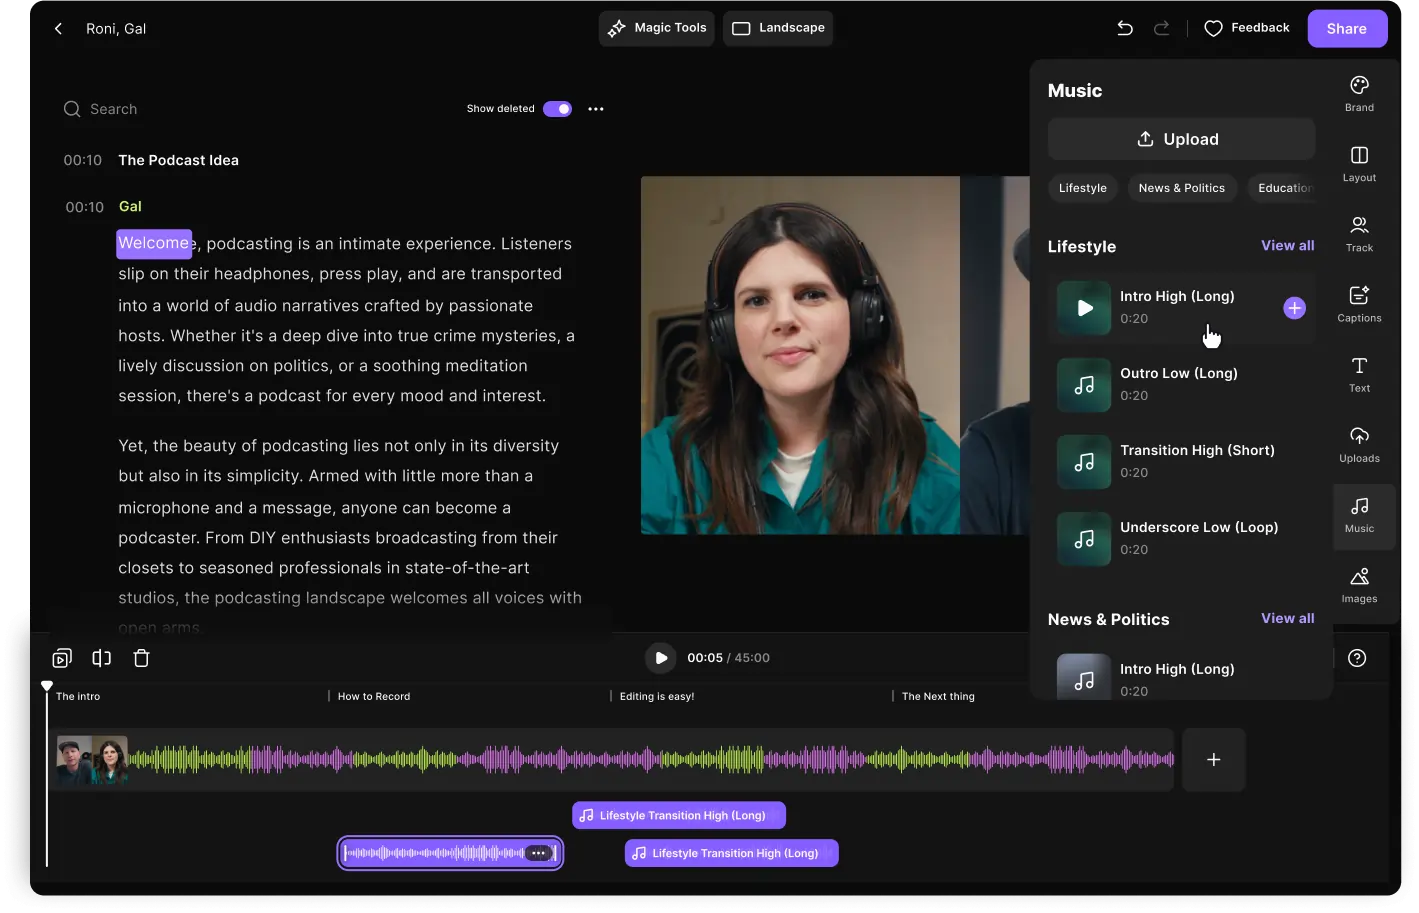
Riverside’s Media Board simplifies the process of adding sound effects and music to your videos. This feature allows you to upload and play audio files directly during your recording session, eliminating the need to add them in post-production. It can also save you tons of editing time. Here’s how it works:
- Preload your media: Before recording, upload your sound effects, jingles, or background music to the Media Board. This ensures all your assets are ready to go when you need them.
- Live playback: During your recording, you can trigger sound effects or play music live, perfectly syncing audio with the visuals. This is especially useful for podcasts, webinars, or live video recordings where timing is crucial.
Incorporating audio directly into your session saves post-production time while achieving a polished result. All media played through Riverside’s Media Board is recorded at the same high quality as your main audio tracks, ensuring a seamless and consistent sound throughout your video.
10. Make smooth transitions
Transitions are essential for creating a smooth and professional viewing experience. They guide your audience from one segment to the next, keeping the flow cohesive and avoiding abrupt cuts that can feel jarring.
Whether it’s moving between scenes in a podcast or introducing a new topic, transitions ensure your message is clear and polished. A transition is a way you connect different shots or scenes in your footage. They can be a direct cut or more complex effects like fades.
What to do
With Riverside, you can add intro and outro clips to your videos to create engaging transitions that keep your viewers at attention. These elements not only enhance the flow of your content but also establish a clear beginning and end, leaving a lasting impression on your audience. Here's how to do it:
- Pre-upload your media: With Riverside’s Media Board, you can upload your branded intro and outro clips—complete with music, graphics, or animations—before you start recording.
- Play in real-time: During your session, you can seamlessly play your intro at the start and your outro at the end, integrating them directly into the recording. This eliminates the need to insert them manually during post-production.
To make the transitions flow better, you can create a crossfade using the fade-in and fade-out controls under Volume & effects:
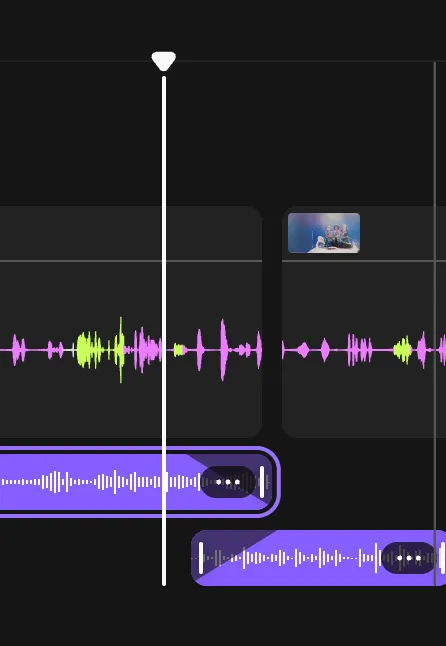
Zoom in on the timeline.
Drag one music segment slightly over the other so they overlap in the timeline.
This overlap will be the length of your crossfade.
- Hover over the first segment in the timeline and click ••• [the three dots].
- Click Volume & effects to adjust the volume settings.
- Drag the controls to set a fade-out effect at its end.
- Do the same with the second segment, but this time, set the fade-in effect.
8 Dos and Don’ts of Video Editing
Video editing is both an art and a skill, with plenty of opportunities to enhance or derail your project in post-production. Keep these essential dos and don'ts in mind to streamline your process and ensure a polished final product.
Do:
- Focus on storytelling: Every cut, angle, and scene should serve your story or message. Remember your audience and ensure your edits create a consistent and engaging narrative flow. A clear vision will guide your decisions and keep your video purposeful.
- Leverage analytics: Use audience data to inform your edits. Are viewers dropping off after the first minute? Do they skip certain parts? Analytics can reveal what’s working and what’s not, helping you refine pacing, length, and content focus for better engagement.
- Take a break before reviewing: Finish your edits at least a day before your deadline and review with fresh eyes. This allows you to catch errors, improve pacing, and see your video as your audience will. A clear mind leads to sharper edits.
- Stay organized: Label your files, organize your timeline, and keep your assets in clearly marked folders. An organized workspace saves time and reduces frustration during the editing process.
Don’t:
- Overdo cuts and effects: While cuts and sound effects can add energy, overusing them can overwhelm viewers and detract from your message. Aim for balance, allowing effects to complement rather than dominate your video.
- Choose misaligned music: The wrong music can completely disrupt the mood of your video. Always match your soundtrack to the tone and message of your content. Also, ensure you use royalty-free or licensed music to avoid copyright issues.
- Forget to save and back up: Losing progress due to a failure to save is every editor’s nightmare. Set up auto-save features and back up your files to an external drive or cloud storage. Platforms like Riverside automatically save recordings locally and to the cloud, providing peace of mind.
- Ignore the flow: Avoid choppy transitions or mismatched edits that disrupt the viewer’s experience. Watch your video as a whole to ensure it flows smoothly and maintains its intended tone.
FAQs on Video Editing Tips
How can I get better at video editing?
The road to becoming an editing aficionado can take some time. As a beginner, the very best thing you can do is practice! A great way to do this is by recording footage to experiment with. This could be intended for a video or as a learning experience.
Make sure to shoot your practice footage from multiple angles, indoors and outdoors, with more than one person in some scenes. This will give you lots to play with in post-production. From there, experiment with our 10 video editing tips and see how they change your recording. Once you are familiar with the basics, you can show off your creativity in your edits.
What are the stages of video editing?
Video editing usually consists of several stages: reviewing footage, cutting and pacing, balancing audio and correcting color, and previewing the final version. However, most video makers have developed a personal editing process over time. The more tips you learn, the more you can customize your editing workflow.
What should you avoid in video editing?
When it comes to editing videos, there are a few mistakes to avoid. Beginner editors commonly make errors, including using copyrighted music, poor sound quality, shaky camerawork and blurry video, and unbalanced audio. If you can avoid these common pitfalls, your video will be in a good place.


.webp)
%20-%20Free%20_%20Paid.webp)
_001%202.webp)


