


Table of contents:
Can you use Adobe Audition for podcasting?
How much does Adobe Audition cost?
Adobe Audition Podcasting Key Features:
How to use Adobe Audition for Podcasting
Getting started with Adobe Audition
Importing and Recording tracks
Is Adobe Audition good for podcasting?
Riverside: An Adobe Audition alternative dedicated to podcasting
Adobe Audition is an industry favorite for a reason. But for those who’ve never used it before, it can be a pretty daunting learning curve.
With so many powerful features, it can be difficult to know whether you’re getting the most out of the platform. Though it definitely requires some time and dedication, you’ll get there. And soon, you’ll be an Adobe Audition pro.
This article will walk you through all the basics. You’ll find a guide to performing the most fundamental podcast editing tasks, so you can get going in no time.
TL;DR
- Adobe Audition is Adobe’s DAW; it’s perfect for recording and editing in-studio podcasts
- Adobe Audition costs $20.99 per month
- Its key features include a whole suite of basic audio editing, in-depth audio cleanup & optimization tools
- Riverside is a great alternative to Adobe Audition, especially for high-quality remote recording & easy audio editing
What is Adobe Audition?
Adobe Audition is Adobe’s professional audio workstation. It is part of Adobe’s Creative Cloud suite. You can use it to record, edit, mix, and restore audio. It will fit seamlessly into both an audio-only or audio and video workflow. It will work well whether you’re editing video audio, a podcast, or doing sound design.
Can you use Adobe Audition for podcasting?
Absolutely. Adobe Audition is a great option for producing professional standard podcasts. If you’re not going to be recording remotely, you can produce your podcast from start to finish in Adobe Audition. However, because of Audition’s higher price point, it may not be the ideal option for every podcaster.
How much does Adobe Audition cost?
Adobe Audition is available for $20.99/month. You can also opt for a Creative Cloud All Apps subscription which costs $54.99 per month.
For businesses, this costs $35.99 per month per license.
Adobe Audition Podcasting Key Features:
Let’s take a look at some of Adobe Audition’s key features:
Basic editing tools:
Adobe Audition gives you all the basic editing tools that a podcaster could want:
- Adjust audio levels and use ‘noise reduction’ to remove beeps, hisses, and other unwanted background noises
- All basic editing tools that you’ll need
- Library of royalty-free sound effects that you can use
Multitrack recording
Multitrack recording is essential when recording a podcast. This gives you the freedom to edit each person’s audio individually and tailor your edits to their specific sound.
Effects & royalty-free music
You can browse a whole library of royalty-free music and effects to help you take your podcast to the next level.
Intuitive Editor
Adobe Audition offers an intuitive editing workflow with a few different features. You can
- Choose between non-destructive and destructive editing spaces. Destructive editing means your changes are irreversible. Non-destructive editing tools don’t affect your original tracks.
- Batch processing for quicker workflows
- Color code your tracks for better organization
- Merge clips together
How to use Adobe Audition for Podcasting
Since Adobe Audition has so many tools and different capabilities, it can be difficult to know where to start. Here, we’ll take a look at the very basic workflows:
Getting started with Adobe Audition
When you first Adobe Audition, here’s what to expect. This should help you get your bearings:
Switching between waveform and multitrack editing:
Remember, in Adobe Audition you have a choice between two modes. Waveform editing is ‘destructive’, while ‘multitrack’ is non-destructive. You can toggle between the two modes in the top left hand corner of your workspace.
Opening an existing file
You can scroll through all your Adobe Audition files on the left-hand panel. When you double click to open one, you’ll see the audio tracks appear on the right.
Selecting part of an audio track
Adobe Audition is meant to be intuitive and easy to use. To select a section of your audio track(s) simply click and drag your cursor. From here, you can then make changes such as deleting that section, editing its amplitude or applying an effect.
Applying an effect
Navigate to the Effects menu in the top left corner of your screen. This is where you can equalize your audio and add effects to your “effects rack”. This rack is on the bottom left of your screen and allows you to test how effects sound before finalizing your edits.
Batch processing
Head to “window” > ”batch process” in the top bar of your workspace to apply effects or edits to multiple tracks in one go.
Importing and Recording tracks
If you want to record new audio, then follow the next steps:
Step 1: Head to “File” > “New” > “Audio File”
Step 2: Give your new file a name and set your sample rate, channels, and bit depth.
- Your sample rate refers to the frequency range of your audio file.
- The channels tell Audition whether the waveform should be mono, stereo, or surround.
- Bit depth is about the ‘amplitude range of the file’. Choose 32-bit for best conditions when using Adobe Audition. But you may have to reduce this when you export to other applications.
Step 3: When you’re ready, hit the red circular record button to start your session.
If you want to record using a multitrack session, then follow these steps:
Step 1: Go to “File” > “New” > “Multitrack Session”.
Step 2: Choose your track sources in the Inputs/Outputs area in the Editor panel. You should be able to do this from your tracks’ input menus.
Step 3: Set audio levels by clicking the arm for Record button. This looks like an “R”
Step 4: Repeat the same for any other tracks you’d like to add, then when you’re ready, select the Record button.
To import pre-existing audio files into Adobe Audition, here’s what to do:
Step 1: Go to “File” > “Open” > “Choose your audio or video file”.
Step 2: Select your file, and import it.
Note: If you want to add an existing audio file into a point in your multitrack session, move your playhead to that point, then click “Multitrack” > “Insert Files” > “Choose your audio or video file”.
When you add an audio file to your Multitrack editing session, it automatically becomes an audio clip on the track that you have selected. Make sure to move your playhead to the right moment in the track.
Editing
Once you’ve got your podcast recording, it’s time to go back and edit. This is the stage where you can optimize, change, and manipulate your audio files to make them shine. In this section, we’ll go through trimming, sound effects, equalization, repairing sounds, and exporting your final recording.
Trimming
To trim audio in Adobe Audition, move the playhead to the relevant point in the track.
There are various ways you can trim content, depending on what you need to cut:
The Razor tool will cut the track into two pieces at the playhead. To delete any irrelevant sections, simply tap the backspace button on your keyboard.
If you simply want to shave a couple of seconds off your audio track, then hover your mouse over the beginning or end of the track. Click and drag the red bracket that appears to the relevant point in the audio.
Sound effects
You can add effects one-by-one to individual tracks or by adding them to your list in the ‘effects rack’. You can add up to 16 different effects to the Effects Rack. There, you have the ability to edit, reorder, and optimize mix levels. You can then test out how a certain combination of effects sounds before actually applying it to your recording tracks. This is a great way of previewing and testing out different effects in a way that’s non-invasive or hard to undo.
Equalization
Equalization (EQ) is the process of editing and adjusting the volume of individual frequencies in order to optimize the overall soundscape of your recording.
There are two types of equalizer that you can choose from: graphic or parametric. You’ll find both equalizers under Filter and EQ in the Effects drop-down menu.
Graphic EQ
With the graphic equalizer, you can make adjustments across the frequency range. To speed things up, you can choose from three pre-set frequency bands (10-band, 20-band or 30-band). 30-band allows you the most precision but also means your changes are limited to a small range of frequencies.
If you’re using the Graphic EQ, then all you need to do is set the number of decibels you want to either boost or cut from the pre-set frequency bands. You can also adjust the sliders up or down in each band to boost or cut them.
It is also possible to minimize the amount you need to play around by using Adobe Audition’s presets.
Parametric EQ
The Parametric equalizer lets you work in more detail, focusing on a specific audio frequency you want to boost or cut. You also have more control over whether your editing impacts surrounding frequencies.
If you’re opting for the Parametric Equalizer, then you’ll be working on a graph where the equalizer is represented as a horizontal line. The x-axis is frequency, and amplitude is the y-axis. You can start making changes by simply moving the dots you see on the graph to different places.
Repairing sounds
The Spectral Frequency Display tool helps you to clean up your audio and get rid of beeps, hisses, and other unwanted background noise. It works by visualizing all the frequencies within your audio recording. Once you’ve identified the unwanted frequency, head to the top bar, where you’ll find the healing brush tool, paintbrush selection tool, lasso, and marquee selection tools. You can use any of these to select the unwanted frequency and then delete it.
Exporting
Head to “File” > “Save”, then give your recording a name and select your desired file format. You also need to choose the sample type, your format settings, and any other metadata that you want to include in your file.
You get a wide range of choices when it comes to exporting your audio files using Adobe Audition. Generally speaking, you want to opt for a lossless and uncompressed format such as WAV to ensure you preserve the integral quality of your recording.
Is Adobe Audition good for podcasting?
There’s no simple answer to this question. Yes, Adobe Audition is definitely a good option for podcasting. However, it totally depends on what you’re looking for. For instance, if you want to work with remote guests or record video, then Adobe Audition won’t work for you. On the other hand, if you’re looking for a professional standard audio editing platform, then you can’t go far wrong with Adobe Audition.
Pros of Adobe Audition
Optimize audio
Adobe Audition has all the tools you need to truly hone and optimize your audio. This is perfect for podcasters who are sticklers for audio quality.
Slots in seamlessly with other Adobe apps
Naturally, Adobe Audition complements other Adobe apps perfectly. So if you’re already using other apps within the Creative Cloud family, Adobe Audition is an obvious choice.
Multitrack recording
Ideal for podcasters recording with multiple guests in-studio.
Match Loudness Feature
The Match Loudness feature makes editing your podcast with consistency super easy.
Cons of Adobe Audition
Pricing
For some podcasters, Adobe Audition may be too expensive to justify, especially when there are a range of alternatives for a fraction of the price.
Not just for podcasters
Adobe Audition is a powerful but general audio editing platform. What we mean is that its target audience is all kinds of creators, audio professionals, and podcasters. This means that some of its features aren’t geared precisely towards what podcasters might be looking for.
No transcription
Adobe Audition doesn’t have a native podcast transcription feature. Again, Premiere Pro does have a Speech to Text tool, so if you have the all Creative Cloud App subscription, then this isn’t a problem.
No video
Another letdown is that you can’t work with video on Adobe Audition. However, if you get the all Creative Cloud App subscription, then you can edit your videos using Adobe Premiere Pro. These two platforms are also fully integrated so Audition can read Premiere Pro projects natively, and importing sequences and projects between them is seamless. This makes for a far cleaner and smoother workflow overall.
No remote recording
Another con is the inability to record with remote guests within Adobe Audition. This means that you’ll need to use a third-party application to record your remote podcast before importing it into Adobe Audition. Although this isn’t the end of the world, it’s another step in your workflow.
Learning Curve
Adobe Audition may present a significant learning curve for podcasters who have never used it before.
You have to download
Adobe Audition is a desktop app, so you have to download the software before you can use it.
Riverside: An Adobe Audition alternative dedicated to podcasting
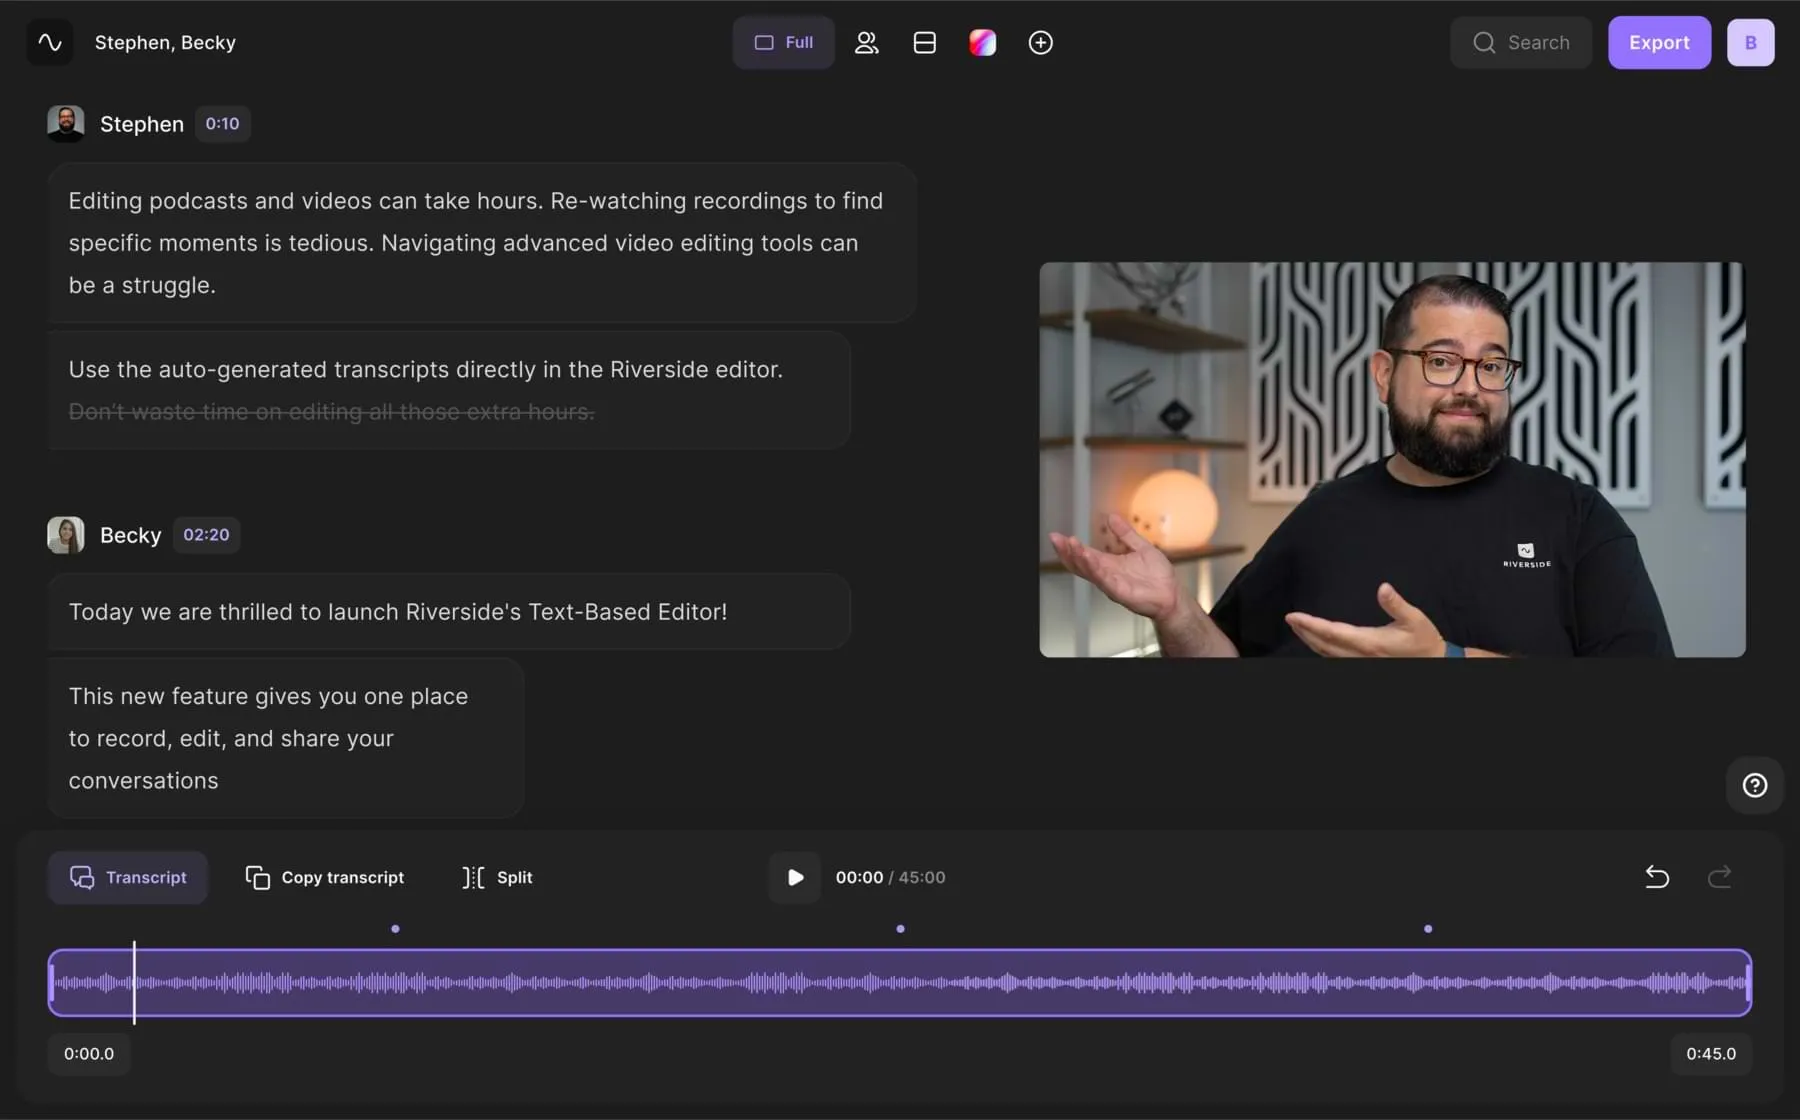
If you’re looking for alternatives to Adobe Audition, Riverside is a strong contender. Riverside is a browser-based podcast recording and editing platform. You can record high-quality audio and video with up to 7 remote guests. Riverside’s features and interface are geared towards streamlining the podcasting process from start to finish. Let’s take a quick look at Riverside’s key features:
- High-resolution remote recordings up to 4K video and 48kHz audio
- Local recording which means that Riverside records every participant on their own device rather than over the internet. This means that weak wifi won’t impact the quality of your overall recording.
- Separate track recording for every participant to give you maximum control during post-production. Each participant’s audio and video has its own separate track.
- Remote recording with up to 10 participants.
- Text-based video and audio editing that makes editing your podcasts as easy as editing a Google doc. All you have to do is make changes to your recording transcript, which automatically mirrors on your actual video and audio recording.
- Easy to use and navigate through recordings
- Magic Clips tool helps you create short-form social media content as part of your production workflow. It automatically identifies key moments in your full-length recording and transforms these into short-form clips.
- Tools for audio fine-tuning to maximize the quality of your recording. Background noise removal and audio normalization tools.
- Ultra-accurate AI-powered transcriptions in over 100 languages
- Producer mode so that your production team can control your recording behind the scenes
- Media board for live mixing and including media during your session
- Mobile app so that you and your guests can record on the go

FAQs on Adobe Audition for Podcasting
Which Adobe for making podcasts?
For audio-only podcasts, you’re looking at Adobe Audition. If you’re working with video too, then you should be using Adobe Premiere Pro.
Is Adobe Audition free?
No, it’s only available with a monthly subscription of $20.99.
Can you edit a podcast on Adobe Audition?
Yes, absolutely. Editing an audio podcast on Adobe Audition will result in a professional-quality recording.


.webp)
.webp)
.webp)


