.webp)


Table of contents:
The world of video editing often seems inaccessible, especially when you’re on the outside looking in. But we’re not here to gatekeep.
Anybody and everybody can edit a video. But the difference between being ‘able’ to edit and being excellent at it is about your creative vision and the time you take to learn about the tools you’re using.
This article tells you everything you need to know about video editing for beginners - from where to start, how to choose your video editing platform, and all the basics you need to know. This is video editing 101.
TL;DR
- Anyone can learn to video edit using a combination of YouTube, paid masterclasses, and learning on the job.
- Choosing the right video editing software is key to a strong start. Make sure to think about budget, usability, and compatibility.
- Riverside’s Editor offers an intuitive and easy alternative for beginners
How do I start learning video editing?
Knowing where to start is often the most challenging part. Luckily, there are several ways to begin your video editing journey.
Remember, though, when it comes to video editing, you’ll always be learning. Even once you’ve got the hang of it, there’ll still be times when you discover a new technique or workflow.
Software walkthroughs & tutorials
Start by reviewing all the learning materials your video editing software provides. If your platform offers a ‘learning’ or ‘walkthrough’ mode, this is a great way to get to grips with all its available features.
YouTube videos
YouTube is an expansive, rich, and free resource for learning about video editing. Make the most of it! You can find general tutorials and broad overviews, plus niche tutorials on editing in a specific style or achieving a particular effect. Don’t worry about the quality of the material either - usually the YouTubers are highly-skilled video editors.
Masterclasses
If you’re ready to invest in your learning, you can also head to sites such as Udemy or Skillshare that offer paid masterclasses or accredited courses in video editing. This is a good option for creators looking for a step-by-step and comprehensive learning course.
Learn as you go
Some creators prefer to learn on the job. This means jumping straight into editing a video and learning as you go. Though others might consider this a more ‘cavalier’ approach, experimental and experiential learning can work well.
Choosing the right video editor
Choosing the right video editor is super important, especially when starting out.
Budget
The first thing to consider is your budget. The amount you’re willing or able to spend will affect your choice of a video editor. Don’t worry, though. There are plenty of options at all price points.
Target audience
Though a little ambition doesn’t hurt, it’s better to stick with video editors that cater to beginners. Choosing a professional-standard editor can be tempting, but it usually equates to steep learning curves and a lot of frustration. Plus, you’ll probably be paying a premium for features you don’t know how to use.
Compatibility
Your computer’s OS will also affect the video editors available to you. So make sure to check before you make your final choice.
Features
Finally, take a browse through the video editor’s features. Make sure that the platform is compatible with the types of videos you’re hoping to make.
Video Editing Tutorial: Editing Basics
Trimming
Trimming is when you toggle the points at which a video clip starts and ends.
A trimming tool lets you cut off irrelevant moments at the beginning and end of the original footage, choosing the exact duration you want. After ‘trimming,’ only the portion you want in your final video will remain.
Transitions
Transitions are key to a seamless flow between one clip and the next. Video editors typically have a library of pre-set transitions that you can choose from. Common transitions include ‘cross-fade’, ‘wipe’, or ‘jump-cuts’.
Music & sound effects
Adding music and sound effects to your video helps to add atmosphere, emphasize specific moments, and elevate the production value. Most video editors include a music and sound effect library from which you can browse and draw freely.
Voice over
A voice-over is an audio track of someone speaking superimposed over a video clip. The voice-over replaces the video’s native audio. You usually record voice-overs retrospectively and then combine them with the relevant section of the video during post-production.
Audio editing
You still have to think about your audio when you’re video editing. Cleaning up and refining your audio is essential to achieving a high-quality result. Audio editing usually includes removing echo and reverb and toggling audio volume, for instance.
Color correction and grading
You might think that color correction and grading are the same. But they actually refer to two different stages of fixing and personalizing your videos' overall visual look and feel.
Color correction is where you adjust the overall color scape of your footage to better match what your subjects look like in real life. This means playing with the saturation, exposure, white balance, and contrast of your recording.
Tip: It’s important to color-correct all your footage together to achieve a cohesive look.
Color grading comes after color correction - and this is where you can let your creativity go wild. Color correction gives you a balanced and standardized canvas to play with during color grading.
Color grading is about conveying atmosphere and style through the visual characteristics of your video. For instance, you can try toggling the tonal temperature of your video to match the mood you’re trying to encapsulate.
Adding text and lower thirds
Another way to personalize your video during post-production is by adding text, overlays and lower thirds. You can include CTAs or give added context or information, for example. Customizing your text's size, placement, and font is also possible.
A lower third is a graphic combined with text appearing in the screen's lower part. These are common for introducing a speaker’s name and position.
Effects
You can add visual and special effects to your video during post-production too. These could be standard effects to stabilize your footage. Alternatively, you could play with your video by including slow-motion clips or speeding certain portions of your video up.
Captions and subtitles
Adding captions or subtitles to your video is essential for making your content accessible to a wide audience. But it’s also important to maximize your video’s SEO ranking.
The first step in creating captions or subtitles is to generate a transcript of your recording. Your video recording software may offer a native transcription feature or you’ll have to find a third-party tool.
Let’s take a quick look at the difference between captions and subtitles.
Captions convey all audio in written form to the viewer. This means they describe dialogue and sound effects.
Subtitles only reflect speech and dialogue. Subtitles are most appropriate when translating foreign language audio. But they are not as accessible as captions for hard-of-hearing audiences.
There are two ways to include captions or subtitles in your videos: closed and open captions.
Open captions are burned into your video footage, so the viewer can’t turn them off. They’re displayed permanently on your video.
Closed captions are created as a separate track so it is up to the viewer whether they want to use them. To include these with your final video, you must upload your transcription to your publishing platform.
Exporting and formats
The final part of editing a video is exporting it. To preserve the quality of your video, you should export in lossless and uncompressed file formats. This means that during export, your video’s quality won’t be sacrificed in favor of file size. We’ve got a video about how to use Adobe Media Encoder and Apple Compressor for advanced video and audio exporting.
If you want to learn more, check out our blog on some of the must-know video editing tips for beginners.
Riverside video editor tutorial for beginners
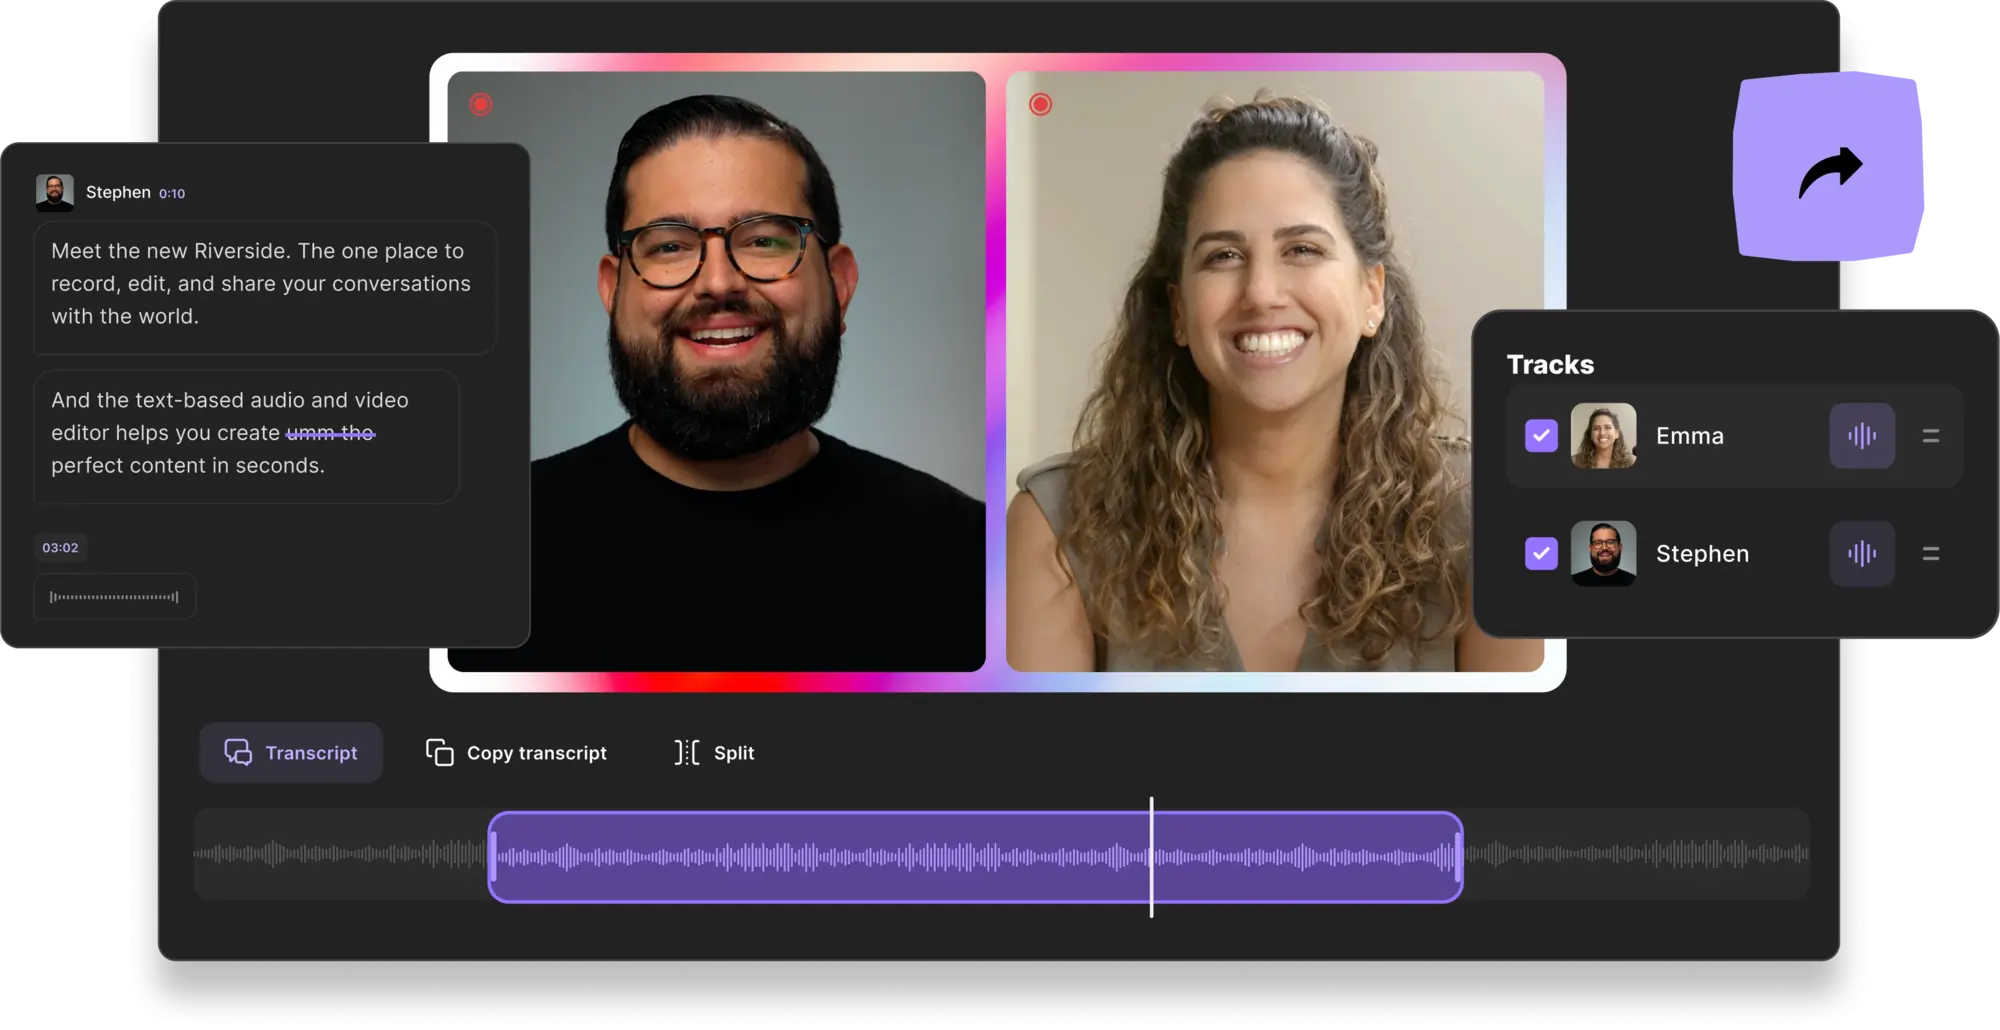
If you’re not quite ready to start using a full-blown editing suite, Riverside offers an easier and simpler approach to editing. Instead of downloading a separate editing software, edit your video as part of your creation workflow within Riverside. All the tools help streamline your workflow and can save beginners and pros alike hours of editing!
The text-based video editor is quick, easy, and intuitive to use. It’s literally as easy as editing a text document. It works with AiItranscriptions where any text you delete in your transcript, removes the matching video and audio in your recording. You can also use these transcriptions to navigate through your recording or search for a specific phrase. When you finish cutting, you can add video captions and style them as you want. Then top off your video with a custom background and logo, and fine-tune your audio with a silence remover, background noise removal and audio normalization.
You can also push your content further and turn one recording into multiple short-form clips. Short videos can help you reach larger audiences while pushing them back to your long-form content. With Riverside you can do this at the tap of AI. Our AI Magic Clips tool finds key moments in your recordings and turns them into short, shareable clips. You can then edit them as you like, or export them as is.
Key features
- Text-based video editing so you can make precise and quick cuts as easily as editing a transcription
- Editor that works with highly accurate AI transcriptions available in over 100 languages
- Easy navigation using your recording transcription so you don’t need to rewatch you videos to find that exact moment
- Magic Clip creator for creating short-form promotional videos for social media as part of your editing workflow
- Customize your video layout, background and add branding with your own logo.
- Automated tools for audio-fine tuning including background noise removal and audio normalization.
- Seamless transitions with AI Speaker View that automatically cuts between participants just before they start speaking.
How to edit videos on Riverside
Here’s a quick look at how Riverside’s Editor works:
Step 1: Record your video in your Riverside studio. You can follow our detailed walkthrough to learn about recording with Riverside.
Step 2: From your recordings page, click ‘Go to Editor’
Step 3: Select the layout for the type of content you want to create.
Step 4: You can then edit using your AI transcriptions to do the following:
- Navigate using the text: Place your cursor on the word you’d like to go to in the transcript, and the playhead in your timeline will automatically move there.
- Search for a phrase throughout your video: Type the term you're looking for in the search bar on the top right. The editor will highlight all the matching words in your transcript, and mark where and which speaker uses this phrase on the recording timeline.
- Remove sections with your transcript: Select the text of the portion you want to remove and click ‘Delete.’ The editor automatically removes the corresponding video and audio in your recording. You can press “Reverse’ to undo this.
- Edit in the timeline: If you prefer, you can split and adjust your recording by dragging in and out points on your timeline. All changes will reflect in the transcript.
Step 5: Using the tool bar on the top-center, you can customize your recording by adding your logo, changing the layout and adding a personalized background. There's also a tool for captioning your video here.
Step 6: Press ‘Export’, adjust your final audio settings and export your video to your email.
Bonus: 3 Video Editing Tutorials to try
To help you get started, we’ve put together a list of the best video editing tutorials to watch on YouTube.
5 Must-Know Video Editing Tips Before You Start
Our own video expert, Bridget O'Rourke, has created this practical video to share her top 5 tips when it comes to video editing. If you're a complete beginner you'll find this easy to digest and you'll end up with 5 actionable ways to get started with video editing.
Total Beginner’s Guide to Video Editing
YouTube itself has a great video that’s called ‘Total Beginner’s Guide to Video Editing’. This is a comprehensive step-by-step walkthrough of how to get started - it takes you through organizing your files to mixing your sound. For creators who are just starting, this is a solid resource to come back to time and time again.
5 Simple Video Editing Secrets to Edit 10x Faste
Vince Opra has all kinds of video editing tutorials on his channel - ranging from broad walkthroughs to specific instructional videos. Try starting with his 5 Simple Video Editing Secrets to Edit 10x Faster video.
5 Levels of Video Editing Transitions in 5 Minutes! (Adobe Premiere Pro CC Tutorial)
Justin Odisho is a real expert in using Adobe Premiere Pro. Luckily, he’s uploaded all kinds of tutorials that dive into editing with it. In this video, he guides you through how to do 5 levels of video transitions in just 5 minutes.
FAQs on Video Editor Tutorial
What is the easiest video editor for beginners?
The answer depends on your budget, ambition, and needs. For instance, if you’re looking for a quick, easy and intuitive platform, we’d recommend starting with Riverside’s Editor. Or if you have a Mac computer, iMovie is a great place to start. Once you’re ready to scale up your setup, you can think about upgrading.
What is the 321 rule in video editing?
The 321 rule is all about keeping three separate copies of every single file you need for your video project saved in at least two, but ideally three, different places. For example, on your computer, in the cloud and on a hard drive. This is to make sure you never lose your precious files.
Can you teach yourself video editing?
Absolutely. Anyone can get started with video editing even with absolutely zero experience. Dedicating time to watching platform-specific tutorials and videos is a great place to start. And you’re sure to learn a lot as you go, so don’t be afraid to just start.
How do I get into video editing with no experience?
Take the leap and start editing your first video. Go easy on yourself and choose a video editing platform that’s aimed at beginners. With time, you’ll find your capabilities and knowledge growing instinctively!
How many hours does it take to learn video editing?
Depends on who you are. If you’re tech-savvy or have some exposure to how video editing works, you can get to a competent level fairly quickly. That being said, there’s always something more to learn. So even the experts are always discovering new techniques and tools.


---Riverside.webp)


