.webp)


Table of contents:
Whether you’re building up your YouTube channel with Shorts, creating a TikTok, or editing corporate videos, there are several reasons why you may want to trim a video. But depending on what software you use, the process can be fiddly and frustrating.
I’m here to help. In this article, I’ll show you all the easiest ways to trim a video, whether you’re working on Mac, Windows, Android, or iOS devices.
Let’s do this!
Key takeaways:
- Trimming a video is relatively easy. You can do this on most video editing software, including native Windows, Mac, iOS, and Android apps.
- Trim using the timeline or text-based editing. Text-based editing tends to be faster and easier for beginners to master.
Riverside provides easy text-based editing for trimming, as well as lots of other editing features to help you perfect your content.
Riverside is one of the easiest options out there, especially for trimming videos. You can trim your videos with the text-based editor which is as easy as deleting text in your recording transcript. Or, you can use the color-coded timeline for quick cuts and splices.
Either way, all participants’ audio and video tracks remain synced, so there’s no need for the additional manual work that many editors require.
Here’s how to use it to trim a video:
How to Trim & Cut Out Video Parts | Remove Sections on Riverside
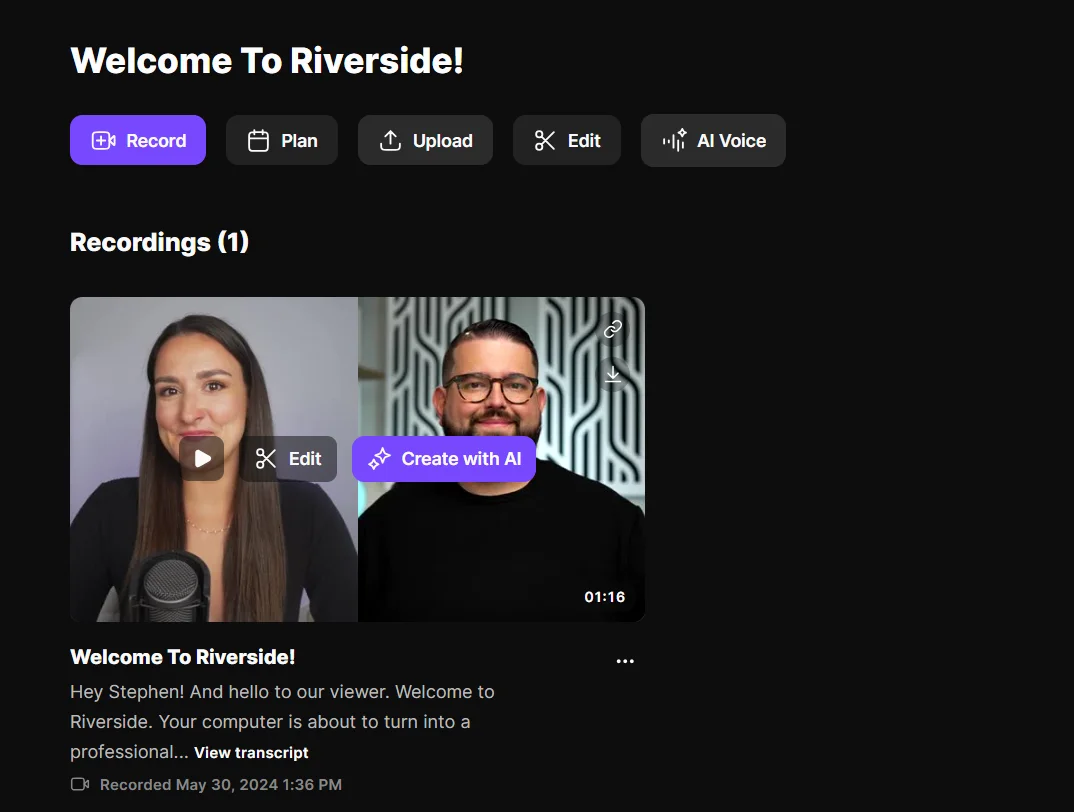
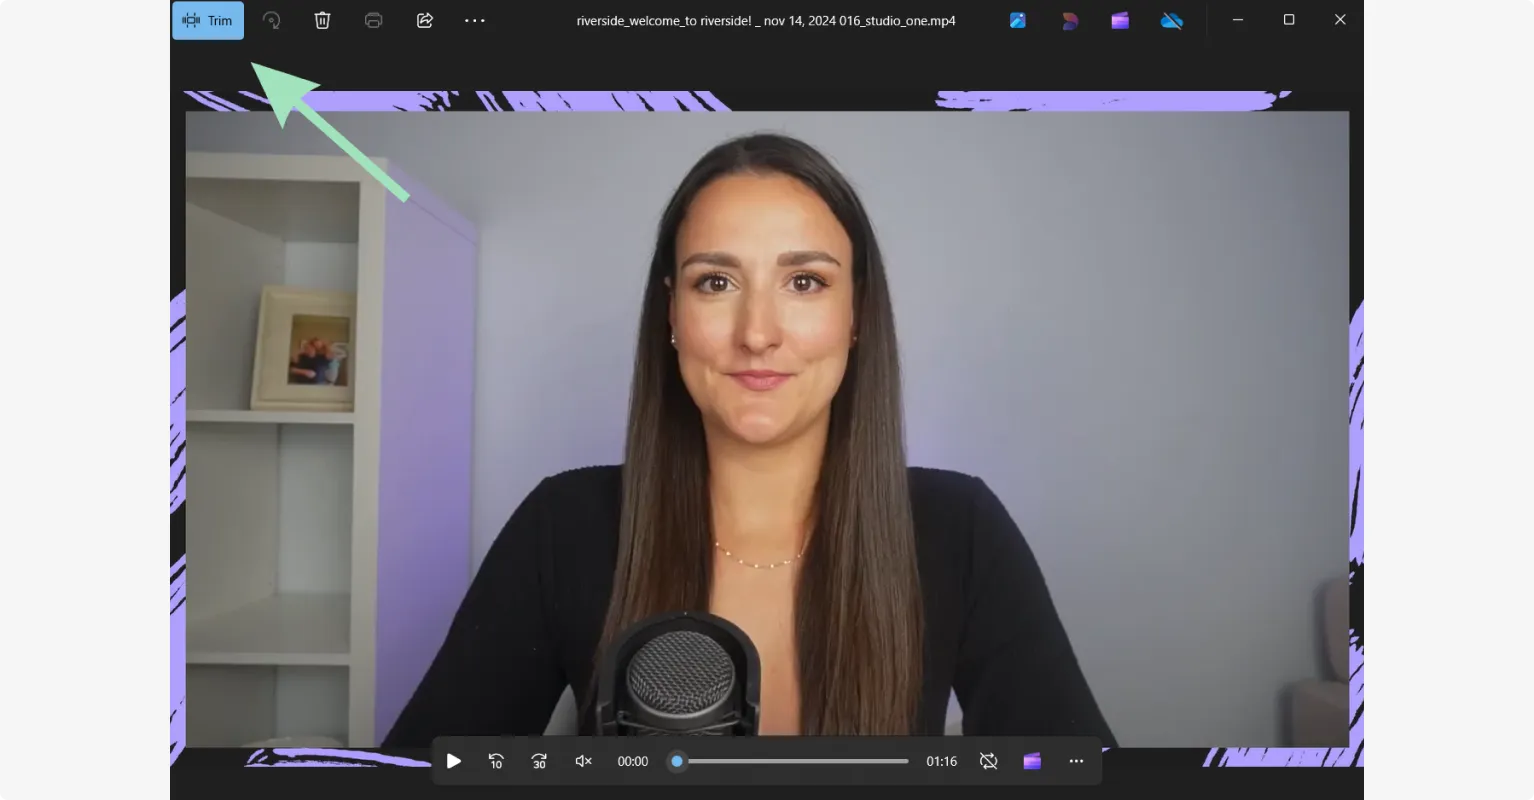
Step 1: Log in to the Riverside Editor and navigate to the recording you’d like to edit. Click “Edit” to open it in the editor.
Step 2: Trim your video. There are two easy ways to do this:
Using text-based editing:
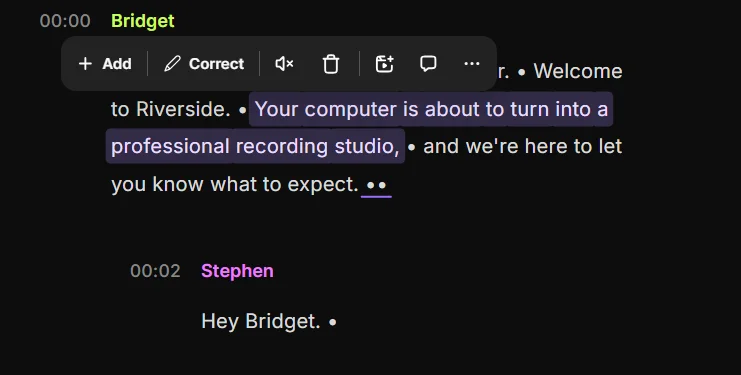
Text-based editing is the fastest, easiest way to trim a video. In fact, you’ll find it very familiar - it’s just like editing a doc!
- Find the automatic transcription on the left of your screen.
- Highlight the text corresponding to the section you want to remove.
- Press the “Delete” key. This will remove the text and the portion of the video that goes with it.
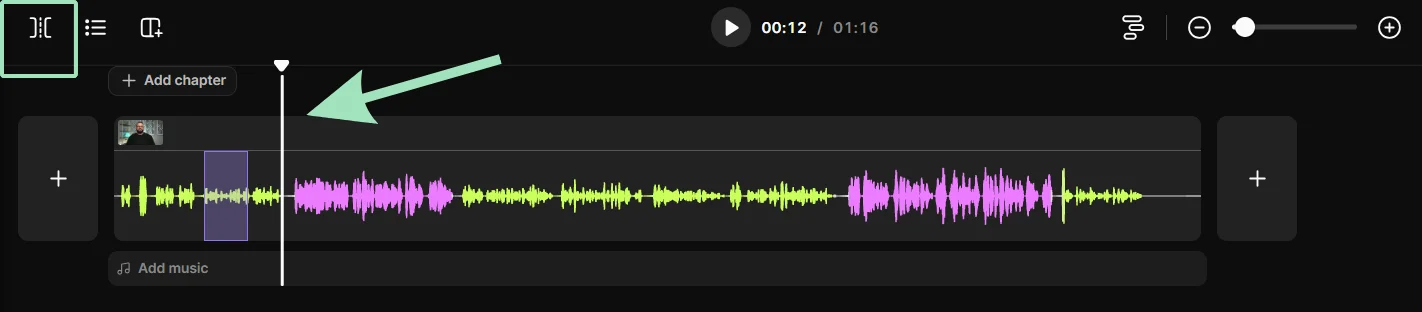
Using the timeline:
This is the more traditional way of trimming a video. But Riverside makes this simple too.
- At the bottom of your video, you’ll see the timeline.
- To trim the video, simply drag the playhead to the desired point and click “Split.”
- You can select the bit you’ve trimmed and click the “Delete” icon to remove it.
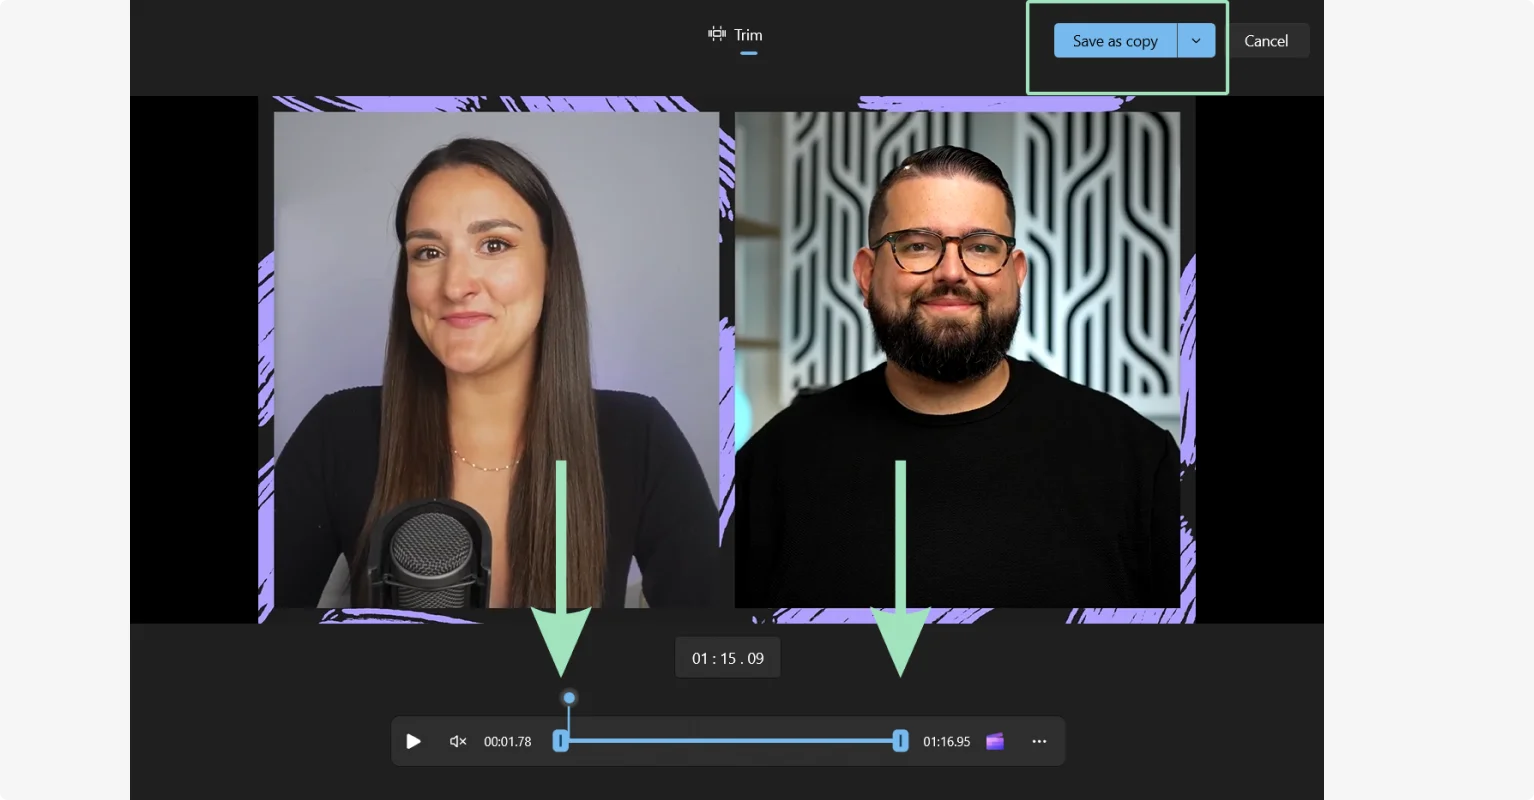
Step 3: Export the edited video
Once you’re done editing, simply click the “Export” button to save your edit. Choose your preferred video quality and other settings, then click “Export” again. Your video will be available to download, edit again, or even share directly to social media platforms like Facebook, LinkedIn, Twitter, TikTok, and Instagram.

Once you’ve exported your video, you can also use Riverside’s Magic Clips to slice and dice your video into short, compelling clips you can use on social media. Magic Clips uses AI to find key parts of your video automatically. It’s so much easier than doing it manually!
- Hover over the recording you want to clip then click “Create with AI”
- Select “Magic Clips” and set your preferences for ratio, layout, and branding. Click “Save”.
- Hover over the video again and click “Magic Clips”. This time, select keywords to focus on, what length you’d like and which speaker to focus on.
- Click “Generate clips” and you’ll have a set of ready made short video highlights.
How to trim a video on Mac
When it comes to trimming a movie on a Mac device, iMovie is the obvious choice. It comes pre-installed on macOS computers and most iOS devices. Here’s how to use it to trim a video:
Step 1: Open the iMovie app on your macOS computer.
Step 2: Click “File” then “Import Media” to upload the video you’d like to trim, or just drag and drop it into the editing panel.

Step 3: The timeline of your video will show up in the editing panel. Drag the beginning and end of the timeline to trim the video and make it shorter.
Step 4: To make cuts, you can use the white vertical line to move to the points you want to edit. Press your spacebar to start and stop playback. Either click the “scissors” icon in the bottom left corner of the viewer or press the Command(⌘)+B keys to split the video into two parts.
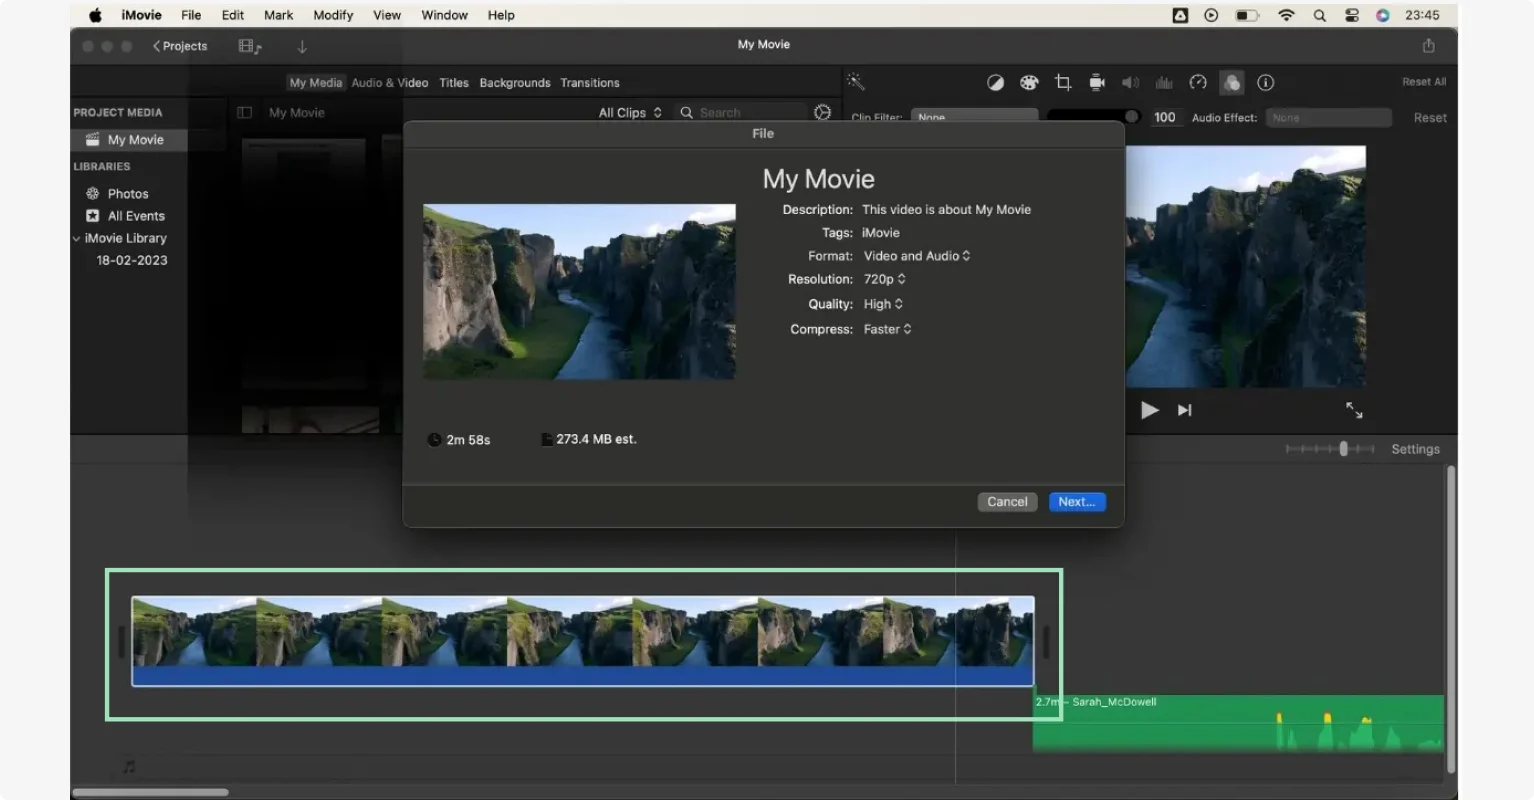
Step 5: Press the spacebar to review the trimmed video and save it if you’re happy with the edit.
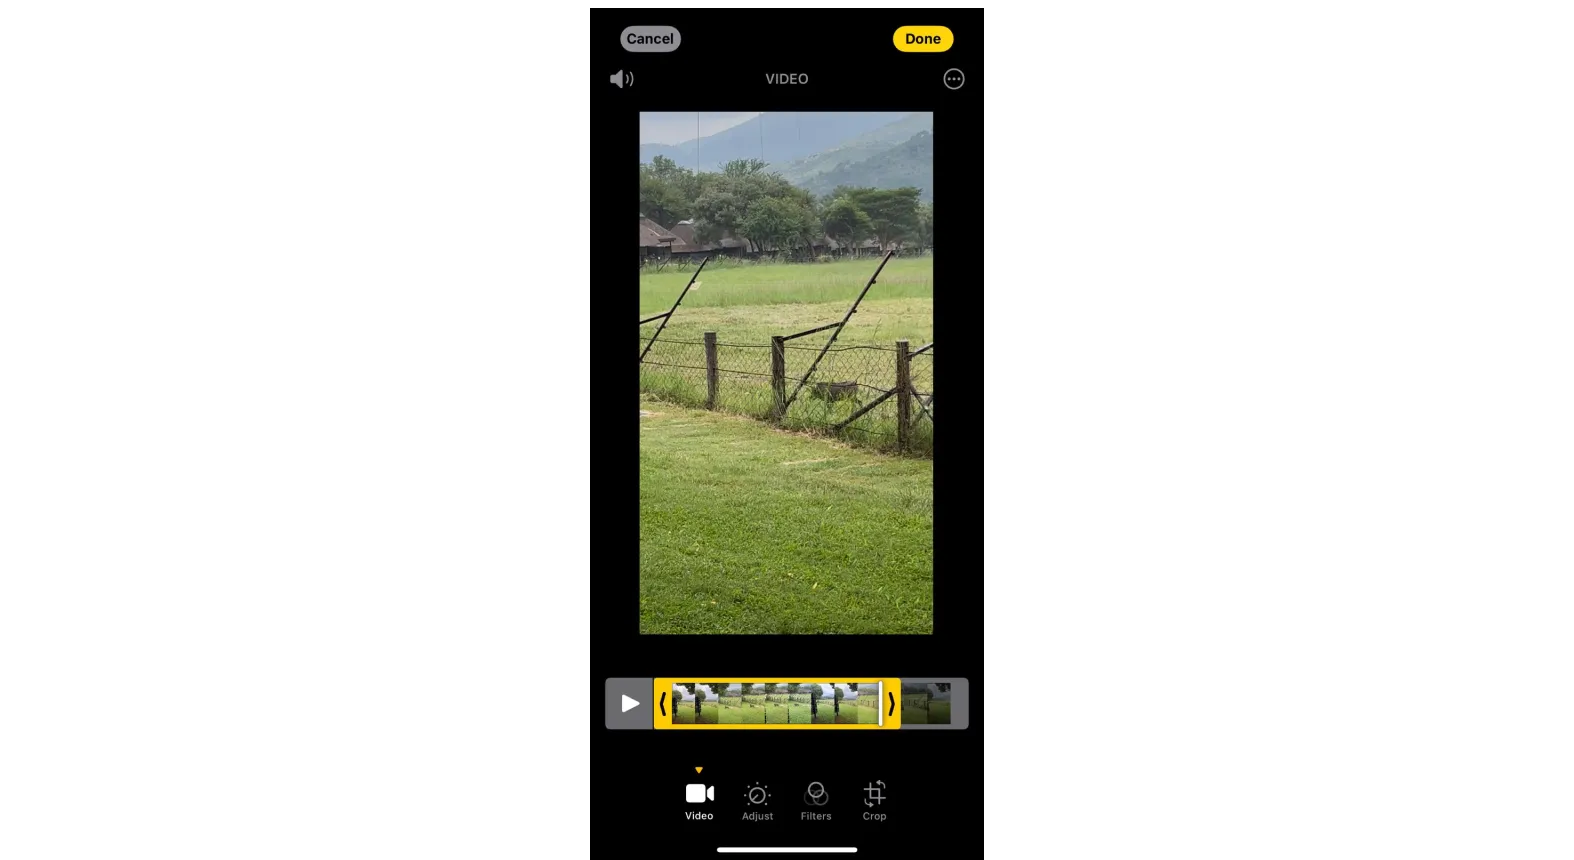
How to trim a video on Windows
When trimming a video on Windows, the quickest option is the Photos app, which is built into Windows 10 and 11 devices. Here’s how to use it:
Step 1: From your desktop, click “Menu” and then open the Photos app. Click on the video that you want to edit to open it. Or, find the video on your computer and right-click to open it in Photos.
Step 2: Select the “Trim” button from the top-right corner.
Step 4: Now you’ll see your video’s timeline at the bottom of the screen, with blue handles on each side. Click and drag them to adjust the length of your video from either end.
Step 5: To trim the file, click the “Save a copy” button in the top-right corner. Your version without the edits will also be preserved.
If youw ant to know more, we’ve got a full guide on how to trim videos on Windows.
How to trim a video on mobile devices (iOs and Android)
If you want to trim a video you’ve recorded on your phone, don’t worry - it’s easy enough to do with your phone’s native apps. While the process is a bit different in each case, the app on both iOS and Android is called Photos. Here’s how to trim a video on iPhone and Android:
How to trim a video on an iPhone
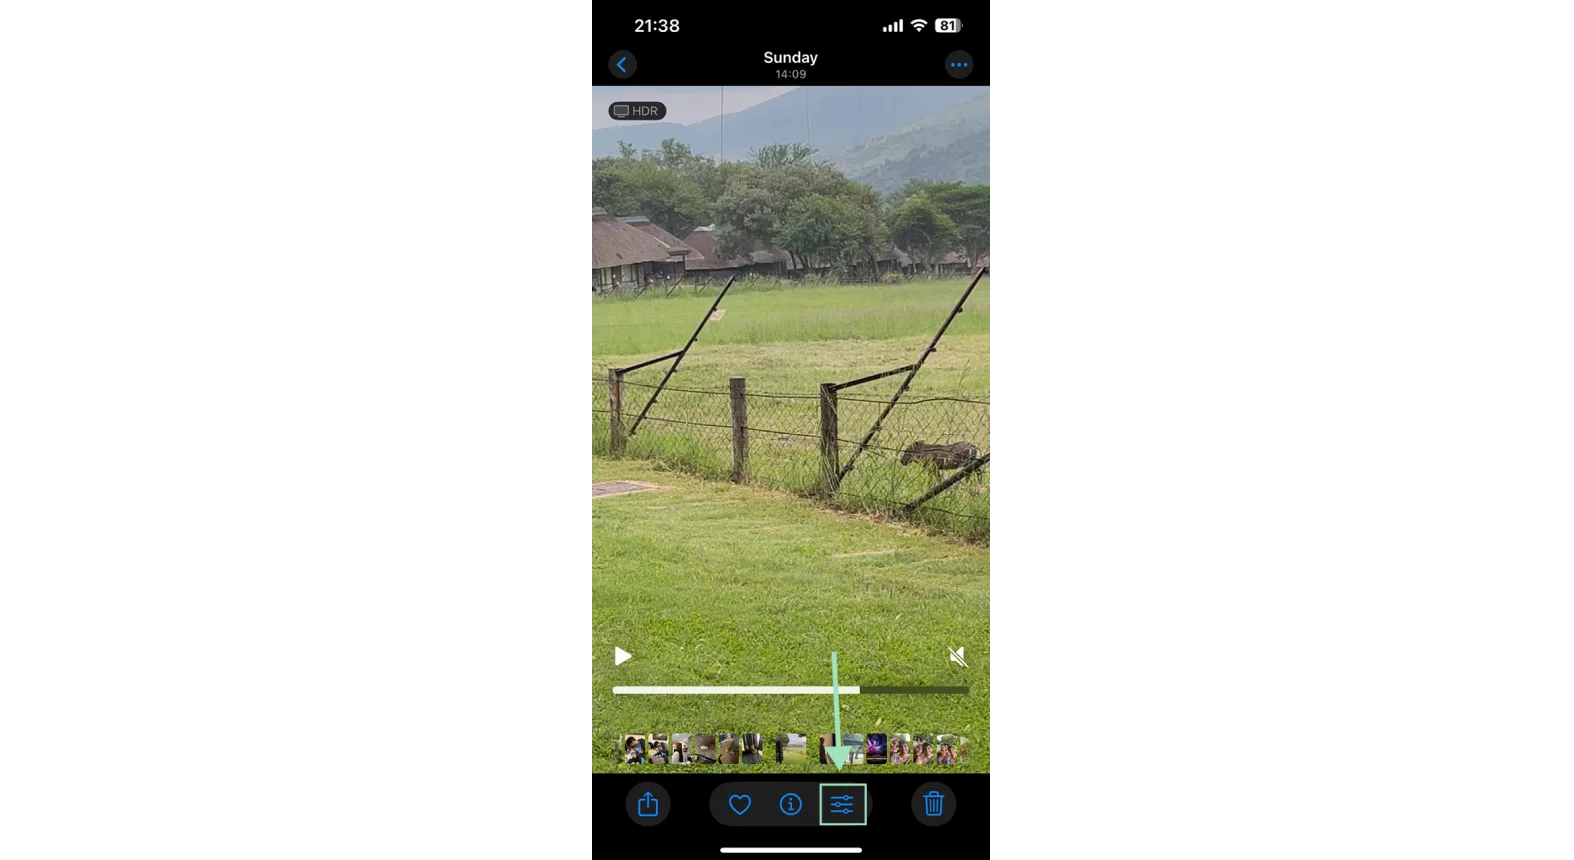
Step 1: Launch the Photos app on your iPhone. Navigate to the “Albums” tab and select “Videos” to locate your video. You may also be able to find the video in your “Recents” album.
Step 2: Open the video in the editor by tapping on the video you wish to trim. Then tap the Edit button in the bottom toolbar. (It looks like three control lines.)
Step 3: Trim the video by finding the timeline at the bottom of the screen with handles on each end.
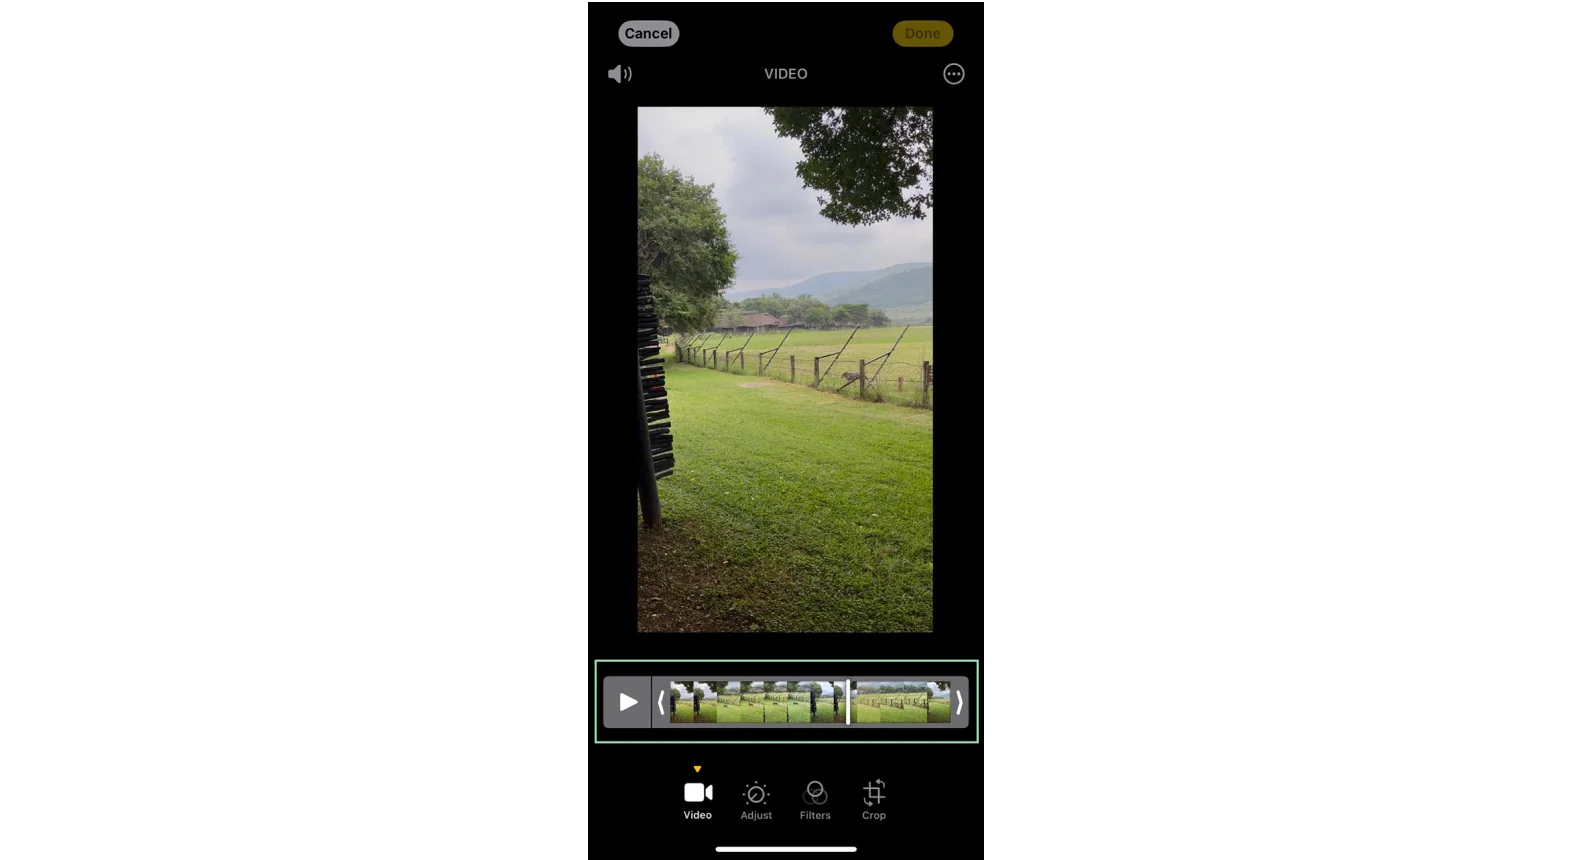
To adjust the starting point, tap and hold the left handle, then drag it to the desired start position. To adjust the ending point, tap and hold the right handle, then drag it to the desired end position.
As you adjust, the yellow box will indicate the portion of the video that will remain.
Step 4: Preview the trimmed video by tapping the “Play” button. Tap “Done” in the bottom right corner, then either “Save Video” or “Save Video as New Clip” to keep the original version.
Android
Step 1: Launch the Google Photos app on your device, navigate to the video you wish to trim, and tap to open it.
Step 2: Tap the “Edit” below the video.
.webp)
Step 3: Trim the video by dragging the sliders at each end of the timeline.
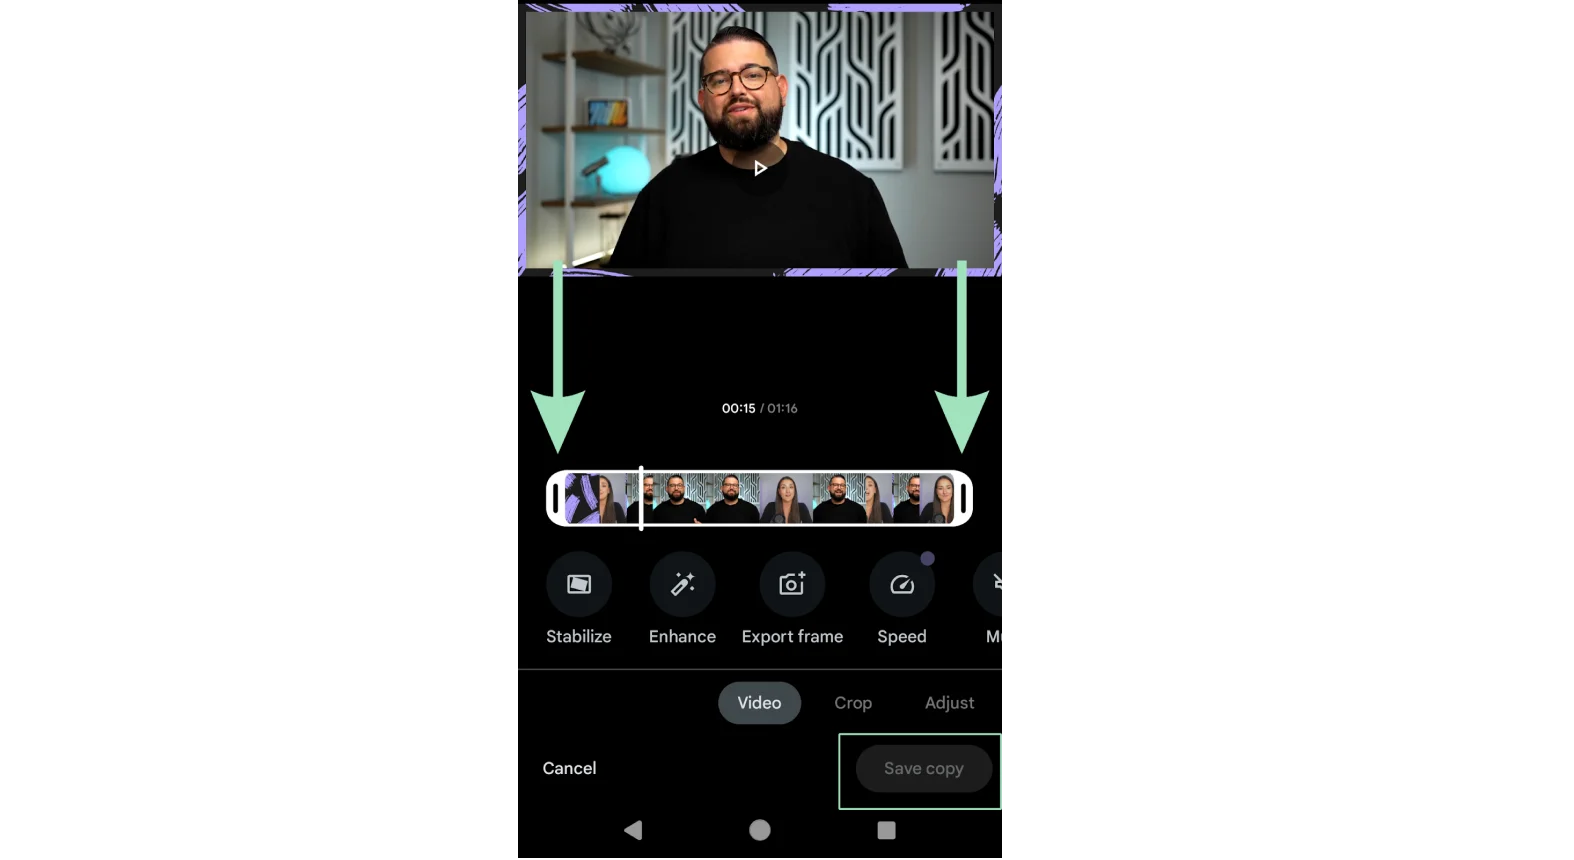
Step 4: Tap “Save copy” to create a new trimmed video.
How to trim a video on YouTube
Trimming a video on YouTube is really straightforward in YouTube Studio. Here’s how to do it:
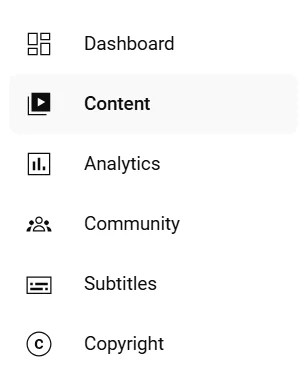
Step 1: Sign in to YouTube, click on your profile picture in the top-right corner, and select YouTube Studio from the dropdown menu.
Step 2: Click “Content” on the left sidebar to display your uploaded videos.
Step 3: Find the video you want to trim and click on the video’s thumbnail or title to open its details.
Step 4: Open the “Editor” in the left sidebar of the video’s details page, then click “Get Started.”

Step 5: To the left of the video preview, click on “Trim & Cut,” then “New cut.”

Step 6: A red box will appear. Use this to select the area you want to remove by clicking and dragging the handles on the right or left side of this box.
.webp)
Step 7: To confirm the cut, click “Preview.” When you’re happy with the cut, click “Save.”
The difference between trimming, cutting, and splicing
Video editing terms are often confused, so let’s clear things up:
Trimming refers to adjusting the length of a video clip by removing content from the beginning, the end, or both. This is a very simple edit to make.
Cutting involves removing a specific segment from a video clip. This is done by making two cuts to remove the segment, then joining what remains in a way that makes sense and isn’t noticeable or jarring for the viewer.
Splicing is the joining of two video clips. It is essential to combine different shots or scenes to create a cohesive video.
You can read about these and other common terms in our Video Editing Glossary.
FAQs on how to trim a video
Want to learn more about trimming and editing videos? Check out the answers to some frequently asked questions.
How do I trim part of a video?
You can easily trim parts of a video using built-in apps as well as third-party editing software. Using the tools mentioned above, you can trim parts of a video by using text-based editing, or by removing sections of the video timeline.
The only thing to keep in mind is to ensure that your audio and video tracks remain synced. Some software (like Riverside!) takes care of this for you automatically. With other software, you’ll have to manually sync the audio and video tracks after cutting out segments.
How do I trim a video for free?
When it comes to free video editing software, there are lots of options. Virtually all of them will include the ability to trim your clips. Look for one that is easy to use and includes other features you like. Riverside allows you to trim your content using either text-based editing or the video timeline. And it includes lots of other features that make editing a video fast and easy. You can even use it to record content in high quality, both from your webcam and your phone!
What is the best video trimmer?
We’ve got a whole guide on the best video trimmers. But, if you want to edit in a chop, give Riverside a try. With text-based editing trimming your videos is as easy as deleting the corresponding text in your recording transcript.


.webp)
.webp)
.webp)


.webp)
.webp)

