.webp)


Table of contents:
Key takeaways:
- Different background noise can affect recordings including the sound of appliances, vibrations and plosives.
- Start by recording in the right environment. Record in a quiet room that you can soundproof with soft furnishing and acoustic panels.
- Choose the right microphone and equipment. Choose a unidirectional mic if possible.
- When editing you can remove background noise with audio filters and effects.
Background noise can cause unnecessary stress and delays in post-production – or even ruin your audience’s listening experience. Luckily, there are a number of steps you can take to prevent or minimize background noise.
Here’s our guide to preventing and dealing with background noise in your recordings.
Table of contents:
- Why do you hear background noise when recording with a mic?
- Types of background noise when recording audio
- 11 Methods to reduce background noise in a recording
- How to get rid of background noise during recording
- How to reduce background noise on your computer with your recording software
- FAQs on how to remove background noise from a microphone
Why do you hear background noise when recording with a mic?
You might be wondering why your mic is picking up background noise in the first place. Here are a few reasons why this might be happening:
- Noisy appliances. Powerful mics can pick up background noise you don’t even notice, like your air conditioning or washing machine. Make sure that these are turned off or at least as far as possible from your mic.
- Unstable placement of the mic. If you haven’t got a mic stand or boom arm, vibrations, and shakes can make sounds that are picked up by your mic.
- Bad mic etiquette. Sitting too close or too far from your mic can reduce the strength of your voice signal, allowing background noise to creep in. Perfecting your mic placement can make a huge difference to the amount of background noise that makes it into your audio tracks.
- Overly-sensitive microphone for recording type. Omni-directional microphones pick up audio from 360 degrees. Using a more focused uni-directional mic can help ensure you’re only picking up the audio that matters.
- Lack of tools to compensate and eliminate background noise. The absence of software and tools that can automatically act against background noise can be a huge oversight. These tools are easy to use, become a seamless part of your workspace, and mean you don’t have to think about manually dealing with background noise.
Types of background noise when recording audio
Though we group background noise together under this umbrella term, there are actually a few different types of noise that you can end up contending with.
Background noise categories:
Background noise is often divided into four main categories:
- Broadband or wideband noise is ambient sound that covers a large range of frequencies.
- Narrowband noise only occurs across a small range of frequencies.
- Impulse noise refers to plosive sounds from speech and electrical crackles.
- Irregular noise – as above – sounds that you usually have no control over such as the weather.

Let’s take a look a closer look at what some more of these terms mean:
Vibrations
Shaking, vibrations, tremors and even subtle movements in the surrounding space can translate to unwanted background noise in a recording environment. For instance, if someone walks by, their footsteps could vibrate the surface that your microphone is sitting on. Since your mic is tuned to capture even small sounds, it could pick up on these vibrations.
Plosives
Plosive sounds such as “Ps” and “Ts” are naturally occurring in speech.
However, these kinds of sounds can result in distorted audio. The way that we aspirate them results in a blast of air directed towards the mic. This can result in a type of background noise that is undesirable.
Irregular background noise
What we call irregular background noise is genuine noise that’s occurring in the background of your recording environment. That could be people talking, a noisy appliance, or construction work next door.
11 Methods to reduce background noise in a recording
There are a few different things you can do to overcome background noise - or at least reduce its impact. This can happen at two points in your recording process: during recording and in post-production. We’ll cover both in this section.
How to get rid of background noise during recording
There are a few small changes you can make to your recording setup that will make a big difference against background noise.
Selecting the right recording environment
Your choice of recording space makes a huge difference.
Opt for somewhere quiet, ideally secluded from background noise.
When thinking about the size of your recording environment, go for a room that’s not too big or small. Any soft furnishings like carpets, or curtains are also helpful as they absorb sound.

Acoustic treatment
Acoustically treating a room means adapting it so the sounding is better.
Treating a room for acoustics can include:
- Soundproofing the room. Close all windows and use soundproof walls, seals for a quiet room.
- Adding absorption materials. As we mentioned, use soft furnishings. You can also get stylish absorption panels.
- Turn off noisy appliances. Make sure you have no AC or fans running.
Choose the right mic
Your choice of mic can influence the amount of background noise you’re dealing with.
Factors that influence the pick of background noise include:
Directionality:
An omni-directional mic picks up audio from all of its surroundings equally. This means it’s more likely to pick up background noise. If you must use one omni-directional microphone between two or more speakers, then consider getting one with noise cancellation.
A unidirectional mic captures sound from a focussed area only. This makes a big difference when you’re trying not to pick up audio from the general surroundings.
Microphone type:
Dynamic microphones tend to be better in louder environments. They don’t pick up as much delicate or detailed noise.
On the other hand, condenser microphones capture nuanced sounds. This means they’re more likely to capture noise.
Microphone Accessories:
A pop filter, stand, and shock mount all reduce background noise.
Mic stand
Adding a mic stand or boom arm to hold your mic securely in place is essential. This protects the microphone from all those shakes, vibrations and tremors that might otherwise negatively impact your recording quality.
It’s up to you whether you prefer a boom arm or mic stand. And don’t worry, you don’t have to break the bank to add one of these to your setup. For example, this Amazon Basics Mic Desk Arm costs under $25.
Pop filter
A pop filter is another small addition that can make a huge difference. Pop filters help to get rid of plosives in your audio recording. They can be built in or are attached to your mic and act as a barrier between your mouth and the mic head.
Again, pop-filters are super budget-friendly. This one from Aokeo costs $10.99.
Shock mounts
Shock mounts are almost an extension to mic stands. They make sure your audio doesn’t pick up any vibrations that travel through your stand.
You can try a universal shock mount like the Rycote Invision USM Shock Mount.
We’ve got a full guide on studio microphones, to learn more.
Think about your mic position & vocal technique
Sitting too far from your mic makes room for ambient noise to filter into what your mic is picking up. Adjusting your position can help to ensure your voice is the primary audio focus.
You should place your mic anywhere between 15 and 30 centimeters away from your mouth.

Know the different types of background noise
Learning about the different potential sources for background noise can definitely come in handy. Here’s a quick list of potential culprits:
- Computers or other electric appliances (in the same room or outside)
- People (outside or nearby)
- Vibrations from movement
- Echo from within your recording space
- Plosives (a natural part of your speech that need to be mitigated against)
For instance, if your mic is picking up a crackle or low humming this could actually be coming from your computer’s connection to a power outlet, for example.
Live monitoring
Grab yourself a pair of headphones and use them while recording. You’ll hear exactly what your microphone is picking up.
You can also check your recording software. This usually includes a dashboard of some sort with audio levels and adjustments.
This gives you room to adjust your set up as needed.
Use the right software
Even if you have the best equipment, you need good-quality audio.
This impacts the audio resolution you can capture. But many platforms also come with features for noise cancellation or adjustments.
For example, with Riverside, you can apply echo-cancellation while recording.
Enter the studio you’re recording in. (You can learn how to create one here.)
In the guest panel on the right, you’ll see the option to toggle on “Echo cancellation” for each of your guests.
.webp)
If you’re using a digital audio workstation, you will likely see filters. You could filters for levelling out the volume of your audio and to reduce low-frequency sounds.
How to reduce background noise on your computer with your recording software
It’s not always possible to remove all background ambient noise during recording. This is where smart tools included in software like Riverside come in:
Background noise removal
Riverside offers both live and post-production background noise removal.
We mentioned the live-recording echo-cancellation above. But, if you forget to switch this feature on during your recording, don’t worry. You can also apply background noise removal retrospectively during post-production.
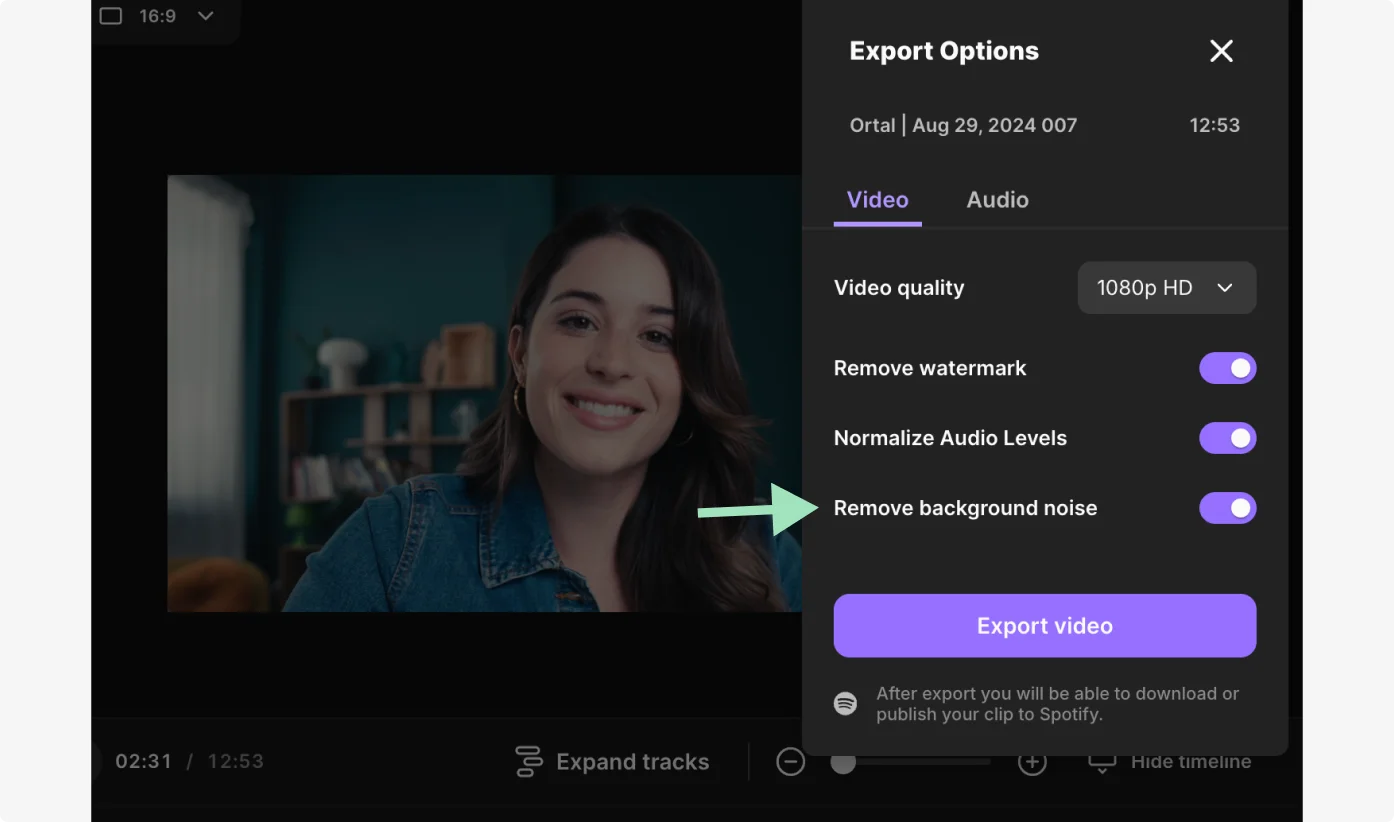
In your studio dashboard, choose the recording you want to remove background noise from.
Click “edit” to go to the Editor. Edit as usual and when you’re done click “Export”. Here you’ll see the option to toggle on “ Remove background noise.”
Set pace: Silence removal
Pauses, gaps, and silences in an audio recording are totally natural. But they’re also not ideal for keeping your listeners attention – and may actually draw attention to a low level background noise issue.
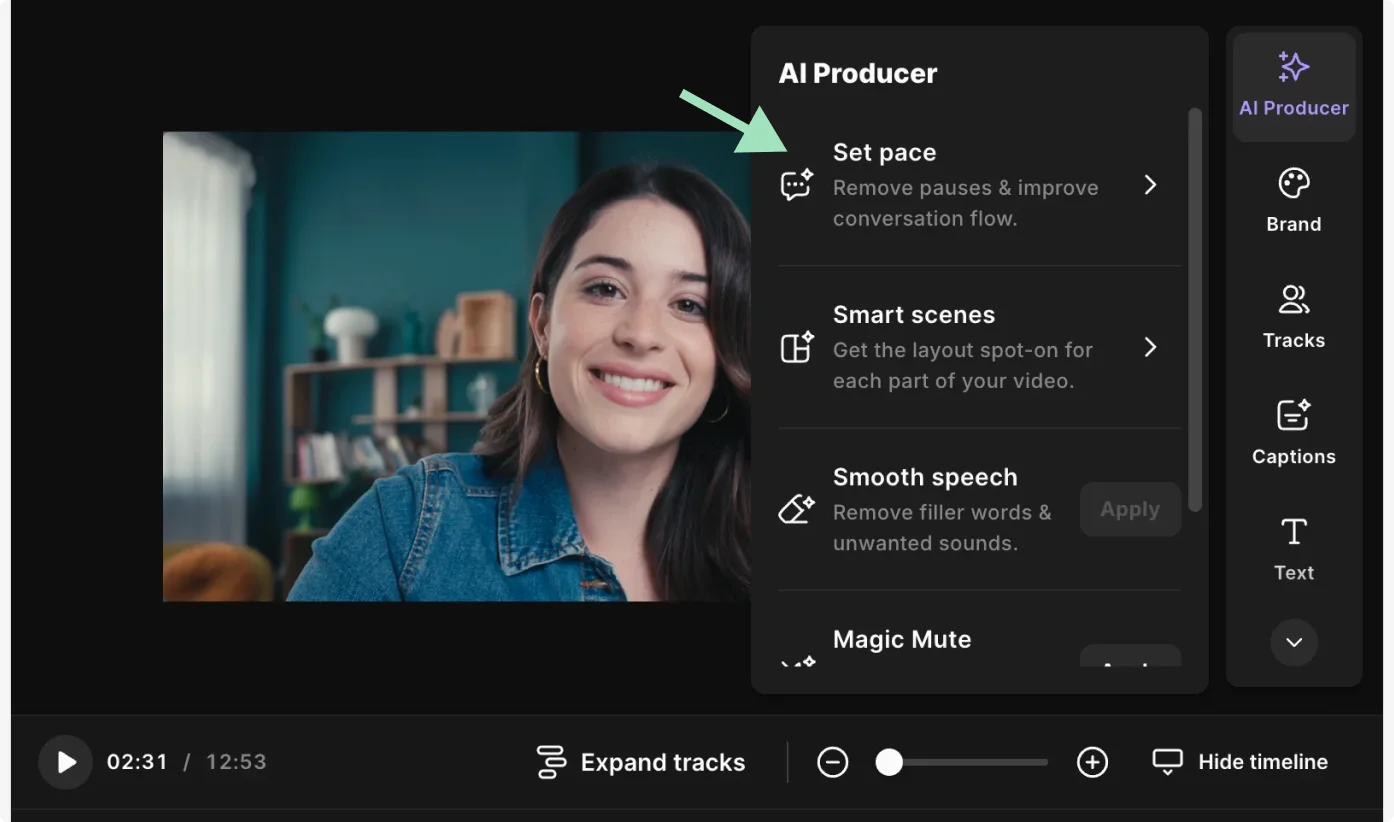
To use the silence removal, head to the Editor again. Click on “AI producer” from the toolbar on the right of your screen.
Click on “Set pace” and decide what types of silences you’d like to remove.
Audio normalization
During post-production and after removing the background noise from your track, you may find that one participant was significantly louder or quieter than others during your recording. You can fix this quickly and simply by using the audio normalization tool when you export your audio from Riverside.
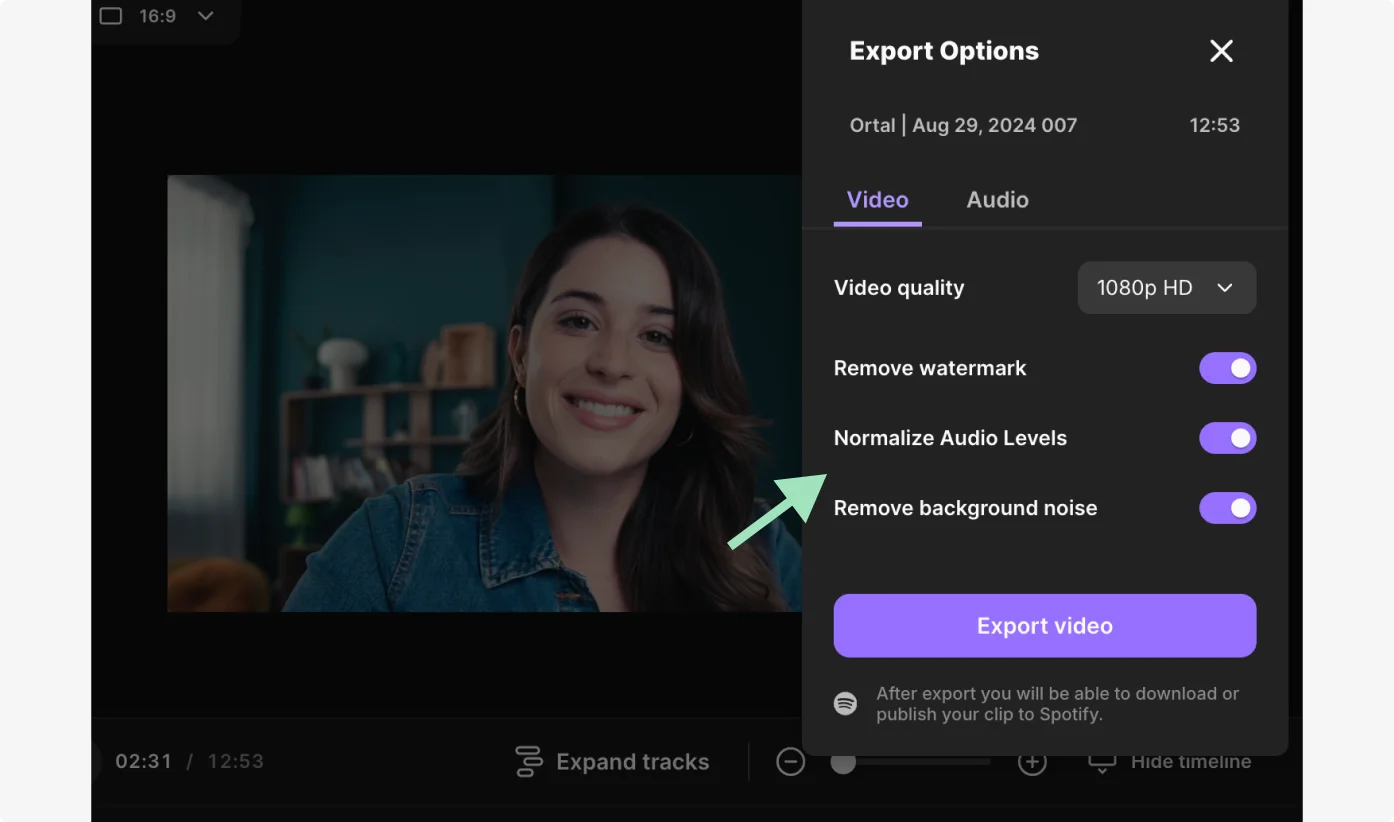
Just like with background noise removal, you’ll find this when exporting your video in the Editor.
Click “Export” and then toggle on “Normalize audio levels.”
Magic Audio
If you’d like to polish your audio completely in one click, then try Magic Audio.
This removes background noise, reverb and normalizes audio levels all in one shot.
FAQs on how to remove background noise from a microphone
Need more information? Here are the answers to some frequently asked questions.
How do I stop my mic from picking up background noise on my phone?
Using your phone to record audio can work really well, but you need to account for the fact that it may pick up a large amount of background noise. Here’s a step by step guide:
- First, choose a quiet recording space
- Check for background noise sources and, where you can, switch them off!
- Place your phone close to the audio source you’re recording to maximize the amount of background noise you eliminate
Why is there constant background noise from my microphone?
As we broke down earlier, there are a few different reasons you might be suffering from background noise during your recordings. If you follow our tips from earlier, you’ll have done everything in your power to reduce the background noise in your recordings.
How do I get rid of background noise when I talk?
If you’ve secured your recording setup and environment and still have background noise to contend with, using tools like Riverside’s background noise removal will seamlessly eliminate any unwanted sounds in your recording.
How do I get rid of background noise on my iPhone microphone?
In general, you should be following all the tips we shared above about eliminating background noise when recording with a phone.
However, iPhones also come with a voice isolation setting that makes your voice clearer during Facetime and phone calls. It automatically prioritizes your voice while blocking out other ambient noises. To turn this setting on, head to the control center by swiping down and then tap “Mic Mode”. Finally, tap “Voice Isolation”.


.webp)
.webp)


