Table of contents:
Recording separate audio tracks when you’re podcasting gives you invaluable control and the ability to edit precisely during post-production.
Unfortunately, not all recording software include this feature. Luckily, OBS Studio, one of the most popular free and open-source podcasting platforms out there, does.
In this article, we’ve created a full guide to recording audio on separate tracks using OBS Studio, as well as comparing how it performs to Riverside.
TL;DR
- OBS Studio is a free and open-source video and live-streaming platform.
- Split audio gives you invaluable control during editing & makes it easier to repurpose your content.
- You can record up to 6 separate audio tracks with OBS Studio by toggling your output settings.
- Riverside makes recording split audio and video even easier because it automatically records up to 10 participants on individual tracks.
What does it mean to split an audio track?
Before looking at OBS Studio in detail, it’s a good idea to understand what it actually means to split an audio track during recording.
Split audio means recording each source of audio onto an individual track. So, in a podcasting context, each participant is recorded onto their very own audio track.
Benefits of split audio
More control during editing
The first major advantage of split audio is that you get far more control over how you edit and manipulate your recording during post-production. You can easily eliminate glitches or mistakes in the audio or dialogue without impacting the overall recording. For example, if two guests speak over each other during your recording, during post-production you can easily and cleanly edit out the interruption without affecting the other person’s flow or dialogue.
Additionally, if your audio tracks have different sound profiles, you can mix and master them accordingly, rather than having to find a balance that works for every audio source on one track.
Easier to repurpose
Another huge benefit of split audio is that it is much easier to repurpose your recordings. Since you have isolated tracks rather than all your audio funneled onto one, you can choose to play with just one audio source to create promotional material, highlight key quotes, and more.
Plus, recording in separate tracks gives you more flexibility to turn your content into a video-only or audio-only version without having to record the same material twice. Even if you don’t wind up using this, it’s great to open up the possibilities during your recording process anyway.
Can you record split audio tracks in OBS?
Yes, you can record on OBS with up to 6 separate audio tracks at once. Follow our guide below to get yourself set up properly.
How to record on OBS studio with separate audio tracks
Here’s a full guide on how to record separate audio tracks on OBS Studio:
Step 1: If you haven’t already, download OBS Studio for free from the website.
Open the application and review app permissions, giving OBS Studio access to your camera, mic, and accessibility settings.
Step 2: Once you’re all set up, head to your OBS audio settings from the lower-right corner of your OBS Studio window.

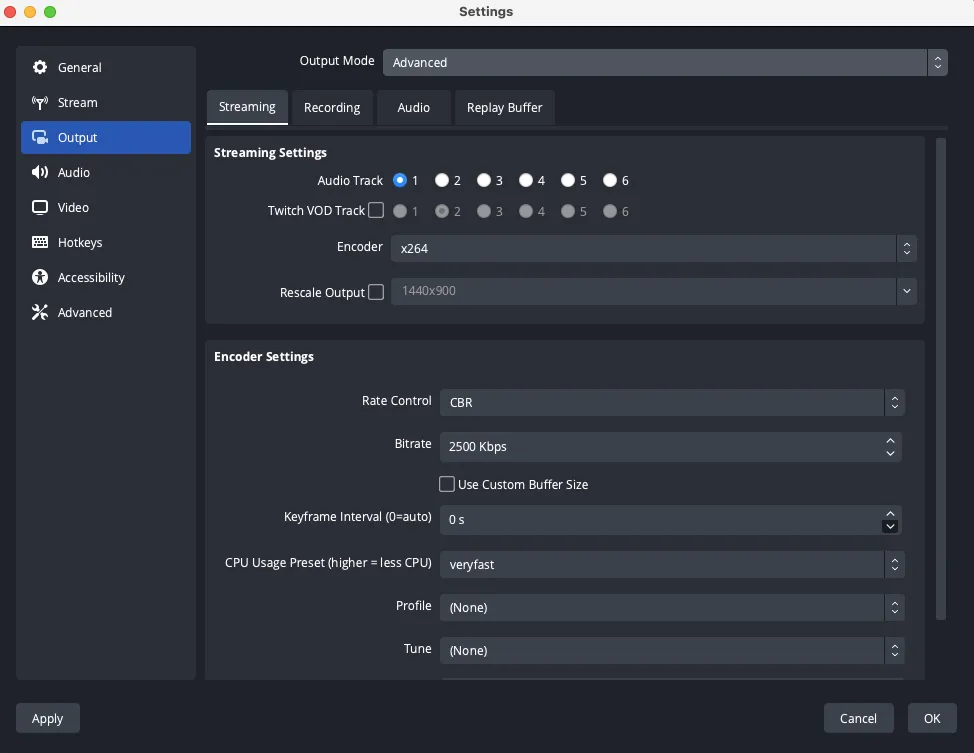
Step 3: Then head to the ‘Output’ tab of your settings window.

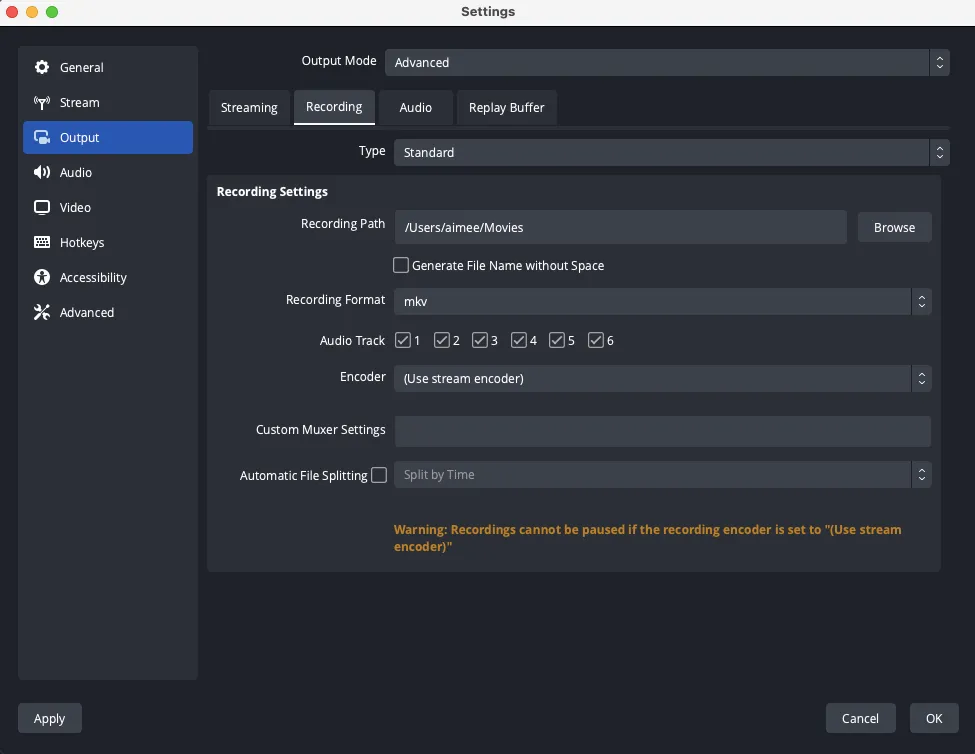
Step 4: Toggle the ‘Output Mode’ to ‘Advanced’, then click on the ‘Recording’ tab.

Step 5: Tick Audio Track 1 - 6, according to the number of tracks that you want to record.
Here you can also toggle the recording format, but bear in mind that not all formats support multitrack recording.

How to record separate tracks in Zoom
Riverside: An OBS alternative for split audio tracks
Though OBS Studio is a great option for creators or podcasters, especially those on a budget, it’s not the only platform out there. There are many OBS alternatives.
Plus, since remote recording isn’t a native OBS Studio feature, it doesn’t tick all the boxes despite its multitrack recording feature. That’s why Riverside might be a better fit for your setup.
What is Riverside?
Riverside is a browser and app-based podcasting platform. Its key USPs include automatic local and multitrack recording, the ability to record both video and audio, and an in-built intuitive editor.
Key Features of Riverside
Let’s take a quick look at Riverside’s key features.
- Remote recording. You can record with up to 10 remote participants on Riverside. The whole platform is intuitive, easy to use, and designed to make remote recording as easy as it should be.
- Multitrack recording. Riverside automatically records every participant’s audio, video and screen captures on individual, separate tracks.
- Local recording. Each guest is always recorded directly on their own device rather than over the internet. This means that even bad wifi won’t affect the quality of your recording.
- HD video and audio. You can rely on Riverside for studio-quality results, with up to 4K video and 48kHz WAV audio.
- Livestreaming: You can livestream and multistream on all major platforms directly (e.g. YouTube, LinkedIn, Instagram, X etc.).
- Progressive upload. Your files upload progressively to the cloud while recording, which minimizes both risk of data loss and how long you need to wait around at the end of your session.
- Intuitive editor. Riverside’s text-based video editor is designed to get your video content ready in a matter of minutes. You can also create short shareable clips for social media and a video transcription for maximum accessibility and repurposing.
- Browser-based. Riverside is totally browser-based so you don’t need to download a specific application to get going. This also means you can pick up where you left off on any device.
- Budget-friendly. Lastly, all of Riverside’s powerful features are available at an affordable price. You can sign up for our free plan, or you can get the most out of the platform with one of our paid plans starting at $15/month.
Recording split audio with Riverside
Recording split audio with Riverside is straightforward because it’s a default setting. All you need to do is hit record and Riverside will capture each of your guests’ audio and video on an individual track. Here’s a quick look at how it works:
Step 1: Create your Riverside account if you haven’t already. Log in.
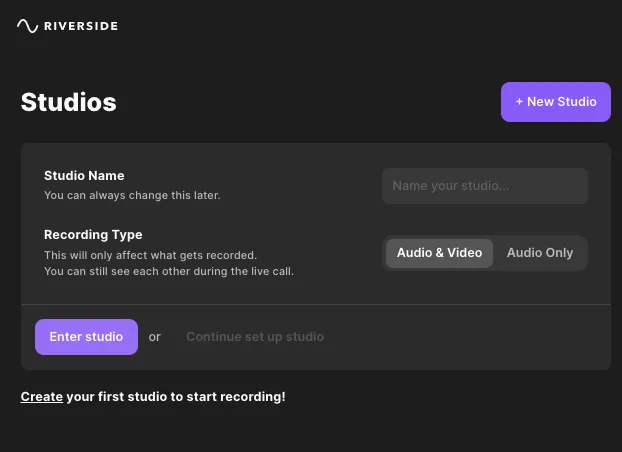
Step 2: Click the purple ‘+ New Studio’ button in your dashboard.

Step 3: Name your studio and select your recording type. If you’re ready to record right away, you can click ‘Enter Studio’. Otherwise, you can continue setting up your studio for a later date and even invite your guests ahead of time.

Step 4: When you hit ‘Enter studio’, you’ll first be invited to check your camera and microphone in the lobby. Here, you can also change your name label.
.webp)
Step 5: When you’re happy, click ‘Join Studio’.
Step 6: Once you’re in the studio, if you haven’t already, invite your guests using the ‘copy link’ or ‘invite by email’ button.
.webp)
Step 7: When everyone is ready, hit the red record button and enjoy your session. Each participant will be recorded on their own individual track.
Step 8: Once you’ve finished, click the red record button to stop your session. Wait for all files to upload, then click the red ‘leave’ button and ‘end session for all’ to end your recording session.
You’ll then land on your recordings page where you can see a consolidated recording with all participants as well as each individual track recording. To download an individual track, click on the ‘high-quality’ download button of the audio or video that you want to download. Then select what you want to download:
- Raw Video
- Raw Audio
- Compressed Audio

Start recording separate tracks seamlessly with Riverside.
FAQs on OBS Split Audio Tracks
Here are the answers to some of the most common questions about recording split audio on OBS Studio.
How do I split two audio tracks in OBS?
OBS can record audio separately but you need to toggle your settings to do so. As we explained above, you can record up to 6 individual tracks by heading to advance settings. Follow our instructions to get yourself set up.
Why is OBS not picking up desktop audio?
If OBS Studio isn’t correctly picking up your desktop audio, there are a few things you can try for an easy fix. Try first troubleshooting by verifying that you’ve got all your device settings correct. If this doesn’t work, then you might want to check you’ve installed the right kind of drivers.
How to record separate audio obs
Recording split audio with OBS is easy. Simply head to your advanced output settings and tick boxes 1 - 6 to record 6 separate tracks. As we’ve seen, recording split audio with Riverside is even easier because it’s a default setting. So all you need to do is enter your studio and start recording.


.webp)
.png)


