Table of contents:
Requirements for going live on Instagram and Facebook
Requirements for going live on Instagram
Requirements for going live on Facebook
How to broadcast live on Facebook and Instagram at the same time on desktop
How to go live on Facebook and Instagram at the same time on mobile
Key takeaways:
- Platform requirements: To go live on Instagram, you need a professional account and an app or streaming software. Facebook requires an account with at least 100 followers and the latest version of the app or streaming software.
- Desktop multistreaming: Using Riverside.fm, you can multistream on both platforms by connecting your accounts and entering stream keys, with Instagram requiring custom RTMP setup.
- Mobile multistreaming: Since Instagram doesn't support stream keys on mobile, you need two devices—one for Facebook and one for Instagram—to stream simultaneously.
- Best practices: Ensure good lighting, balance your resolution (720p for both platforms), and test your audio and video setup before going live to ensure a smooth experience.
Want to reach your audience on Instagram and Facebook at the same time? Multistreaming is your answer—letting you broadcast your content across platforms seamlessly.
In this guide, we’ll walk you through how to set up and run a smooth multistream so you can expand your reach without the extra effort.
Requirements for going live on Instagram and Facebook
Before going live on Instagram, Facebook, or both, you must meet each platform’s requirements. Let’s take a look at what they are:
Requirements for going live on Instagram
To go live on Instagram, you need:
- A professional Instagram account
- The latest version of the app for your mobile device (to stream from mobile) OR streaming software (to stream from desktop)
- An account in good standing (no violations, bans, restrictions, or reports against your account)
Requirements for going live on Facebook
To go live on Facebook, you need:
- A Facebook account that is at least 60 days old
- A Page or profile with at least 100 followers
- The latest version of the app for your mobile device (to stream from mobile) OR streaming software (to stream from desktop)
- To go live from a Page, you need Admin, Editor, or Live Contributor access
How to broadcast live on Facebook and Instagram at the same time on desktop
Although Meta owns Instagram and Facebook, there’s currently no way to multistream to both platforms without streaming software or third-party tools.
Here’s a step-by-step look at how to go live on Facebook and Instagram simultaneously using Riverside.
Step 1: Create a new studio
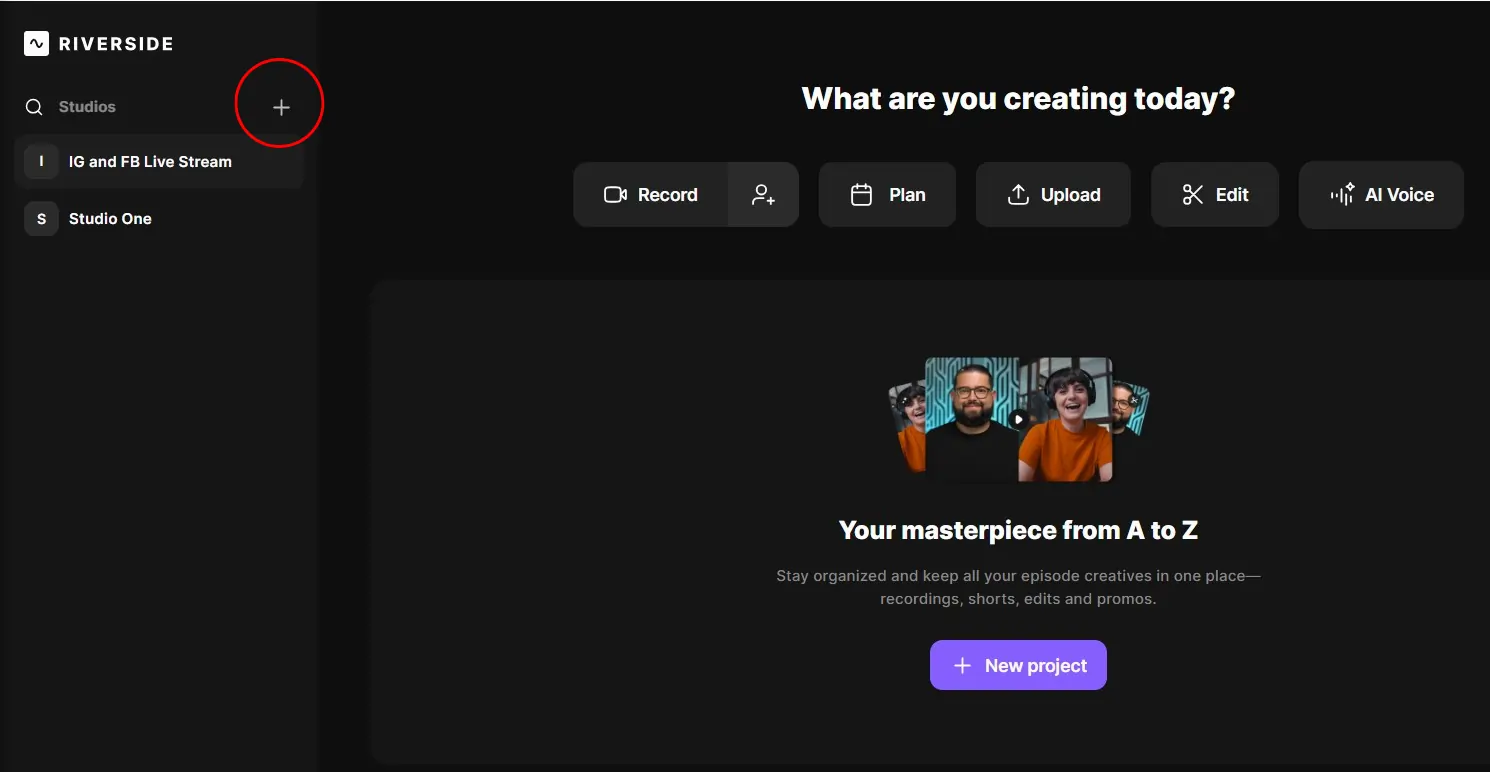
Log in to your Riverside account and create a new studio for your live stream by clicking the “+” icon on the left side of your screen. This is especially helpful if you plan to livestream regularly—your settings will be ready to go the next time you log in.
Step 2: Enter your recording studio
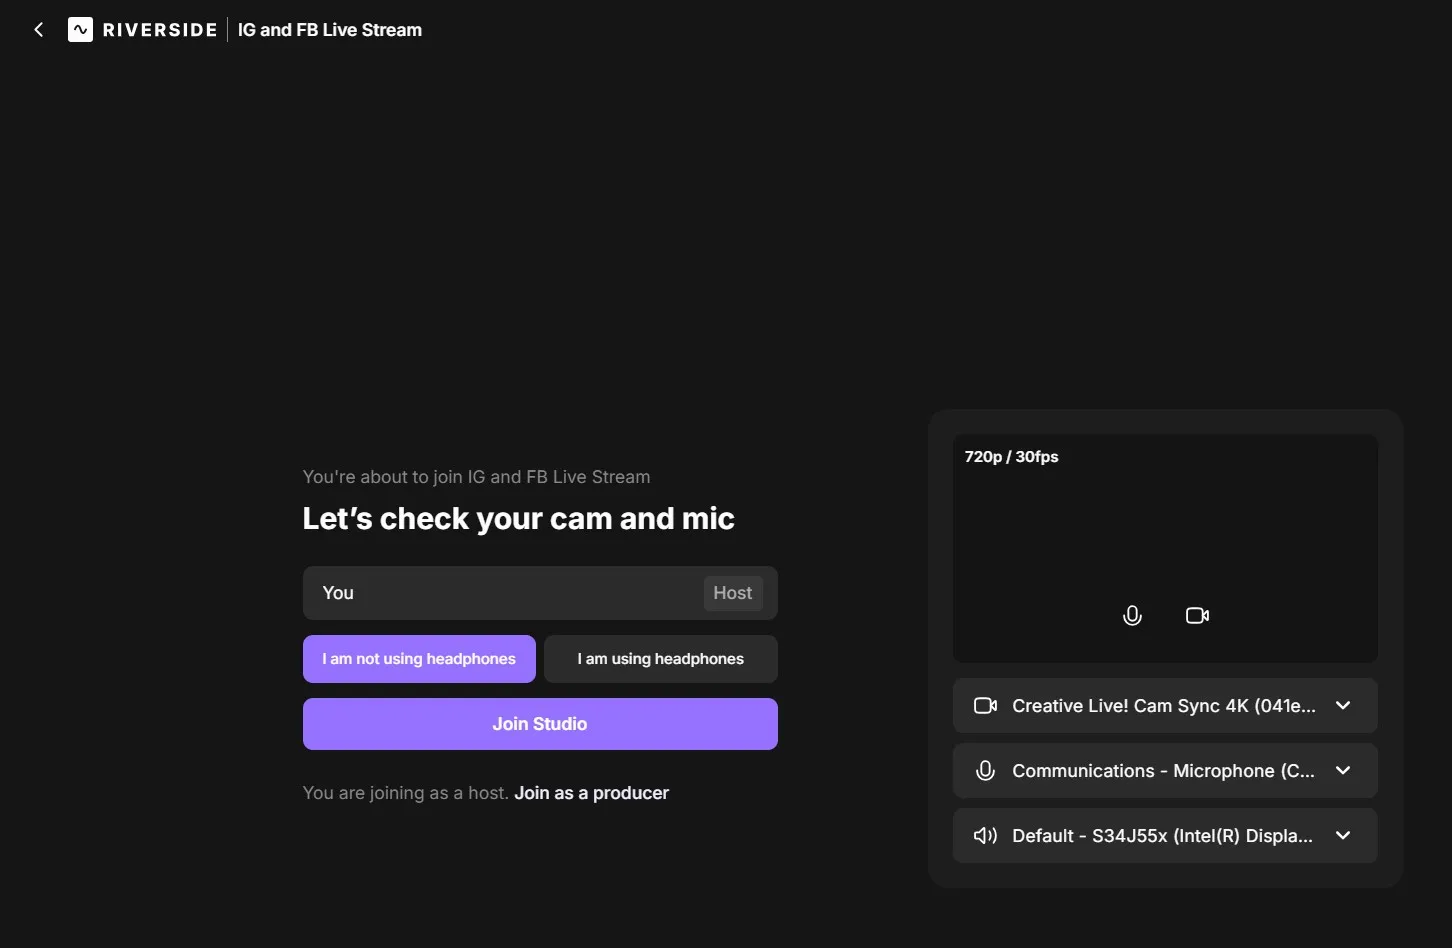
Click “Record” to enter your recording studio. Don’t worry—the recording won’t start immediately.
Next, you’ll be prompted to check your camera and mic. Select whether you are or are not using headphones during your recording and click “Join Studio.”
Step 3: Connect your FB and IG accounts to Riverside
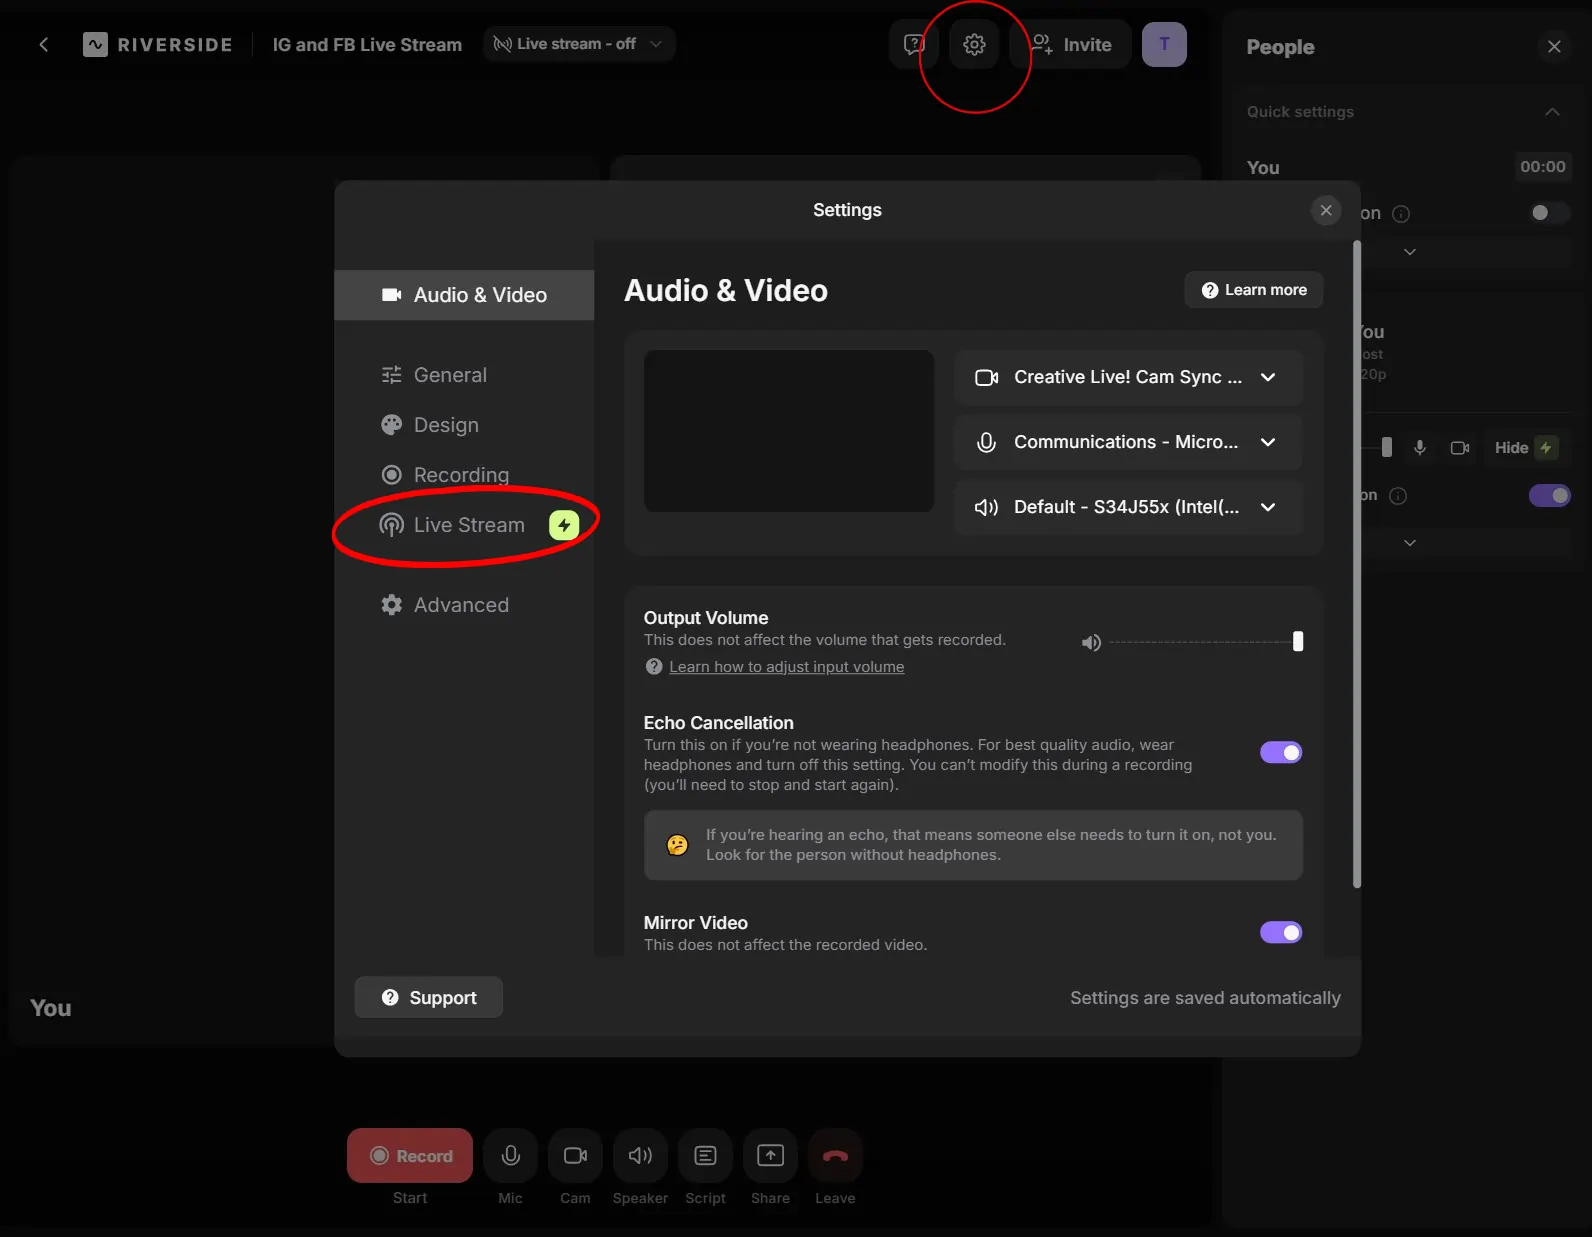
Now that you’re in your studio, it’s time to connect your Facebook and Instagram accounts to Riverside. You can do this by clicking the “Settings” cog at the top of your screen. Next, Select “Live Stream.”
Connecting your Facebook account
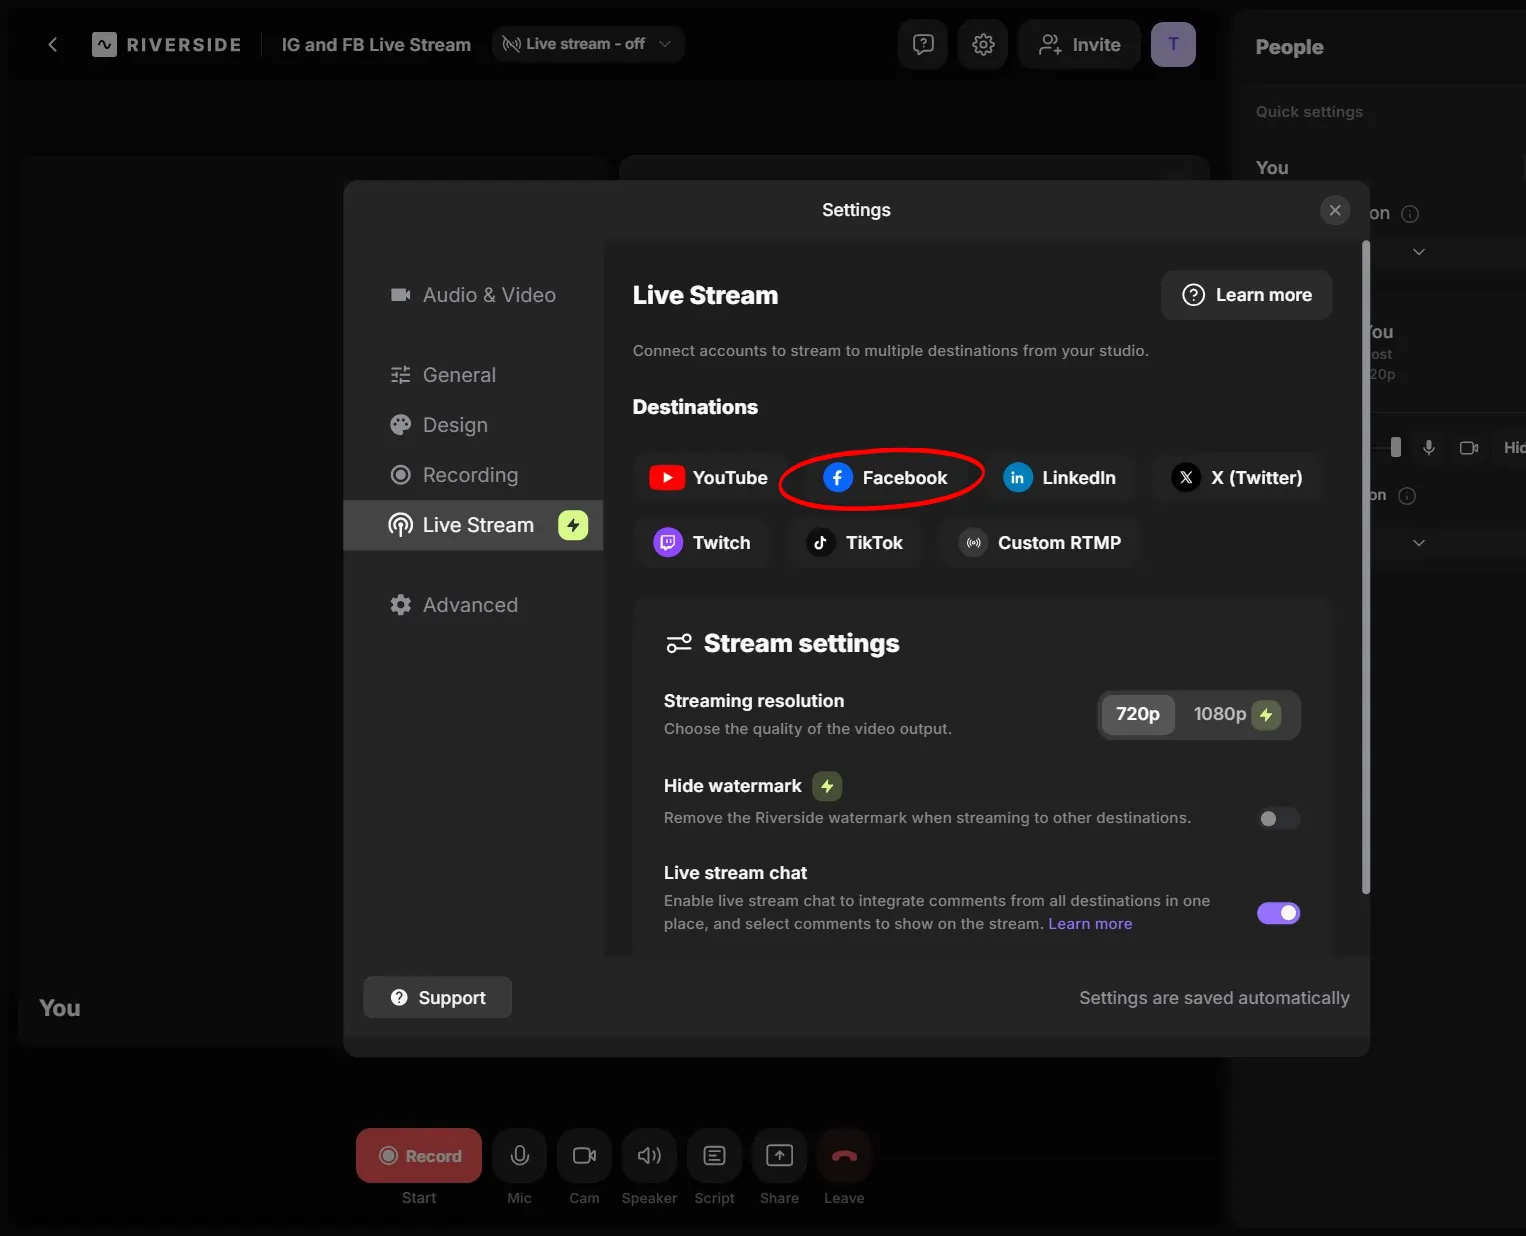
First, let’s connect your Facebook account. You can do this by selecting the Facebook icon and following the prompts to connect to a Facebook profile or page. You will need to be logged in or log in to your Facebook account in order to authorize access. Note that it’s really easy to connect and multistream to many other platforms with Riverside, including YouTube, LinkedIn, and TikTok.)
Connecting your Instagram account
Note that you need a professional Instagram account to multistream using streaming software. This is free and easy to set up. Just go to your Instagram homepage and click on “Settings.” Scroll down to “Account Types and Tools,” then click “Switch to a professional account.” Then Click “Done.”
Now, in your Riverside Studio, select “Custom RTMP” from the same menu you used to connect your Facebook account.
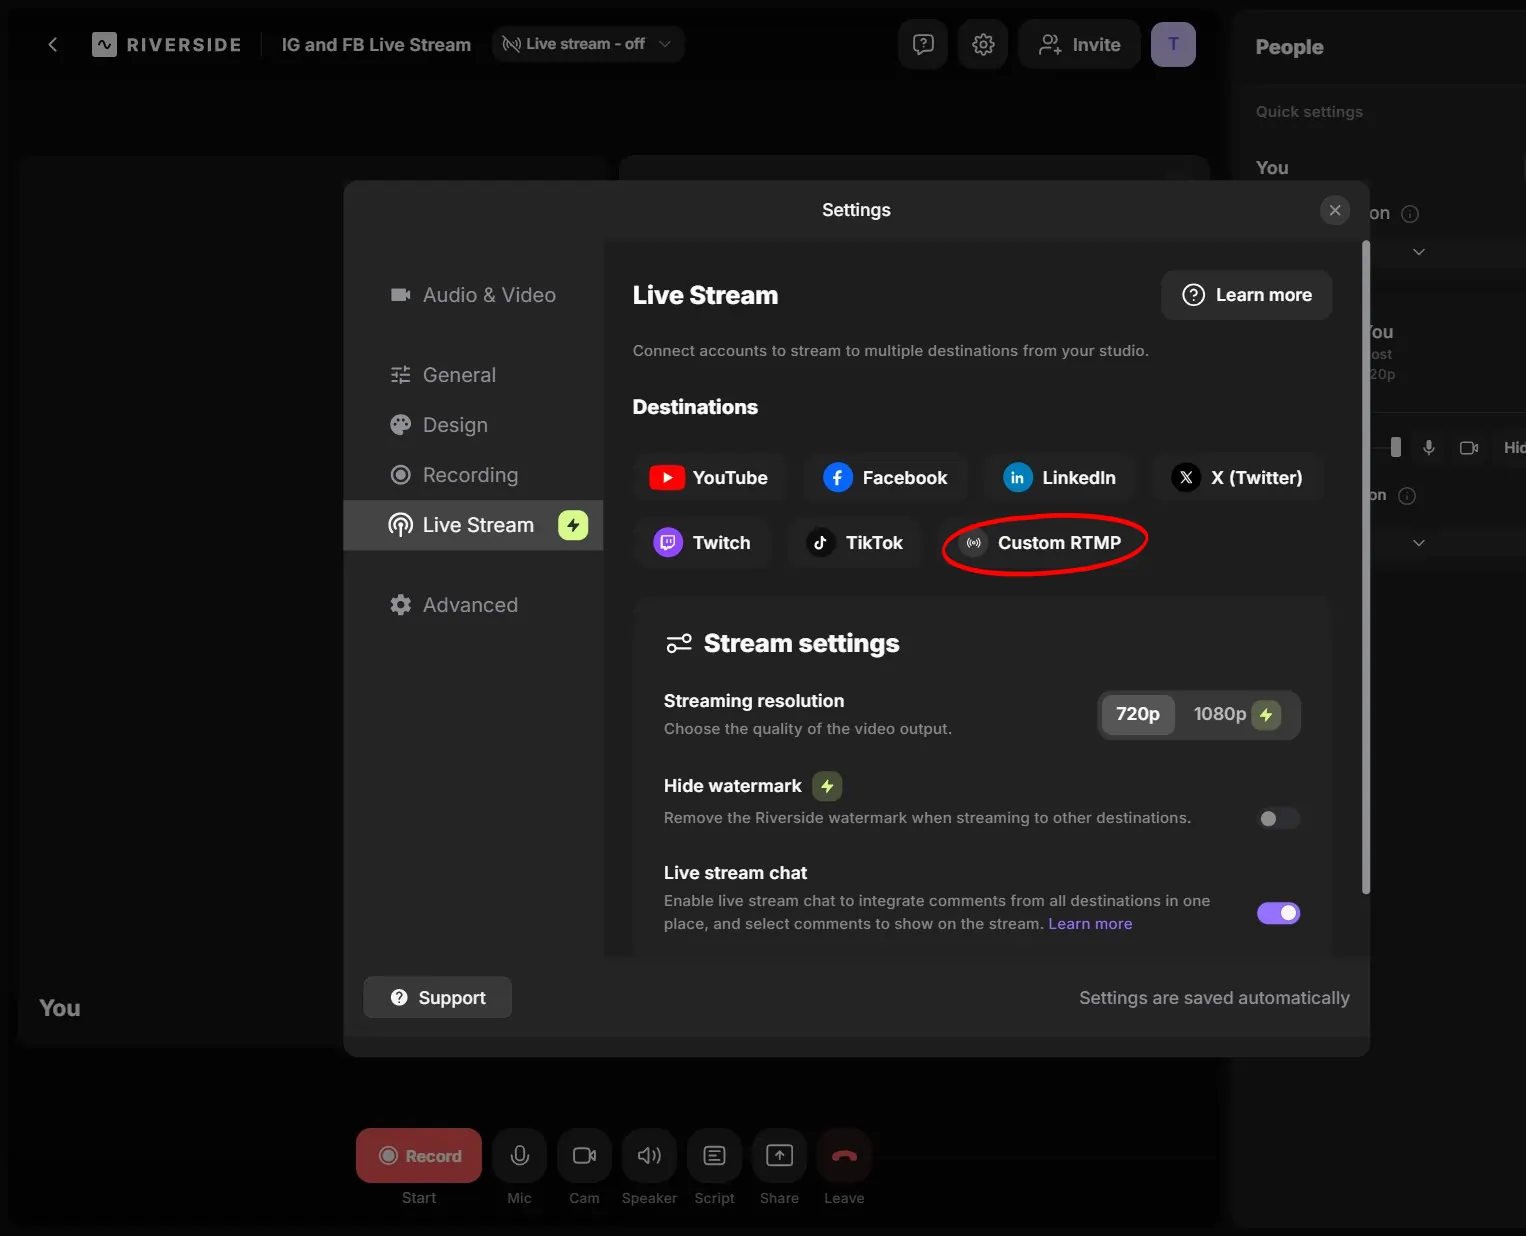
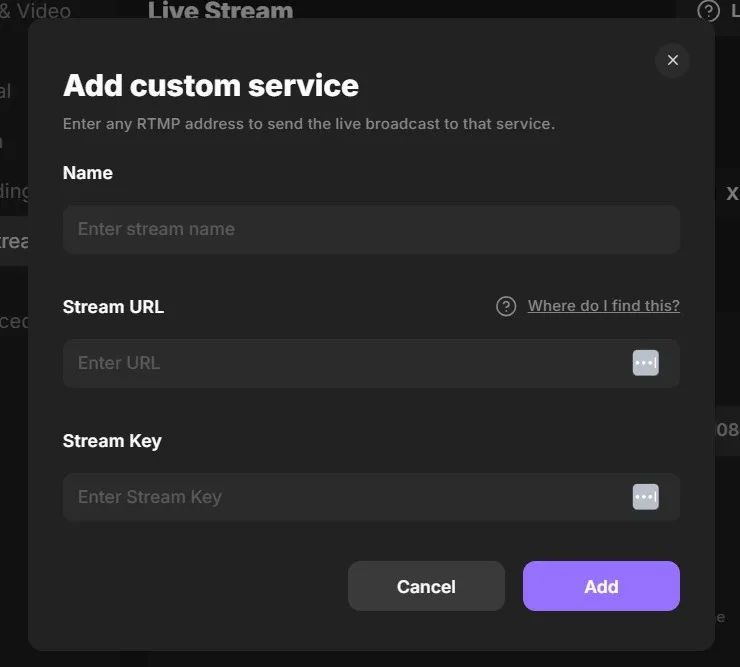
A new window will open, asking for your live session's Stream Key and Stream URL. You can do this by launching a live video on your Instagram account.
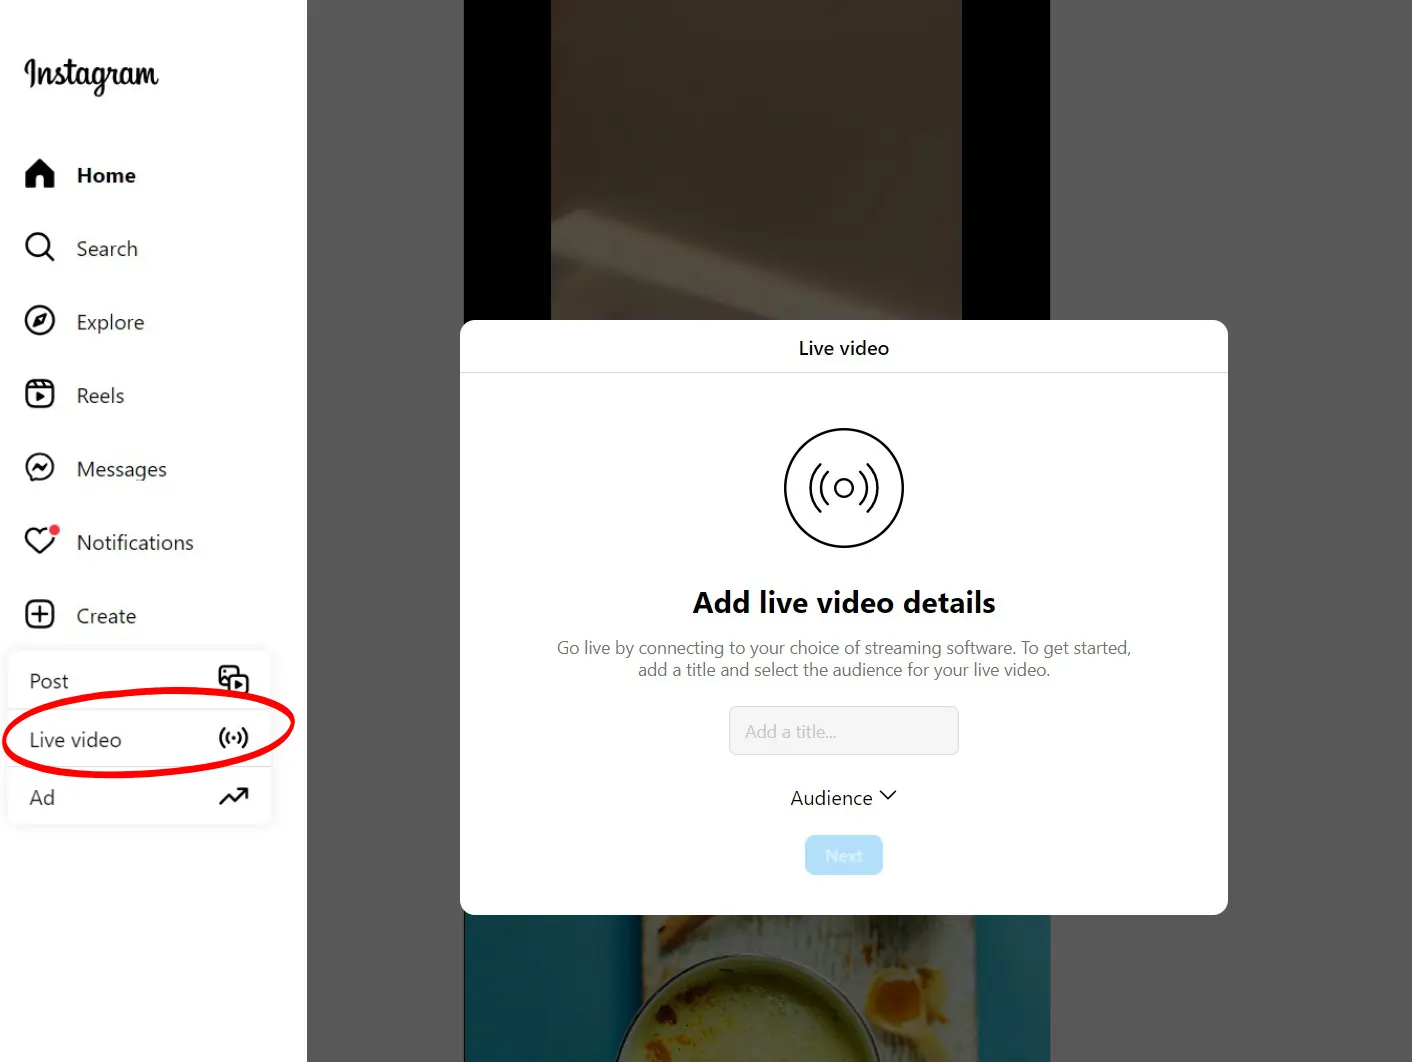
Open Instagram on a new tab on your desktop and click “Create” and then “Live video.” Then, type in your live session’s title and choose an audience. Once you’re done, click “Next.”
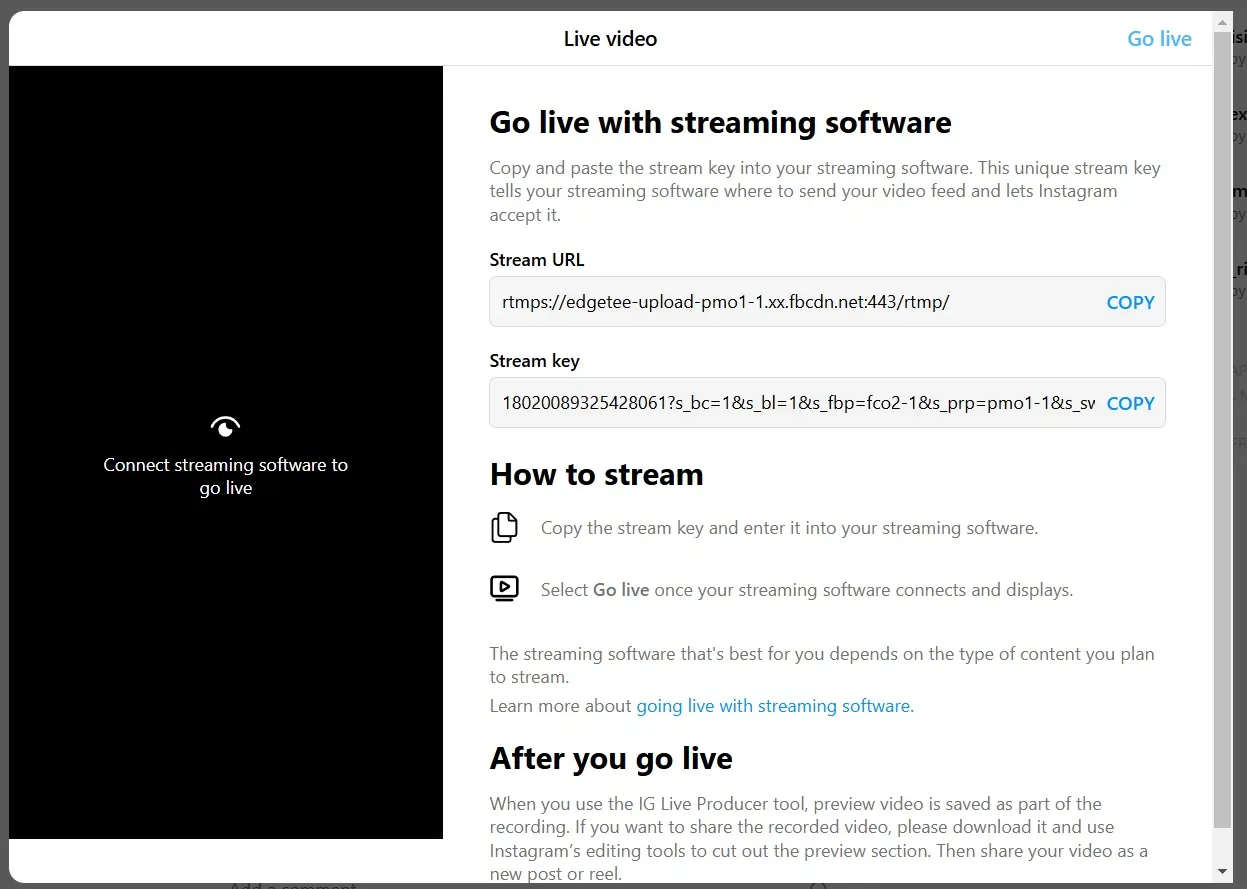
A page titled “Live video” will appear. Copy your Stream Key and Stream URL and paste it into Riverside. (Note that this stream key is not permanent. It will reset after each stream.) Leave this tab open with your Instagram account. You’ll need it to go live in Step 5.
Step 4: Adjust Your Settings
Before you go live, you might want to adjust a few settings or set up a few other things in your studio. You can:
- Invite other guests to join you
- Personalize your studio’s design to reflect your brand
- Set audio quality and video resolution (Instagram Live supports a maximum resolution of 720p)
- Enable or disable live stream chat (you can control this right from your studio)
Step 5: Go live on Facebook from Riverside
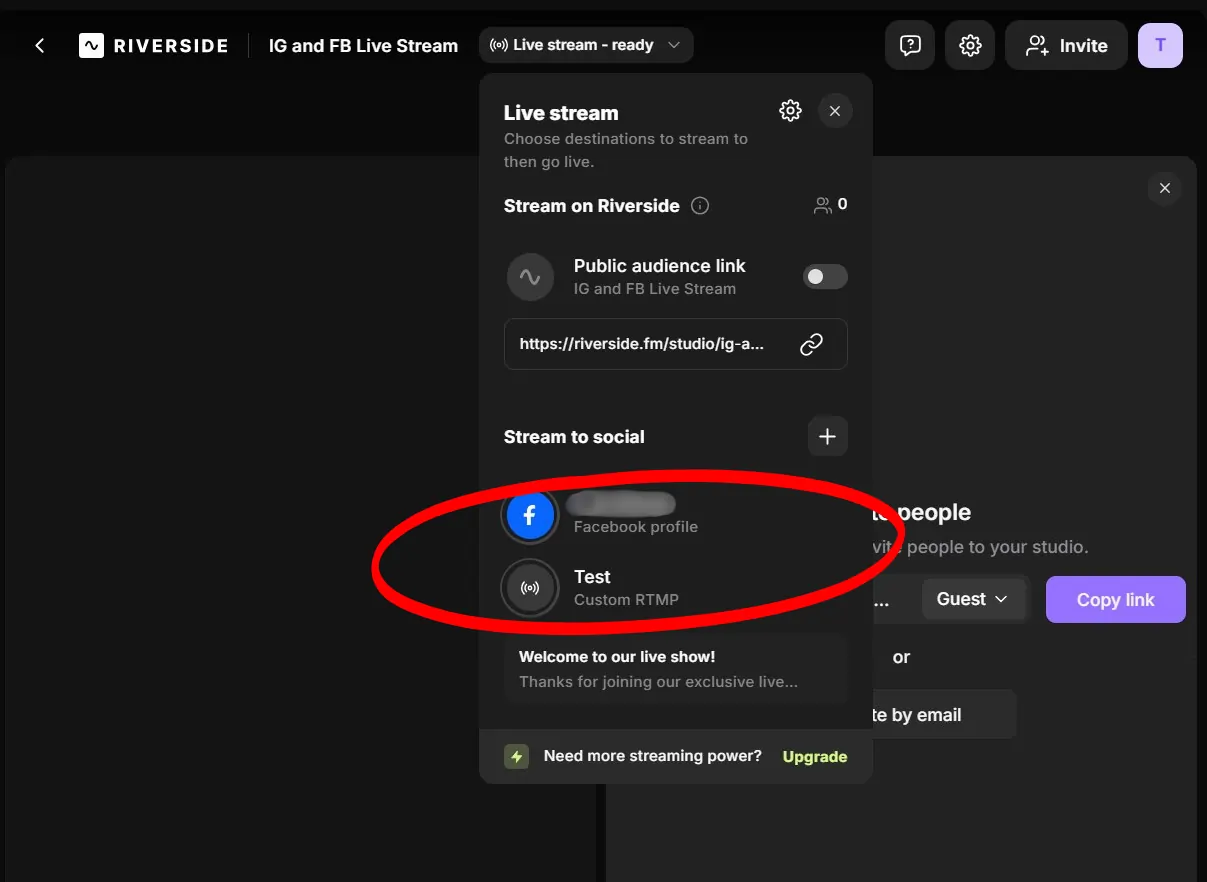
In your Riverside Studio, ensure that Instagram and Facebook are connected under “Settings.” Remember that your Instagram will be connected as a Custom RTMP. If you’re all set, click “Go Live.” You’ll get a five-second countdown before your stream goes live on Facebook.
Step 6: Go live from Instagram from Riverside
Because Instagram is a bit fussy about API access, you have to actually go live from your Instagram page as well, even when you’re streaming through Riverside.
Return to the Instagram tab where you got your URL and Stream Key (the one you left open). You should see a preview of the video you’re recording on Riverside on the left side of your screen. Click “Go live” in the top right corner to launch your live session on Instagram.
Note that when you click “Go live” in Riverside, you’ll have a 5-second countdown before your stream starts for your audience. This should give you enough time to set yourself up with this final click on Instagram.

You can head back to your Riverside studio to control the show. During your live stream, you can:
- Chat with your guests directly from your studio
- Share your screen or a presentation
- Take live call-ins
- Add even more platforms to your live-stream session
- Play audio and video files
- Work with a producer in Producer Mode
Step 5: Stop streaming and access your recording
When you’re ready to stop your live stream, you can click “Stop” at the bottom of your screen. This will stop the live stream on both Instagram and Facebook at the same time. As soon as you do this, you’ll get a prompt to “View Recording.” At that point, you can:
- Edit your recording in Riverside’s editor
- Download the audio, video, or audio and video file for your video
- Download your video transcript
- Add captions
- Clean up your audio
- Instantly create short clips of your live stream to share with your followers.
Riverside saves your recording so you can use it when your live stream is over. While you can download a video you live streamed directly from Instagram or Facebook, these videos will be lower quality. With Riverside, you’ll get individual tracks for audio and video, which makes for much higher-quality edits. Plus, even if you’re live streaming in 720p, you can still record in up to 4K.
How to go live on IG and FB at the same time on mobile
Going live on Instagram from a mobile device can be tricky. Instagram does not support the creation of a Stream URL and Stream Key on mobile. But there is a workaround. The only catch is that you’ll need two mobile phones or tablets to make it happen. Here’s how to do it:
Step 1: Create your setup
To do this, you’ll need two mobile devices, one with the Facebook app and one with the Instagram app. Ideally, you should set each up on a tripod.
Step 2: Open Instagram and set up your live stream
Open Instagram on one phone, tap the “+” icon at the top of your screen, then scroll to the “Live” option at the bottom. Add a title or description (optional), and place your phone on the tripod stand.
Step 3: Open Facebook and set up your live stream
Open the Facebook app on your second device. Navigate to the profile, page, or group where you want to go live. Tap on the “Live” button. You’ll find it under the box where you add a post. Add a title or description, then position your device on the second tripod.
Step 4: Go live
Tap “Go Live” on both Facebook and Instagram to start your live stream on both platforms.
Step 5: Manage your streams
Check comments on both streams as you go, and do your best to respond where you can. You’ll also need to ensure you’re giving both cameras equal attention.
Step 6: End both live streams
Tap “End” on Instagram (top right) and “Finish” on Facebook (bottom) to end your live screen.
Step 7: Post and share
After the live stream ends, you can share a replay of your live session from Instagram or save it to your phone. On Facebook, you can post your recorded live video to your timeline, page, or group for those who missed it.
Best practices for multistreaming on Instagram and Facebook
Now that you’re ready to go live on Facebook and Instagram, here are a few tips to ensure your livestream succeeds.
Plan your setup in advance
The best streamers take their setup seriously. Your lighting, camera angles, and audio quality can all help ensure you get the best stream possible.
Perfect your lighting setup before starting your live stream. Try different camera angles in your studio to see what works best. Consider using a dedicated microphone rather than your computer mic. (Check out our list of some of the best microphones for streaming.)
Balance your resolution
The highest resolution Instagram Live will accept is 720p. Facebook accepts up to 1080p. Balance the needs of both platforms by streaming in 720p from your Riverside studio. Otherwise, Instagram will downgrade the resolution, which could result in lower quality.
Test your audio and video
Test your microphone before you go live. Our one-click mic test makes it super easy. You can also use Riverside’s test recording feature to ensure everything runs as it should. This is crucial for a live recording.
Engage with viewers
In a live stream, viewers are there because they want to see you live and feel like they’re a part of the action. Engage with them as much as you can. Fortunately, we have some pro tips for mastering live streaming.
Practice with shorter streams
If you’re new to live streaming, try practicing with shorter streams first. This will help you get comfortable managing Instagram and Facebook without getting overwhelmed.
FAQs about multistreaming on IG and Facebook
How long can you be live on Instagram and Facebook?
The maximum duration of a live stream on Instagram Live is 4 hours. On Facebook, you can go live for up to 8 hours when streaming from a computer and 4 hours when streaming directly from a mobile device. Once you hit these limits, the live stream will end automatically, but you can immediately start another live session if you want to continue.
Can you multistream on Twitch and Facebook?
Yes, you can stream to Twitch and Facebook using Riverside. Connect your Facebook account to Riverside from your studio's “Settings” menu. In this case, you can do the same for Twitch by inserting the Stream Key and Stream URL retrieved from Twitch. Once connected, click “Go live” to stream to both platforms.
How can I go live on all social media at once?
On Riverside, you can easily livestream to several social media platforms, including YouTube, Facebook, LinkedIn, X, Twitch, Instagram, and TikTok. Once you’ve connected your platforms to your Riverside studio, it’s as easy as clicking “Go live.” Once your live stream is over, you’ll get a recording and transcript, which you can edit to post on the platforms for more engagement.
How to stream to multiple platforms for free?
Riverside has a free plan. You can live stream in 720p to social media with basic branding and chat functions. Give it a try today.


.webp)


.webp)

.webp)


