.webp)


Table of contents:
Being able to add captions to your Zoom meetings is a game-changer. This means that everyone, regardless of their native language or audio availability, can still engage with what is said in the meeting.
Zoom actually caters to three types of captions: manual, automated, and third-party generated. So, theoretically, you should be able to find captions that work for you.
In this article, we guide you through everything you need to know about Zoom captions and why you might want to consider an alternative tool for better accuracy.
TL;DR
- Zoom has manual captions and automated captions. You can also integrate a third-party captioning service if you need.
- You can save your captions as a transcript for download too.
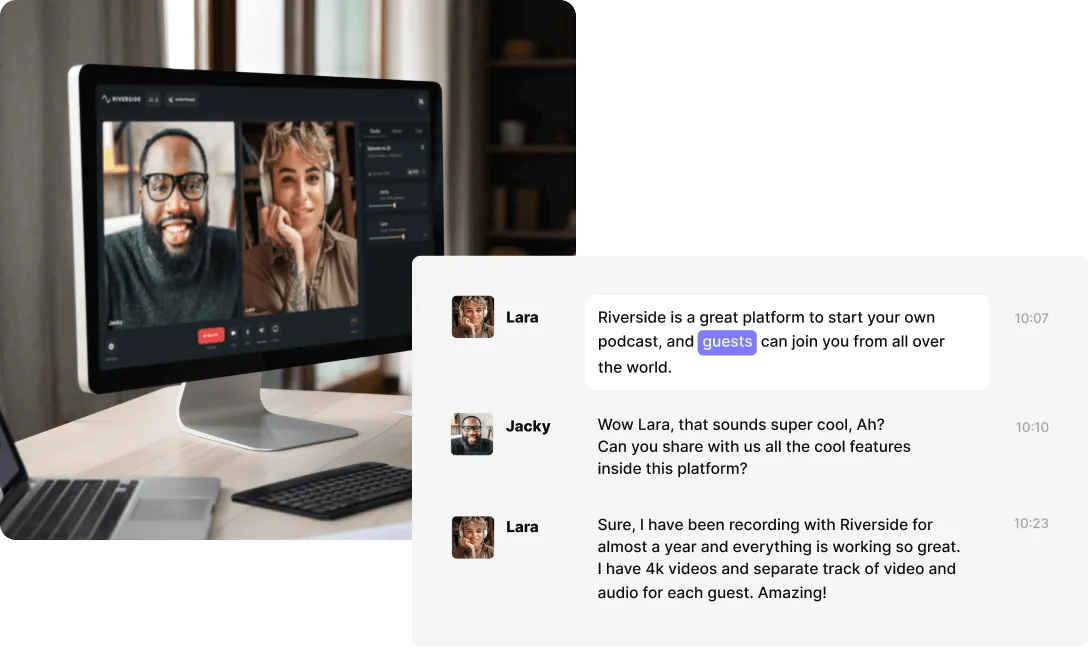
- Riverside offers a more seamless and accurate transcription experience. Plus, your recordings will be of higher quality.
Does Zoom have closed captioning?
Yes, Zoom does have a few different closed captioning features available.
You can enable manual captions, use Zoom’s automated captions feature (also called live transcription), or use a third-party closed captioning plug-in.
Manual vs. automated captions on Zoom
Since Zoom offers two types of captions, let’s take a quick look at the difference.
Zoom’s real-time automated captions
Zoom’s native automated captions feature is also called ‘live transcription’. This tool automatically transcribes your webinar or video call’s audio into captions as you’re talking. This is available in a number of languages.
Though Zoom’s real-time automated captioning feature is definitely useful, there are a few limitations that you should consider.
For instance, if the audio quality is low or there’s substantial background noise, this might affect the accuracy of the captions. Zoom can’t guarantee high-quality recording because its recording quality is dependent on good internet. For this reason, Zoom actually suggests using a third-party captioning service or manual captioning if high accuracy is essential.
Zoom’s manual captions
Zoom’s manual captioning feature lets you assign a participant to type out the captions themselves. Opting for this type of captioning usually guarantees higher accuracy, especially if your participants speak with a specific dialect or accent. However, for obvious reasons, it also requires a lot of effort on the part of the person typing the captions out.
Zoom closed captioning requirements
In order to be able to use and see captions during a Zoom meeting, there are a few requirements:
- You need to be using the ‘Global Minimum’ version or higher of the Zoom desktop application.
- If you’re on mobile, you also need to make sure you upgrade to the ‘Global Minimum’ version or higher.
- Unfortunately, if you’re on Linux, live transcription isn’t available.
If you want to use automated captioning in any language other than English, then you need to be using version 5.11.9 or higher.
How to enable closed captioning on Zoom meetings or webinars
Let’s take a look out how to use and enable captions on Zoom:
Enabling automated captions as the host
If you want to turn on automated captions for all users, here’s what you need to do:
Step 1: Sign into your Zoom account. Ensure you’re signing in as an admin with the right to edit account settings.
Step 2: Next, head to ‘'Settings’
Step 3: Head to 'Meeting’ > ‘In Meeting (Advanced)’ > ‘Automated Captions’. Toggle Automated Captions on.
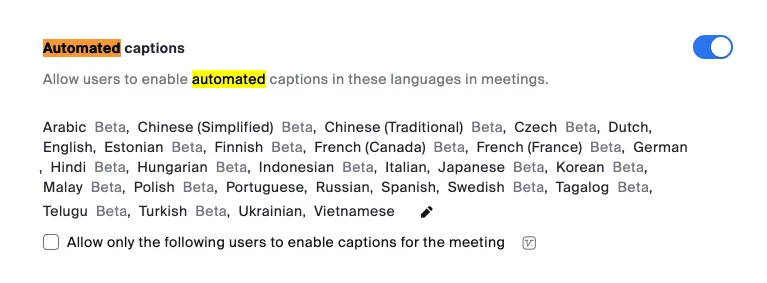
Step 4: You might see a pop-up that asks you to verify this change. Click ‘Enable’.
Step 5: If you want to select the languages you want to be available for captioning, then click the pencil icon and choose from the list. When you’re done, click ‘Save’. You can choose to ‘lock’ this setting so that users can’t make changes. Do this by simply clicking on the ‘lock icon’.
If you want to enable automated captions but only for a defined group of users, this is what you need to do:
Step 1: Head to ‘User Management’ > ‘Groups’, then select the group in question.
Step 2: Then follow step 2 - 5 from above.
Enabling translated captions as host
Zoom also has the option to enable translated captions for non-native speakers.
Sign in as an admin and then head to ‘Account Management’ > ‘Account Settings’ > ‘Meeting’ > ‘In Meeting (Advanced)’. Here, click the ‘Translated Captions’ button and toggle it on.
You, then, also need to ‘edit translation languages’ to select the ‘language pairs’ you need. A language pair has one input (speaking) and one output (caption) language.
How to enable manual captioning as host
Instead of using Zoom’s native live captioning feature, you can assign a participant to manually type out the captions instead.
First, head to your meeting controls toolbar and click the arrow next to the ‘CC’ button. Head to ‘Host Controls’ > ‘Set Up Manual Captioner’ > ‘Enable Manual Captioner’.
Then, either click on a participant’s name in the participants list and click ‘Assign to Type Closed Caption’ or choose ‘I will type’ to manually caption the meeting yourself.
If you want, you can assign more than one participant to manually type out the closed captions. If you’re using Zoom breakout rooms, this is especially helpful.
Note that if you enable manual captions, then you can’t use automated captions too.
Enabling captions as a participant
If you want to set your Zoom up always to display captions when available, you should head to ‘Settings’ > ‘Accessibility’ > ‘Closed Captioning’. Then click ‘Always show captions’.
On desktop (Windows, macOS, Linux) & browser
When you join a Zoom meeting or webinar, you need to navigate to your meetings control toolbar and click ‘CC’ - the ‘Show Captions’ button. Don’t forget that you can drag your captions around the screen to ensure they’re not blocking anything.
Setting your speaking language
You might also have to set the meeting’s ‘speaking language’. English is always the default setting, but you can manually change this by heading to ‘CC’ (‘Show Captions’) and then clicking the upward pointing arrow to select ‘Speaking Language’. Choose from the list, confirm your selection, and then click save.
It’s important you don’t forget to set your language because if you’re speaking a language other than English, Zoom’s captions might be inaccurate.
Changing the size of your captions
If you want to toggle the display size of your captions, click on the ‘CC’ button again and then the upward-facing arrow. Click on ‘Caption Settings’ and then move the slider next to ‘Font Size’ to adjust your captions accordingly.
On mobile (Android, iOS)
Join a meeting or webinar from the Zoom mobile app. Head to the meetings control toolbar and tap ‘CC’. This will automatically turn captions on.
Setting your speaking language
If you want to set your speaking language, then head to the ‘Meeting Settings’ > ‘Speaking Language’ and then tap your language of choice. When you’ve chosen your language, tap ‘Done’.
How to save closed captions on Zoom
If you want to view your recording’s full transcript, click on the ‘CC’ button, then the upward facing arrow, then ‘Your Caption Settings’ > View Full Transcript.
A window will appear with your full transcript. You can then click the ‘Save Transcript’ button at the bottom of your screen to download a copy.
A more seamless way to caption videos: Riverside
Though Zoom’s captioning features are a great option for ensuring your calls and webinars are accessible, it’s definitely not the smoothest or most accurate tool out there. Plus, Zoom’s low recording quality means that all-in-all, you might be left with a recording that doesn’t live up to expectations.
With Riverside, you’re guaranteed high-quality recordings and transcriptions. Riverside’s AI-powered transcription tool offers highly-accurate transcriptions in over 100 languages.
Riverside uses local recording, so everything records directly on your device instead of the internet. This means you can expect top-quality video and crystal-clear audio without worrying about your internet connection. Higher quality audio also means more accurate transcription.
When you record with Riverside, we automatically generate a transcription straight after recording. You can download transcripts in either .TXT or .SRT format, depending on your needs, though SRT files are best for closed captions.
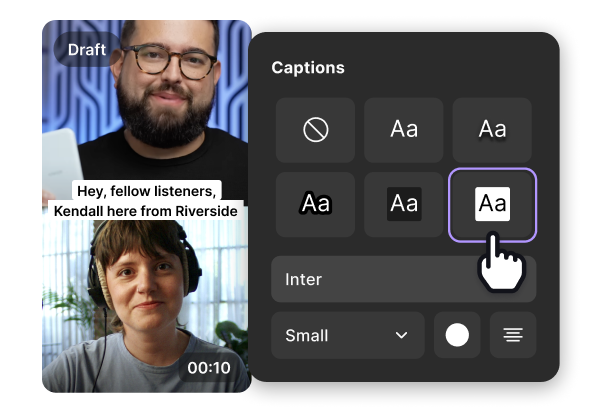
You can also head to the text-based editor, where you can make changes to your video by simply editing your transcript. Here, you can also burn your transcriptions to create open captions on your video.
“Riverside is far better than Zoom for recording interviews.” - Seth Godin, author, entrepreneur and marketing leader.
Key Features:
Here’s a quick overview of some of Riverside’s main features:
- Local recording which means Riverside records each participant on their own device rather than over the internet. This guarantees high-quality recordings even when your internet’s not playing ball.
- Record with up to 9 remote guests
- Multitrack recording for maximum control during post-production.
- Highly-accurate AI transcription compatible with over 100 languages
- AI text-based editor which makes editing your videos as easy as reading a doc
- Easy to export SRT transcripts for subtitles or captions and TXT transcripts for quick content repurposing.
- Captions feature, where you can add and style captions directly on your video.
- Progressive upload to minimize the amount of time you have to wait for your recordings to process
- Magic Clips tool which uses AI to repurpose key moments in your recording into short-form video clips for ideal for social media.

FAQs on Zoom Closed Captioning?
How do I get free closed captioning on Zoom?
Live closed captions are free on all Zoom accounts, even if you’re on a free plan. You may have to head into your settings and enable them.
How much does closed captioning cost on Zoom?
Auto-generated captions on Zoom are available to all users, so you don’t need to pay for this feature.
Does Zoom closed captioning come in different languages?
Yes, you can enable ‘translated captions’ so that if not all your participants speak the same language, everyone can still understand what’s being said.


.webp)
.webp)