


Table of contents:
Key takeaways:
- Live streaming transmits audio and video in real-time over the internet without needing to store it first.
- The audio and video data is compressed, encoded, and broken up into smaller data packages before it reaches the receiving end.
- On the receiving end, the data decompressed and converted back into audio and video.
- To live stream you need a microphone and camera, plus a hardware encoder or streaming software like Riverside.
Whether you’re a content creator, a large business, or an online gamer, live streaming lets you connect with your audience and expand your reach.
Think about SpaceX’s historic launch of the Crew Dragon spacecraft or the Fortnite World Cup Finals, where millions of viewers are connected simultaneously.
These live streaming events would be so much less powerful in any other form, which is why streaming is here to stay.
In this guide, we’ll cover what live streaming is, why it is so important in digital communication, and how to ensure your audience’s engagement.
Table of contents:
What is live streaming?
Live streaming is a technology that transmits data in real-time over the internet without needing to record and store it first.
Think about the difference between watching a movie and a TV broadcast. The former is recorded and then transmitted to an audience, while the latter occurs in real-time. That’s how live streaming works in a nutshell - the audience sees the video as it is created, with minimal delay.
The first live streams over the web date back to the late 1990s, primarily on RealPlayer, one of the oldest media players from the early internet era. However, due to the technological limitations at the time, such as low video quality, it took another decade before live streaming events began gaining traction.
YouTube launched its first live streaming session in 2008, followed by Twitch in 2011. Since then, live streaming has continuously gained popularity. Today, many live streaming platforms are available, such as YouTube Live, Twitch, Facebook Live, and, of course, Riverside.
How does live streaming work?
At a very basic level, a live streaming session starts when data is captured by a video or audio input device, such as a camera and a microphone. This raw digital data is then compressed, encoded, and segmented before it’s sent to a Content Delivery Network (CDN) for distribution.
The CDN will cache each segment of this data and then send them to all users who are watching the stream. Data is segmented to avoid sending it all out at once, preventing bottlenecks and saving bandwidth.
Once the user receives this data, it needs to be decompressed, decoded, and converted back into video and audio information by a dedicated app, such as a video player (usually within the browser).
All this must happen within milliseconds to minimize video and audio latency as much as possible. The goal is for viewers to see and hear what the live streamer is recording with the shortest delay possible, ideally in real-time.

Live streaming terms to know
Still feeling a bit confused? Let’s dig a bit deeper into the terms we just covered in a way that will help clarify what live streaming is and how it works.
Compression
Before data can be sent to a CDN for distribution, its size must be compressed. The more data that’s sent, the longer the delay with the client will be. To minimize this, any redundant information, such as static backgrounds or other non-changing parts of the image, is removed by the compression algorithm, known as codec.
Encoding
Once data is compressed, it must be encoded to a new format before it can be sent to the CDN for delivery. Encoders, which can be hardware or software, act as “middlemen” that convert compressed data into a proper format for streaming.
Once this data reaches its destination, it will be decoded and decompressed by the user’s video player. Encoders use different video codecs for compressing and decompressing audio and video data. The most common of these are:
- H.264
- H.265
- AVC
- HEVC
- VP9
- AV1
- AAC
- MP3
Transcoding
Transcoding means converting an encoded video from one codec to another. This operation can be done to improve compatibility with different devices or apps, enhance the quality of the content, or increase its bit rate.
Content delivery network (CDN)
Users can be thousands of miles away from the location where the creator is streaming their content. A CDN is a network of servers that transport cached data through various exchange points. The purpose of a CDN is to deliver this data to a server positioned as close as possible to the end user, minimizing delay and loading times.
Segmentation and caching
Sending an entire video all at once over the internet wouldn’t be practical or feasible, as it would defeat the purpose of streaming in real time.
Instead, streaming content is split into smaller segments of a few seconds each. These segments can be temporarily stored by the CDN (cached) to ensure the content is received more rapidly by the user. This optimizes bandwidth usage and reduces buffering.
Media Player
Once the encoded data is received by the viewer, it must be decoded and decompressed to be converted back into video and audio format. This operation is performed by a dedicated application known as a media player.
Typically, a media player is embedded in your browser as an extension and is almost always an HTML5 video player. HTML5 replaced Adobe Flash Player in 2020, after its lack of security and compatibility with mobile devices made it obsolete. (HTML5 simply refers to the markup language used to create webpages).
Video streaming protocols
Earlier, we discussed how video must be compressed, encoded, and then decoded and decompressed by the viewer. A video streaming protocol is a set of rules that dictates how this process occurs.
These protocols define the methods for breaking videos into small pieces, reassembling them when they reach the end user, and handling errors. Some of the most common video streaming protocols used today include:
- HLS: This is Apple’s protocol for streaming, but it’s widely used by other devices.
- WebRTC: This open-source protocol facilitates live video sharing between two peers (for example, a video call).
- MPEG-DASH: This is similar to HLS. Both use adaptive bitrates (quality), so your stream continues even when your connection is slow.
- RTMP: A Real Time Messaging Protocol pushes content from an encoder to your streaming platform.
- RTSP: A Real Time Streaming Protocol allows you to control streams from one platform to another. (For example, with playback options.)
- SRT: A Security Reliable Transport is for secure low-latency streaming on a public network (like the Internet.)
Your live stream setup: Equipment and software
One of the best things about live streaming is that you don’t need much equipment to reach your audience. At the most basic level, you only need a good streaming webcam (your iPhone’s one will likely suffice), a stable internet connection, and a microphone.
However, if you want to look a bit more professional during your live stream sessions, here are a few extra things to set up:
Equipment
Streaming webcam or camera
Your laptop or computer’s laptop isn’t usually the best choice for high-quality streams. We’d suggest trying a webcam with at least 1080p resolution.
You can check out our full guide on streaming webcams to find one. Good options include the Razer Kiyo Pro or Logitech c920s Pro HD.
It’s also possible to use a DSLR as a webcam, or even convert your phone as a streaming camera.
You may also need a tripod if your webcam doesn’t attach to your camera.
Note: If you’re using a Logitech with Riverside, please check our guidelines.
Microphone
Your audio quality is key, and that means it’s worth investing in a microphone.
Cardiod microphones are best for recording vocals. These mics capture noise from the front, reducing background noise in your audio.
A typical desk microphone like the Blue Yeti Nano will do, but if you’ve got the budget you could also try the Shure SM7B.
Check out our guide on the best streaming microphones to find the perfect fit.
High-end microphone with a dedicated arm to hold it in place
Hardware Encoder
Encoder software tends to be easier and more budget-friendly. But, hardware encoders offer more reliable higher quality streaming. This is because their sole task is to encode your stream, whereas software uses your computer’s resources to do this.
Some options you can try include the Teradek Vidiu X or the Blackmagic Design ATEM Mini Pro.
We’ve got a full guide on software and hardware live streaming encoders to help you out.
Additional equipment
Beyond these basics, make sure you have a fast internet connection of 1GB or more.
You may want to consider getting:
- A capture card if you’re streaming external inputs.
- A green screen or a visually appealing background for your studio.
- Video lighting to improve the way your video looks. (You may even choose to get aesthetic lighting).
- Mic accessories like a stand or pop filter to make your audio extra smooth.

Software
You can break streaming software into a few categories:
You’ll find software to host and share your streams directly. For example, think of YouTube or Twitch.
Other streaming software acts as an encoder. This software pushes your single stream to various sites for sharing.
Some, like Riverside, also do both.
If you want a reliable solution for streaming with a quick and easy setup, check this out:
With Riverside live streaming, you can expect:
- Easy setup: Riverside simplifies the live streaming process by acting as both recording software and as a software encoder. This way you won’t need a separate encoding device or capture card.
- High-quality recordings: All live stream participants are recorded directly on their devices in up to 4K video resolution and uncompressed 48kHz WAV audio tracks. This ensures freeze-free recordings even with unstable internet connections.
- Multistreaming: You can stream to YouTube, Facebook, Twitter, Twitch, LinkedIn, and any other social media platform, all at the same time.
- Branding: Personalize your recording studio with your logo, color theme, and background.
- Live audience call-ins: Engage your audience with Q&A sessions, AMAs, or community gatherings live during your session.
- Omnichat: Access all chats from various streaming platforms in a single, easily accessible interface within the Riverside platform.
- Seamless interactions: Add sound effects and media clips directly from the studio, and invite a producer to manage behind-the-scenes operations so you can focus on the live content.
- Screen recording: Share and capture your screen, demos, or presentation slides in high-quality.
Check out our full guide on streaming software.

How a live streaming setup works
We’ve got a full guide on how to live stream. If you’re live streaming with a hardware encoder, you’ll need to plug everything in and sort your settings according to the encoder’s instructions.
If you’re streaming with software, then you can check out the steps below. We’ve used Riverside as an example, but most software will likely have similar guidelines to this:
Step 1: Enter an existing studio, or create a new one. (You can learn how here).
.webp)
On the Lobby page, enter your details and click “Join Studio.”
Step 2: Once you’ve created a new studio, you can send an invite link to your guests and audience by clicking on “Guest” and choosing the appropriate type of user you want to invite (audience, guest, or producer).

Step 3: You can now click on “Copy link” or copy and share the link displayed in the middle of the screen. You can also click on “Invite by email” and then follow the same procedure.

Step 4: At the top of the Studio, click “Live Stream off” and then choose the icon of the social you want to stream on under “Stream to social.”
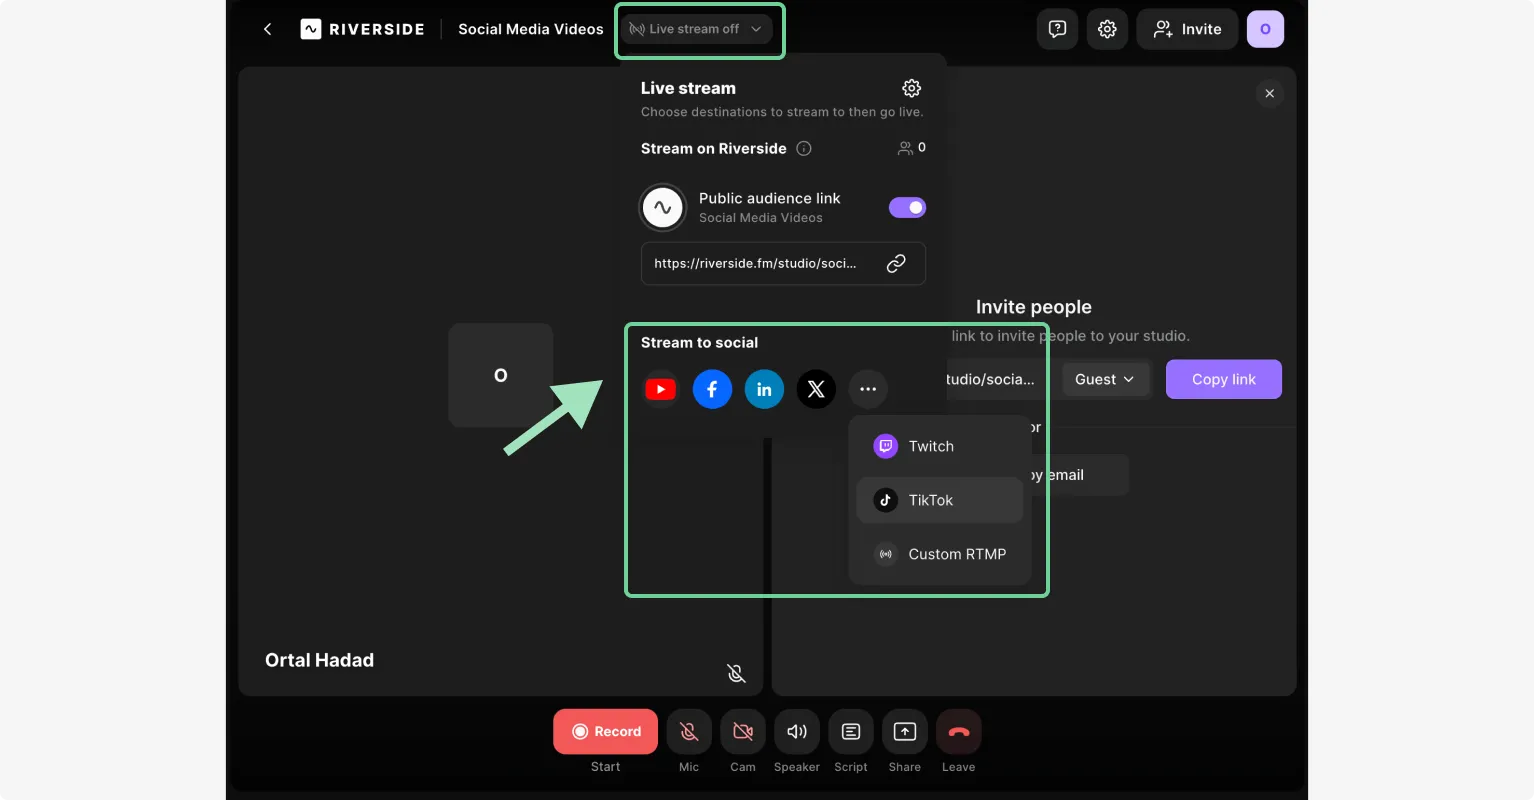
Step 5: Log into your social media account. Give Riverside’s authorization for the social media platform.
All your connected accounts will now show up under “Stream to social.” Make sure that the platforms you want to live stream to are toggled on.
Ways to use live streaming
Live streaming is appreciated for the authenticity and immediacy it creates.
People who choose to tune in during live sessions are highly committed to the creator, making it an excellent way to establish a solid connection with your audience.
Here are a few applications for live streaming:
Entertainment and media production
Undoubtedly, live streaming owes much of its popularity to its use in the entertainment and media industry. When Twitch launched in 2011, it attracted more than 3 million monthly users within its first year.
From video gamers playing live on Twitch to YouTubers hosting live sessions, live streaming has become a premium choice for content creators to connect with their subscribers, engage their communities, and interact with them directly.
Business and marketing
Live streaming is particularly appreciated by businesses for marketing purposes since it’s an effective way to capture data from their user base. It makes customers feel heard and helps organizations gain a deeper understanding of their demographics, needs, and preferences.
From Q&A sessions to understand customer needs, to streaming sessions that “humanize” a brand, live streaming is a perfect tool for both small and large businesses.
Educational initiatives and training
Webinars are the most common form of live streaming used to teach students and provide educational content (lectures, training, conferences, etc.) to specific audiences.
Live streaming has revolutionized remote learning in schools and universities, and has made education much more accessible with one-on-one e-learning courses.
Community engagement and social impact
Digital broadcasting of live events, debates, and social initiatives has helped many nonprofit organizations raise awareness about critical issues.
Live streaming is also the technology behind many other services with a deep social impact. For example, it has enabled telemedicine and mental health services to reach even the most remote or underserved communities.
Tips for live streaming
Even if it isn’t the most complicated thing you can learn, streaming still isn’t as easy as it might look at a glance. However, with proper preparation, patience, and some of our hints, you can easily become a professional streamer in no time.
Here is some advice to take your live streaming sessions to the next level:
Prepare in advance
Always test all your equipment before starting a session!
Ask your guests to log in at least 30 minutes before the session, and run all the necessary tests with them. If there’s an audio or video issue, you want to be sure it’s fixed before you go live.
Engage your audience
Remember: a loyal fanbase is an engaged one.
Be natural and authentic, and don’t forget to connect deeply with your audience through genuine and meaningful interactions. Few things will make your fans dwindle more than plain boredom.
Feel free to check our guide on how to maximize your audience engagement to find some useful tips.
Maximize reach and impact
Try to be active on as many platforms and social media as you can. If your live streaming sessions are run on more than one platform, you’re increasing your reach and chances to be seen by more people.
Whenever possible, test yourself with different audiences (e.g., demographics, interests) to see which one reacts better.
Do some post-stream optimization
After your live streaming session ends, your job is not over!
You can analyze audience engagement metrics to understand what your viewers enjoyed the most and tailor future content to their preferences. Or, you can optimize the content you recorded by highlighting key moments that can be repurposed into short clips for YouTube, Instagram or Tik Tok.
With Riverside Magic Clips, this process can be completely automated, leaving AI with the task of picking out your best moments and editing them for you!
Don’t overlook technical considerations
Run a speed test to ensure your internet connection is fast and stable enough to handle live streaming.
Make sure your speed is at least 5 Mbps for HD quality, and then run a separate test for packet loss (shouldn’t be more than 1%). A software encoder will do for most streaming sessions, but if your processor is already heavily taxed (such as when gaming in HD), a hardware encoder might be the best solution.
Consider any legal implications
Make sure you have the rights to use any music, images, or other content included in your stream. You don’t want your content to face a copyright strike or demonetization!
Also, be aware of platform-specific guidelines, especially when streaming with guests or sharing user-generated content.
Final thoughts
Live streaming is a straightforward, cost-effective, and easy-to-learn way to increase your reach. Whether you’re a content creator, an influencer, a business, or a teacher, streaming allows you to communicate in real time with your audience using your most engaging content.
We hope you’re ready to take the first steps to go live. Once you get the hang of it, streaming will be as easy as talking to your friends online. And Riverside's livestreaming capabilities can make the whole process - from recording through to post-production - easier than ever.
FAQs about live streaming
What are the benefits of live streaming?
Streaming is an extremely efficient way to build authority and credibility with your audience and create meaningful and deep interactions. This will help you understand them better and tailor your content or products to their needs. The main benefits of live streaming include:
- Increased engagement with your audience
- Establishing a direct contact with your customers
- Improved audience analytics and insights
- Easy to set up and run
- Very cost-effective
- Builds trust and authority
- Easily increases your reach across multiple channels
Do you have to pay for live streaming?
Streaming can be free or, at the very least, very cost-effective. You don’t need expensive equipment to start streaming. Especially if you’re beginning, a good webcam and a microphone are all you need. Most streaming platforms like YouTube or Twitch are also free to use.
If you’re looking to make a more professional live stream, you can also access most of Riverside’s features for free.
What is an example of live streaming?
There are many examples to explain what live streaming is. Here are a few:
- A thought leader hosting a webinar on social media
- A researcher presenting a keynote speech
- A video gamer running a live game session on Twitch
- A professor teaching during an online course
- A musician performing a live concert
- A travel blogger exploring exotic markets
- A podcaster recording a live episode with audience interaction
- A chef running a live cooking demonstration
What is the difference between live TV and live streaming?
Live TV is a single broadcast signal sent through traditional television networks and received by many viewers at the same time. It is aired at a set time, and viewers cannot interact with it.
In contrast, live streaming works on a one-on-one basis, with different users receiving individual signals simultaneously by connecting to the host.
Unlike live TV, live streaming allows users to interact with the host, usually through live chat, private messaging, gamification, polls and quizzes, and more.
How can I monetize live streaming?
Live streams can be monetized in many ways. The easiest method is to establish a partnership with the platform, such as YouTube or Twitch, which will provide monetary compensation based on the number of viewers and subscribers to your channel.
You can also increase your revenue by offering premium content through subscriptions or pay-per-view access, accepting donations during live sessions, or securing sponsorships and advertisements. Some content creators also sell their own merchandise or services and use live sessions to boost their sales.


-(1)-(1).webp)
.webp)
-(1).webp)

