.webp)


Table of contents:
Whether you’ve made a video tutorial before or not, it’s very likely you will have watched one yourself. In fact, you may have clicked on dozens of instructional videos to learn all kinds of skills from home improvements to making a CV.
Last year, 52% of people reported watching at least two instructional or information videos every week, and this figure continues to rise with each passing month. If you want to create your own video tutorials, there’s no better time to go for it than now.
So, how do you make video tutorials? What is the best video tutorial software? And how can you edit your video tutorials? Follow this step-by-step guide for answers to these questions and more.
What Is a Video Tutorial?
A video tutorial is an instructional or ‘how to’ video that explains a specific process, like crocheting a hat. Good video tutorials are presented in a clear and encouraging way, with a sequence of steps so that viewers can follow along at home.
Why Would You Make a Video Tutorial?
If you have knowledge about making anything from a website to a pair of earrings, a video tutorial is a fantastic way to share your wisdom with others.
In this digital age it’s clear to see a growing preference for video instructions over written ones. In fact, statistics show that 86% of U.S. viewers often learn new things from YouTube.
A recent study conducted by TechSmith even showed that 83% of people prefer to access instructional content by watching videos rather than via text or audio. So if your goal is to reach people in a popular and accessible way, video tutorials are an excellent choice of content.
Benefits of Video Tutorials
There are 5 key benefits to video tutorials compared to other forms of information, such as written instructions. They are as follows:
1. The personal touch
Video tutorials put a face to the information, encouraging viewers to engage with the process and interact with you by leaving comments.
2. The viewer has more control
They can pause, rewind, speed up and replay any part of the video they like. The ability for viewers to learn at their own pace is a feature which makes video tutorials so popular and clickable.
3. Easier to follow
The combination of visual and audio content makes for the clearest and most comprehensive instructions. This increases the probability that someone would seek out your tutorial instead of reading instructions.
4. Increased accessibility and reach
By uploading tutorials to major platforms such as YouTube, you can make your content available to almost anyone, anywhere. This also makes your content more accessible to visual learners, or those who aren’t first-hand English speakers.
5. Free learning
Video tutorials make self-teaching not only more practical but often free! They encourage the ‘give it a go’ spirit by guiding viewers in an approachable way. This trend of independent learning means your video could receive increased attention and more viewers.
How to Create a Video Tutorial in 10 Steps
Step 1: Brainstorm Your Video
It’s important not to rush into hitting the record button in any video production process. Tutorials require information to be delivered concisely, clearly, and comprehensively. So make sure you set yourself up for success by first deciding on the central topic of your tutorial, and then identifying the common questions and most important steps involved. You can note this information down in a brainstorming diagram like the one below.
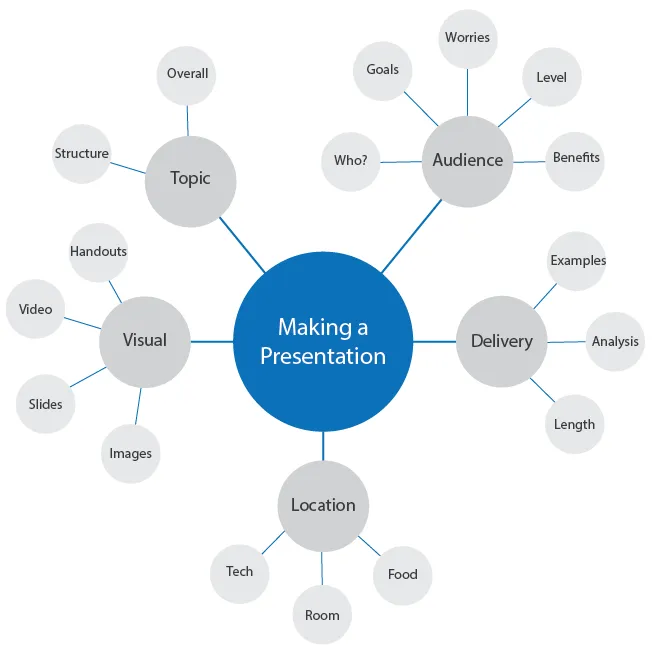
While you brainstorm, it is important that you keep in mind your target audience. The information you choose to include in your video should be tailored to the age, interests, and common concerns of your audience.
Step 2: Create a Storyboard
Now that you know the main elements of what your video will cover, it’s time to arrange them into the format of your video. You should create a sequence of steps involved in your tutorial, so that viewers can move logically from one stage to the next. You can do this by drawing arrows between the ideas on your brainstorm diagram.
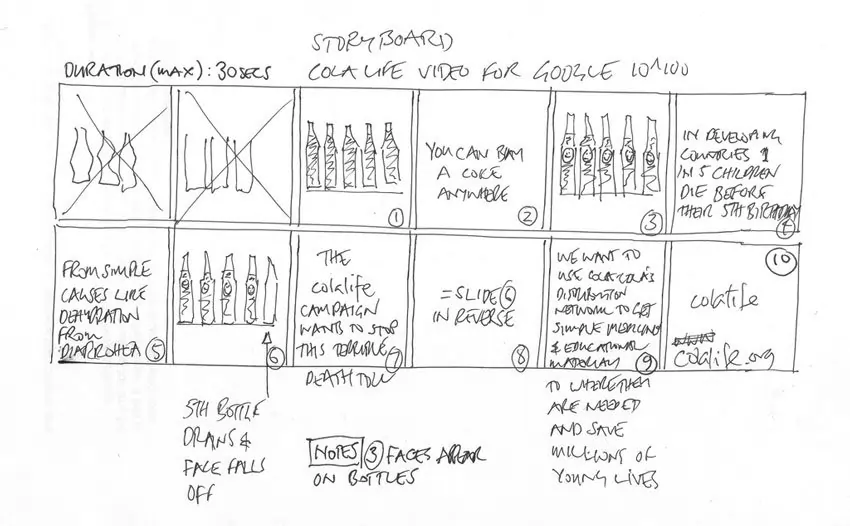
You can also create a visual storyboard, which will map out the sequence of your video. Useful features of storyboards include: a sketch of each scene in the video, numbered to show the sequence of the shots; a short caption with key information such as the subject of the video; a note about how long the scene will be. Some storyboards even include script or dialogue.
By including these elements, your storyboard could look something like this:
Step 3: Write a Script
A good video tutorial script consists of an introduction, instructions, and a conclusion.
Your introduction should be short and attention-grabbing, setting up what the video will be about. In your introduction, it’s a good idea to mention the difficulty level of your tutorial and how long it will take a viewer to complete the steps you show.
Your instructions should cover the chronological stages of the process. Be careful not to skip a step, but try to keep your script as short and simple as possible. While you write your steps make a note of any visual information you want on the screen at the same time, such as video footage of you carrying out this step.
Keep your conclusion to the point, summarizing what the viewer has learned and covering any common questions they might have about your tutorial.
Step 4: Practice Your Script
Now that you’ve got your script ready, you might feel the urge to start shooting your video.
But practicing what you will say on camera is an essential part of making the best video tutorial you can.
Read your script aloud in front of the camera and get used to making eye contact with the lens. Have your arms at your sides and don’t drop your chin while you speak to keep your body language open and friendly.
The more you practice, the better your camera presence and confidence will be. A tutorial should be logical, so make sure you understand what you’re saying and speak in a clear voice.
Step 5: Choose a Recording Location
You should shoot your video in a place that accommodates the subject of your tutorial. For example, if your tutorial is about cars or gardening, portions of your video may need to be outdoors. Remember to shoot these scenes during the morning or afternoon to capture the best light quality.
If you record indoors, make sure your background is plain and not distracting. Keep in mind whether you will need to show something physical to the camera, like a notebook or a painting. Use a table or stand to display these clearly to the camera.
Step 6: Organize Your Recording Equipment and Setup
Although you can use a smartphone to record from, if you have the budget to invest in specialist equipment your footage will thank you for it. The most important equipment you will need to begin recording tutorials is a high quality camera and microphone.
To choose the right equipment, ask yourself these questions: Will you record indoors or outdoors? How noisy is your recording environment? Does your equipment need to be light and easy to move?
There are so many options to choose from that it’s best to be specific about your preferences for recording equipment, and how you plan to use it. For example, you might want the best dynamic microphone for recording voice-overs, or an easy to use tripod so you can set it up on the go.
Film and edit your video using recording software such as Riverside, which provides a streamlined platform for recording, viewing and editing high-quality footage all in one place. With Riverside's text-based video editor you can make precise cuts as quickly and easily as editing a text doc.
Think about the framing of your video. In most tutorials, it’s necessary to leave space on the screen to put written information or pictures. When you set up your camera, you should position yourself off-centre to leave room for these additions.
The type of tutorial you are filming should inform your camera angle. For example, if the focus of your video is on a skill such as handcrafting, you may want to shoot some scenes with your phone or camera using a tripod so that it looks down onto a table. From here, you can get a clear aerial shot of what you are working on.
Step 7: Record Your Video
If you are looking to upload your video to a platform like YouTube, you will need to record your video in landscape mode. Don’t worry about getting your tutorial perfect in one take. You can always reshoot different parts of the video and make changes in post-production.
You might choose to record B-Roll in addition to your main footage. This means shooting additional video content to put between the steps of your instructions or main narrative, such as a shot of you setting up your desk with paints and a canvas to begin painting. These supplementary recordings help to create the kind of tone and atmosphere you want your video to have.
Another thing to think about is Voiceovers. Voice-overs are a common part of tutorial videos, as they include both clear audible instructions alongside video footage of the steps being carried out. You can record your voice-over without a camera as an audio file, and film a separate video to go with it.
Recording your footage in separate audio and video tracks is very useful when it comes to editing and synchronizing your recordings. This will give you more control in cutting out as well as mixing your audio and video content. Stitching together separate tracks smoothly, will give your tutorial a professional and informative edge.
Recording separate tracks is simple with certain video recording software like Riverside. Such software also allows you easy access to all of your recordings in one place.
Step 8: Edit
The purpose of editing your tutorial should be to make your video clear and engaging. Cut out any coughs and sneezes or misspoken lines and streamline the content you have by adding any of the following:
- Written text. This is the most common editing addition you will see in tutorial videos, as by including text on the screen you can emphasize your instructions.
- Number each step in the corner of the screen, so the viewer knows exactly how far along they are.
- Subtitles are not compulsory, but create an effective and accessible way to get your information across. This will also help viewers who aren’t as familiar with English.
- Zoom-in to certain shots where a close-up view is needed.
- Cut any long pauses in your speech.
- You can include music for an enjoyable atmosphere, but make sure that it either stops or is very quiet during your speaking parts so that you can be heard.
- Use a voice-over to give audible information while showing a visual step.
- Sound effects are a great way to get creative with your editing and keep your viewer’s attention. You could have a crowd cheering sound after an important step is completed, or a pen scratching to suggest the viewer should write something down.
- Transition sounds are an engaging way to progress from one scene to another. This gives the watcher an audible notification that you are moving on to the next step.
A good way to check whether your content needs any more editing is to ask a friend or colleague to view your video. If they have time, you could even ask them to follow along with the tutorial. This will make it obvious if there are places where your instructions are confusing, and extra editing is needed.
Step 9: Upload
You will need to choose a site to upload your video to. Of course, the most popular choice is YouTube, the world’s second-largest search engine with the biggest pool of potential viewers to appeal to. But you could also upload your video to major sites such as Vimeo and Facebook Watch to reach multiple streams of viewers.
You will need to make a thumbnail for your video. If you’re not sure what your thumbnail should focus on, go back to your brainstorm chart and remind yourself of the key elements of your video. Include an image of both the finished result of the tutorial and your face, if you are visible in the video, in your thumbnail.
Step 10: Repurpose
Your tutorial’s journey doesn’t have to end yet. Share it across social media by creating short shareable clips of your video and sharing these on sites such as TikTok, Twitter and Instagram. This can be a great way to direct people to your full-length video. The best part is that if you're recording on Riverside, this can be as simple as one extra click. Our Magic Clips tool uses Ai to find key moments in your long form content and repurposes it into multiple short shareable videos.
How To Find the Best Video Tutorial Software?
Searching for the best video tutorial software can feel overwhelming, as there is so much choice out there. A good place to start your search is on a software comparison page, but you should keep in mind the software features that are most important to you.
Software from different companies will have varying pros and cons, such as high resolution and inbuilt editing tools but a costly subscription service. Factors you should look for in good video recording software include: screen recording, guest hosting, HD footage and multi-track recording. These are all features you could use to record a great tutorial.
Riverside.fm: The Best Software for Making a Video Tutorial Remotely
One of the best options for video tutorial software is Riverside. Riverside is designed to be a simple and user-friendly platform encompassing all the tools you need to make a great tutorial.
Complete the full process of video creation, from recording to post production, all in the same place. Conveniently browser-based and available via mobile app, Riverside is ready and waiting for your amazing new content.
Key Features
Riverside sets you up for success with our inbuilt features, including:
- High quality video resolution of up to 4K.
- Text-based video editing so you can create professional content as easily as editing a text document.
- Automatic Ai transcripts in over 100 languages with unmatched accuracy ideal for quick captions and content repurposing
- Screen sharing and recording for including presentations and demos in your video.
- Separate audio and video tracks for every participant which is perfect for voice-overs and gives you more editing control.
- The ability for you to host and record with up to 9 guests in one studio session.
- Create short shareable snippets with Riverside’s Clips tool.
- Our integrated Media Board gives you the freedom to add effects and edit live.

Bonus: 10 Tips for a Successful Video Tutorial
- Present your information in a clear order by numbering each step of your tutorial on screen.
- Use open body language. The more relaxed and assured you are, the more trust the viewer will have in your information.
- Use editing to your advantage. Adding visual and audio effects keeps the viewer’s attention.
- Cover the most common questions people might ask about your tutorial in your conclusion.
- Follow the rule of thirds to frame your video for optimal engagement.
- Record with a high-quality microphone, particularly if you plan to do voice-overs.
- Be aware of background noise, and try to minimize intrusive sounds. If you need to record outside, record video and audio as separate tracks.
- Learn your script well. It’s best not to read off of paper or a screen, so try to memorize your words and look straight at the camera.
- Keep the steps clear and simple. Your video shouldn’t be longer than 20 minutes, so make sure to cover all your points concisely.
- Track viewer engagement using analytics. You can do this from a YouTube account. Monitor which of your videos are more successful, and where viewer engagement fell.
FAQs on Making Video Tutorials
How Long Should a Tutorial Video Be?
According to research, the ideal video tutorial length is between 3-6 minutes, so that your audience doesn’t lose interest. At most, your video should be no longer than 20 minutes.
How Can I Make a Tutorial Video for Free?
Free tutorial recording software is available. You can create a free account with Riverside to record high-quality videos with ease. Our free plan includes unlimited recording and editing, plus separate tracks for the first two hours you record!
To keep costs low, use recording equipment you already have, such as your smartphone. You can get inventive with your background and location by rearranging the furniture and lights you have to make the most of your space.
What is the Best Software for Making Video Tutorials?
Some of the most popular software for tutorial videos includes:
- OBS
- Apowersoft
- Shotcut
- Riverside
- Adobe Premiere Pro, and more..
If you particularly need to make a video remotely, or are just looking for an all-in-one video creation platform, then we’d suggest Riverside. With Riverside, you can tap into a range of benefits including inbuilt editing software, separate track recording, and the ability to remotely host guests. You can get started with Riverside for free straight from a Chrome browser, or download our mobile app to record on the go.
Can I Make Tutorial Videos for YouTube?
Anyone can create instructional content to upload to YouTube. Even without past experience of video recording, you can make great tutorials by following our steps and practicing your recording skills along the way.
How Do I Make a Good Tutorial Video?
Most importantly, be clear and confident in how you present yourself on camera. Make sure your steps are not too complicated, and practice delivering your script. Try to get the best quality video and audio recordings possible by reducing background noise, and investing in a good quality camera or microphone if you have the budget.
How Do I Make a Video Tutorial on My Laptop?
Once you’ve turned your tutorial idea into a script, use video recording software to both record and edit your video. You can open Riverside on your laptop via a Chrome browser.
How Do I Record My Screen for a Tutorial Video?
Some video recording software, such as OBS and Riverside offer the option to turn on screen recording. Select the screen share icon on Riverside and you can choose to share your whole screen, a specific application, and whether you want to record your on-screen audio.


-(1).webp)


