.png)


Table of contents:
A Brief Overview of OBS Studio
Why Bitrate, Resolution, and Frame Rate Are Important
How to Set Resolution, Frame Rate, and Bitrate in OBS
The Best OBS Settings for Recording
How to Record Your Screen with OBS Studio on Mac or Windows 10
How to Screen Record with OBS Studio on iPhone or Android Mobile Devices
How to Record Desktop Video & Audio on OBS on Windows 10
How to Record Audio with OBS on Mac
How to Stream Live with OBS Studio
How to Record a Podcast with OBS
TL;DR
- First, you need to add your microphone, screen, and webcam as input sources.
- In settings, select the exact devices you want to capture and adjust bitrate and resolution as desired.
- Add a new scene and start recording. Stop the recording when you’re done, and it’ll save on your computer.
Open Broadcaster Software (OBS) is a free screen recorder for podcasts, live streaming, and vlogging. Although you can access it for free, many find it intimidating to figure out how to record on OBS.
We’ll show you how to use it, the best OBS recording settings, and whether or not it’s worth upgrading to a premium product instead when you want to record your podcast.
A Brief Overview of OBS Studio
Open Broadcaster Software (OBS) Studio is open-source software that records and streams video and audio on your computer. Compatible with most video and audio sources, OBS easily integrates with popular streaming platforms like YouTube and Twitch, which makes it appealing to podcasters, vloggers, and live-streamers. First-time users often get confused, so we’ll walk you through how to install OBS and get started.
How to Install OBS Studio
OBS Studio works with all of the major operating systems: Windows, Mac, and Linux. To Get OBS for your system, follow the steps below:
Step 1: Visit the OBS Studio website.
Step 2: Select your OS (Windows, macOS, or Linux) to download the installation setup.
Step 3: Open the installer.
Step 4: Complete the installation. You'll have the option to add plugins to your installation. Only add plugins you know you need. You can always install additional plugins later.
Sections of the OBS Screen Recorder
The OBS recorder can be a bit intimidating at first, especially for beginners. If you're not familiar with waveforms or some recording terms, the software's interface might seem confusing.
To begin to understand how to record with OBS, break down the interface into six separate parts for simplicity's sake:
- The Preview Window: Once finished recording, you can see what your recorded video will look like in this section of the screen. Use the preview window to try different settings out to see which works best with the equipment you have for your broadcast or recording.
- The Scenes Section: Scenes will show inputs from different sources, including live stream, an image, or another type of input source.
- Audio and Video Sources: This section shows you any audio or video device used for capturing content. Once you have everything set up, here, you can see your mic, webcam, and other sources.
- Audio Mixer: You can use the audio mixer to adjust the settings for your audio recordings. (We'll explain how to select the best OBS settings for recording audio later on in the OBS tutorial.)
- Scene Transitions: With scene transitions, you can add fun animations that will play while switching between scenes in your recording or stream.
- Controls: Here, you'll find basic operating functions to start or stop recording, select the output mode, and adjust your recording settings.
Setting Up OBS Studio
After you've downloaded OBS Studio and gotten familiar with its interface, you'll want to begin setting everything up. Though adjusting the OBS recording settings can get a bit complicated, this OBS studio tutorial will walk you through making adjustments so you can easily capture quality content for your podcast, vlog, or stream.
The OBS Studio Auto-Configuration Wizard
After installation, you'll have the option to run an auto-configuration wizard that will set the OBS recording settings to defaults based on factors like your system's graphics card.
While we don't recommend using the auto wizard, you can use this option if extremely pressed for time and need to start recording or streaming right away.
You can always go back to adjust any settings to improve the quality of your recording later on.
How to Add a Webcam to OBS Studio
If recording video, the first source you'll want to add is your webcam. To add a webcam to the OBS recorder, follow the below steps:
Step 1: In the Sources section, click the + symbol.
Step 2: Choose Video Capture Device.
Step 3: Give your video input device a nickname so it's easily identifiable and click the OK button.
Step 4: Select your video device from the drop-down menu that appears.
If you're not using a webcam or using more than one input source for your select video capture device, the OBS recorder also supports these other source types:
- Game Capture: Use this source to capture a specific game if you're streaming gaming.
- Browser: Choosing this source will let you live stream or record anything in your browser window through OBS.
- Display Capture: To display everything appearing on your monitor, choose this source.
- Media: This source type is for sharing media files you upload directly to your stream or recording. Support file formats include aac, mp3, wav, mp4, mov, avi, gif, and more.
- Images: Add almost any image format to your video with this input source.
How to Set up Microphones in OBS Studio
Before adjusting the OBS recording settings for the audio, add your microphone as one of your audio input sources. Add a mic using the process below:
Step 1: Under the Controls section, select Settings.
Step 2: Choose the Audio tab from the Settings menu.
Step 3: In this menu, indicate the speakers, headphones, mics, and other audio devices you're using with your system.
Step 4: Select if you want to enable push to talk or push to mute for any of the audio devices you're using to record.
H3: How to Adjust Output Settings in OBS
Changing the bitrate, resolution, and frame rate is necessary for a high-quality finished product. After you've connected your hardware, you should adjust output settings to control the quality of your recording or stream.
Why Bitrate, Resolution, and Frame Rate Are Important
Selecting the right resolution, bitrate, and frame rate for your video output will affect how your audience can experience your content. Choosing to have these things as high as possible might give you great quality. However, your viewers may experience buffering if they don't have a good system or high-speed internet connection. Understand and choose the right frame rate and other settings for the best end result.
How to Set Resolution, Frame Rate, and Bitrate in OBS
You can find a balance between high-quality streaming that’s also accessible. Set the resolution, frame rate, and bitrate recording settings using these steps:
Step 1: Access the settings window from the "Controls" section of the OBS recorder.
Step 2: Select the video tab from the menu on the left of the screen. From here, you can set the frame rate and the base and output resolutions.
Step 3: Click on the Output tab in the menu to the left. Set the video bitrate to the level you want. You can also change the encoder between CPU and GPU by selecting one from the drop-down menu.
The Best OBS Settings for Recording
Experiment with the settings while learning how to record with OBS. Because so much depends on system specs and internet speeds, it's hard to say the best OBS settings for recording. Start with some standard settings when trying to figure out what works best for capturing your content.
The Best Audio Settings for OBS Recording
For audio recording in OBS Studio, pay attention to the sample rate and the channel. You can adjust both using these steps:
Step 1: Access the Settings via the Controls section.
Step 2: From the menu on the left, select the Audio tab.
Step 3: Choose Audio Settings.
Step 4: Locate Sample Rate and Channels in this menu. Sample Rate should be set at the standard rate of 441 kHz and Channels should be Stereo. We recommend keeping these at the standard selections. If you have any doubts about this, check out the recommended audio settings for the streaming service you're using.
Video Settings for the Best OBS Recording
To change the video settings for your OBS recording, use these steps:
Step 1: Access the Settings via the Controls section.
Step 2: From the menu on the left, select the Output tab.
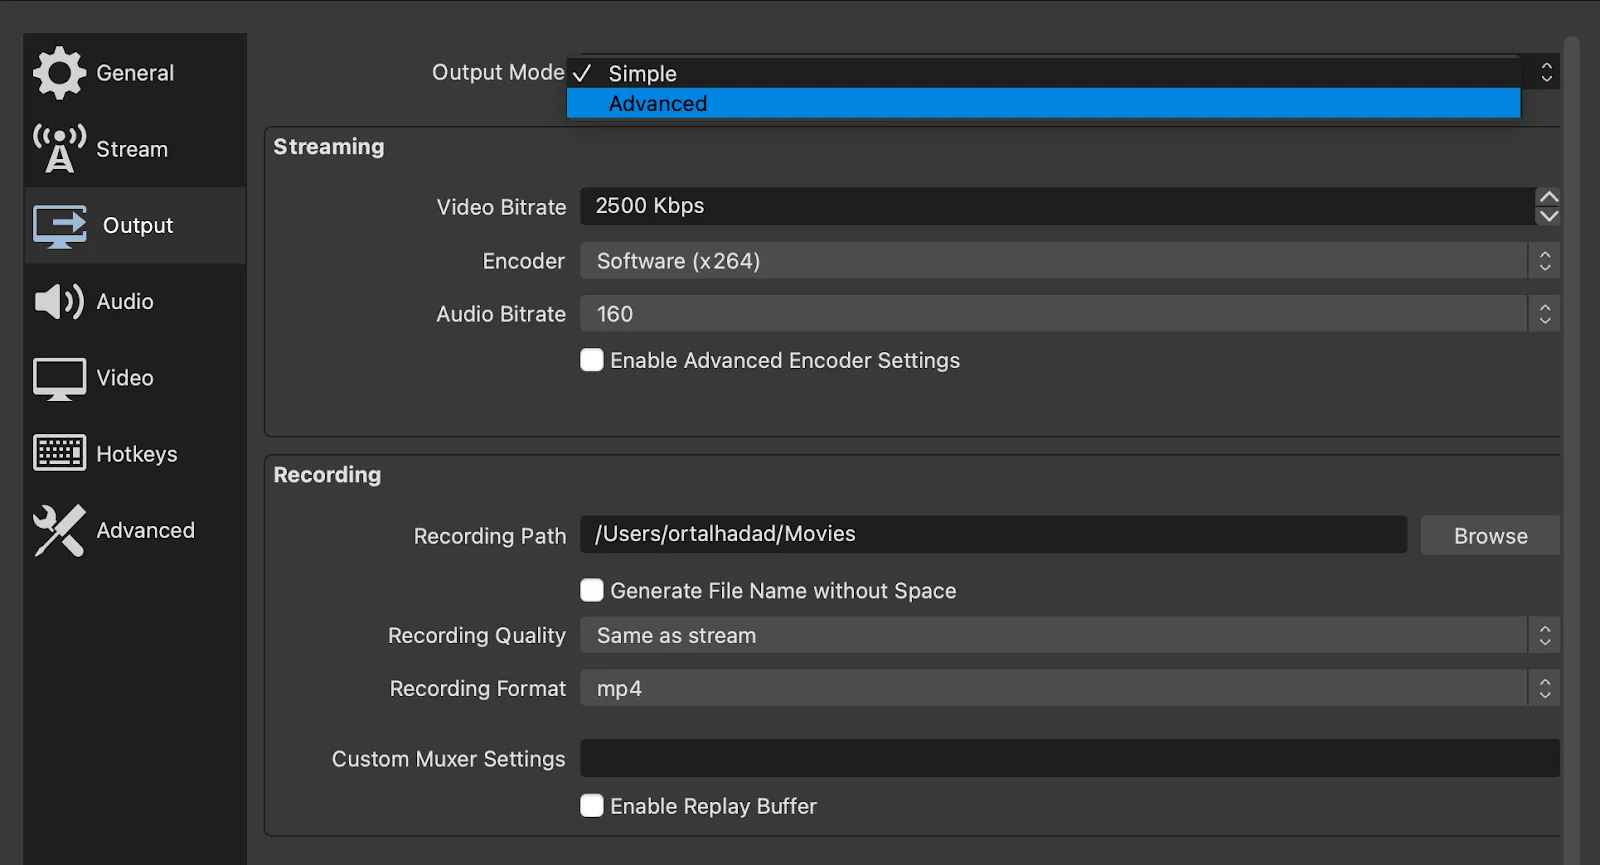
Step 3: Change the Output Mode to Advanced
Step 4: In the Advanced menu, choose the Recording tab.
Step 5: Choose these settings from the dropdowns for the sections on the recording tab:
- Type: Standard
- Recording Path: Select the folder on your computer where you'd like your recording to be saved
- Encoder: NVIDIA NVENC H.264
- Rate Control: CBR
- Bitrate: 16000 Kbps
- Keyframe Interval: 2
- Preset: Max Quality
- Profile: High
- GPU: 0
- Max B-frames: 2
Step 6: From the menu on the left, select the Video tab
Step 7: Choose these settings from the dropdowns for the sections on the Video tab:
- Base (Canvas) Resolution: 1920×1080
- Output (Scaled) Resolution: 1920×1080
- Downscale Filter: Lanczos (Sharpened scaling, 36 samples)
- Common FPS Values: 60
How to Record Your Screen with OBS Studio on Mac or Windows 10
When it comes to recording your screen with OBS there are different options. You can choose to record a specific browser window or, alternatively, you can record your whole entire screen.
To record everything appearing on your screen from corner to corner, complete these steps:
Step 1: Add a new Scene in the Scene section or choose an existing one
Step 2: Click the "+" symbol in the Source section to add a source.
Step 3: Choose Display Capture as the source type and click 'OK' when the pop-up appears.

Step 4: Click 'Start Recording' in the Controls section. Just like that, OBS should start recording your screen.
.webp)
Step 4: When you are done, select 'Stop Recording' and then you can access your recordings in your video or movie folder.
Note: All recordings are saved in your video or movie folder by default, but you can change this: Go to Settings, select the Output tab and adjust the Recording path. Simply, click on 'Browse' and choose where you’d like to save your files.
How to Screen Record with OBS Studio on iPhone or Android Mobile Devices
While OBS Studio doesn’t have a direct mobile app for screen recording, there are ways around this. You can always use your phone’s built-in screen recorder and upload and combine everything after, or alternatively, if you’d like to capture everything at once an option is to get your phone screen to display on your desktop’s screen. One way to do this is through screen mirroring software.
In general, you can follow these steps:
Step 1: Download screen mirroring software on your desktop (and phone if necessary).
Step 2: Connect your phone and desktop together so your phone screen display mirrors on to your desktop’s screen.
Step 3: Open OBS and click the "+" symbol in the Source section to add a source.
Step 4: Select ‘Window Capture’ as your new source and when the pop-up appears choose the window with your mobile screen mirroring. (This will only capture the mobile display).
Step 5: Click ‘Start Recording’ in the Controls section and record on OBS as usual.
You can watch this video from Michael Feyrer Jr. for a visual step-to-step guide on how to record your Android or iPhone screen with OBS.
How to Record Desktop Audio on OBS on Windows 10
OBS generally records audio with video by default, but if you'd like to record your desktop's audio separately you can read over our steps to learn how to adjust your audio.
Step 1: Add a new Scene in the Scene section
Step 2: Click the "+" symbol in the Source section to add a source.
Step 3: Choose 'Audio Output Capture' which will record sound from your desktop. If you'd like to record from your mic as well, add 'Audio Input Capture'.
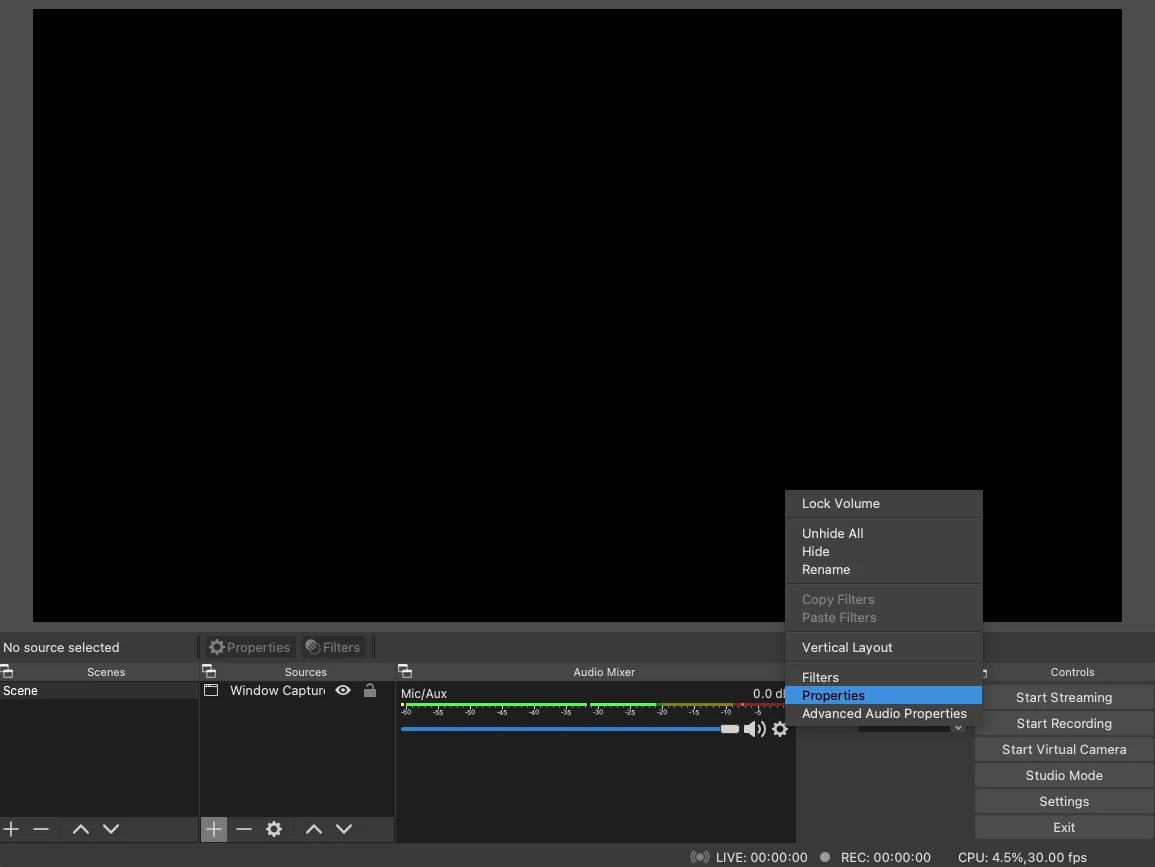
Step 4: Adjust your audio levels in the Audio Mixer box. You can also select 'Properties' to choose a specific input for audio recording. It’s also possible to mute audio using the mixer.
Step 5: Click 'Start Recording' in the Controls section and 'Stop Recording' when you are done.
How to Record Audio with OBS on Mac
Though OBS Studio is compatible with macOS, you'll still have to follow a couple of extra steps if you want to record desktop audio using the software. This is because macOS is not designed with a feature for recording audio internally.
Use these steps to use OSB to record audio with a Mac:
Step 1: Download and install, and configure a third-party tool for recording audio. There are a lot of great third-party programs out there that are free.
Step 2: Click on Settings in the Controls section
Step 3: From the menu on the left, select the Audio tab.
Step 4: Click the dropdown for a Mic/Auxiliary Audio option you aren't using.
Step 5: Add a new Scene in the Scene section
Step 6: Click the "+" symbol in the Source section.
Step 7: Select Audio Input Capture
Step 8: Name your audio source
Step 9: Select the device you installed and configured in step 1.
How to Stream Live with OBS Studio
OBS Studio is used by many live streamers because of its cost (it’s free!) and because of its capability with many different streaming platforms. Use these steps to connect OBS to your platform of choice to start streaming:
Step 1: Access the Settings via the Controls section.
Step 2: Select the Stream tab from the menu on the left.
Step 3: Choose the streaming service you're using from the drop-down menu. Popular platforms including Facebook Live, Twitch, and YouTube can be selected from the list. You can also select a custom service if you know the server information.
Step 4: Enter your Stream Key in the field that asks for it.
How to Record a Podcast with OBS
Want to use OBS for podcasting?
You can definitely use the platform to capture video podcasts, but it might not be your best bet for high-quality content.
For starters, you can’t directly record guests remotely. You’ll have to either:
- Screen capture a call on another remote platform
- Use external software like Ninja OBS for capturing guests on OBS
As for multitrack recordings or separate tracks for each of your guests, this also becomes a bit of a hassle, especially for video. We cover how to do this in more detail later in the article.
So, is OBS Good for Podcasting?
It’s not the most ideal platform for podcasting with remote guests, but it probably can work if you’re recording in one location and don’t need separate tracks. If you’re more audio-focused, then the platform isn’t suited for this either.
We’d say you’re better off using dedicated podcast recording software like Riverside. You’ll get high-end and uncompressed audio files at up to 48kHz and you can record video at up to 4K video resolution. Other features include separate tracks, local recording and you can invite up to 7 guests to join you from anywhere.
How to Record Multiple Tracks on OBS
Recording separate tracks gives you more control in post-production. All this means is that for every recording you have a separate audio file and video file for each person. This is useful in editing because it gives you more freedom with choosing what to display and with what audio. For example, if two people are talking at the same time on a one-track recording, you can’t easily mute one of the voices. On the other hand, if you have separate audio tracks for each person, you can just cut one of them out.
But can you record separate multiple tracks on OBS?
Recording audio separate tracks isn’t too complex, but when it comes to OBS and separate video tracks, this isn’t entirely supported by the platform.
How to Record Separate Audio Tracks
When it comes to separate audio tracks, you can capture up to 6 separate tracks. You may want to capture the audio of a game separately or perhaps you’d like to record a guest from a call separately.
In short, all you need to do is adjust your settings as follows:
Step 1: First go to your OBS Settings, you can find this under your Control tab on the main page.
Step 2: Go to the Output tab and at the top of these settings you’ll see an option for Output Mode. Click on this dropdown and select ‘Advanced’.
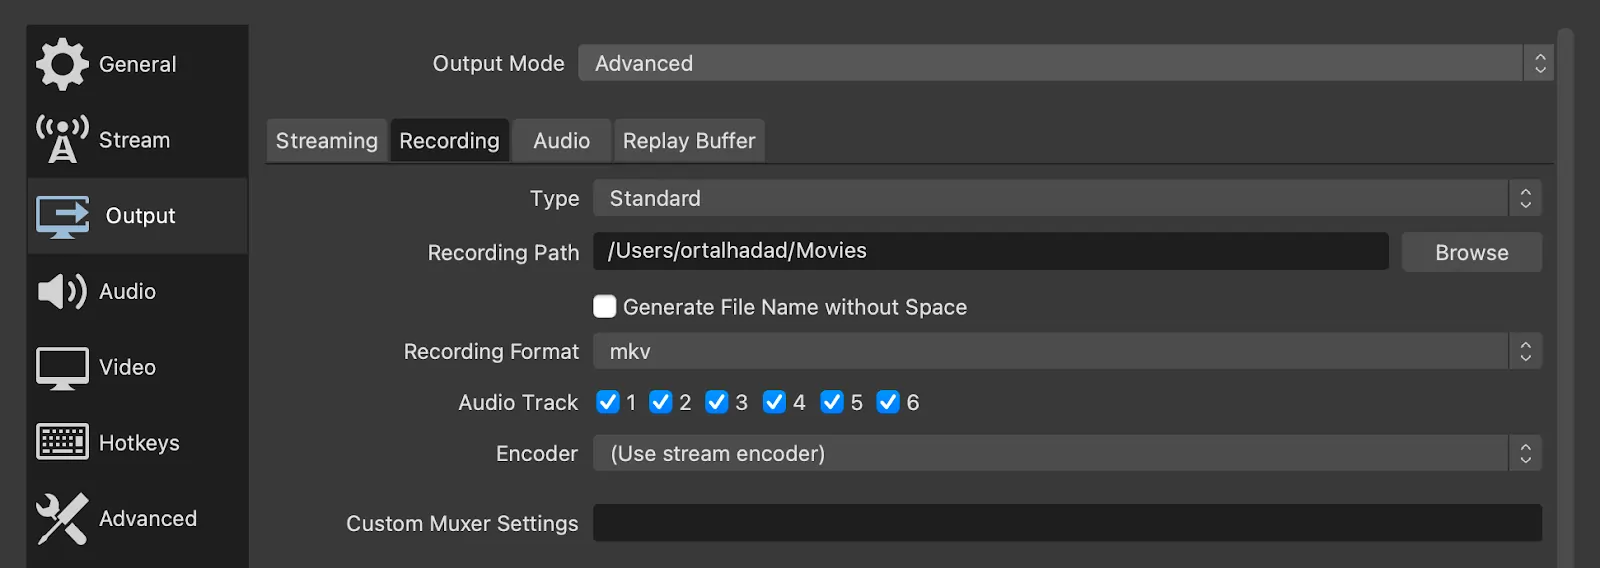
Step 3: Go to the Recording tab and set your format to either MP4 or mkv.
Step 4: Underneath, you’ll see an Audio Track option with 6 checkboxes. Tick boxes based on how many tracks you want to record separately.
Step 5: Go back to the main page and then add in all your audio sources.
Step 6: In the Audio Mixer click on the gear icon next to one of your audio sources and then click on ‘Advanced Audio Properties’.
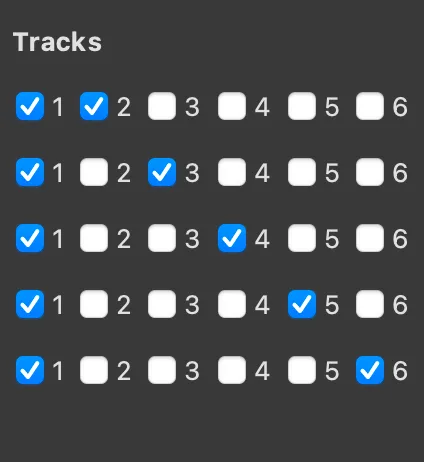
Step 7: Here you will have the option to select which audio corresponds to which separate track. For separate tracks, make sure that the track you select for a specific output is different to what you select for the other audio sources.
You can still choose to record one track with all (or multiple of) your sources and then also record separately simulataneously. All you’d have to do here is tick the same channel for the sources you’d like to record together. Then tick a separate second channel to capture that track alone as well.
Just like that you’ve recorded multiple audio tracks separately on OBS.
How to Record on OBS with Multiple Video Tracks
Can OBS record multiple video tracks? Technically you can, but this isn’t exactly supported by the platform. There’s no specific feature or setting for this, instead you’ll have to use a workaround with obs to record separate video tracks.
Some users have reported using a plug in to do this, but it seems to be intensive on computer resources. Others suggest to simply record on a separate camera or device (such as another computer if possible) and then merge everything later on in editing.
If you’d like to do everything on one computer and device, then you can by simply using two OBS sessions. This is also resource intensive, so it be best to make sure your computer can handle this type of processing first.
All you need to do is the following:
Step 1: Open your first OBS studio session.
Step 2: To make sure your two sessions will sync, go to Settings and then go to the Hotkey tab.
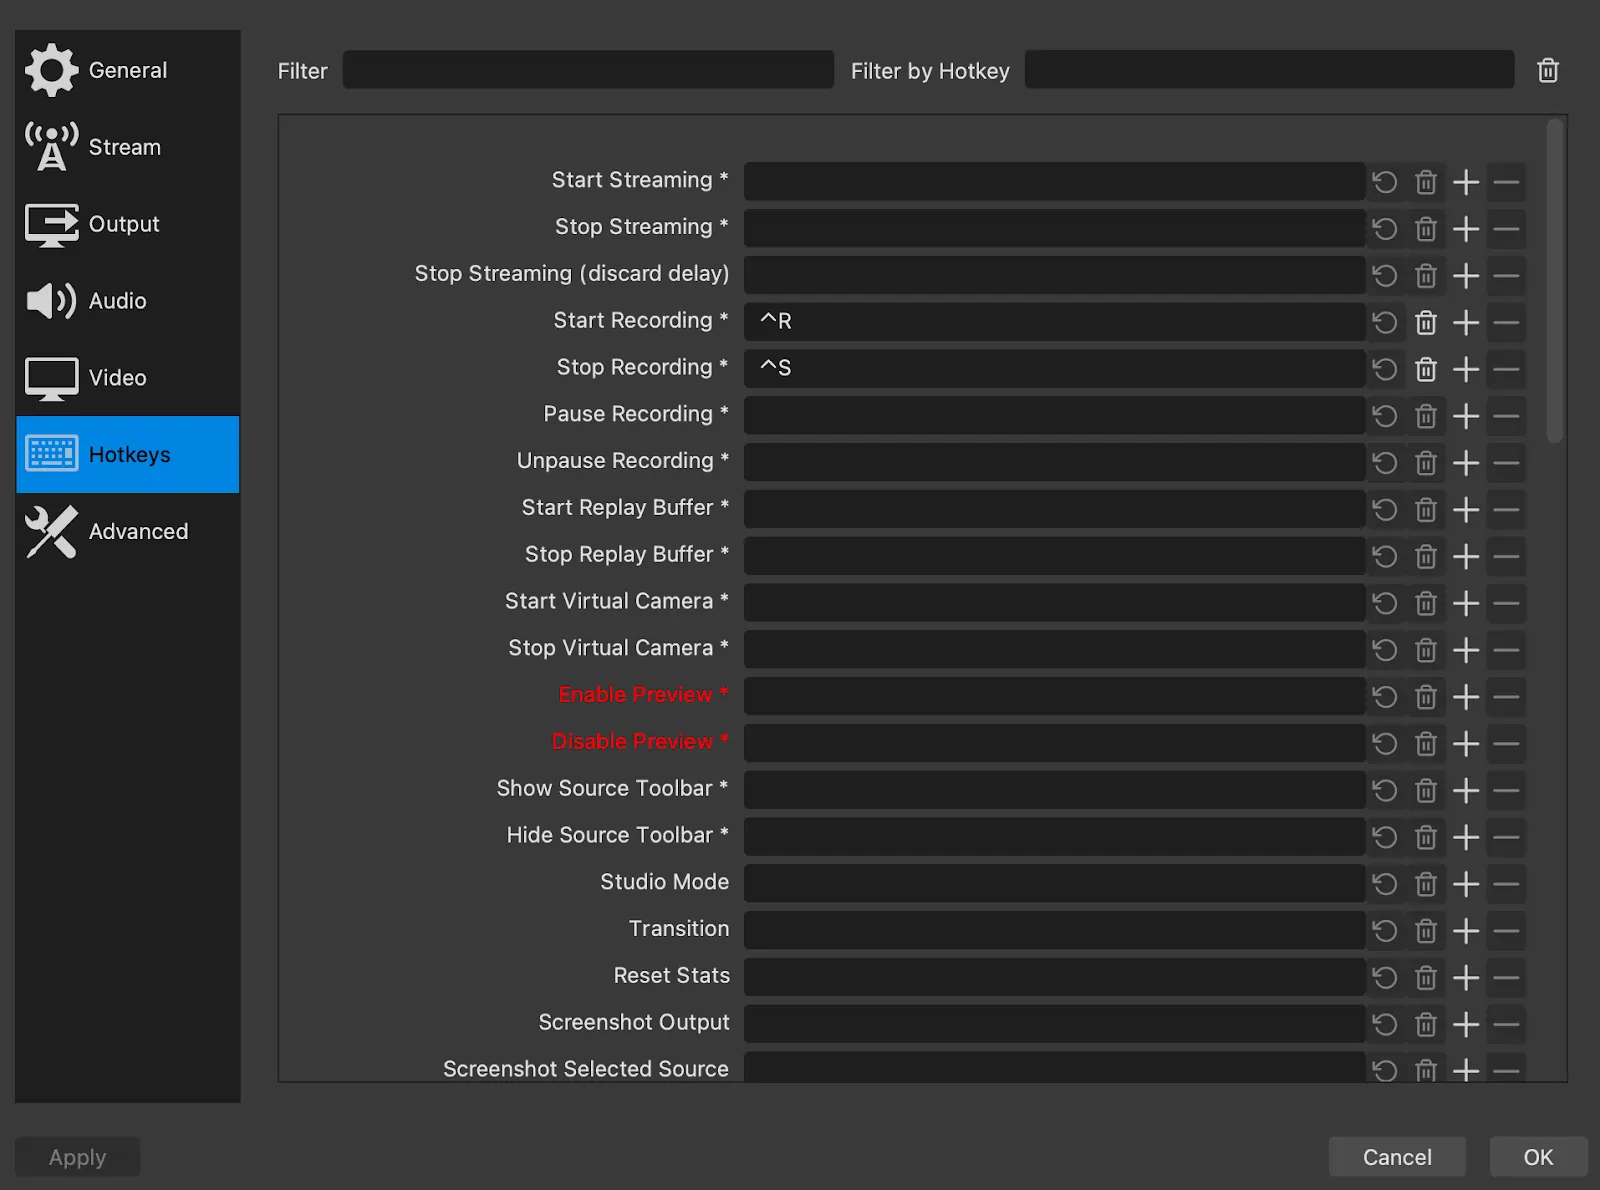
Create your own easy hotkeys. These are shortcuts to initiate an action on OBS. For example, you can make ‘Crtl+R’ the Start Recording command and ‘Crtl+S’ the Stop Recording command.
Step 3: Close this OBS session and then reopen it. Then open your second session.
Step 4: Choose your recording paths for both sessions.
You can do this in Settings. Go to Output and then the Recording tab to find the Recording path. Make sure you give each session different names.
Step 5: Now you’re good to go and you can use your hotkeys to start and stop your recording.
An OBS Studio Alternative: Riverside
OBS Studio is a piece of open-source software that’s maintained and developed using mostly donations. As they say, “you get what you pay for”, and in this case, free loses a lot in quality.
OBS does not have a clean or intuitive interface, which sometimes makes using the program confusing. Sure, you won’t pay anything but OBS lacks streamlined and automated features that other screen recording software provides.
If you want an intuitive and easy-to-use platform, check out Riverside. If you're after quick video and screen recording then you can try our online free screen recorder. But you'll get much more if you sign up for a Riverside plan. You can choose the free plan or pay a low monthly fee but you’ll benefit from better features and usability.
Riverside records desktop video and audio with just a couple of clicks. Instead of having to navigate a bunch of settings menus and make adjustments, you can start recording right away. Plus, advanced controls like Producer Mode give you over your recordings makes it more than worth the cost.
Some key features include:
- High-quality recordings with up to 4K video and 48kHz audio resolution.
- Separate screen, audio, and video track recordings for to give you more editing flexibility.
- Remote recording with up to 8 participants, and 1000 live audience members.
- Local recording so all files are captured directly on your device instead of relying on your internet connection.
- Live streaming to YouTube, Twitch and other online platforms.
- Audience live call-ins for more authentic engagement.
- Media board behind the scenes
- Producer mode to make it easier to control your recordings behind-the-scenes.
- Mobile app for recording on the go, or turning your phone into a secondary webcam.
- Editor for seamless fine-tuning and customizations.
- Clip creator for repurposing your long-form recordings into short-shareable snippets.
Sign up on Riverside for free to start recording and see the difference for yourself.
FAQs on How to Use OBS
How do I add a remote guest to OBS?
There are a few ways you can add a remote guest to OBS. Two ways of accommodating OBS for studio remote guests is through:
Screen capturing another remote recording platform:
Here you would simply use a remote video calling platform like Skype, or Zoom and then screen capture this window through OBS. This probably won’t give you the best quality.
Use OBS Ninja:
OBS Ninja is a popular platform that lets you invite guests and simply add them as separate video sources in OBS using a link. This captures video over the internet though, so depending on your connection you may have lower-quality resolution.
To avoid all the hassle and fuss, you might be better off using specialized software for remote guests. In this case, we suggest checking out Riverside which offers local recording so no internet issues interfere with you and your guests’ video quality.
How to fix pixelated OBS?
Does your OBS recording look pixelated?
There are a few reasons why your OBS streams are pixelated. It could be:
- Wifi or internet issues
- Recording settings
- Too much processing power is being used on your computer
Fixing and OBS pixelated recording is dependent on your issue. If your issue is internet connection, you can try using a wired connection instead of something wireless. As for recording settings, you’ll want to make sure your bitrate is high enough and that your settings match the capabilities of your screen or whatever platform or device you’re recording. As for processing power, you’ll want to make sure you’re using hardware that can handle the tasks at hand.


.webp)


