-in-5-Steps-(1).webp)


Table of contents:
Key takeaways:
- Video podcasts build engagement: Adding video helps audiences connect with you and creates versatile content for platforms like YouTube and Instagram.
- Invest in the right equipment: Use quality microphones, cameras, and lighting to ensure a professional look and sound.
- Editing refines your podcast: Hving the right video and audio editing tools helps you polish your content with ease.
- Riverside is ideal for remote recording: It records locally for top-quality audio and video, offers live streaming, and includes AI tools for quick edits and clips.
Video content is taking over, and podcasts are no exception.
Adding video might feel overwhelming if you’re an audio-only podcaster, but it’s simpler than you think. You don’t have to give up your audio format; adding video can enhance your show and expand your audience.
This post will guide you through the process, covering all the necessary equipment and software and breaking down the steps to create studio-quality video recordings alongside your audio podcast.
What is a video podcast?
A video podcast adds a visual component to the traditional podcast format, typically involving audio episodes available for streaming or download as part of a series. Subscribers receive new installments automatically.
The key benefit of incorporating video is that it helps you build a stronger connection with your audience by letting them see you and your guests. It also creates additional content that can be repurposed for platforms like YouTube, Facebook, Instagram, and Twitter, helping you reach a wider audience.
Different ways to record a video podcast
There’s no one-size-fits-all approach to recording a video podcast. Your chosen format will depend on your style, content, and audience. Whether you’re recording in-person, collaborating remotely, or engaging viewers through live streams, there’s a method that suits your needs. Below are some of the most popular ways to record a video podcast so you can find the best fit for your show.
- In-Person: Record in a podcast studio or other location with chairs, a desk, and cameras. For dynamic setups, use a tripod and handheld mic for public interviews.
- Online with Remote Guests: Record from different locations with co-hosts or guests using online platforms, removing geographical limitations.
- Livestream: Stream live on platforms like YouTube or Twitch to engage with your audience in real time. Then, save the livestreams for on-demand viewing later.
- Solo on YouTube: Address your audience directly by recording a solo video podcast. Use a simple camera setup and upload the video to YouTube.
- Webinar-Style: Webinars allow you to present yourself as an authority. Share your screen or display visuals to explain concepts with tools that support screen recording (like Riverside).
What equipment do you need to record a video podcast?
Having the right equipment ready to go is essential for creating a high-quality video podcast. Even the most compelling content can fall flat if your audience struggles to hear or see it clearly. Investing in the proper tools will ensure your podcast looks and sounds professional, keeping your audience engaged from start to finish.
Microphone
When choosing a microphone, consider your podcast type and recording setup:
- For remote recording:
- Use a USB mic with a cardioid pattern (sensitive to front sound only).
- Options: Rode NT-USB, Blue Yeti, or Audio-Technica ATR2100x-USB (includes XLR compatibility for future upgrades).
- For in-person, multi-person setups:
- Use XLR microphones paired with a USB audio interface or mixer.
- Recommended mics: Behringer Ultravoice Xm8500 or Rode Procaster.
- Interfaces/mixers:
- 2 XLR inputs: Focusrite Scarlett 2i2 (2nd Gen).
- 4 XLR inputs: Behringer Xenyx Q1202USB or Tascam US-4×4.
- Note: Mixers don’t allow multi-track output for separate editing—choose a USB interface for this.
- Additional equipment to improve mic performance:
- Mic stand, shock mount, and windscreen/pop filter.
Camera
Decide how to record your video component:
- For remote recording:
- Use your built-in webcam or a high-quality external webcam.
- With local recording software, internet glitches won’t affect video quality.
- For in-person recording:
- Use a camera compatible with a tripod.
- Beginner: Use your smartphone on a tripod or an entry-level camcorder like the Panasonic HC-V770 (Full HD or 4K).
- Semi-professional: Sony FDR-AX53 with 4K, fast autofocus, and Dolby 5.1 Surround Sound microphone for backup audio.
Headphones
Good headphones are essential for monitoring audio quality.
- Why you need them:
- Catch audio issues (muffled sound, background noise) during recording.
- Hear your podcast audio the way your audience will.
- Recommended features:
- Over-the-head style for better noise cancelation and comfort during long sessions.
- Budget option: Audio-Technica ATH-M30X (similar to the higher-end M50X).
- Premium option: Bose QuietComfort 25 with excellent noise-canceling and lightweight design.
Lighting
Lighting dramatically impacts video quality, ensuring consistent results regardless of location or weather.
- Budget-friendly option:
- Use natural light or position a lamp before you (never behind).
- Studio setups:
- 3-point lighting kit: Two softboxes in front, one overhead softbox slightly behind.
- Budget option: CFL lighting kits.
- Advanced/portable options:
- Aputure Amaran HR672 LED kit: High CRI, adjustable brightness, remote-controlled, with rechargeable batteries.
- Aputure AL-F7: Compact, flicker-free portable LED light with adjustable temperature.
Software
When recording and editing your video podcast, the right software is just as important as the right equipment. The best choice depends on your specific needs and how you plan to record.
recording software (audio & video)
You can use simple video recording tools if you’re recording a solo podcast from a home studio. Mac users can rely on GarageBand for basic audio recording, while PC users might prefer Audacity, which is also free. Reaper is a fantastic option for something more advanced with a one-time fee of $60, or you can try Adobe Audition for $20.99/month.
For remote podcasts—whether an interview or a co-hosted show—remote podcast recording software that prioritizes audio and video quality is a must. While Zoom or Skype might be convenient, their reliance on internet stability can lead to pixelated video and choppy audio.
Instead, consider Riverside.fm, a platform designed specifically for podcasters. Riverside records audio and video locally, ensuring high-quality output regardless of connection issues. It also simplifies guest participation with a shareable link and lets you live stream to social media platforms.

Video editing software
Once you’ve recorded your podcast, you’ll need video editing software to polish the final product. For basic editing—like syncing audio with visuals, cutting out pauses, or adding transitions—free options like iMovie (Mac) or DaVinci Resolve (Mac and PC) work perfectly.
If you’re ready to invest in more advanced tools, consider Final Cut Pro for Mac users or Adobe Premiere Pro, which is compatible with Mac and Windows. These tools offer more features for high-production-value projects.
Riverside is another great option, especially since its a recording solution as well. This enables you to use one tool to recording and edit your podcasts.
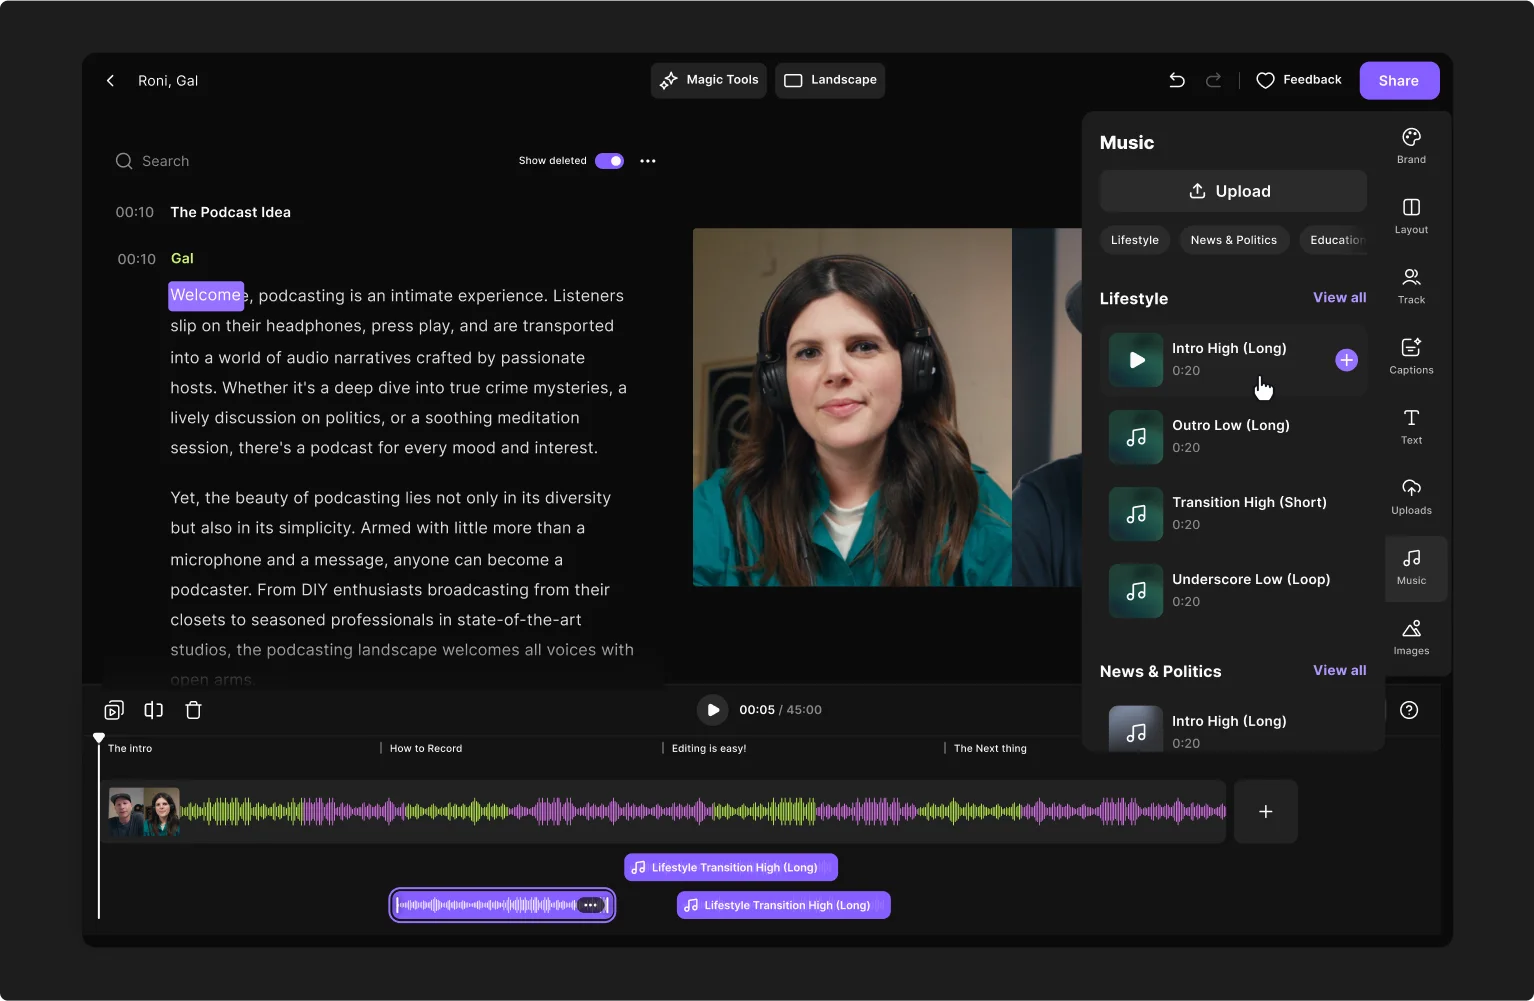
Video editing is simple and efficient with Riverside's intuitive text-based editor. Using AI-generated transcriptions, you can edit your video as easily as editing a text document—just highlight and delete words or phrases, and the video is automatically updated.
Additionally, Riverside allows you to customize your video with logos, captions, and branding, making your podcast visually appealing and professional. Its Magic Clips feature uses AI to quickly create shareable highlights from your recordings, saving you time while producing high-quality promotional content for social media.
Audio editing software
Audio quality is critical for any podcast. If you’ve recorded your audio elsewhere, like on Riverside.fm, tools like GarageBand or Audacity are perfect for basic editing. They’re easy to use and allow you to clean up your audio before publishing your episode.
Ultimately, your choice of software will depend on your budget, workflow, and the complexity of your podcast. Whether you stick with free tools or go for premium options, ensure your software supports your creative vision and makes your process as smooth as possible.
Riverside can edit your audio as well. It also offers built-in audio editing tools, including background noise removal and automatic level adjustment, so your recordings sound polished without requiring extra software. With separate audio tracks for each participant, you gain full control in post-production, enabling you to adjust individual levels or fix issues with ease.
Read More: Complete Guide on Best Podcasting Equipment for 2025
How to record and create a video podcast in 5 steps
Creating a video podcast might seem daunting, but breaking it into simple steps makes it much more manageable. Here’s everything you need to know to set up, record, and publish your show.
1. Set up your studio
Your studio setup plays a key role in the quality of your video podcast. Here’s what you need to set up first:
Cameras
Decide if you want a single wide-angle shot or multiple cameras for dynamic angles.
Charge batteries (plus spares), format SD cards, and ensure you have enough storage for the entire episode.
Mount your cameras on tripods, test framing, and adjust angles with someone in the shot.
For remote recording, clean your webcam lens to ensure a clear video.
Lighting
Maximize front lighting and minimize any light behind you. Close curtains to avoid inconsistent outdoor lighting.
For a 3-point lighting setup:
- Key light: Brightest light at the 4 o’clock position.
- Fill light: Half-intensity light at 8 o’clock to reduce shadows.
- Backlight: Positioned slightly above and behind the subject to add depth.
Read More: A Complete Guide For How to Create Professional Video Lighting
Microphones and Mixers
Place your mixer or audio interface within reach.
Connect microphones, headphones, and power, then plug it into your computer via USB or FireWire.
Test audio levels, adjust gain, and select the correct input for remote setups.
Set Decoration
To create a visually engaging background, you can add branding, such as a neon sign with your podcast name or fan artwork.
Use props or decor that match your theme (e.g., plants, posters, or tools related to your podcast topic).
Think visually: if someone watched your podcast on mute, could they guess what it’s about?
2. Record your podcast
Recording your video podcast is where all your preparation comes together.
Whether you record in person or remotely, following the proper steps ensures that your audio and video are clear, professional, and ready for editing.
In-Person Recording
Once everything is set up, open your recording software and confirm that the correct mic input is selected. Then, record a short test clip to check the audio, video, and lighting.
Once you’re confident everything is working, hit record on your camera, then your mic, and start your show!
Remote Recording
For remote podcasts, use software like Riverside.fm, which ensures high-quality audio and video even with internet issues.
Steps for recording remotely:
- Log into your Riverside account and create a new recording.
- Invite guests by sending them a link (up to 10 participants).
- Test everyone’s mic and camera settings, ensuring they switch to external devices if needed.
- Double-check video quality and frame rate (up to 4K).
- Start recording.
If you prefer recording on mobile, Riverside’s iOS/Android app offers professional-quality audio and video, regardless of your internet connection.

3. Edit your video recordings
Editing is your chance to refine your podcast and give it a professional finish.
- Beginner-Friendly Options:
- If you used Riverside to record your podacst, take advantage of its text-based editor. With AI transcriptions, you can easily trim mistakes by editing text, removing background noise, and adding custom branding or logos.
- Use Magic Clips to generate short, shareable highlights for social media in just one click.
- Advanced Editing:
- Use video editing software like Adobe Premiere Pro, Final Cut Pro, or DaVinci Resolve for more control.
- Work with separate audio and video tracks for precise edits, normalize audio, remove background noise, and trim unnecessary content.
Remember to ensure your recording files are in a compatible format with your video editing software before starting the process.
Read More: 11-Step Podcast Editing Tutorial
4. Publish your video podcast
Your podcast is all good to go and now all you have to do is publish it onto the right directories and platforms. In order to do this you’ll have to first upload your video to a podcast host. We have a full guide to help you choose the right podcast host for your needs.
Through your podcast host, you can select which podcast directories to push your video to. We recommend including one of the most popular directories, Spotify, which recently enabled video podcasts through Anchor and Riverside’s partnership.
Some hosts also let you use your podcast’s RSS feed to push it to any website you’d like. (Creating a website for your podcast is actually a good way of promoting it.)
Another option is to create a YouTube channel for your podcast and upload your podcast there. The benefit to this is that it reaches a larger audience, especially considering there are over 2 billion users on YouTube.
5. Promote your video podcast
Publishing your podcast is just the first step—now you need to promote it.
Create short promotional clips to share on social media. Riverside’s Magic Clips tool makes it easy to generate these quickly and easily. These clips act as teasers, encouraging viewers to watch the full episode.
Use email campaigns, giveaways, or even paid ads to reach a broader audience.
Engage with your listeners on social platforms to create a loyal community around your podcast. Check out our full guide to podcast marketing to create the perfect strategy for your video podcast.
Read More: A Complete Guide to Podcast Promotion
Expert tips for recording successful podcasts
Creating a successful podcast goes beyond just hitting record. Every detail matters.
These expert tips will help you deliver polished, professional episodes that resonate with your audience.
Prepare/research beforehand
Before you start your show, have a rough outline of how you’d like it to go. Ahead of interview podcasts, prepare a flattering intro for your guest and brush up on who they are so that you can ask targeted and insightful questions.
If your show dives deep into certain topics, research them beforehand so that you can have a meaningful, unique conversation that engages your audience beyond the surface level.
"I always map out an outline covering the key topics, talking points, and stories I want to hit during each episode. This acts as a guide to keep me on track while still allowing for natural conversation flow,” said Noel Griffith, CMO of SupplyGem.
“For example, one episode I was really proud of focused on tips for productive remote work. Before recording, I outlined four main sections: establishing a dedicated workspace, technology tools, scheduling tactics, and work-life balance strategies. Having that framework made the episode ultra-focused and ensured I comprehensively covered the topic from multiple angles. Preparation is the key to a polished, high-quality final video podcast.”
Get your guests comfortable
If you have a guest on your show, especially if they are a stranger to you, consider meeting - virtually or in the flesh - to put them at ease. Get to know them, and give them the low down on what to expect from the show. The more comfortable they are, the more they will open up in conversation.
“If you’re interviewing someone remotely, give them a heads-up about camera angles, microphone setup, and lighting. A little preparation can go a long way in making them feel comfortable and ensuring the recording goes smoothly. I’ve found that when guests feel prepared, the conversation flows much more naturally,” said Rodger Desai, CEO of Prove.
Allow the show to go where it goes
Although doing preparation and having a guiding structure prevents your show from being messy and hard to follow, don’t be too attached to your preconceived idea of what will happen when you start recording. If you encounter a super interesting but unexpected topic, don’t be afraid to explore it. Your audience can tell if you’re trying to force the conversation to go a certain way, and it will sound contrived and off-putting. Likewise, if you are interviewing a guest, be open enough to pick up on small details in what they’re saying and build on them, even if they weren’t part of your original plan.
"Question quality from the interviewer is also important. Good questions go beyond the surface and generate a conversational flow rather than an interview. I've found that podcast producers who investigate their guests' expertise yet allow for spontaneity get the most helpful ideas," said Jake Ward, founder of Kleo.
FAQs on How to Record a Video Podacast
Is a video podcast still a podcast?
Yes, a video podcast is still a podcast. It follows the traditional podcast format of episodic content but incorporates a visual element alongside the audio, allowing creators to engage audiences through both mediums.
How many cameras do I need to record a video podcast?
You can record a video podcast with just one camera, but using multiple cameras allows you to capture different angles, making the final product more dynamic and visually engaging. A single wide-angle shot works well for solo or simple setups, while multi-camera setups are great for interviews or co-hosted shows.
Is a video podcast a vlog?
No, a video podcast is not the same as a vlog. While both involve video content, a video podcast typically follows a structured, episodic format like a traditional audio podcast, whereas vlogs are more casual, personal, and often centered around the creator's daily life or experiences.
What can I use to record a video podcast?
To begin with, you'll want to use a good recording camera, preferably a DSLR camera. However, a phone camera can do just as well, as some cameras can record up to 4K resolution. Other than that, you can use reliable video-recording software. Of course, we suggest Riverside as it specializes in video podcast recording and offers you all the features you need. It's best to invest in a microphone, but this is no different from recording a regular podcast.
For more info, we've covered everything you need to record a video podcast in the article above.
How long should a video podcast be?
As with audio podcasts, video podcasts can be of varying lengths. Some are only 15 minutes, whereas others are 45 minutes or longer. It depends on the topic you're covering and how much time you need. We suggest choosing a time based on how much interesting information you have. As soon as you think you're starting to go into tangents, it's time to cut down on time.
You may also choose your video podcast length based on how often you're posting. If you're publishing content regularly, it may be better to post shorter videos at around 15 minutes, whereas if you're posting less frequently, it's more viable to post longer video podcasts.
Can I record a video podcast on my phone?
While using a proper camera and microphone might be better, it's not always ideal to carry all this equipment for those recording on the go. The good news is that you can record a video podcast straight from your phone. Some phone cameras are high-quality and record in 4K,, so you don't have to lose out on top video resolution. For recording a podcast on your phone, we recommend you try Riverside's mobile app. iPhone users can host a video recording with up to 10 participants, and their guests can join from any Android or iPhone device.


