.webp)


Table of contents:
Most solo content creators don’t have access to a professional recording studio. But monetizing a YouTube channel, starting a podcast, or growing your following on social media can be difficult without studio-quality video.
Whether you’re a beginner or a seasoned content creator looking to level up, you’ve come to the right place.
In this article, we’ll share actionable tips for producing studio-quality content and converting those grainy videos into crisp, clear productions. We’ll even tell you how to do some of this for free!
Why is it important to make your video high-quality?
In 2022, more than 50 million people worldwide consider themselves content creators. The creator economy, alone, is worth approximately $104 billion.
Want a place at the table and a slice of the pie? To stand out in this competitive market, you’ll need to step up your content creation game.
Don’t get us wrong—we’re not here to discourage you! Quite the opposite; we’re here to show you that your content creation dreams are achievable by helping you take a crucial step: improving the quality of your videos.
How can I make a video better quality?
The easiest way to maximize video quality is to start from the beginning with the right equipment, soundproofing, lighting, and more. In this section, we’ll cover the best tips for recording professional-quality videos at home.
13 Tips for Improving Video Quality
1. Plan ahead!
What’s your goal for the video? It might be:
- Marketing a product
- Driving traffic to your website
- Gaining followers on social media
Your objectives should determine every decision you make, which is why it’s important to keep your goal(s) in mind when reading through the tips in this article.
Similarly, who is your target audience? Which social media platforms do they spend time on? Which topics are they interested in? You’ll want to cater your videos to them.
Lastly, where do you want to film? Your recording location will determine how you implement the tips below.
2. Choose the right camera
For optimal video quality, buy an external camera instead of using your computer’s webcam. Look for a camera that can record in 4K, since 4K videos have four times as many pixels compared to HD videos and can capture sharper images.
If you’re not sure where to start, check out our list of the best cameras for YouTubers.
Keep in mind that you’ll need a lot of computing power to record and edit these videos. One way to capture a high-quality video regardless of your computer is by using an external capture card to distribute the load away from your device.
Wondering how to make a video high-quality on an iPhone? If you have an iPhone 6 or newer, you can record video in 4K! It’s better to buy a dedicated camera, but if you’re on a tight budget, an iPhone will do the trick.
3. Use an optimal frame rate
You’ll usually see frame rate abbreviated as “fps” (frames per second). This refers to how quickly consecutive images (frames) are displayed in your video.
Here’s the classic illustration: imagine flipping through a book with a single image on each page. Each image is slightly different from the last. As you flip through, the images appear to move. The more pages you flip per second, the quicker the images move. Similarly, the higher the frame rate, the smoother and crisper your videos look.
The ideal frame rates for content creators are 24 or 30 fps because they ensure you can stream your content on multiple social media platforms. Some platforms, like Facebook, won’t live stream videos at frame rates higher than 30fps.
4. Use a battery grip
A battery grip attaches to the bottom of your camera and holds an extra battery to help power your camera while you’re recording. This is important if you’ll be recording for hours at a time and don’t want your camera to die during the recording process. Battery grips also make cameras easier to hold!
Tip: Another way to ensure your camera won’t stop recording during your video is to disable sleep mode. This mode is meant to save battery while you aren’t using your camera, but if it kicks in while you’re filming, your camera may turn off, and you may lose your footage.
5. Choose the right mic
In the same way that using an external camera produces higher-quality video than your computer’s webcam, using an external mic produces higher-quality audio than your computer’s microphone.
Here are a couple of terms to know when choosing a mic:
- Condenser mics are more sensitive and have a higher output level, so you won’t have to amplify sound as much in post-production. However, they may pick up undesired ambient noise.
- Dynamic mics pick up less ambient noise and are less expensive than condenser mics, but the audio is less crisp overall.
If you’re recording indoors, you may be able to get away with a condenser mic—and it will give you better audio. Just remember to turn off your heat or A/C and any fans while recording, because while you may not notice them, your mic will.
If you’re recording outdoors, consider a dynamic mic instead. You can get a windscreen to soften wind noise; some mics even come with one.
For more tips on choosing the right microphone for you, see our article on microphones for all budgets.
6. Use mic accessories
Whether you’re recording indoors or outdoors, consider getting a pop filter. These tools attach to your mic and soften “p” sounds as you’re speaking.
If you’re recording with a computer and not using a lapel mic, a mic arm is a nice alternative to holding your mic for hours. These extend out and support your mic while you’re speaking. They are adjustable, enabling you to position your mic in the most convenient location.
Make sure your mic is 2–12 inches from your mouth. Closer is better; just make sure you have that pop filter!
7. Choose a suitable location
Think about what time of day you’ll be recording. When that time comes, sit for 10 minutes in every location you’re considering using for your video and just listen. Which location was the quietest? If you don’t need your video to be set in a certain location, you could choose the quietest spot for filming.
If you’ll be filming indoors, smaller rooms and rooms with soft surfaces will produce less echo and, thus, better sound in recordings. That’s because the farther sound waves travel, the more the sound echoes. The same goes for hard surfaces—they produce more echo. This is why some people record in closets!
8. Soundproof the recording room
If your chosen spot is indoors, consider soundproofing the studio. Even the quietest room will have some noise from traffic, neighbors, or household appliances. And no room is completely covered in soft surfaces.
That’s why many content creators attach sound panels to their walls and ceilings. Generally, the more sound panels, the better—but if you don’t want them everywhere, it’s best to put them directly behind and in front of you.
Tip: If you’re worried about damaging your walls, you can first hang a cardboard panel using command strips or small nails, then attach the sound panel to the cardboard using an adhesive spray. For the best acoustics, make sure the cardboard is tight against the wall.
You can also put up thick curtains, try a soundproof door jam, and use a sound blanket. You may feel silly, but you can drape it around your recording space like a kid building a blanket fort.
Lastly, if you don’t have a small room, you can get an acoustic partition.
9. Use good lighting techniques
For best results, we suggest using the three-point lighting method to create visual depth in your videos. As the name suggests, this method uses three lights:
- Key light: Your primary light
- Fill light: Opposite the key light
- Backlight: Behind the video’s subject
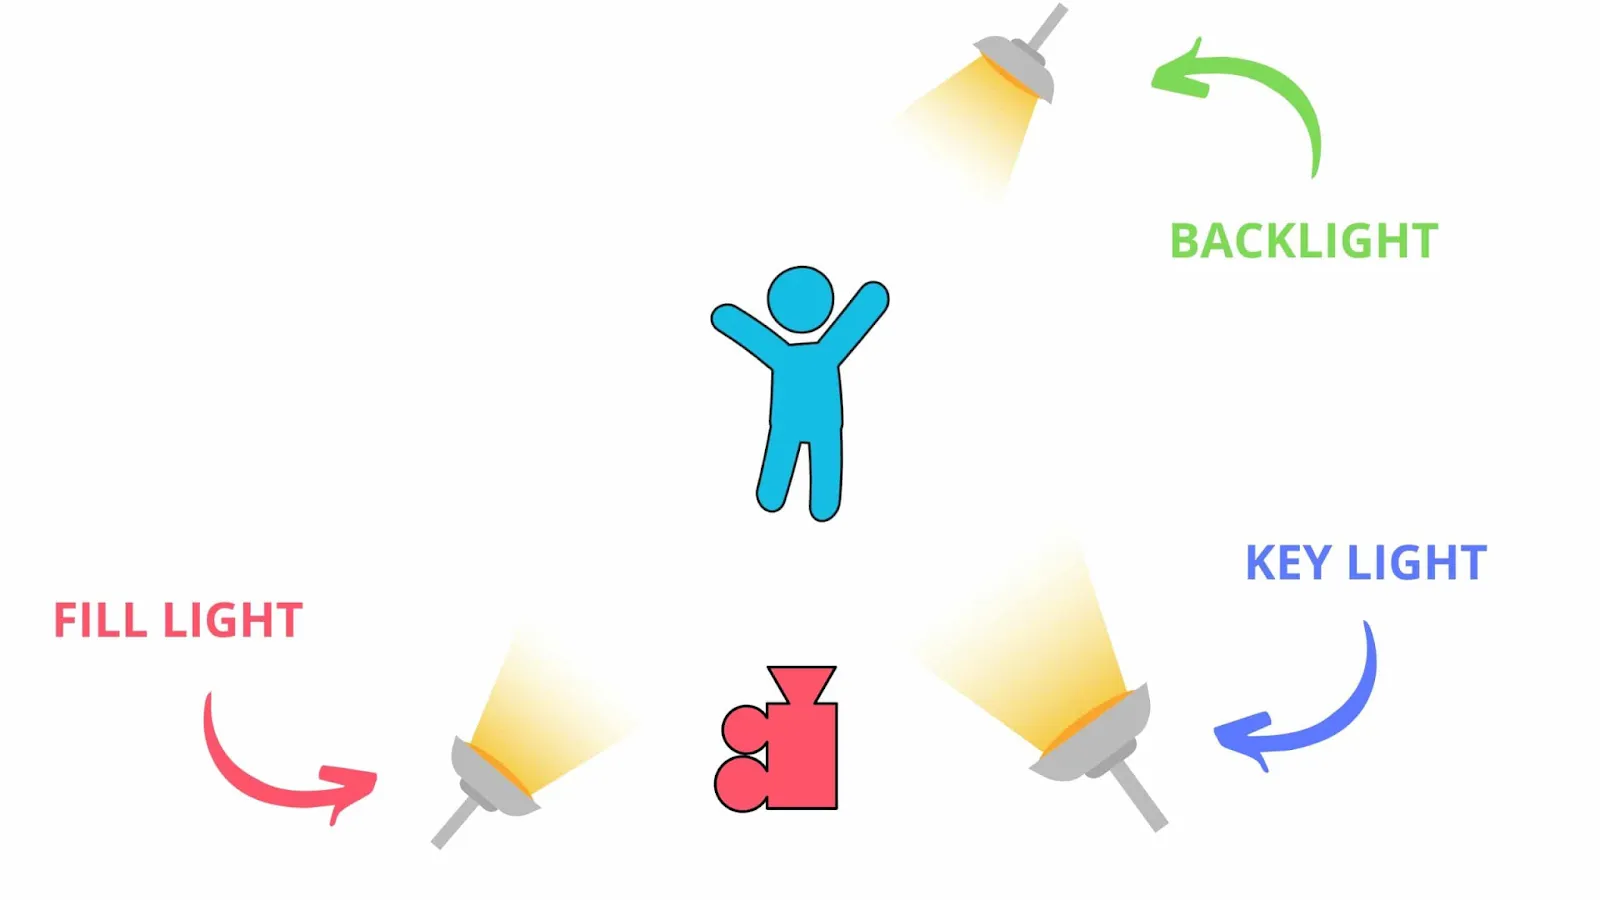
As you can see, all three lights should be oriented at approximately a 45-degree angle from you (or the video’s subject).
The key light is your primary light and should be the brightest of the three. In general, it should be about twice as bright as your fill light. The backlight creates visual depth; just make sure it is also dimmer than the key light so that you don’t look “backlit.”
If you want to soften a light without dimming it, hang semi-sheer material in front of it to diffuse the light.
Also, if you’re outside, you can use the sun as one of your three sources of light! Remember that the light will be most flattering at golden hour (the first hour after sunrise or the last hour before sunset) or on a cloudy day.
10. Use a simple background
Less is more for your video background. Keep it simple by standing in front of a blank, neutral-colored wall or by using a collapsible backdrop. Stand a few feet in front of the wall or backdrop; this keeps you from casting hard, distracting shadows.
If you’re filming outdoors or want a little something in the background, choose a calm, comfortable backdrop that fits the aesthetic of your video without being distracting.
11. Frame yourself
Have you heard of the rule of thirds? It’s the process of overlaying a grid onto an image or video frame to divide it into thirds and putting important image elements where the lines intersect. This technique is more visually appealing than putting elements in the center of the frame.

So whether you want your viewers to focus on you, your dog, or a piece of scenery, place the video’s subject at one of the intersections in this grid for best results.
12. Improve your camera presence
Looking more professional and confident goes a long way in making a high-quality video. Here are some tips:
- Speak conversationally; don’t read your lines.
- Look at the camera! This is a common mistake in online meetings—people look at the speaker rather than at their webcam. To simulate eye contact, look at your webcam.
- Pause briefly between sentences. You’ll thank yourself when you’re editing your video later—this will make it easier to cut pieces out.
- Smile!
13. Choose the right recording software
No matter how many expert video production techniques you use, in the end, your video’s quality is only as good as the software you use to record it. Look for the following features when choosing recording software:
- Recording up to 4K video resolution and 48kHz WAV audio for premium quality
- Both editing and recording capabilities for easy content production
- Local recording (recorded directly to your computer) so you don’t have to rely on your internet connection
- Automatic video transcription for greater accessibility
- User-friendly interface
One great option that checks all of these boxes (and more!) is Riverside. Below, we’ll walk you through the steps to produce a high-quality video using our professional-grade software.
Read more: How to Make a Video: Step-by-Step Guide with Effective Tips
How to make a high-quality video with Riverside
Step 1: Using Chrome as your browser, go to https://riverside.fm and create an account.
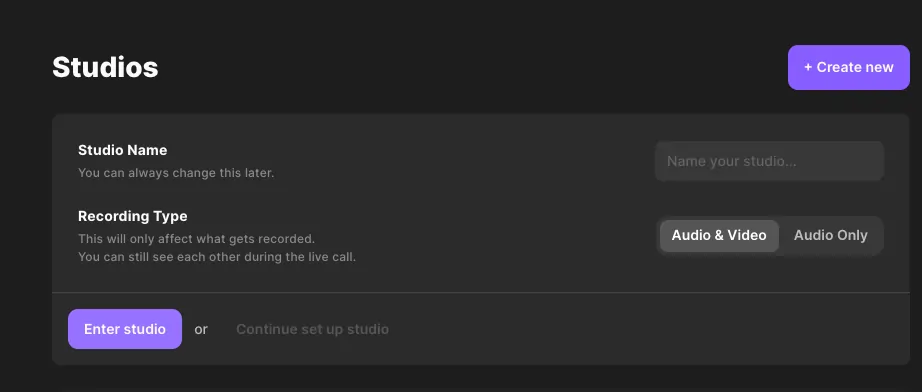
Step 2: At the top of Studios list, click + New Studio. Choose a Studio name, select either Audio & Video or Audio Only, and click Enter Studio to join as a host.
Step 3: Select and test your equipment out in the lobby, then when you are ready press Join Studio.
.webp)
Step 4: In your studio, click Settings in the bottom left corner to choose exactly how you want your video to be recorded.
If you’ll be recording a remote interview or webinar, you can also invite guests to join if you haven’t already.
Step 5: Once you’re ready, click Record at the bottom of the screen and begin recording your video! You can click on Share to share your screen, and Riverside will simultaneously record your screen, video, and audio.
.webp)
Step 6: When you’re finished, click Stop and wait for all your files to upload before you leave the call. You can also select View Recordings to see all of your studio recordings.
Step 7: You’ll be taken to a page containing your recording.
Here you can either download your recordings as separate tracks and use another editing tool to finish the post-production process. But to save you time, you can edit directly on Riverside. Simply, select the recording and click Go to Editor in the box at the top right.
In Riverside’s Text-based audio and video Editor you can:
- Stitch tracks together
- Remove sections as easily as editing a text transcript
- Select an aspect ratio, layout, and speaker view
- Choose one of Riverside’s backgrounds or upload your own
- Add your company logo
- Add and style video captions
Step 8: Click Export in the top right corner, then select your desired video quality (720p, 1080p HD, or 2160p 4K).
And with that, your professional, studio-quality video is ready to share!
In the recordings dashboard, you can also create repurpose one recording into multiple short, shareable clips. Simply click on our Magic Clips button and let Ai do the rest.

Can a poor-quality video be improved after recording?
What happens if you didn’t know how bad your video quality would be until after you’ve already recorded? Luckily, you can increase video quality online using dedicated software called video enhancers.
What is a video enhancer?
Video enhancer software improves the quality of an existing video through a process called upscaling, or increasing the resolution so the video looks crisp, bright, and smooth. Video enhancers can also crop, rotate, add filters, reduce shakiness, and more.
Keep in mind, though, that video enhancers aren’t magic solutions. If you have an extremely poor-quality video, there’s only so much an enhancer tool can do to improve it. That’s why you should use the best practices listed above to record in high quality from the start.
Examples of video enhancers for improving video quality
There are numerous video enhancers on the market today. Below, we’ll tell you a little about three of the most popular tools.
Adobe Premiere Pro
You’ll see Adobe Premiere Pro used by many professional content creators. Like other advanced software, it is a video and audio editor in addition to an enhancer. Premiere Pro lets you adjust the exposure, contrast, and white balance of your videos, make color corrections, and much more. It even has AI technology that can make adjustments for you.
The biggest downside to Premiere Pro is the steep learning curve, even for experienced content creators. But if you have the time, it’s worth it.
Topaz
Compatible with both Mac and Windows, this software uses machine learning to take your videos up to 8k resolution and 120 fps. Key features include deinterlacing, upscaling, and motion interpolation (motion smoothing). Like Premiere Pro, it uses AI technology to improve video quality automatically.
HandBrake
HandBrake is an open-source video transcoder that is completely free. It will crop, resize, upscale, and deinterlace your videos, as well as adjust the volume, add subtitles, and more.
It works with numerous file types and converts your videos into formats compatible with different devices. While it doesn’t have as many advanced features as Topaz or Premiere Pro, if you just need to make a few simple adjustments to your videos, it’s a great place to start.
FAQs on How to Make a Video High Quality
How do I fix poor video quality?
You can improve a poor-quality video using video enhancer software. If you’re willing to pay and you have time to learn to use them, advanced video enhancers like Adobe Premiere Pro or Topaz are the way to go. If you’d prefer a simple, free option, check out HandBrake.
How can I make a video high-quality for free?
If you’ve already recorded your video, a free video enhancer can increase video resolution and let you crop, increase video brightness, and more.
But if you haven’t recorded your video yet, you can make it high-quality by:
- Recording and editing with free high-quality software like Riverside
- Using the three-point lighting system (no need to buy lights; use what you have!)
- Catering to your audience
- Improving your camera presence
- Keeping your background simple
How do you make blurry videos clear?
Upscaling is the process of turning a low-resolution (blurry) video into a high-resolution (clear) video. Video resolution is measured in pixels, and low-resolution videos have fewer pixels—which is what makes them look blurry. Software called video enhancers will upscale your videos for you.
Is there an app to improve video quality?
If you’re looking for a mobile app to improve video quality, a few options are:
Or if you want an app for your computer, you could try:
Can I convert low-quality video to HD?
Yes, you can do this using a video enhancer. All of the options linked above are video enhancers. Keep in mind that you don’t have to stop at HD—some video enhancers can convert your video to 4k, which has four times the resolution (sharpness) of HD, or 8k, which has eight times the resolution!
Whether you’ve recorded yet or not, there are so many ways to turn your videos into professional-quality productions—from home, for free. We hope this article helps you take the first steps.


.webp)
.webp)


