.webp)


Table of contents:
Key takeaways:
- Podcast editing starts with trimming your recording, cutting it into segments, and then creating a seamless narrative.
- Next is sound design, where you’ll add music, your intro and outro, and other sound effects.
- Touch up your audio with filters and effects so it sounds clear. You’ll also want to remove background noise and level out your audio volume.
- If you’re editing a video podcast, end off with captions, layouts, and a custom background.
The Tim Ferriss Show, How I Built This, The Daily—What do all of these podcasts have in common? Quality podcast editing. To take your show to the next level, learn how to edit your podcast professionally. Sound design, mixing, and mastering take time to master. But, it isn’t rocket science. Our full tutorial will guide you through what podcast editing involves and how to do it. You’ll produce a quality show that can stand up next to the pros.
Table of contents:
How to edit a podcast: Podcast post-production process
You can take any podcast to the next level through editing. All you need is the right tools and to know the basics of the post-production process.
We’ve made it simple for you. We’ve divided the editing process into 3 stages. Read on for a full guide on what to do when editing your podcast:
Stage 1: Podcast editing basics
These basics involve slicing your recording and arranging it in a way that creates a compelling story for your listeners.
1. Define the length of your podcast episodes
Before you start making any edits to your recording, you need to have a clear idea of how long your episode is going to be. This will guide you through the editing process and make trimming the fat out of your conversations much easier. Check this useful resource from PRISM Agency on how to plan your podcast episodes.
Podcast episodes can last anywhere from 20 to 60 minutes in length, but if you're just starting out, 20-30 minutes is probably enough. This will give you enough time to convey a full narrative to your audience, and you won't have to worry about losing listeners because of content dragging. You'll also save time in post-production if you're not producing long episodes.
For a more in-depth guide check out our article on how long your podcast should be.
2. Create a compelling story through cuts and sequencing
When you sit down to edit your podcast, keep in mind the story you want to tell. Focus on what tells your story and the rest cut out.
For example, let’s say you interview a professional in the movie industry. You want listeners to learn about what it’s like working in entertainment; celebrities they’ve met, the writing and filming process, how they got to where they are.
You should constantly be asking yourself: "Does this add to the story I'm trying to tell?". Some obvious things to edit out include any chatter before and after your show begins or random tangents, like the weather.
How to cut and trim a podcast: Timeline editing vs text-based editing
Timeline editing:
You’re likely familiar with a traditional video editing timeline. Let’s take Riverside’s for example. Our timeline is color-coded by speakers and includes automatic chapters for easy navigation.

Drag the edges of your recording to lengthen or shorten it.
To cut our a specific section, use the splice tool. Place the playhead or marker in the beginning point you’d like to cut. Then click the splice tool and you’ll create a cut. Repeat the same process for the end point. Then click on the clip on the timeline and click “Delete”.
You can also use the splice tool to create segments you want to move around. Just don’t delete the cuts you’ve made. And, to move them simply drag and drop.
Chances are most editors have similar tools. But, not all editors keep up with technology. If you’re looking for a faster way to cut a podcast then you should try text-based editing.
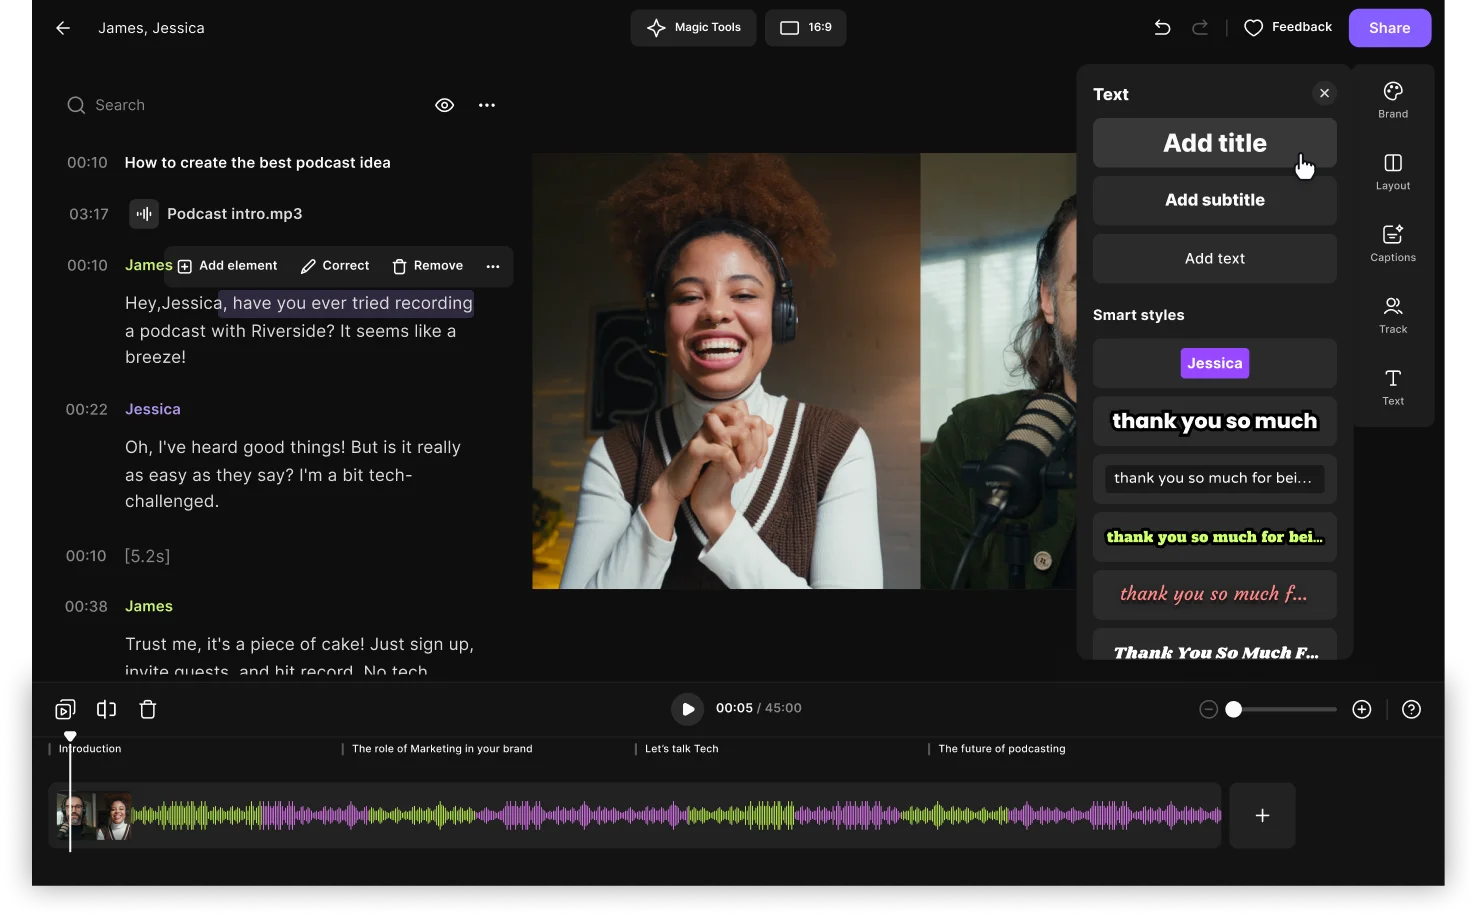
Text-based editing
In Riverside’s video editor, you will see an AI transcription of your recording. Instead of sifting through your recording on the timeline, you can make changes to using this text. Much faster!
Simply delete the text of sections you want to cut out, and the Editor will cut the matching video in the recording.
.webp)
3. Make your podcast flow
When you’re trimming down your podcast, make it focused so it fits your desired length.
Then edit out any remaining “noise” from the good parts of the podcast that you decided to keep. For example, you should cut:
- unnecessary words
- discourse markers (you know, so)
- mistakes or awkward moments (sneezing, loud background noises)
- filled pauses (um, er)
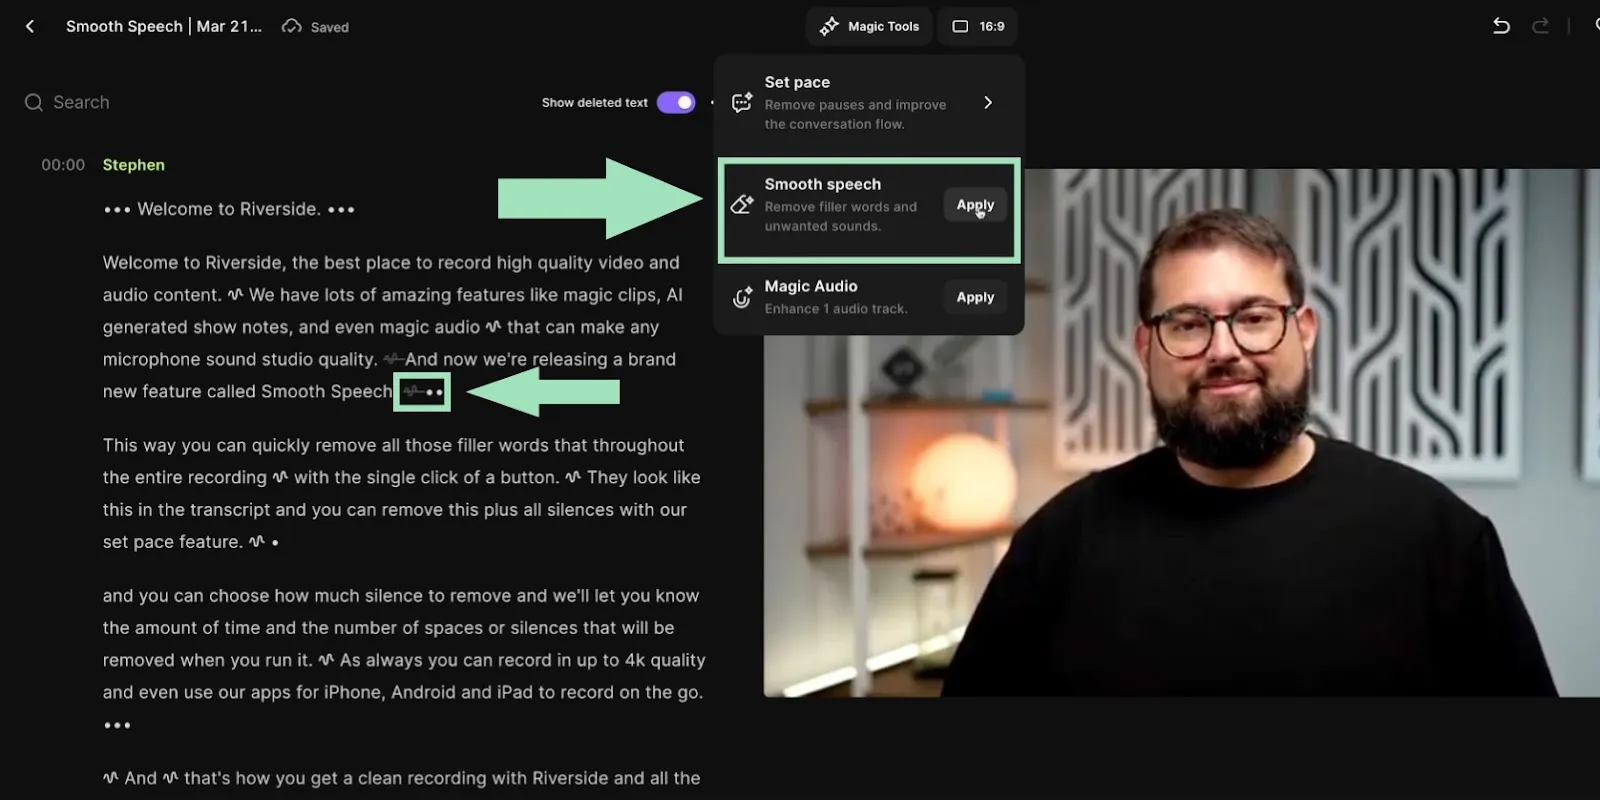
With Riverside’s Smooth Speech feature, you can do that in an instant—all it takes is just one click.
Be careful about clipping words or parts of a conversation you may actually need. Carefully edit to create a story, but keep in mind that the conversations should still have a natural flow to it and not be over-edited.
Stage 2: Sound design
Sound design focuses on using audio elements to elicit emotions and enhance the overall listening experience.
For example, music tracks and sound effects enhance your podcast.
This area of post-production really takes some practice. Part of it involves taste, and another part involves understanding your audience and the content that they want.
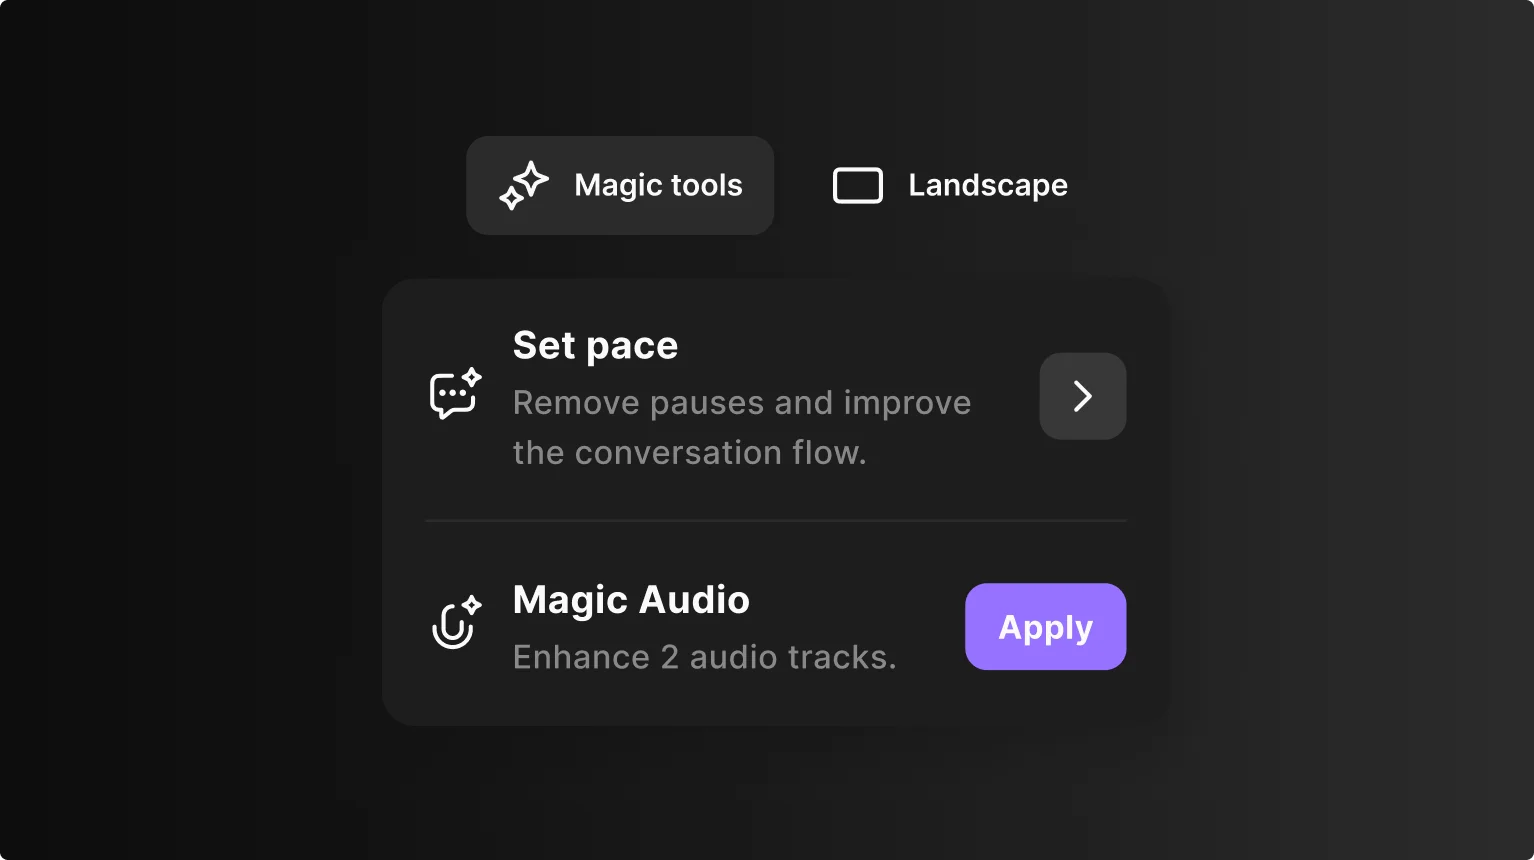
4. Create a memorable Intro and Outro
Stop and think about one of your favorite TV shows. One of the first things that you probably think about is the show's theme song.
You could try a jingle at the beginning of your show or a couple of spoken words over music to sign off. Either way, having a unique podcast intro or outro has a lasting effect on your audience and is great for branding.
For example, check out this intro in the Mel Robbins podcast:
It's quite popular also add your intro just before or after a hook. This can be a tease on what to expect in the episode. You can even find a captivating clip from your actual recording and use it as a preview.
How to add an intro or outro
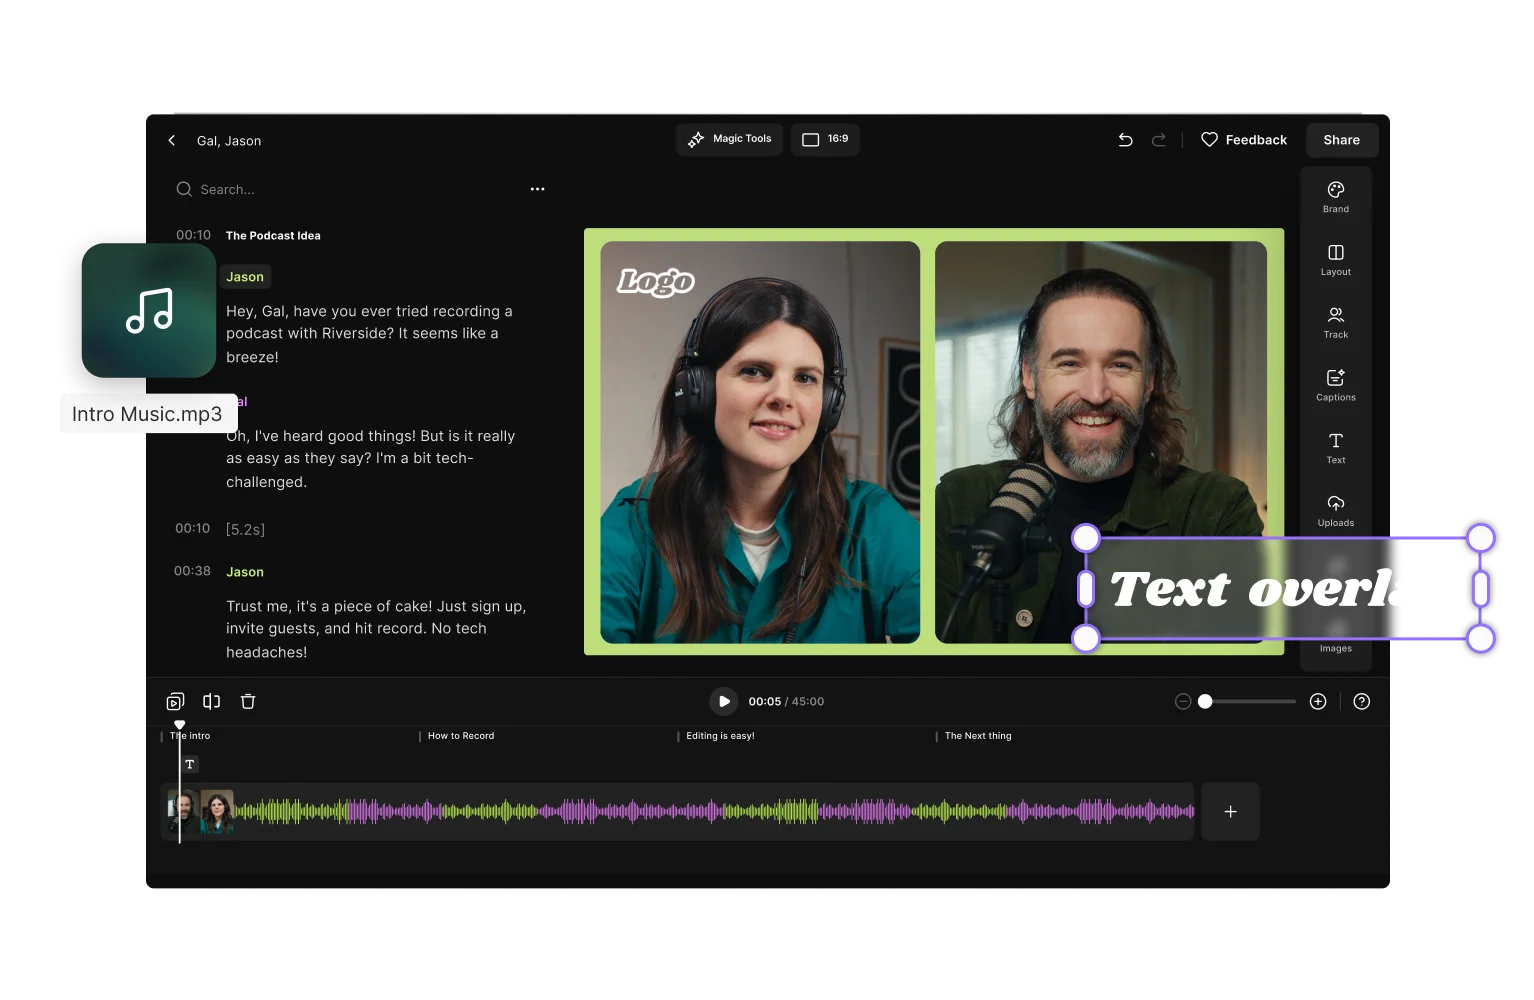
Keeping Riverside as an example editor here’s how to add an intro or outro:
Step 1: From your dashboard, select the audio or video you want to edit and click on it.
Step 2: Click on the “Edit” button to access the editor.

Step 3: To add an intro, click on the “+” icon at the beginning of the timeline. Select “Music”.
Step 4: Either choose one of our pre-recorded clips or click “Upload” to add your own music files. Add a track by clicking on the “+” button next to it.
.webp)
Repeat the same process for an outro, but this time clicking on the “+” button at the end of the timeline.
5. Use music to enhance your podcast story
Think of themes from Jaws or Jurassic Park or a suspenseful track during a horror film. These are great examples of how music conveys powerful emotions.
Placing podcast music strategically in your show will amplify storytelling. It can heighten the mood, add drama, and allow listeners to better connect with your guest and the story you want to tell.
How to add music to your podcast
With some platforms like Riverside, you can add music or sound effects while recording, or after when editing.
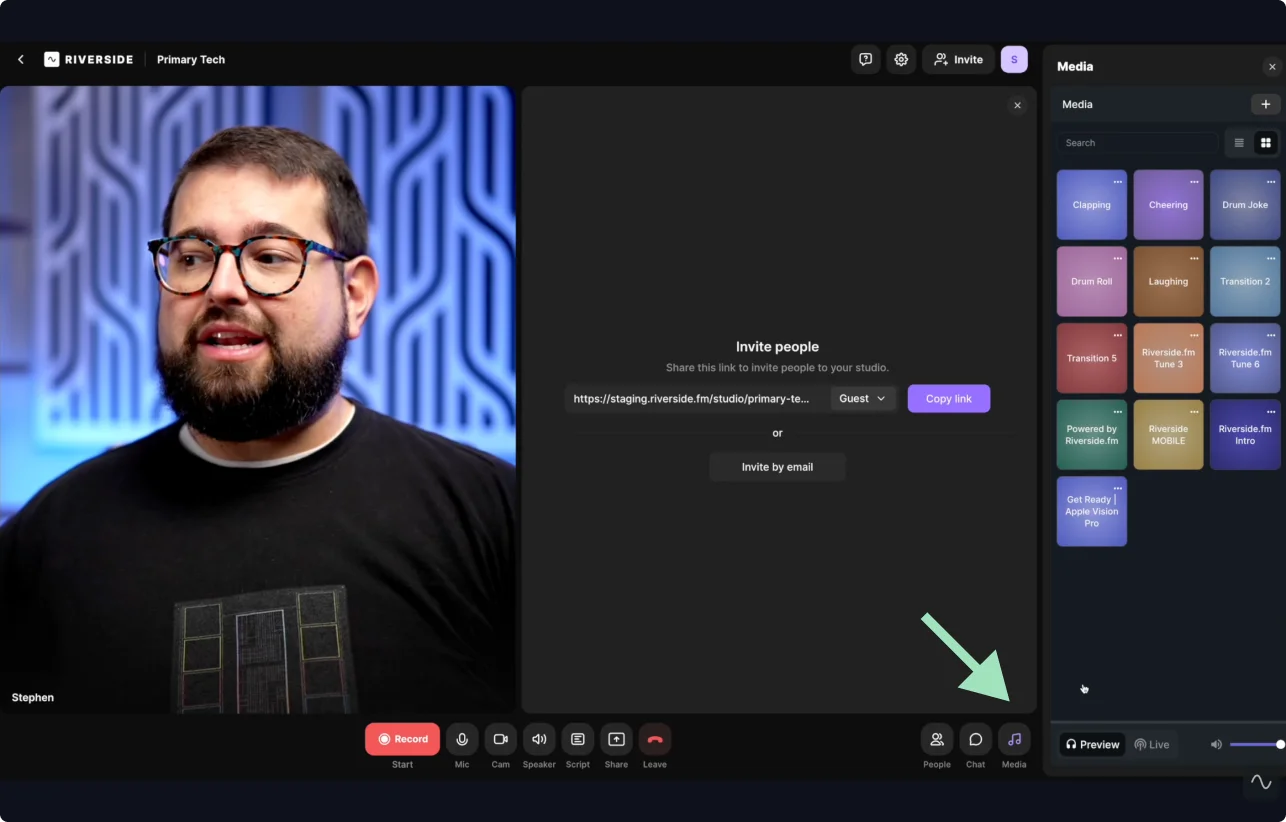
If you’re using Riverside use the media board while recording.
From your Studio, just click on the “Media” button on the right. Select the sound effect you want to add, or click on “Upload media” to add your own music or audio files.
In the Riverside Editor, click on the “Music” button from the right toolbar.
Choose a track, or upload your own song. Click on the “+” button to add it to the timeline. This track will be added in the audio section of your timeline.
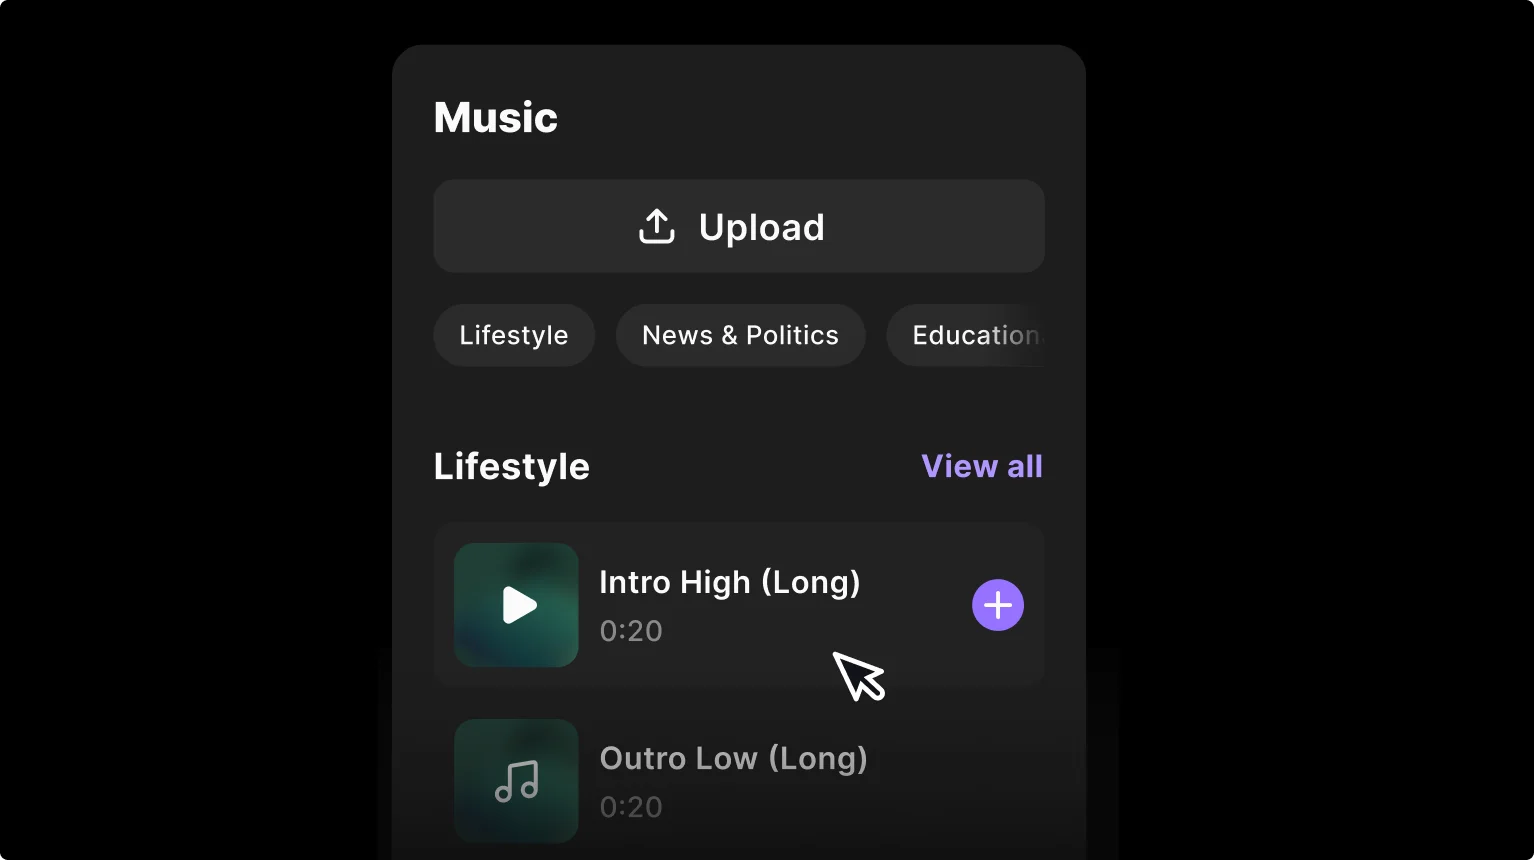
Trim and drag it as you wish to align to your podcast recording.
6. Use sound effects in your podcast strategically
Sound effects can spice up your podcast, like adding a “ba dum tss” drum after a joke. Just make sure you don’t overdo it! Having too many sound effects can end up distracting your listeners from your content and leave them with an overall negative experience.
How to add sound effects to your podcast
You can use the exact same steps for adding music, to add sound effects. Some editors may be different, but overall you’ll likely just need to upload the audio files.
Stage 3: Mixing
Mixing focuses on audio quality and the more technical aspects of your podcast audio. During the mixing process, you go through all of your audio tracks and make adjustments to a number of elements. For example, you’ll work with EQ, reverb, pitch, and track levels (more on all of this later) to get the best audio quality for your podcast.
7. Organize tracks and audio clips
Before you start mixing, make sure your tracks and audio clips are properly organized. This will save you a lot of time throughout the mixing process. We recommend arranging your tracks in the following order to start:
- Host Audio
- Guest Audio
- Room Tone
- Music
Once you have your tracks set up, make sure that each track has only similar audio clips. This means that all clips on the "Host Audio" track should be audio from you, all clips on the "Guest Audio" track should be audio from your guest, etc.
On Riverside, each speaker is color-coded so you can easily discern them in both the transcript and timeline. This way, you can find everything you need quickly and easily.
8. Improve your podcast’s tone using equalization
Equalization (EQ) adjusts the balance of frequencies in your recording.
Adjusting EQ makes your audio sound more natural by removing unpleasant high or low frequencies from your recording.
If you use proper recording techniques, it’s possible you won’t have to make any EQ adjustments at all.
How to use EQ for your podcast
You’ll likely need an advanced editor to use an EQ filter. For example you can find this in Adobe Audition.
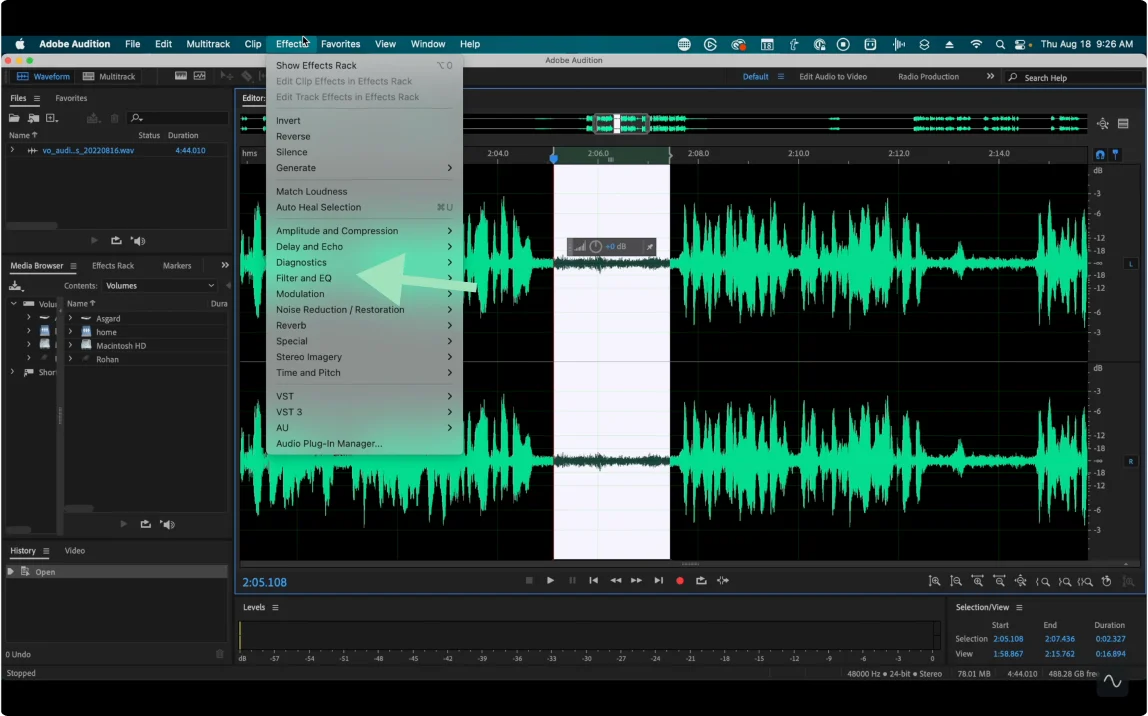
In your digital audio workstation, use a low pass filter to edit out high frequencies. Set it at a cutoff frequency of, say, 10kHz.
Use a high pass filter, setting a cutoff frequency of 70Hz to cut out any sound in the recording below that.
The lowest frequency that almost all human voices go down to is 80Hz.
If you’re completely new to editing, it might be better for you to stick to a tool with automatic audio enhancement like Riverside.
9. Use a compressor to improve podcast sound
A compressor reduces (or compresses) the dynamic range of your recording. Using a base threshold, a compressor brings the loudest sounds and the quietest sounds closer together within a specific range so that your recording is easier to listen to overall.
Without compression, the overall sound of your podcast could fluctuate in a way that's unpleasant for your audience. You probably noticed this sometimes in movies, when an action scene gets super loud and the dialogue sounds softer. You have to constantly adjust the volume.
So how would this apply to your podcast? Let’s say you have a guest that speaks quietly compared to your loud co-host. Listeners would need to constantly adjust the volume. A compressor will equalize the levels between the two speakers so the listener doesn’t have to turn the volume up and down to hear everything comfortably.
How to apply compression to your podcast
Just like EQ, this is usually a filter or effect you apply.
Import your recording into your DAW (digital audio workstation) and then select the appropriate filter. For example in Adobe Audition, you’ll find this under “Amplitude and Compression” effects.
Diving into compression is complex and out of the scope of this article. You can learn more in our video on audio effects explained.
We recommend cleaning up any tonal problems in your recording before you use a compressor, as compression can sometimes highlight tone issues in your recording.
10. Use noise reduction to give your podcast clarity
Unless your recording space is entirely soundproofed, you may pick up background noise in your podcast recording. You can take steps to reduce noise before you start recording, but it's almost impossible to eliminate unwanted sounds entirely. Some ways to reduce unwanted noise in your podcast include:
- Removing background noise: This noise can come from cars outside, equipment running in the background, or a noisy upstairs neighbor.
- Employing de-verbing: Sound bounces off hard surfaces, which can cause reverb on your audio track. The best way to reduce verb is to have the right recording set up. If you still pick up some in your audio, you can reduce it during the mixing process.
- Removing Plosives and Essing: Having the right equipment, like a good mic with a pop filter, is probably your best defense against this type of thing. However, if your recording has plosives or a lot of essing, mixing is the point in the post-production process where you can remove it to create more professional audio.
- Clean Up Your Audio Track With Riverside: Riverside seamlessly cleans up your audio in a matter of minutes. Our Magic Audio feature automatically enhances and levels your audio, removes background noise and reverb, and equalizes your recording so it’s… pitch-perfect!
Stage 4: Mastering
Mixing and mastering a podcast is pretty similar. The main difference? During the mastering step, you prepare your podcast for distribution.
Mastering is all about listening to all of the editing that you've done and identifying anything you may have missed. During this step, you’ll put the finishing touches on your podcast and polish it up so that it’s ready for distribution.
Make sure your podcast transitions well and that the audio tracks blend together. The audio clips have to transition seamlessly. Your show shouldn’t have big, sudden changes in volume from one audio clip to the next.
Stage 5: Final Video Editing (Optional)
Once you’re done with your audio, if your podcast supports it, it’s time to polish your video a little bit.
11. Add the final touches to your video
If you’re creating a video podcast you’ll also want to enhance it visually.
Consider adding a:
- Personalized logo and background
- Image and text like lower thirds for more context
- Animated captions to make it easy to follow along.
You can also play around with your layout and how you want to display your speakers.
And if you’re promoting your podcast online consider creating short clips for TikTok, YouTube Shorts or Instagram reels.
What software should you use to edit podcasts?
Podcast editing software will function as your digital audio workstation or DAW. This is where you will complete all of the work on your podcast and produce the final product to share with the world. There are many options out there when it comes to choosing the best podcast editing software.
When shopping around, consider the following:
- Which operating system are you using? Some tools are only compatible with Windows, and others only with Mac.
- How much are you willing to spend? Podcast editing software comes at many different price points.
- How experienced with editing are you? Some podcast editing tools are more beginner-friendly, while others cater to a more advanced audience.
After considering these factors, here are some options you can try out:
Riverside
Riverside gives you the freedom to record and edit content seamlessly on one platform. With up to 4K video resolution and separate recording tracks for all participants, you have full editing control with no need for any external editing software. Riverside's video editor makes video editing just as easy as editing text, and we mean this quite literally.
Simply record as usual, and straight after, you'll find an automated transcript of your recording in the video editor. With this transcript you can:
- Cut audio and video: Any text you delete in the transcript automatically removes the corresponding video or audio content in your recording timeline
- Navigate through your recording: When you select text in your transcript, the timeline playhead jumps to the exact point in your recording.
- Search for specific phrases in your video: Use the search bar to find a specific phrase in your transcript and timeline.
Our AI transcriptions come in over 100 languages, so no matter what language you're recording in, you can edit effortlessly.
Once you've got a final cut, Riverside has automated tools for polishing your video. You can:
- Create short social media clips at a simple touch of AI with our Magic Clips tool. (This is a game changer, saving you time and effort!)
- Adjust the dimensions of your recording to suit where you’ll be posting
- Automatic audio enhancment to clean up your audio tracks, normalize audio levels, remove background noise and silences in a matter of minutes.
- Color coded timeline so you can easily spot who is talking.
- Generate summaries, takeaways, and chapters, as well as show notes from your content.
- AI-generated captions and subtitles that can be added automatically to all your videos with your preferred fonts.
You don’t have to worry about any files going out of alignment. Riverside’s multitrack sync ensures all your tracks stay aligned no matter how much you edit.
Riverside offers both podcast audio editing as well as podcast video editing tools. It's the go-to solution for a seamless podcasting experience.
You can learn more about Riverside here, or you can sign up to start creating podcasts seamlessly.

Audacity (Free)
Audacity lets you perform any basic editing and mixing you need to do totally free of charge. It also has some sound design capabilities where you can add intros, outros, and music.
Audacity is a great option if you’re new to podcast editing and want to learn a little before they make the commitment of paying for a subscription service.
Adobe Audition (Paid)
Adobe Audition is better suited for professionals looking for advanced podcast editing.
You can set a template for the adjustments you want to make to your audio files and add the same edits to multiple files.
The software also has many easy-to-use presets, so you can add music, segues, and fades to your tracks. Adobe Audible costs $22.99/month for a subscription, but you might already have access to it if you are a Creative Suite subscriber.
Pro Tools (Free & Paid)
Pro Tools one of the most comprehensive podcast editing tools. It comes with a large number of features, so it can take some time to learn them all. You can go from beginner to pro gradually as you keep improving your editing skills.
Pro Tools has a free version or two paid plans for more advanced users. The Standard version costs $34.99/month and the more advanced "Pro Tools Ultimate" is $99.99/month.

5 Quick podcast editing tips
Post-production editing can take a lot of time, energy, and resources. By following these tips, you can reduce the time you spend editing and improve your podcast’s sound quality.
1. Have a plan for your podcast
Go into your interview with a clear plan of how you want things to go.
Having an outline and knowing what you want to ask your guest ahead of time will reduce awkward moments in your interview. This also helps you stay on topic.
2. Create the right recording environment for your podcast
Record your podcast in a quiet room where you can close the door and reduce potential background noise.
It’s important to understand acoustics. Sound will bounce off hard surfaces in your recording space, which can cause reverb on your audio track. So try to find a place with carpet and upholstered furniture to record your podcast.
3. Use good mic technique while recording your podcast
Understand where your mic and your guest’s mic should be placed to get consistent audio while you’re recording and save a lot of editing time adjusting your audio’s volume levels.
Your microphone should be positioned half a dozen inches from your mouth (15-30 cm), with a slight angle (approx. 45 degrees). This avoids picking up room noise,, while reducing plosive sounds.
Also, look for a microphone with a pop filter to drastically reduce the number of plosives in your recording.
4. Listen to your podcast once before editing
Listening to your recording once from beginning to end will give you an idea of what you have to work with post-production. This way, you can get a clear sense of the narrative you want to create.
5. Don’t over edit your podcast
Make sure you haven’t cut off words or created an awkward conversation flow while editing your podcast. Also, make sure sound effects enhance your podcast, instead of distracting from it.
FAQ's on Podcast Editing
Do podcasts require editing?
If you want to create a professional high-quality podcast, then you'll need to edit your podcast after recording.
This involves fine-tuning your audio, cutting out content you don't want to include. Also, make sure your whole podcast sounds polished and smooth with some effects such as outros and intros. The same applies to video podcasts.
What makes a good podcast edit?
A good podcast edit involves making sure your audio and video look and sound clear.
This could involve removing unwanted background noise or awkward pauses. It's also a good idea to make sure that wherever you cut out content there is a smooth and natural transition between cuts.
If you record with good equipment and a reliable recording software, like Riverside, your podcast editing will be much easier.
How long should it take to edit a 45 minute podcast?
As a general rule of thumb, a podcast should require 3 to 5 minutes of editing per minute of audio recorded, so for a 45-minute podcast, it will take an average of 2 to 4 hours.
With AI-powered podcast editing software like Riverside, this time can be substantially shorter.
In any case, do not over-edit your podcast, as the conversation may end up sounding unnatural. Aim for a high-quality end product that doesn’t sound like you spent hours editing.
How much do podcast editors charge?
As with any profession, more experienced editors typically charge higher rates, while less experienced ones are usually more affordable. Most freelancers charge an average of $30 to $50 per audio hour, but prices can reach up to $200 per hour of audio for more experienced editors or more complex edits. Several podcast production agencies also offer professional editing services.
Is podcast editing hard?
With today's software and equipment it's much easier to edit a podcast!
It's best to record with good equipment and high-quality recording software in order to minimize the amount of editing you need in post-production.
But don't worry! Even if you need bigger fixes, there is a lot of editing software, like Riverside's Editor, that comes with automated tools to help you.
How do you process audio for a podcast?
Audio processing is when you fine-tune and polish your sound so it’s crisp, clear and balanced out. This is an important step that we’ve already covered above, but to recap:
- Equalization: Also called EQ, this refers to balancing out the frequencies of your recording to make your audio sound more natural.
- Compression: Try to make everyone’s volume levels as consistent as possible to improve your audio quality. This way, your listeners won’t have to adjust their volume throughout your show in order to hear everyone.
- Noise Reduction: You can use an automatic background noise remover and get rid of harsh sounds through removing plosives, de-essing and de-verbing.
Do you need a DAW for podcast editing?
Not necessarily. Today, there are many podcast creation tools which allow you to edit podcasts online without having to download anything. DAWs are great for precise and detailed editing, but if they seem too complex for you, the easiest way to edit a podcast is to use podcast platforms, like Riverside, with automated functions and features.
Final Thoughts
When it comes to podcast editing, try not to overthink it. At the end of the day, your podcast should tell a story in a fun, interesting, and engaging way. Edit out distractions and include enhancements that make sense. You’ll release a show you can be proud of that keeps your audience coming back for more.


.webp)
-(1).webp)


