Table of contents:
How to edit video audio: 7 Steps
Step 1: Recording and importing separate tracks
Step 2: Trimming unwanted sections
Step 3: Cleaning up silences and filler words
Step 4: Adjust volume levels and reduce background noise
Step 6: Audio filters, effects and transitions
Step 7: Adding the final touches and exporting
4 Best video editors for audio
Key Takeaways
- Start by recording and importing your audio and video files as separate tracks.
- Basic audio editing involves cutting, trimming, removing background noise, and adjusting your levels.
- Most video editors offer essential audio editing tools. Some platforms offer entire dedicated audio-editing suites.
Don’t overlook audio when editing videos. If you’re unsure where to start, we’ll teach you how to edit video audio and where it’s best to edit.
Luckily, most video editors, like Riverside come with audio editing tools too.
This article covers all the basic audio editing features and processes you should know about.
Table of contents:
- How to edit video audio: 7 Steps
- Step 1: Recording and importing separate tracks
- Step 2: Trimming unwanted sections
- Step 3: Cleaning up silences and filler words
- Step 4: Adjust volume levels and reduce background noise
- Step 5: Equalization (EQ)
- Step 6: Audio filters, effects and transitions
- Step 7: Adding the final touches and exporting
- 4 Best video editors for audio
- Best practices on improving video audio
- FAQs on How to Edit Video Audio
How to edit video audio: 7 Steps
Despite their name, video editors usually include several tools that let you fix, toggle, and adjust your video’s audio.
And you shouldn’t ignore your audio. Studies show poor audio quality deters listeners even when your visuals are top-notch.
Here are the basic steps you must follow to edit and improve your video’s audio:
Step 1: Recording and importing separate tracks
Separate tracks are important when recording with multiple people.
Chances are, each host speaks at a different pitch or volume. For example, someone may talk louder than everybody else. Separate track editing lets you edit the audio of this host without affecting other tracks.
Recording separate tracks
The first step is to record each person’s tracks separately.
We’ve got a whole list of multitrack recording software, but let’s take Riverside as an example.
Riverside records separate audio (and video tracks) for up to 10 participants. With local recording, everything records directly to each person’s device and uploads to the cloud. This way, you'll have separate high-quality tracks unaffected by connection issues.
You don’t need to do anything specific to record separate tracks on Riverside. Simply log in, create a recording studio and everything automatically records separately. (You can learn how to record on Riverside here).
Importing separate tracks into your editor
If you’ve recorded on Riverside, you can head straight to our multitrack editor. But take note that our audio enhancement tools are automated. This is best for beginners or professionals who want a quick touch-up.
We have audio tools for:
- Filler-word removal
- Silence removal
- Background noise removal
- Normalization (which levels all tracks’ volume)
For nitty-gritty edits, you can export your recordings to another editor.
Importing from Riverside
Go to the recording you want, then scroll till you see the downloadable tracks. Click “Export all”, and you’ll have the option to import your tracks already synced into Premiere, DaVinci Resolve, Descript or Final Cut Pro.
You can also click on “Download tracks” to download everything separately.
Importing from other software
If you’re recording through other software, check for integrations like Riverside’s, that automatically import separate aligned tracks. Otherwise, download your tracks separately and then import them. In this case, you may need to sync your audio and video tracks.
Luckily, most editors can do this automatically. You can learn more about how to sync video and audio tracks in our guide.
Step 2: Trimming unwanted sections
Look for all sections of your content that you don’t want to keep. Make sure the story flows smoothly while keeping the content tight and compact, and trim anything unnecessary. For example, cut out unexpected tangents, blunders like sneezing or laughing, or repetitive content.
With Riverside, you have two ways of trimming content. You can try text-based editing or you can use a traditional editing timeline.
Trimming with text-based editing
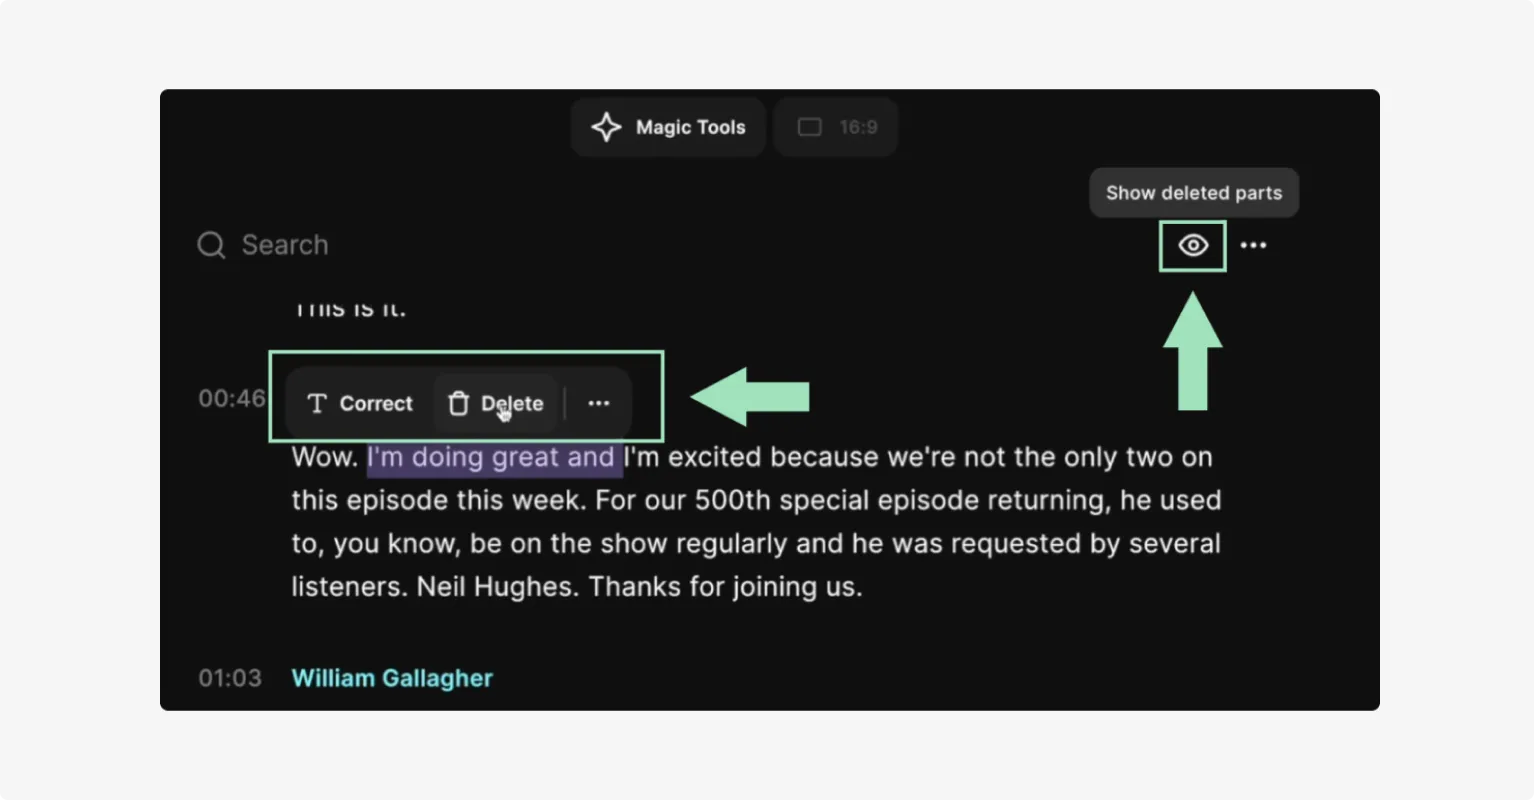
We use AI transcriptions of your recording for text-based editing. Any text you delete in these transcripts automatically removes the matching video and audio in your recording timeline.
To cut sections of your content in Riverside, click on the recording you want to edit. Click “Edit” on the top right corner.
In the Editor, you’ll see a transcript right next to your video. Highlight the words you want to remove and click on the “Delete” button.
You can click on the eye icon on the upper right corner to “Show deleted parts”, or to keep them hidden.
Traditional editing timeline
If you’re using the traditional editing timeline, drag the edges of your recording to lengthen or shorten it.
To cut out specific sections, place your marker at the beginning of the point you want to cut. Click on the “Split” button on the top right of the editing timeline. Do the same for the end point of the section you want to cut out.
Click on this section and click “Delete”.
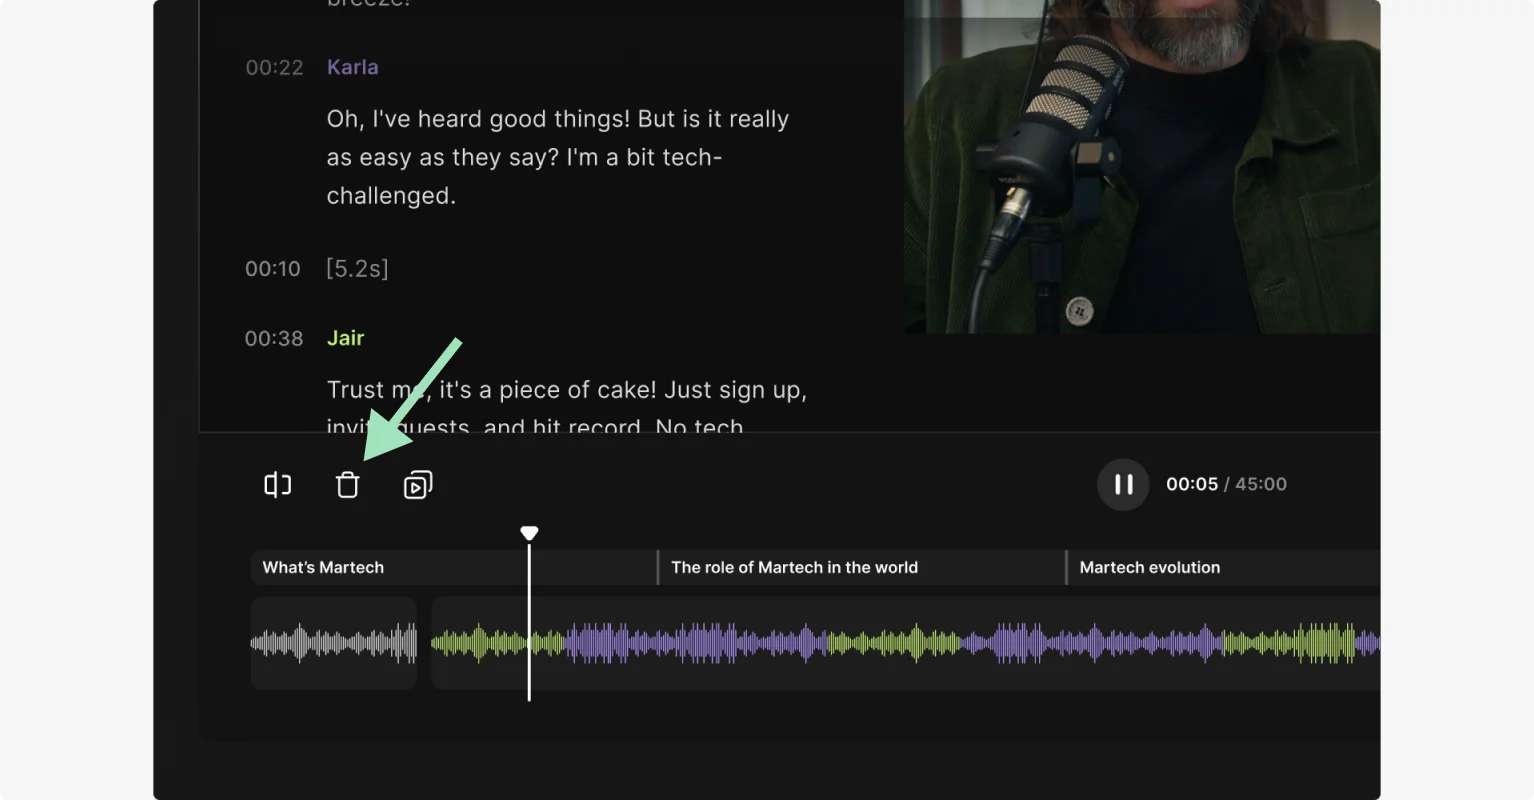
You can also move these segments around. Just drag and drop them.
You’ll likely find similar tools in other editors.
Step 3: Cleaning up silences and filler words
To further refine your audio tracks continue by removing pauses, filler words, and silences.
Look for small sections of audio without waves, as these are likely silences, and cut them out. Then, ensure there are no gaps between speakers by adjusting the audio and video clips accordingly.
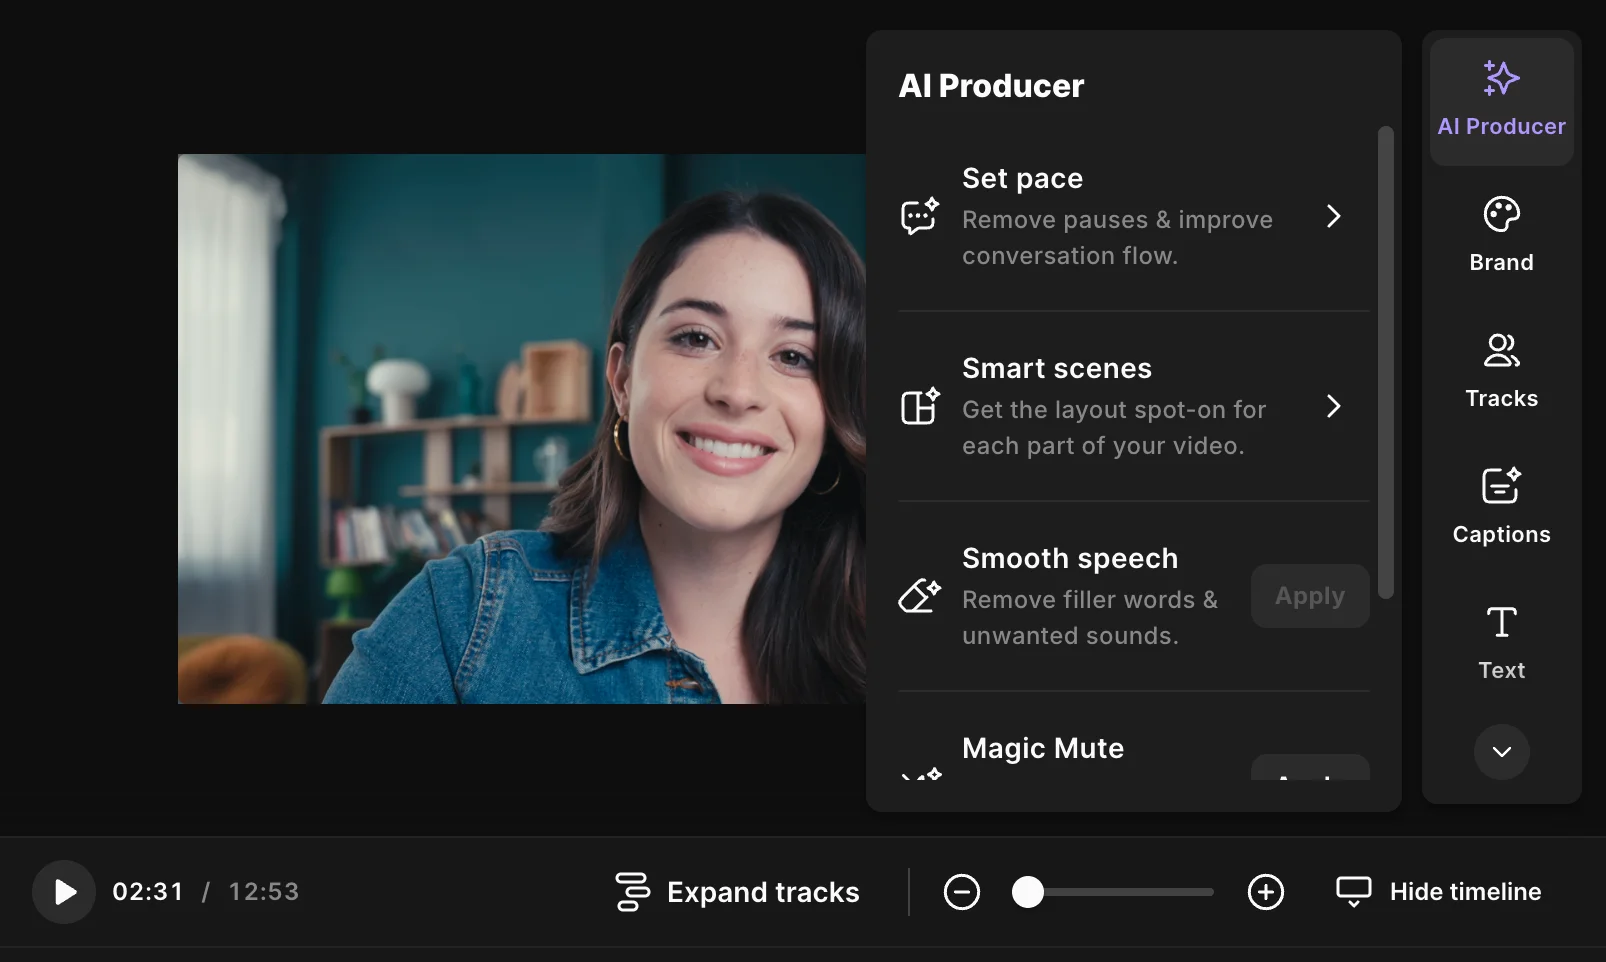
On Riverside, you can do that with just one click.
Go to your editor and open the “AI Producer”. Here, you can click on “Smooth Speech” to remove filler words and unwanted sounds. Or, click on “Set pace” to adjust the slider and remove silences and pauses.
Step 4: Adjust volume levels and reduce background noise
You may want to reduce the volume of a specific track’s audio or remove it all together.
For example, a host might be speaking too loudly, while another is too soft. This leaves you with some tracks that are louder or quieter than others, so you have to adjust them manually.
Also, steady background noise during playback can be pretty annoying so you might want to use audio processing to get rid of it.
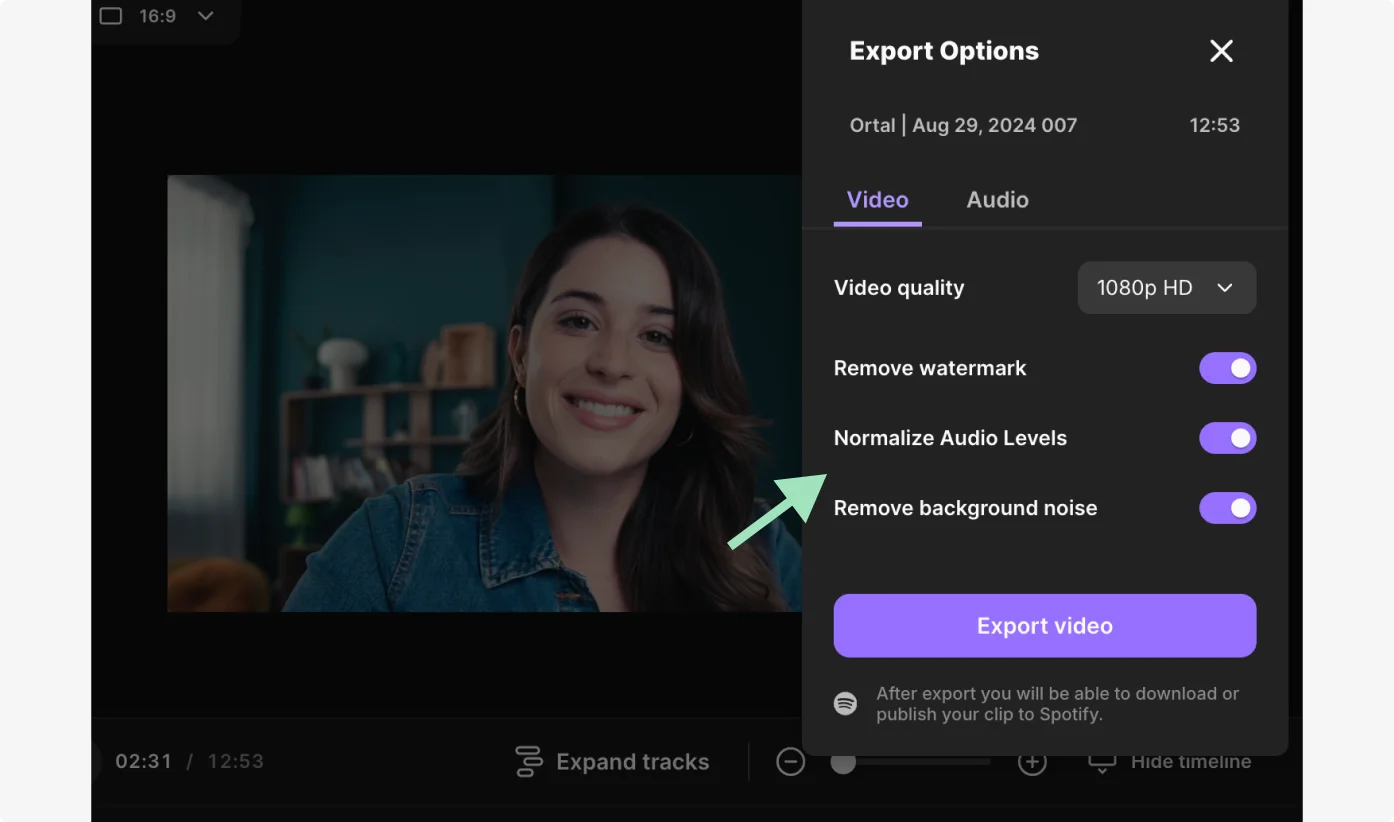
Riverside’s audio normalization tool offers a quick and easy solution to balance your sound levels automatically in the editor.
Our background noise remover automatically removes unwanted ambient noise from your recording. This cleans up your overall audio and makes for a far better listener experience.
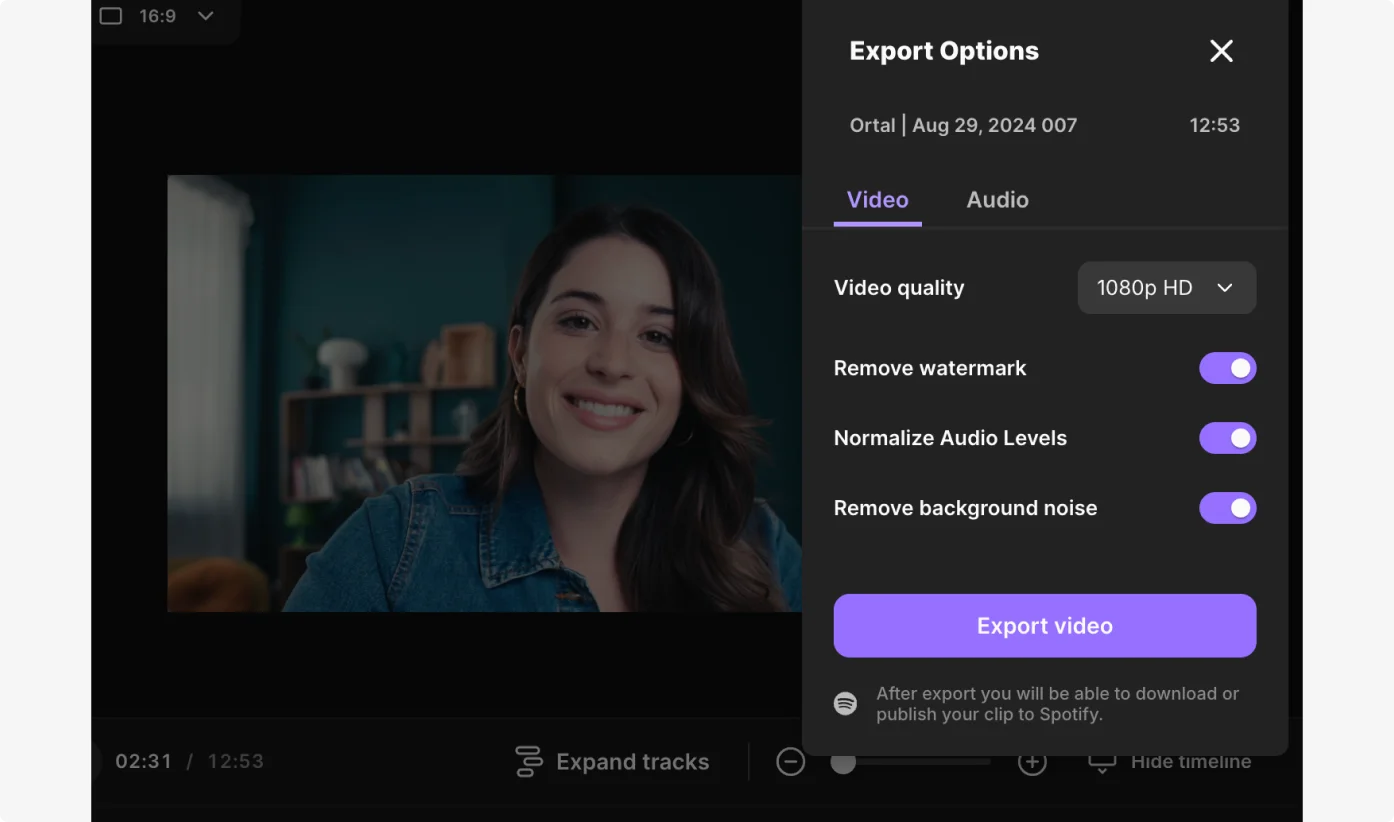
To add these, click “Export” in the Editor and you’ll see an option to toggle on “Normalize Audio Levels” and “Remove background noise”.
You’ll also remove background noise when you use Magic Audio. This uses AI to improve your audio quality.
Go to your editor and open the “AI Producer”, then click on “Magic Audio”.
Step 6: Audio filters, effects and transitions
Next we want to smoothen the audio and add in some zest. We do this with audio filters, effects and transitions.
Audio filters
Filters adjust your audio or help it become crystal clear.
Some common audio effects include:
- Limiter: Sets a dB cap on your audio, making sure it never gets above that level. It caps the loudest parts of your content, ensuring that volume stays consistent.
- Expander: It increases the volume of louder sounds, while making softer ones even quieter. This keeps the main audio clearer and is often used to remove reverb.
- Noise Gate: It completely mutes audio when it falls below a certain threshold. It’s used to cut out unwanted background noise during silent or quiet parts of the recording.
- Compressor: It reduces the so-called “dynamic range,” balancing overall volume. In a nutshell, it reduces the difference between the loudest and softest parts of the audio.
- Reverb: An effect that simulates the echo of sounds recorded in a room or hall. It can be used to add depth and space to your audio, or to create the illusion that the recording occurred in a specific environment.
- Echo cancellation: It is used to eliminate any unwanted echo during the recording. On Riverside, you can toggle echo cancellation on and off for individual call participants at the start of your recording.
Sound effects and transitions
You can also spice up and personalize your content using sound effects and music. Ideally, your video editor will have a pre-loaded media library you can use. You can use these effects to add highly recognizable intros and outros, or sound effects and jingles to highlight the best moments.
In addition, having quick cuts between different audio clips is not always ideal. Adding transitions such as fades and dissolves is important for achieving that seamless flow.
On Riverside, you can also easily add overlay background music with just a few clicks.
Once you’re inside your editor, select the portion of the transcript where you want to overlay your background music and click “Add”. Click on “Music” and then choose one of the many royalty-free music clips from our library or upload your own audio clip.
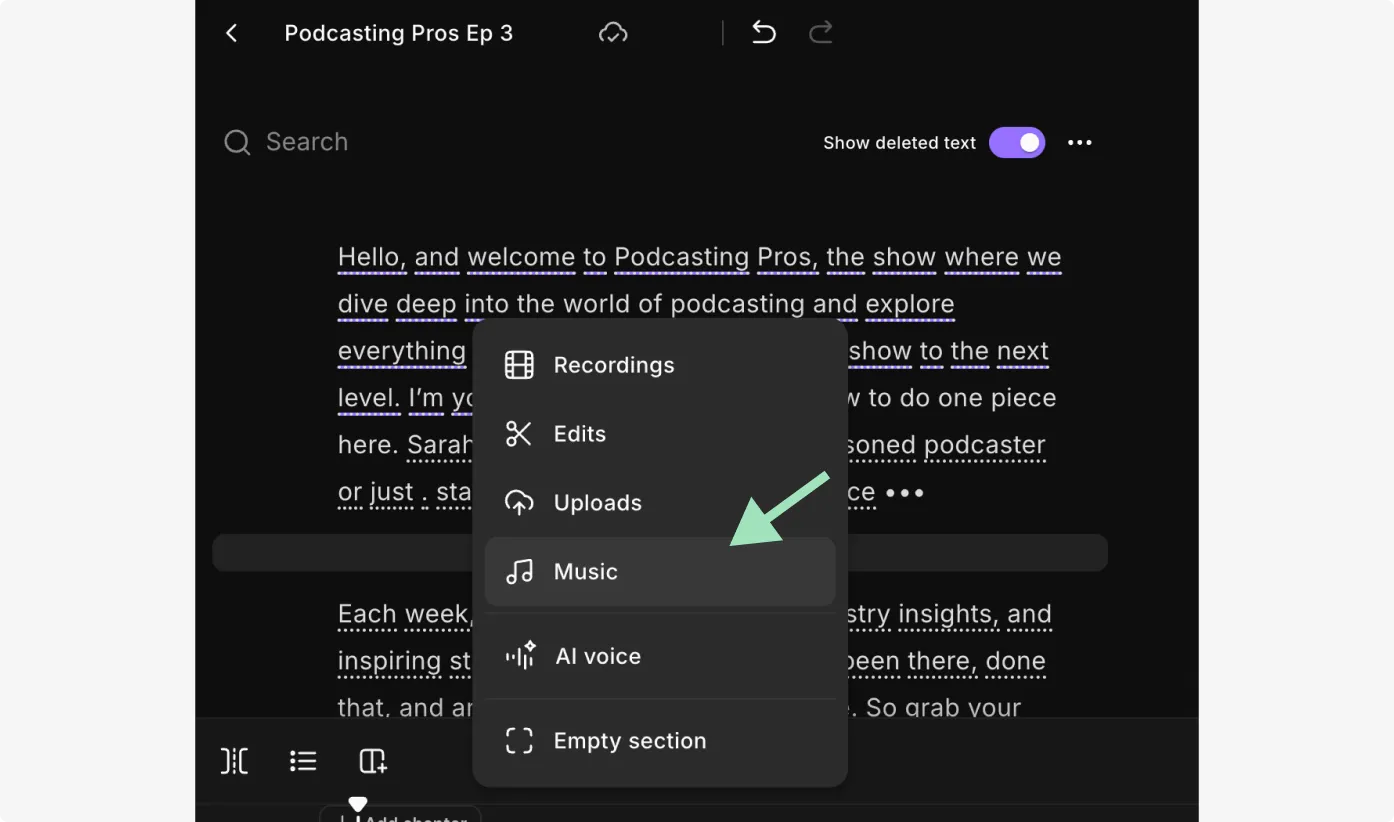
If you want to add an intro or outro, click on the “+” button on the bottom left part of your screen, then “Music” or “Uploads” to add a music clip from our library or an audio file you uploaded. You can drag this new section at the beginning or end of your timeline, then use all the other tools to add text, images or video overlays to your intro or outro.
.webp)
Step 7: Adding the final touches and exporting
Final touches include all that fine tuning and granular editing that improves the flow of your content as much as possible.
For example, you can rearrange audio chunks so you or your guests don’t cross-talk with each other or overlap. You might also move a laugh to emphasize a joke or insert a moment of silence to highlight a meaningful pause.
On Riverside, each audio track is color-coded so you always know who’s speaking. You can zoom in on the timeline to check and edit everyone’s audio and then trim, cut, and splice it as you deem fit.
Once you’re finished, you can now export your video or audio tracks by clicking on the “Export” button on the top right corner of the Editor screen. Select your video and audio quality, then click on “Export video” or “Export audio”.
4 Best video editors for audio
Achieving high-quality audio edits doesn’t mean paying for yet another editing tool. Here are the best video editors that offer audio editing features too:
Riverside
Price: Free plan, $15/month (Standard), $24 (Pro), On request for Business plans.
Best for: Streamlined recording and editing all under the same roof.
Riverside is a browser-based studio-quality recording and editing platform.
You can record in up to 4K video and 48kHZ audio without worrying about faulty internet connection impacting your recordings. Riverside uses local recording, so everything records directly on your device instead of relying on the web. Each participant’s video and audio records in separate tracks to give you more editing control.
The best part is you don’t have to worry about files going out of sync. With Riverside’s multisync, everything stays aligned no matter how much you edit.
With Riverside’s text-based video and audio editor you can trim your video like you’re editing a text transcript.
We have automated audio enhancement for removing background noise, silences, and filler words. You can also mute tracks and normalize audio levels. And, to spice things up add background music or sound effects from our media library.
End off with customizing your video background and branding. We have dynamic captions, text, and image overlays.
Riverside is best for beginners or those who want to shortcut their editing.
.webp)
Key video audio editing features:
- Text-Based editing: Edit your video as easily as editing text
- Smooth Speech: Automatically removes filler words and silences from your audio, for a polished, professional audio.
- Magic Clips: Save a lot of time by automatically generating short, shareable clips from your recordings using AI.
- Local recording: Enjoy top-notch quality with no freezes or lag by recording video and audio directly on each participant's device.
Audacity
Price: Free
Best for: Beginners and professionals looking for a budget-friendly, open-source audio editing tool.
Audacity is a free, open-source audio editor that works on every operating system. For all these reasons, plus its solid toolset, it’s a popular choice for both professional and amateur content creators.
Audacity is compatible with many third-party plugins, further increasing the features and effects available to manipulate your audio. However, you cannot preview any effect in real-time, which can make it time-consuming to test each change you make. It offers many useful advanced tools, such as noise gates and parametric EQ, as well as a spectrogram. Still, the interface isn’t exactly sleek, and fully leveraging all of Audacity’s features can be challenging at times.
Key video audio editing features:
- Multi-track recording: You can record multiple tracks straight into Audacity, and then edit them at once.
- Master effects: Apply effects such as reverb, compression or distortion to the entire project at once.
- Spectrogram view: Visualize your audio tracks with a spectrogram for granular edits.
Final Cut Pro
Price: $299.99 (one-time purchase)
Best for: Expert video editors looking for advanced editing tools to work across Apple devices.
Final Cut Pro is Apple’s video and editing platform aimed at creators who require powerful tools and granular control. It integrates with other Apple products, so it’s a prime choice for those who prefer to work within this ecosystem.
It has many audio-focussed tools, including Voice Isolation that automatically enhances speech. You can also draw on several bundled plugins for audio compression and EQ. Final Cut Pro is a powerful, professional-grade tool, so it’s best suited for more advanced users looking for fine-tuning their audio with precision.

Key video audio editing features:
- Waveform visualization: Provides a detailed view of your audio tracks, allowing precise editing of audio segments with maximum accuracy.
- Panning audio: Built-in pan presets to adjust the spatial distribution of audio within the stereo field, helping to balance sound across channels.
- Fade audio in or out: Easily apply fades at the beginning or ending of a clip to smooth out transitions.
Adobe Premiere Pro
Price: $22.99/month or $263.88/year
Best for: Professional (or ambitious) video editors who want ultimate control over their video and audio recordings.
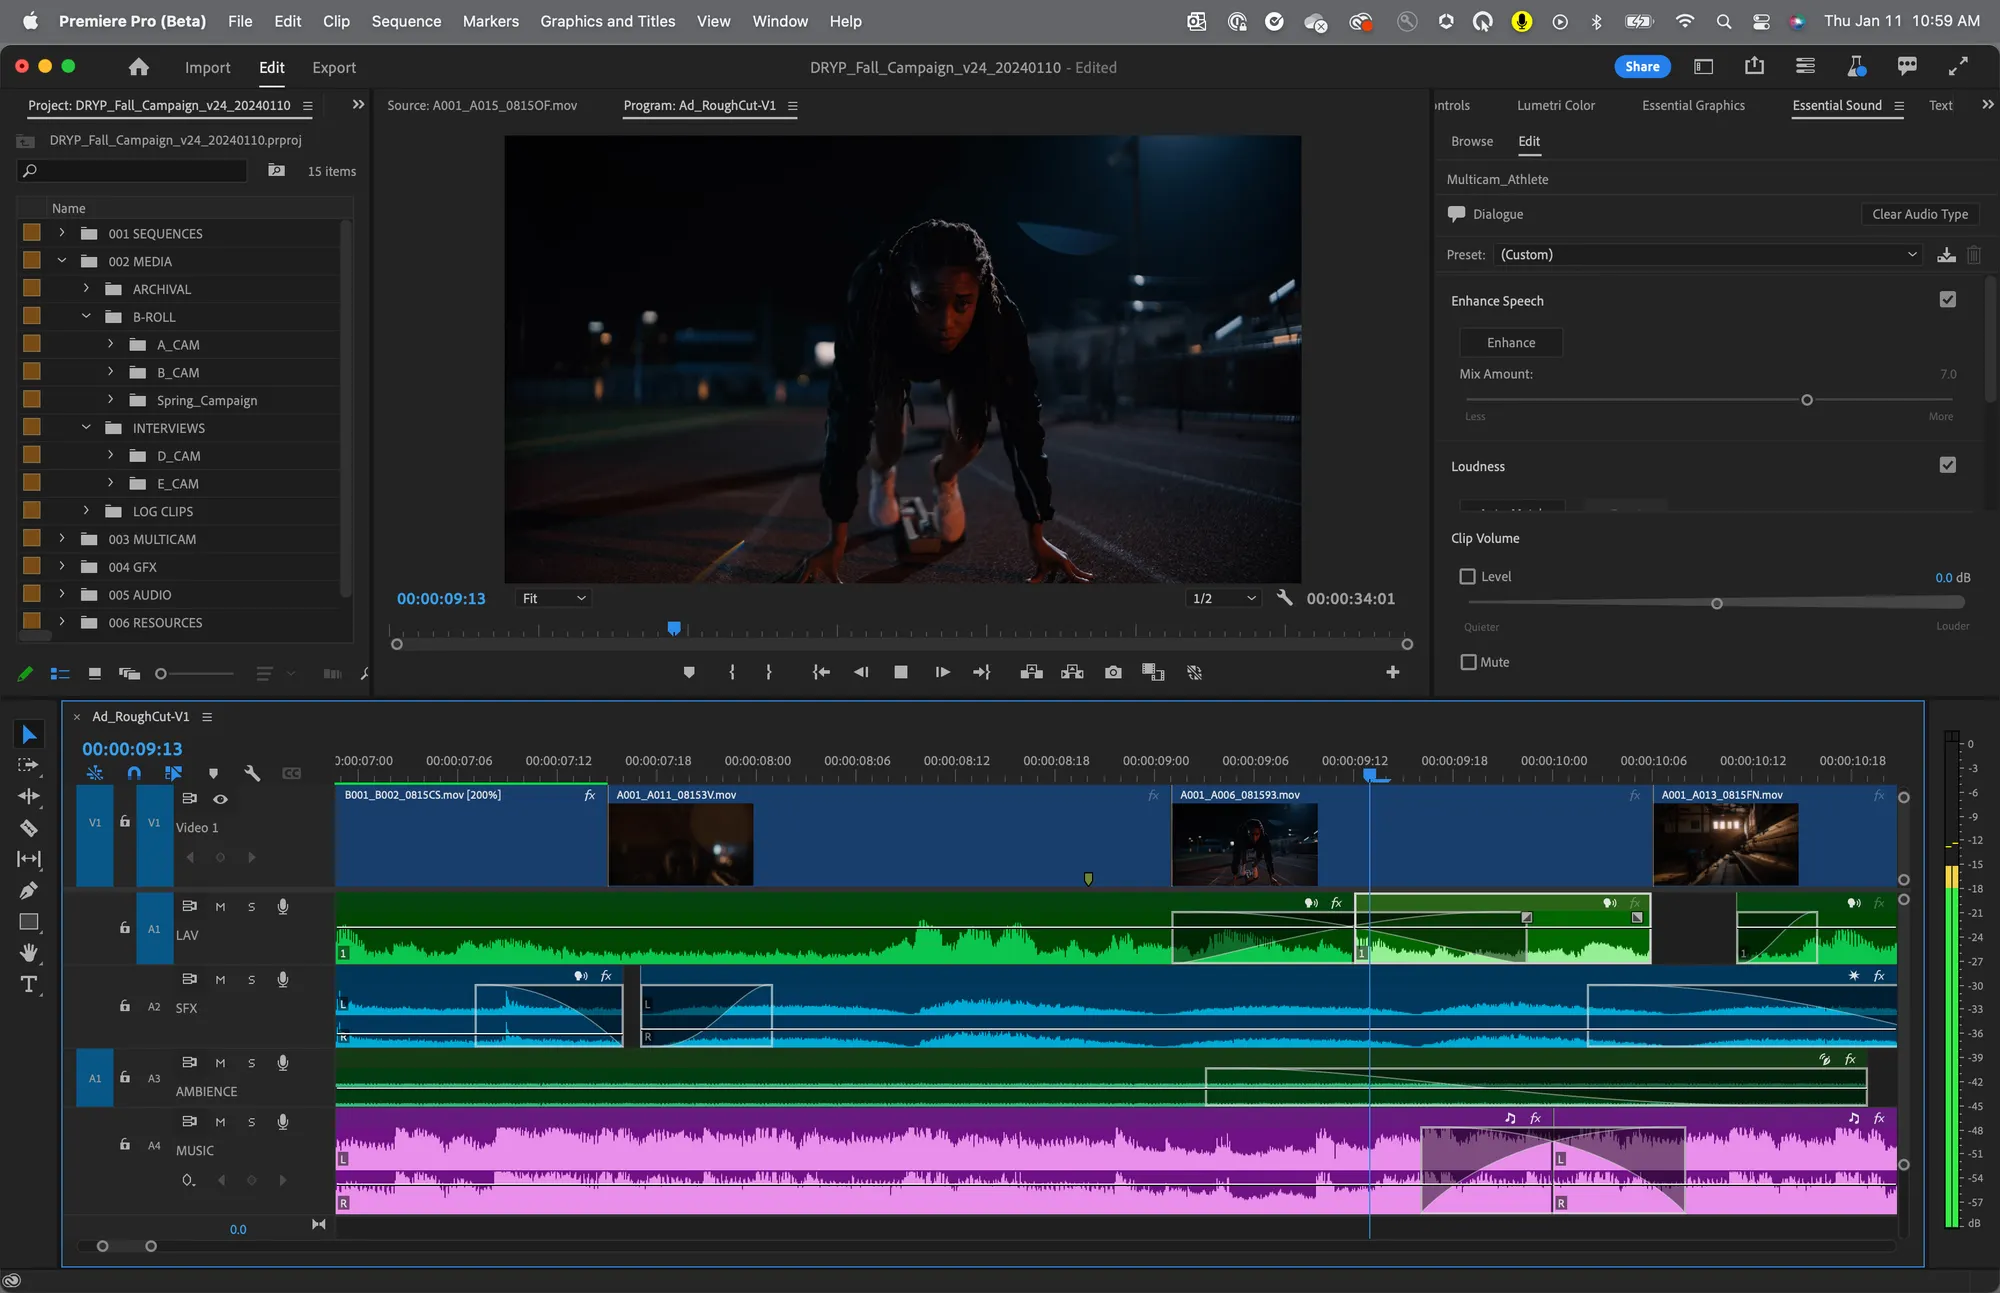
Premiere Pro is Adobe’s professional-grade video editing suite. It also includes a dedicated audio workspace with several features that help to ‘fine-tune your sound’ and edit your audio. These tools allow you to repair and adjust your audio and embellish it with sound effects and music.
The platform’s audio editing workflow is intuitive but caters to more advanced editors. It lets you color code your tracks and intuitively rearrange and edit as you go, set automatic levels for the same kinds of tracks (e.g. dialogue), or add atmosphere using the ‘ambience audio tag’.
Using ‘Dynamic Link’, you can also send your Premiere Pro audio sequences over to Adobe Audition for more in-depth edits.
Key video audio editing features:
- Automated speech-to-text: Uses advanced speech recognition to automatically generate and sync subtitles and captions with your audio.
- Adobe Sensei integration: Automated normalization of audio levels and enhancement of sound quality by leveraging Sensei – Adobe’s proprietary AI.
- Audio keyframing: Improves control over audio levels and effects by applying keyframes directly within your timeline.
Best practices on improving video audio
To help you achieve the best results possible, here are some best practices to keep in mind to improve audio quality:
- Always use a dedicated mic. Using an external mic to record your audio is key to giving yourself the best-quality audio during post-production. Though relying on your camera’s in-built mic is tempting, this likely won’t live up to your expectations.
- Always opt for a platform that locally records each of your participants. This is the best way to guarantee the quality of your audio and video recording when working with remote guests. With Riverside, you can do that so easily thanks to async recording.
- Multitrack recording. The ability to work with each person’s audio separately is invaluable. This means you can fix everyone’s specific glitches or audio impurities freely.
- Work with platforms that record to lossless and uncompressed file formats. The more an audio file is compressed, the lower the quality will be, and the higher the chance for distortions or background noise. Look for tools like Riverside that record 48kHz WAV audio..
FAQs on How to Edit Video Audio
Here are the answers to some of the most frequently asked questions about editing a video’s audio.
How do I remove echo from my video audio?
If you can’t prevent echo during recording with features like Riverside’s echo cancellation, you must remove it during post-production.
Some audio editors include reverb reduction features or plugins to do that automatically. Otherwise, you should reduce the frequencies contributing to the echo effect with EQ, then suppress audio falling below a certain volume threshold with a noise gate.
How can I learn more advanced audio editing techniques?
There are tons of tutorials online. Check out platforms like Udemy or YouTube.
For example, check out our YouTube channel. We have YouTube videos on topics including how to edit audio podcasts, or how to edit on Final Cut Pro.
Is there a way to edit out voices in a video?
Yes, you can edit out voices in a video by using a DAW like Adobe Premiere Pro or Final Cut Pro. The exact workflow will depend on the video editor that you’re using, but you should first isolate specific vocal frequencies and then cut them out. There are also some tools providing AI-based vocal separation such as iZotope RX.
How do I edit the audio on my iPhone video?
If you want to make simple edits to your iPhone video, such as simply muting the audio, you can use your Photo app’s built-in features. If you want a more advanced tool to make more complex edits such as adjusting audio levels or equalizing, you should look for tools like Final Cut Pro (paid) or iMovie (free).


.webp)
.webp)


