-(1).webp)


Table of contents:
Unable to screen record, and feeling frustrated?
You have come to the right place!
No matter whether you’re a Mac, Windows, iPhone or Android user, I’ll walk you through how to screen record on any device.
Let’s do it!
How to screen record on a desktop or laptop
Want to record from a desktop or laptop? We’ll show you how to screen record online, or using built-in Mac and Windows tools.
Let’s go!
How to screen record online
To screen record online, try Riverside. Riverside is easy to use and produces high-quality audio and video. Plus, you can record with up to 10 guests! Here’s how it works.
Step 1: Log in to your Riverside account
Log in and go to the studio you want to record from. At the top of Studios list, click “+ New studio” to create a new one.
Click “Record” in the dashboard's top menu to enter the studio.
You’ll enter the green room where you can check equipment. Click “Join studio” to enter the studio.
Step 2: Invite guests to your screen recording (optional)
If you want to screen record with multiple guests, click the “Invite” button on the top right.
You can invite up to 1 participants with a quick link.
.webp)
Step 3: Set up your screen recording
Inside the studio, select “Share” to share your screen for recording. You can choose between sharing your screen or uploading presentation files to record.
.webp)
Click “Screen” and choose between capturing your:
- Chrome tab: Records only the tab you select.
- Window: Records the window you select.
- Desktop: Records your whole screen, no matter what you switch to.
Note if you want to record audio, you must record a tab and select “Also share tab audio”.
.webp)
Step 4: Start recording your screen
Once your screen share is set up, select “Record.”
Step 5: End your recording
When you're done, click “Stop” and wait for your recording to upload. Then, go to “View recordings” to access separate audio, video, and screen share files, allowing for easy editing.
.webp)
Why record with Riverside?
If you screen record with Riverside, you’ll also get:
- Top-quality audio and video. Riverside records in up to 4K video and 48 kHz audio.
- Simple editing tools. Use our text-based video editor to trim your video. Quickly and easily add captions, lower thirds, and music. Clean up audio with a click.
- Customizability. Record your screen or screen and webcam. You can include guests and switch layouts quickly and easily.
- Live streaming. Live stream or multistream to major social media platforms quickly and easily directly from your Riverside studio.
- Repurposing. Easily edit your recording into short, shareable clips for social media, or into evergreen content you can reuse. You’ll get a full transcript with every recording too.
How to screen record on Mac
You have two options when recording video on your screen with a Mac. You can use either the built-in recording keyboard shortcuts or QuickTime media player. Let’s take a look at both options.
Mac’s built-in keyboard screenshot shortcuts
Step 1: Hit “Command” + “Shift” + “5” on your keyboard to open the Screenshot toolbar.
Step 2: A rectangular toolbar will appear toward the bottom of the screen.
.webp)
Step 3: Choose to record the entire screen or a selected portion.
Step 4: Click “Options” to adjust settings like save location and a countdown timer.
.webp)
Step 5: To screen record with sound, click “Options” to choose your microphone under “Microphone.”
Step 6: Click “Record” in the toolbar to start recording.
Step 7: To stop recording, click the Stop icon in the menu bar at the top of the screen.
Step 8: Find your recording in the selected save location or click the thumbnail that appears in the bottom right corner.
QuickTime media player
QuickTime is easy to use and is built into most Macs. Here’s how to use it for screen recording:
Step 1: Open Launchpad and search for QuickTime Player to launch the app.
Step 2: Click “File” in the top left corner and select “New Screen Recording.”
.webp)
Step 3: The same rectangular toolbar will appear at the bottom of the screen.
Step 4: Choose to record the entire screen, a selected window, or a selected portion.
Step 4: Click “Options” to adjust settings like save location and a countdown timer.
Step 5: To screen record with sound, click “Options” to choose your microphone under “Microphone.”
Step 6: Click “Record” in the toolbar to start recording.
Step 7: Stop recording by clicking the Stop icon in the menu bar.
Step 8: The recording will appear on your screen. Click the Play icon to preview it.
Step 9: Click “File” → “Save,” choose a save location, and hit “Save.”
Pro tip: Using Mac’s built-in screen recording software is quicker and ideal for those who are a whizz with keyboard shortcuts.
Need more options for screen recording on your Mac? Check out our top 10 picks for best screen recorders for Mac.
How to screen record on Windows
If you want to screen record on Windows, you can use the built-in Snipping Tool on Windows 11, or external tools such as Xbox Game Bar and Clipchamp. Let’s take a look.
Snipping Tool
Snipping Tool is likely preloaded on your device, but it is also available via the Microsoft Store. Note that older versions of the Snipping Tool did not record audio. However, the software has been updated and now includes audio capabilities.
Here’s how to screen record with Snipping Tool:
Step 1: Open the Start menu, search for Snipping Tool, and launch the app.
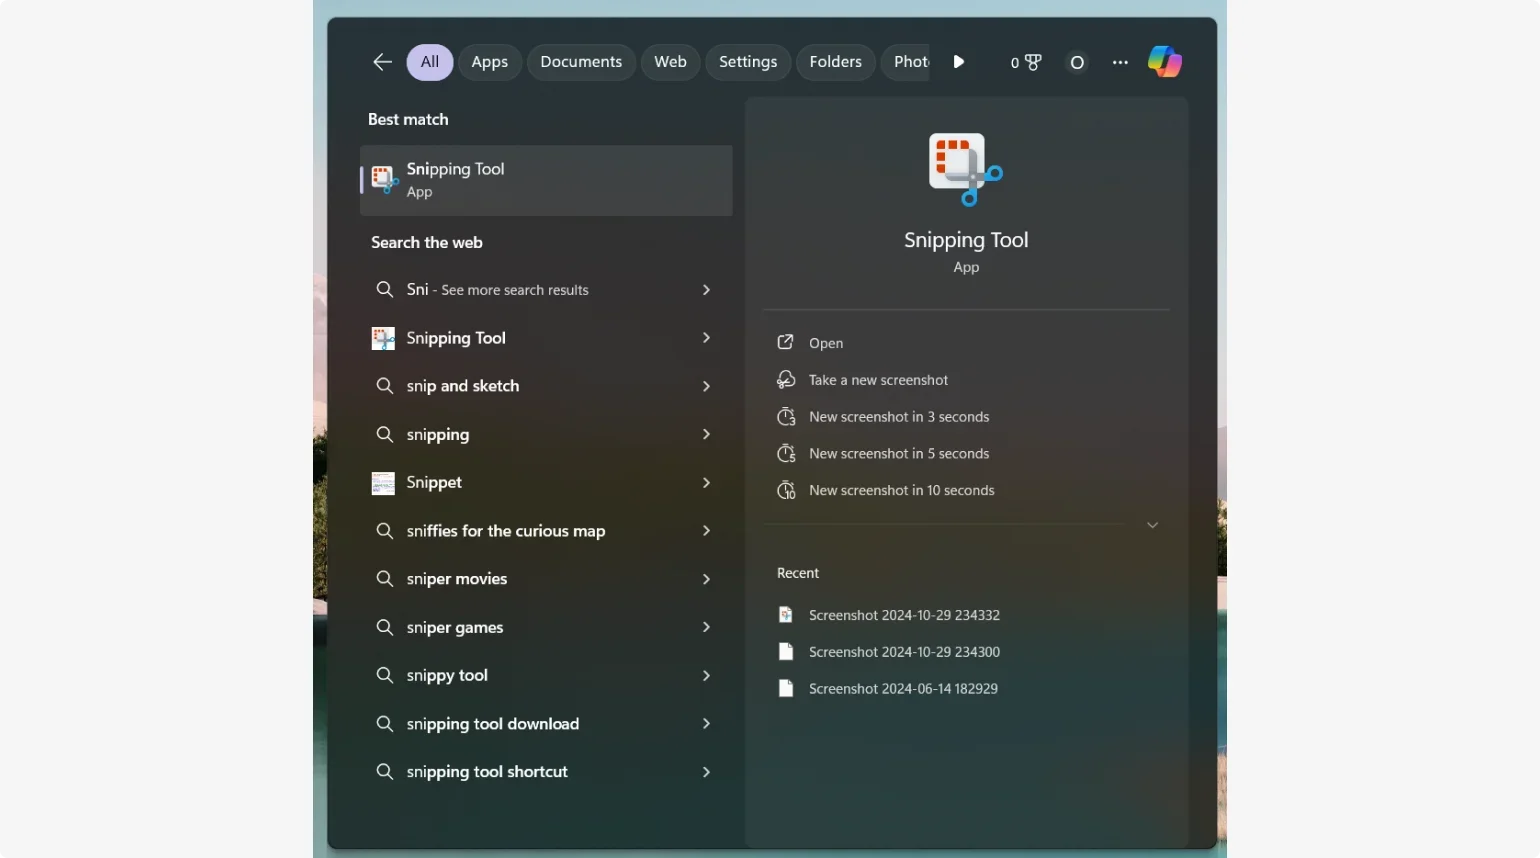
Step 2: Click on the video camera icon to go to screen recording mode.
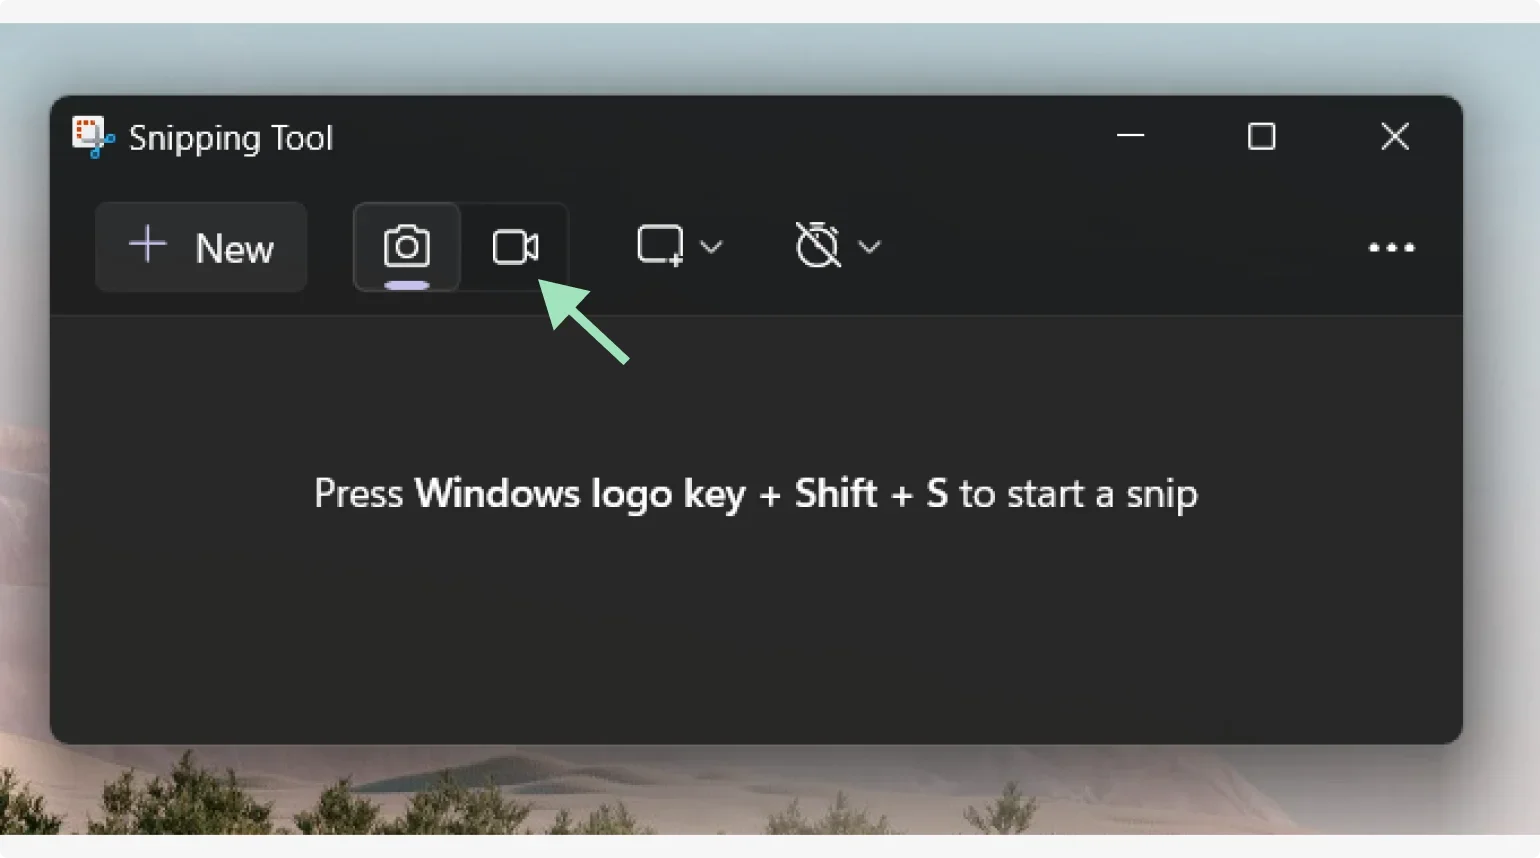
Step 3: Click “New” to start a new recording.
Step 4: Drag and resize the rectangular box to select the portion of the screen you want to record.
Step 5: To record with sound, click the microphone icon, uncheck “Mute”, and select your preferred microphone.
Step 6: Click “Start”, and a 3-second countdown will begin before recording starts.
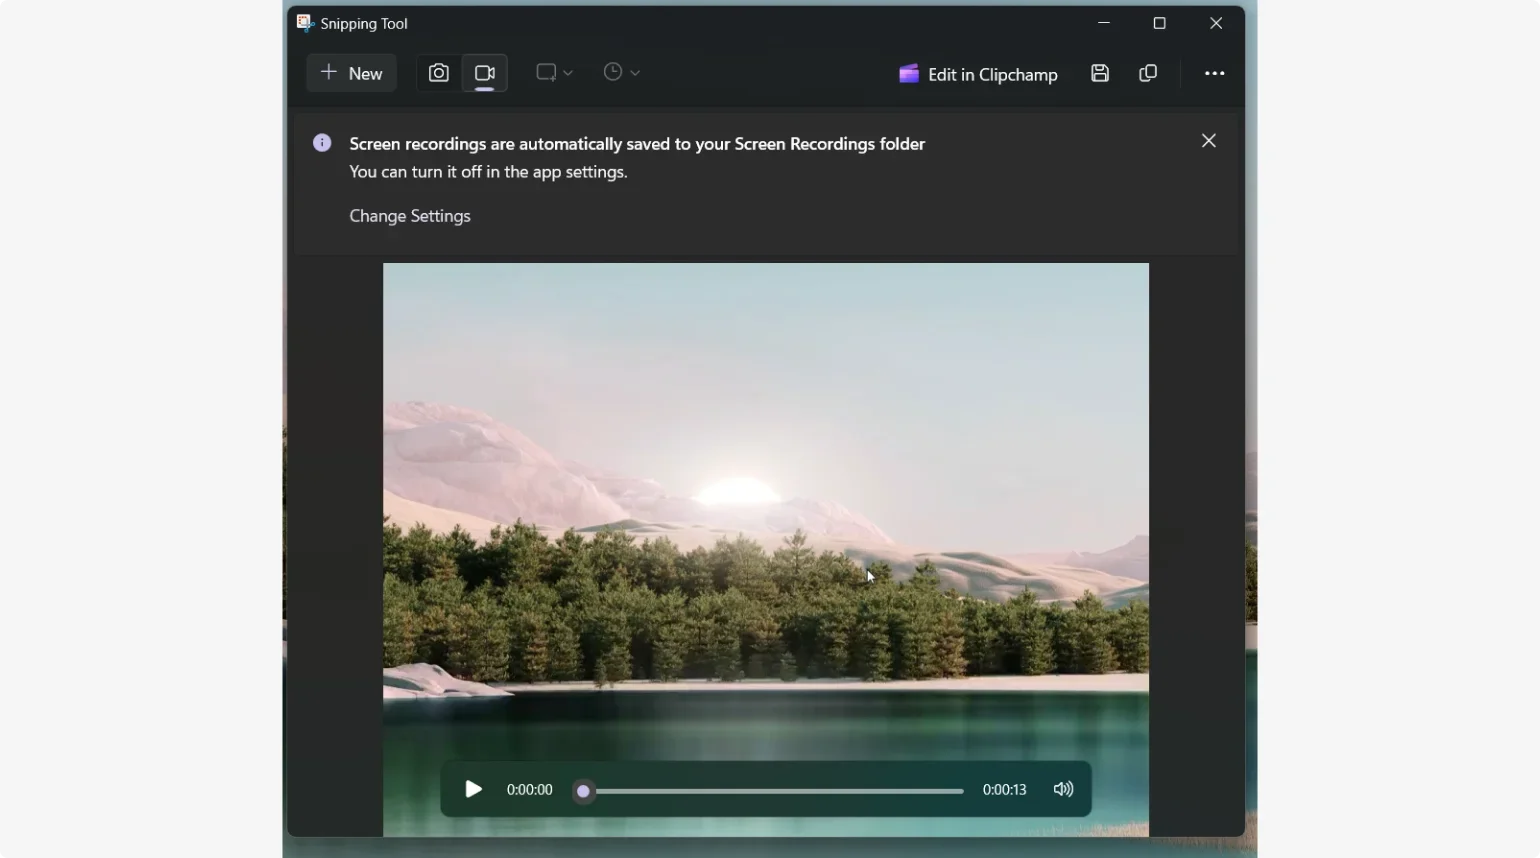
Step 7: Click “Stop” to end the recording. You can copy, share, or save the file.
Step 8: By default, recordings are saved in the Videos folder.
If you have an older version of Windows, you’ll need to use an external tool like Clipchamp or Xbox Game Bar.
Xbox Game Bar
Xbox Game Bar is a gaming overlay built into Windows 10 and 11. It includes a useful screen recording feature. Here’s how to use it:
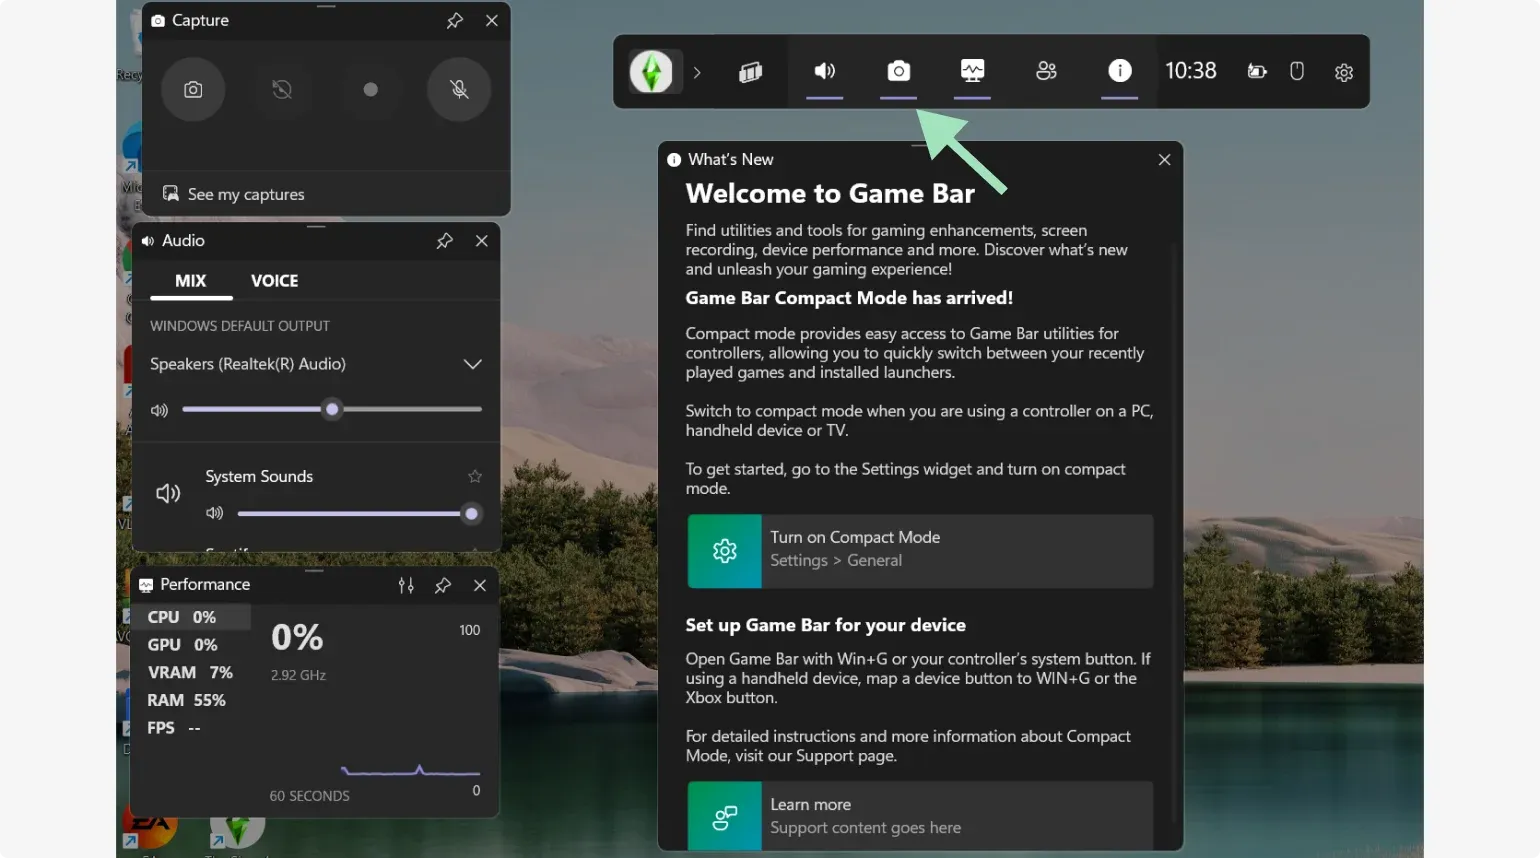
Step 1: Press the Windows key + “G” or search for Xbox Game Bar in the Start menu.
Step 2: Click the Camera icon to open the recording window.
Step 3: Choose to record your screen as a video or screenshot.
Step 4: To record with sound, click the Microphone icon (Xbox Game Bar captures system audio by default).
Step 5: Click “Record” (solid white circle) to start recording.
Step 6: Click “Stop” when finished.
Step 7: Click “Show all captures” to review your recordings.
Clipchamp
Clipchamp is a video recorder and editor. It is available to download for free from the Microsoft Store.
Step 1: Open Clipchamp on your desktop.
Step 2: Click “Record & Create” in the left toolbar.
Step 3: Select “Screen” from the recording options.
Step 4: Allow camera and microphone access in the pop-up.
Step 5: Choose your microphone and toggle the speaker coach on or off.
Step 6: Click the red record button to start recording.
Step 7: Select to record a tab, window, or entire screen.
Step 8: Click “Stop sharing” when finished.
Step 9: Preview your recording and choose “Retake recording” or “Save and edit”.
Get more tips in how to screen record on Windows.
How to screen record on Chromebook
Chromebooks have built-in screen recording. Here’s how it works:
Step 1: Open the Quick Settings panel in the bottom right corner.
Step 2: Click “Screen Capture” to open the recording toolbar.
Step 3: Select the video icon for screen recording (the camera icon is for screenshots).
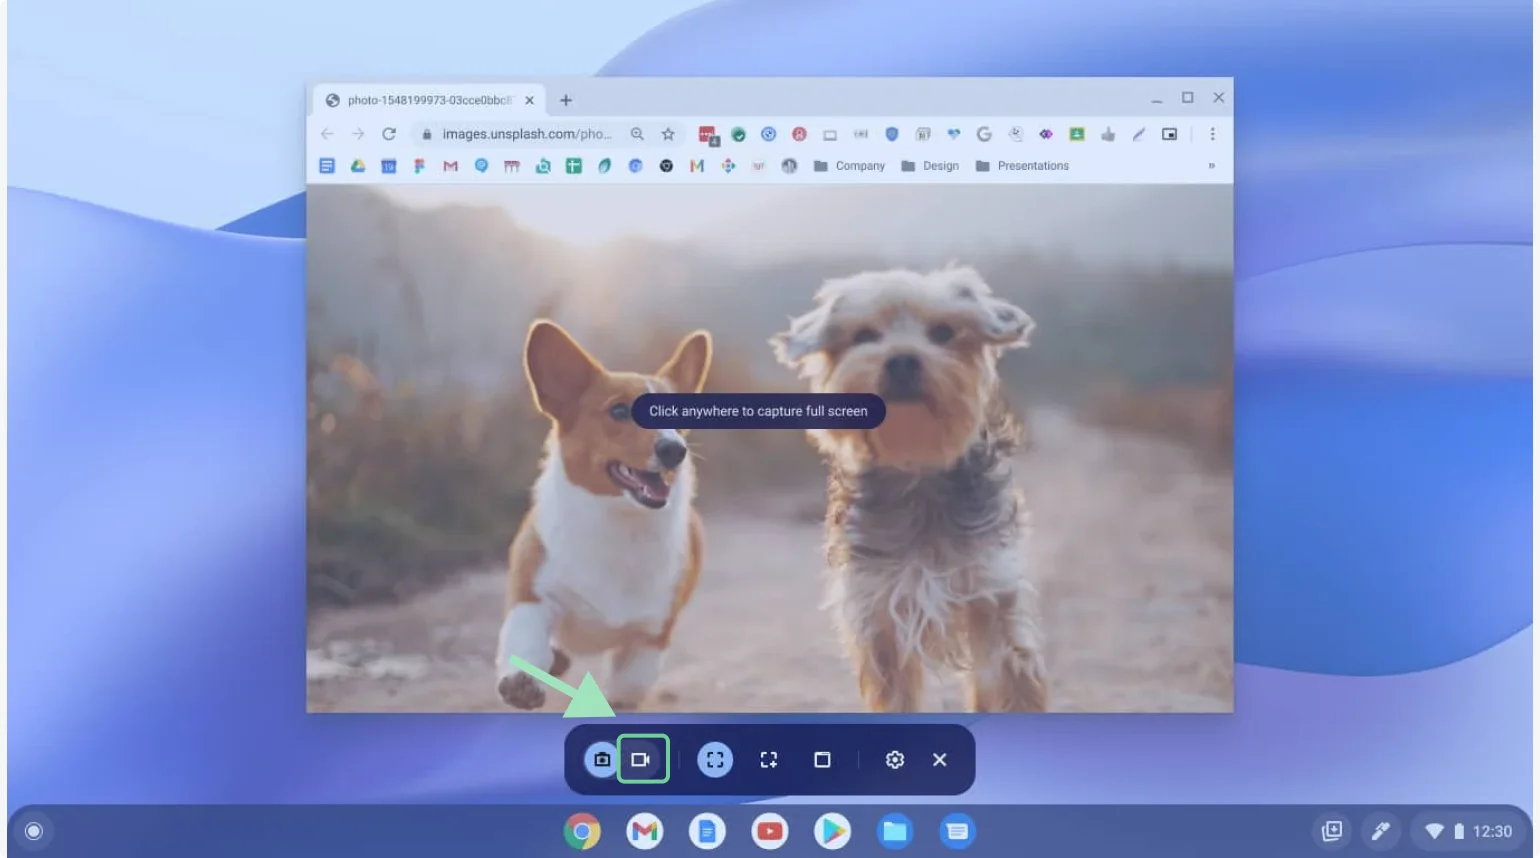
Step 4: Choose to record the full screen, a window, or a selected area.
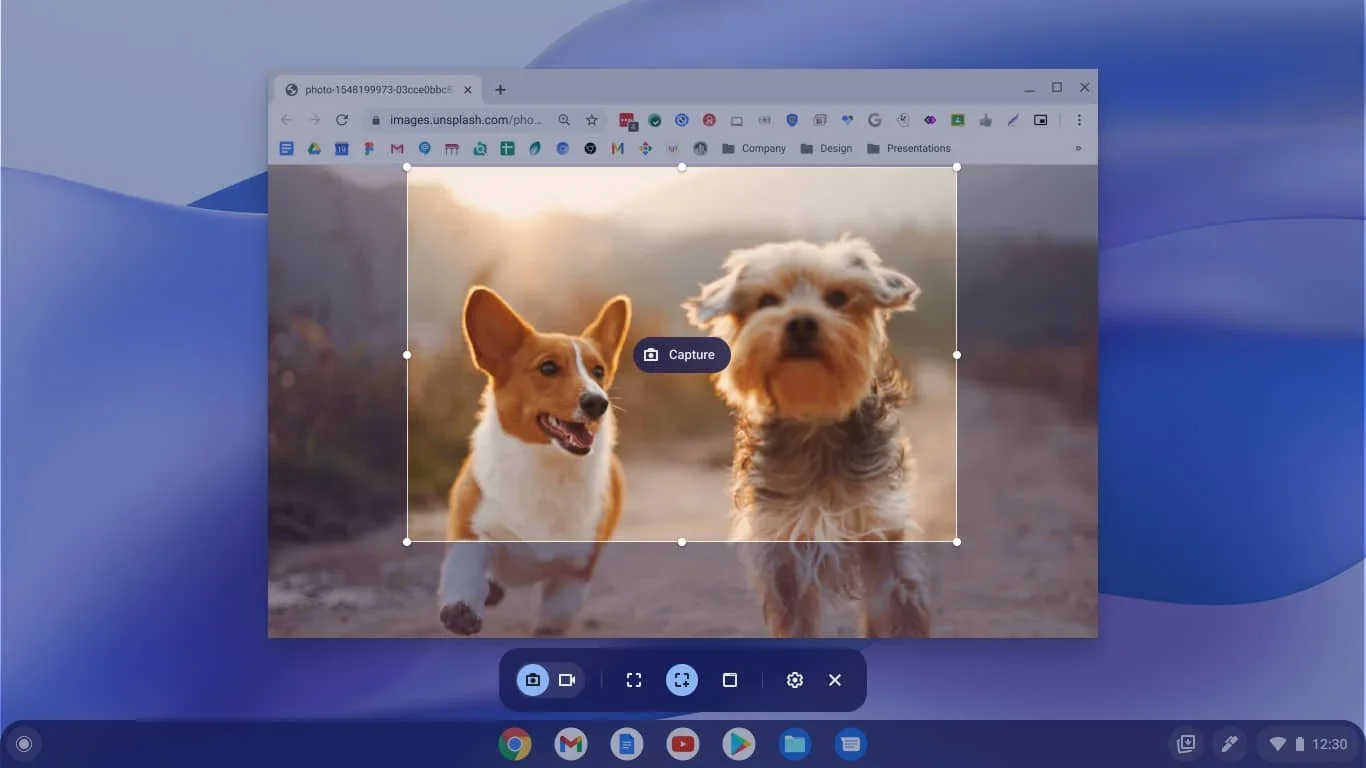
Step 5: Click the Settings gear to select your audio input (microphone, device audio, or both).
Step 6: To record:
- Full screen: Click anywhere to start.
- Single window: Click the window you want to record.
- Partial area: Drag to select the area, then hit “Record”.
Get more tips and details in How to Screen Record on Chromebook.
How to screen record on a mobile device
Whether you want to record your iPhone or Android screen, we have you covered with the steps below.
How to screen record on iPhone or iPad
Recording your iPhone screen is super simple. Here’s how to do it:
Recording your screen on iPhone or iPad is quick and easy. Here’s how:
Step 1: Open Control Center:
- On iPhone (Face ID models) & iPad, swipe down from the top-right corner.
- On iPhone (Home button models), swipe up from the bottom of the screen.
Step 2: Touch and hold the background, then tap “Add a Control.”
Step 3: In Controls Gallery, tap “Screen Recording” to add it (only needed once).
Step 4: Tap anywhere to return to Control Center.
Step 5: To record with sound, tap “Microphone” and ensure it says “Microphone On.”
Step 6: Tap the Screen Recording icon, and a 3-second countdown will begin.
.webp)
Step 7: Tap the red circle at the top of the screen to stop recording.
Your recording will be saved in the Photos app
How to screen record on Android
Android has a built-in screen recorder too. Here’s how to use it:
Step 1: Swipe down twice from the top of your screen to open Quick Settings.
Step 2: Tap “Screen Recorder.” If it’s missing, swipe right or tap “Edit” to add it.
Step 3: Ensure the content you want to record is visible.
Step 4: Tap “Start” to begin recording after the countdown.
Step 5: Choose to record device audio, microphone, or both when prompted.
Step 6: To stop recording, swipe down and tap the “Screen Recorder” notification.
How to screen record on Galaxy Tab
Now let’s walk through the screen recording steps for a Galaxy Tab:
Step 1: Swipe down from the top-right corner to open Quick Settings.
Step 2: Tap the “Screen Recorder” icon.
Step 3: Choose your sound settings: You can select no sound, media sounds, or media sounds and mic.
Step 4: Tap “Start recording” and wait for the countdown.
Step 5: When finished, tap the “Stop” icon. Your recording will be saved in the Gallery app
Troubleshooting: Why can’t I record my screen?
Issues with screen recording can stem from a few common problems. Here’s where to look first.
- Update graphic drivers: Outdated or corrupted graphics drivers can hinder screen recording functionalities. Download new drivers if necessary.
- Manage system resources: High CPU memory usage can impede screen recording. Try closing other applications that may be running.
- Review privacy settings: Ensure apps have permission to access and record your screen in your settings.
- Verify storage space: Insufficient storage can prevent screen recordings from saving. Check available storage space via your settings and delete unnecessary files.

Final thoughts: Record your screen on any device
Screen recording doesn’t have to be complicated. In fact, most devices have built-in screen recording tools that do a solid job. But if you’re looking for the highest quality screen recordings, try Riverside. It’s free to use and provides lots of additional tools to help ensure your screen recording looks and sounds professional. Happy screen recording!
FAQs on how to screen record
Looking for more information? Here are the answers to some frequently asked questions.
What is the best software for screen recording on a PC?
The best screen recording tool for you depends on your needs. Many devices have built-in screen recorders that are easy enough to use and do the job. But most provide lower-quality audio and video, and lack additional tools to help you polish your work. Plus, many don’t allow you to record your screen and a webcam.
With Riverside, you can record in up to 4K video and 48 kHz audio. You’ll also get a full suite of easy-to-use editing tools to help you polish your recording. You can even live stream your presentation directly from our platform!
What are the best apps for screen recording on Android?
While screen recording is possible using the built-in Android tool, you may wish to use an app to give you more options and flexibility. AZ Recorder is a popular choice within the Android community as it provides high quality video as well as additional options such as editing and the ability to live stream.
Can I screen record on my Android phone without downloading an app?
Absolutely! Android versions 11 and above all support native screen recording. If you have an older version of Android, consider updating your device or using an external app like AZ Recorder or Mobizen Screen Recorder.
What are the best free screen recording software options available?
All the options discussed in this article are free or have free versions available. There is no cost to use native tools on your Mac, Windows, iPhone, or Android device. Xbox Game Bar is free, and both Riverside and Clipchamp offer free plans.
What software is best for screen recording on a Mac?
The best screen recording software depends on your needs. If you want something easy and straightforward to use, Mac’s built-in screen recorders will get the job done. But if audio and video quality are a concern, or you want additional tools to polish your work, you’ll need an external tool.
With Riverside you get top quality audio and video, the ability to customize your colors, layout, and branding, and the ability to invite up to 9 guests. Check out our top 10 picks for best screen recorders for Macs for more options.


.webp)


