Table of contents:
Key takeaways:
Captions can make your videos more accessible to people who are hard of hearing and keep viewers engaged, even when they’re watching on mute.
CapCut is a video editing tool created by ByteDance, the creator of TikTok. It’s incredibly popular, and if you’re here, you want to use it to add subtitles and captions to your videos.
Good news; it’s really easy, and you’re in the right place. We’re here to guide you step by step!
How to add captions on CapCut on a PC
There are two different ways to add captions to CapCut on your desktop computer. You can do it directly on your browser through the online editor or download and install the desktop app.
These two editors have different interfaces, so we’ll tackle them one by one. Let’s start by adding them inside the online editor.
Adding captions on the online editor (CapCut Web)
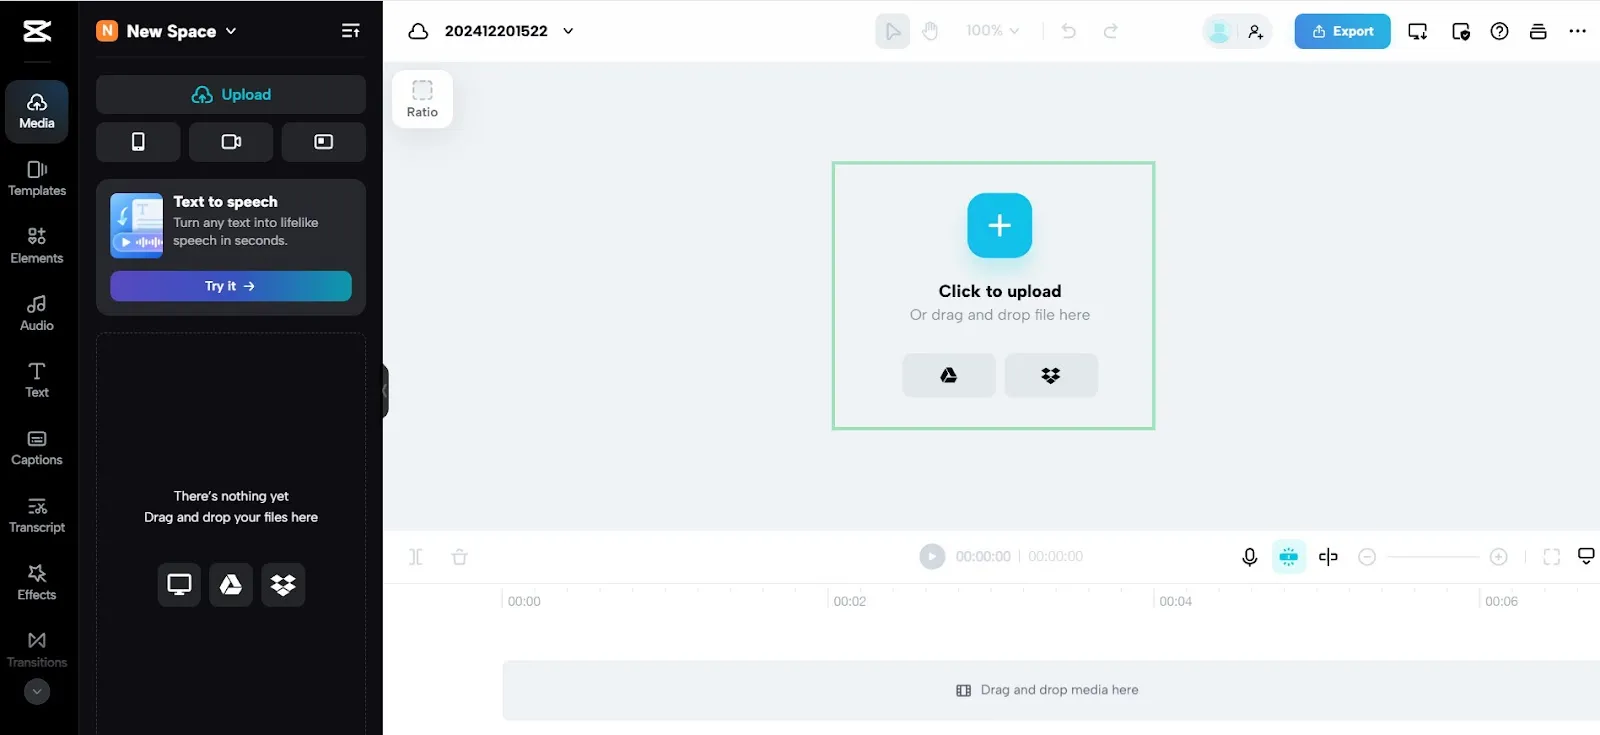
Step 1: Upload the video you want to caption. To do so, click the blue “Click to upload” button in the center of the screen, drag and drop your file, or link your Google Drive or Dropbox to CapCut for easy access.
Step 2: Click the “Captions” icon on the left sidebar, then choose one of the available options. You can generate your captions automatically by clicking “Auto captions,” typing them manually, or uploading a caption file.
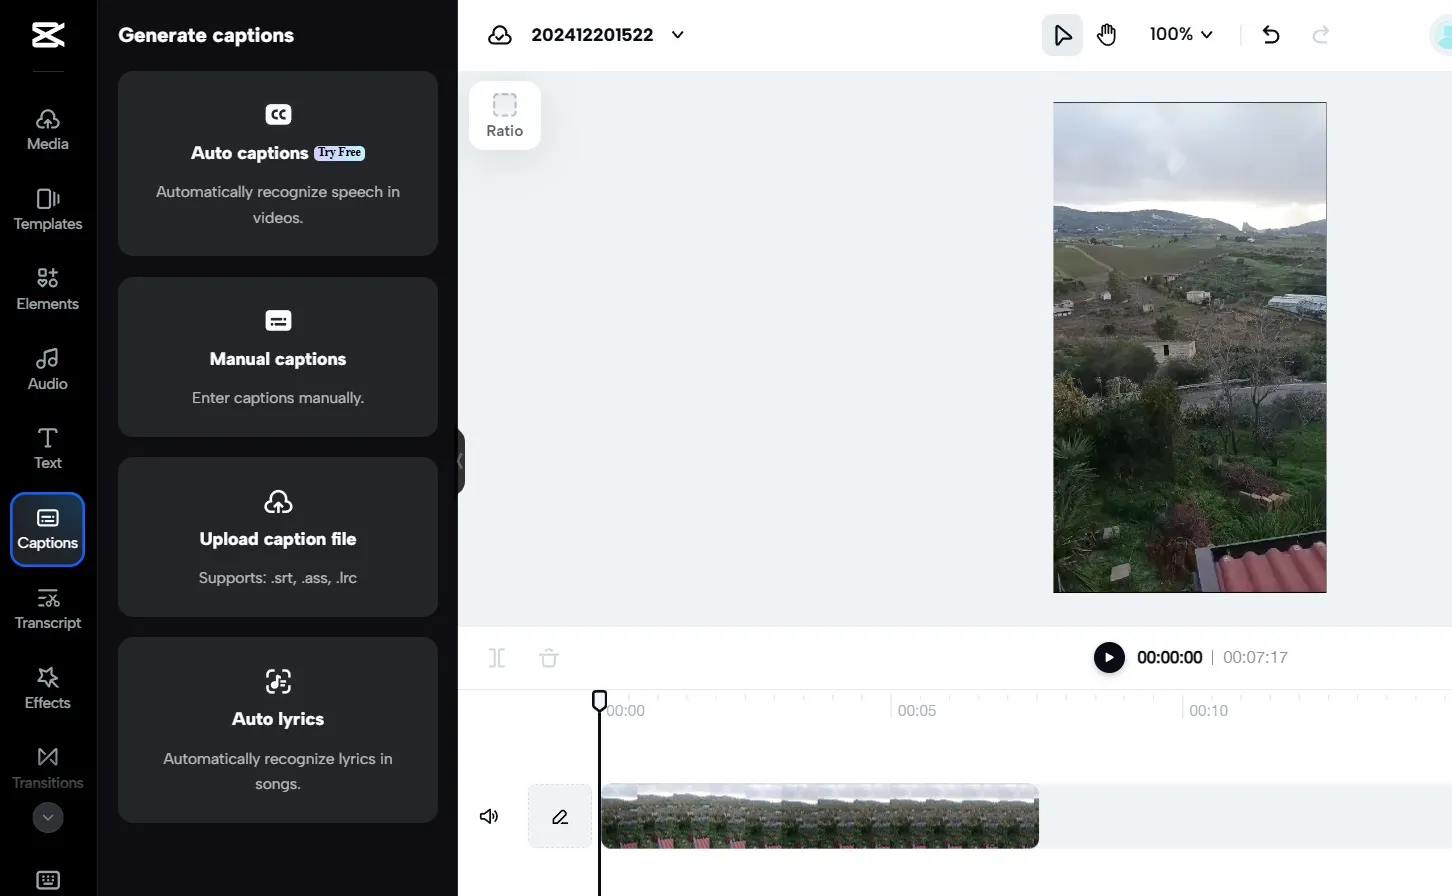
Step 3: To create captions automatically, select “Auto captions,” then select the language of your video. Click “Generate” and wait for the subtitles to be added.
Step 4: The newly generated captions will appear on the left sidebar. Click on them and edit the text to fix any issues or change them as you see fit. Captions may suffer from some accuracy issues, especially if the original audio's quality was low.
You can also drag the sliders on the timeline at the bottom to tweak their duration and appearance time.
Finally, you can drag them across the screen to select their position and click the “Presets” and “Basic” buttons on the right sidebar to edit their size, font, and style, or choose from preset styles and templates.
Most font styles and layouts are locked, and only basic ones are available for free users.

Step 5: Once you’ve edited your captions, click the blue “Export” button at the top right of the screen, then “Download” to burn them into your video.
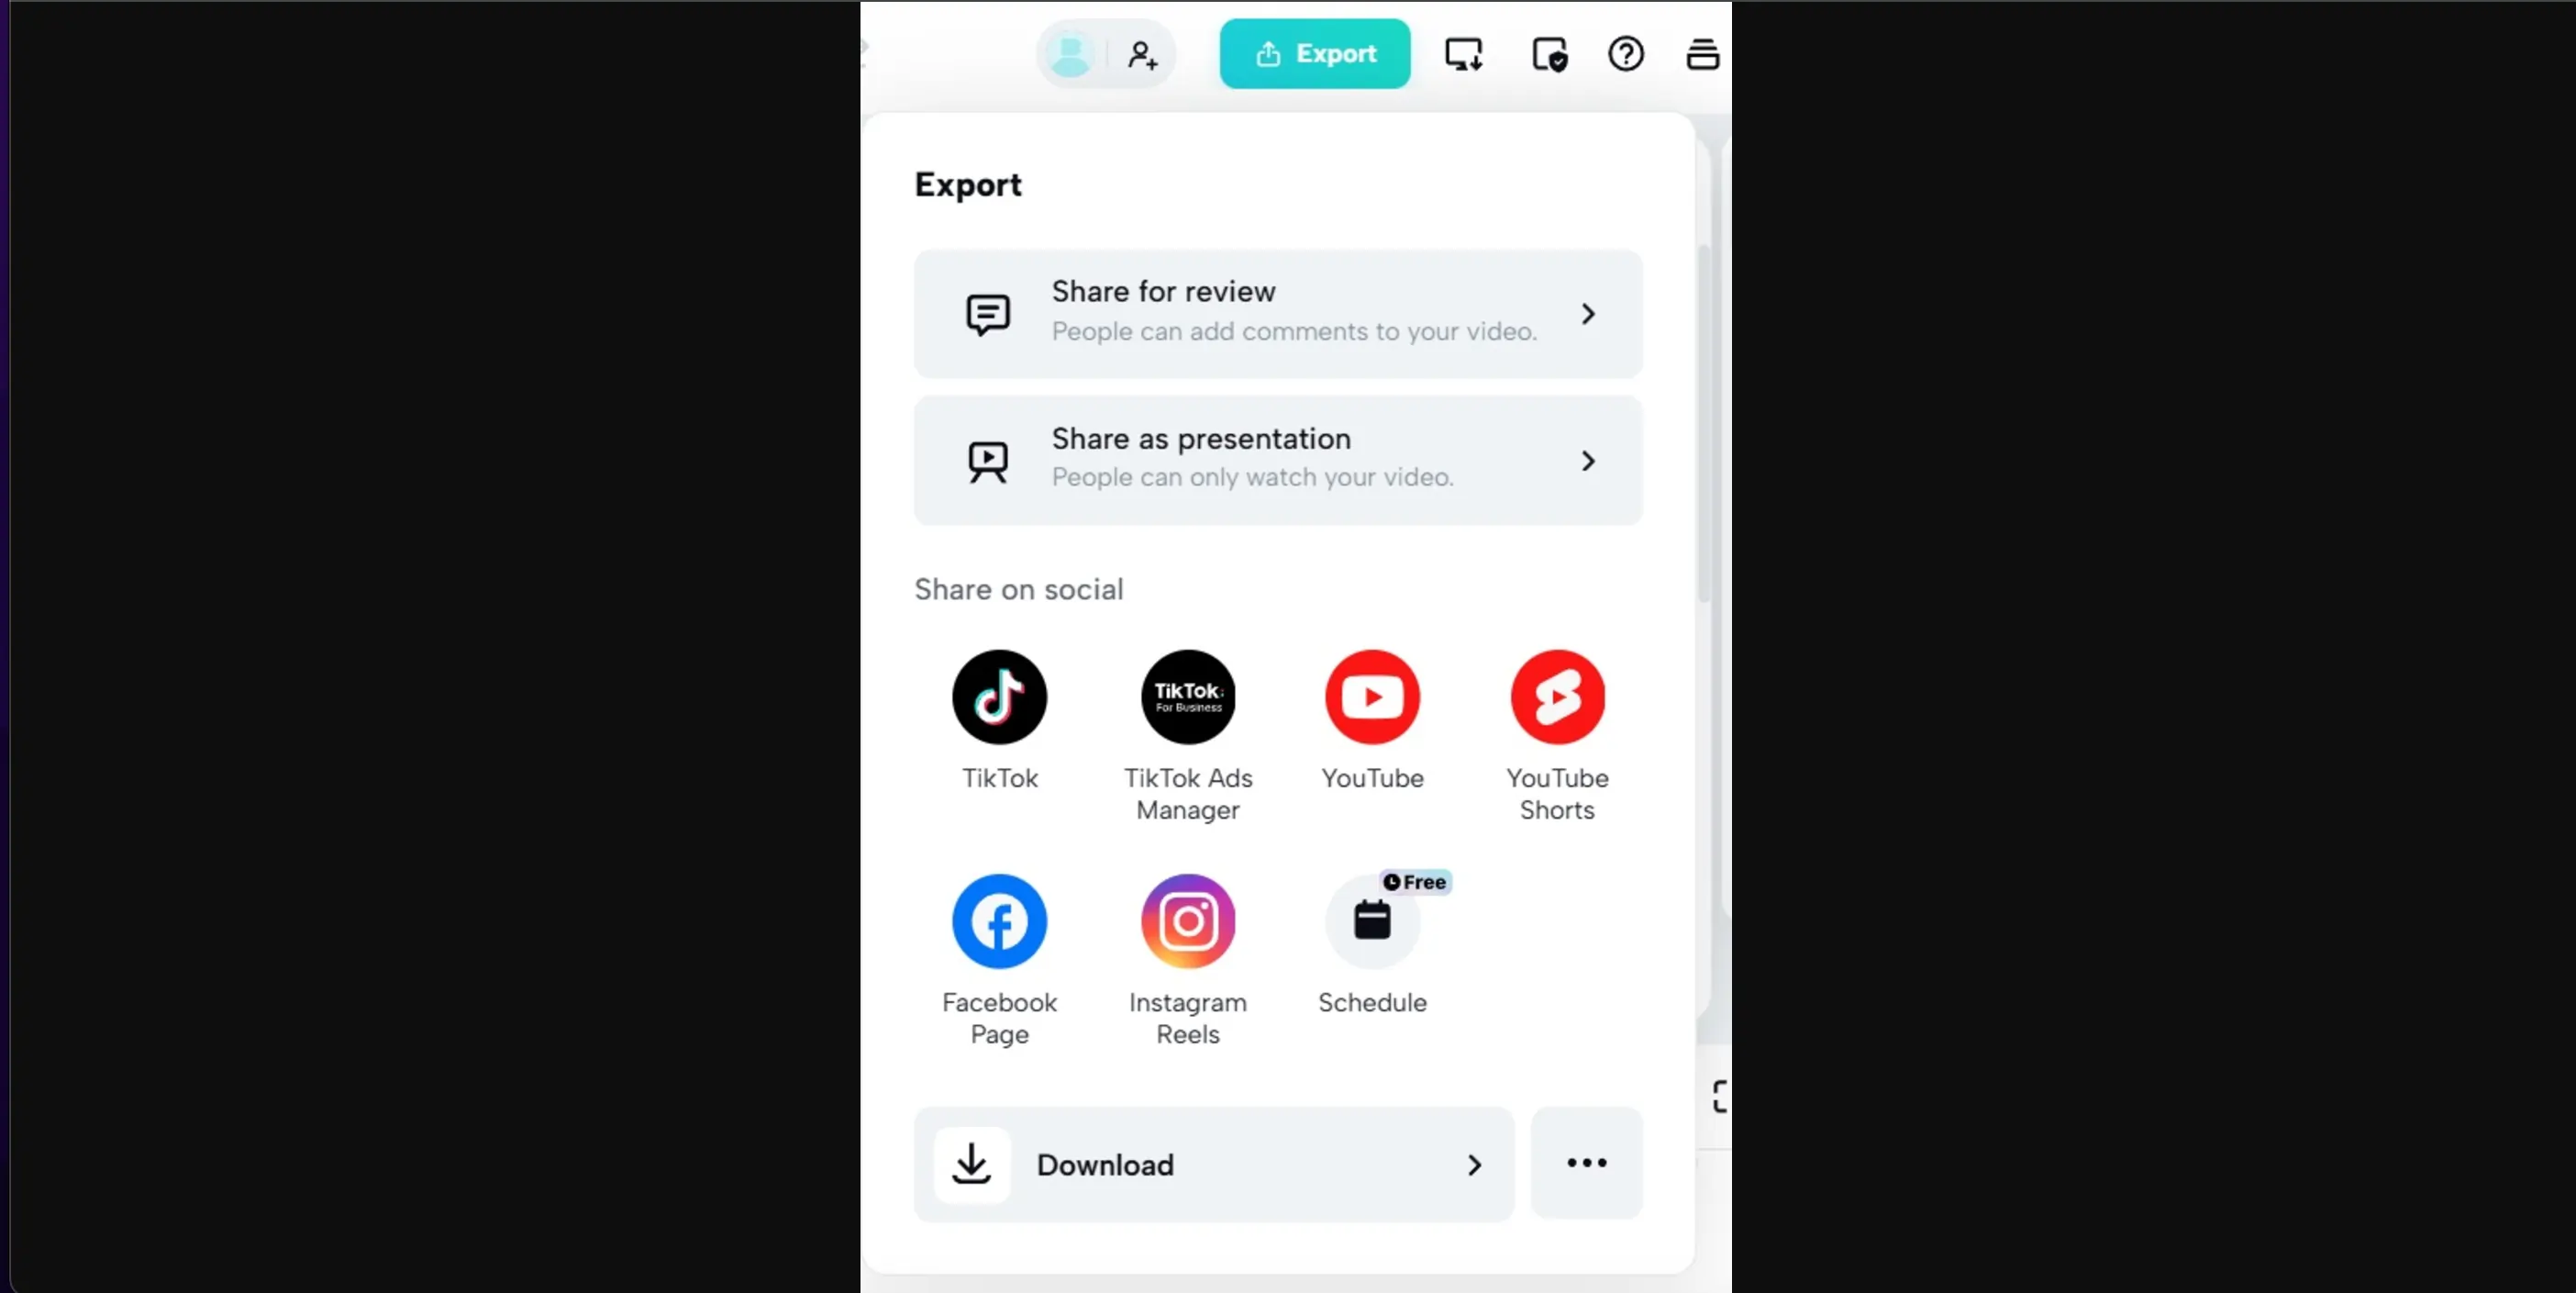
Select the resolution, quality, frame rate, format, and file name, then click “Export” to download your video.
CapCut Web common issues: How to fix the insufficient storage bug
Sometimes, you might encounter a frustrating bug where CapCut Web prevents you from uploading files, warning you that you’ve run out of storage space. On closer inspection, you’ll notice that the maximum file size you can upload is 1 byte (yes, one BYTE), making it impossible to load any video. This glitch is most common when setting up a new account.
To fix this issue, follow these steps:
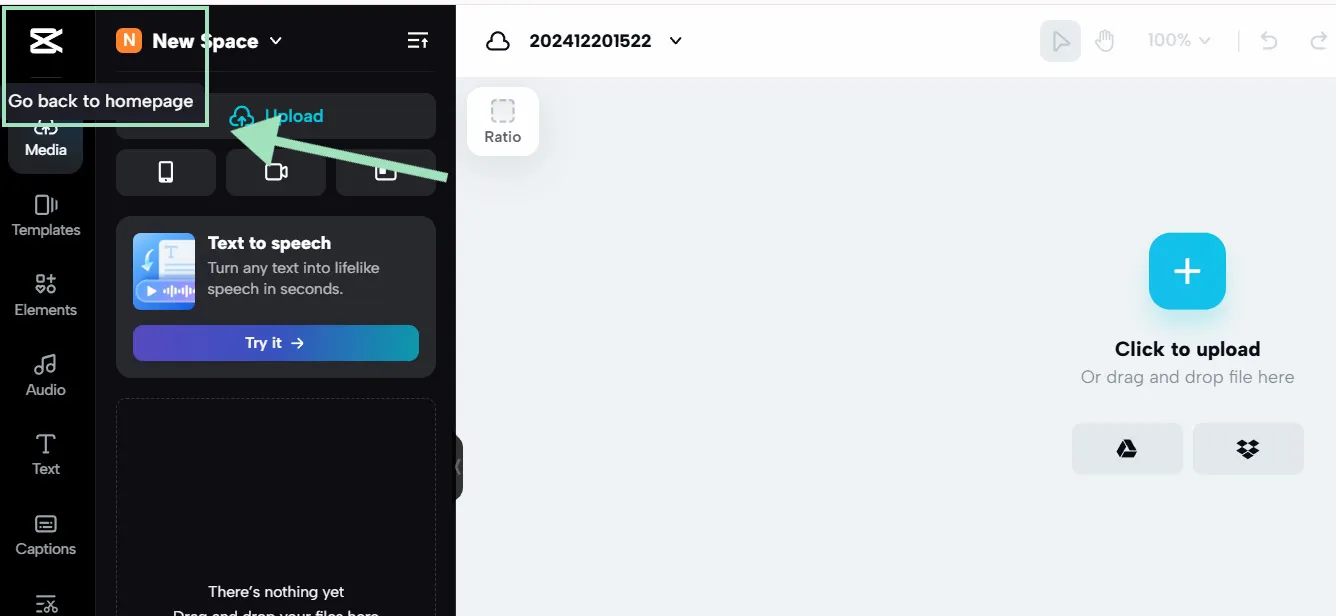
Step 1: Click the icon in the upper left corner of your screen to return to your CapCut homepage.
Step 2: Once you’re back on your homepage, you will notice that the storage space available for your newly created space is only one byte.
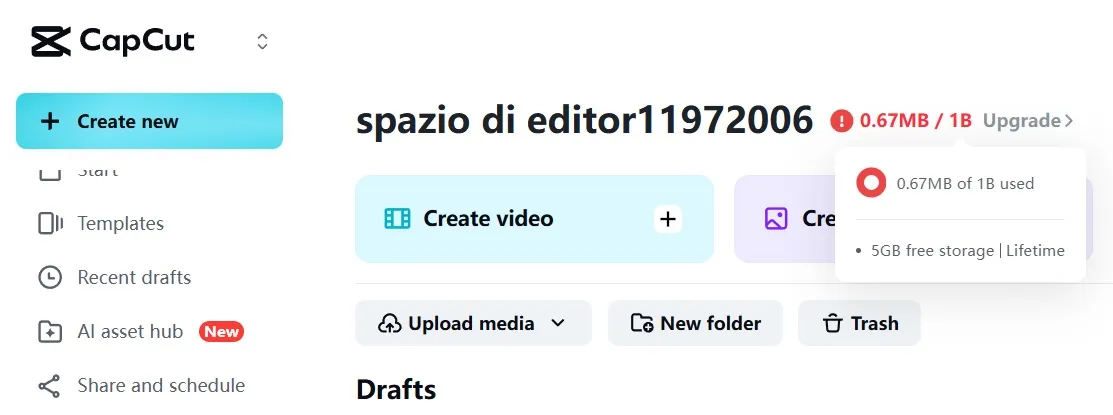
To create space, go to the “Spaces” section on the left sidebar and click “Create new space.”

Step 3: In the menu that appears, type a name for the new space, then click the blue “Create space” button.
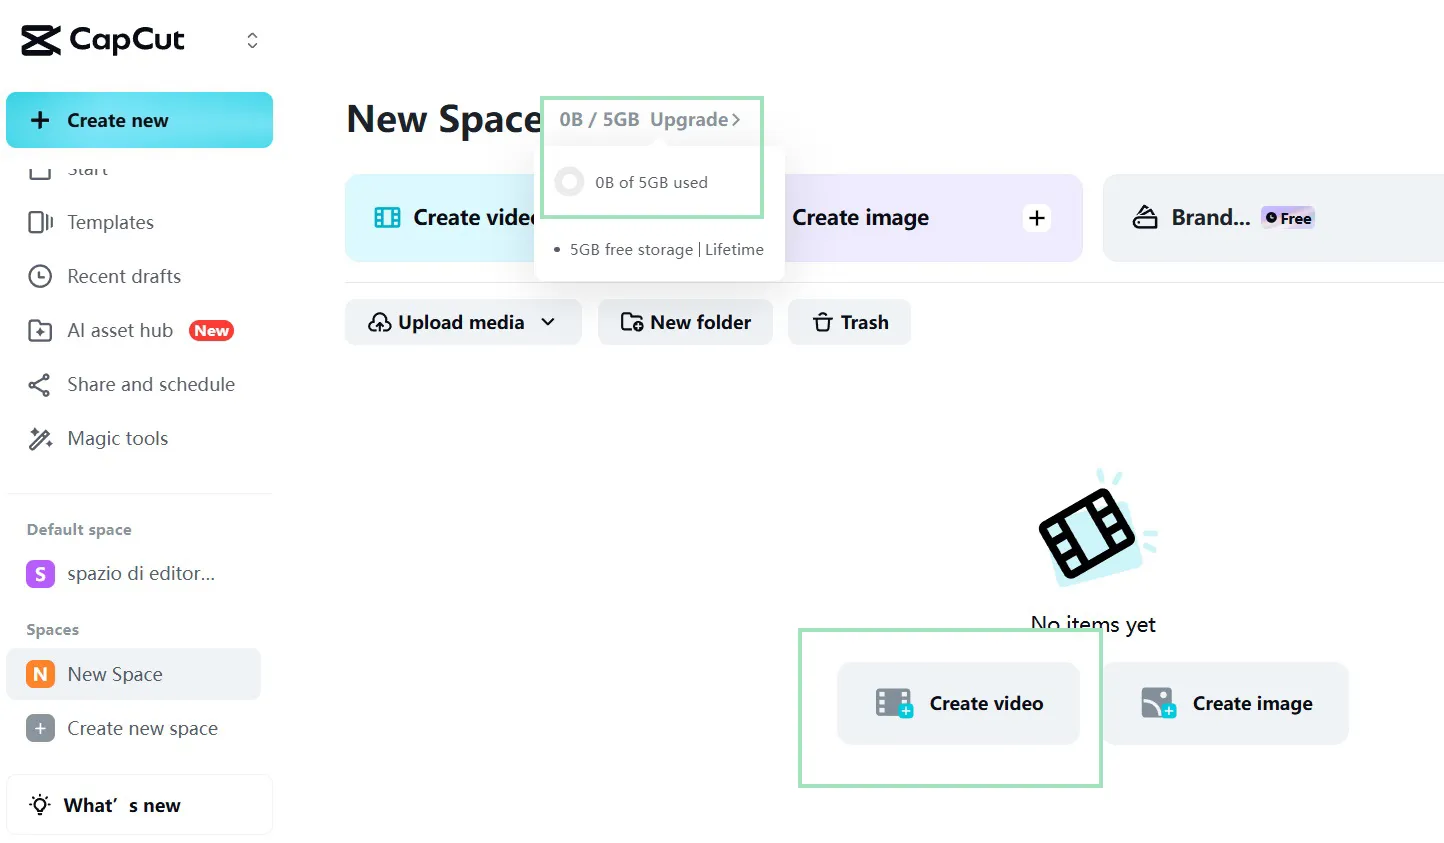
Step 4: Once you return to the homepage, you’ll notice that the new space you created now has 5 GB of space. The bug is fixed!
Once ready, click “Create video” in the middle of the screen to open the online editor and start a new project.
Adding captions on the CapCut desktop app
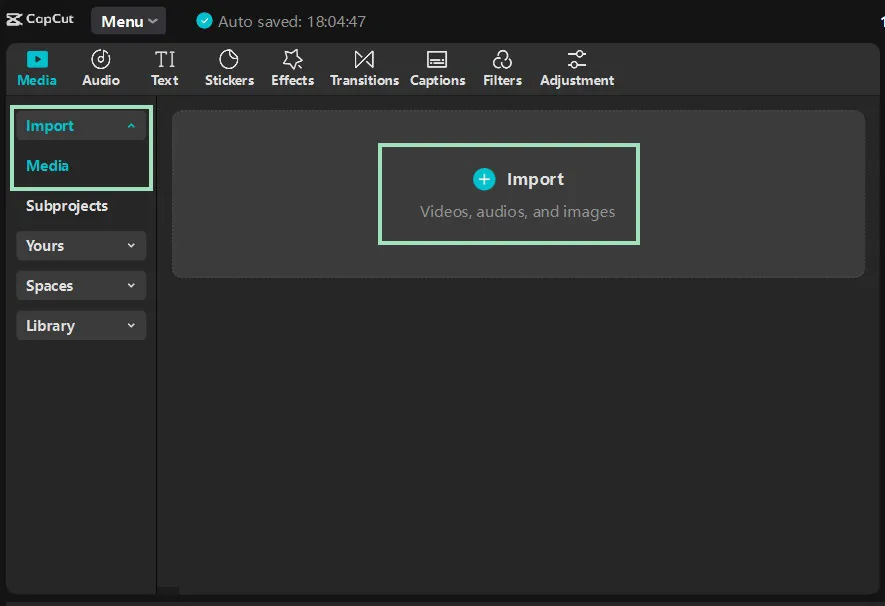
Step 1: Upload the video you want to caption by selecting “Import” then “Media” from the left navigation bar. Then click the blue “Import” button on the left of the screen and choose the file you want to edit.
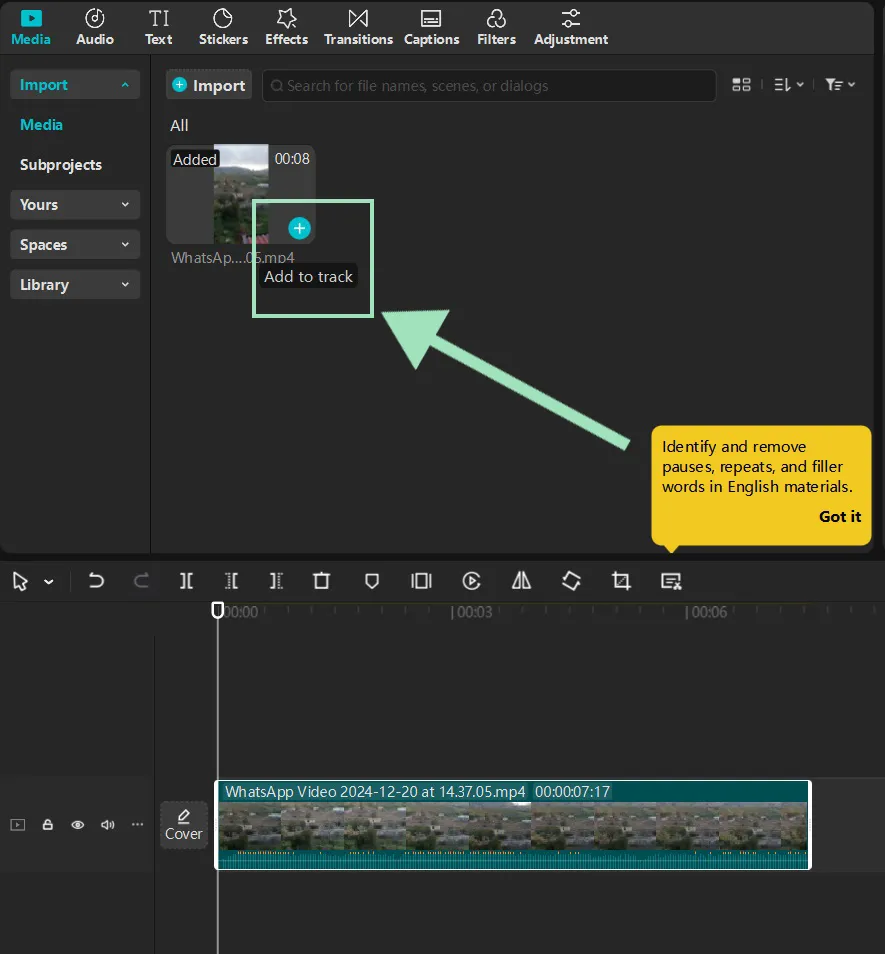
Step 2: You will now see a small preview of your video on the upper left side of the screen. Hover on the video miniature, and click on the small “+” button to add the clip to the track below. You can add multiple clips to the same track if you want.
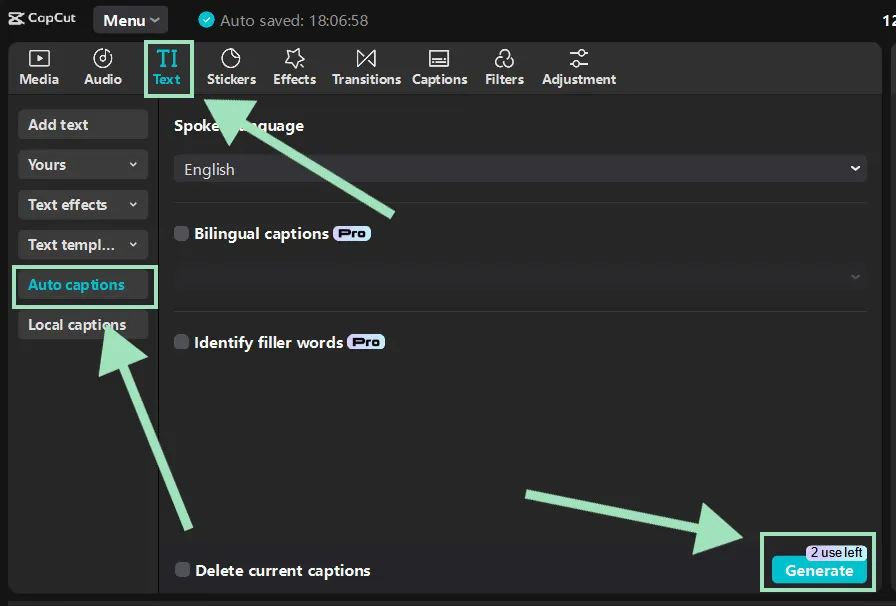
Step 3: Click the “Text” button on the top toolbar. Then, from the left-hand menu, select “Auto captions” to let CapCut generate your captions automatically.
Select the language of the video, then click the blue “Generate” button to generate auto-captions.
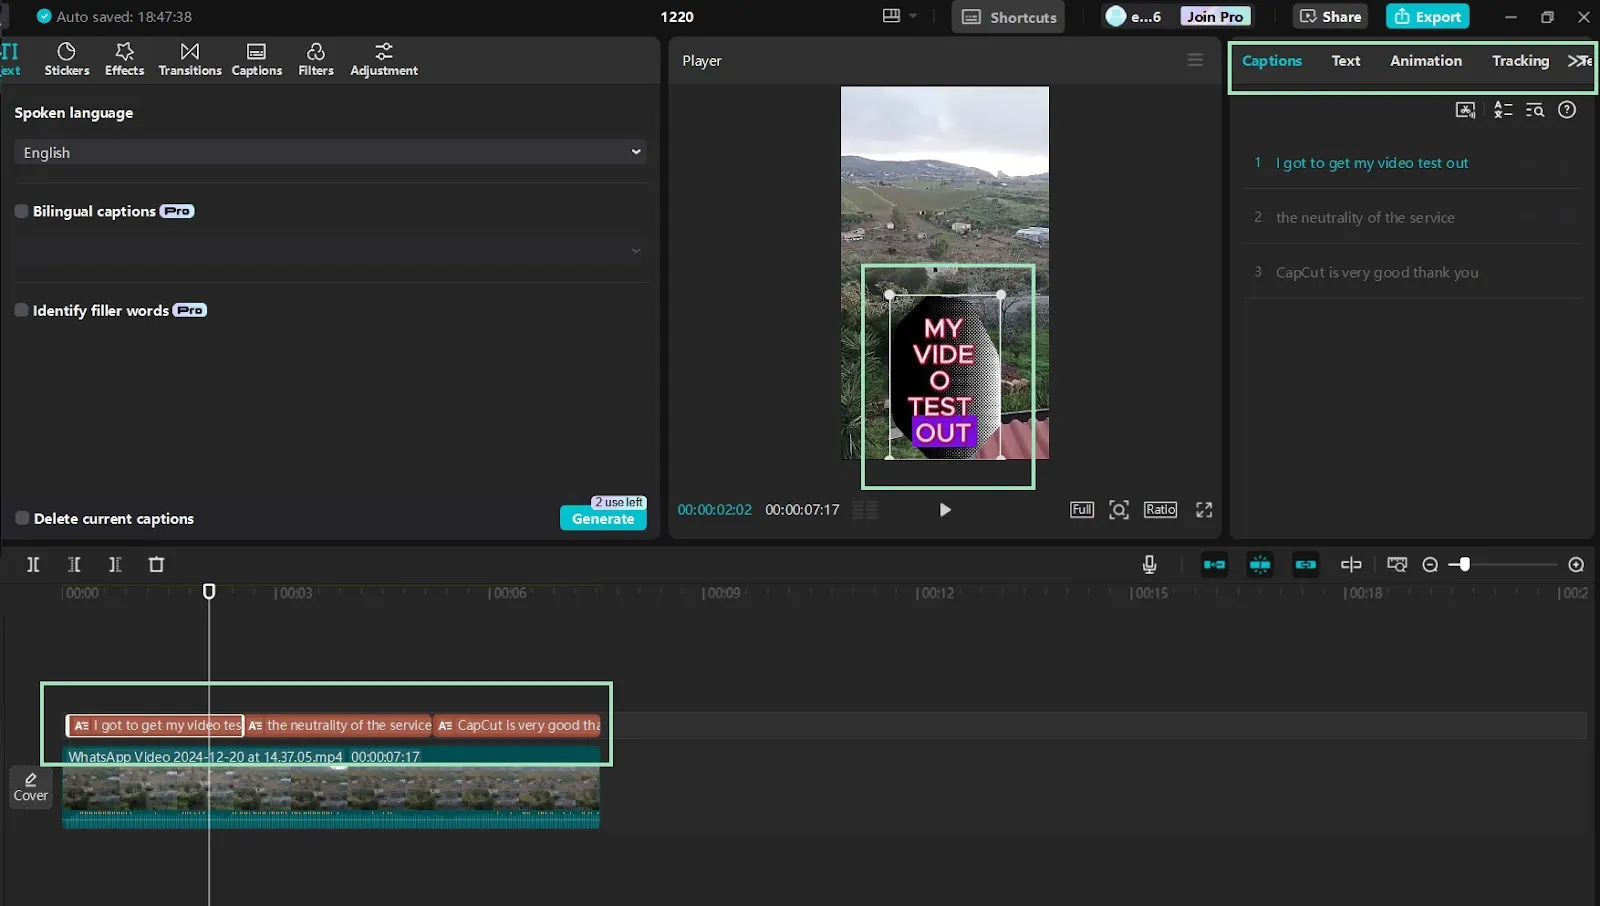
Step 4: You can now edit your captions' text, layout, and timing. On the top right sidebar, you can click on “Captions” to manually edit the text, or “Text,” “Animation,” and “Tracking” to change their style, font, size, and layout or apply some templates.
Most more advanced effects and templates are locked for free users.
You can also drag the sliders on the timeline at the bottom to tweak their duration and appearance time.
Finally, you can drag them across the screen to select their position.
Step 5: Once you’re happy with your edits, click the blue “Export” button at the top right of the screen. A new menu will appear with several options, such as the resolution, format, and codec you want to use for your video.
Choose the ones you prefer, then click on “Export” to burn your captions into the video and download it.
How to add captions or subtitles on the CapCut Mobile App (iOS & Android)
If you want to add captions to your video on the go, the CapCut Mobile App is the ideal solution. Just follow these steps:
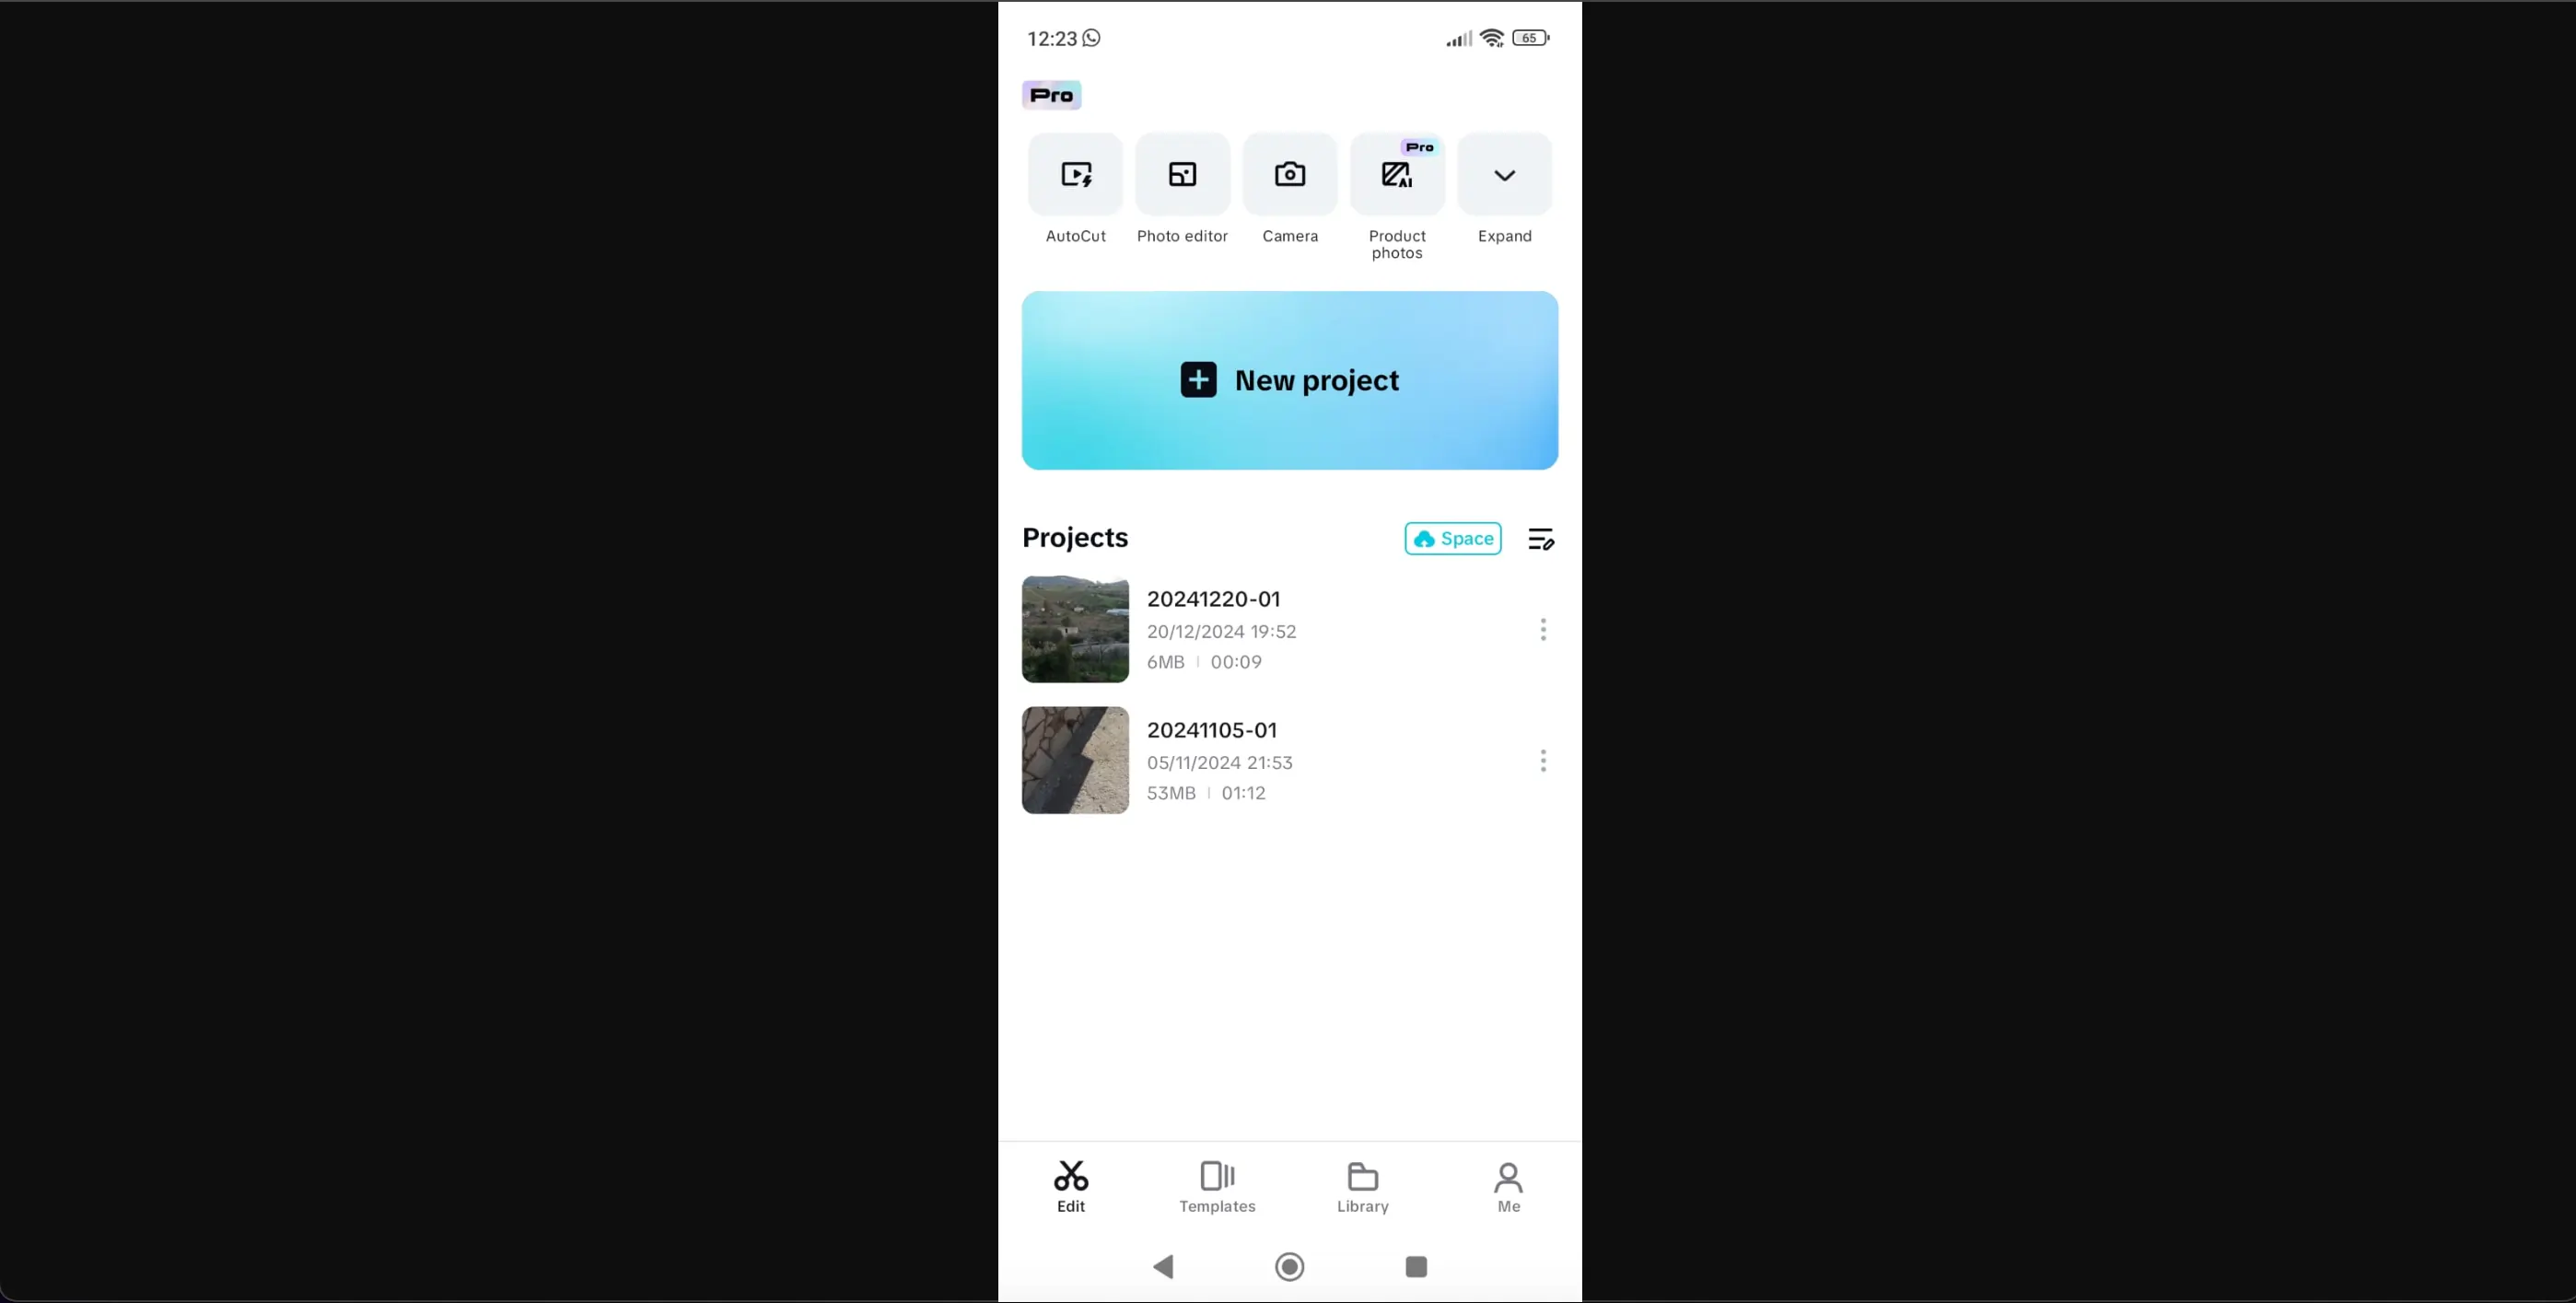
Step 1: Click the large blue button “New project” in the middle of the screen, then click “Add” to load the video you want to caption by clicking “Add.”
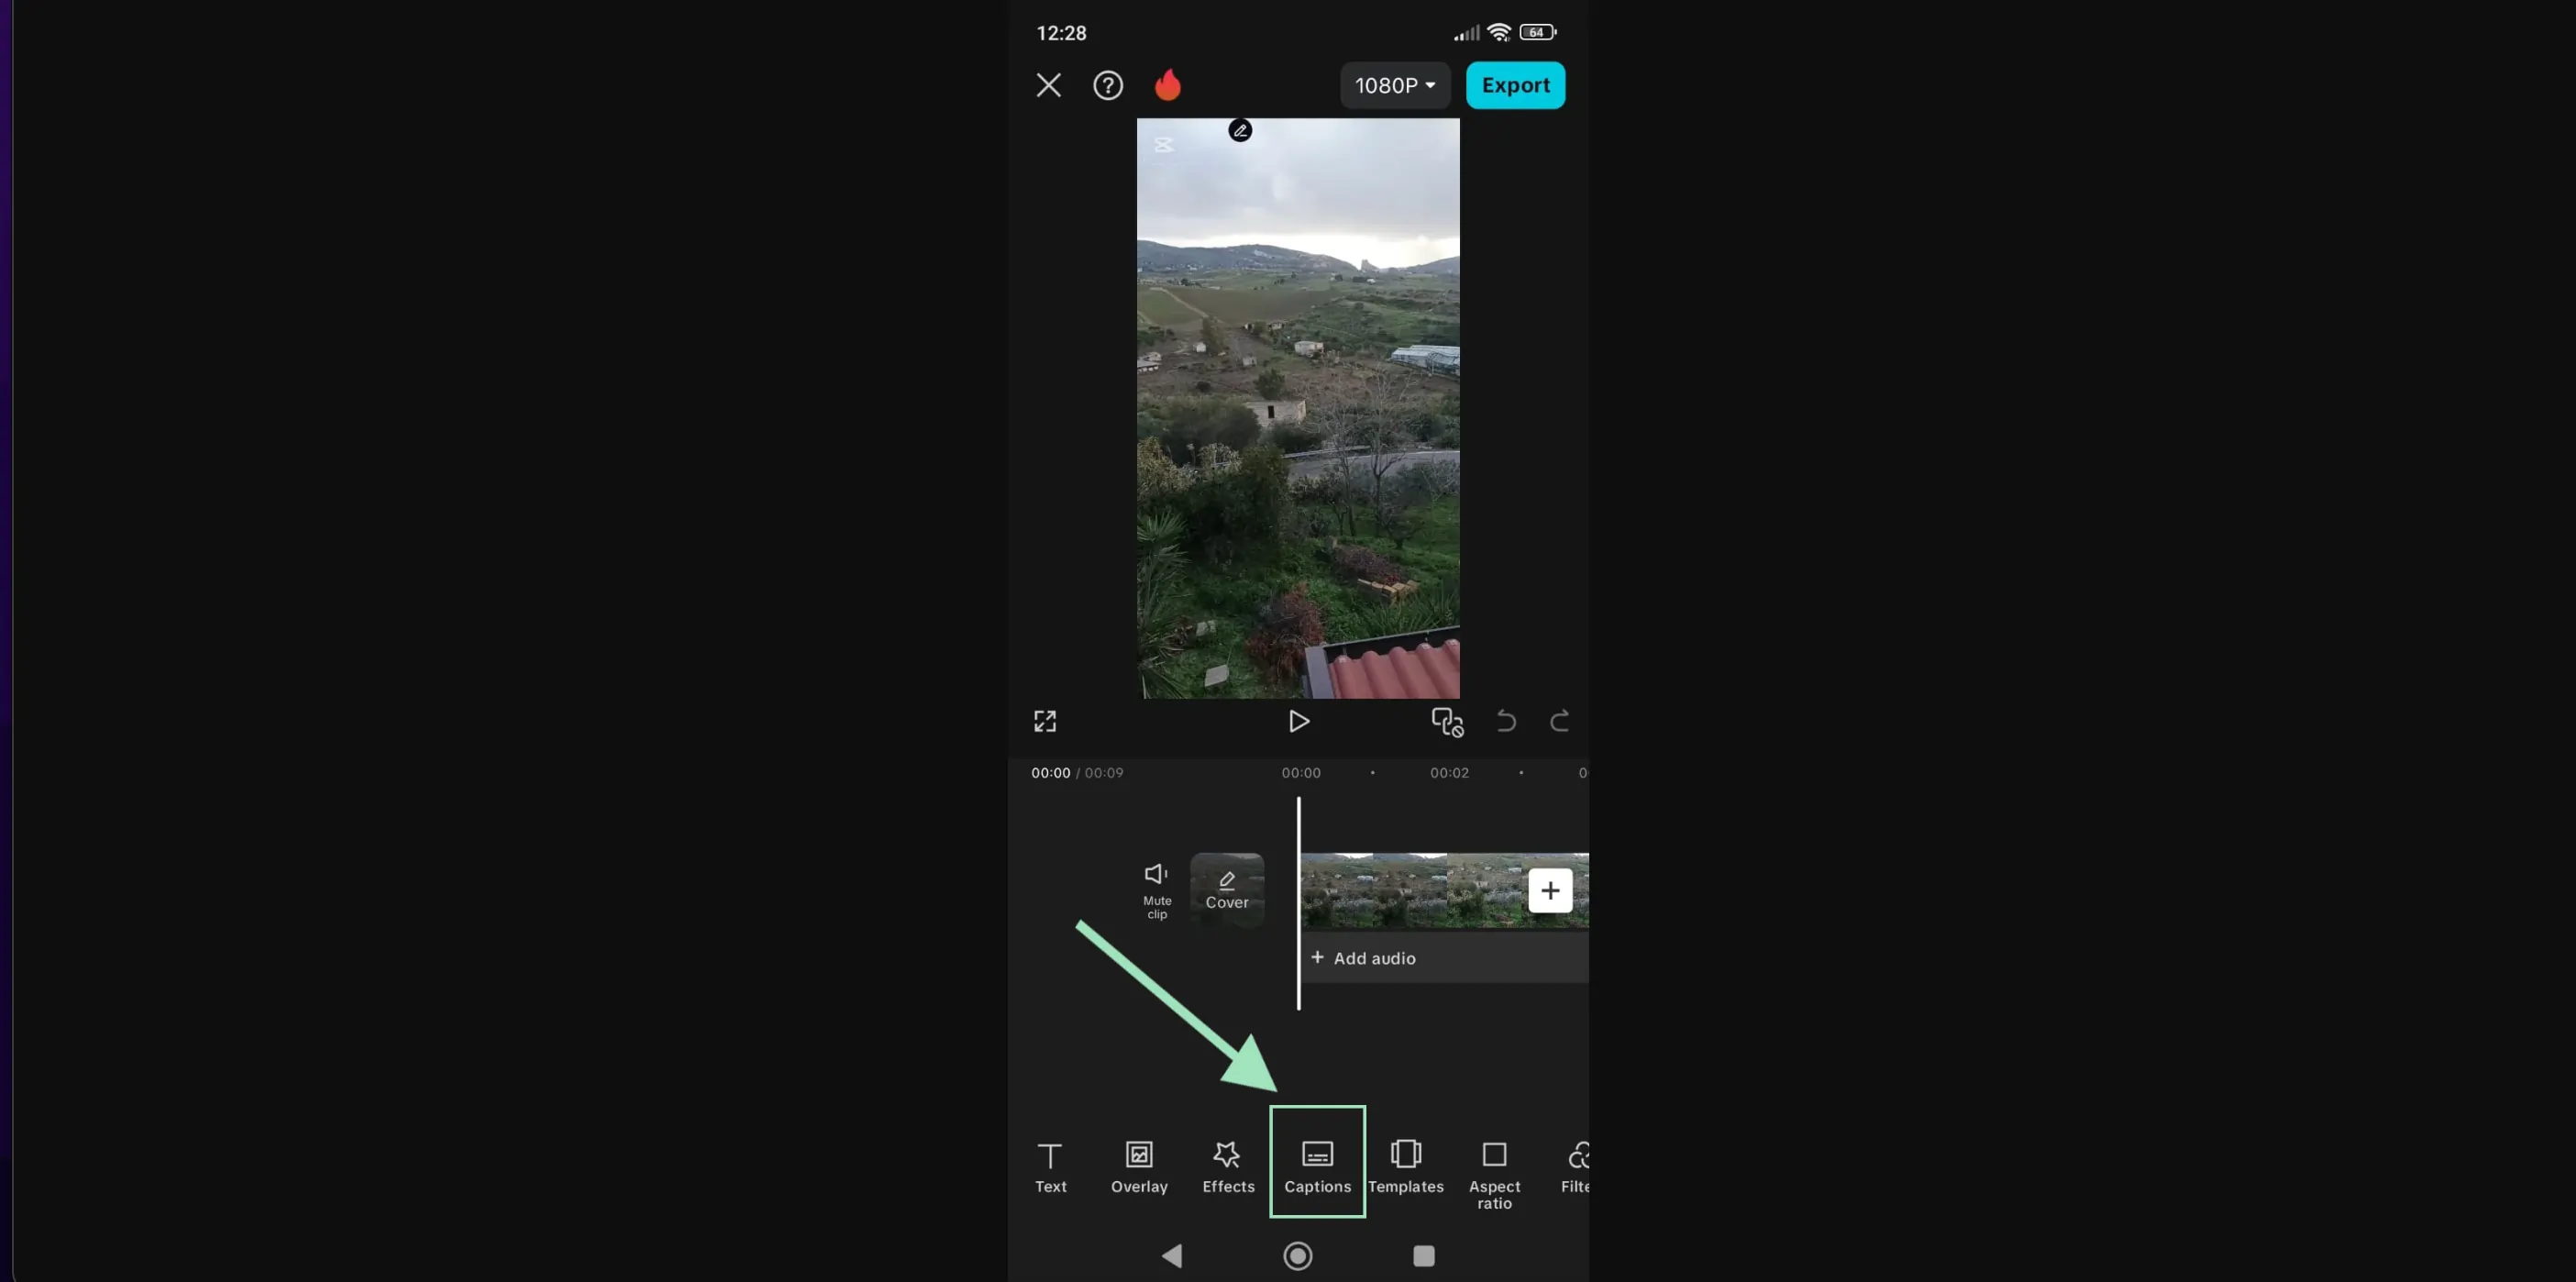
Step 2: Click on the “Captions” icon on the bottom bar.
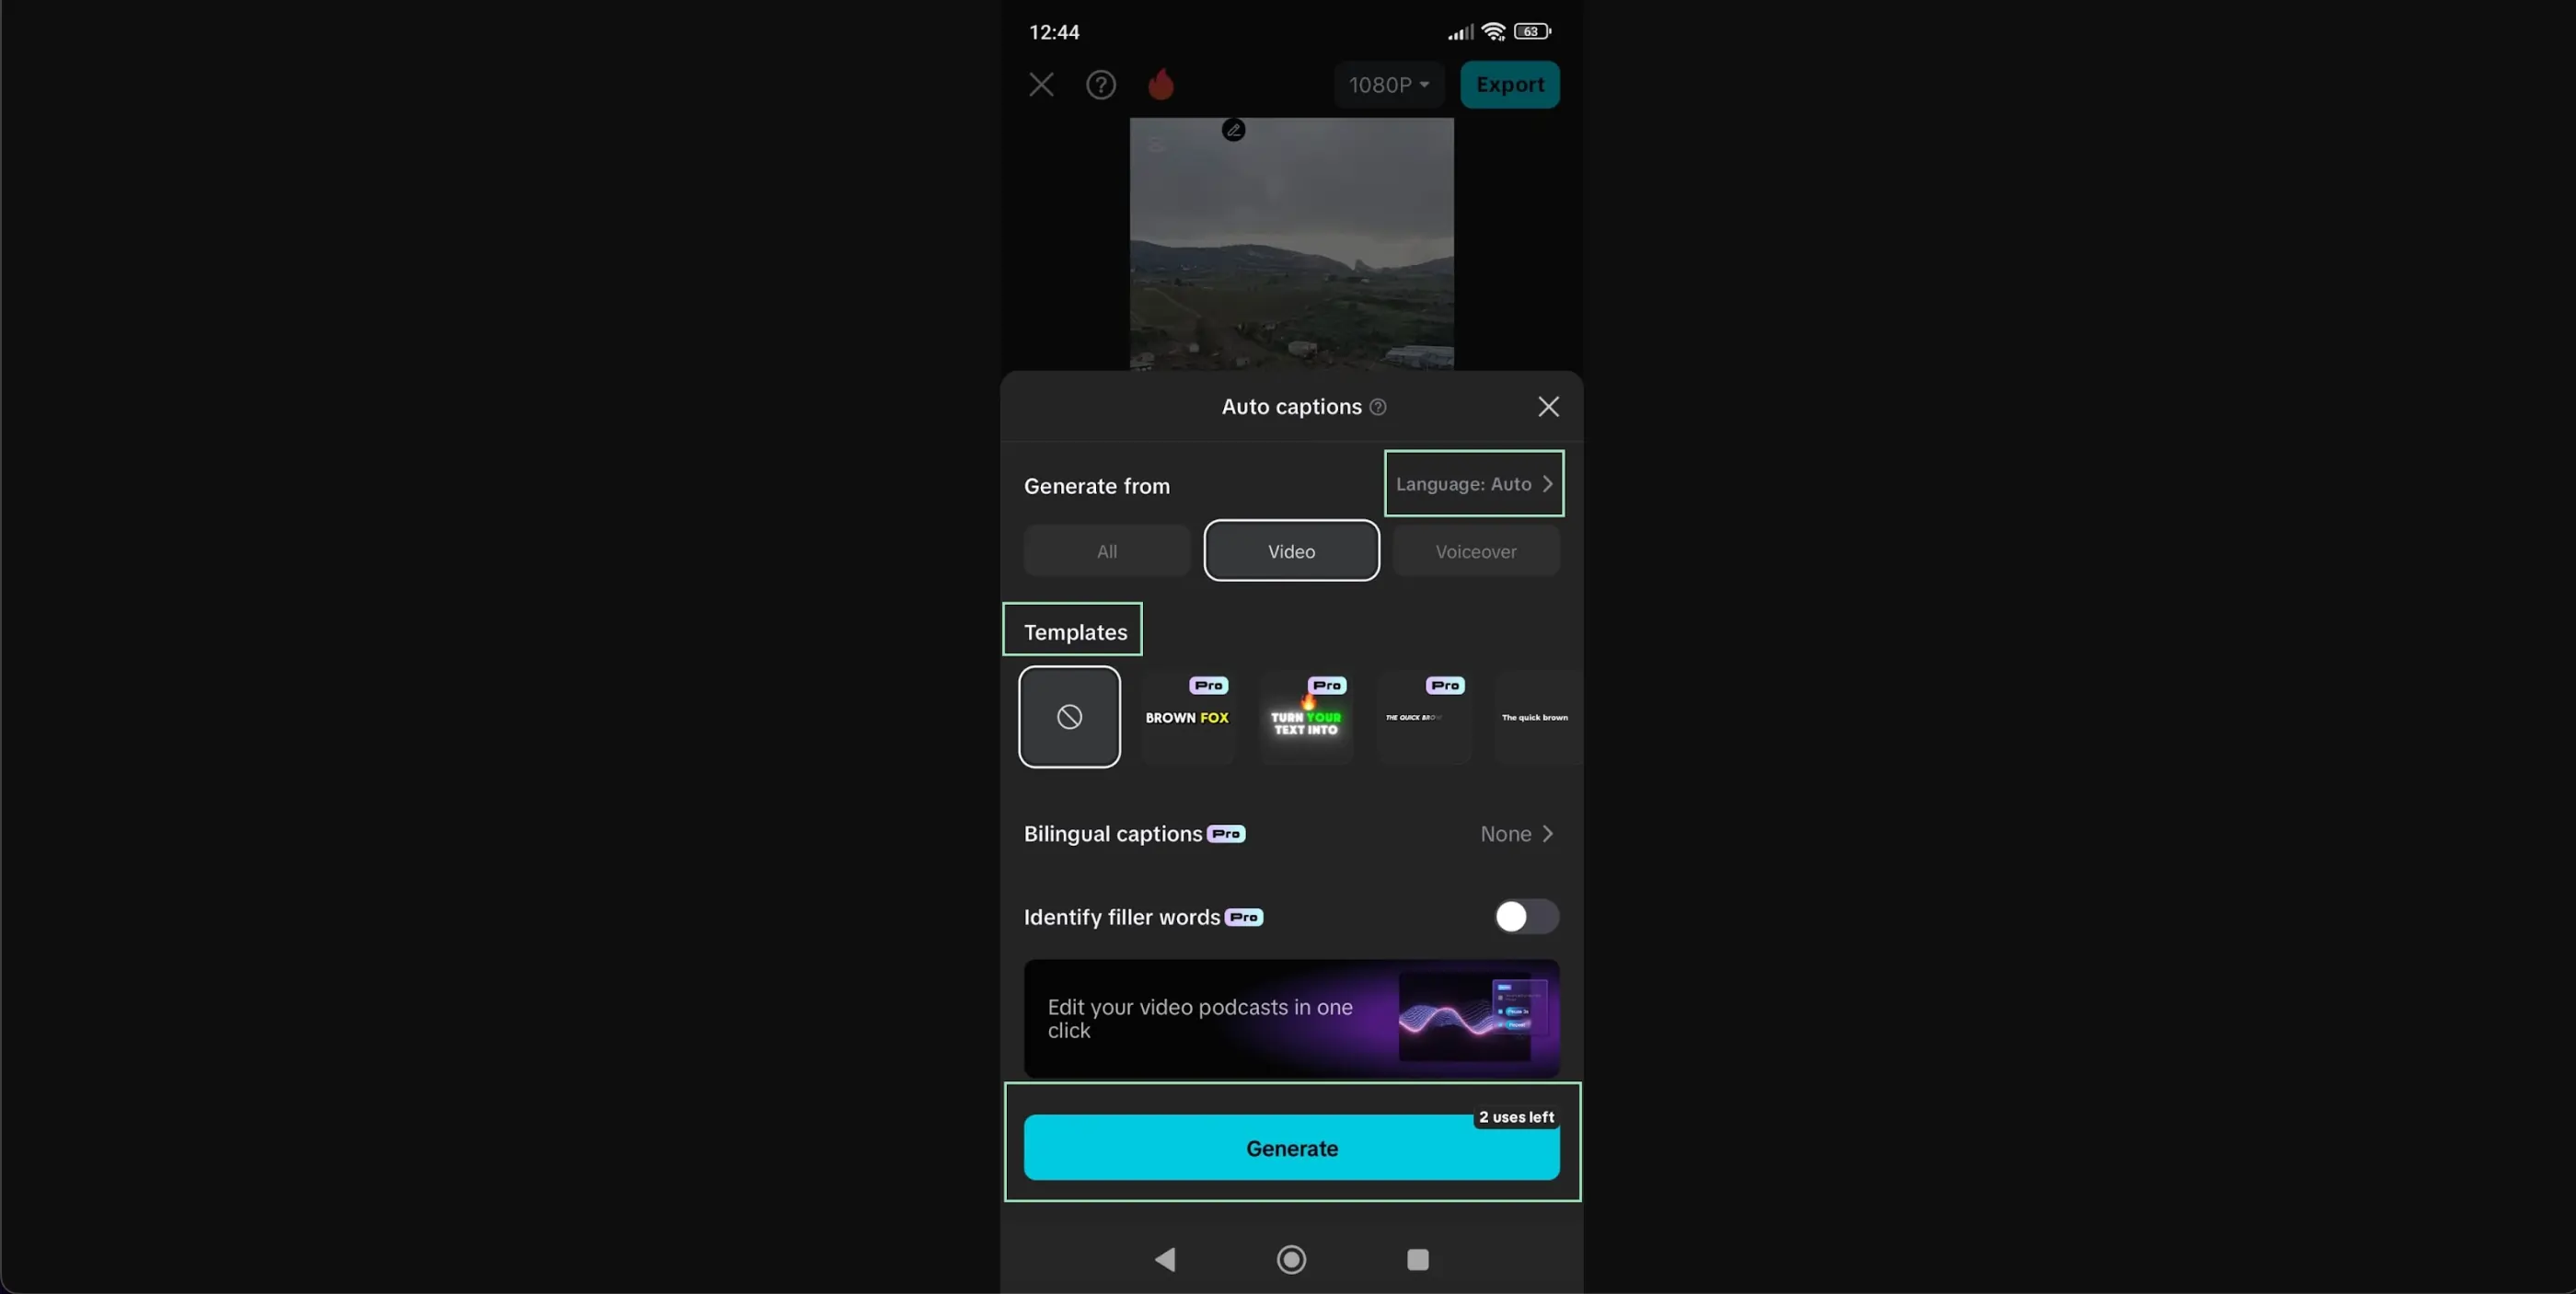
Step 3: Select the language of your video (or set it to auto), choose a template for your captions (note that the vast majority of them are locked for non-premium users), and click the blue “Generate” button at the bottom.
Note that you can only use auto-generated captions for a few free times per month. The captions are shared between the CapCut desktop PC app, the online editor, and the mobile app.
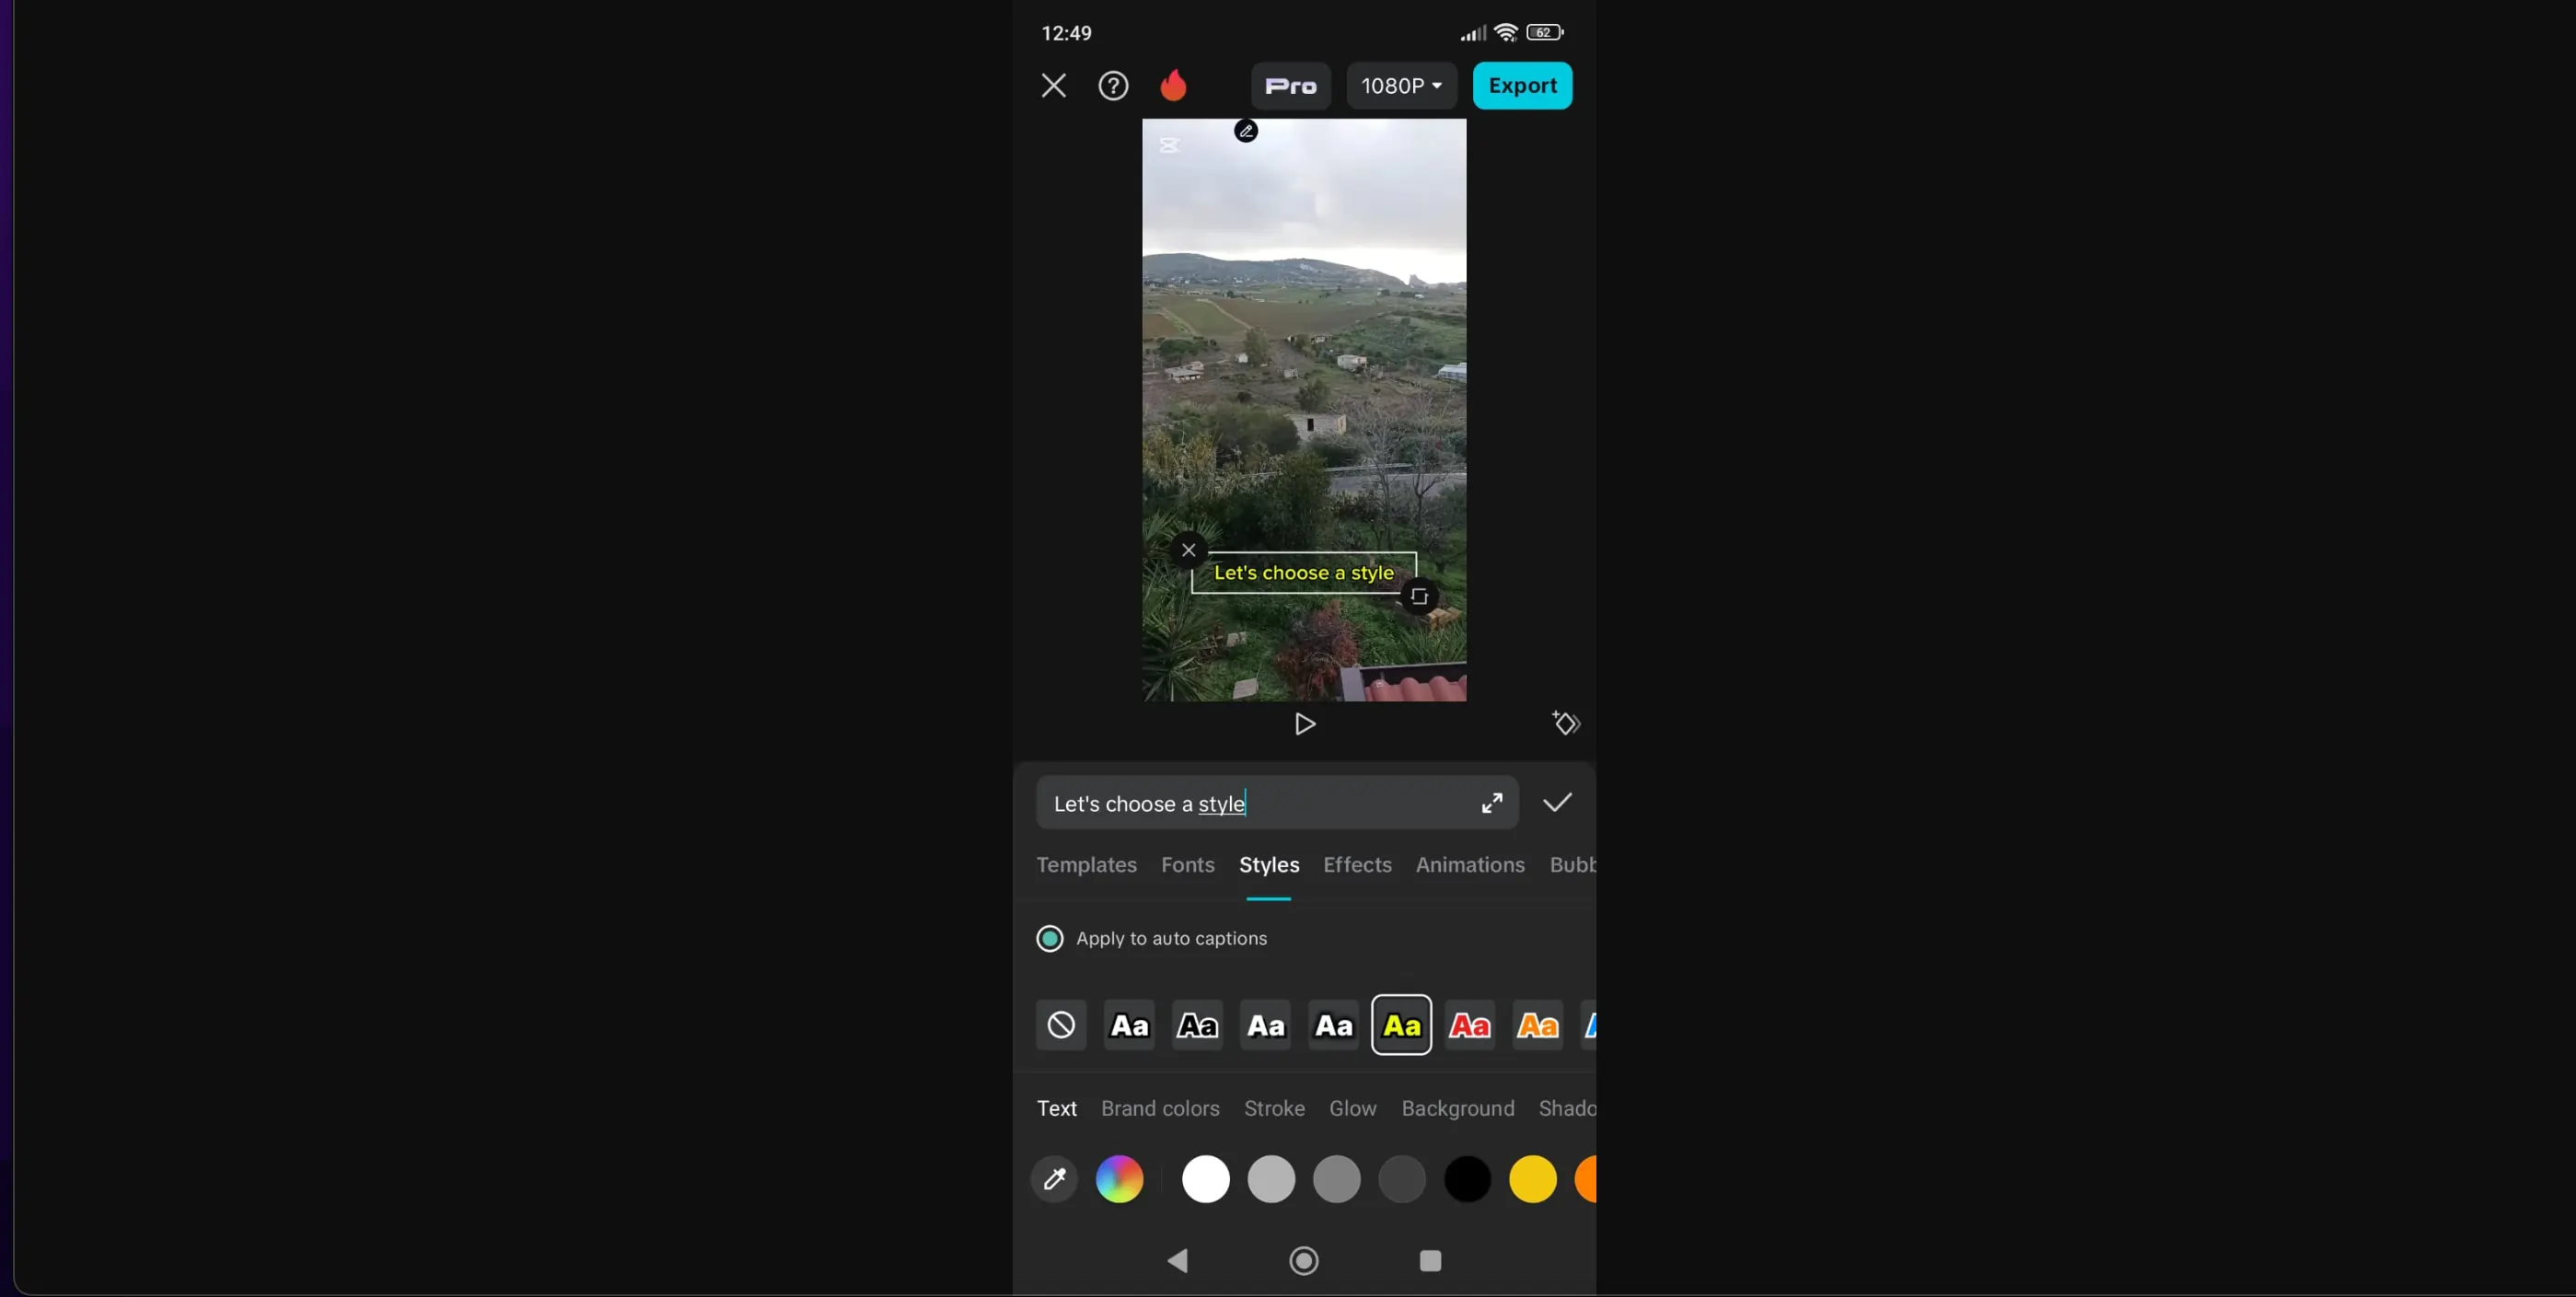
Step 4: Edit and style your captions by clicking on them directly on the screen. You can correct them by typing new text.
Style them by clicking on the various menus at the bottom or choosing a new template.
You can also drag the sliders on the timeline at the bottom to tweak their duration and appearance time.
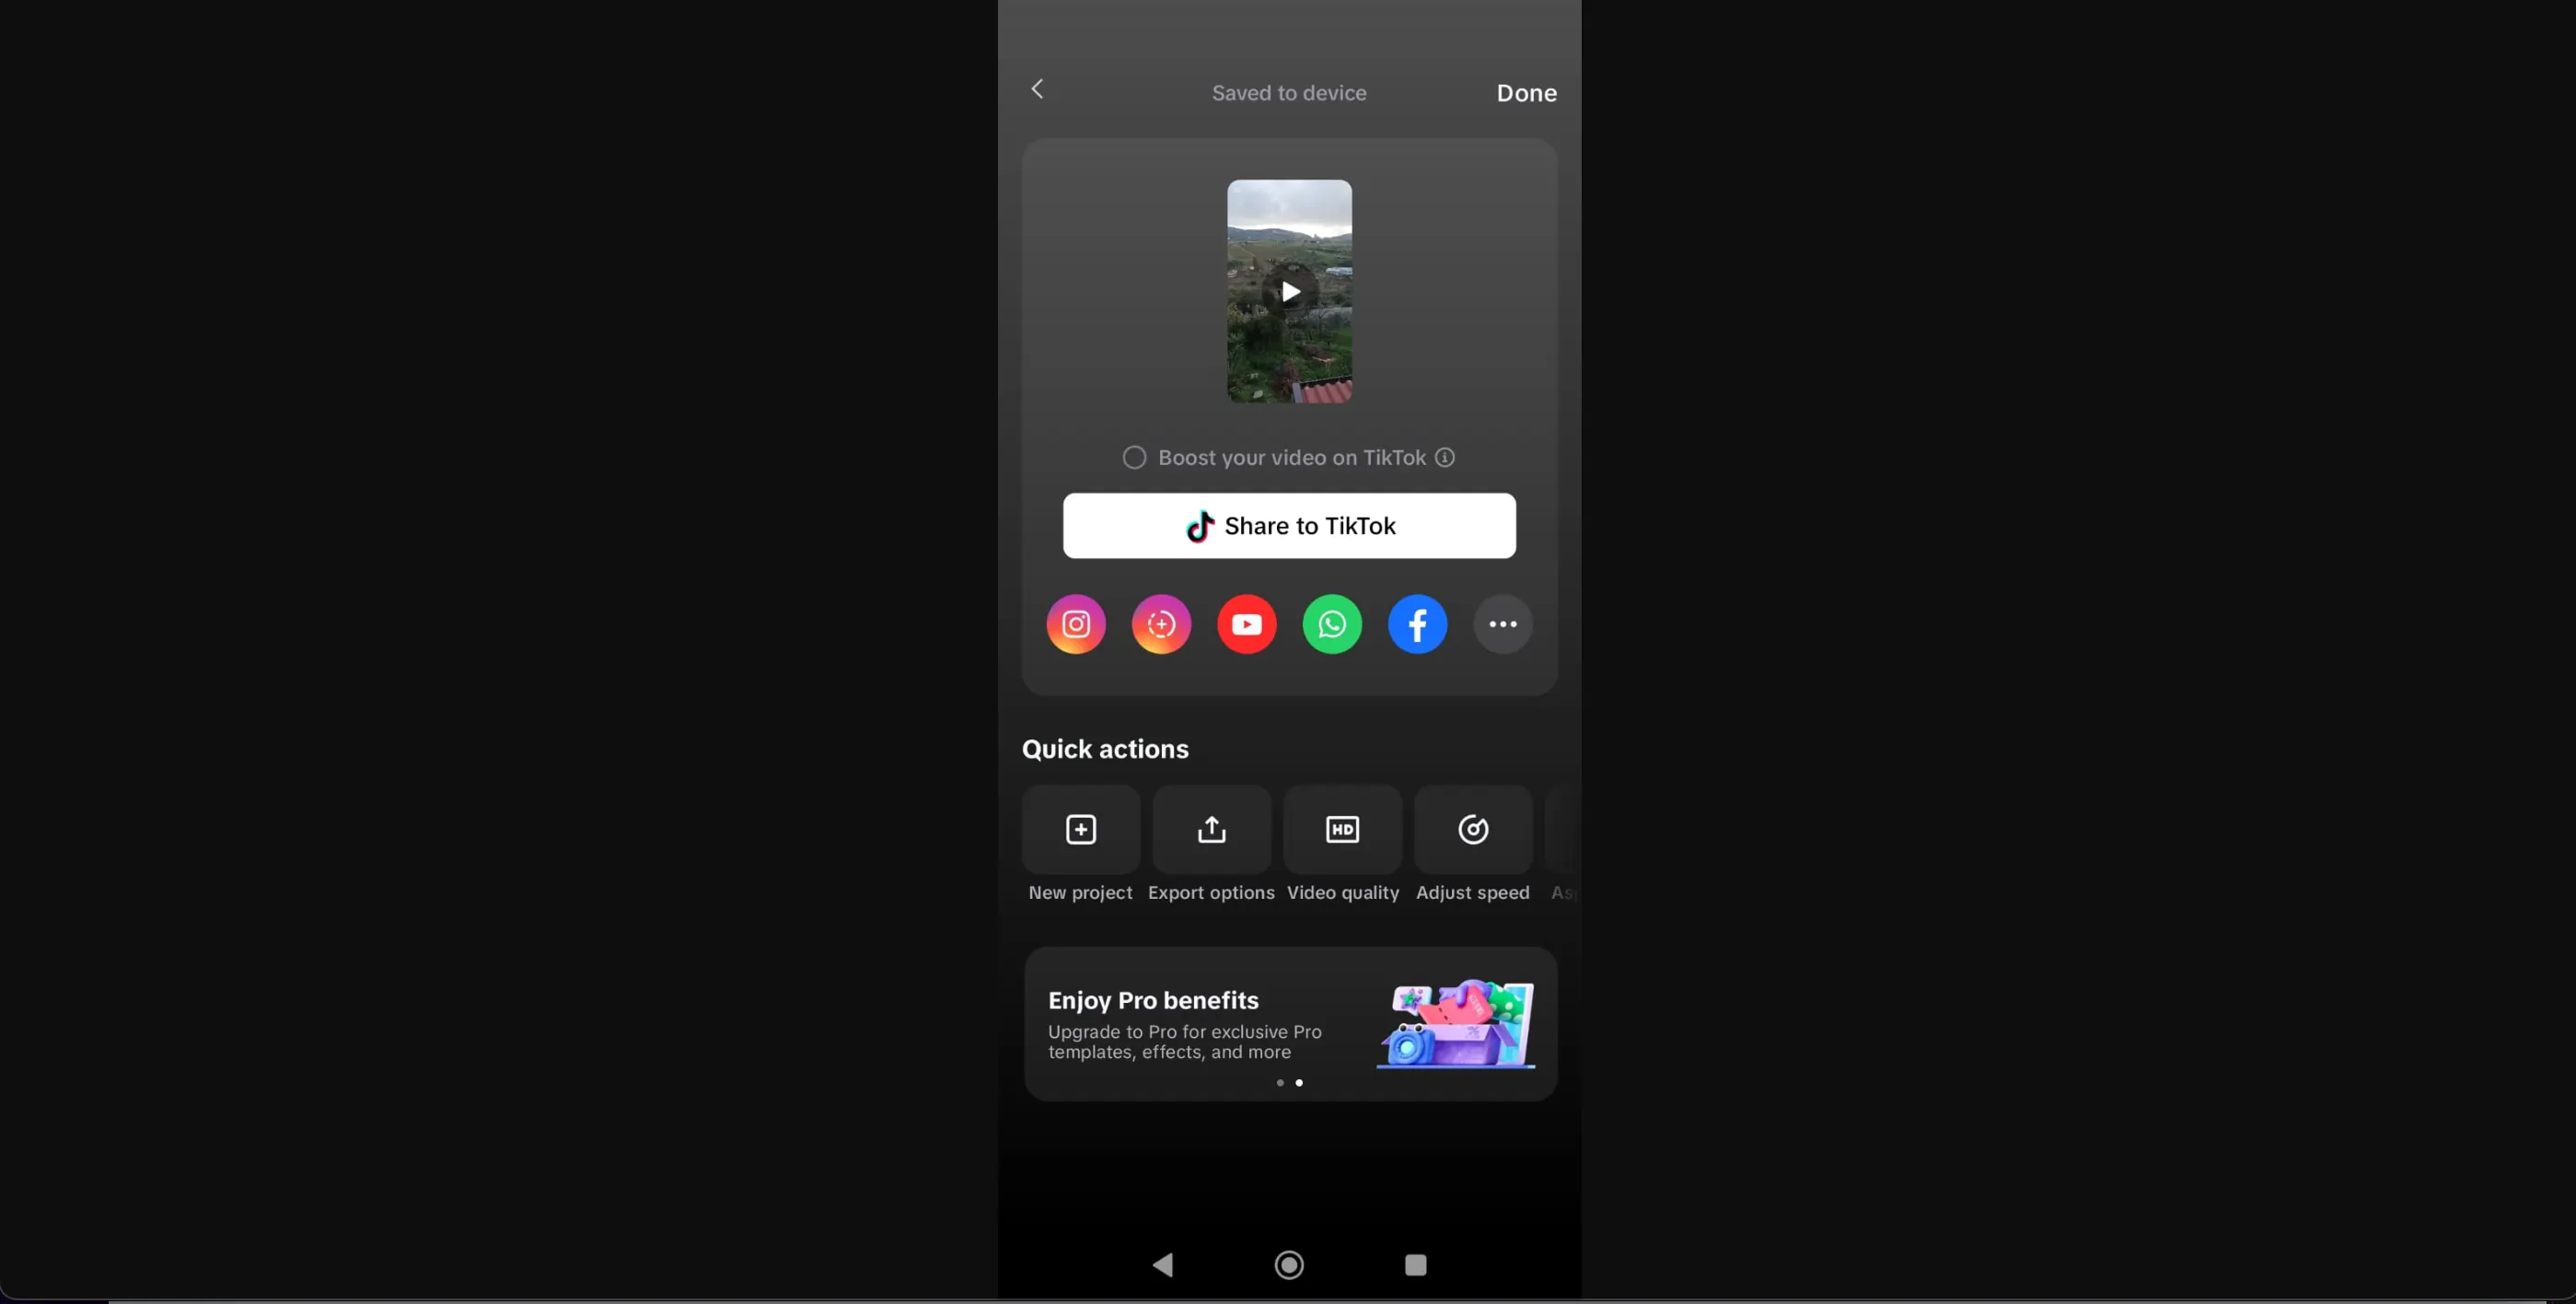
Step 5: Once you’re happy with your edits, click the blue “Export” button at the top right of your screen. Note that the mobile app allows a limited number of free exports without a watermark per month.
Clicking on the buttons at the bottom lets you tweak a few more video options, such as the aspect ratio, resolution, and video quality.
When you’re finished, click the “Done” button at the top right corner of the screen to save the video. Alternatively, you can share it on social media by clicking the respective icons.
Tips for adding captions with CapCut
CapCut’s workflow can sometimes be a bit clunky, and it’s not always simple to sync the clips with your audio and have them fit the rhythm of the speaker’s cadence.
Here are a few tips to improve the quality of your auto-generated captions:
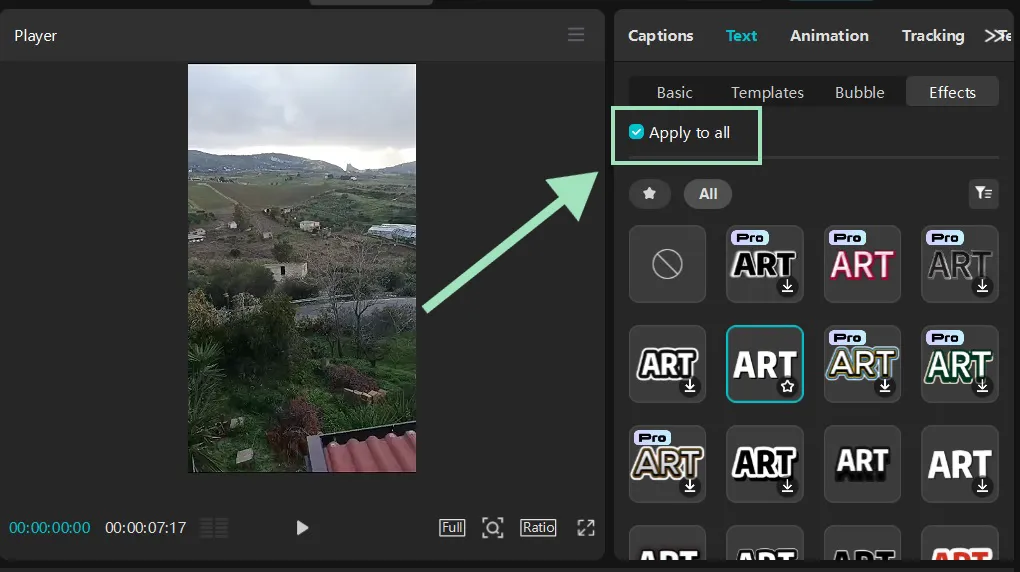
Applying edits to all captions
When you apply a template, style, or effect to your captions, always ensure that they’re applied to all of them rather than just the block you’re editing. To do that, check that the “Apply to all” box is ticked.
Improve the readability of your fonts
For your content to look engaging, make sure that your fonts stand out as much as possible. Use a large, visible font that can be read comfortably, even on a mobile screen. Choose colors that contrast with the background and shadows and highlights when your video has busy visuals.
To emphasize key moments of your video, you can use bold or colored text to highlight important words or phrases.
Sync with the audio
Captions should appear and disappear in sync with the spoken words or sound effects to avoid confusion. However, the timing of CapCut’s auto-generated captions is often inaccurate, and the last words often disappear too quickly or are entirely cut from sentences.
Review all your captions, and if needed, re-sync them by dragging the timeline bars at the bottom.
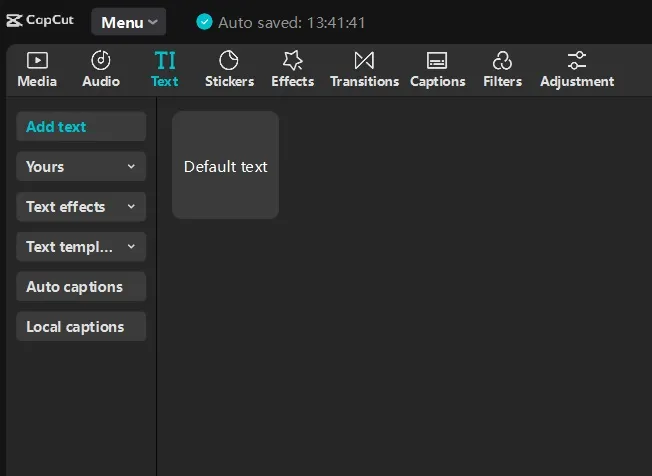
You might want to create a compound layer for challenging sections or animated text by adding new text. Do that by clicking on the “Text” button on the top toolbar, then on “Add text.”
Troubleshooting CapCut captions
CapCut makes adding captions simpler than typing them manually. However, you might run into a few hiccups along the way.
In this section, we’ll check some of the most frequent caption-related issues and how to fix them to get your project back on track in no time.
Captions not syncing with the video
Issue: The captions appear at the wrong time or are out of sync with the video.
Solution: You can adjust the timing of each caption in the timeline (the tracking bar (usually at the bottom of the screen). Drag the caption bars to match the video’s audio or visuals, and then adjust each caption's start and endpoints.
Auto-generated text’s accuracy is far too low
Issue: The auto-caption feature produces text with too many errors or misses words entirely.
Solution: CapCut’s auto-generated captions aren’t particularly accurate, so a few mistakes are common. However, if your captions are wildly off, there might be an underlying issue.
First, check that you’ve selected the correct language for your auto-captions. The language should match the video's audio, not the captions' target language (translation can be done later). Next, ensure the audio quality is high and free of background noise. To improve the clarity of your audio without recording a new video, you can use Riverside’s automatic noise remover to clean up your file.
Font or style changes not applying
Issue: Font, size, or color adjustments don’t reflect on the captions.
Solution: Double-check that you’ve selected the specific captions or groups of captions you want to style. Apply changes in the text editor and preview the video to confirm updates. If changes still don’t appear, verify that the fonts, styles, or effects you’ve chosen aren’t restricted to premium users.
Auto-caption feature doesn’t work
Issue: The auto-caption tool fails to generate captions altogether.
Solution: Check your internet connection, as this feature requires connectivity. If the issue persists, restart the app or try reinstalling it. Also, check if you’ve exceeded your monthly limit of 5 free auto-caption generations. CapCut only allows 5 free uses per month for non-premium users. These free uses are shared between the CapCut desktop PC app, the online editor, and the mobile app.
Export process takes too long or fails
Issue: The export process freezes, leaving captions and videos incomplete.
Solution: If your video is too large, CapCut may take some time to render it. To speed up the process, reduce the export settings' video resolution or file size. Also, ensure your device has enough storage space and close background apps to free up system resources.
Best CapCut alternative: Riverside
CapCut is a popular tool for editing videos and adding captions because it integrates well with TikTok. But is it the right choice for you?
CapCut falls short in key areas, especially if you’re looking for an all-in-one solution that doesn’t require you to struggle with a sometimes clunky interface. Riverside is a far better alternative if you're serious about producing high-quality videos easily.
Here are a few reasons why you should choose Riverside over CapCut:
Record and edit all in one place
Unlike CapCut, which is strictly a video editing tool, Riverside allows you to record and edit your videos all in one platform. It’s a one-stop-shop for video creators, so you don’t need to fumble with several apps or platforms to complete your project.
Streamlined editing experience
Editing, syncing, and timing captions in CapCut can sometimes feel cumbersome and unintuitive, especially if you resort to compound layers. Riverside’s interface is much more user-friendly. Its text-based editor lets you cut, trim, and edit videos directly from an automatically generated transcript.
Accurate captions and superior audio quality
CapCut auto-generated captions often contain errors, and the automatic timing can be unreliable, with frequent issues like missing words or out-of-sync text. Riverside uses cutting-edge speech-to-text AI technology to generate highly accurate captions that can be easily exported in SRT and TXT formats.
Plus, Riverside supports professional 48kHz audio recording, ensuring crystal-clear sound to maximize the accuracy of your captions. Its built-in noise remover and AI audio enhancer make it easy to refine audio quality, whether starting from scratch or improving existing recordings.
How to create captions in Riverside
Adding captions on Riverside is really easy. Just follow these steps:
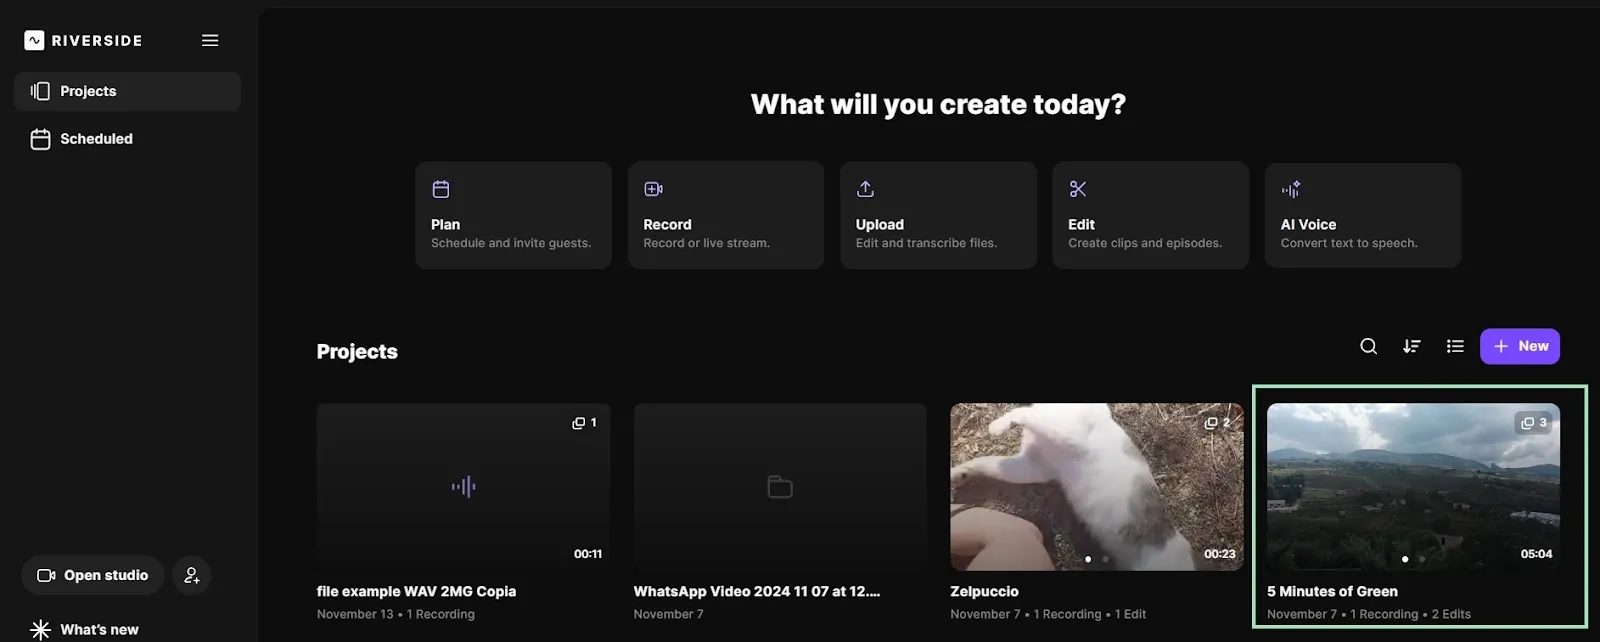
Step 1: Select the video you want to edit from your dashboard. In the next screen, hover over the video preview and click “Edit.”
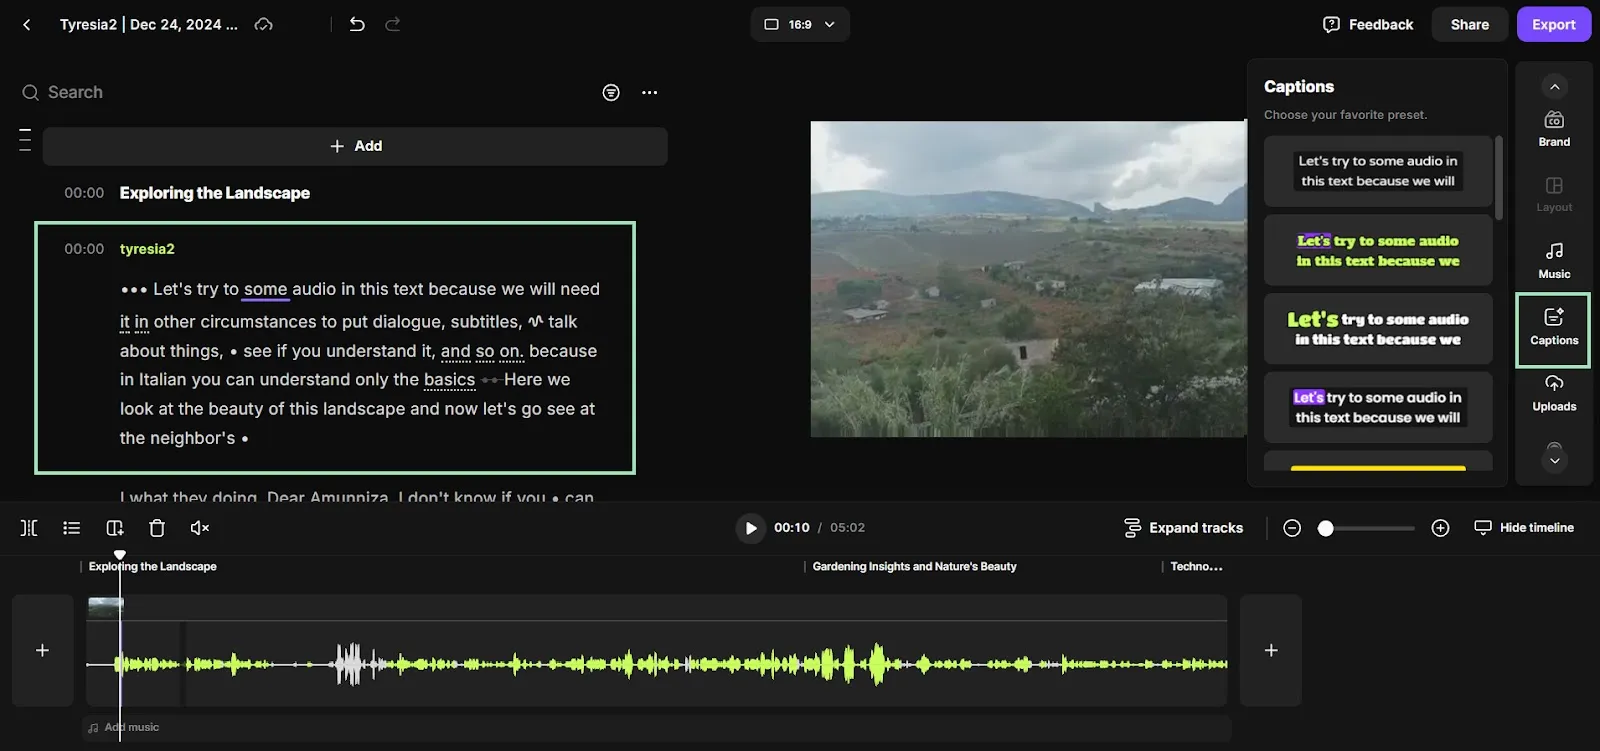
Step 2: On the left side of the screen, you can correct the transcript to improve its accuracy. You can also use this text to edit your video, cut it, and trim it.
On the right toolbar, look for “Captions” to open a list of presets and choose the one you prefer.
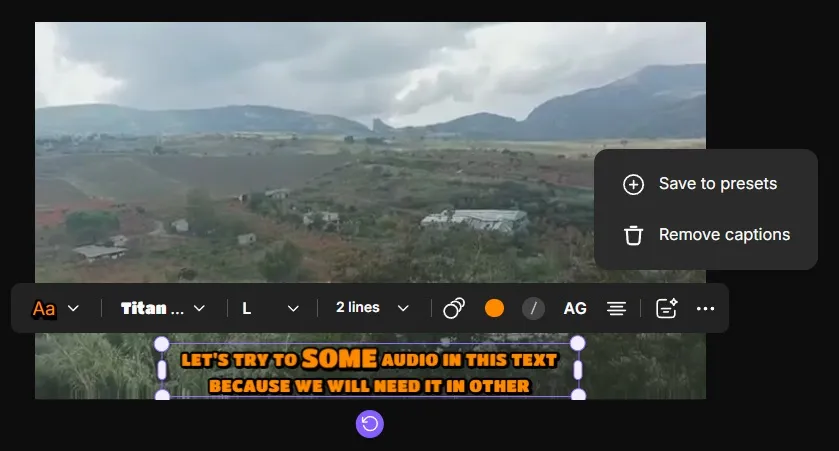
Step 3: Click on the captions to style them or drag them around the screen to position them. You can also save your style as a new preset for later use.
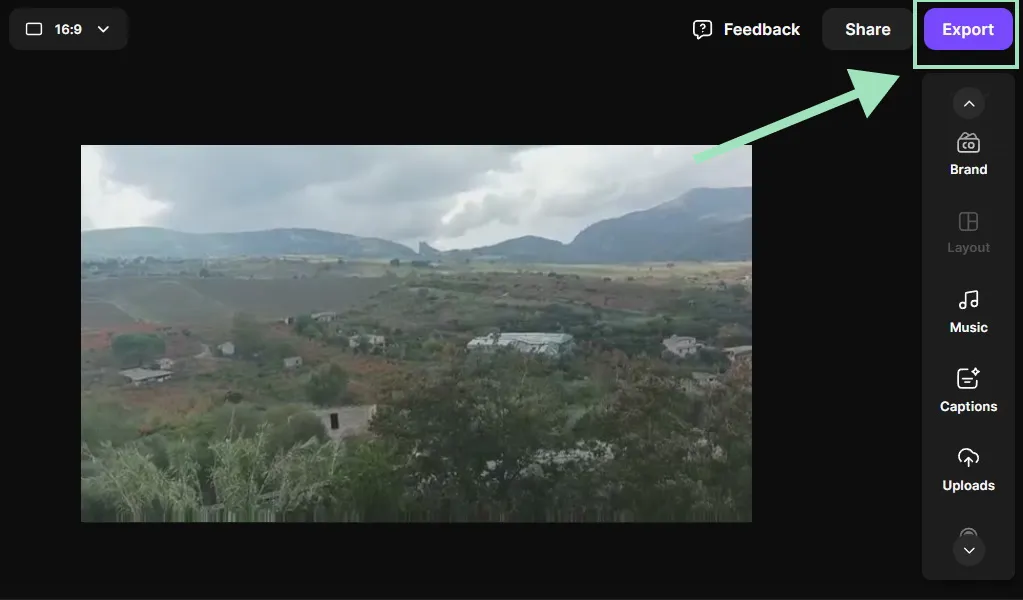
Step 4: Once you’re done, click the purple “Export” button at the top right corner of the screen. Select your export options, then click “Export video.”
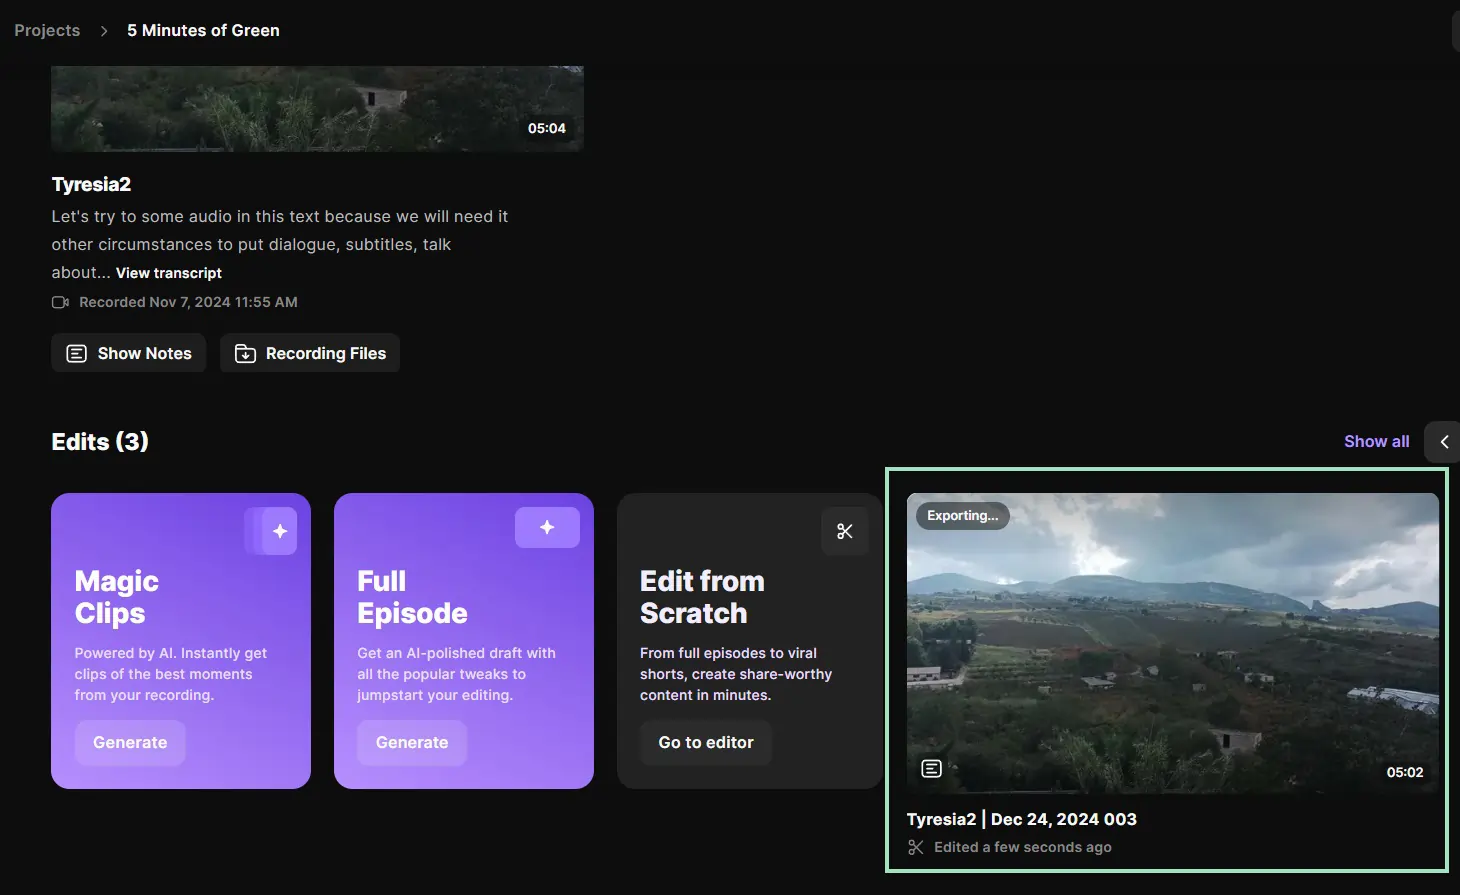
Once the video is ready, you can download it from your exports section.
FAQs on how to add captions in CapCut
Here are the answers to some of the most commonly asked questions about adding captions in CapCut.
Are auto captions free on CapCut?
Auto-generated captions are free on CapCut, but non-premium users are limited to 5 free auto-caption generations per month shared between the desktop app, the online editor, and the mobile app. Upgrading to a Pro account removes this restriction.
How do you turn text into captions on CapCut?
To turn text into captions on CapCut, use the "Text" tool to add and customize your captions manually. You can then style your text to match your other captions or drag and drop its layer on the timeline to sync it with the video's audio.
How to make auto captions all caps on CapCut?
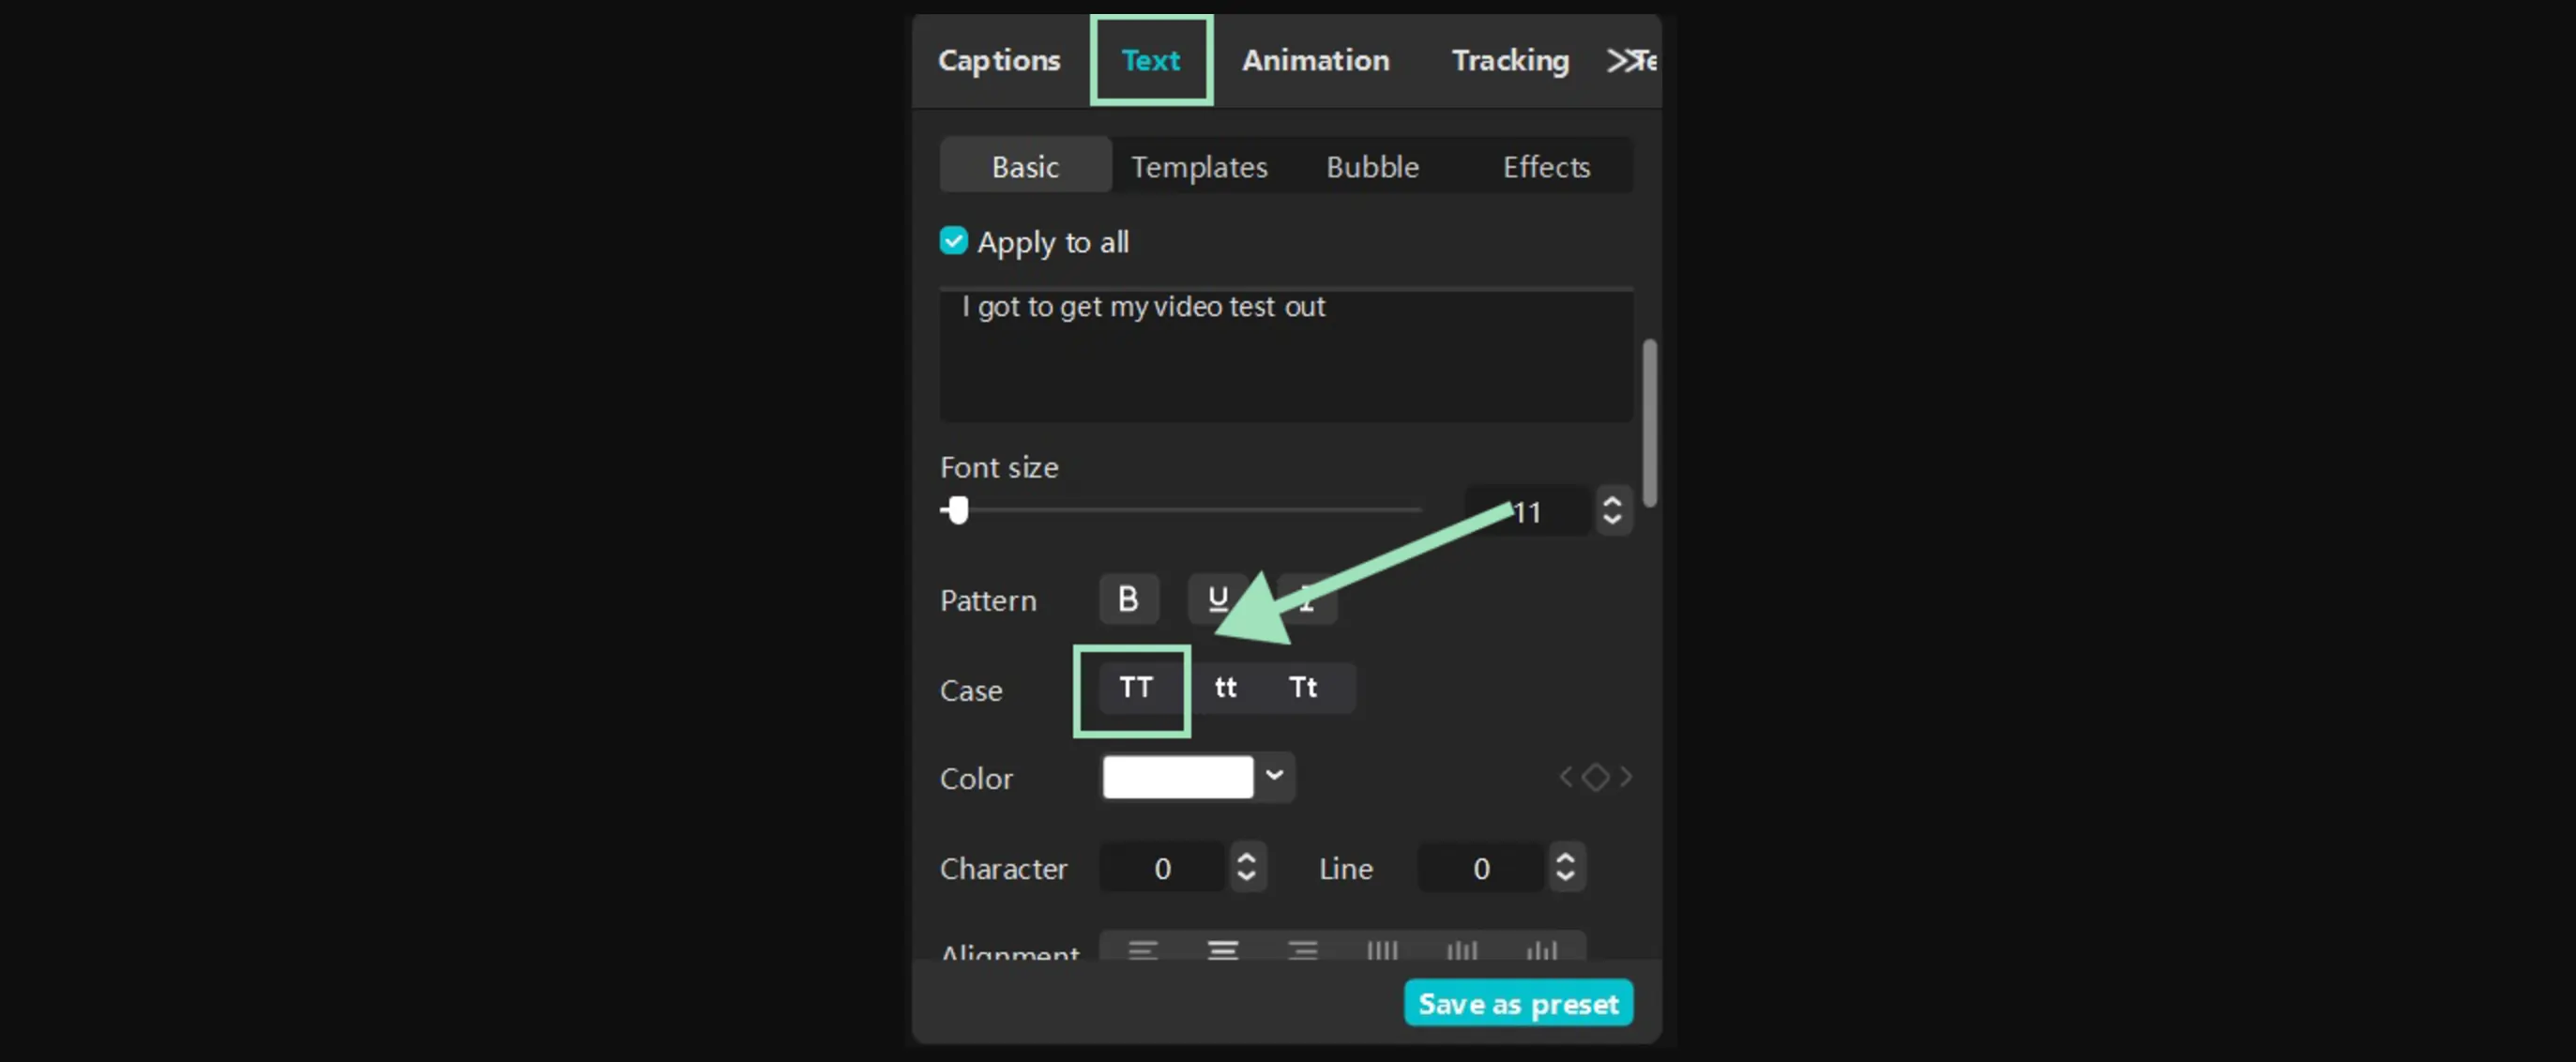
To capitalize all your auto-generated captions, select them in the timeline. Then, on the right toolbar, go to the “Text” tab and click on the all-caps icon near “Case” (it’s a double T).
How do I get dynamic captions on CapCut?
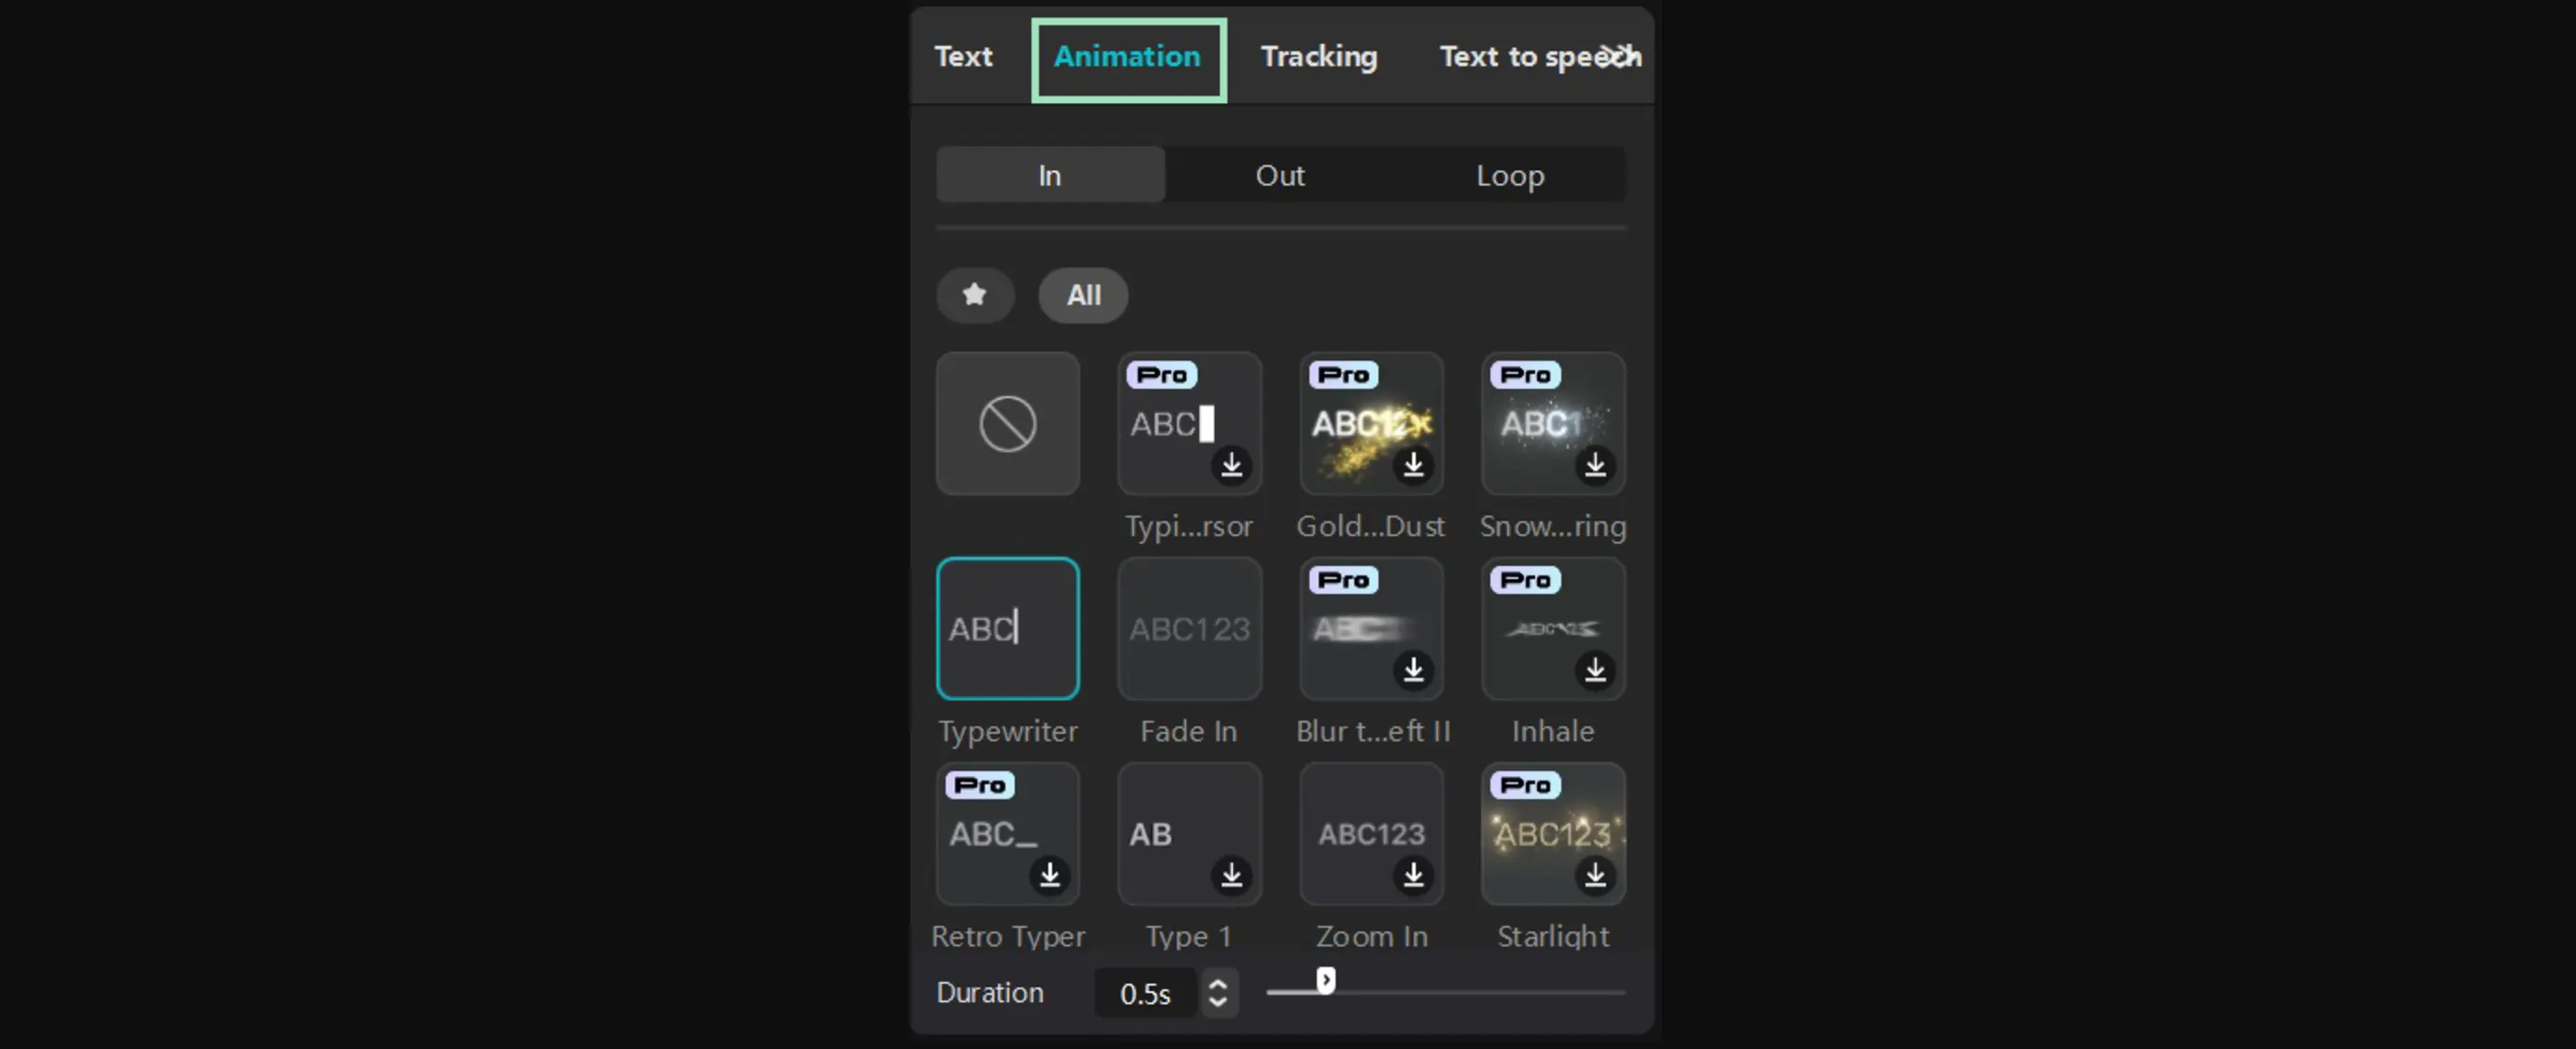
Dynamic captions are created by applying animation effects to your text. Select captions, then choose the animations you like from the “Animation” tab on the right toolbar.

.webp)


