.webp)


Table of contents:
MacBooks are often the computers of choice for highly creative professionals. So, it should come as no surprise that recording a podcast on a Mac is straightforward. You've come to the right place if you have an epic podcast idea and want to get it off the ground.
In the following guide, we will look at what equipment you will need to get started, the programs you can use, and the steps you should take to record a podcast on your Mac. Here’s what you need to know.
Can you podcast with a Macbook Pro?
Yes, you certainly can. The MacBook Pro is a powerful and versatile device with all the necessary tools and software to record, edit, and produce high-quality podcasts. Whether you're a beginner or an experienced podcaster, it provides the convenience and flexibility to bring your creative ideas to life. However, it is important to understand which software and equipment you need before you start working on your first podcast episode.
What equipment do you need to podcast on a Mac?
Before we even get started on how to record a podcast, you need to make sure you have the right podcasting equipment. It’s worth doing some research to help you along the way. To help you get started, here’s a quick breakdown of the type of hardware and software you need.
Hardware
1. Microphone
A good-quality podcast microphone is crucial for capturing clear and professional audio. USB microphones like theSamson Q2U or Audio-Technica ATR2100x are popular for beginners, as they are easy to set up and provide decent sound quality. However, there are many different types of microphones out there, depending on your skill level.
2. Headphones
A reliable pair of podcast headphones is essential for monitoring audio while recording and editing. Closed-back headphones are preferable, as they help reduce external noise bleed into the microphone. Take the time to look at different headphone options before you start.
3. Pop Filter
While not an essential item, a pop filter could make your audio sound on point. A pop filter helps prevent plosive sounds (“pops”) from overwhelming your recordings. It's a simple device in front of the microphone to diffuse air when pronouncing words with strong "P" or "B" sounds. Of course, if you are strapped for cash, you don’t need one of these.
4. Microphone Stand or Boom Arm
A stand or boom arm helps keep the microphone stable and in the right position during recordings. It reduces handling noise and ensures consistent audio quality. Some microphones come with a separate stand that you can set up.
Software
1. Recording Software
To get the most professional sound, you need decent recording software. In this guide, we will take a look at some of the best options. Although, we suggest trying Riverside, which offers studio-quality podcast recordings from anywhere. You can also edit your podcast content with our seamless automated tools.
Note that when choosing your recording software make sure you choose software for what you need. Some software only records audio, but most record both.
2. Editing Software
As we just mentioned, many recording software like Riverside includes built-in editors. Though if you want to make more advanced edits, you may need separate podcast editing software. For Mac, you’ve got GarageBand already installed on your computer. This editor is more for music, but it’ll do fine for podcasts. The platform offers a range of tools for editing, adding effects, and mixing your podcast episodes. Other suggestions include Final Cut or Premiere Pro if you’re recording video.
3. Podcast Hosting Platform
While not Mac-specific, you'll need a podcast hosting platform to upload and distribute your episodes to various podcast directories. A podcast host is where you store all your episodes, while a directory is where you publish your content for your audience to access. Popular hosting options include Libsyn, Podbean, and Spotify for Podcasters.
How to create professional podcasts on a Mac with Riverside - The easy way
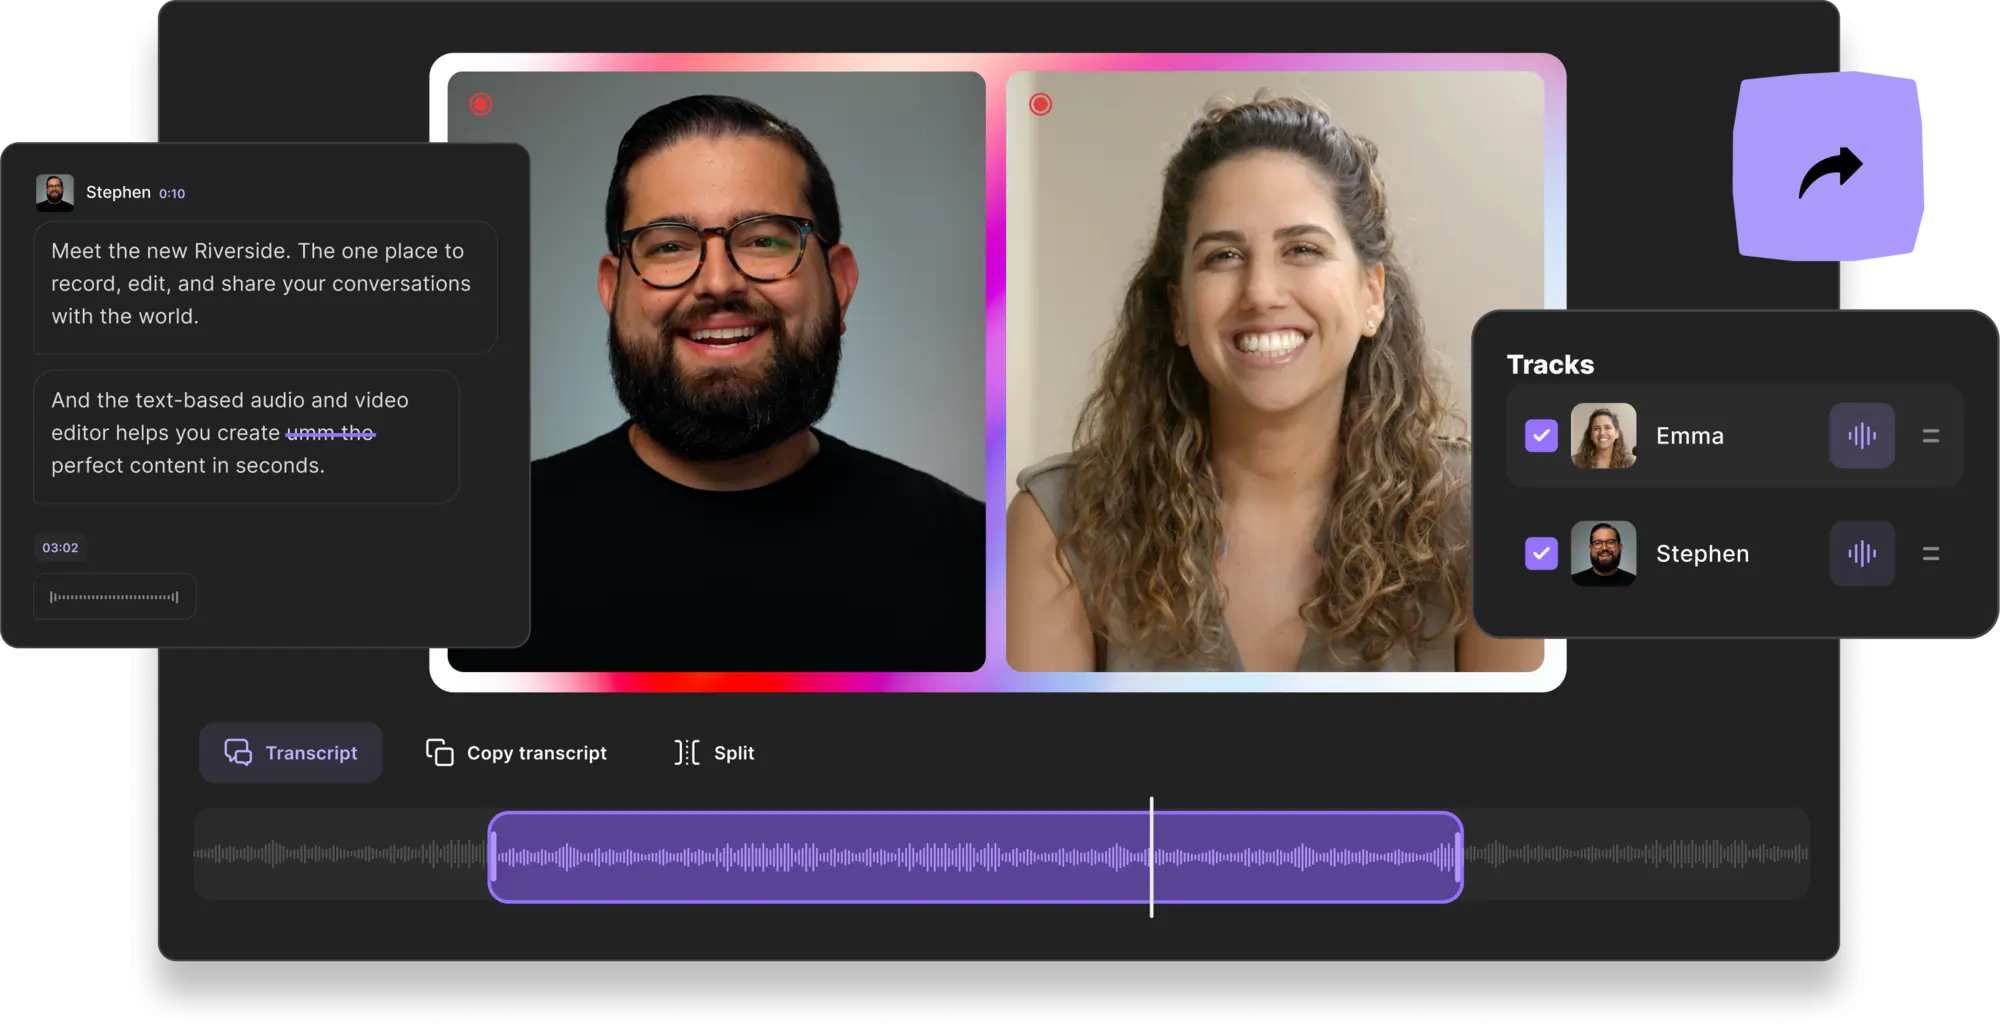
If you’re looking for a simple way to record a podcast on your Mac, Riverside is the answer. It’s an affordable and straightforward recording and editing platform. It offers local recordings, high quality 48kHz audio resolution, and AI-generated transcriptions. What’s more, you can invite up to 9 guests to join you in your studio no matter where in the world they are. The platform offers separate audio and video tracks to make editing a breeze.
After recording your podcast, you can use the text-based editor to finalize your content. That means that you don’t have to worry about exporting and importing files. You can trim your recordings by simply deleting transcript text, and you have a wide variety of automated tools to polish your recording for posting. Remove background noise, cut out silences or normalize your audio levels, all at the tap of a button.
Key Features
- Create virtual studios and record your podcast
- Separate audio and video tracks for each participant to give you more editing control
- Highly accurate AI transcriptions for easy captions and subtitles
- Up to 4k studio-quality video recordings and 48kHz audio resolution
- Text-based editor so trimming your recordings is as easy as deleting text.
- Speaker detection so you can pinpoint certain parts of your transcript
- Automatic editing tools for background noise removal and level normalization
- Magic Clips tool which uses AI to turn one recording into multiple short, shareable videos.
- Mobile recording app, so you can also record on your iOS mobile devices

Step 1: Join Riverside and launch a virtual studio
First up, you need to join Riverside. There are plans for every budget. Open the program in your browser and then launch your virtual studio by pressing ‘+ New Studio’. You will see a pop-up box where you can name your studio. Choose either ‘Audio’ or ‘Audio & video’ and click ‘Enter studio’.
Step 2: Choose your microphone and camera input
When you have entered the lobby, you should see a 'Mic' button below the main box. Click the button and choose the microphone that you want to use. You will see a list of microphone options, including your Mac microphone and any external microphones too. You can also choose the camera input and make sure that it is right before you start. When you are ready click ‘Join studio’.
Optional step: Invite guests
If you want to invite guests to your studio, you can do so. You can either do this when creating a studio, by selecting '+ New Studio' > 'Continue set up studio' and then scrollling down to 'Invite participants'. You can invite guests by clicking 'Add participants' and then entering their details.
Alternatively, you can do so in your studio, by selecting the Invite button.
Step 3: Record your podcast
Now that you are all set up, it’s time to start recording your podcast. Click the Record button to get started. You will see a countdown. Wait until it is at zero, and then start speaking. The program will continually save your content as you record it. Once you have finished your recording, simply press Stop and after your files finish uploading click ‘Leave’ and ‘Leave studio’.
Step 4: Edit your podcast to make it perfect
Next, you will see a screen with your podcast recording on the screen. Click it and then press ‘Go to editor’ in the top-right of the screen.
Here you can edit your recordings via editing a transcript. As you delete or edit text, you will also be editing the audio track. You can also use additional features including captions, changing the video layout, and adding a unique background or logo here.
Step 5: Export and save
When you are happy with your podcast recording, the final step is to export it. Press the 'Export' button at the top-right of the page. Then, choose which file format you want to use. You can pick from MP3 or WAV. You can also toggle on the 'Normalize audio levels' and 'Remove background noise' features at this point. Click on 'Export' once more.
How to record a podcast with Garageband on Mac
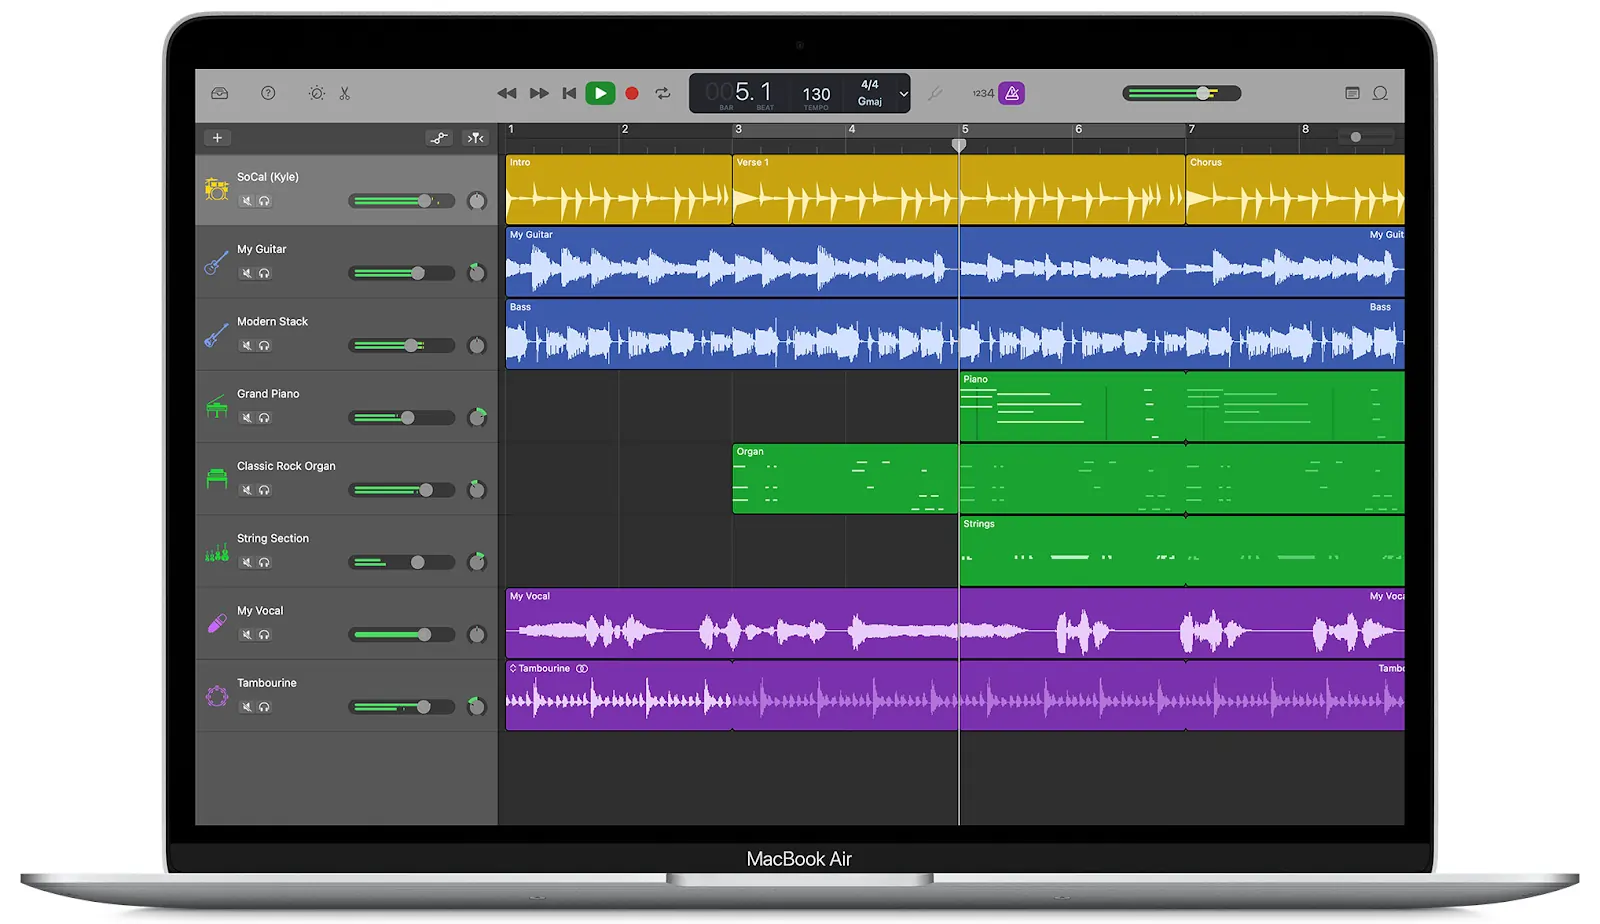
GarageBand is a powerful digital audio workstation that comes pre-installed on macOS, offering a range of tools to enhance your podcasting experience. Recording a podcast with GarageBand on Mac is a simple option for creating professional-quality audio content.
Key features:
- Pre-installed on MacOS
- 100 EDM- and Hip-Hop–inspired synth sounds
- Transform Pad Smart Control
- Add multiple tracks
- Available on your Mac or iOS
Step 1: Open GarageBand and create a new project
Launch GarageBand from your Applications folder. Click Create new project and select Podcast as the project type. Choose a name and location for your project, then click Create.
Step 2: Choose the microphone input and adjust the settings
Connect your microphone to your Mac. In GarageBand, go to the Track Header area on the right side of the window and click the '+' button to create a new track. Select Audio for the track type and choose your connected microphone from the input settings.
Step 3: Set up headphones for monitoring
Connect your headphones to your Mac. Monitoring your audio while recording is essential to ensure sound quality and detect any issues. In the Track Header area, click the small headphone icon to enable monitoring for each track.
Step 4: Create a new track for the recording
If you plan to have multiple podcast participants, create additional tracks for each person. Click the ‘Track > Configure Track Header’. Next, click the Record Enable button in the header of each track you wish to use during the recording.
Step 5: Record your podcast episode
Click the red record button at the top of the GarageBand window to start recording. Speak into the microphone clearly and ensure everyone's audio levels are balanced. When finished, click the stop button to end the recording.
Step 6: Edit and enhance the recording (if needing)
After recording, you can edit the podcast episode to remove any mistakes. Use GarageBand's editing tools, such as the scissor tool, to cut and rearrange segments.
Step 7: Export the final podcast episode
Go to the File menu and choose Export to disk. Select the format, adjust the quality settings if needed, and click Export to save the final file to your desired location.
How to record a podcast with QuickTime on Mac
Recording a podcast with QuickTime on Mac is a simple and effective way to get started in the world of podcasting. QuickTime is a built-in application on macOS that offers basic audio recording capabilities, making it accessible to beginners.
Key features:
- Built-in on MacOS already
- Simple to use
- Basic audio recording
- Split audio into multiple clips
- Easy to use for beginners
Step 1: Open QuickTime Player
First up, go to your Applications folder, locate QuickTime Player, and open it. You can also use Spotlight (Cmd + Space) and type 'QuickTime Player' to launch the application.
Step 2: Set up audio and microphone input
Connect your microphone to your Mac. In QuickTime Player, go to the 'File' menu and select 'New audio recording.' A recording window will appear.
Click the small arrow next to the red record button in the recording window. It will reveal a drop-down menu where you can select the connected microphone as the input source.
Step 3: Check audio levels
Before recording, speak into the microphone at your normal volume to ensure the audio levels are high enough. You should see the audio level meters responding to your voice.
To adjust the recording quality, click the small arrow next to the record button again and choose Audio quality. Select the appropriate rate based on your podcasting needs.
Step 4: Record your podcast
To begin recording your podcast, click the red record button. Start speaking clearly, and ensure you are adequately positioned near the microphone. When you've finished, click the stop button (square) in the recording window to end the recording.
Step 5: Save the recording
After stopping the recording, QuickTime will automatically open the recording in a new window. Go to the File menu and select Save to save the audio file to your desired location on your Mac.
Podcasting on Mac: Troubleshooting for Common Issues
Now that you are ready to start podcasting on your Mac, let’s talk about some of the issues you may come up against. Here’s what they are and how to solve them.
- Low microphone volume: Check the input volume settings in your recording software and Mac's System Preferences. Ensure the microphone is properly connected and functioning.
- Audio distortion or clipping: Reduce the input volume to avoid overloading the microphone and causing distortion. Use a pop filter to minimize plosive sounds.
- Audio sync issues: Check if recording with multiple microphones is in sync. Adjust the track alignment during editing if necessary.
- Headphone monitoring delay: If there's a noticeable delay in headphone monitoring, consider using an audio interface or external mixer for real-time tracking.
- Software crashes: Update your recording and editing software to the latest version. Save your work frequently to prevent data loss in case of crashes.
- Audio driver issues: If experiencing audio problems, restart your Mac and check for driver updates from the microphone manufacturer.
FAQs on How to Record a Podcast on Mac
How can I record audio from my Mac?
Yes, Macs are ideal for podcasting. Before you get started, make sure that you have the right hardware and software in your arsenal. While you can use your built-in Mac microphone, investing in a good external option is better. You should also make sure you have quality recording and editing software.
What app can record podcasts on Mac?
Macs have both GarageBand and QuickTime already on them. You can use either of these to record your podcast. However, if you are looking for a program where you can record flawless audio and edit it right away, you can sign up to Riverside.


%20(1).webp)
-(1).webp)


