


Table of contents:
Why does Zoom have audio quality issues?
Why does Zoom have lower audio recording quality?
Can you improve Zoom’s audio recording quality?
7 Tips for Improving Zoom Audio Quality
1. Improve your internet connection
2. Record separate audio files
3. Adjust input and output volume
5. Use an external audio interface
7. Designate one person to provide audio for in-person group calls
There are many good reasons to use Zoom. After the Covid pandemic made Zoom a remote-work necessity, everyone knows how to use it—and it’s a reliable way to hold remote interview calls for your YouTube channel, video podcast, or other creative content.
But Zoom is built to optimize the real-time call experience, which means it sacrifices sound and video quality. When your recording is full of distracting background noise or displays a grainy picture, Zoom may feel like more trouble than it’s worth.
To help reduce your frustration, we’ve compiled 7 easy tips for improving your Zoom sound quality—solutions that will help you get back to working and connecting without wasting time wrestling with technology.
Why does Zoom have audio quality issues?
The culprit behind your Zoom sound quality issues could be your internet connection, your position relative to your mic, the mic itself, your chosen audio settings, or another factor entirely.
While that list might feel overwhelming, none of the solutions to those problems are complicated. We’ll explain how tweaking just one or two small things can make a big difference in your sound quality.
Why does Zoom have lower audio recording quality?
While you may experience audio quality issues in live Zoom calls, Zoom’s audio recording quality is likely to be even worse. That’s because Zoom specializes in virtual conferencing software, not recording software.
Zoom prioritizes audio quality during live calls over audio quality in recordings. This is why they compress audio during calls to decrease the data being transferred and increase connection speed. The compressed audio is why recordings sound clipped or distorted.
Can you improve Zoom’s audio recording quality?
You can do several things to improve your sound quality on Zoom. These range from buying high-quality audio devices like an external computer mic and an audio interface, to optimizing Zoom’s sound settings for the devices you’re using. Below, we’ll walk you through exactly what to do and how each solution will help with your audio problems.
7 Tips for Improving Zoom Audio Quality
1. Improve your internet connection
Though it may seem obvious, one of the most likely causes of your sound problems is your internet connection.
That’s why you should always close as many apps and browser tabs on your device as you can before joining a Zoom meeting. It’s also a good idea to ask others in your household to avoid bandwidth-intensive activities (like video streaming) during your meeting, so as much bandwidth as possible goes toward your call.
If you’re still having problems, try moving closer to your router. If the problems persist, use Ethernet instead of Wi-Fi; it’s generally faster because the signal is less likely to be disrupted when moving along a cable vs. through the air.
As a last resort, you can turn off your video during the call to reserve all of the bandwidth for your audio.
Learn more: How to Improve Bandwidth for Recording Smoothly Online
2. Record separate audio files
Although Zoom can’t eliminate audio problems stemming from other participants’ internet quality, you can minimize these issues by telling Zoom to record separate audio files for each participant. You can then isolate only the problematic audio tracks for post-production editing.
To start recording separate audio files, follow these steps:
1. Open your Zoom ‘Settings’. If you’re using a computer, you can access your settings in a Zoom meeting by selecting the up arrow next to the microphone icon in the ‘controls’ toolbar at the bottom of the screen and clicking ‘Audio Settings’.
2. Click ‘Recording’ in the vertical menu bar on the left.
3. Check the box beside ‘Record a separate audio file of each participant’.
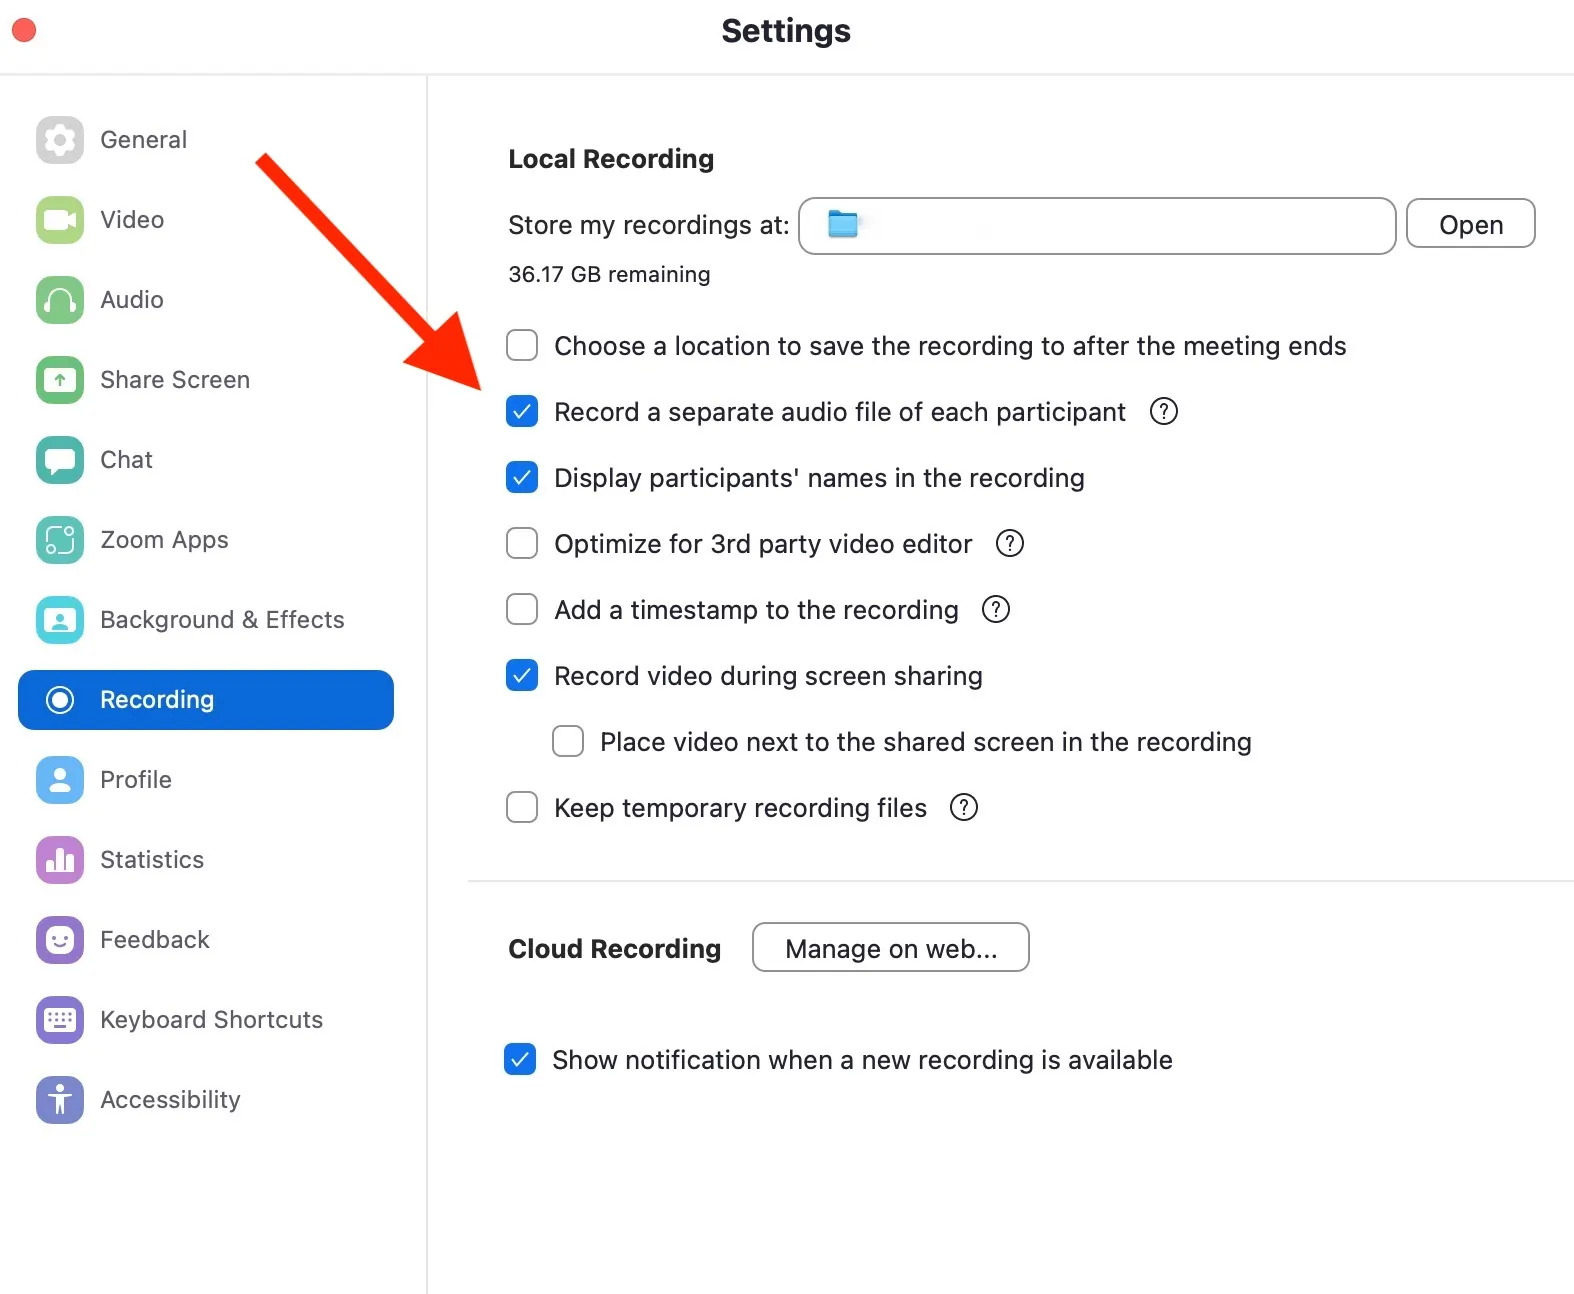
4. Return to the main call screen and click Record.
If you want to enable this option before joining a meeting, go to your Zoom dashboard and click on the gear icon in the top right corner. From here you’ll click Recording and check the separate audio files box.
3. Adjust input and output volume
If other attendees comment that you sound too loud or quiet, you can adjust your mic’s input volume and Zoom’s microphone settings.
To adjust your computer’s built-in mic volume, follow these steps:
1. Go to System Settings (on Mac) or Settings > System (on Windows).
2. Click on ‘Sound’, then ‘Input’.
4. Move the input slider to your desired volume.
And here’s how to adjust Zoom’s input volume:
1. In your Zoom dashboard, go to Settings (the icon in the upper right corner).
2. In the vertical menu bar on the left, click ‘Audio’.
3. Under ‘Microphone’, move the ‘Input Volume’ slider to your desired location.
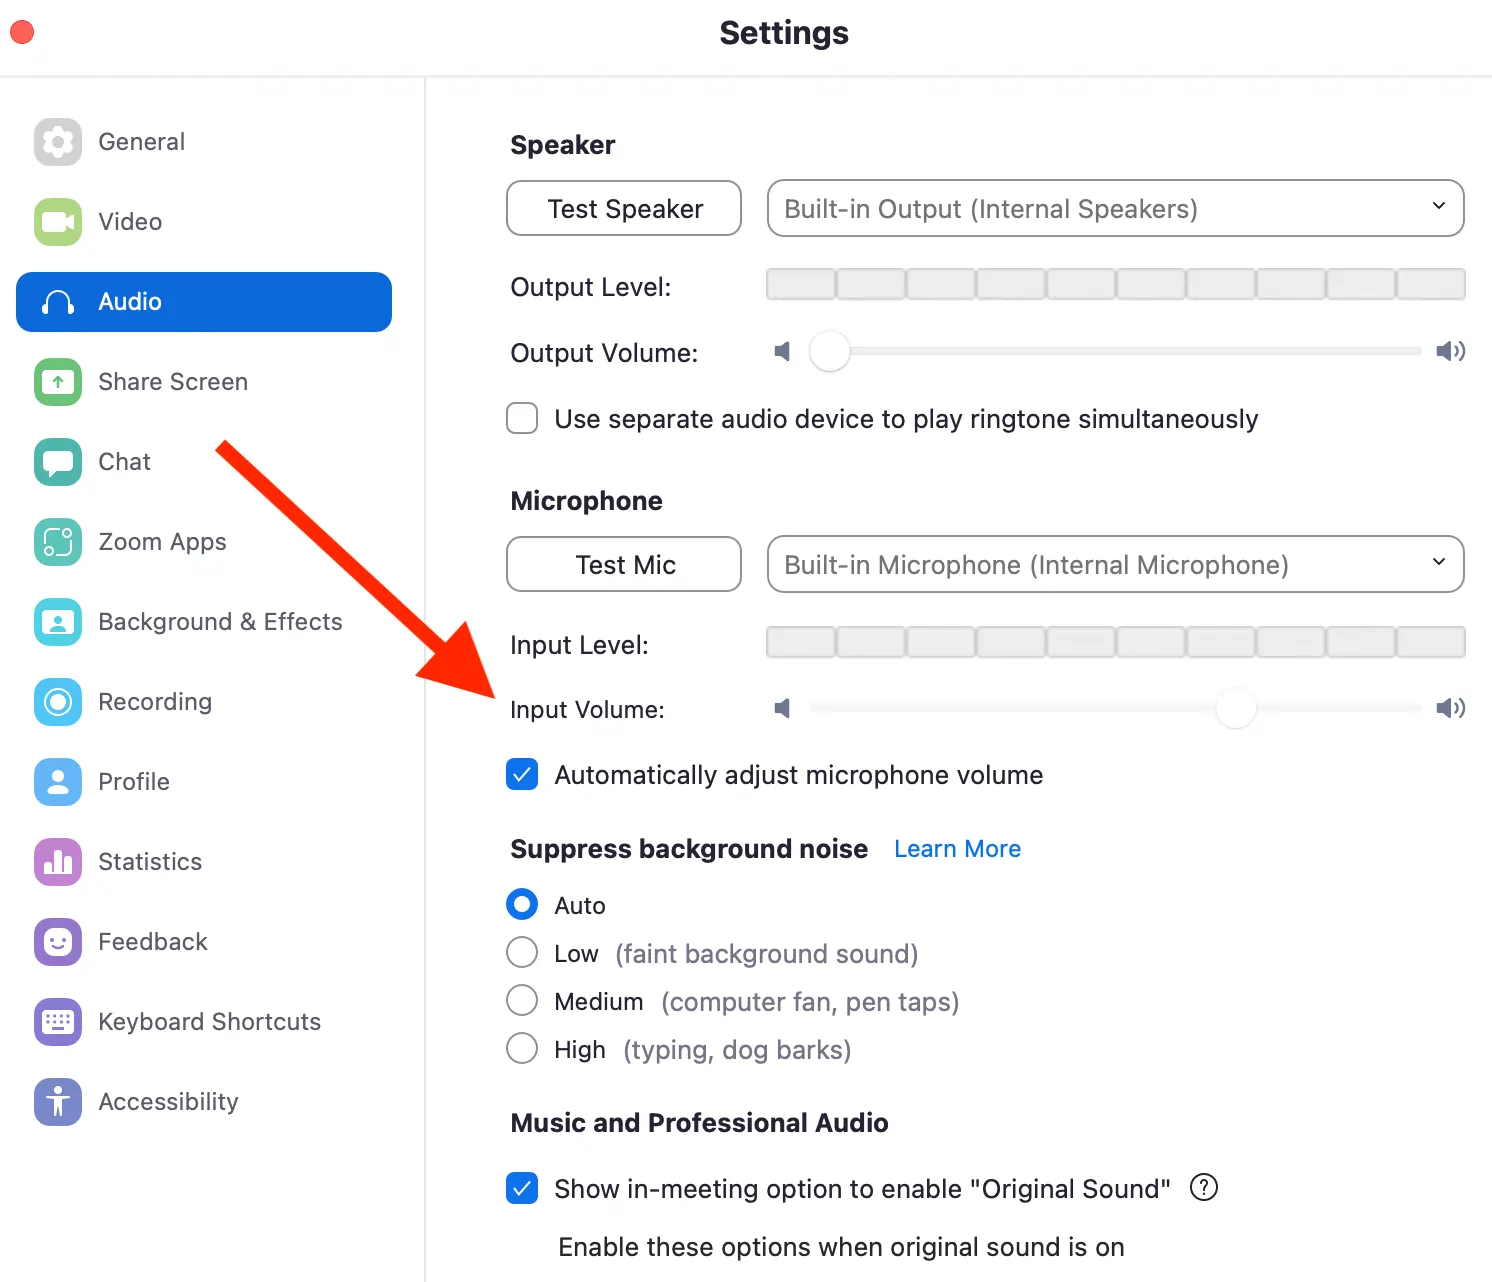
If you have your computer speakers set to a normal volume, but the other meeting attendees sound too quiet or loud, you can also adjust Zoom’s output volume here under ‘Speaker’ by moving the ‘Output Volume’ slider.
4. Use an external mic
You may have heard that it’s better to use an external mic, but did you know that many of the other techniques for improving audio quality won’t work if you’re using your device’s built-in mic? By attempting to automatically correct the audio issues caused by a low-quality built-in mic, Zoom can actually worsen audio recording quality.
That’s why it’s hard to overstate the benefits of using dedicated equipment instead of your device’s built-in equipment.
When shopping for an external mic, consider buying from this list of mics supported by Zoom. They’re less likely to experience sound problems compared to mics that may not be fully compatible.
Feeling overwhelmed by all the options? Check out our list of the best microphones for computers to narrow it down, keeping in mind that these mics are not only great choices for podcasters but also for anyone doing voice recording.
5. Use an external audio interface
An audio interface is a device that allows your computer to communicate with audio devices like your mic and speakers. They do this by taking the analog signal produced by these devices and converting it to a digital signal that your computer can understand.
Every computer has a built-in audio interface, but like your built-in mic, it won’t produce professional-quality sound. That’s one reason we recommend getting a higher-quality external audio interface. You can start with our list of the best USB audio interfaces.
Having an external audio interface will also enhance the efficacy of the next tip.
6. Use original audio
By default, Zoom makes a few changes to your call’s audio while producing the recording. These changes are intended to enhance the audio by removing background noise, interference, echoes, etc. However, these corrections can be imprecise. So, for a high-quality recording, it’s best to start with high-quality audio equipment that will render these post-production enhancements unnecessary.
If you don’t have an external mic and audio interface, we don’t recommend implementing this tip. But if you have the equipment, here’s how you can disable automatic audio enhancements and get original, high-quality audio by making just a few changes to Zoom’s sound settings:
1. In your Zoom dashboard, go to Settings.
2. Click on ‘Audio’.
3. Under ‘Music and Professional Audio’, check the box beside ‘Show in-meeting option to enable Original Sound’. Note that you’ll need to toggle this on or off during your meeting.
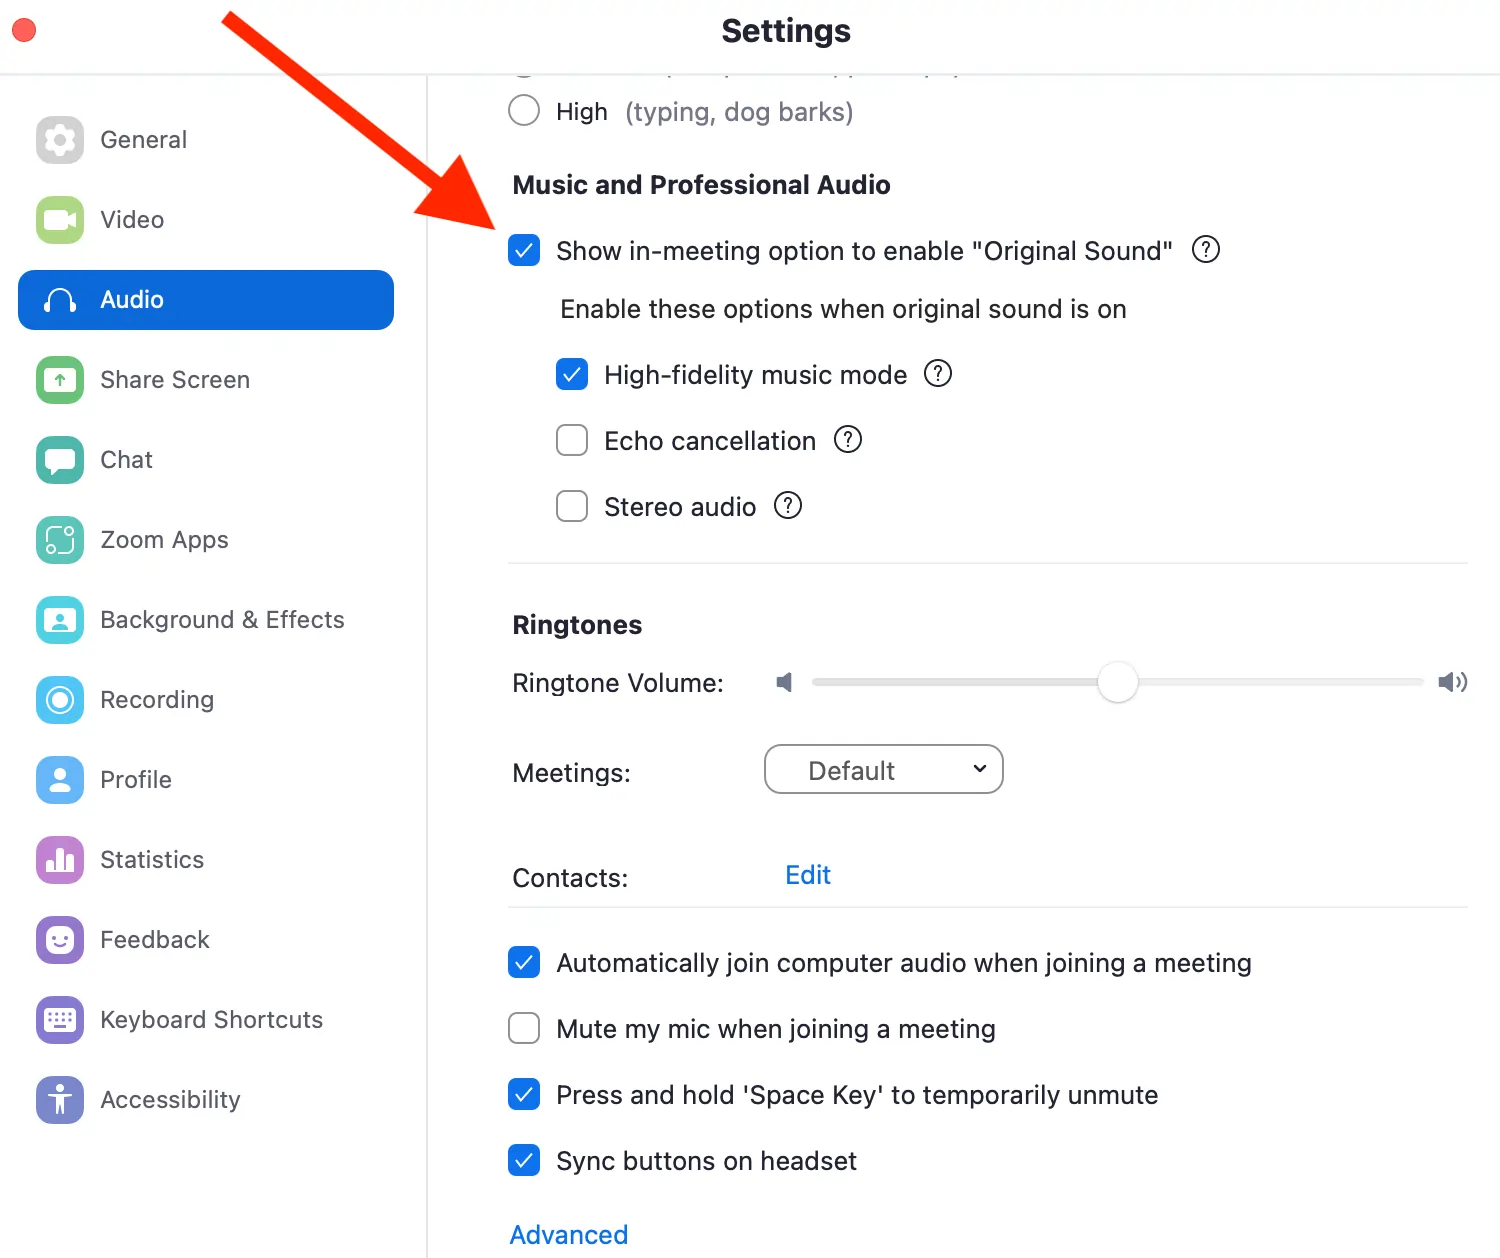
4. Uncheck the box beside ‘Echo Cancellation’—especially if you’re using a mic with built-in echo cancellation, you shouldn’t need to enable this Zoom feature. Be sure to test this before your meeting, though, and if you’re hearing an echo, try moving closer to the mic or soundproofing your recording studio.
5. Check the box beside High-Fidelity Music Mode. As the name suggests, this mode was designed, for recording music, but its benefits extend to anyone trying to record professional-quality sound. Remember how Zoom automatically removes parts of the audio track to optimize connection speeds during live calls? This setting keeps that data removal to a minimum.
Note that Zoom recommends using an Ethernet cable for a faster connection speed when using this mode.
To enable original audio in the mobile app, follow these steps:
1. Tap More in the bottom right corner of the home screen.
2. Under ‘Settings’, tap ‘Meetings’.
3. Toggle on ‘Use Original Audio’.
Lastly, if you’re using a PC, scroll to the bottom of Zoom’s Audio settings screen and click ‘Advanced’. Here you want to disable ‘Signal processing by Windows audio device drivers’. This keeps your PC’s built-in audio interface from electronically manipulating your audio in an attempt to enhance it. In other words, it gives you the original sound, which should already be high-quality if you’re using a good external mic and audio interface.
7. Designate one person to provide audio for in-person group calls
If you’ve ever been to a meeting with both in-person and Zoom attendees, you’ve likely experienced the interference that can occur when multiple in-person attendees are logged into the Zoom meeting.
To eliminate that interference, choose only one person to provide the audio input and output for the room. This means every other in-person attendee logged into the meeting needs to mute their mic in Zoom and mute their computer’s speakers.
One other tip for making this work well is to make sure each speaker stands in front of the computer providing the audio input. Most built-in mics only clearly pick up audio directly in front of them.
Is it worth using Zoom for high-quality audio recordings?
While it’s possible to improve Zoom’s audio quality using the tips above, Zoom was not designed to produce professional-quality audio recordings. Instead, it was designed to optimize audio during live meetings at the expense of recorded audio quality.
To get the best audio, we recommend trying dedicated recording software like Riverside.
“Riverside is far better than Zoom for recording interviews.” - Seth Godin, author, entrepreneur and marketing leader.
Riverside: Seamless high-quality audio recordings
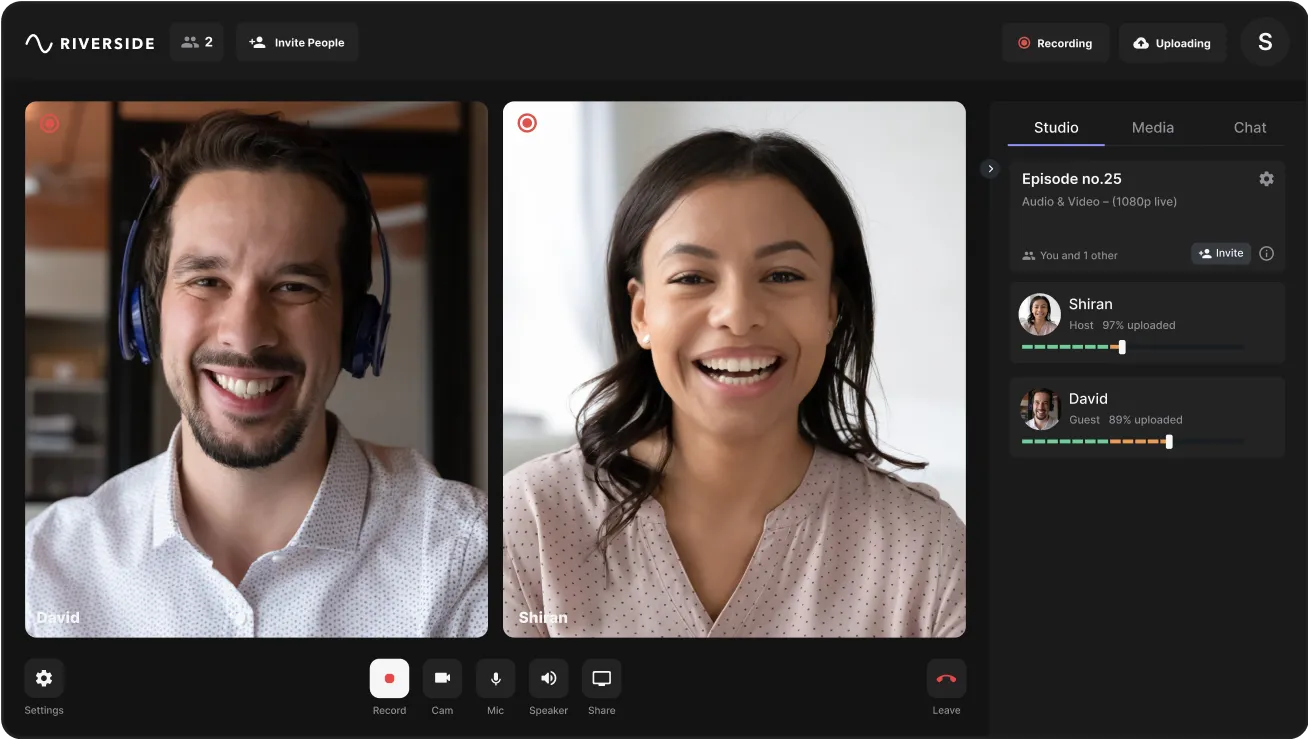
Because Riverside was initially designed for podcasting, it optimizes live plus recorded audio and video quality. This is why it’s become an excellent choice for anyone looking to record studio-quality video or audio calls for personal or professional use! Names like Gary Vaynerchuk, Casey Neistat, Microsoft, and Spotify, all use Riverside to create their high-end content.
Riverside automatically records lossless 48kHz WAV audio. That refers to Riverside’s sample rate—the number of samples taken from an audio track per second. A 48kHz sampling rate creates a highly accurate reconstruction of the original sound signal. That’s why Riverside’s audio sounds crisp and crystal clear.
Like Zoom, Riverside records separate audio tracks for each participant—though it does this by default, saving you time spent figuring out how to change the necessary settings. On top of this, you can also record separate video tracks, a feature Zoom doesn’t provide.
Unlike Zoom, Riverside provides double-ender recordings. That means each participant’s audio and video is recorded directly on their own computer, instead of relying on internet connection which can affect the quality of the final recording.
In addition to recording and streaming audio and video, Riverside’s text-based editor uses Ai transcriptions which you can use to navigate through and trim your videos. Any text you delete in your transcripts automatically cuts the matching video and audio in your recording. Our editor also comes with automated tools for fine-tuning audio and customizing your video's appearance.
Key features:
- Records in high-quality with up to 48kHz WAV audio and 4K video resolution
- Built-in media board for live editing and inserting audio and video clips in real-time
- Local recording ensures internet connection problems won’t affect recording quality
- Separate audio and video tracks for each participant for enhanced control in post-production
- Text-based audio and video editing so anyone can create a professional video as easily as editing a text document
- iOS and Android mobile apps enable recording on the go on any device
- Producer mode allows you to adjust audio settings during a call without being recorded
- Continuous uploading during calls ensures recordings are available as soon as calls end
- Magic Clips feature enables you to repurpose one long-form recording into multiple short videos ideal for promoting your content on social media
- Automatic transcriptions of call audio for easy tracking, content repurposing or subtitles if you’re capturing video
- Live streaming to YouTube, Facebook, Twitch, Twitter, and more
- Up to 8 remote participants on a call
Ready to create high-quality audio recordings seamlessly? Start recording with Riverside

FAQs on How to Improve Zoom Audio Quality
How do I fix bad audio in Zoom?
First, try moving closer to your Wi-Fi router or using a wired Ethernet connection. If that doesn’t solve the problem, there are a few tweaks you can make to Zoom’s audio settings.
If you’re using an external mic (which we recommend you do!), in your Zoom dashboard go to ‘Settings’, ‘Audio’, and toggle on ‘Show in-meeting option to enable Original Sound’. Toggle off echo cancellation and toggle on high-fidelity music mode (though note that you’ll need the higher speed of an Ethernet connection to use this mode). You’ll then need to enable this once in your meeting.
In the mobile app, tap ‘More’ in the bottom right corner of the screen, then under ‘Settings’ you’ll tap ‘Meetings’. Here you’ll see the option to toggle on ‘Use Original Audio’.
By default, Zoom makes a few adjustments to your audio, which can sometimes result in lower-quality audio. Enabling original sound will give you the raw audio instead.
Why is my Zoom audio muffled?
The most likely culprits behind muffled Zoom audio are the microphone you’re using or your distance from it.
Assuming you’re sitting a normal distance away from your device, its built-in microphone may not be able to pick up your voice clearly. That’s one reason why it’s better to use an external mic. The closer you can get to the mic, the less muffled your audio will be—though it’s a good idea to get a pop filter to dampen those “p” sounds if you’re sitting very close to the mic!
Next, make sure you’ve selected the correct microphone. If you’re in a Zoom meeting, click the arrow beside the microphone icon to see which mic is highlighted—it should be the one you’re actually using. Your audio might be muffled because Zoom is picking up sound from the wrong source.
You should also make sure nothing, including your hand, is blocking your mic—or, if you’re using a built-in mic, touching your device during your call. Lastly, make sure you’re positioned directly in front of your device. This is especially important if you’re using a built-in mic; these usually only clearly record sound directly in front of them.
How do I improve my audio quality?
One of the most impactful things you can do to improve your audio quality is to buy an external mic designed for your specific activity and software. If you’re recording a podcast, choose a dedicated podcasting mic. If you’re using Zoom, choose from this list of Zoom-optimized mics. If you want professional-quality audio, buying an external audio interface can make a big difference.
Once you have high-quality audio equipment, you can disable any settings in your recording software that attempt to correct for audio problems—since your equipment is already doing that! Disabling those settings will give you the original sound, which will likely be higher quality, and which you can edit with precision using editing software if needed.
We also recommend using software designed to produce studio-quality audio in both live calls and recordings. The best option for this is Riverside, an all-in-one call hosting, recording, streaming, and editing software.
Can we change audio quality in Zoom?
You can increase Zoom’s audio quality to 48kHz by going to Settings > Audio > Music and Professional Audio, toggling on ‘Show in-meeting option to enable Original Sound’, then checking the box beside ‘High-fidelity music mode’. In the mobile app, you’ll tap ‘More’ in the bottom right corner of the screen, then under ‘Settings’, you’ll tap ‘Meetings’. Here you’ll see the option to toggle on ‘Use Original Audio’.
Just make sure you’re using an external mic, external audio interface, and Ethernet connection. If that sounds like a lot, remember that all three of those will enhance audio quality in and of themselves!
How do I test my audio on Zoom?
If you’re in a Zoom meeting, you can test your audio by clicking the arrow beside the microphone icon in the control bar at the bottom of the screen and choosing ‘Test Speaker & Microphone’. If you want to test your audio prior to joining a meeting, go to your Zoom dashboard, click on the ‘Settings’ icon at the top right, click on ‘Audio’, then choose either ‘Test Speaker’ or ‘Test Mic’.
To test your audio on the Zoom mobile app, you’ll need to start a new meeting. Make sure your microphone is not muted, then tap on ‘Participants’. Your name will pop up with the microphone and video icons beside it. When you speak into the phone, the microphone icon should turn green; this shows that it is working. If you’d like, you can go back to the meeting’s home screen and tap ‘Record’, speak into the phone, then tap ‘End recording’. Play back your recording to hear how your audio sounds.
We hope these tips on how to improve Zoom’s audio quality will help you take one more step toward productive days at work and restful evenings at home. For more information check out our article on improving zoom video quality.


