


Table of contents:
Key takeaways
- Setting up a Zoom webinar takes planning and practice.
- Schedule your webinar, set up registration, and keep the event interactive using Zoom’s built-in tools.
- Run a test webinar to check your setup and avoid live tech issues.
- Want higher-quality recordings and easier editing? Try Riverside.
Planning to use Zoom for your next webinar? It’s a popular platform many people are familiar with. But if it’s your first time, you’ll need a game plan to ensure things go smoothly.
No worries, we’ve got you. Follow along, and we’ll walk you through setting up your next Zoom webinar step by step.
Zoom webinar requirements
Before you do anything else, make sure you have everything you need to host a smooth Zoom webinar.
You’ll need:
Zoom Webinars add-on
To host a webinar, you’ll need a Zoom Webinar license - even if you already have a Zoom account.
With Zoom’s Pro plan, you can host up to 100 participants — or 300 on the Business plan. But these are meetings, not webinars — so you’ll miss out on key webinar features like registration, attendee management, and advanced audience tools.
You can opt for a monthly plan or, if your webinar is a one-off, purchase a single-use license instead.
Zoom desktop client OR up-to-date browser
Next, you need to download and install the latest version of the Zoom desktop client on your device. If you prefer to use your browser, make sure you have the latest version of Chrome, Firefox, Edge, or Safari.
Adequate processor and RAM
A smooth webinar experience requires a reasonably powerful computer. Zoom recommends at least a dual-core 2GHz processor with 4 GB RAM.
A stable internet connection
For 1080p video streaming, you’ll need a reliable connection with at least 2 Mbps upload and download speeds. Use a speed test like Fast.com or Ookla to check your connection speed, but if your internet isn’t stable, your audio and video quality will drop mid-session.
How to set up a Zoom webinar: 4 Steps
Ready to set up your first Zoom webinar? Follow these steps to begin.
1. Schedule your webinar
It’s best to schedule your webinar ahead of time to promote it properly and maximize attendance. We recommend setting the date at least two weeks ahead.
How to schedule a webinar in Zoom:
Step 1: Sign in to the Zoom web portal, and choose “Webinars” from the navigation menu on the left side of your screen.
Step 2: Select “Schedule A Webinar,” and enter your event’s topic and description in the relevant fields.
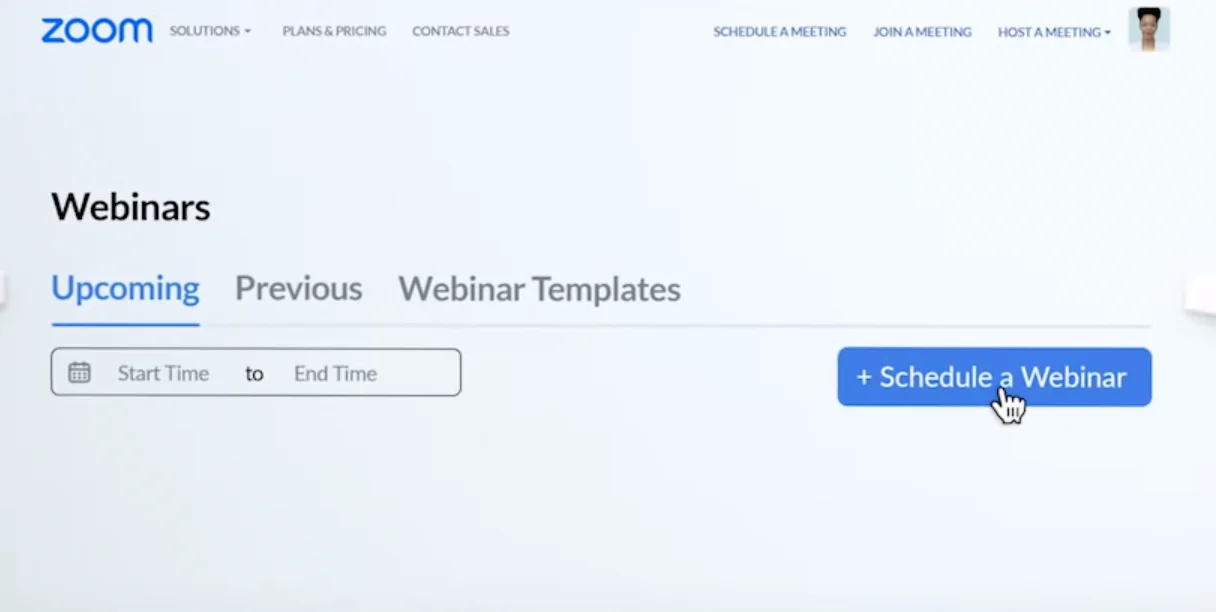
Step 3: Use the fields on your screen to fill in the date, time, time zone, and duration of your webinar event, along with any other webinar settings.
How to set up registration for a Zoom webinar
You can require your attendees to fill out a registration form before joining your event. Here’s how:
Step 1: In your webinar scheduling settings, scroll down to the registration section and select the “Require registration” checkbox.
If your webinar is a recurring event, you can use settings to control whether attendees need to register just once or re-register for each new webinar.
Step 2: Scroll down to confirm video, audio, and other options, then click “Schedule” to finalize.
How to set up automatic or manual registration on Zoom
Choose between manual or automatic registration approvals. Automatic approval means you won’t have to approve each registrant - it will happen as they register. Here’s how to do it.
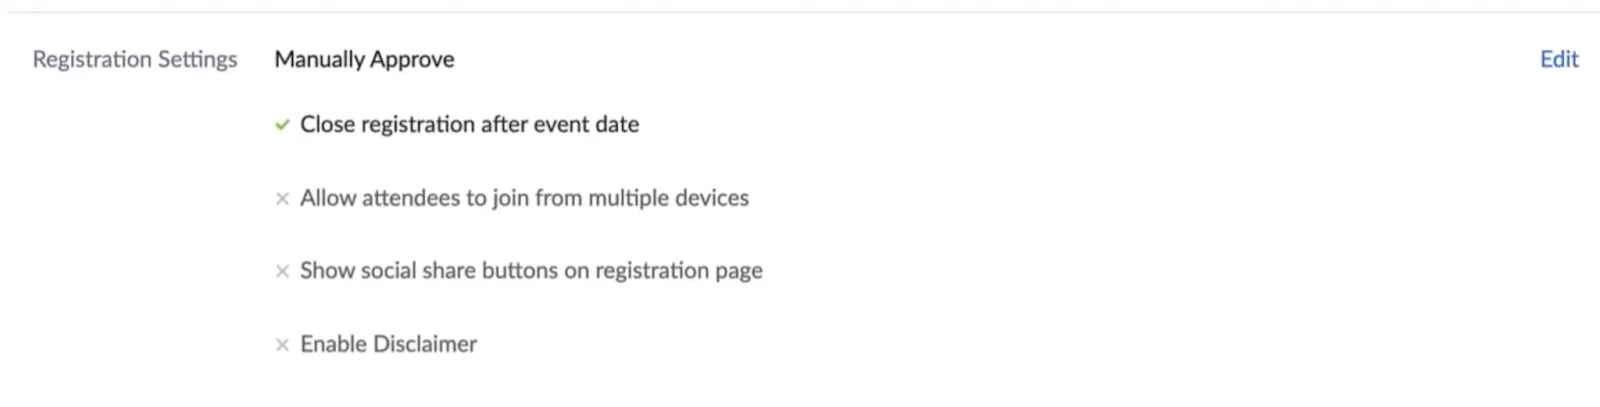
Step 1: Once you’ve scheduled your Zoom webinar, scroll to the bottom of the details page, and select the “Invitations” tab.
Step 2: Review the registration options under “Registration Settings.” If manual approval is listed, click “Edit” on the right.
Step 3: Under “Approval” in the “Registration” tab, select “Automatically Approve” or “Manually Approve.”
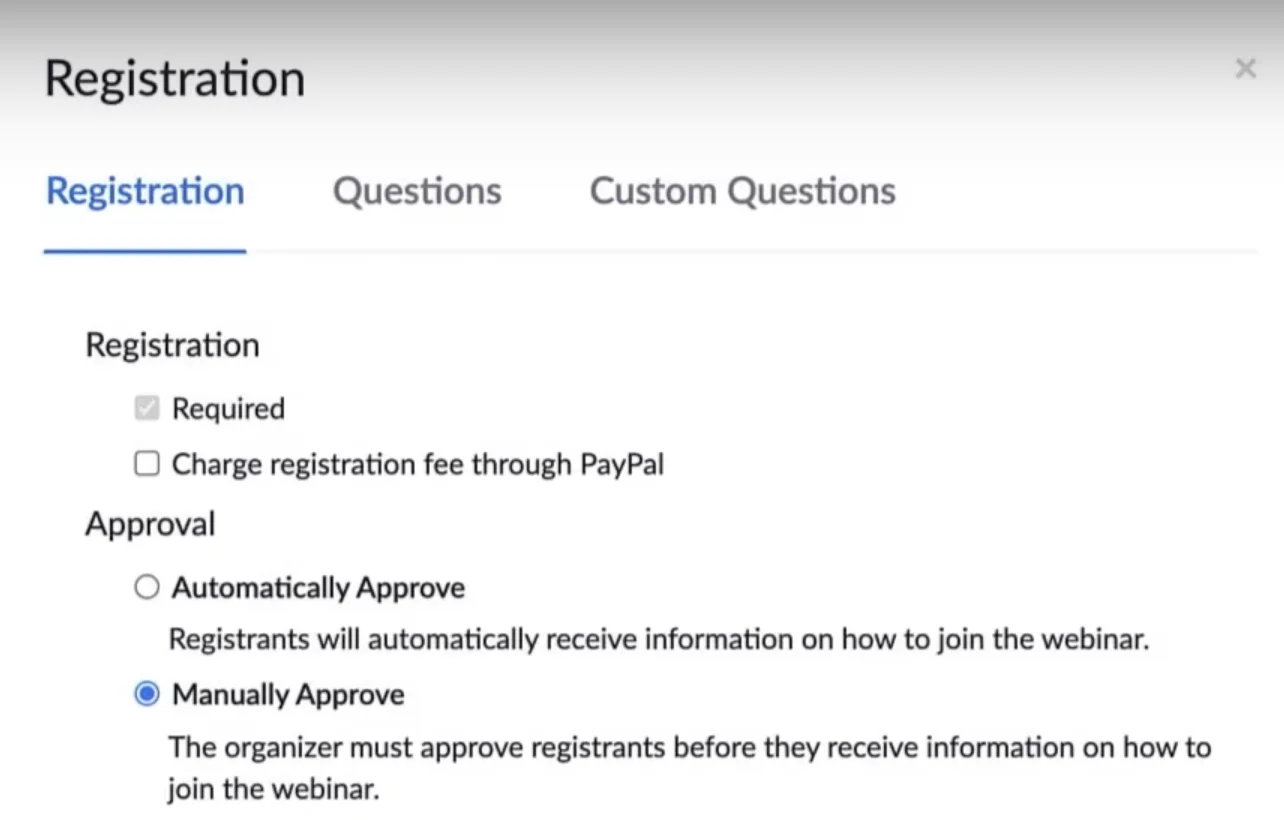
Step 4: Finally, “Save” your changes before sharing an invite with your attendees.
How to run a Zoom webinar without registration
You can run a Zoom webinar without requiring registration. Here’s how:
Step 1: Click on the "Schedule a Webinar" button to create a new webinar.
Step 2: Go to “Webinar Settings” and select “Registration.”
Step 3: Toggle off “Require Registration.”
Pro tip: Want more control over registration? With Riverside, you can easily set up custom registration fields to collect specific information from attendees (and it’s way less clunky than Zoom!).
2. Inviting attendees and panelists
What’s a webinar without guests and attendees? Here’s how to invite them to your event.
How to invite attendees to a Zoom webinar
Attendees are view-only participants. However, they can be unmuted by the host and interact via Zoom’s Q&A and chat functions.
To can invite attendees:
Step 1: Go to the “Invitations” tab.
Step 2: Copy the registration URL and share it on your website, social media, or via email.
Step 3: Select “Copy invitation” to copy Zoom’s pre-generated invite and send it to your attendees.
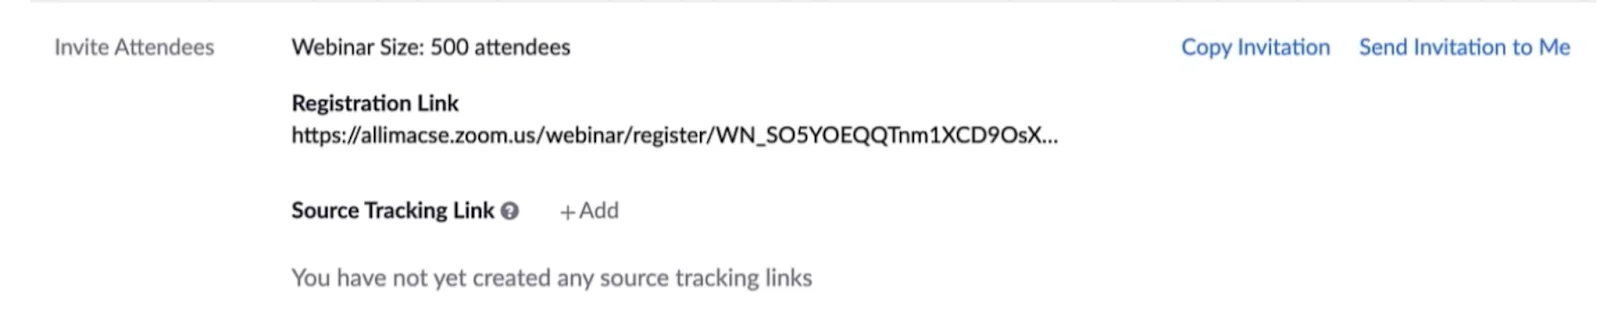
Step 4: Select “Email me the invitation” to receive the invitation in your inbox and forward it to attendees.
How to invite panelists to a Zoom webinar
Panelists are full participants in the webinar. They can screen share, annotate, and interact freely.
You can add them while scheduling your webinar, and they’ll receive a unique URL to join with panelist privileges.
Follow these steps:
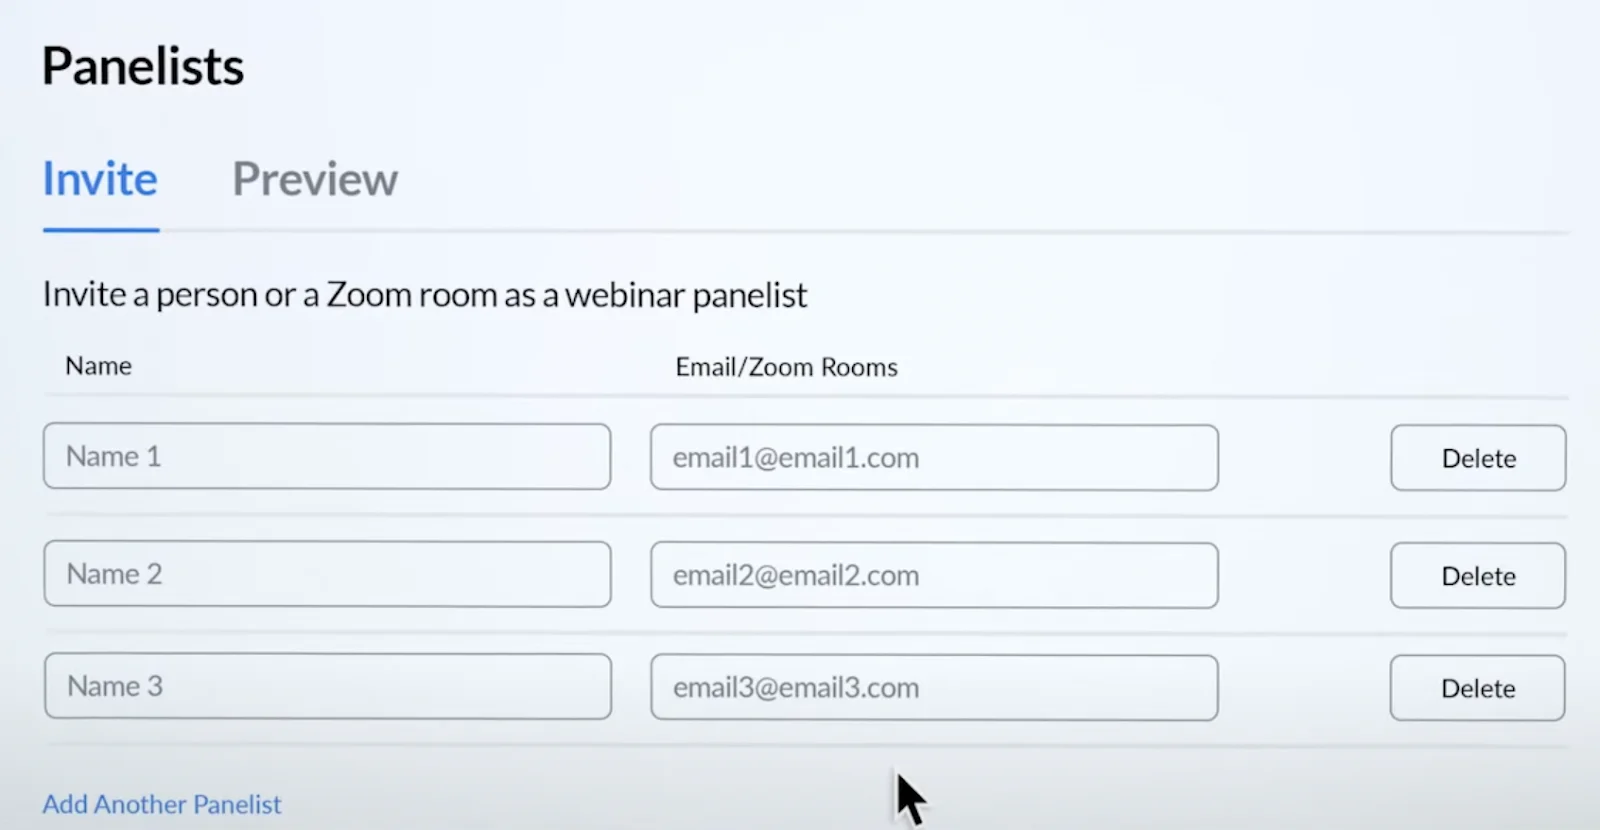
Step 1: While scheduling your webinar, scroll down to the Invite Panelists section.
Step 2: Enter each panelist’s name and email address.
Step 3: Zoom will automatically email them a unique panelist link to join.
3. Host your webinar on Zoom!
You’ve got everything set up - now it’s time to run the show.
Here’s what you need to know.
How to start your webinar
To start your webinar:
Step 1: From the web portal, sign in to Zoom and click “Webinars.” From the desktop client, click the “Meetings” tab.
Step 2: Find your event, click it, then hit “Start.”
Step 3: To start the webinar from your calendar, you can click the event link in your reminder.
Note that in Zoom, the webinar will start immediately when you click “Start.” Attendees will be able to join and see the live session immediately.
If you want to prepare without broadcasting to attendees, enable the "Practice Session" feature during scheduling. This allows hosts and panelists to join and rehearse privately before going live. Once ready, click "Start Webinar" to allow attendees in.
Pro tip: With Riverside you can enter the studio with your guests, get everything set, and only start broadcasting the webinar when you’re 100% ready. No more awkward surprises!
How to use Zoom’s interactive features
Once your webinar is rolling, you’ll want to use some of Zoom’s interactive features to keep your audience engaged. You can:
- Present a PowerPoint presentation while also keeping your webcam visible.
- Share your screen so others can see your work.
- Create polls and quizzes to engage participants.
- Record, edit, and share short video messages.
- Use Breakout Rooms to split participants into smaller groups for creative work and problem-solving.
You’ll find these interactive features in the toolbar at the bottom of your screen. Only the host can initiate certain features, such as launching polls or creating breakout rooms. We highly recommend practicing using these tools before going live!

Pro tip: Enable “Always show meeting controls” in Zoom to ensure your toolbar doesn’t disappear mid-session - together with the features you need.
You can do this by going to Settings > General > Always show meeting controls.
4. Assess analytics and performance
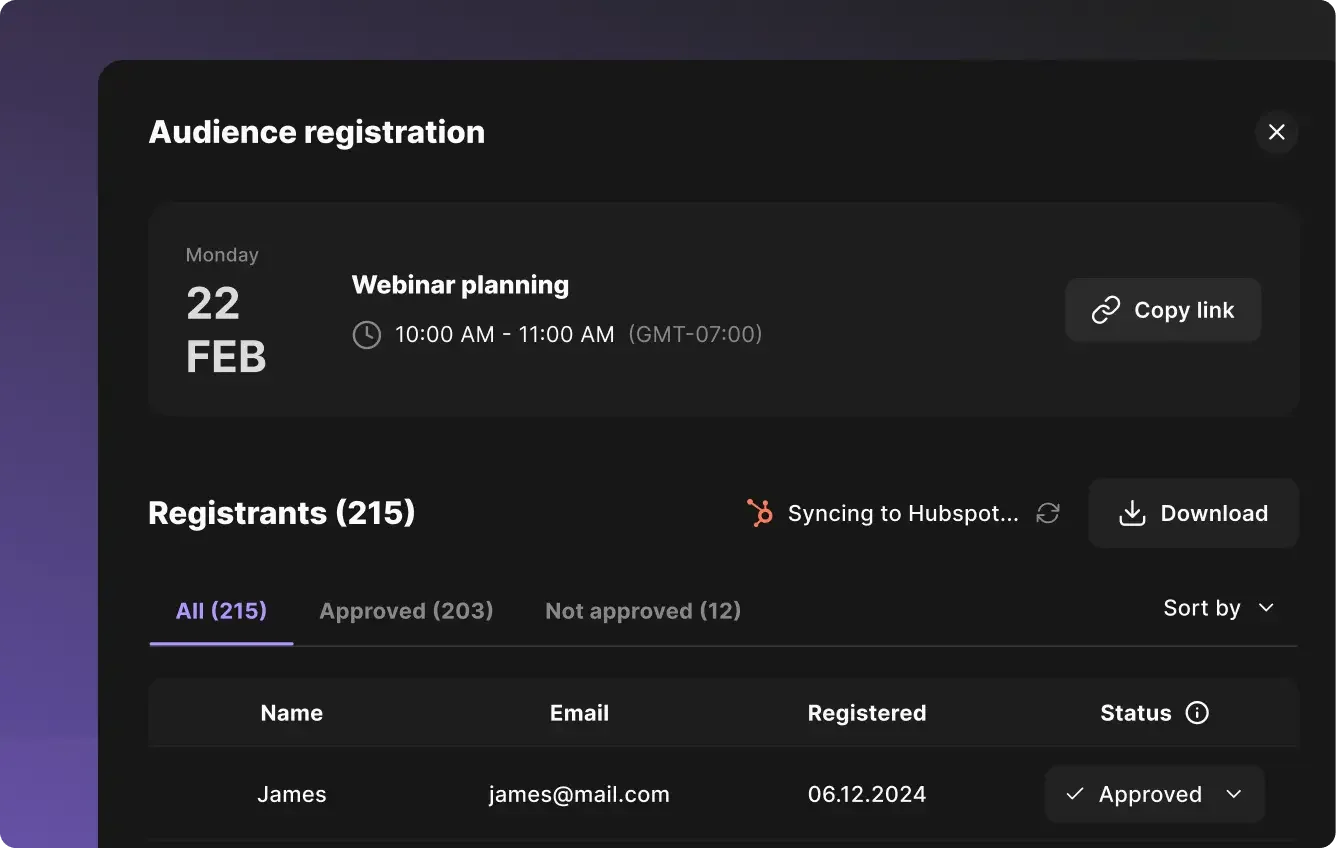
Zoom provides built-in analytics to measure your webinar’s success - and you should definitely use them! You can get information like:
- A list of registrants and their details.
- Attendee insights, including when they joined and when they left the webinar.
- Engagement stats such as registration rates, attendance data, and audience feedback.
- A Q&A report that shows all the questions asked and answered.
- Poll results displaying how attendees responded.
- Survey data with post-webinar survey responses.
To generate your webinar analytics report in Zoom:
Step 1: Sign in to Zoom and go to “Reports.”
Step 2: Click “Webinar” and select the “Report Type” you would like to search for.
Step 3: Enter the date range of your webinar and click “Filter.” You can also enter the webinar ID and click “Search.”
Step 4: Select the webinar, then click “Generate CSV Report.”
5 best practices for setting up Zoom webinars
Running a webinar can be a lot of work, so you’ll want to set yourself up for success.
Here are some tips to help you get the results you want:.
Plan ahead of time
A well-planned webinar is a successful webinar. Give yourself time to think carefully about your topic, line up guests, and ensure that your content provides real value to your audience. After all, you’re asking them to spend an hour with you - make it worth it!

Need a game plan? Check out our full guide on webinar planning to learn more.
Try a test run (or three)
A test run will ensure that your event will go off without a hitch.
Run this practice webinar just like you plan to run the real deal. Schedule a date and time, invite some guests, and run through your materials.
You can even invite a friend or colleague to give you some feedback.
Market your event
It’s no use hosting a webinar if no one ever knows about it!
Explore webinar marketing opportunities in advance and start spreading the word about your event.
Reach out to existing connections and followers, promote your event on your website and email newsletter, and ask your guests to share it with their networks.
For extra visibility, list your event with popular online directories, like Eventbrite.
Learn from feedback
After your webinar is over, attendees may be willing to share their thoughts and ideas.
Use this feedback to offer a better experience for your audience and improve your skills. This will help you develop webinars that align with your goals while meeting your audience needs.

Riverside: A Zoom alternative
If you’re planning to host your webinar on Zoom, let me introduce you to a better option - Riverside. You can host webinars with up to 10,000 attendees without breaking the bank.
Unlike Zoom, on Riverside, you can record in up to 4K video and 48 kHz audio (Zoom maxes out at 1080p). You’ll also get separate audio and video tracks for every participant, ensuring maximum control during post-production. Best of all, Riverside records locally, meaning even if your internet lags, your recording stays flawless. (If you’ve ever been stuck in a frozen Zoom meeting, you know how much this matters!)
Keep things interactive by inviting your audience members to call in live or use our presentation recorder to share informative slides. Riverside even includes a built-in teleprompter to help you stay on script!
Did you know Riverside is also a text-based video editor? Once your live event is over, you can easily repurpose your recording to turn it into on-demand content, or short, shareable clips you can use on social media.
“Riverside is far better than Zoom for recording interviews.” - Seth Godin, author, entrepreneur and marketing leader.
Here’s what else you can expect from Riverside:
- One-click shareable invite links with customizable registration form.
- Up to 10,000 audience members.
- Producer mode, with behind-the-scenes video creation controls.
- Live streaming to broadcast in real-time on social media platforms.
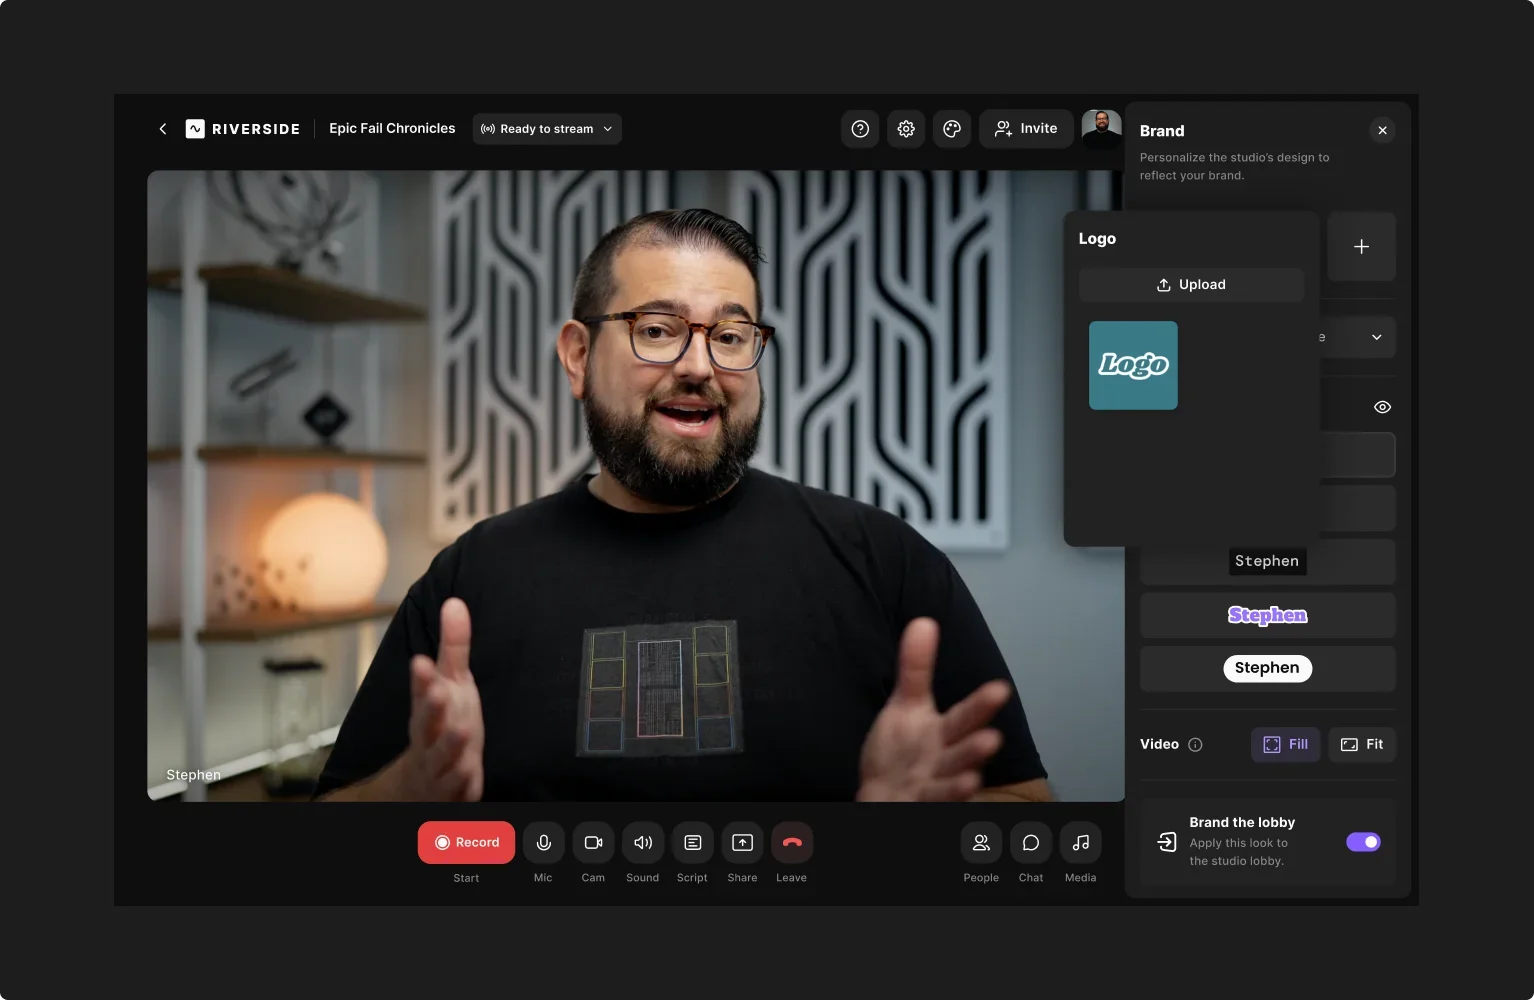
- Add custom branding, captions, and lower thirds quickly and easily.
- Engage with viewers across platforms from one chat box.
- Text-based editing and AI-enhanced tools for fast, easy post-production.
- Background noise removal tools to eliminate audio distractions.
- AI Magic Clips for creating automatic short-form videos with a click.
- Share your screen in HD for tutorials, walkthroughs and educational sessions.
- Upload presentations and slides, and capture them in high-quality.
- Add your own custom videos and sounds, or choose from our library with the media board.
- Separate video and audio tracks for up to 10 speakers.
- Accurate AI transcriptions in over 100 languages.
FAQs on how to set up Zoom webinars
What is the difference between a Zoom meeting and a webinar?
Zoom meetings are the standard offering of the Zoom platform and are aimed at interactive sessions for small groups. Generally speaking, a meeting is best for up to 10 people collaborating. Zoom meetings offer basic features like video and audio sharing, muting and unmuting functionalities, and breakout rooms.
Zoom Webinars is an add-on product explicitly designed to support larger audiences, as in the case of a webinar or virtual conference. It includes specific features such as audio-only mode, listen-only mode, and exclusive unmuting, as well as engagement tools like Q&A, polling, and live chat.
Can I host a webinar on Zoom for free?
Unfortunately, no, you can’t. While you can use Zoom meetings for free, Zoom’s webinar feature is as an add-on that can cost upwards to several thousands of dollars for larger sessions. The free plan for Zoom Meetings only allows you to host sessions with no more than 100 participants, with a 40-minute time limit, and no webinar-specific features.
You can host a webinar on Riverside’s free plan, though! You’ll get access to many great features with no limits on recording or live streaming time.
Can you start a Zoom webinar before the scheduled time?
Yes, Zoom webinars can start at any time before the scheduled time.
If you want to start earlier to connect with your guests and get set up on the platform, We recommend using a “Practice Session.” You’ll find this option when you click on the webinar in your web portal. From there you’ll be able to enter the live event by clicking “Start Webinar” from the top banner in Zoom. Clicking “Start” begins the webinar and allows attendees to immediately join.


.webp)
.webp)
.webp)

