.webp)


Table of contents:
1. Using dedicated podcast remote recording software
2. Recording conversations via video conferencing software
3. Using a ”double-ender” setup
4. Recording remote audio podcasts with a phone
Tips and best practices for better remote podcast recording
Define your recording and editing process
Optimize your internet connection
Regularly clear out your storage
Choose the remote podcasting recording method that suits you best
Key Takeaways:
- Dedicated Podcast Software is Best for Quality: Remote podcast recording software like Riverside is the most hassle-free option, offering high-quality audio and video (up to 4K) by recording locally, ensuring consistent quality even with unstable internet connections.
- Essential Equipment for Remote Recording: Key equipment includes a good microphone, headphones, a pop filter, and, optionally, a dedicated camera for superior video quality.
- Multiple Recording Options: You can record remotely using various methods like video conferencing software (e.g., Zoom or Google Meet), the double-ender technique, or even phone calls. Each option has pros and cons.
- Optimizing Your Setup is Crucial: Whether using a home studio or outdoors, ensure a quiet environment, use appropriate microphones, and pay attention to your video background.
Remote podcast recording gives you the ability and freedom to launch and grow your podcast regardless of where your guests or co-hosts are based. You can record from two (or more!) different locations, invite guests from all over the world, and record both video and audio at home.
Best of all, recording podcasts remotely has never been easier. In this guide, we’ll walk you through the four most popular virtual podcasting options to help you pick the right one for your needs.
1. Using dedicated podcast remote recording software
The best and most hassle-free option is using dedicated podcast remote recording software.
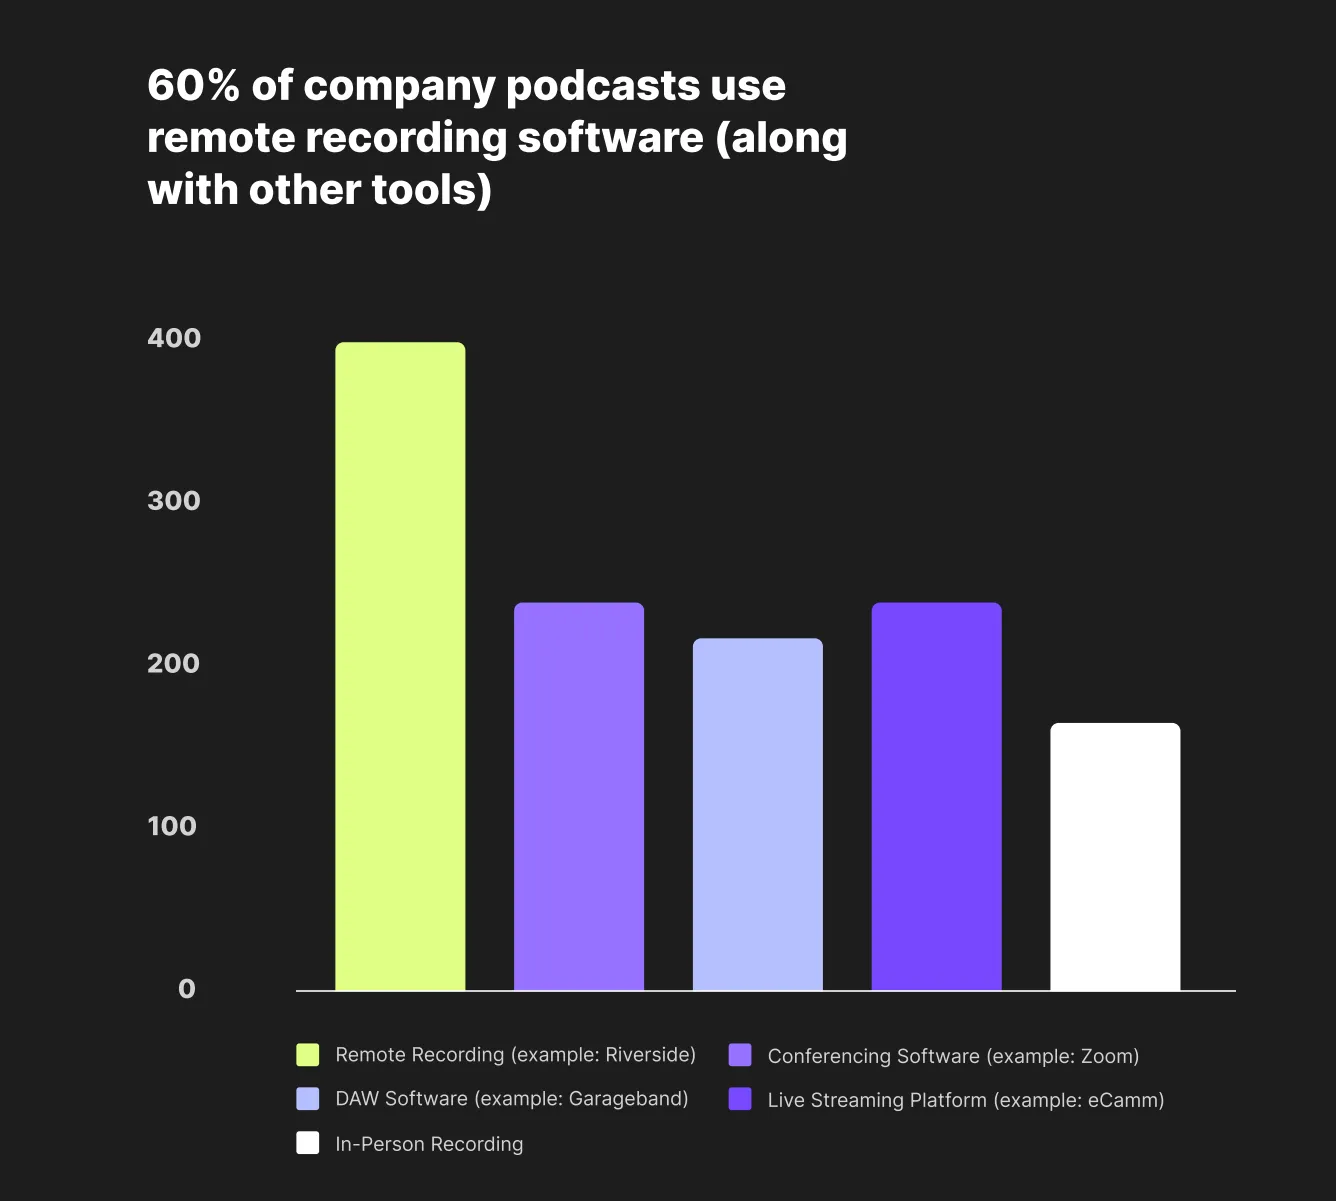
It’s what podcasting pros use. Our 2023 survey report showed that 60% of company podcasts are recorded using dedicated podcasting software.
When evaluating and choosing the right remote recording software, be sure to consider the following:
- Offered audio formats: What type of files does the platform export? For example, MP3 files compress audio, taking up less space but lowering quality. Uncompressed, lossless WAV files are heavier but offer clearer audio.
- Video resolution: Opt for software that can record in high-definition (1080 pixels and above), but find a platform that allows you to record in 4K resolution for the best quality.
- Online vs. local recording: The best remote recording software can capture high-quality video and audio of people in different locations using local recording. This means that everything is recorded directly on your local devices so that the recording quality is always high, regardless of the quality of your internet connection.
- Compatibility: You need podcasting software that is compatible with the other podcasting equipment you’re using (laptops, mics, cameras, etc.).
Evaluating these four criteria helps you establish a baseline and better understand what the best remote podcasting solutions offer.
What you’ll need
Using a solution like Riverside as your remote podcasting software allows you great versatility in your setup. You can connect any podcasting equipment and record virtually from anywhere with co-hosts and podcast guests worldwide.
Calibrate your setup to match your goals, but don’t feel the need to overspend. Setups can differ based on your chosen recording method. However, here are some essential equipment needs to start with:
- Microphone: There are many options available when choosing a podcasting microphone. For a budget-friendly option without a huge learning curve, consider these plug-and-play USB microphones:some text
- Pop filter: A pop filter for your mic helps reduce distracting accentuated “p” and “b” sounds when you’re speaking.
- Headphones: Podcast headphones help monitor sound and prevent your mic from picking up feedback. You can use anything from earbuds to dedicated high-tech headphones, like the popular Audio Technica ATH-M50x.
- Video camera: If you want higher quality video than what your laptop or phone’s cameras can offer when recording video, we suggest using a dedicated camera such as:some text
If you’re looking for a more detailed guide and a greater number of equipment suggestions, check out our essential podcast equipment checklist for every budget.
How it works
Here’s a step-by-step guide on how to record a podcast remotely using Riverside as your dedicated virtual podcasting software:
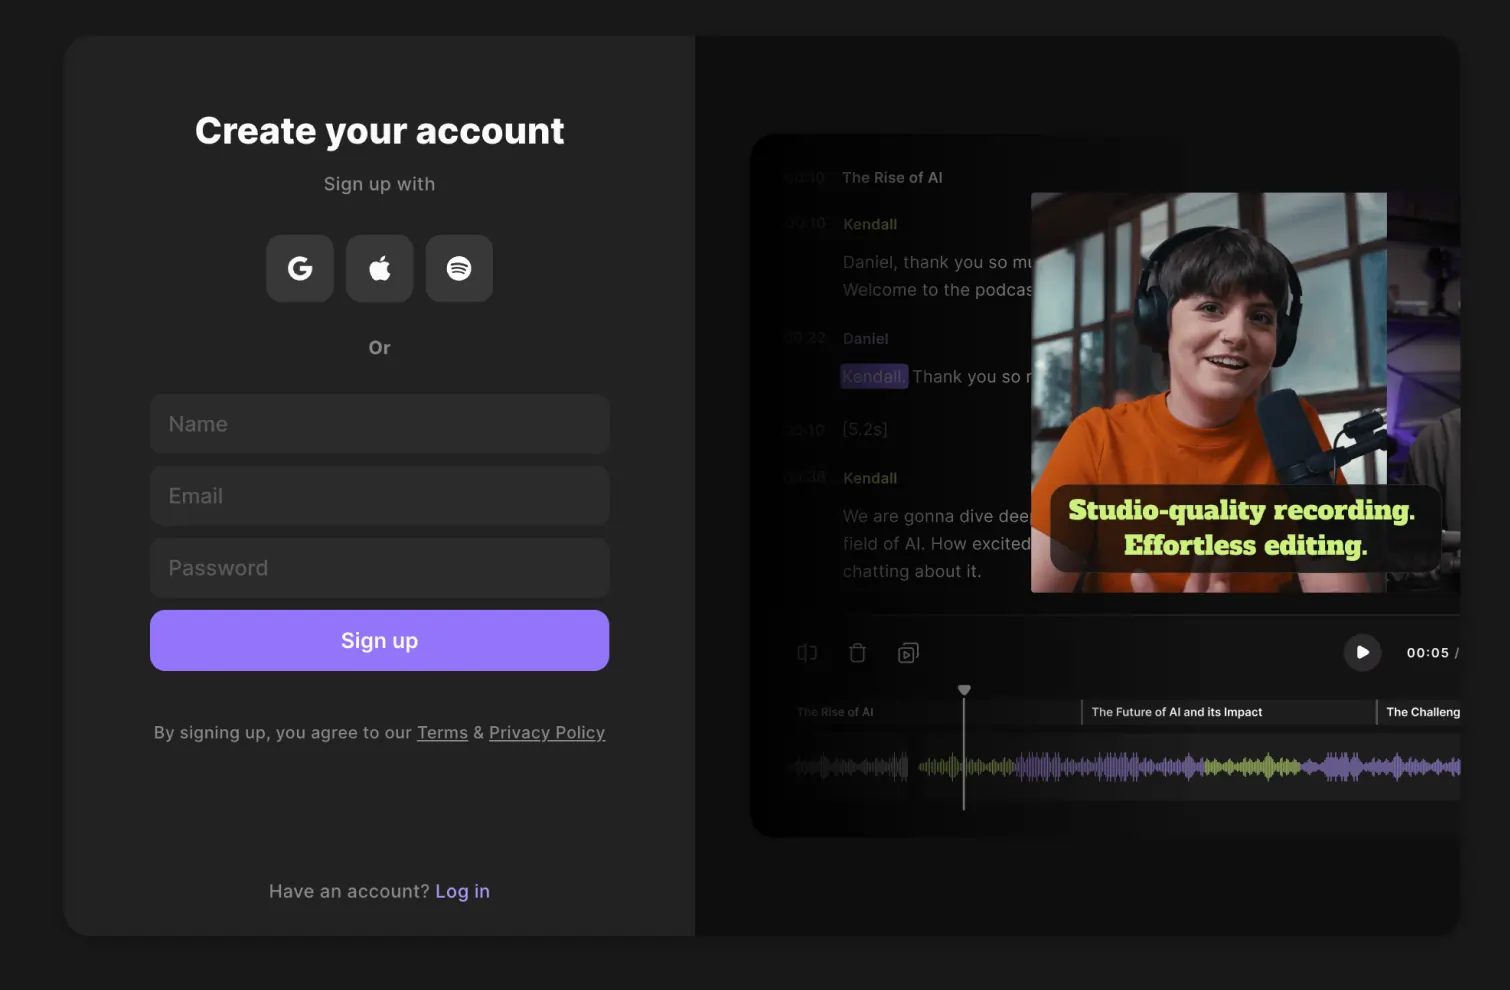
- Sign up for a free Riverside account or log in with your details if you already have one.
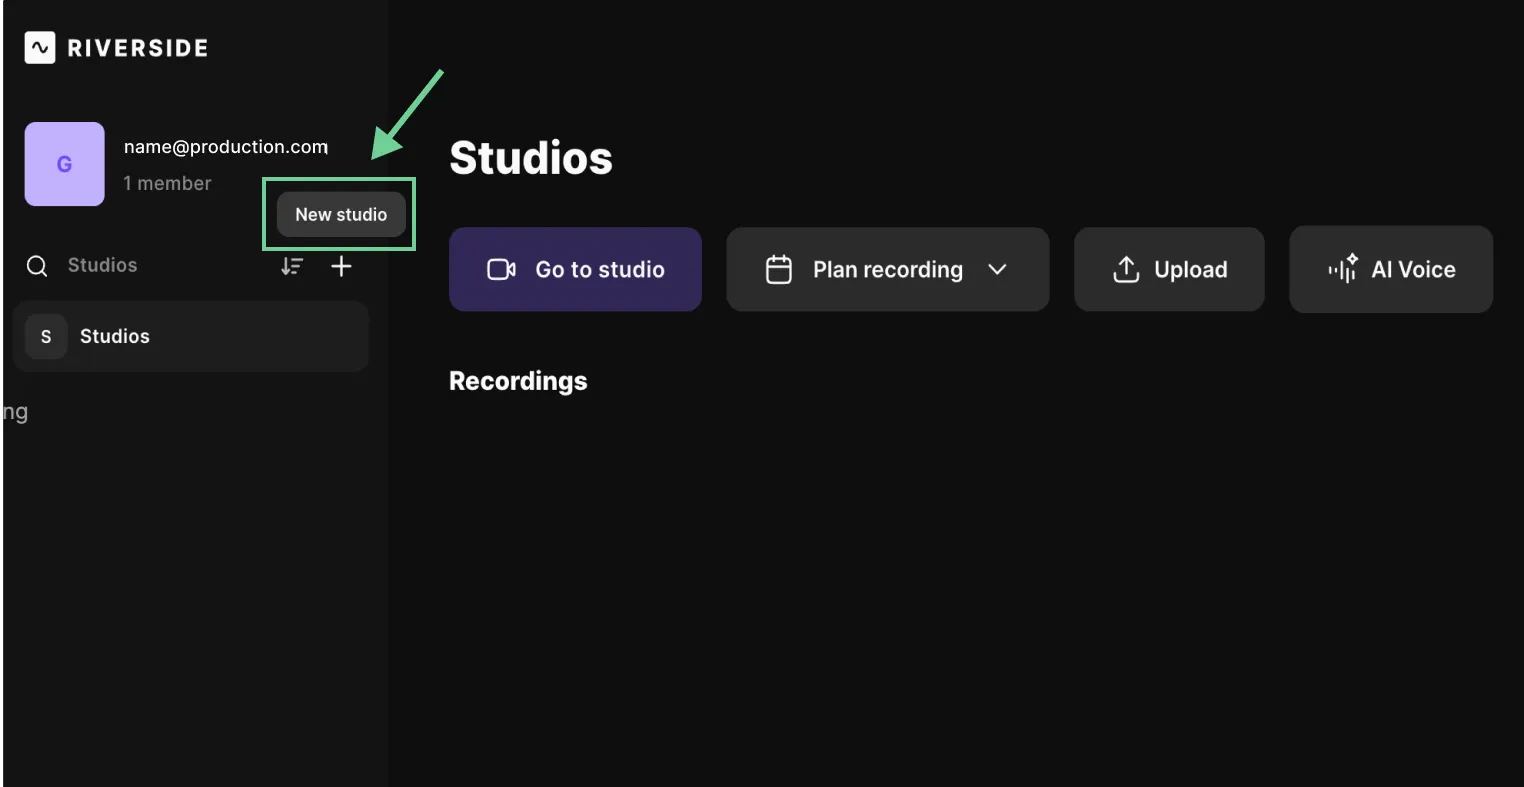
- Create a new studio by clicking ‘+ New studio’ and giving it a name.
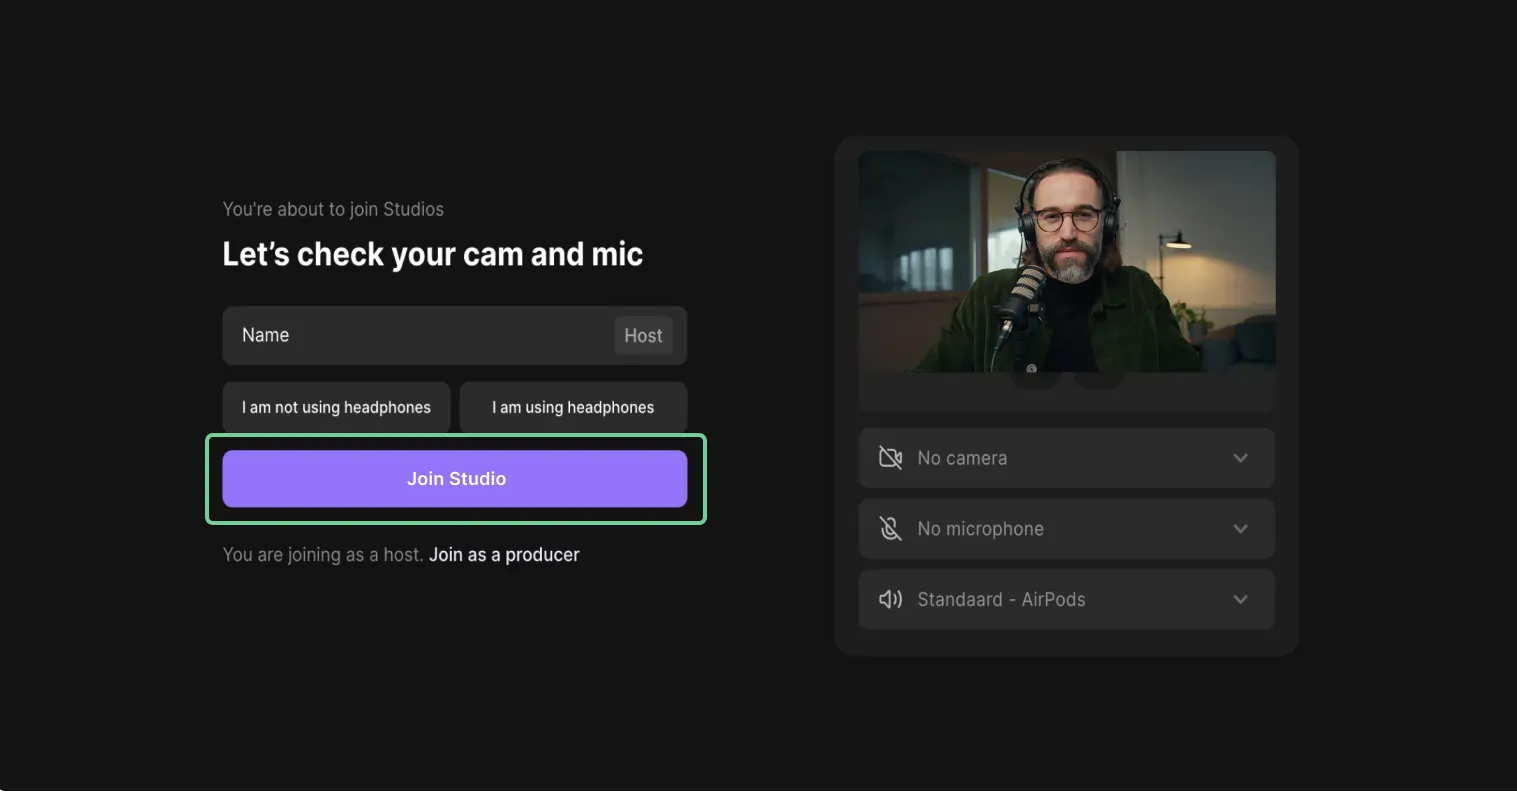
- If you’re ready to record, click ‘Join Studio.’ Select whether or not you are wearing headphones. If you or your guest are not wearing headphones, Riverside will enable the Echo Canceling feature to minimize unwanted noise.
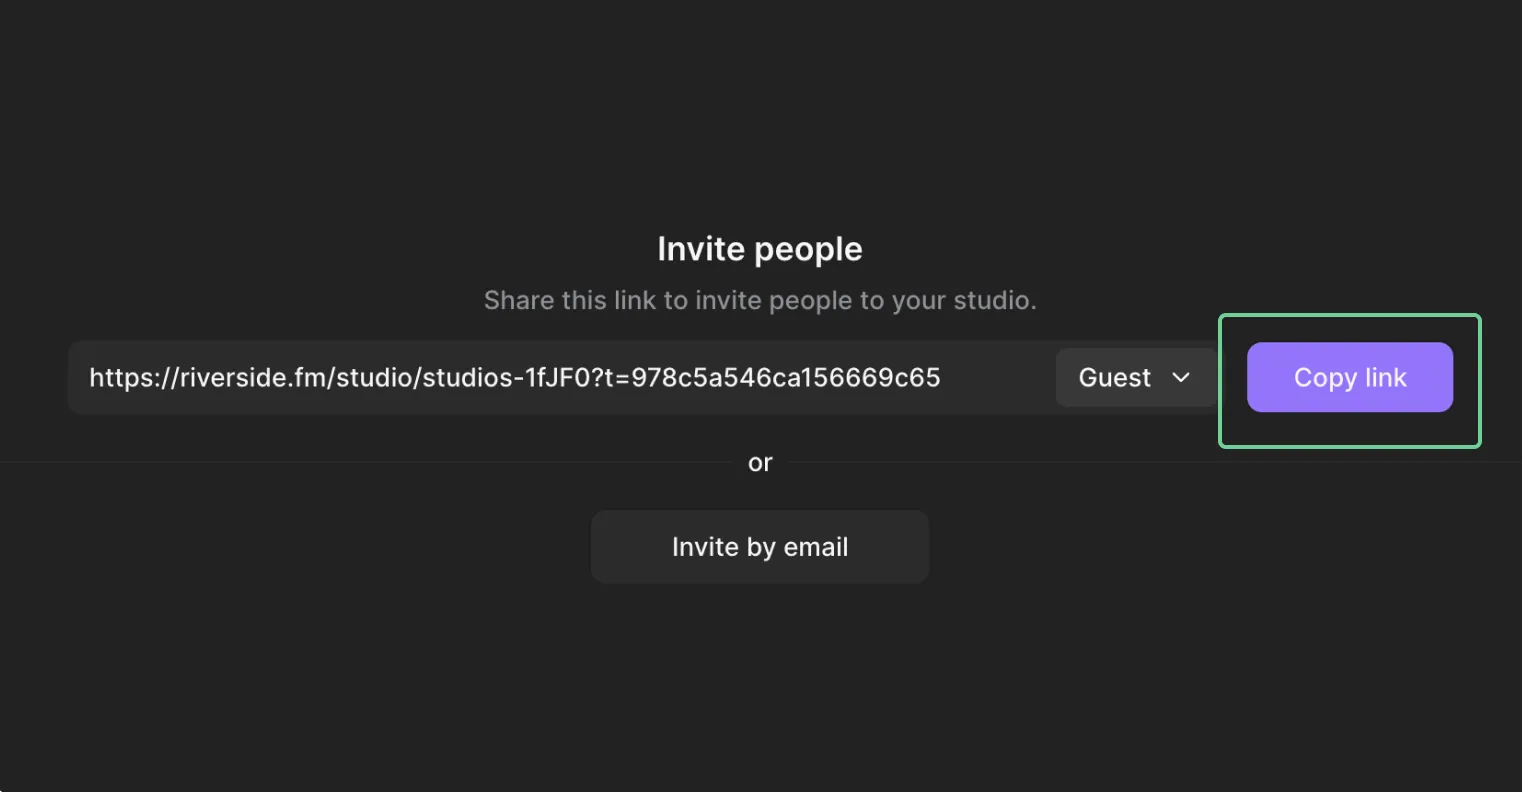
- Now, invite your guests to join you. You can either copy the link and share it with them or invite them via email.
- When your guests have joined, start recording by clicking the red record button at the bottom.

- You can see the upload status of your recording in the top right corner throughout the session. When you’re done recording, click the red record button again.
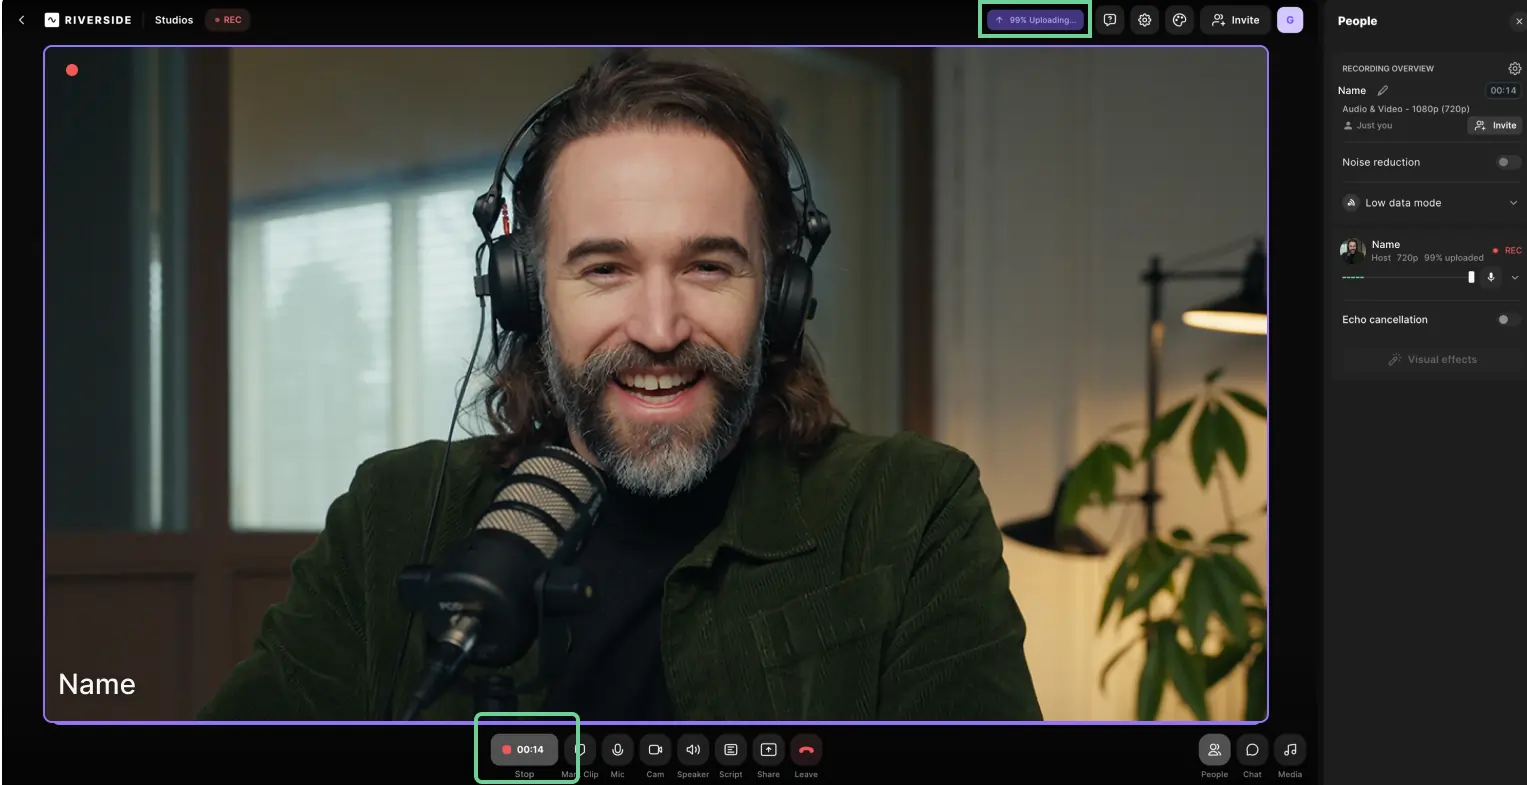
- Once the recording has been uploaded fully, click the ‘leave button’ (red phone receiver icon) to leave the studio and end the session.
When you're done recording, you can view all your studio-quality recordings, download separate audio and video tracks for you and your guest to edit them in your favorite video editing software, or head to the Riverside editor to edit your remote podcast without leaving the platform.
Even if you or your guests are just starting out podcasting and have no equipment, you can still record a remote podcast using nothing but your phone and the Riverside app.
To see the process, check out these how-to videos for using the Riverside iOS and Riverside Android apps.
Pros and Cons
The most significant advantages of using dedicated remote podcast recording software include:
- Ease of use: Most dedicated podcasting platforms boast intuitive and straightforward interfaces for hosts and guests to set up and use. Riverside can be used by Windows, Apple, iPhone, and Android users alike. The platform also offers intuitive features that make podcast production more versatile and streamlined, including:some text
- Producer mode to assign help behind the scenes. You can add a producer who is not the host to your podcast session to ensure everything runs smoothly.
- Media Board for adding live sound effects to your podcast.
- High-quality audio and video: Podcasting software that records audio and video locally ensures you’ll get incredible quality recordings, even if the internet connection isn’t great. Riverside offers unbeatable quality with remote recordings in up to 4K video and 48kHz audio that you can download as synced but separate audio and video tracks.
- Versatility: The structure and format of your remote podcast is only limited by your imagination. Riverside enables you to invite up to 9 remote participants and 1,000 live audience members to your virtual podcast.
- Editing features: Dedicated remote podcast software like Riverside offers built-in editing options, so you don’t have to leave the platform or learn to use another editing tool to create perfect podcast episodes. Riverside also boasts an AI text-based editor that cuts down podcast editing time.
- Tons of extra features: Podcasting platforms are constantly innovating and adding new features to try and stay ahead of the competition and give their users tons of great extras. Riverside offers the following and more:some text
- AI transcriptions and captions to increase your show’s reach
- Magic Clips tool to turn your podcast into shareable social media teasers
- AI Show Notes for automatic descriptions, titles, and chapters in a click
- Live streaming to any platform with live audience call-ins
- Podcast host integration with Spotify for Podcasters
Are there any cons to using dedicated remote podcasting software? The only potential downside could be if your guests aren’t very tech-savvy and have difficulty using online apps and platforms.
But if that’s not an issue and you want to check out a best-in-class remote podcasting software, explore Riverside’s full capabilities and all-in-one feature set by signing up for free to test it yourself.
Or, if you’d like to learn more about podcast recording options other than Riverside.fm (Zencastr. Ringr, Squadcast. etc.), check out this best podcast recording platforms guide.
2. Recording conversations via video conferencing software
Video conferencing software is, without doubt, the most popular tool people use to talk to others remotely via the internet. It experienced a boom in usage during the COVID-19 pandemic when employees were forced to stay home and needed to find a way to hold work meetings remotely.
If you want to give video conferencing software a shot for recording remote podcasts, some of the most popular options to check out are Zoom, Google Meet, and Skype.
What you’ll need
All you need to record a remote conversation with video conferencing software is a phone or a laptop with the conferencing application installed.
However, it’s important to note that, unlike with using a remote podcasting platform like Riverside, the video and audio quality will depend on the quality of your internet connection.
Since your audio and video are not being recorded locally in high resolutions. it’s best that the hosts and guests have quality podcasting equipment available to them, including:
- Microphones
- Pop filters
- Cameras
- Headphones
If you’re using external equipment like this, just make sure that you and your guests have plugged everything in correctly and that you have picked the video and audio outputs you want to use within the video conferencing software settings before starting the conversation.
How it works
To give you an idea of what recording a remote podcast with video conferencing software looks like, we’ll walk you through the process using two of the most popular options, Google Meet and Zoom.
One of the main things to look for when recording with video conferencing software is permissions. Typically, only the host of the meeting will have recording access.
Let’s start with how to record with Google Meet.
- Open the Google Meet App.
- Start your video call.
- Select the ‘Activities’ icon to find the meeting recording feature.
- Press ‘Start Recording’ and then click ‘Start.’
Once you’ve started recording, all meeting participants will be notified that the meeting is being recorded. When the meeting has concluded, head back to the Recording tab and click ‘Stop recording’ to end the recording.
If you’re using Google Meet, you’ve already opened a Google account. The recording will be automatically saved to your Google Drive after the session ends. You’ll find it inside the Meet Recording folder.
Now let’s look at how to record meetings with Zoom as a host:
- Open the Zoom app.
- From the Home tab, click the Settings gear and Go to the Recording tab to select the folder to which you’d like to save your recordings.
- Start your Zoom meeting and click the Record button on the control bar at the bottom of the screen. You can pause or stop your recording by clicking the Pause or Stop icons.
When you’re done recording, you’ll find the recorded files in the folder you previously selected as your recording location.
If you don’t have permission to use the recording features in Zoom or Google Meet, the alternative is to record the meeting using a free screen recorder on your computer or native screen recording features on your smartphone.
Pros and cons
There are plenty of things to like about video conferencing software as a remote podcasting option, especially if you are a beginner. Some of the main advantages include:
- The ability to record both video and audio at once. The software automatically records audio and video when you press record; no additional setup is required.
- The ability to invite many guests to join your conversation. Zoom allows you to invite up to 100 participants for free.
- Familiarity. Many people, especially those with experience working remotely, have used video conferencing software and are already familiar with it.
- Affordability. Zoom will allow you to record conversations up to 40 minutes in length on a free plan.
The main disadvantage of using video conferencing software to record remote podcasts is that it’s not podcasting software, meaning it wasn’t designed with high-quality podcast recording in mind. Since it’s not a dedicated podcasting solution, you’ll have to deal with the following disadvantages:
- The recording quality will ultimately depend on your and your guests' Internet connections. The more guests you invite to participate, the greater your chances of experiencing connectivity issues resulting in poor audio and video quality.
- No amount of podcasting gear can give you high-definition results. Even if all your guests use good microphones, cameras, and headphones, your recording quality is still 100% reliant on your internet connection. Your audio and video quality will suffer if your internet is bad or experiences hiccups during your conversations.
- You won’t get separate video and audio tracks. Zoom and Google Meet export one track of the recording with audio and video combined. This gives you little flexibility when editing the recording and making it look and sound as good as possible.
Video conferencing software is an excellent entry-level solution for people who have just started podcasting. However, if you’re serious about delivering podcasts that sound and look great, the quality limitations of video conferencing software are almost impossible to overcome.
3. Using a ”double-ender” setup
Double-ender remote recording is a good option for getting pristine audio and video quality when recording remote podcasts. However, it’s also easily the most involved and complex setup option for podcasting.
You and your guests record everything locally on your computers in a double-ender setup. If you have a co-host, they should also be recording their audio and video locally on their device.
Like dedicated remote podcast software, this option lets you completely control your podcast’s quality because you’re not relying on the quality of your internet connection when recording.
What you’ll need
Double-ender podcast recording requires a lot of hardware if you want to have optimal results.
Technically, you can still do a double-ender recording using your laptop’s microphone and camera, but that defeats the purpose of double-ender recording. If you’re already going through the trouble of getting everyone to record their video and audio locally, you should do everything you can to make sure you’re getting the best quality out of your setup.
Essential equipment for everyone involved in the recording of high-quality doubler-ender recording (host, co-host, guest) includes:
- Microphones
- Pop filters
- Cameras
- Headphones
- Recording devices (audio interfaces, mixers, or podcasting software)
Unless you’re using dedicated podcasting software with this setup, you’ll also need video conferencing software to enable the conversation.
As the host, you should also have digital audio and video editing software. Once the podcast is recorded and the guest has sent you their locally recorded audio and video tracks, you will need editing software to combine them with your own and ensure that both recordings are synced seamlessly.
How it works
While the details of the double-ender recording process depend a lot on the equipment you’re using, here are some basic steps to follow:
- Test out your equipment: Do a run-through by yourself first to ensure everything is hooked up correctly and recorded in high quality. Try talking from varying distances from the mic, try out your microphone's various settings, and experiment with camera angles and positions. Find what works best before recording, and encourage your guest(s) to do the same.
- Start the conference call: Log in to your conferencing app of choice and start the call with your guest (and your co-host, if applicable). Always wear headphones to reduce the chances of potential feedback being recorded.
- Start recording: When everyone is ready, hit the record button and start your podcast. Make sure everyone else starts recording too.
- Use a marker at the start of the discussion. You can do a countdown or snap your fingers before beginning to speak. Markers make it easier to align everyone’s files afterward.
When the recording is complete, don’t forget to remind your guests to send their files to you promptly so that you can import them into your editing software and start working on the final product.
Double-ender recording is pretty demanding. Generally, the more equipment and technology involved in the process, the greater your chances of experiencing issues during the recording.
The good thing about double-ender recording is that if you notice problems mid-podcast, you can address them and continue recording normally. However, if you want to streamline double-ender podcast recording, we recommend adding dedicated remote podcasting software to your tool stack.
Check out this guide to see how double-ender recording works with Riverside.
Pros and cons
The main advantage and the reason serious podcasters prefer the double-ender technique is that it ensures high-quality audio and video recording on all ends. Double-ender recording allows you to record your audio and video locally in the highest possible quality without worrying about your Internet connection messing something up.
Even if your video conferencing app experiences lags or degradations in sound and audio quality, your final local recordings will remain unaffected.
However, there are a few disadvantages associated with double-ender recording, including:
- It’s storage-heavy: Since everything is recording on your device, you must ensure enough storage space for audio and video files. The higher the recording quality, the more storage space you need.
- File sharing can be tedious: Your guest typically has to use cloud storage and sharing tools like Google Drive and Dropbox to send large files to you since most email providers don’t support attachments that large.
- It’s complicated: To get the best results, you and your guests must be experienced podcasters, well-versed in using all the needed equipment, and, overall, very tech-savvy.
- It requires editing expertise: Once you have all your files in one place, it’s post-production time. You’ll need to sync and edit all the audio and video files in software that can handle both video and audio files, like Adobe Premier Pro. This type of software is pretty complex and comes with a significant learning curve for inexperienced podcasters.
It’s also important to remember that double-ender recording puts some control in your guest's hands. Even if you’ve done everything right, there’s still a chance that the recording could fail or not meet your expectations and quality standards as a result of their mistakes.
4. Recording remote audio podcasts with a phone
If you want to interview a guest who isn’t very tech-savvy and doesn’t have a microphone or any other type of recording equipment at their disposal, recording the conversation via a phone call is your best option. However, if you’re recording a conversation via phone, you won’t be able to create a video podcast from the interview.
What you’ll need
As already mentioned, your guest only needs a phone for call recording. On your side, you’re going to need some, if not all, of the following:
- A smartphone for calling your guest
- A strong cell signal ensures the quality of the audio conversation.
- A podcast microphone to record your voice.
- Headphones to hear the conversation better and minimize audio bleed from the phone and your surroundings.
- A mixer and/or audio interface to capture audio from your phone and microphone
- Cables for connecting your phone to the mixersome text
- Newer iPhones will require a USB-C to lightning cable
- Most Android phones will require a USB-C to USB-C cable
- A digital audio workstation for audio editing your recorded audio
How it works
There are a couple of options based on the equipment you have access to and the quality you want to achieve.
Recording calls directly to your phone
If you want to record your phone call directly on your smartphone, you can use apps like Google Voice or TapeACall. In this case, you would have to export your recorded conversations to a cloud storage platform like Google Drive or Dropbox and then import the audio file into your digital audio workstation for editing.
This is the simplest option but also the lowest quality and least versatile option, giving you a single audio file with both your voice and the guest's voice on the same track.
Recording calls using a mixer
Including a mixer in your recording process gives you more versatility and control over the recording’s quality. A mixer lets you use a mic to record your voice and have your phone audio—your guest’s voice—on a separate channel.
You can then export these separate tracks from your mixer to your digital audio workstation, giving you more versatility and control in editing.
Depending on your needs and budget, you have plenty of options when choosing a podcast mixer. Some more sophisticated mixers, like the RØDECaster Pro mixer, have built-in audio interfaces and connect directly to your computer.
More basic analog mixers will need to be connected to an audio interface, like the Scarlett 2i2, to send the audio from the mixer to your computer for further editing in audio editing software like Audacity or Audition.
Pros and cons
The biggest benefit of this method of recording podcast interviews is that you can invite just about anyone to participate—all they need to have on their end is a mobile phone. It doesn’t even have to be a smartphone. All of the required equipment and setup are on your side of the conversation, which gives you complete control over the quality of the recording.
The two main drawbacks of recording remote interviews via phone call are that you’re limited to audio recordings, and the audio itself won’t be that great since phone networks compress your audio significantly—even more than online conference recording tools like Zoom and Skype do.
Tips and best practices for better remote podcast recording
Now that you know how to record a remote podcast, let’s cover some tips and best practices for creating the best possible remote podcast recording, no matter what method you’re using.
Prep your location
When choosing where you’re going to be recording your remote podcasts, it would also be best to record in a dedicated studio. Can you record a podcast outside of a recording studio? Sure. But you should take steps to keep your environment as quiet as possible.
For example, if you want to record your remote podcast outdoors, you’ll want to use suitable outdoor podcast equipment, such as a super-cardioid or shotgun microphone that will pick up less background noise.
If you’re going to create a podcast studio setup for yourself, choose somewhere quiet with minimal background noise. Choose a carpeted room if you’re at home since carpet dampens echoes. While you don’t need to soundproof your room professionally, consider getting a reflection filter around your microphone to reduce echo.
Also, consider how you’re going to set up your video background. Create an aesthetic within your remote podcast studio that matches your brand and isn’t distracting.
“You want your background to be clean and organized, otherwise, it can make the video feel chaotic and messy. A good question to ask yourself is What can I take out of the frame rather than what can I put into the frame?” - Bridget O’Rourke, host of Learn with Bridget.
Think about adding color to your frame. Do you have some sort of vibrant knickknack that may look good on camera? Could you add something to your screen in the background? Or if you have a less colorful background, you can always change the feel of the frame with your wardrobe,” she adds.
We suggest also getting proper video lighting, or if you’re on a budget, use natural light whenever possible.
Professional podcaster Stephen Robles recommends the SmallRig RM75 RGB Video Light, which costs less than $100 and can make a big difference.
“It's pretty small, which is nice, so it's portable as well, has an on-off switch, you can recharge it with USB-C, but you can also change the intensity and color temperature of this little light. And it even comes with a silicon diffuser that goes over the LED panel to help get a little bit of a softer look.” - Stephen Robles, host of Primary Technology
Consider your guest’s setup
Recording remote podcasts is typically easier and more convenient when guests have a similar setup, but this isn’t always possible. If your guests don’t have any equipment, you can send them equipment to use. If you’re willing to do this, send easy-to-use gear so that the setup process isn't overwhelming for them.
It’s also a good idea to send them clear instructions for setting up the equipment. For the best results, your guests should have:
- A quality microphone: They can use built-in earphones if they can’t get a microphone. This is still better than their laptop’s microphone.
- Headphones: They help cut down echoes and interference picked up on their side of the conversation.
- A camera: If they don’t have a dedicated camera, suggest they use a high-quality smartphone, like an iPhone, for video recordings.
Before recording, encourage your remote guests to set up in a quiet recording space (carpeted room with soft furniture to minimize echoes), avoid sitting near noisy air conditioning units or loud appliances, and speak clearly into the mic.
Define your recording and editing process
Improving your remote podcast recordings over time is an ongoing process of trial and error. To get started on defining your perfect recording process, here are a few quick tips:
- Before recording
- Test all equipment to ensure everything is working smoothly.
- Minimize distractions, silence phones, and close extra browser tabs.
- While recording
- Position your mic properly and advise your guests to do the same.
- Note key points in your recording so it’s easy to return to them.
- Record separate tracks for easier post-production and editing.
- When editing
- Create an orderly naming practice for a smoother workflow.
- Use transcriptions to navigate through your recordings faster.
- Try AI editing software to create professional content with less fuss.
Keep notes of what works best and what doesn’t work after each recorded podcast. This can help you create an optimal remote podcast recording process that results in high-quality episodes and stress-free collaboration with guests every time.
Prioritize preparation
Don’t just wing it. Put in the work ahead of time to make sure that you’re ready to record an interesting and engaging episode when you press record.
“If it's a topical podcast, make sure you do your research and have valuable information you're bringing to the show, and if it's an interview, make sure you do your research on your guests, their past work, books, other interviews they've been on—anything that's going to help your podcast be more interesting when you have them on.” - Stephen Robles, host of Primary Technology.
Leave as little to chance as possible by doing practice runs before the recording session when possible.
But don’t insist on it. Ask your guests if you have time to run a few practice takes first. Explain how putting in the extra time will make the process smoother, more stress-free, and result in a higher quality product in the end.
Always wear headphones
If you’re not wearing headphones, there’s a greater chance that your microphone will also pick up your guest’s audio. While it’s not a huge problem, it will make post-production and editing more tedious and time-consuming.
Optimize software settings
While dedicated podcasting software guarantees high-quality audio and video no matter the settings you’re using, video conferencing software offers internal options for choosing settings that can result in higher-quality recordings.
For example, you can head into Zoom’s settings and set the software to record in high definition (above 720 pixels) instead of standard definition (below 720 pixels). However, these options are sometimes reserved for Pro accounts and paying clients, like in Zoom's case.
Zoom also allows you to adjust your lighting settings. For example, if you’re recording in a poorly lit room, you can turn on the option that adjusts the video for low light. But be aware that this option is a filter, which decreases the quality of your video.
In terms of sound quality settings, Zoom offers built-in echo cancellation features, which you can also turn on. This setting is automatically toggled in a dedicated podcast platform like Riverside.
Optimize your internet connection
When you’re using remote podcasting software or the double-ender method, you don’t have to worry about your internet connection too much because the audio and video tracks are being downloaded locally.
However, nothing is more critical to the quality of your Zoom, Google Meet, or Skype recording than the quality of the internet connection.
Some of the best ways to improve your connection before recording your podcast include:
- Limiting Wi-Fi use: Don’t connect to a Wi-Fi network when recording. Better yet, turn the Wi-Fi off to free up bandwidth and ensure no one else is accessing your network.
- Connect with an ethernet cable: If you have an ethernet port, connect your computer to it. Wired connections are much more secure and stronger than Wi-Fi connections, offering enhanced stability. Ask your guests to use ethernet cables instead of wireless connections if possible.
- Close apps you don’t need: Every application you open on your computer consumes valuable bandwidth and system resources. Only open the ones you need to record your podcast.
- Get a better internet plan: If you’re still experiencing problems recording remote sessions online, maybe it’s time to upgrade your plan. Ask locals for recommendations and do some research to identify the internet service provider in your area with a reputation for delivering fast and stable internet connections.
Regularly clear out your storage
Once again, having enough space on your laptop isn’t that important when you’re using dedicated podcasting software because all of the audio and video tracks are saved on the cloud first.
However, if you are recording using video conferencing software or the double-ender method, don’t start recording before you’ve checked how much local storage you have and are confident you have enough to save your complete audio and video files.
Having more storage also decreases the chances of technical difficulties since your computer can allot more resources to recording the podcast.
Choose the remote podcasting recording method that suits you best
Once you understand all the options for recording a podcast remotely available, it’s easier to choose the one that aligns with your specific needs and budget.
Dedicated podcasting platforms are the way to go if you prioritize ease of use and quality. The process is simplified by integrating recording, editing, storing, and even distributing your podcasts into a single solution.
To see for yourself, give Riverside a spin. Even if your budget’s small, a free Riverside account gives you all the features you need to start creating high-quality remote podcasts.
FAQs on How to Record a Podcast Remotely
How can I remotely record a podcast for free?
You can record a podcast interview completely free with some remote recording software. For example, Riverside has a free plan where you can easily create a podcast with up to 7 guests in different locations.
Can you record a podcast with people in different locations?
Yes! As we’ve outlined above, recording a podcast from different locations is not complicated. You can record a high-quality podcast interview remotely by using:
- double-ender recording
- A mixer
- Video call recording tools like Zoom or Skype
- Remote recording software like Riverside.fm or Ringr
Can you record a podcast outside of a studio?
While you’ll want to record in an environment that’s as quiet as possible, you can make a podcast without a recording studio. In this case, you’ll want suitable outdoor podcast equipment, such as a super-cardioid or shotgun microphone that will pick up less background noise.


.webp)
-(1).webp)
.webp)


