


Table of contents:
In 2024, almost anyone can record professional videos.
Gone are the days of bulky camera equipment and grainy home movies. Now, the only tool you need to get high-quality footage is the phone in your pocket.
In this article, we’ll show you how to tap into your iPhone’s full filming potential. With the right settings, software, and equipment, you'll be making high-quality videos on your iPhone in no time.
Can you record professional video with an iPhone?
Modern iPhones are the new digital cameras. They can record high-definition 4K footage that rivals the best DSLRs. And the many settings they offer make it easy to film pro-quality videos.
But their internal microphones struggle to capture clear audio. The farther your iPhone is from your mouth, the more muddled your video’s sound will be.
Below, we’ll tell you how to work around that with the right software and equipment. We’ll also explain which iPhone settings produce the highest-quality video.
6 Steps to record top-quality video using your iPhone
Step 1: Download recording software
First, choose software to record with. The right recording software takes your videos from mundane to stand-out productions.
Your recording software should give you flexibility and do some of your work for you. To that end, choose a tool that not only records high-quality audio and video but also lets you live stream your footage.
We also recommend going with software that lets you invite remote guests to join your videos. That gives you the flexibility to film video podcasts or just spice up your recordings with new faces.
Good recording software also makes editing your videos easier. Choose a tool that lets you perform basic edits, like removing footage you don’t want and adding sound effects. Your recording software should also integrate with advanced editing software like Adobe Premiere Pro. That makes it simple to import your videos for more edits.
For recording software that checks all these boxes, check out Riverside.
With our iOS app, you can record professional-quality videos on your iPhone for free. Our software saves videos to your personal online recording studio, so you can access them from any device. That makes it easy to pull videos up on your computer and edit them using our Editor.
We’ll get more into how this works later.
Once you’ve downloaded your recording software, it’s time to choose a filming location.
Step 2: Pick a location
There are two main things to keep in mind when deciding where to film an iPhone video: lighting and sound.
Lighting
Choose a spot with bright, natural light. Your best bet is a room with a lot of windows, but if you can’t find one, you can replicate it with artificial lighting. We don’t recommend filming outdoors unless you have to because there’s so much ambient noise.
Whether you use natural or artificial lighting, use a three-point lighting system. That involves three lights: one bright, two dimmer. Put the bright light in front of the video’s subject and the other two behind the subject. Here’s what that looks like.
.webp)
Position your phone close to your key light. Use a tripod or prop it against a vertical surface. One great way to do this is to use a ring light. These lights not only evenly distribute light onto the subject, but also come with a phone holder.
Sound
Your filming location should not only be well-lit but also quiet. Choose a spot with as little background noise as possible. Spend a few minutes sitting in potential locations at the time of day you’ll be filming. Listen for traffic noise, bird noise, and sound from household appliances. You probably won’t find a silent spot; just go with the quietest one.
Another factor to consider here is echo. Try to find a small room with soft surfaces, like carpet and curtains. Large rooms with a lot of hard surfaces will produce echo. If you can’t find an ideal spot, make one! Lay blankets on the floor and over hard furniture. Move furniture into the middle of the room to create a sound barrier. It doesn’t have to be perfect; every little bit helps.
Step 3: Buy equipment
Microphone
If you want to record pro-quality iPhone footage, we recommend buying an external microphone. As we mentioned, your microphone needs to be within a few inches of your mouth to pick up clear audio. And you probably don’t want to film yourself from six inches away.
But don’t worry—external mics aren’t always expensive. For a list of options, check out our article on the best external microphones for iPhone videos.
An alternative to buying an external mic is using a second iPhone as your mic. This is a great option if you can borrow a phone from a friend. Dangle the phone above you, just out of your camera frame, or put it in your shirt pocket. Make sure the mic is facing toward your mouth. Then start a voice memo before you begin filming.
Then, add the audio from the second iPhone to your video in post-production.
Stabilization tools
Newer iPhones come with image stabilization, but it’s still a good idea to use a tripod. Tripods compensate for shake from passing cars or people walking nearby. They also give you more flexibility in phone placement when filming.
If you shoot videos on your iPhone while moving, we also recommend buying a gimbal. It makes your video look smoother.
With the right lighting, an external mic, and stabilization tools, recording videos on your iPhone is easy.
Step 4: Choose your settings
The last step before filming is to find the right iPhone camera settings for your video. We’ll walk you through them.
Resolution
Resolution refers to the amount of detail in videos. The higher the resolution, the more detail.
The default resolution on newer iPhones is 1080p. While that’s good, we recommend switching to 4K resolution for pro-quality footage. Even if you’re posting to a platform that only accepts 1080p, recording in 4K will also give you more editing flexibility. You can make the change by going to Settings, Camera, and Record Video, then selecting 4K.
Frame Rate
In simple terms a video is compromised of many image stills and the frame rate indicates the speed at which these images consecutively display. This is measures in FPS which stands for frames per second. Videos with a higher frame rate tend to look smoother.
We recommend using 24 fps because it’s closest to the way the human eye views motion in real life. We only recommend a higher frame rate if you plan to slow down your videos during editing.
Dynamic Range
Next, toggle off HDR Video under Record Video.
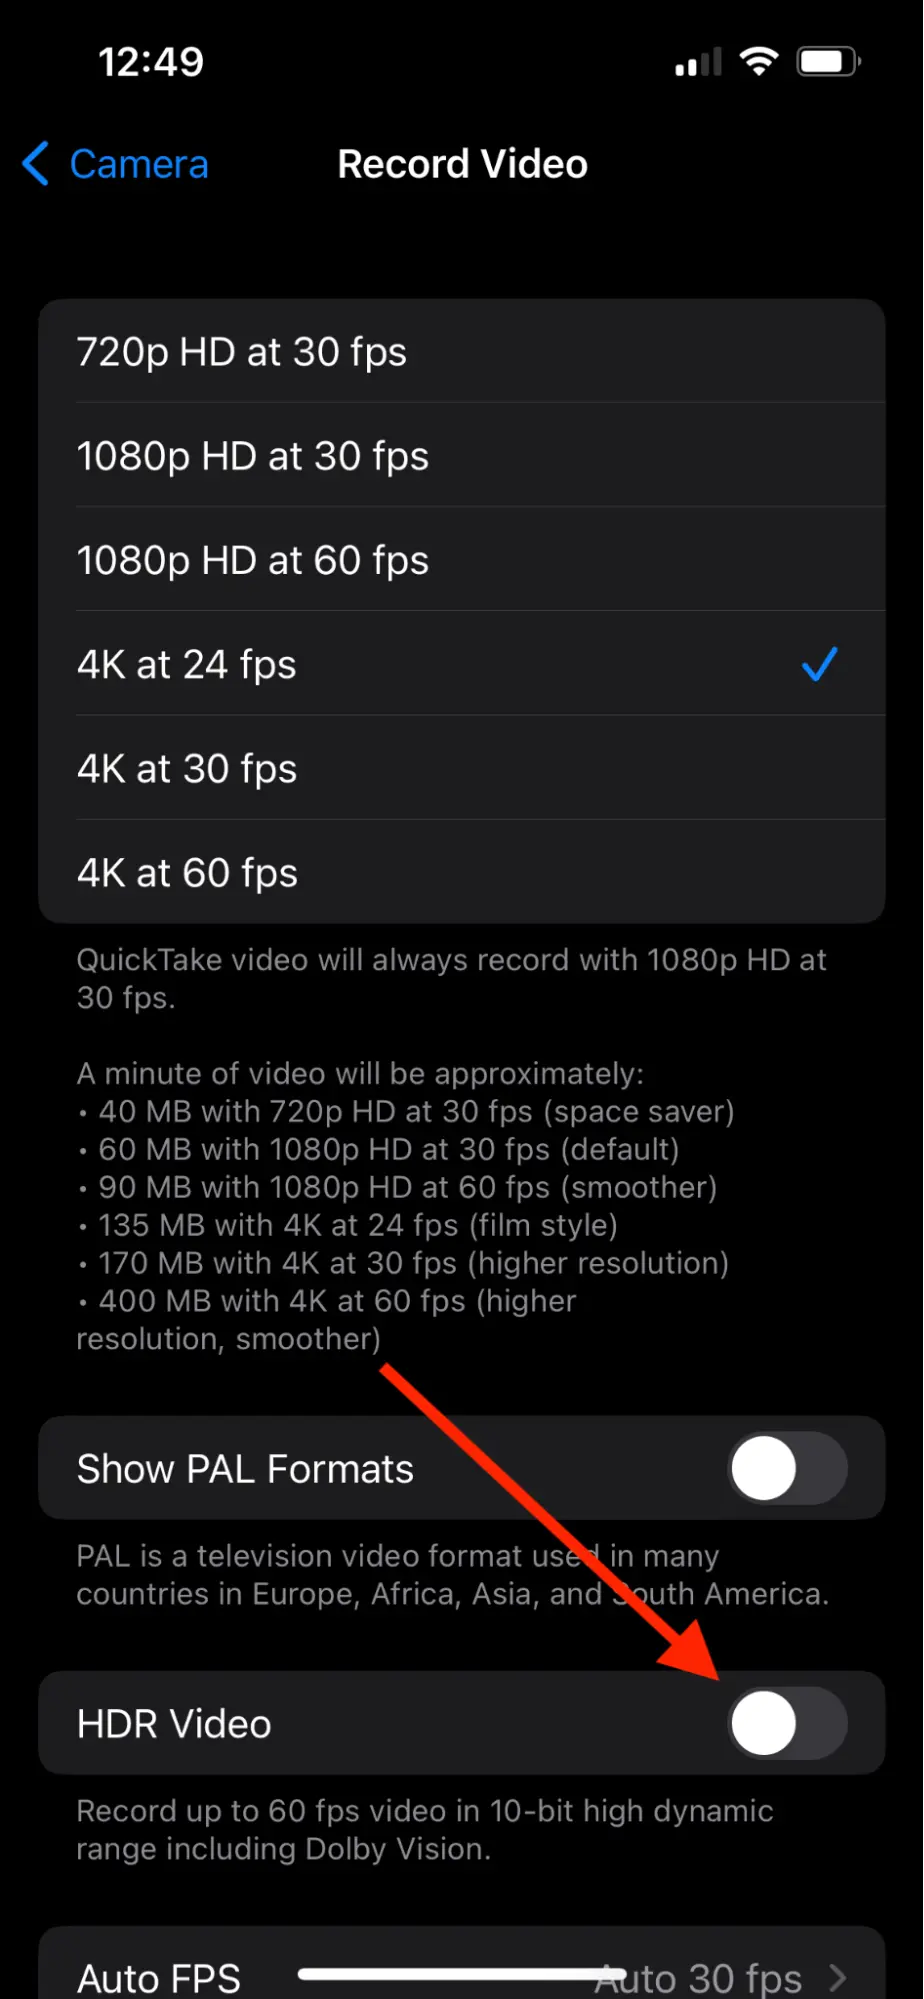
HDR, or high dynamic range, ensures your videos capture the full range of light to dark colors. While that sounds useful, we recommend against it for two reasons.
First, it makes your footage less compatible with video editors. Many editing tools only accept SDR (standard dynamic range) videos.
Second, many videographers think HDR videos look unnatural. Coloring on faces can look especially strange.
Grid Overlay
Using a grid overlay helps you frame your shots. Under Composition in your iPhone’s camera settings, toggle on Grid.

That overlays a grid onto your shots. The grid won’t appear in your video.
The grid helps you follow the rule of thirds. This rule suggests you place the focal point of your video in one of the outer thirds of the frame. Here’s an example.
It doesn’t matter if you put it on the top, bottom, or side of the frame—just don’t put it in the middle. That may seem counterintuitive, but the human eye tends to find images more pleasant this way.
Put the video’s subject where two of the gridlines intersect. If the subject is a person, line their eyes up with the top line.
Focus and Exposure
Your iPhone automatically chooses a focus and exposure (brightness) for each shot. But while that’s a useful feature for photos, it’s not the best for videos. The phone continuously tries to refocus as you’re filming, making footage look choppy. It also adjusts the lighting for each shot in your video, which is jarring for viewers.
To avoid that, lock the exposure and focus before shooting a video. Line up your shot, then tap on your screen to focus on your subject. A box with a sun icon will appear, as you can see here:
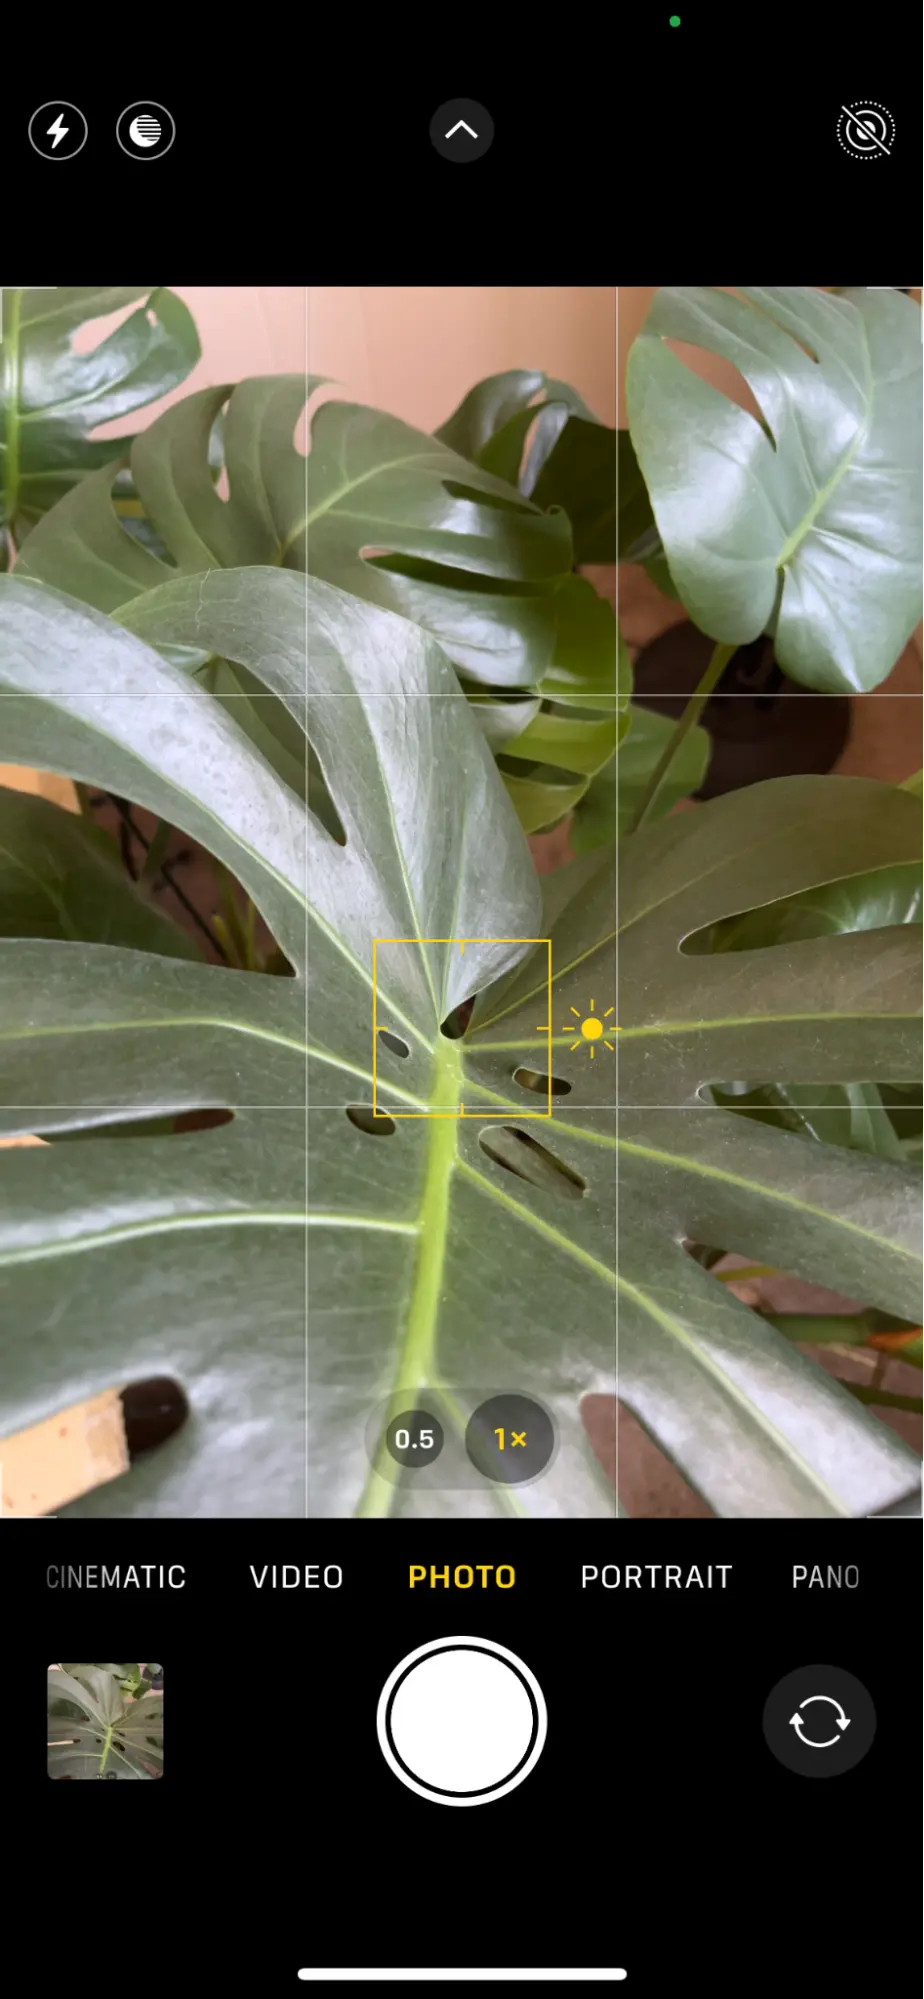
Hold your finger on the sun icon and slide it up or down to increase or decrease exposure. Then tap and hold anywhere in the box to lock in those settings.
Mode
Your iPhone has several video modes. These include cinematic, slow-motion, and time-lapse. If you have an iPhone 14, you also have action mode.
Cinematic mode is the video equivalent of portrait mode. It focuses on your subject and blurs out the background. That sets the subject apart from its surroundings, creating a cinematic effect. Next time you watch a movie, look closely—you’ll notice this effect!
To use it, open your camera and tap Cinematic. Whether cinematic mode enhances or takes away from your footage depends on what you’re shooting. We recommend shooting a test video before committing to this mode.
To shoot slow-motion videos, open your camera and swipe left to Slo-Mo. After you’ve captured your video, you can edit it to change which part of the video plays in slow motion. The rest of the video will play at normal speed.
Time-lapse mode is great for capturing a sunrise or a drive along a scenic road. To use it, swipe all the way to the left in your iPhone’s camera. It’s best to use a tripod when shooting time-lapse footage to avoid shake in your video.
Last, if you have a newer iPhone, you can use action mode to shoot a smooth video while moving. In your camera, tap the Action icon, which looks like a person running. Then set the mode to On.
Step 5: Record
It’s finally time to record!
Set up your shot using the rule of thirds and start filming. But don’t shoot the entire video from one angle; switch it up. Try shooting from the ground, from up high, and from different areas of the room. Variety makes videos more interesting.
Remember to keep the video’s subject close to the camera. Many viewers watch on small screens, and you don’t want them to miss the detail in your footage.
Before you wrap up, get some B-roll footage, or extra shots. You may not think you need them, but it’s good to have them in case you don’t like your original footage when you sit down to edit.
Step 6: Edit footage
The last step to filming on your iPhone is editing your video.
If your video is short, it may be tempting to text or email it to yourself so you can edit on your computer. But doing so compresses your video, resulting in lower-quality footage.
Luckily, if you recorded with Riverside, you can pull up the video in your personal online recording studio. Then, use our Editor to make changes. That ensures your video remains high-quality throughout the editing process.
For a deeper dive into video editing, check out our step-by-step guide to video editing.
Best practices for recording videos on iPhone
Now that you know how to video record on iPhone, here are a few tips to keep in mind while filming.
1. Orientation
If you post videos to YouTube or your website, turn your iPhone sideways while filming. That’s called landscape orientation, and it’s the best way to view videos on a computer or TV screen. It’s also the way YouTube shows videos.
If you don’t turn your phone sideways, you’re filming in portrait orientation. That’s not good for YouTube; your videos will show up with a lot of black space around them. But it’s ideal for Shorts or Reels.
To make sure you use the correct orientation, decide where you’ll post videos before filming.
2. Front vs. rear camera
Modern iPhones have both a front and a rear camera. The front camera is the one you use for selfies; the one on the phone screen. The rear camera looks out through the phone case.
If you’ve ever looked at your phone’s specs online, you’ll know the rear camera takes better pictures. So while it’s easier to film yourself in selfie mode, you sacrifice video quality by doing so. Instead, frame your shot through your iPhone’s rear camera before you start filming.
3. Zoom
Another way to get the best video quality is to avoid using your iPhone’s digital zoom feature.
Your iPhone’s lens doesn’t zoom optically like that of a digital camera. Instead, it enlarges images digitally. You may not notice it while filming, but that decreases image quality and causes pixelation. It’s especially noticeable if you enlarge videos in post-production.
For sharp, clear videos, move your iPhone closer to what you’re filming instead of zooming.
4. Lens correction
You may have noticed image distortion at the sides of your screen when filming in landscape orientation. To prevent that, go to Settings, Camera, and toggle on Lens Correction at the bottom of the screen.
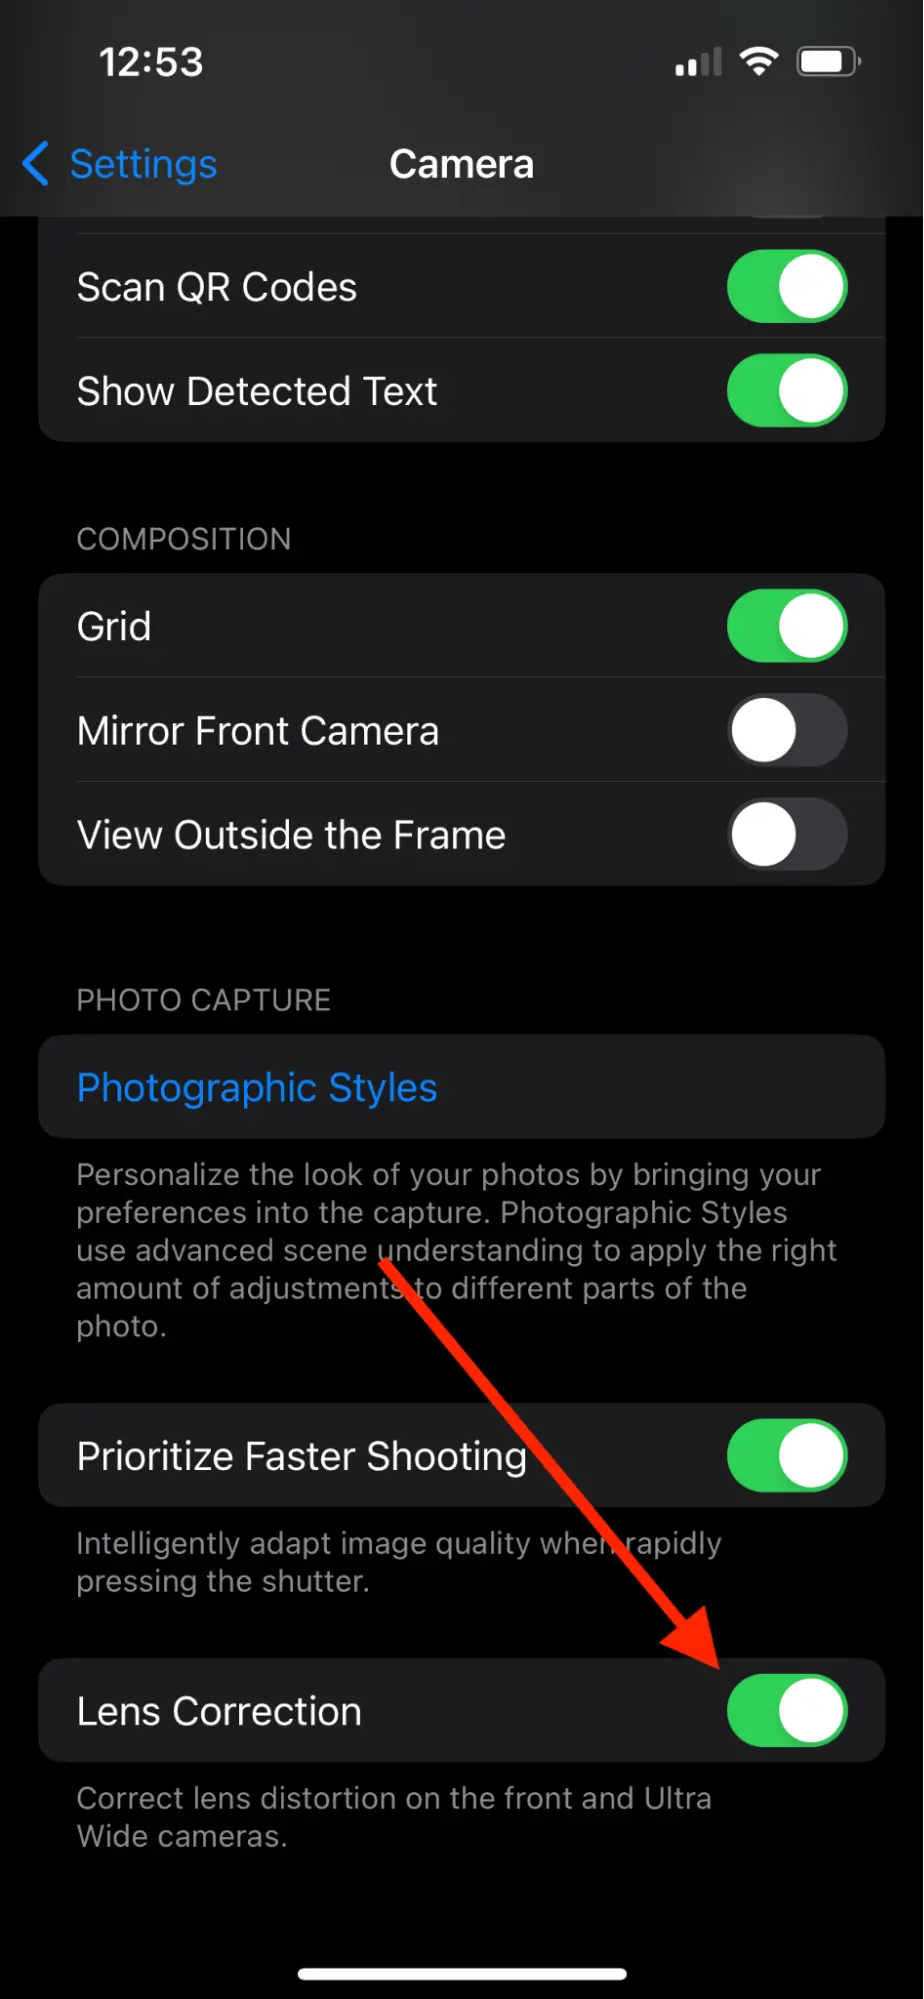
That’s especially important if you’re using your iPhone’s ultra-wide camera.
And now we’ll leave you with the quickest and easiest way to make a video on your iPhone—Riverside’s recording software.
Riverside: The best way to record top-quality videos on iPhone
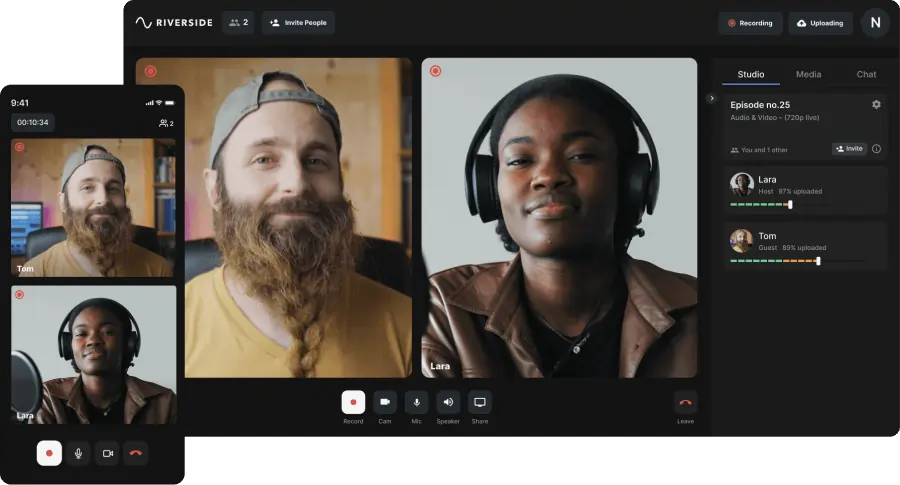
Riverside’s all-in-one recording, editing, and streaming software lets you record studio-quality videos straight from your iPhone. It captures 4K video and lossless, uncompressed 48 kHz audio.
With our software, guests can join your videos from anywhere in the world. You can simultaneously record and stream videos on YouTube, Twitch, and more. And everything records locally on your computer instead of relying on the Internet. This ensures a shaky internet connection doesn’t affect your video quality. You get all the perks of online videos without any of the drawbacks.
And Riverside’s automatic transcription makes it easy to add subtitles and captions to your videos. That make it easy for search engines like Google to find your videos. It also makes them accessible to the hard of hearing and viewers who speak a different language.
Key Features
- iOS recording app so you can effortlessly record on the go
- Secondary webcam feature where you can turn your phone into a secondary camera for your desktop
- Highly accurate automatic transcription so you can easily repurpose recordings
- Local recording where everything records directly on your device instead of relying on faulty internet connection
- Record with up to 10 remote participants no matter where they are
- Live video streaming to multiple platforms, including YouTube, LinkedIn and more
- High-quality recordings with up to 4K video and 48kHz WAV audio
- Built-in Editor with text-based editing and automated tools for video customization, layout and more.
- AI clips creator that turns your recordings’ key moments into short, shareable social media videos

How to record videos on iPhone in-person or remotely with Riverside
It’s simple to record in-person or remote videos on your iPhone using Riverside.
Step 1: Go to the App Store and download the Riverside.fm iOS app.
Step 2: Open the app and make a free account.
Step 3: Tap the + icon at the bottom of the screen, then choose New Studio.
Step 4: Name your studio, then choose Create.
Step 5: Once in your studio’s lobby, tap Join at the top right.
Step 6: Choose Record at the top left to start recording your video or select Invite People to invite remote guests.
Step 7: When you’re finished, tap the red phone icon to end the recording. Then select End call for all.
You don’t have to download an app on your computer to view and edit your videos. Just log in to Riverside.fm to see the videos in your online studio. You’ll also see the transcript for each video.
Riverside gives you all the tools you need to produce studio-quality videos. So what are you waiting for? Get started today by making an account at Riverside.fm.
FAQs on How to Record Video on iPhone
How do I record video on my iPhone screen?
Adding Screen Capture to your Control Panel lets you record your iPhone screen.
To do that, go to Settings, then Control Panel. Scroll down to Screen Capture and tap the green + sign. You can now access Screen Capture from your Control Panel.
To get to your Control Panel from any screen, swipe down from the top right of your iPhone. The Screen Capture icon looks like concentric circles. Tap it to begin recording your screen.
How do I make a video on my iPhone?
You can shoot an iPhone video with your phone’s native Camera app. Open Camera, then swipe left to Video.
You can then perform basic edits on your phone, like cropping and shortening your video.
What do you need to record professional video on iPhone?
For a pro-quality iPhone video, we recommend using at least a microphone and recording software. You may also want stabilization tools like a tripod, a three-point lighting kit, and editing software.
Riverside’s recording software is a great place to start. Download our iOS app, make a free account, and start recording studio-quality videos on your iPhone today!


.webp)

.webp)


