


Table of contents:
Key takeaways:
- You can edit videos directly on Instagram. The built-in editor has tools for trimming, filters, effects, text, captions, and music.
- It’s easier to edit videos on Instagram, but you won’t have as much flexibility or customization with features like captions or effects.
- Other options for editing videos for Instagram include Riverside, CapCut and Premiere Rush.
Did you know that videos account for 85% of all Instagram traffic?
On Instagram, videos rule.
Want to start creating and editing videos that will skyrocket your Instagram engagement rates? We’ve got you. Whether it’s for Stories, Reels, or your feed, here’s a detailed guide on how to edit videos for Instagram.
Table contents:
- How to edit videos for Instagram Reels
- How to edit videos for Instagram Stories
- How to edit videos for your Instagram feed
- How to edit video for a carousel for your Instagram feed
- Bonus: How to enhance video on Instagram Live
- The best way to edit videos for Instagram
- Start editing videos for Instagram!
- FAQs about how to edit videos for Instagram
How to edit videos for Instagram Reels
Reels are Instagram’s answer to TikTok. These 15 to 90-second videos appear in a dedicated space in the app that allows you to scroll through them. Reels have a higher engagement rate than regular posts and tend to be favored by Instagram’s algorithm.
You can edit videos for Instagram Reels either directly in the Instagram app, or using third-party video editing software like Riverside.
Since editing in Instagram is likely your first stop, we’ll take you through this step by step. For a truly great Reel, you might want to do some planning before you make your Reel.
Step 1: Open the Instagram app and select “Reel”
Launch the Instagram app on your phone.
Tap the “+” icon at the bottom of your screen or swipe right from the home screen to access the camera.
At the bottom of the screen, swipe to the “Reel” option.
.webp)
Step 2: Record or upload clips
You can create a Reel using either new footage or pre-recorded videos.
You can start a reel from your Camera, Drafts, Templates, and Made for You.
To upload from the gallery:
Select an item from your gallery on the screen.
To access more of your content, you can tap “Recents” to select different videos or albums.
To record video:
Select “Camera,” then press and hold the circular record button to record a clip.
Release the button when you’re done. You can record multiple clips by pressing and holding again.
.webp)
To add effects while recording:
Tap the:
- “Sparkle” icon on the recording screen to add augmented reality filters and masks.
- “1x” icon to speed up or slow down the speed of your recording.
- “Music note” icon to add music or other audio.
- “Green Screen” icon to change your background.
Step 3: Trim or reorder clips
After recording or selecting a video clip, you can trim it.
Select “Edit Video” to go to the editor.
Tap the “Edit” (or the scissors icon) to get cutting tools.
.webp)
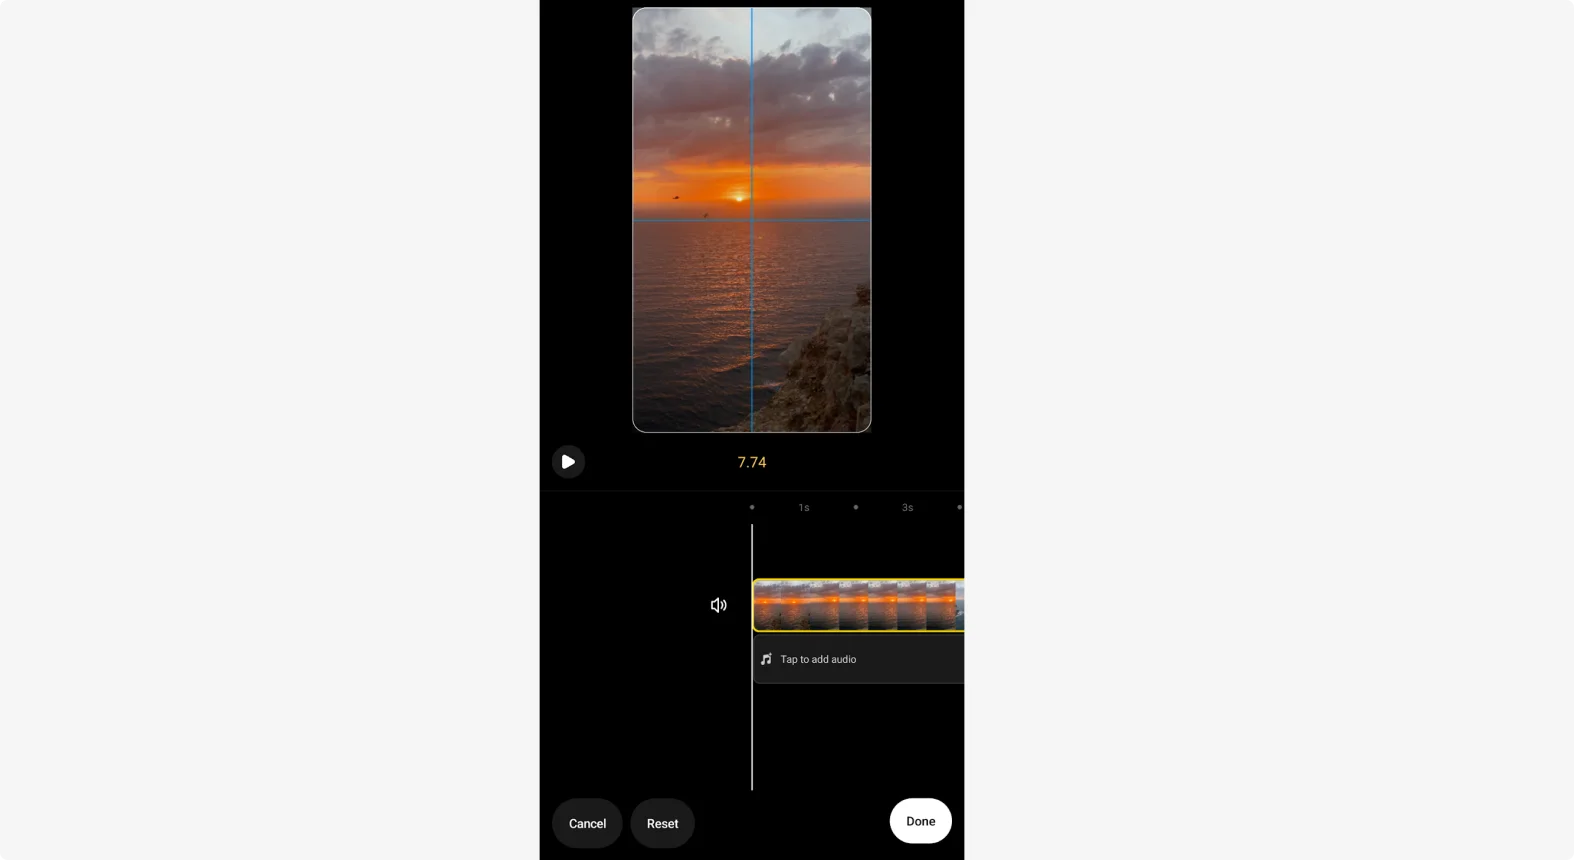
To trim your video:
Drag the edges of the timeline slider to the right or left to trim the beginning or the end of the video.
You can see the running time of the video along the top of the slider to guide you.
To create a split or cut:
Place your playhead where you’d like to make a cut.
Click “Split” from the bottom toolbar.
.webp)
To add more clips:
Tap the “Add Clips” button on the right of your timeline.
.webp)
If you have multiple clips, you can reorder them.
Click on the clip you want to move. Tap the "Reorder" button from the bottom toolbar.
Now you can drag, drop, and reorder your clips where you want to.
Click “Done” to implement your reordering.
Step 4: Apply audio or music
Next, you’ll want to sort out your audio and music.
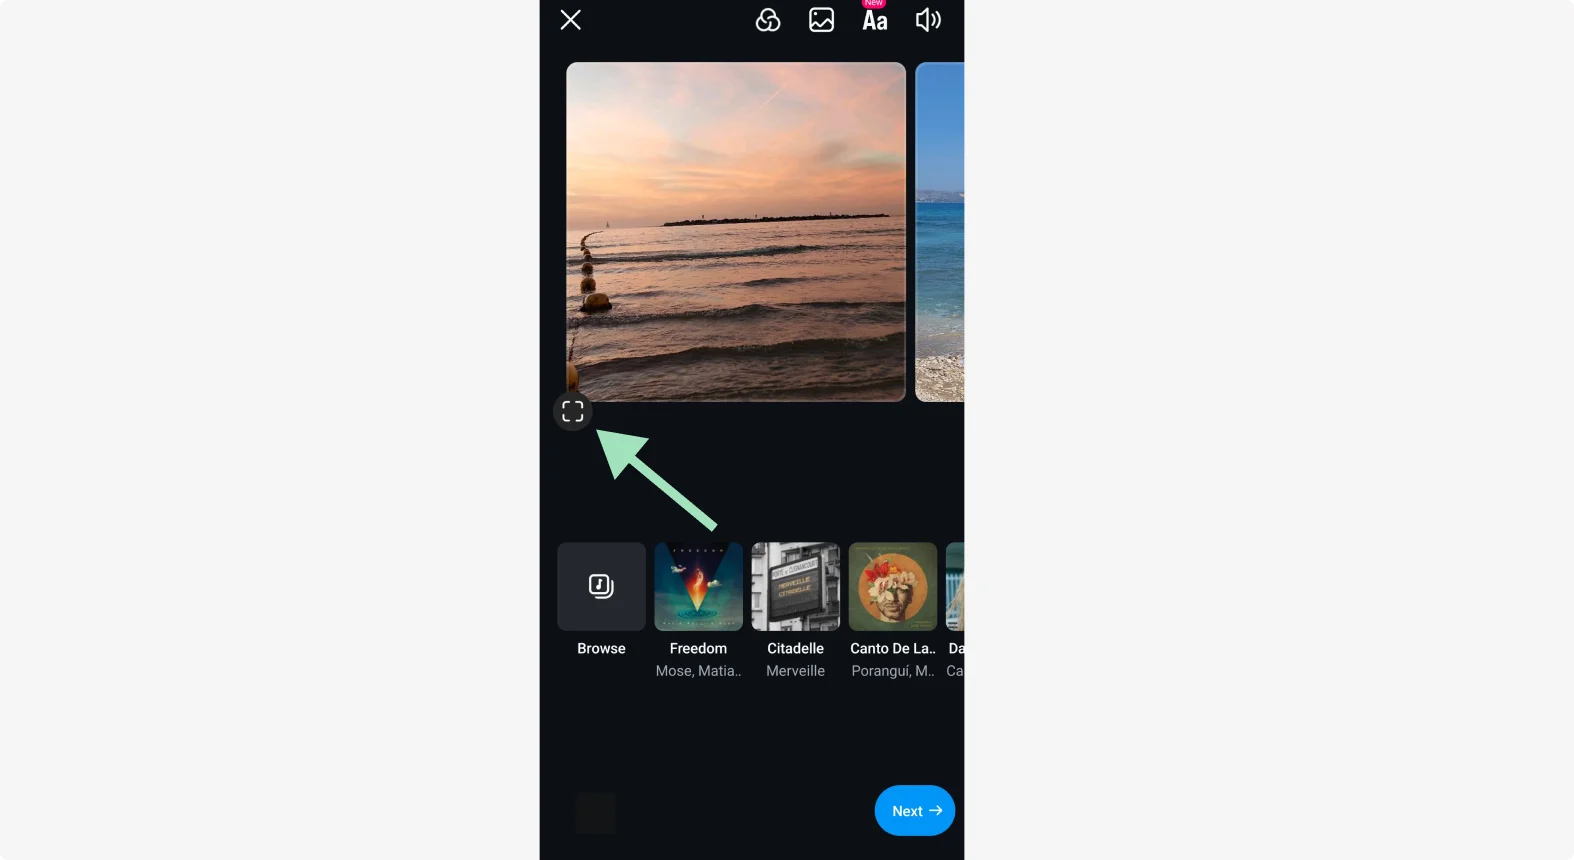
To add music:
In the editor, click “Add audio”. (If you’re in the preview screen, click the “music note icon” on the bottom left.)
.webp)
Search Instagram’s music library or select a track from trending songs.
Click on a song to preview it. You can also slide the track to the part of the song you want to include.
Click “Done”.
To add voiceover or original audio:
Go back to the “Add audio” dashboard to add your own original audio.
Select “Voiceover” from the slider above the music library.
Click the record button to capture your voice over your reel. Press stop and then “Done” to save it.
.webp)
Of course, you can always record a video with audio included, as well.
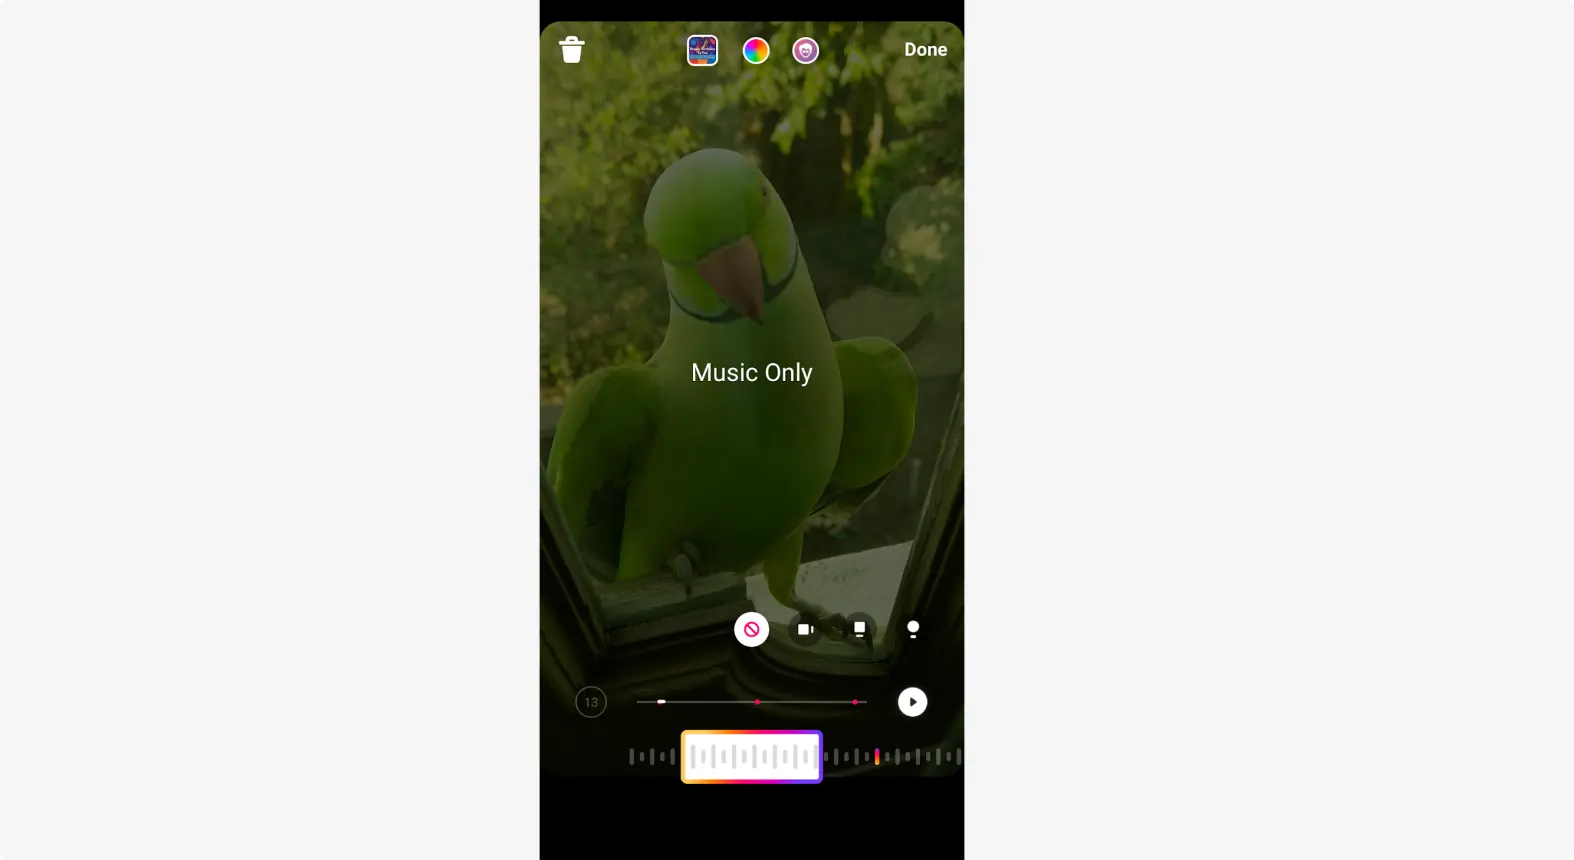
To adjust your audio:
To enhance your audio, go to the audio dashboard and tap the “Enhance” icon. Instagram will automatically reduce background noise and equalize your voiceover.
You can tap the “Audio mixer” icon (looks like two sliders) to adjust the volume of your music and voiceover separately.
Step 5: Customize your video
Customizing from the editor
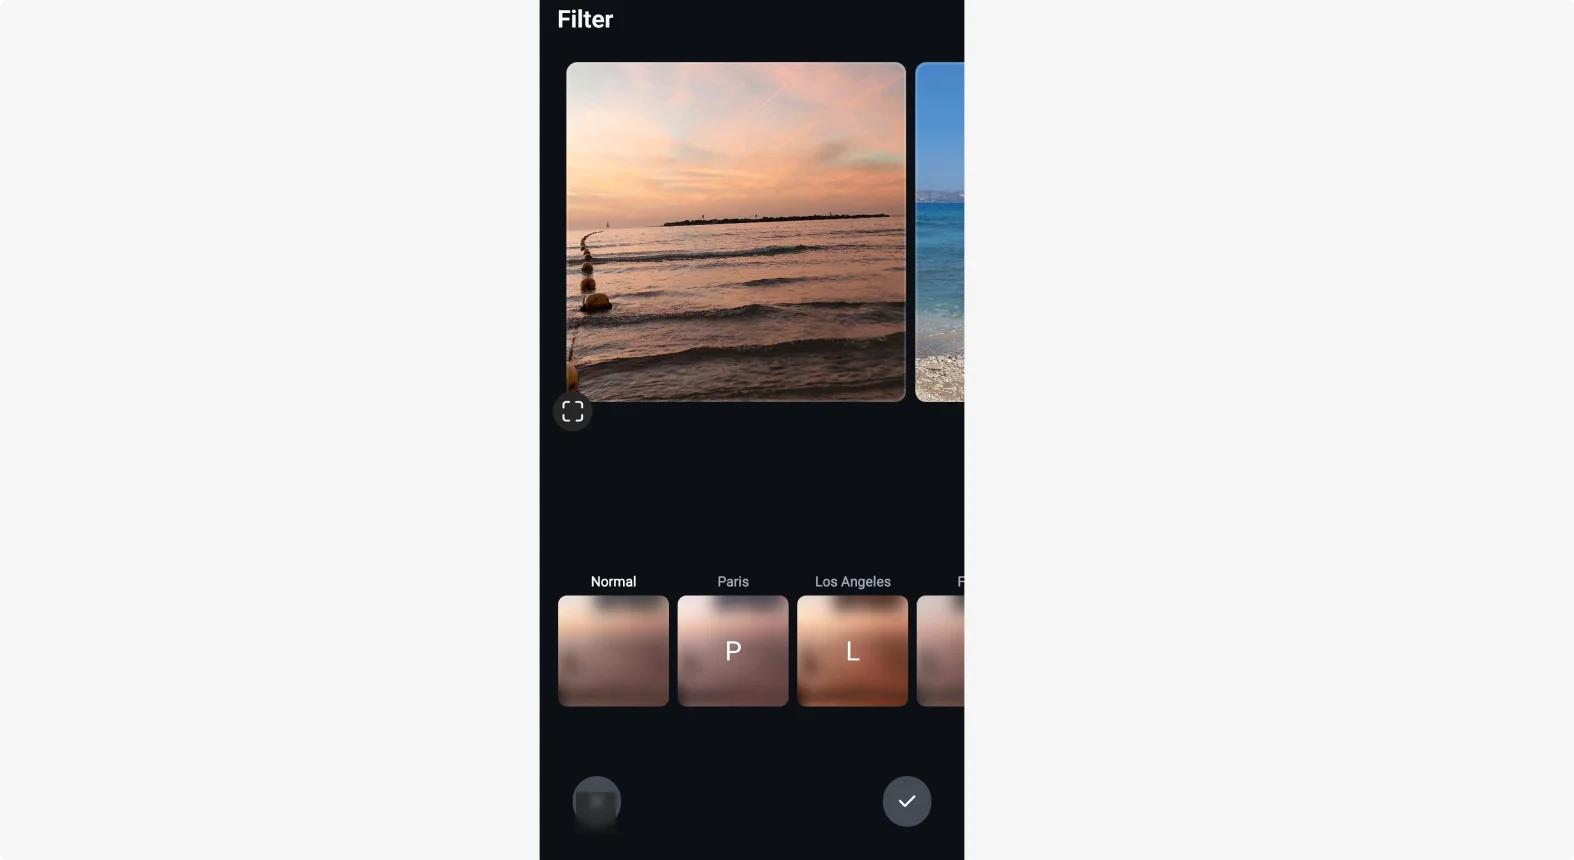
Choose from a range of effects and filters from the bottom of your edit screen.
Click:
- “Filter” to adjust the look and tone of your video.
- “Add sticker” to add stickers, but also captions, your location or other similar interactive elements.
- “Clip hub” to add GIFs.
.webp)
Working in the preview screen
You can also find the above in the preview screen.
Tap the “smiley face icon” (stickers icon) on the bottom slider to add gifs or stickers.
You can resize and position them by dragging and pinching on the screen.
.webp)
Adding a speed effect
If you want to speed up a clip or make it go in slow-motion, click on it and click “Edit”.
Then, tap “Speed”. You can adjust the slider to speed or slow down your clip.
1x is normal. The higher you go, the faster your video plays and vice versa.
Step 6: Add text and captions
Adding text
Tap the “Aa icon” (text icon) on the slider either in Edit or Preview mode to add text to your video.
Type your text out. Then, use the toolbar to change its font color and alignment. Click “Done”.
Drag the text to position it as you want on the reel.
You can also set the text to only show up during certain parts of your video.
Go to the Editor, and you’ll see a text track that you can trim or cut to adjust where it appears and disappears during the video.
Adding captions
Instagram has its own automated captions.
Click the “CC” Captions button in the Preview or Editing mode.
.webp)
This automatically transcribes your video. You can select a style from the bottom toolbar. At the top, you’ll see an option to change your color and remove or add a background.
Learn more in our full guide on how to add captions to Instagram reels.
Step 7: Preview, tag, and share your Reel
If you need to make adjustments, you can go back and edit individual clips, adjust the text or stickers, or change the audio.
All changes will appear in layers or tracks. To remove one, tap the lawyer to select it, then tap the “Discard” button to remove it.
From the Editing view, tap the “down arrow” in the top left corner to preview the video.
When you’re happy with your preview click “Next” to publish.
Publishing your reel
Before sharing your reel, fill in your caption and details.
Click “Tag People” to mention other accounts in your Reel.
Tap “Add Location” to show where you filmed your reel. This makes your Reel discoverable in location-based searches.
Next, type in your caption. We suggest also adding some hashtags.
Then, click “Edit cover” if you want to add your own. You can also adjust other publishing settings here like how the reel will show on your screen.
Tap “Share” to publish your Reel.
If you want to save some time, consider using an editing tool like Riverside. With our Magic Clips tool, you can create Intagrammable clips automatically from long-form video in seconds.
How to edit videos for Instagram Stories
Stories are up to 60 seconds of video that appear at the top of your Instagram feed. Stories disappear after 24 hours unless you opt to “highlight” them and make them permanent on our profile. You can post videos, Boomerangs, GIFs, and Reels as Stories.
Here’s how to edit a video for Instagram Stories.
Step 1: Record or select a video
Open Instagram and swipe right to access the camera or tap the "+" icon and select "Story".
To record a video:
You can either record a video directly by pressing and holding the capture button.
To upload from the gallery:
Or, upload a video from your gallery by swiping up on the screen to access your phone’s library.
Step 2: Trim the video
If the video is longer than 60 seconds (the max length per Story), Instagram will automatically split it into multiple stories.
You can trim the video manually by tapping the "scissors" icon and dragging the start/end points.
Step 3: Add music
Tap the music note icon at the top to add a song from Instagram’s music library. You can search for a specific song or browse by genre or mood.
Once you select a song, drag to choose which part of the song plays in your Story.
Step 3: Customize your Story
You can add filters, stickers, and more to your stories.
To add filters:
Adding filters to a live video:
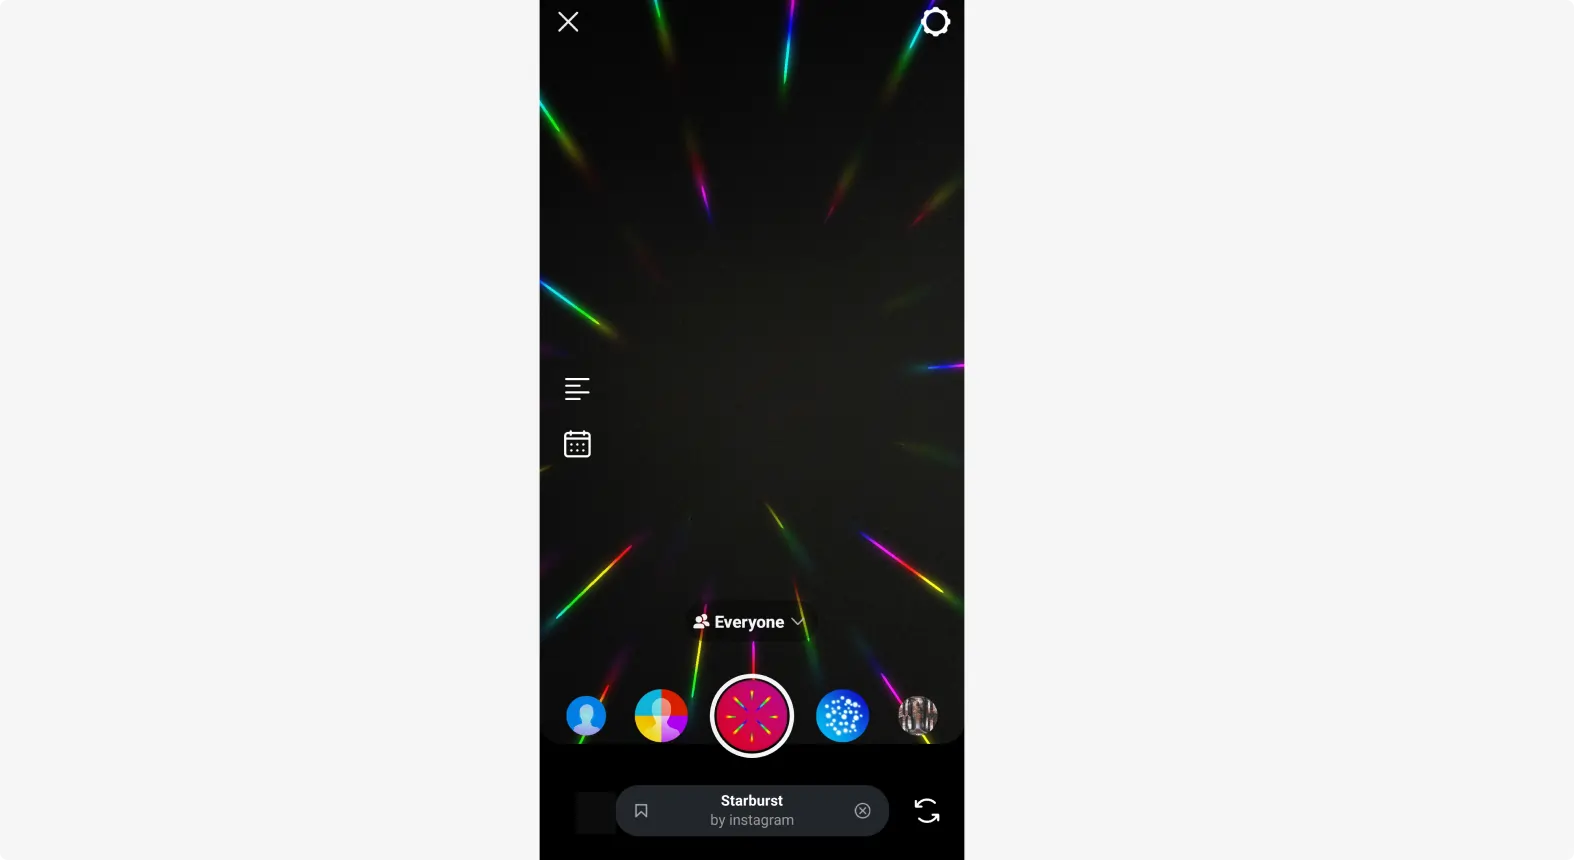
Add a range of filters and effects in a live video. Before recording, click:
- The “sparkle” icon to add filters and effects.
- The “Boomerang” icon to loop a video.
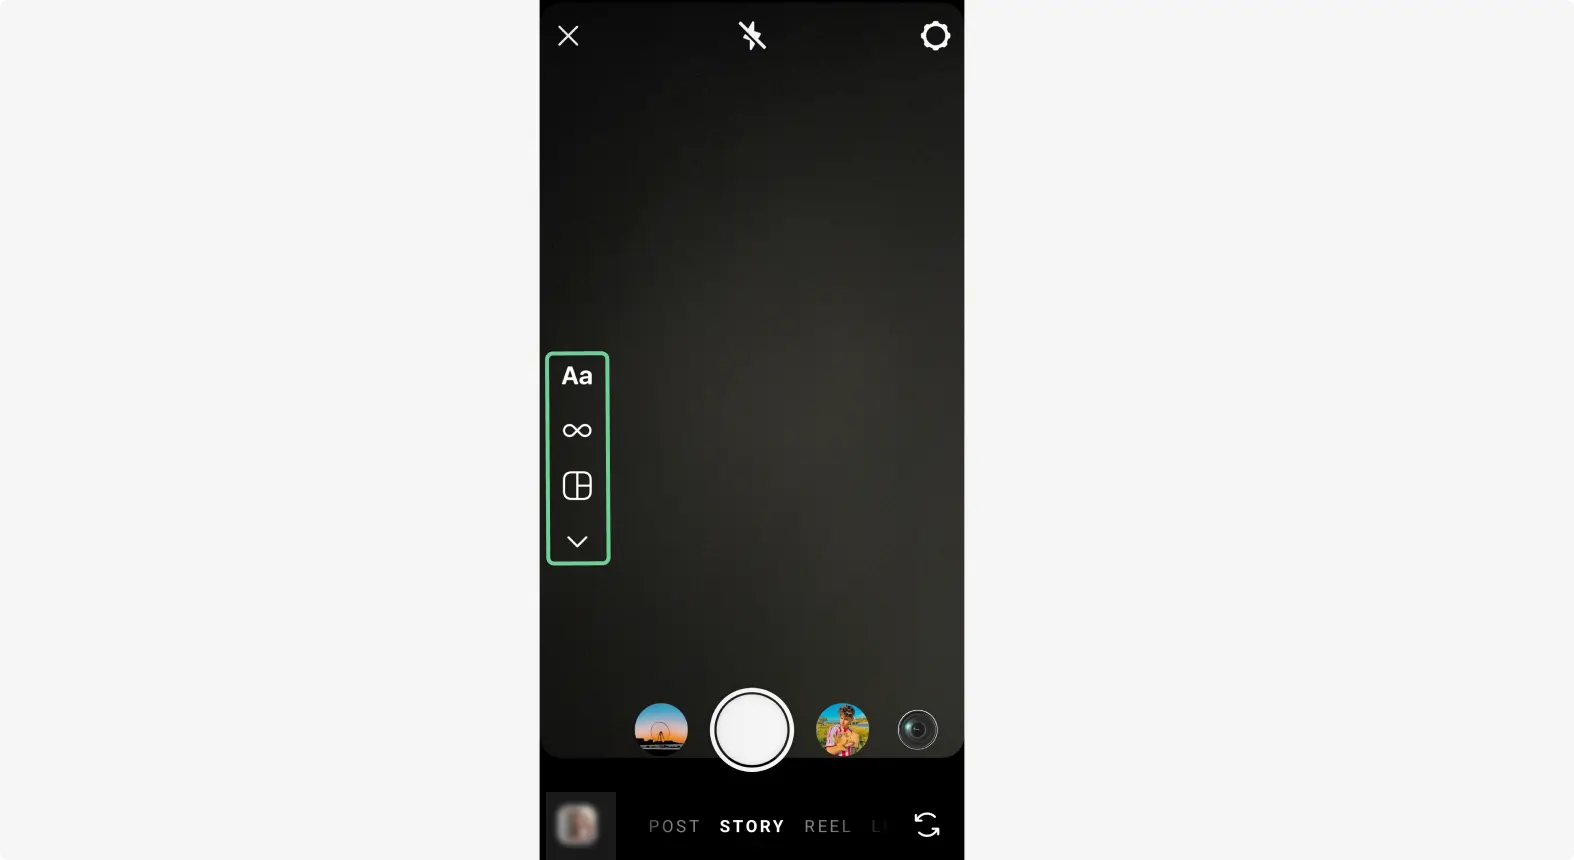
- The “Create” button to create text-based stories with different background colors, fonts, and appearances.
Adding filters to a pre-recorded video:
Swipe left or right across the screen to apply Instagram's preset filters to the video.
Filters change the color tone and mood of the video, giving it a stylized look.
To add text and captions:
To add text:
Tap the “Aa icon” at the top to add text. You can choose from various fonts and text styles. You can also adjust the color, size, and position of the text by dragging it around the screen.Tap the text to change its alignment or add background color for better visibility.Use the timeline at the bottom to control when the text appears and disappears.
Click “@Mention” to tag people and “Location” to set your location.
.webp)
To add captions:
Click on the sticker button on the top toolbar. Then click on the Captions sticker to automatically generate captions. If this doesn’t appear, then you might not have access to this feature yet.
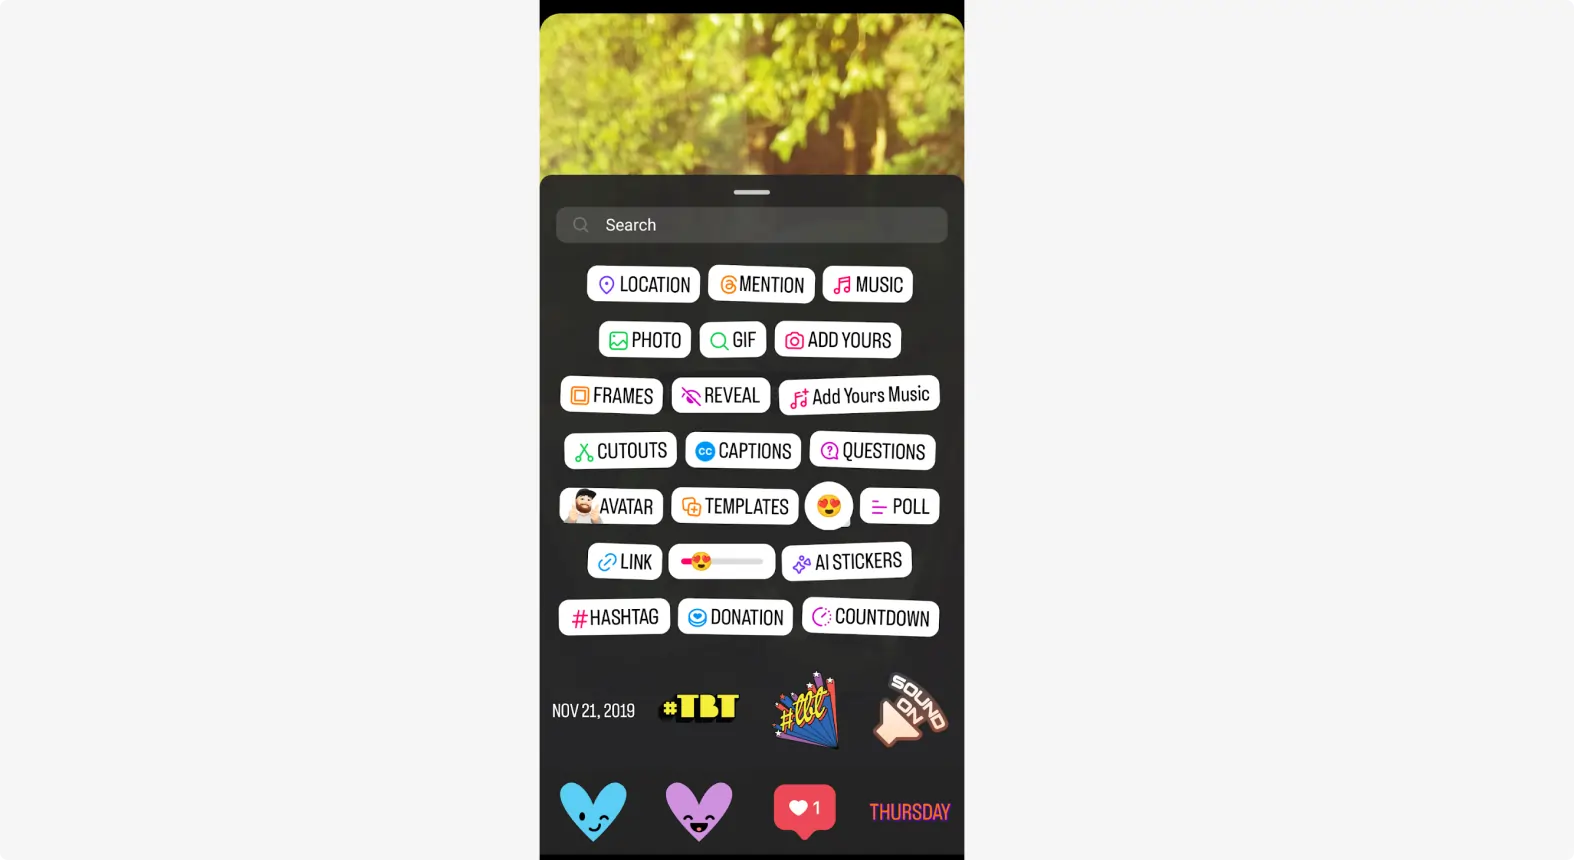
To add stickers and gifs:
Tap the sticker icon at the top to add fun elements like:
- GIFs: Search Instagram's GIF library to add animated stickers.
- Polls or Questions: Engage your audience by adding polls, quizzes, or Q&A stickers.
To draw on your video:
Tap the three dotted menu on the top right corner. The clock on “Draw”
You can draw on your video using various pen styles and colors. This is useful for highlighting parts of the video or adding artistic touches.

Step 4: Preview and post your video
You can preview how the video looks in sequence by tapping on it to view from start to finish.
Once you're happy with the edits, tap the white “Arrow” at the bottom right of your screen to determine how and where to post it.

Did you know that you can add branded elements and custom overlays to your Instagram Stories? Film them in Riverside and you can incorporate custom logos and backgrounds, and add graphic overlays, outros, and intros that align with your brand.
How to edit videos for your Instagram feed
This is the most common way to share longer, more polished video content on the platform. They appear in the main Instagram feed alongside photos, displayed in the standard square or portrait format.
These videos can be between 3 seconds and 10 minutes long. For accounts with a large following, videos can be up to 60 minutes (if uploaded from a desktop).
Here’s how to edit one.
Step 1: Record or select a video
Open Instagram and tap the "+" icon at the bottom of the screen.
Choose "Post" and either record a new video by selecting the camera option or upload an existing video from your gallery.
Step 2: Trim the video
Instagram Feed videos can be up to 10 minutes long for most accounts, and up to 60 minutes for larger or verified accounts.
Tap “Edit Video,” then use the “trim tool” (scissors) to cut your video to the desired length. Tap the video and drag the trimming sliders to adjust the start and end points.
Step 3: Choose the aspect ratio
Instagram Feed supports square (1:1), portrait (4:5), or landscape (16:9) aspect ratios.
Click “Edit”, and select the “crop icon”.
Adjust the frame to fit the best aspect ratio for your video.
Note that Portrait (4:5) typically takes up the most screen space and tends to perform better in the feed. Pinch and move the video manually to adjust how it looks on the screen.
Step 4: Apply filters and effects
Swipe left or right to choose from Instagram’s preset filters to enhance the look of your video.
Add text, stickers, clips, or audio from the “Edit” menu. (You can use the same workflow and tools like we mentioned above for Stories and Reels).
Step 5: Post your video
Add captions
Write a compelling caption for your video. This can include relevant hashtags, mentions (@username), and emojis to grab attention.
Add a location and tag people
You can tag a location in your video post. You can also “Tag People.”
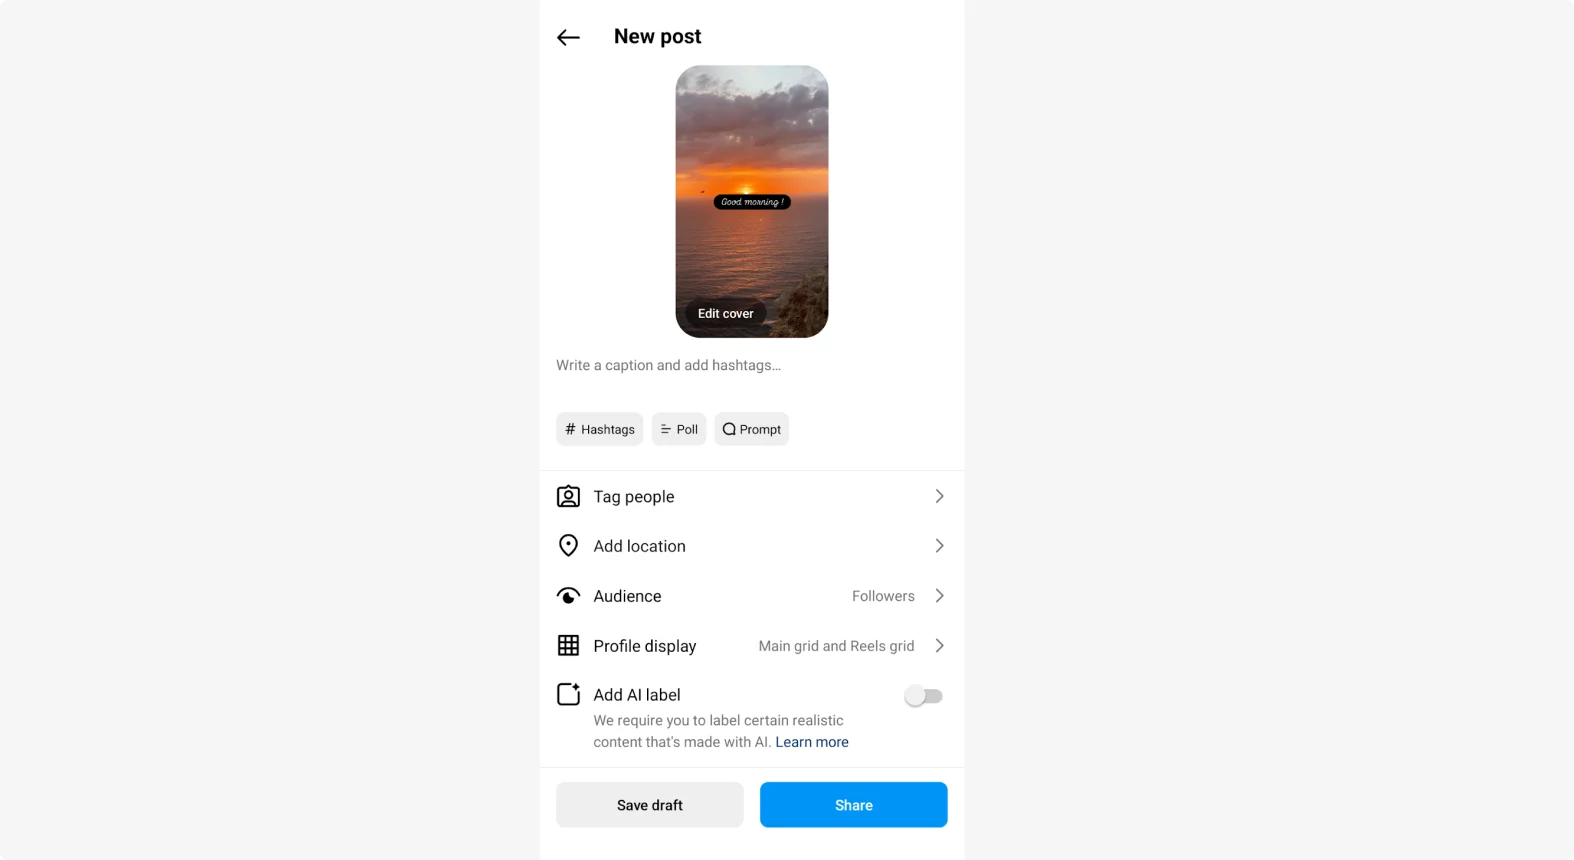
Add a cover image
Tap the cover icon to select a thumbnail (cover image) for your video. You can either choose a frame from the video itself or upload a custom image from your gallery.
Make sure the cover is eye-catching, as this is the first thing users see before deciding to play the video.
Publish your Instagram video
Make sure the "Also Share to Feed" option is toggled on if you want the video to appear in your main feed. Otherwise, the video will only appear in your profile’s “Videos” tab, but not in the main grid on your profile.
Tap “Share” to post the video. You can also simultaneously share the video to Facebook or Twitter if linked to your Instagram account.
How to edit video for a carousel for your Instagram feed
Feed posts include carousels, which are posts that appear on the regular feed. You can share multiple photos, videos, or a combination of both in a single post. Viewers can swipe left or right to see up to 10 images or videos in a single carousel. Each video in the carousel can be up to 60 seconds long.
Here’s how to create a carousel post for Instagram.
Step 1: Open Instagram and create a post
Tap the "+" icon at the bottom of the screen to create a new post.
Select "Post" from the menu options.Tap the “multiple photos icon” (square stack) in the bottom right corner of the selected thumbnail image. This allows you to upload multiple videos or photos in one post.
You can select up to 10 videos or photos from your gallery.
Tap the videos or photos you want to include. The numbers will indicate the order in which they will appear in the carousel.
Step 2: Choose the aspect ratio
Instagram Feed supports square (1:1), portrait (4:5), or landscape (16:9) aspect ratios.
Select the crop icon and adjust the frame to fit the aspect ratio that works best for your video. Note that Portrait (4:5) typically takes up the most screen space and tends to perform better in the feed.
You can also pinch and move the video manually to adjust how it looks on the screen.
Step 3: Trim or edit individual videos and rearrange clips
After selecting each video, Instagram allows you to trim them. Tap the video and drag the sliders to adjust the length.
Apply individual filters to each video or photo by selecting the desired filter from Instagram’s options.
If you want to change the order of the videos or photos, tap and hold the selected clips and drag them into the desired sequence.
Step 4: Add music
Select a track from the slider underneath the carousel of videos and images. You can also click to browse.
Step 5: Post your carousel
Write a caption that applies to the entire carousel. You can also include hashtags, emojis, and mention other users if you want to.
You can tag people in each individual video or photo within the carousel. This is useful for collaborations or showcasing different products or contributors in each frame.
Tag a location if you want the post to be discoverable in location-based searches. The location tag applies to the entire carousel post.
Post your content!
Bonus: How to enhance video on Instagram Live
Instagram Live allows you to post live videos to your followers in real-timereal time. This feature is part of Instagram Stories but allows for more direct and spontaneous engagement with followers.
Because Instagram Live is, well, live you can’t edit your video. But there are some adjustments you can make during your Live. You can also download the video after recording and edit it for your feed or other purposes using video editing software. Here are a few things you can do to enhance an Instagram Live video.
Apply filters and effects
Apply AR Filters: You can use Instagram's augmented reality (AR) filters while live. Tap the “sparkle icon” (usually on the right side of the screen) to browse and apply filters to your video.
Change Filters: You can switch between filters at any time during the broadcast to keep things dynamic or add fun elements to your live video.
Pin comments
You can pin important comments during the live session. This is useful for highlighting a key message or a specific question you want everyone to see.
To pin a comment, tap and hold on the comment and then select "Pin Comment." This comment will stay at the top of the comment section for the duration of the live stream.
Create questions and polls
You can engage with your viewers by answering questions that were submitted before or during the live session.
To use this feature, viewers must submit questions via the question sticker in your Stories before you go live, or they can ask during the Live. Tap the “question icon” to display and answer these questions.
Share images or videos
You can share images or videos from your camera roll during the live session.
Tap the "Media" icon (usually at the bottom) and choose an image or video to share with your audience, while still being on camera in a split-screen layout.
If you want to share videos during your Live or repurpose your live recording, try Riverside. You can easily reformat your content for every platform.
The best apps for editing videos for Instagram
When it comes to editing videos for Instagram, the Instagram app has some tools to help. But it doesn’t have all the features you need to create high-quality video like your favorite influencers.
If you want to edit a truly great video for Instagram, you’ll need a video editing app. With a dedicated app, you can customize transitions, graphics and text overlays. You can also access more advanced audio editing features that go way beyond Instagram’s basic volume adjustments.
Not sure what Riverside video editing software is best for Instagram? Here are a few options:
Riverside
If you’re more comfortable editing on a desktop, then Riverside offers you a seamless solution.
You can record video in up to 4K resolution from your phone or desktop. No matter what device, everything records directly on your device but then uploads to the cloud while recording. Your internet connection won’t get in the way of your recording quality. But, at the same time, you’ll find your files automatically on your desktop even if you’re recording on your phone. No need to upload or download anything!
Invite guests to join you, and you’ll get high-quality tracks for each.
This platform is best for repurposing your long-form videos like a podcast or YouTube interview into multiple Instagram reels or posts. The Magic Clips tool uses AI to turn your recordings’ key moments into short, shareable videos.
And, the editor is packed with features to streamline your workflow. From text-based editing to automated audio enhancement, you’ve got a video ready to go in no time.
.webp)
With Riverside, you can:
- Record and edit high-quality video and audio: Record in up to 4K video and 48 kHz/16-bit audio.
- Edit in less time: With text-based editing, trim your video as easily as deleting text in the recording transcript.
- Automate edits: Delete filler words, removal background noise, and cut long silence all in a click.
- Customize layouts and overlays: Add text, music, or image overlays. Then choose a layout and background to match your brand.
- Automate transcripts and captions: Add dynamic captions and style them as you like. (You’ll have much more flexibility here than you would on Instagram).
- Multi-platform exporting: Export your video in multiple formats and resolutions, optimized for different platforms. This makes it easy to use your content in many more ways
Start creating high-quality videos by signing up for a free Riverside account.
Capcut
CapCut is a user-friendly option that has become popular for editing Instagram videos because of its simple interface. It also has prebuilt templates that help users create visually appealing Instagram content quickly.
You can work with CapCut on desktop or mobile.
While it’s got everything you’ll need, you won’t have access to everything on the free plan.
Premiere Rush
Premiere Rush is a streamlined video editor from Adobe designed for content creators. It’s a simple but powerful enough tool that also integrates with higher-level Adobe editing software.
Think of it like the compressed version of Premiere Pro. It doesn’t have everything you’d need - for example, there are no automated captions - but for most, it’s enough for editing videos.
Learn more in our full guide on the best Instagram editing apps.
Start editing videos for Instagram!
Do you feel ready to start editing videos for Instagram? You should have all the tools you need to give it a try. But it’ll take practice to master these techniques and create videos your followers will love.
Check out our blog for more tips on video editing for social media and other platforms.
FAQs about how to edit videos for Instagram
Looking for more information? Here are the answers to some frequently asked questions.
What do Instagram influencers use to edit videos?
Instagram influencers use high-quality video editing software to edit videos for Instagram. There is a range of different software options here and choices among influencers are diverse. Some common choices include Davinci Resolve, Capcut, or one of the editors from the Adobe suite. Instagram influencers with huge followings may also hire a video editor to help them refine their content. But that person will be using a high-quality video editor as well!
Overall, we recommend Riverside. Unlike some other video editors, it’s also a recording studio. So, you can record and edit high-quality video and audio all in one place. It’s also super easy to use and includes lots of helpful tools that make content creation easier. It’ll even create clips automatically from longer form content.
How to edit videos for Instagram for free?
There are lots of video editing software options that are totally free. Most others have free trials or freemium models. Check out our extensive list of best free video editing software for more options!
How to edit videos for Instagram on iPhone?
If you want to edit Instagram videos on iPhone, you easily do this within the Instagram app, as shown above.
If you’re looking for the additional features of a dedicated video editing app, the next step up might be iMovie. It’s free and designed for Apple devices, but note that creating vertical videos on this platform is more challenging. Other popular choices for iPhone include InShot, Adobe Premiere Rush, Clips, and KineMaster.
How to edit videos for Instagram with music?
For Stories and Reels, you can use Instagram’s built-in music feature. Once your video is ready, tap the “Music Note” icon at the top of the screen. Then just follow the steps above depending on the type of video you are making.
You can also add music to Instagram videos by using a video editor like Riverside. This will give you a lot more control and professional-quality editing. It also allows you to import your own music track. Then, you can apply audio editing such as trimming the music to match your video, syncing the video to specific sections of the song, adjusting volume levels, and applying fade-in and fade-out effects.
Note that Instagram has automatic detection systems that scan videos for copyrighted music. If your video contains music that is copyrighted, the platform can mute the audio on your video, block the video from being uploaded or viewed, or even penalize your account. Be sure to look for royalty-free music when sourcing music from outside of Instagram.


.webp)


.webp)
.webp)
.webp)

