


Table of contents:
Key takeaways:
- Optimize Zoom settings for HD recording: To improve Zoom video quality, enable HD video recording (720p or 1080p), which requires a Pro or higher account. Ensure you have adequate bandwidth, use full-screen mode, and set Speaker View for optimal results.
- Enhance audio quality: Activate "Original sound for musicians" in Zoom settings to bypass automatic audio enhancements, and use external microphones for superior sound.
- Create the best recording environment: Improve lighting, use external cameras and microphones, and ensure your recording space minimizes distractions and echoes for better video and audio quality.
- Riverside as a superior alternative: Riverside offers local recordings in up to 4K resolution, uncompressed 48kHz audio, and advanced features like separate tracks, producer mode, and automated noise removal, surpassing Zoom's limitations for professional-quality recordings
Are you looking for a way to enhance your Zoom recording quality? Zoom is a communication tool used by organizations and individuals to connect remotely. Businesses and individuals often use it for operations and content creation. While the platform is convenient, its video resolution and recording quality aren’t always great.
There are many ways to improve your recordings, from adjusting your Zoom video quality settings to creating the best recording environment.
We’ll explain how to improve Zoom video quality by maximizing your video and audio settings and provide tips on recording a meeting to achieve top performance.
General tips for improving Zoom recording quality
Zoom offers limited options for improving video quality. However, you can improve your environment and recording equipment for Zoom recording quality.
You can start by watching the video below and then keep reading to learn how to create a great recording setup to improve Zoom video quality.
Maximize your internet connection
Good Zoom resolution requires a strong, stable internet connection. You’ll want to make sure you have as much bandwidth available as possible before starting your Zoom recordings.
You can improve your internet connection to get better Zoom resolution in a couple of ways:
- Turn off WiFi on other devices: Limit WiFi use on your network during a Zoom call. Turning off Wi-Fi on other devices will free up bandwidth and provide a better Zoom experience.
- Get close to your router: Unless you’re using signal boosters, your router’s signal will dwindle in strength the further you are from it.
- Connect with an ethernet cable: If your device has an ethernet port, you can improve your connection significantly by connecting to your router with an ethernet cord. Wired connections are much more secure than wireless connections and will provide better-quality recordings.
- Turn off background apps: Many apps running in the background could eat your bandwidth. Close all software like Google Drive, Dropbox, or OneDrive that could sync files during your meeting.
Create the best recording setup
One way to improve the quality of your Zoom recording is to have a good recording setup. While Zoom’s video resolution is not always reliable, the right equipment and recording environment can enhance the quality of your recording.
We’ll explain ways you can improve Zoom recording quality outside the platform.
Lighting
Your lighting situation can make or break a video. Whether you’re using natural light or have lighting equipment, you must understand how to position your body and camera correctly.
Ensure your light source is in front of you, not behind you. Your webcam will automatically adjust to the brightest light source; if that’s coming from behind you, you won’t be in focus in your recording.
Camera
Built-in webcams are convenient and easy to use but don’t always produce the best quality. If you plan to record a lot from Zoom, you may want to invest in an external camera.
External cameras have better lenses and offer advanced features to improve video quality. Many affordable options can be easily connected directly to your desktop or laptop.
Microphone
An external microphone will significantly improve the sound quality of your recordings. The microphones in desktop and laptop devices don’t often have noise canceling and sound-enhancing features that external mics have.
With the proper placement, an external microphone can produce crystal-clear audio that is impossible to achieve using only your device’s built-in mic.
Location
Be sure you’re recording from a place where there will be no visual or auditory distractions during your Zoom recording. Set up your recording space with carpeting or other soft surfaces, such as couches and chairs, to reduce echo and reverb in your audio.
Make sure you face any windows instead of having them behind you. Choose an area where other people won’t be walking back and forth during your recording to limit distractions and interruptions.
Position your camera correctly
This may seem obvious, but often, video quality suffers because the person recording doesn’t have their camera positioned correctly. The camera's position can affect your lighting, and your recording will look better overall if you’re centered in the frame.
To get the best quality video, ensure your laptop webcam is level with your eyes. You can do this using a laptop stand or even some large books. Preview your video to ensure you’re centered in the frame. During your call or meeting, make eye contact with the camera frequently.
How to increase the quality of a Zoom meeting: 4 ways
You can improve your overall Zoom recording quality by selecting the right settings within the program and using additional software.
We’ll describe how to enable HD video recording, optimize audio, choose the best recording settings, and explore screen capture software.
1. Enable HD recording on Zoom
Zoom can record in HD (720p or 1080p), but you must first meet some conditions.
Purchase a paid account
Standard HD (720p) and Full HD (1080p) are available only for Pro, Business, Education, or Enterprise accounts, while the standard Zoom recording format for free accounts is SD (240p, 360p and 480p).
Ensure you have enough bandwidth
Zoom auto-adjusts video resolution according to the strength of your internet connection. If your connection isn’t great, your video quality will suffer.
The minimum bandwidth requirements for recording in HD are the following:
- Standard HD (720p): 1.2Mbps/1.2Mbps U/D (1-on-1 calls) or 2.6Mbps/1.8Mbps U/D (group calls)
- Full HD (1080p): 3.0Mbps (receiving) or 3.8Mbps (sending).
Toggle full-screen and speaker mode on
Zoom records in HD only if the meeting window is in full-screen mode and at least one attendee (including you) is in full-screen mode.
You must also run your meeting in Speaker View mode. This means that the person currently speaking will be featured in the large video window, while the others will be smaller at the top.
To enable Speaker View, follow these steps:
- Open the Zoom desktop client.
- Join or start a meeting.
- Click View at the top of the desktop client.
- Make sure the Speaker layout is selected.

Note that only the speaker will be recorded in HD or Full HD quality, although you might request that high-quality feeds for attendees be activated when streaming large-format events and webinars.
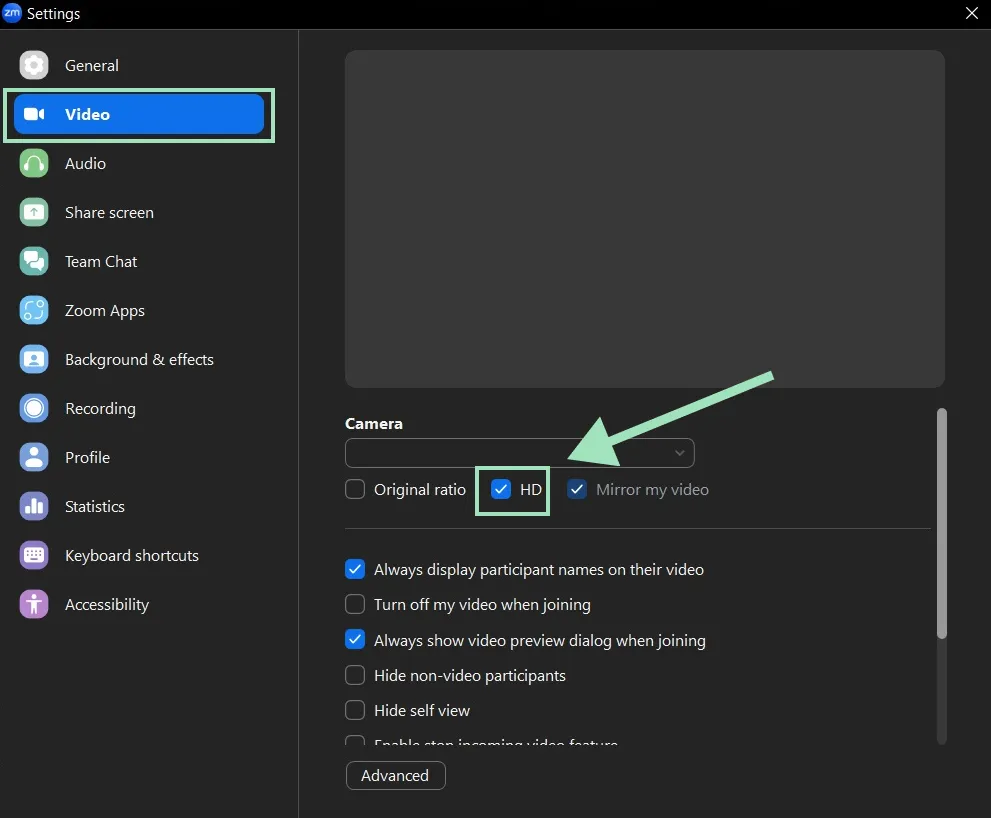
Set Zoom video resolution to HD
You have to take a couple of steps to enable Zoom HD recording.
To turn on Standard HD (720p) resolution, follow these steps:
- Open the Zoom desktop client.
- Click on your profile picture.
- Select Settings from the dropdown.
- Click on the Video tab in the navigation bar on the left of the screen.
- Click HD to enable HD video.
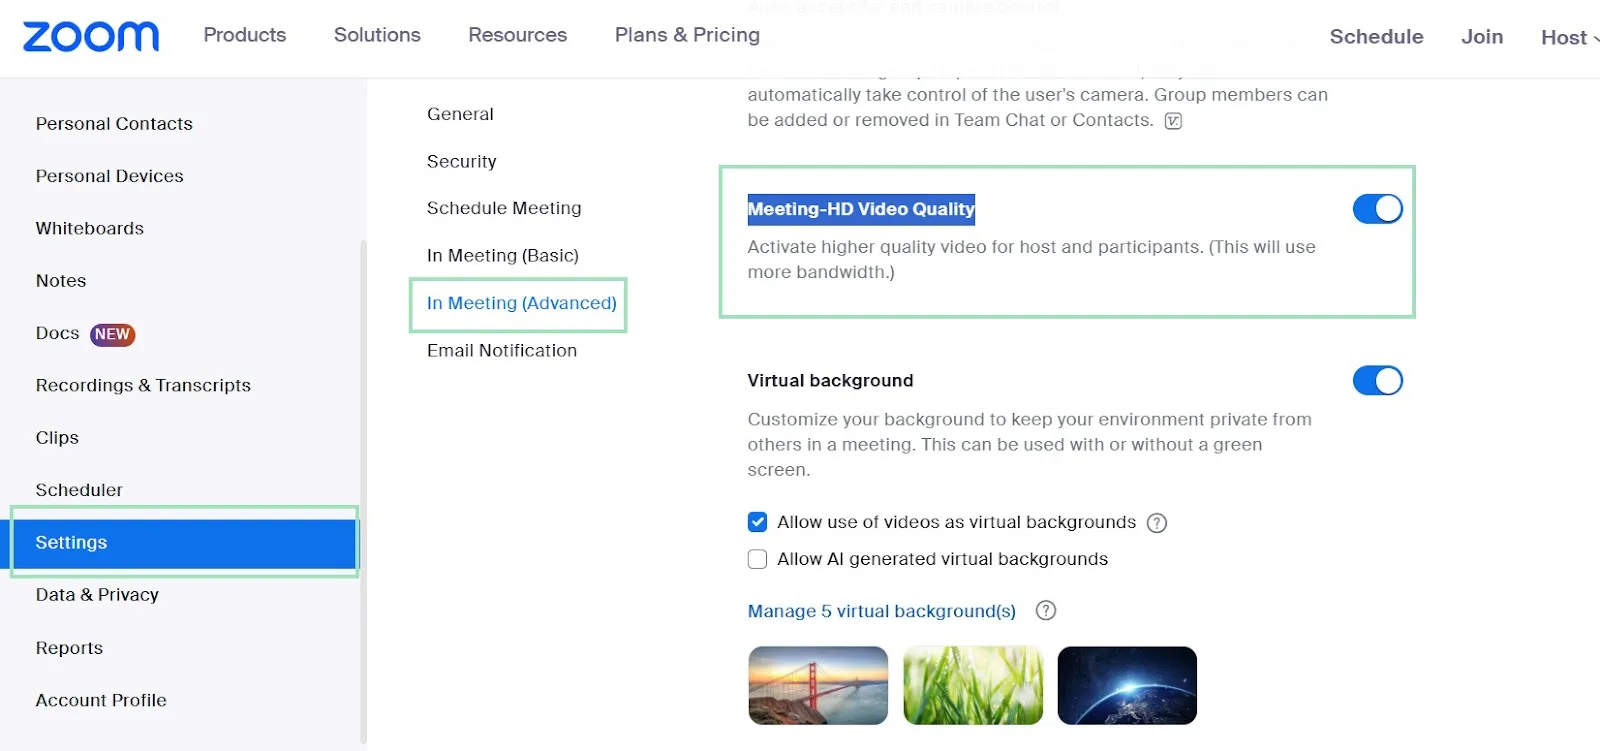
To turn on Full HD (1080p) resolution, follow these steps:
- Access Zoom via the web portal.
- Click Settings in the navigation bar on the left of the screen.
- Click on the Meetings tab.
- Navigate to the In Meeting (Advanced) section.
- Click on Meeting-HD Video Quality video to enable HD.
- Select the Full HD (1080p) option (if available).
- Click Save.
2. Activate original audio
Zoom has built-in features for echo cancellation and audio enhancement. However, many external microphones have better audio features and produce better sound for Zoom recordings.
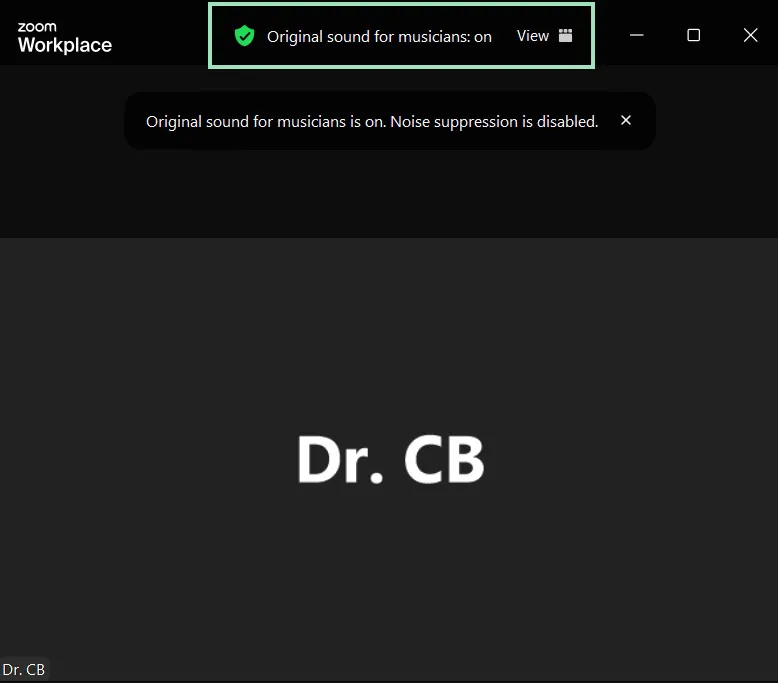
You can conduct and record meetings using the original audio once you enable “Original sound for musicians” in your settings.
Follow these instructions to enable the in-meeting option to record the original sound:
- Open the Zoom desktop client.
- Click on your profile picture.
- Select Settings from the dropdown.
- Choose Audio from the navigation menu.
- Under Audio profile, find “Original sound for musicians” and set the checkbox for High-fidelity music mode to on and the checkboxes for Echo cancellation and Stereo audio to off.

Once you’ve enabled the in-meeting option, you can turn on original sound by following these steps:
- Open the Zoom desktop client.
- Join or start a meeting.
- Click “Original sound for musicians” at the top of the desktop client.
Learn more: How to Improve Your Audio Quality on Zoom with 7 Easy Tips
3. Adjust video settings
While turning HD video on will already help your Zoom recording quality, there are a few other optimizations you can do for video:
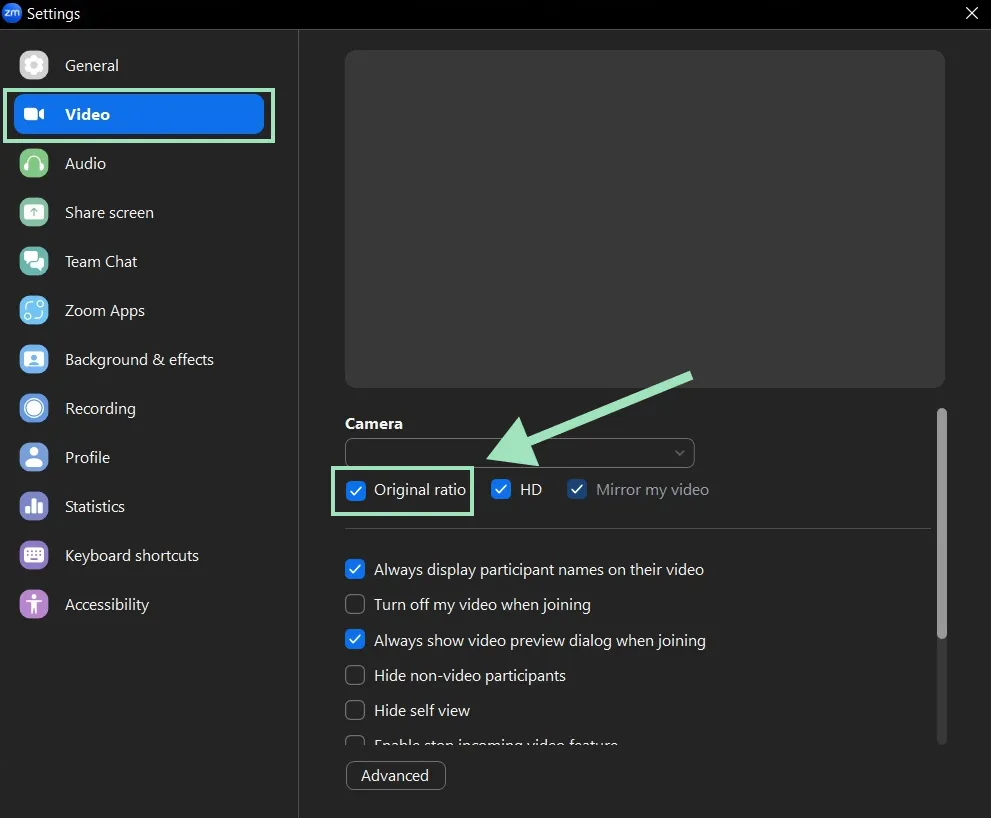
Turn on Original Ratio recording
The 16:9 ratio is generally the standard for landscape recordings and will be easier to edit with.
To record in the original 16:9 ratio, follow these steps:
- Open the Zoom desktop client.
- Click on your profile picture.
- Select Settings from the dropdown.
- Click on the Video tab in the navigation bar on the left of the screen.
- Click Original ratio to record in 16:9.
Record with an external camera
Under your video Zoom settings, you can select which camera to use for recording. We suggest using an external dedicated camera, which records much better quality than a PC’s built-in camera.
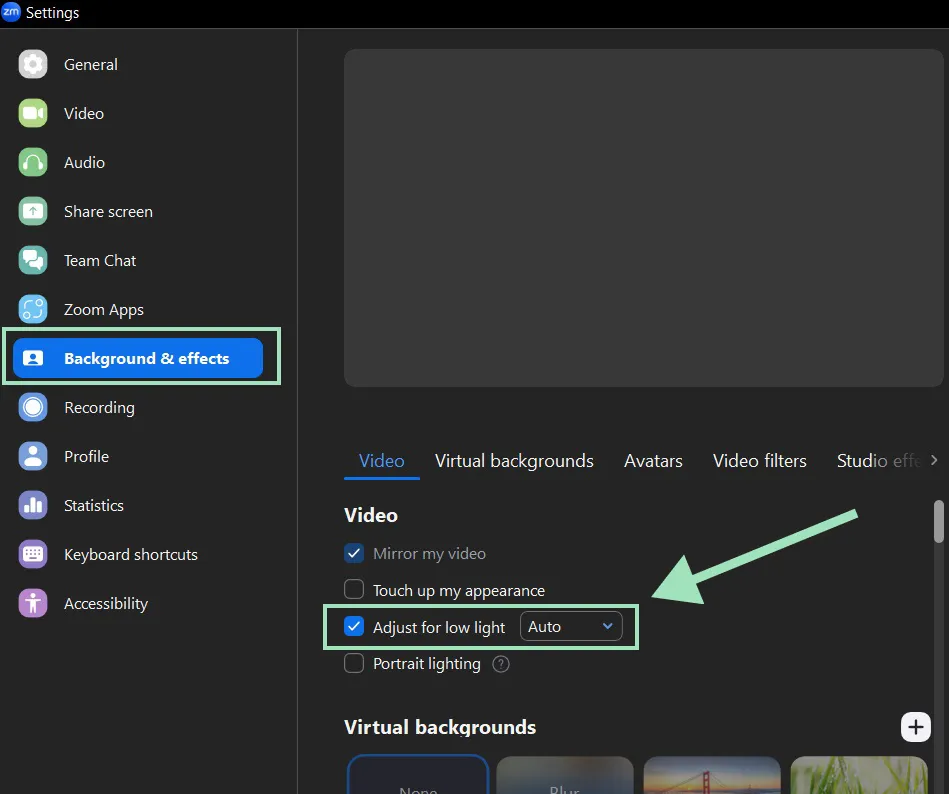
Adjust your lighting as needed
Zoom has an option to “Adjust for low light,” which can help if you’re in a poorly lit room. However, we suggest recording unfiltered video.
You can adjust your lighting using a lighting kit or by ensuring you’re close to natural light.
To turn the “Adjust for low light” option, follow these steps:
- Open the Zoom desktop client.
- Click on your profile picture.
- Select Settings from the dropdown.
- Click on the Background & effects tab in the navigation bar on the left side of the screen.
- Click “Adjust for low light” to activate light adjustment. You can also choose whether Zoom will take care of your brightness (Auto) or if you want to manually increase it (Manual).
- If your video is still blurry due to less-than-perfect lighting, you can try unticking the “Touch up my appearance” box and turning on the “Portrait lighting” option.
Disable virtual backgrounds
Using virtual backgrounds without a green screen is resource-intensive and can consume a chunk of your CPU power.
In most cases, your video will be capped at 720p, but if your computer isn’t powerful enough, the quality of your recording may even drop to 360p.
4. Use screen capture software
Screen recording software is a great option for improving the quality of your Zoom recordings. Programs like OBS allow you to record your screen and enhance your audio and video for a better quality recording.
If you plan to use screen capture software to improve the quality of your Zoom recordings, ensure that all features are included.
Keep an eye a couple of features out for these features when you’re shopping around for screen capture software:
- Localized recording: Recording directly to your device will ensure the video or audio quality of your recording won’t suffer because of a poor internet connection.
- Separate recording for audio and video: Recording video and audio separately produces better quality and makes it easier for you to make edits.
- Built-in editing features: Be sure to select a program that allows you to record and edit video in one place. Take a look at the editing features included to see if the program has all you need to edit your videos.
- Automated editing features: Some programs include automated features that streamline the editing process. If you don’t have a lot of experience with editing or just don’t have the time to edit your recordings, these features will do all of the heavy lifting for you
A great Zoom alternative: Riverside
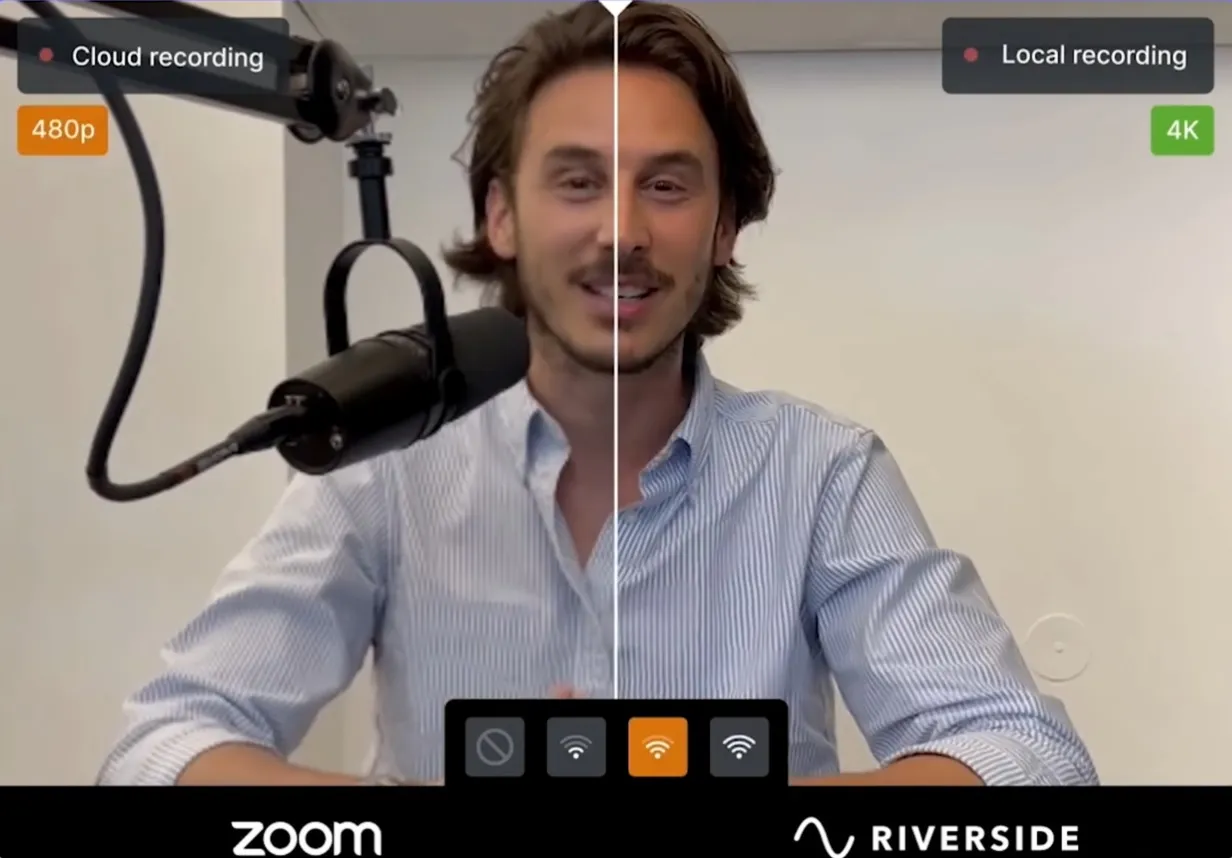
Zoom allows for computer or cloud recording, but this terminology can be a little confusing, so let’s clarify things.
Cloud recordings simply means that Zoom captures your recordings over the internet and then stores them online. You’ll need a paid account to do this.
Conversely, computer recording means that Zoom locally stores your recordings, shared content, and audio-only files on your device. This is the default option for both free and paid subscribers.
Zoom doesn’t allow local recording, which is when your device captures all video or audio directly during the recording without an internet connection. This protects your files from faulty internet connections, which can reduce the recording’s overall quality.
It’s important to mention that Zoom’s computer recordings are not the same thing as local recordings.
Zoom only stores your files locally on your device; all recordings remain online. This means your recordings are still susceptible to your connection’s stability and bandwidth, potentially leading to lower resolution or glitchy video.
Local recordings will always be better quality than cloud recordings and computer recordings, as they don’t rely on the strength or stability of your internet connection.
Various options are available for recording locally, but try Riverside, a Zoom alternative that provides quality local recordings without limitations for the best results.
All call or meeting participants are recorded locally on Riverside in up to 4K resolution, and sound is captured as an uncompressed 48kHz WAV file. Thus, you never have to worry about the quality of your recording being affected by a poor internet connection.
“Riverside is far better than Zoom for recording interviews.” - Seth Godin, author, entrepreneur and marketing leader.
Riverside includes many other powerful features to help you produce high-quality recordings:
- Separate audio and video tracks for every participant.
- Studio-quality recordings with up to 4K video and 48kHz.
- Producer mode so you can invite someone to adjust your recording settings behind the scenes.
- Mobile app available for recording on the go on any iOS or Android device.
- Automated AI transcriptions available in over 100 languages.
- Text-based editing so trimming your video is as easy as deleting text from a transcript.
- Automated background noise removal, audio normalization and other AI audio enhancements.
- Presentation recorder that captures your slides locally.
- Recording for up to 10 meeting participants.
- High-quality screen recording in Full HD (1080p).
Learn more, or start recording top-quality videos seamlessly!
FAQs on improving Zoom recording resolution
Do you still have questions about how to improve video quality on Zoom? Read the answers to the most frequently asked questions here.
Does Zoom record in high-quality?
HD recording is possible with Zoom, but video quality is determined by the strength of your internet connection. If you want to record in HD instead of SD, you must have a strong internet connection and ensure you’ve enabled HD video on the platform. We’ll explain how to enable HD video below.
What resolution does Zoom record in?
Zoom is capable of recording in 360p, 720p, and 1080p. If you’re recording more than two people, your recording will be in 360p unless you have a Paid account with Group HD. Group HD allows you to record 3 or more people in 720p (or 1080p for broadcasting large-format events). You can record a call or meeting with two participants at 720p. Be aware that HD recording is available on Zoom, but the platform auto-adjusts video resolution according to the strength of your internet connection. If your connection isn’t great, your video quality will suffer.
Zoom recording quality local vs. cloud: What’s the difference?
Zoom’s terminology can be confusing, so let’s clarify things. Cloud recordings simply mean that Zoom captures your recordings over the internet and then stores them online. You’ll need a paid account to do this.
Now, things get confusing with Zoom’s local recording. Local recording generally refers to any video or audio your device captures directly without an internet connection. This protects your files from faulty internet connection, which can reduce your recording’s overall quality. It’s important to mention that technically, Zoom’s local recordings are not actually like this.
Zoom only stores your files locally on your device; all recordings remain online. This means your recordings are still susceptible to your connection, and this could lead to lower resolution or glitchy video.
Why is my Zoom video quality so poor?
Zoom has limited HD recording capabilities and relies on a stable connection to the internet.
The platform adjusts your video quality based on your connection, so even if you have HD recording enabled, you won’t get HD quality with a poor connection. Our article above suggests some ways to circumvent this limitation.
Does Zoom support 1080p resolution for recording?
Zoom only supports 1080p resolution for Enterprise or Business accounts and only for the active speaker. Attendees can only request the activation of Full HD feeds when streaming large-format events and webinars.
Can Zoom handle a 4K video?
Zoom does not currently support 4K video. The highest possible Zoom resolution you can achieve on the platform is 1080p.
What is the best way to improve your Zoom recording resolution?
You can improve Zoom resolution by enabling HD video and optimizing your internet connection. The article above provides instructions on adjusting Zoom video settings and tips on boosting your internet connection during recording.


.png)

