Table of contents:
Why should I list my podcast On Spotify?
How to start a podcast on Spotify: 5 Easy steps
1. Open and set up your Spotify account
2. Add your podcast on Spotify
4. Optimize your podcast on Spotify
5. Publish and distribute your Spotify podcast
Spotify’s podcast requirements
Key takeaways:
- Starting a podcast on Spotify is completely free.
- It takes only 5 easy steps to start a podcast on Spotify from scratch.
- Use the Riverside integration to create an audio or video podcast directly on Spotify.
- If you have an existing podcast, just link your RSS Feed to Spotify.
If you’re new to podcasting, getting your podcast on Spotify is a must.
With more than 626 million users, Spotify is one of the most popular podcast platforms, right up there with Apple Podcasts and YouTube. It's a leader in the field, already integrating useful features like video.
But where to start?
Here's your ultimate guide on how to start a podcast on Spotify. Whether you’re uploading a podcast to Spotify—or creating something from scratch—we'll cover each step.
Why should I list my podcast On Spotify?
Having your podcast listed on Spotify is one of the best ways to get your show heard. It’ll help you receive new traffic, boost your legitimacy and reputation, and collect data and reviews from your listeners, especially since it’s one of the top directories in the world.
How to start a podcast on Spotify: 5 Easy steps
Starting a podcast is surprisingly simple with Spotify and Riverside. The easiest way to do this is through Anchor's podcast hosting platform, now known as Spotify for podcast.
Read on for a step-by-step guide on how to submit a podcast to Spotify.
1. Open a Spotify account
Go to the Spotify for Podcasters site and click “Get Started”.
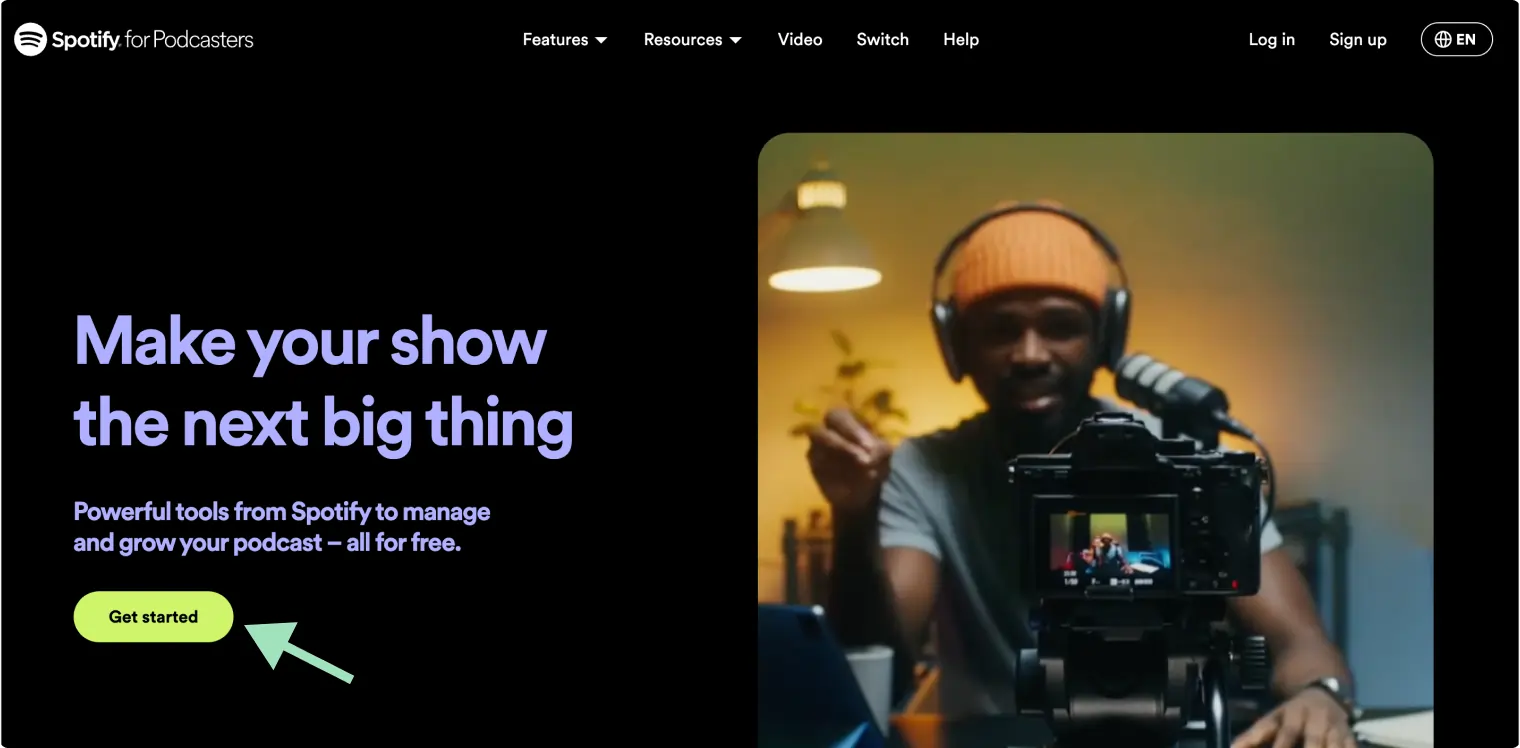
Log into your account or create a new account. Simply click “Sign up for Spotify” and follow the prompts.
Note that you’ll need to agree to the terms and conditions Spotify stipulates by signing up.
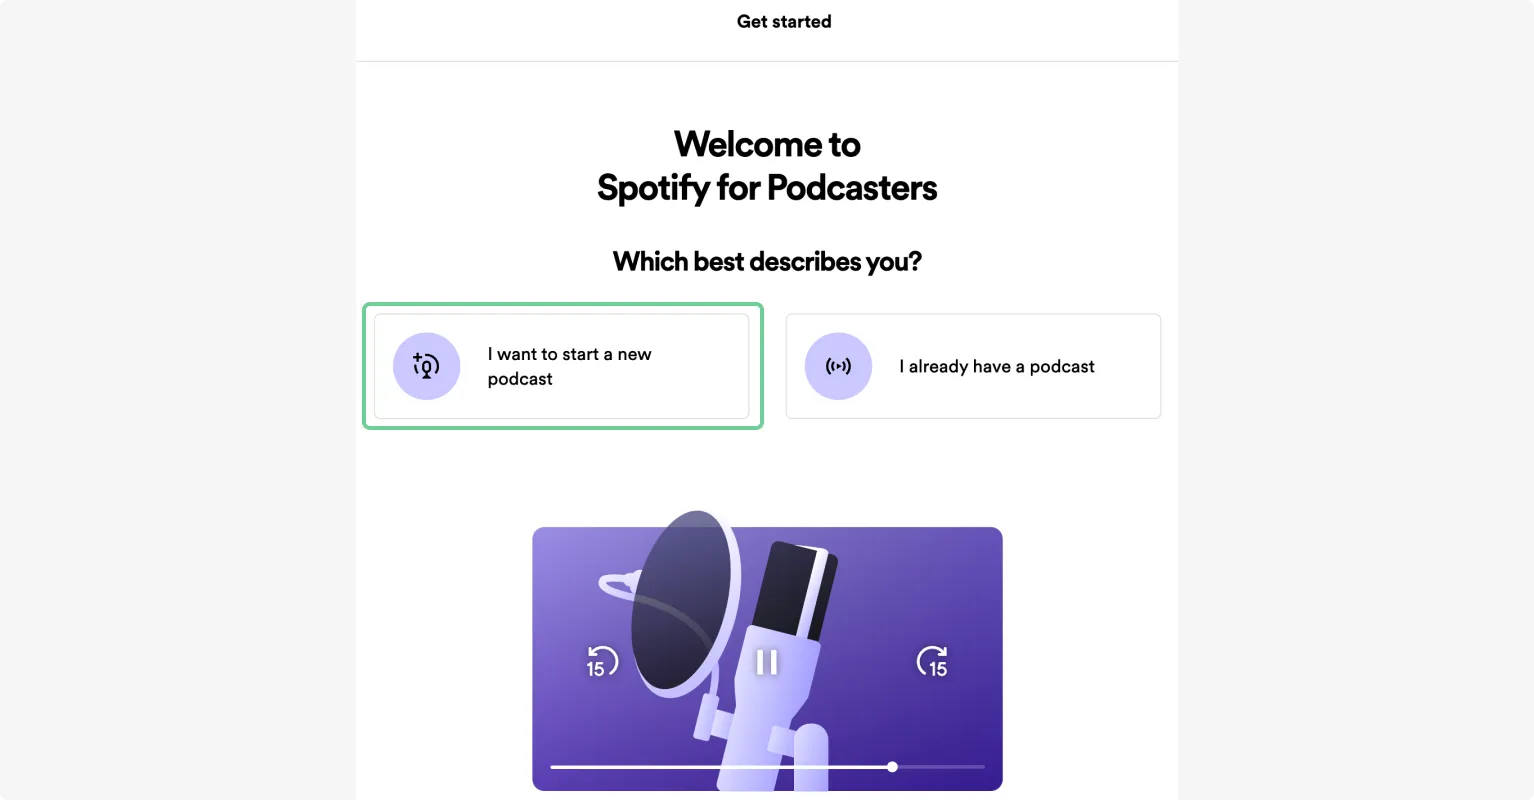
After signing up, you’ll get asked whether you’re creating a new podcast or already have one. Select “I want to start a new podcast”.
2. Add your podcast on Spotify
First, you’ll actually want to set up your podcast on Spotify.
On the welcome page click on “Go to podcast setup” under “Set up your podcast”.
Here you can fill in your podcasts’:
- Name
- Description
- Category, and
- Language
When you’ve completed filling in these details, select “Continue” before moving to the next step and adding your first episode(s).
3.Record your first episode
After setting up your podcast, click “Let’s do it” under the “Add your first episode” section.
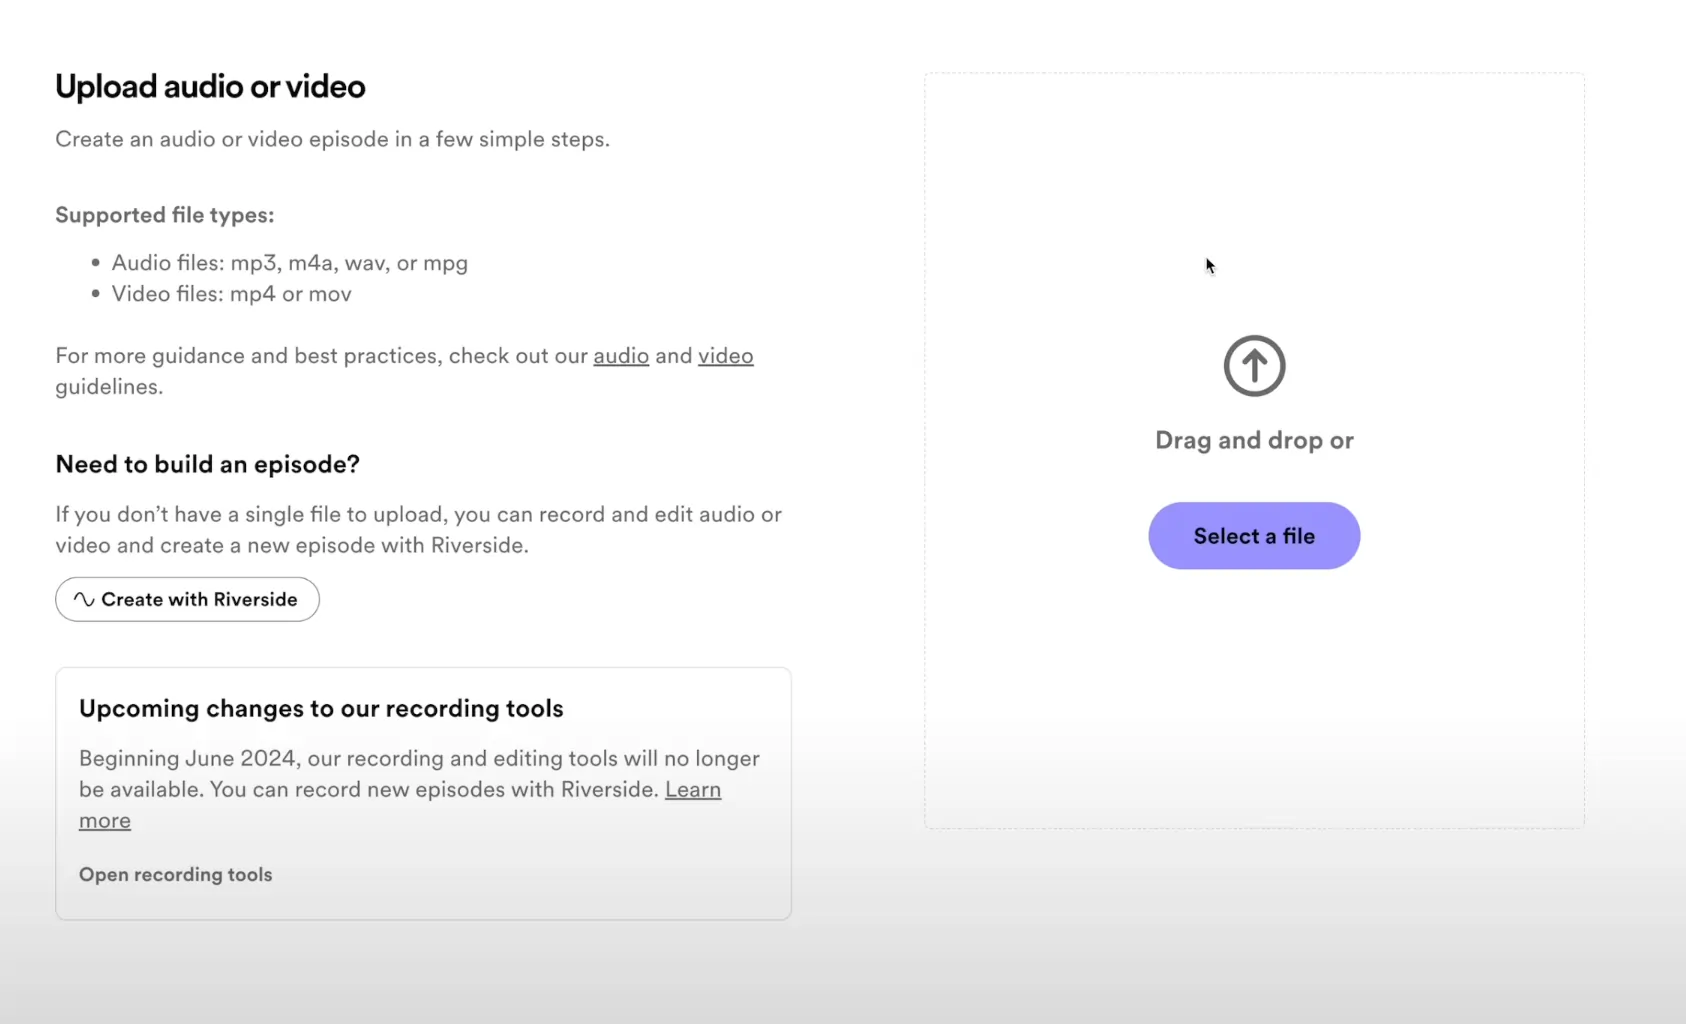
You can upload video or audio you've recorded elsewhere by clicking “Select a file”.
Or, you can create a podcast from scratch using Spotify’s Riverside integration by clicking “Go to Riverside”.
You’ll see a pop-up, click “Let’s go” and you’ll get directed to the Riverside creation tools.
Recording an audio podcast with the Spotify x Riverside integration
Log in if you have an existing account or create a new one. You’ll then have the option to record or edit an episode.
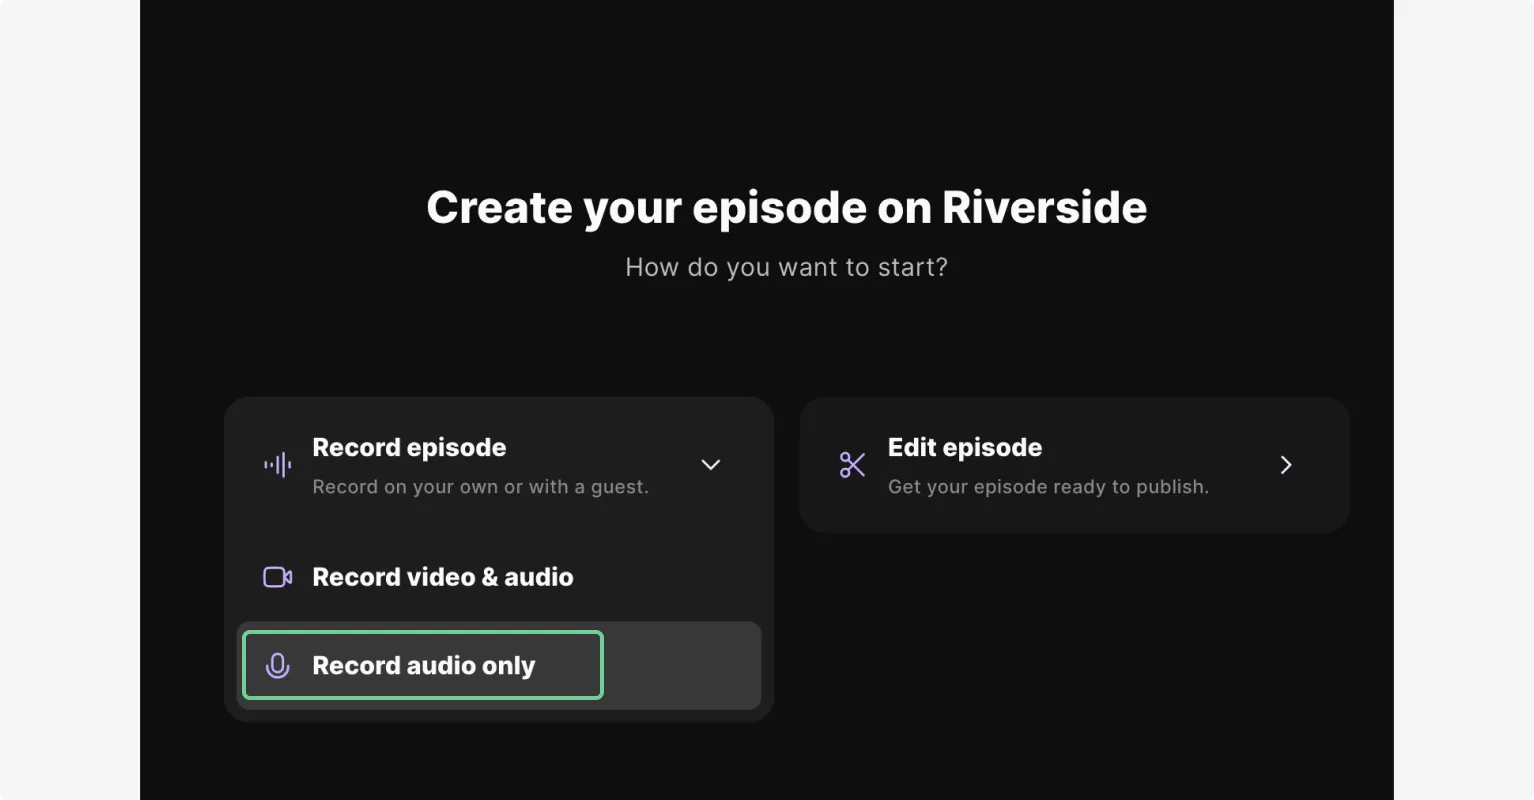
Hover over “Record episode” and then select “Record audio only”.
In the studio, you can invite others to join your recording. Click on the “copy link” button to share a link, or click “Invite by email” to send invites.
Whenever you and your guests are ready click the “Record” button to start recording. Each person’s audio will record on a separate track for easier editing afterwards.
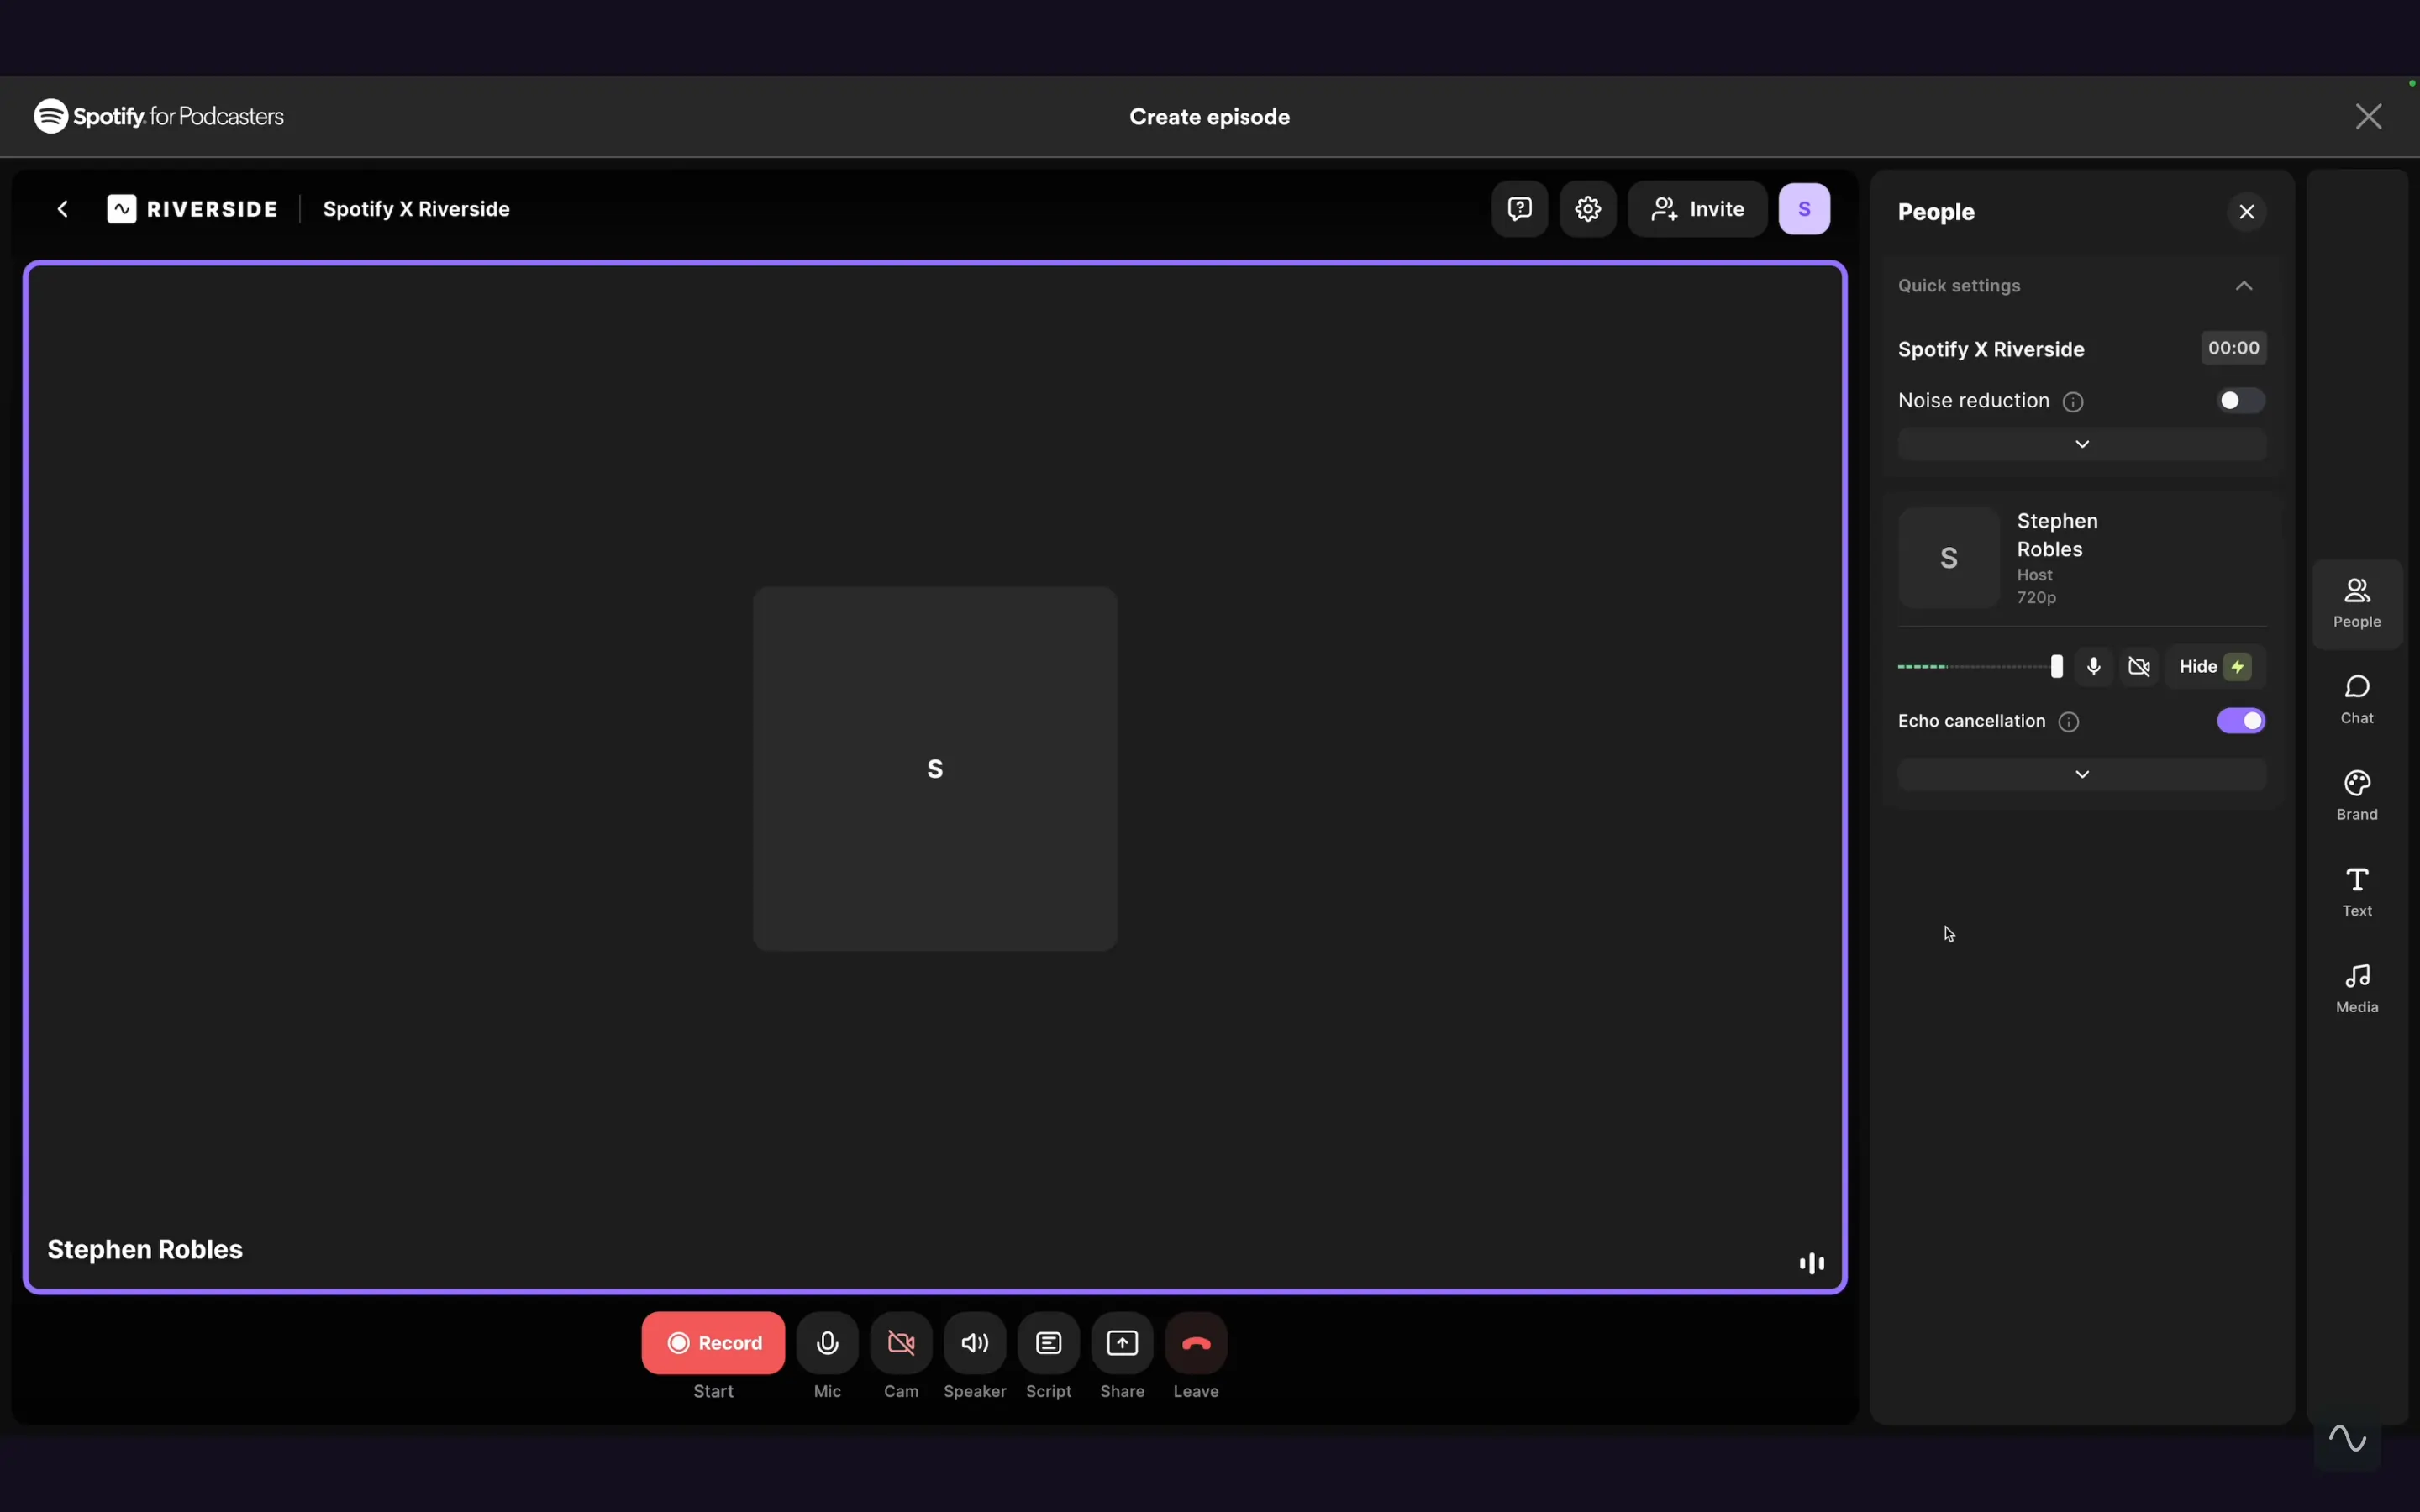
Once you’re done recording, click “Stop” and then after everything uploads click “Start editing”.
Editing your Spotify podcast on Riverside
In the editor you can complete your episode.
Start with cutting your audio.
If you’re using text-based editing, select the transcript text of the parts you’d like to remove and then click “Delete”. You can also select the three-dotted menu and then “cut” and paste the text elsewhere to move it around.
Alternatively, edit the audio files with our traditional waveform editor. The timeline is color-coded and has chapters for easy organization. Place the cursor anywhere and click the split button on the top left of the timeline. This will create a cut. Once you’ve created clips, you can move them around freely and even upload new audio or media.
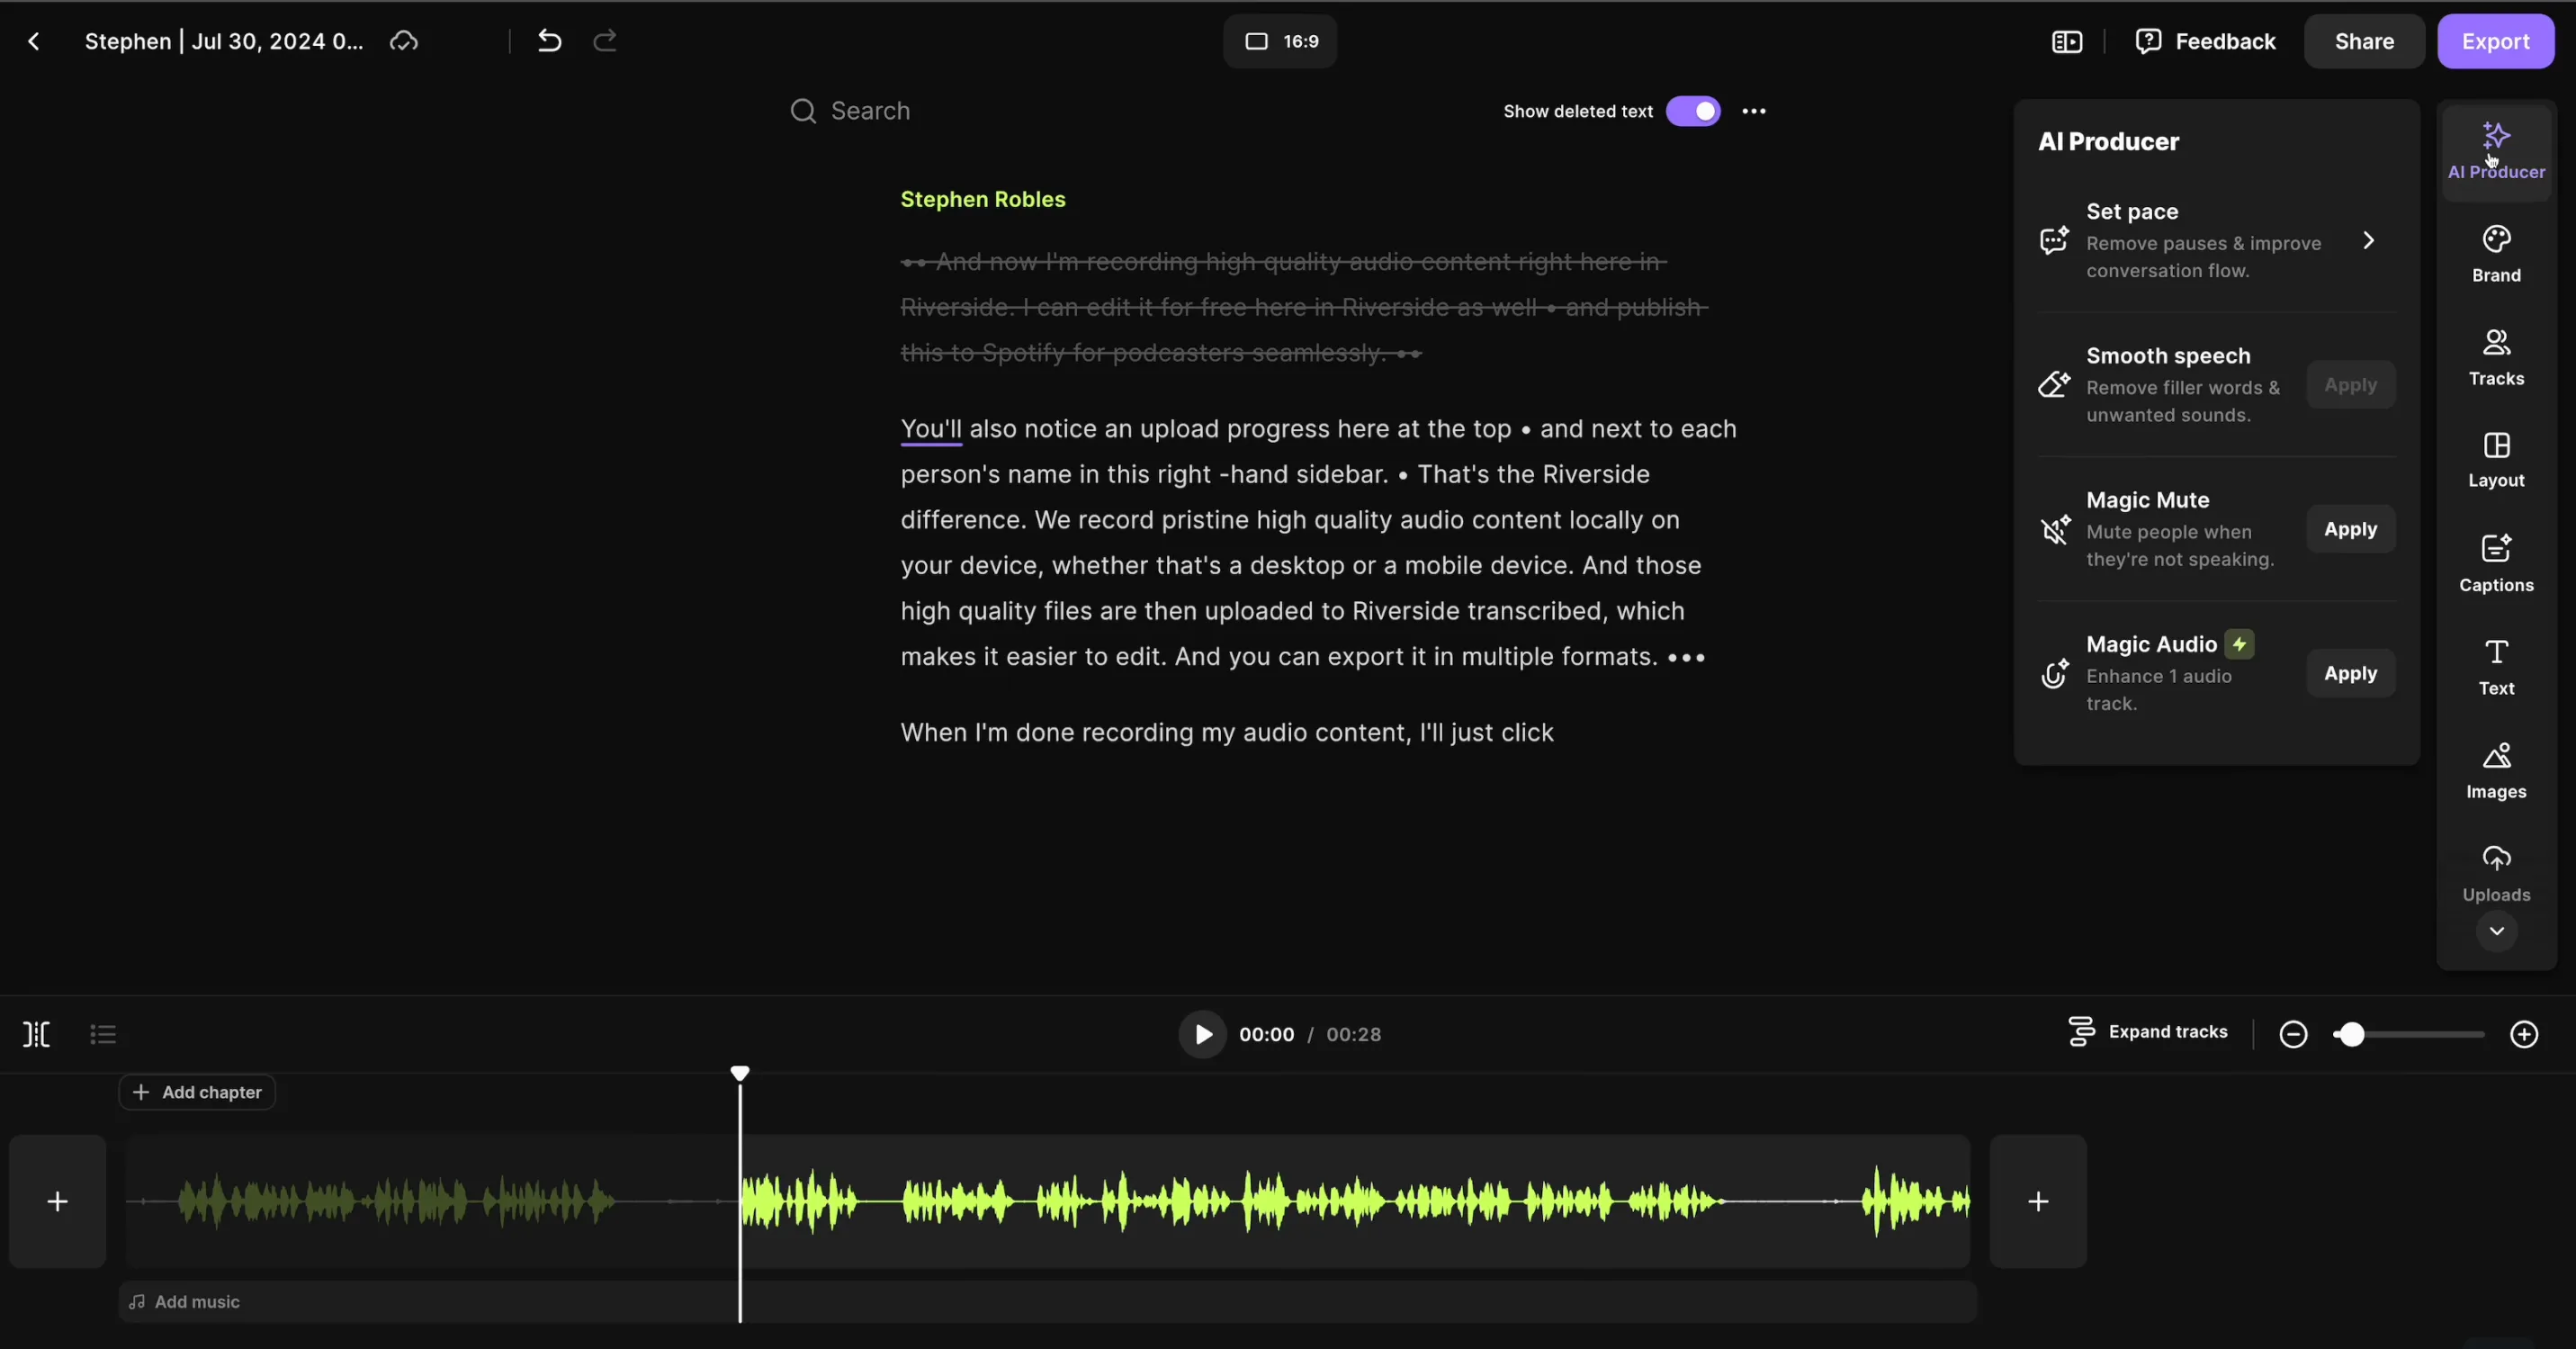
Polish your edit with the AI Producer features located at the top of the right toolbar.
Is the conversation moving a little too slowly? Here you can set the pace of your audio with automatic silence removal. Plus, you can use Magic Audio for automatic audio enhancement that will clear background noise, and normalize audio levels.
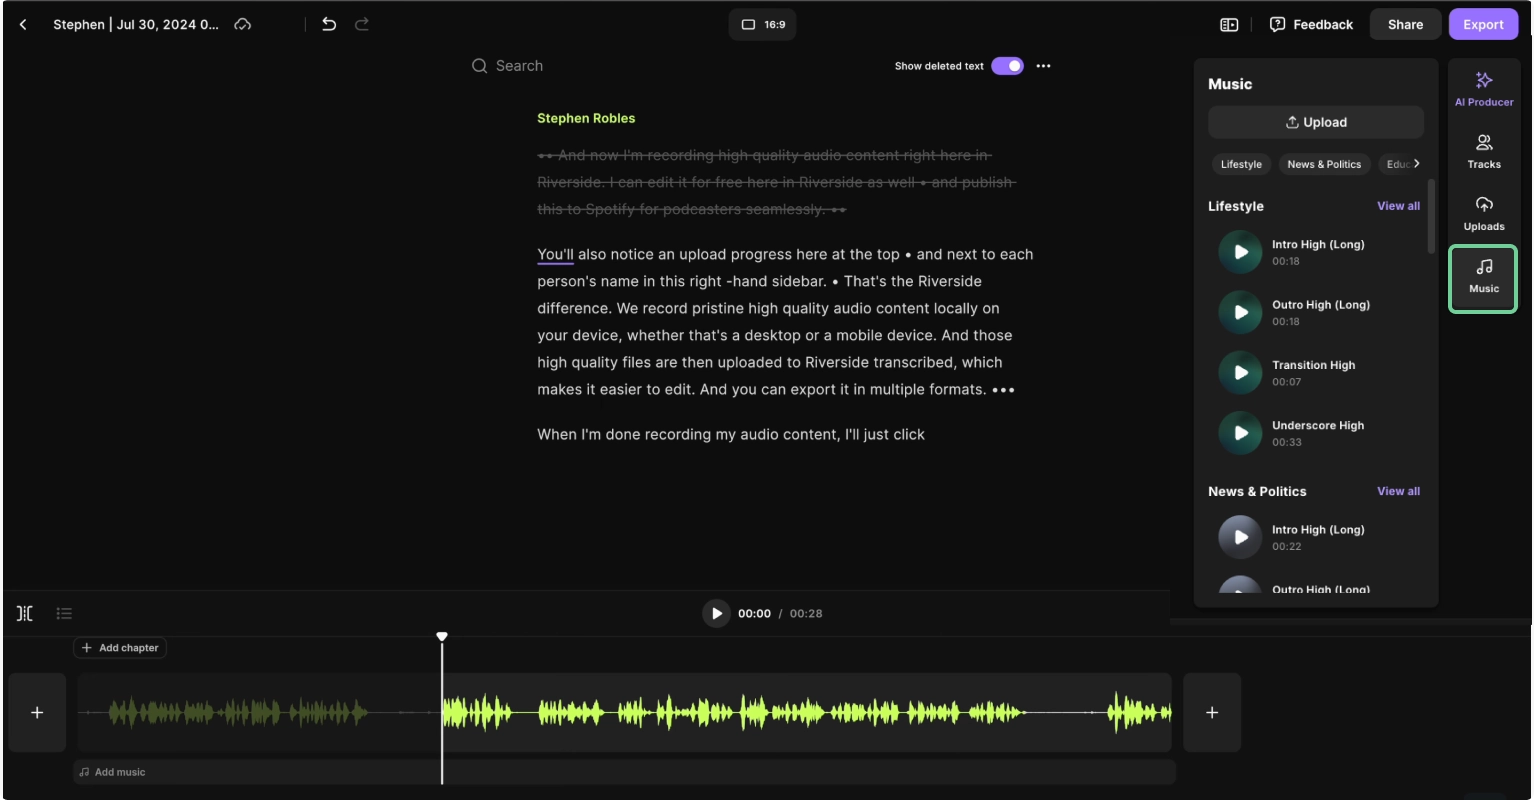
To end off, you can add music. Click the “Music” button on the toolbar to do this. You can select a song or upload your own, then click the “+” button to add your track. Your track will appear wherever your playhead is positioned in the timeline.
At this stage, you have a brand-new podcast episode ready to be published and distributed.
Export your Spotify podcast from Riverside
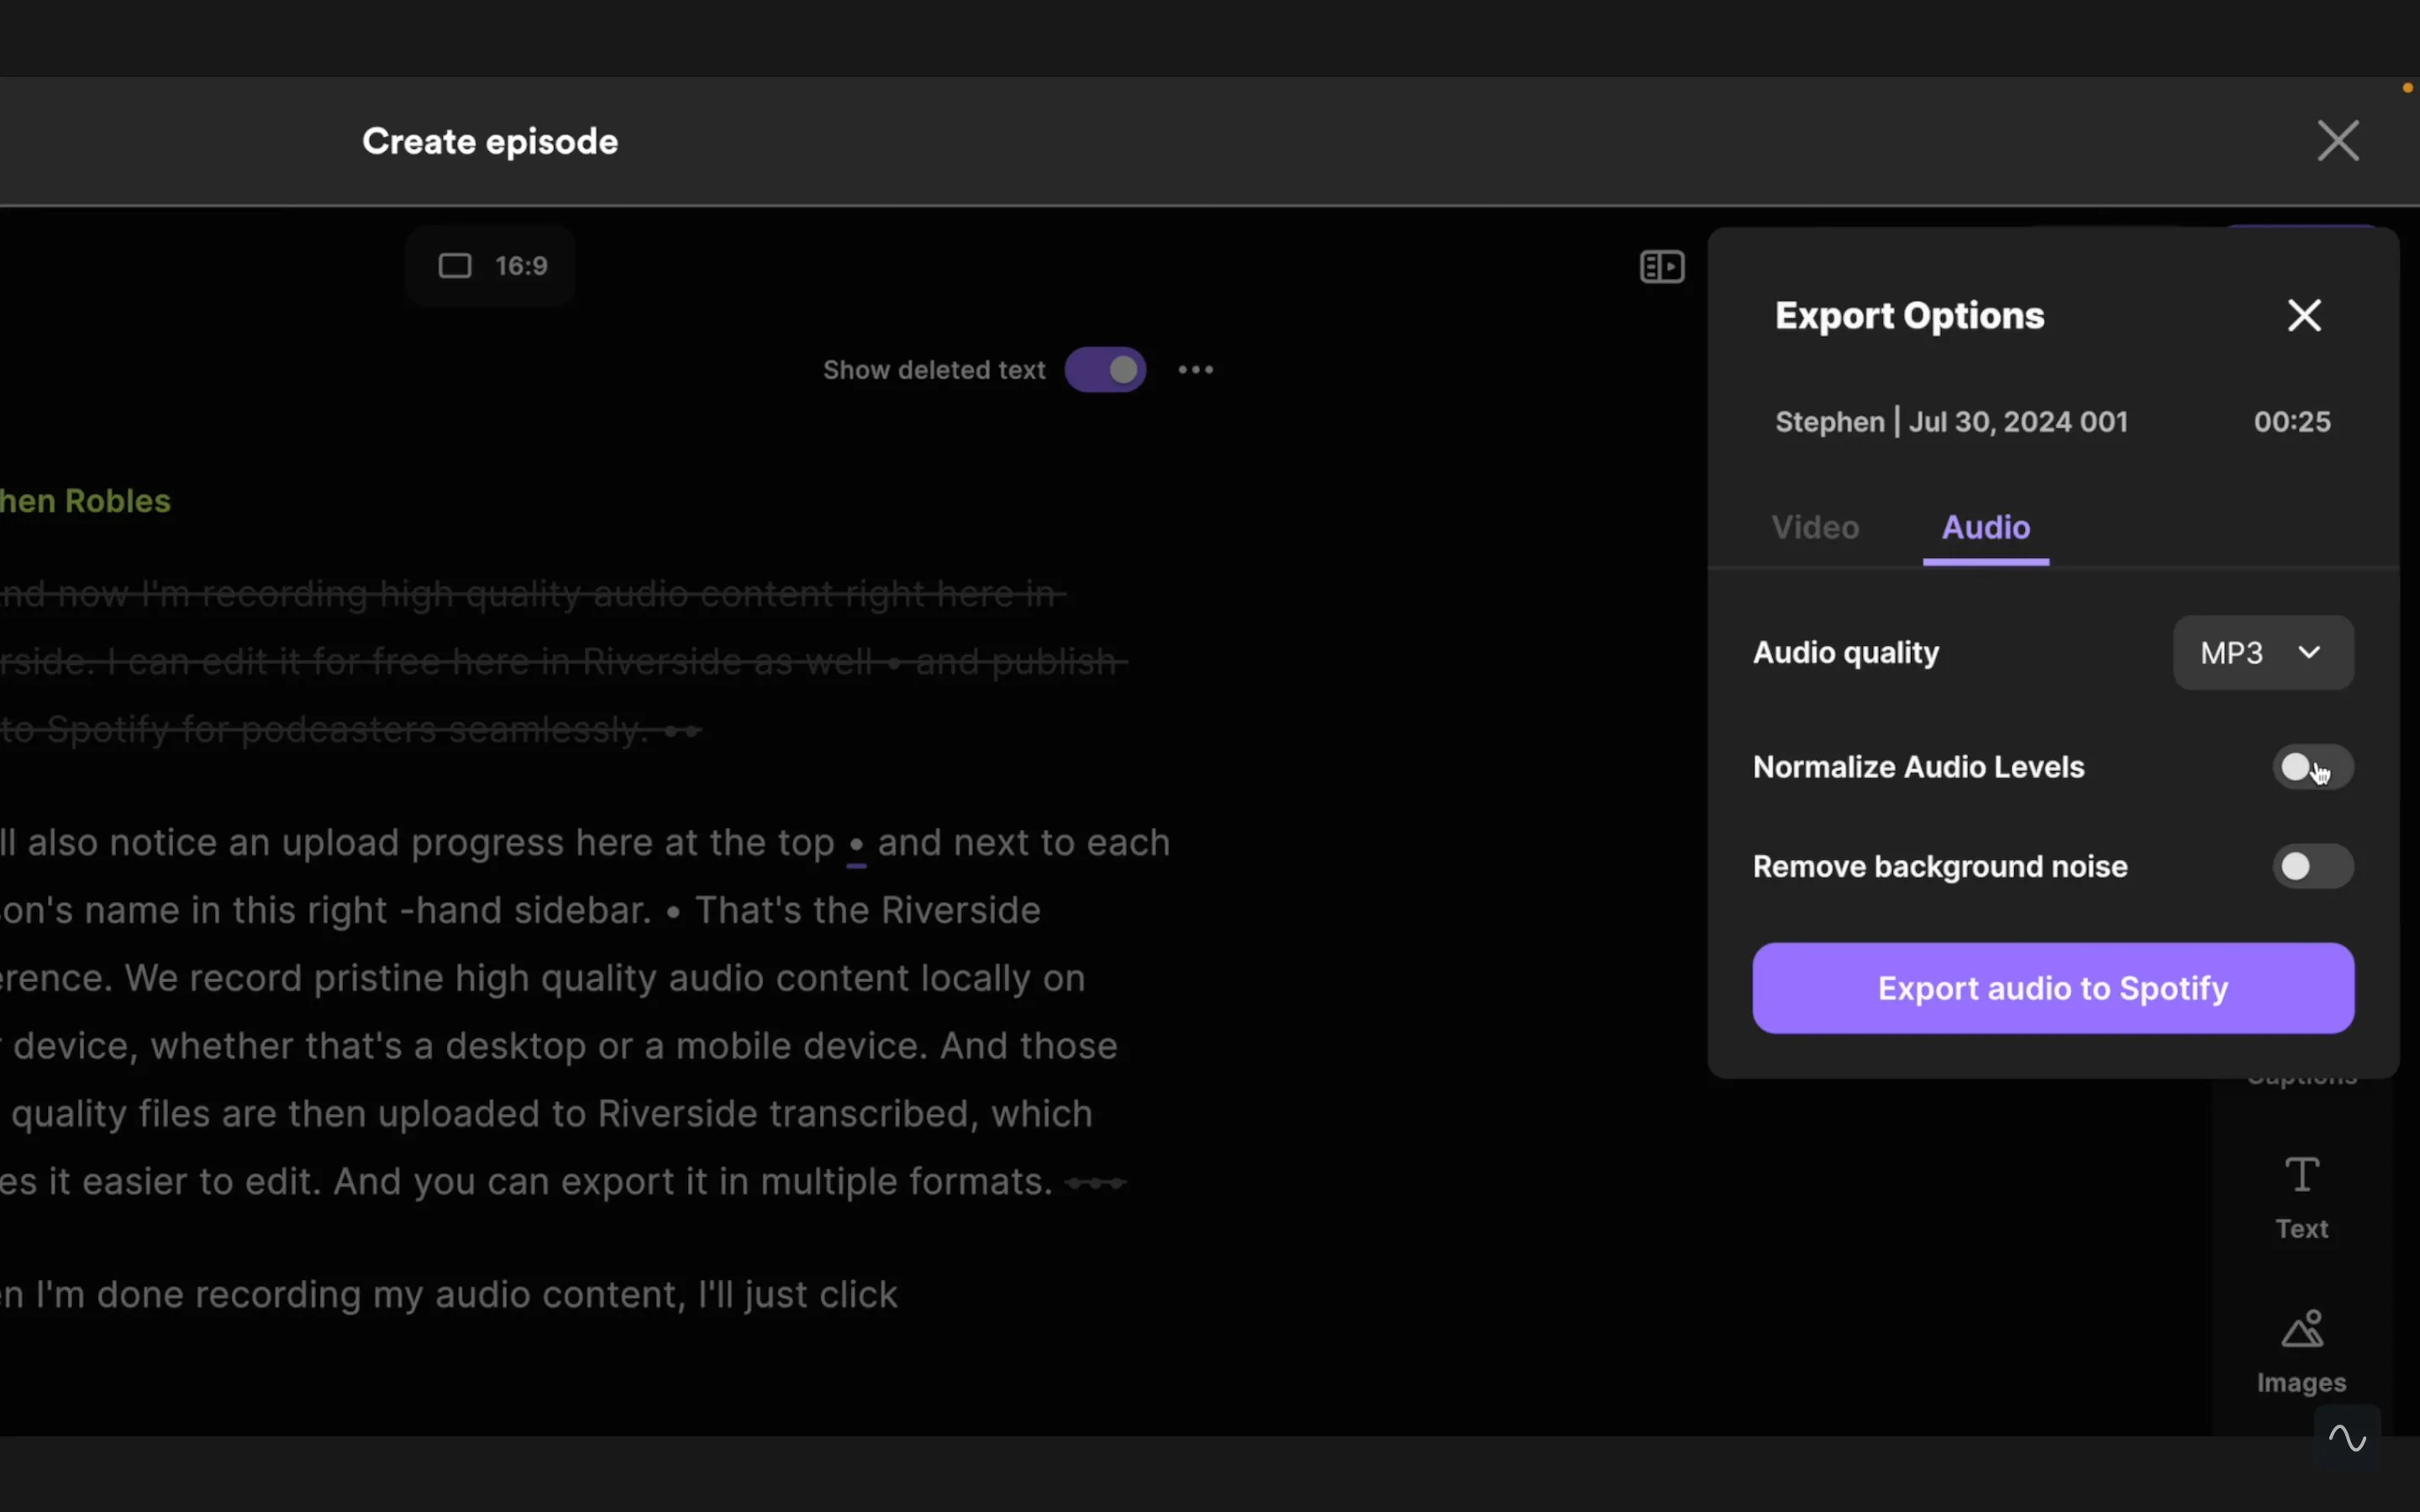
After editing, click on the “Export” button on the top right of the screen, and then click “Audio”.
Select “MP3” next to “Audio quality” as this is compatible with Spotify.
When you’ve sorted the settings click “Export audio to Spotify” and then your podcast will now automatically appear on Spotify.
Head back to Spotify for Podcasters where you can continue with filling in details before publishing.
Creating a video podcast on Spotify with Riverside
If you’re recording a video podcast, the process will be slightly different from the steps above.
You can follow this video for a full workflow or read on for the main changes.
Here’s what you’ll need to do differently:
Type of recording
After logging into Riverside from Spotify, you get prompted to choose a recording type. Instead of selecting audio only, choose video.
Hover over “Record episode” and then select “Record video & audio”.
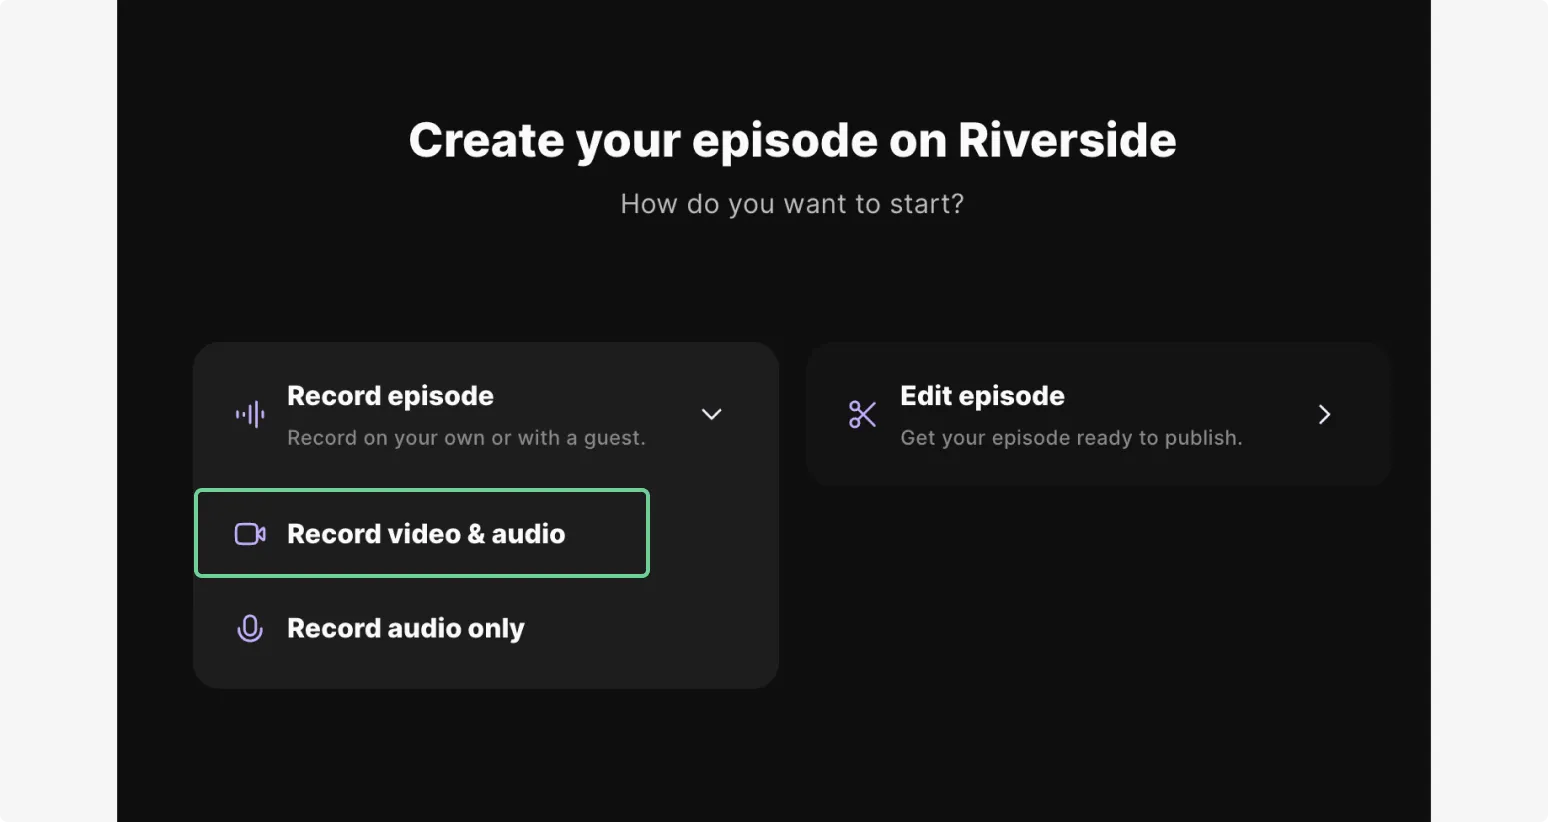
Unlike in the audio workflow, this directs you to the lobby. Here, you’ll need to accept microphone and camera permissions and select your equipment.
.webp)
Once you’re ready, click “Join Studio” to enter the studio.
Recording studio
You’ll see your webcam input on screen.
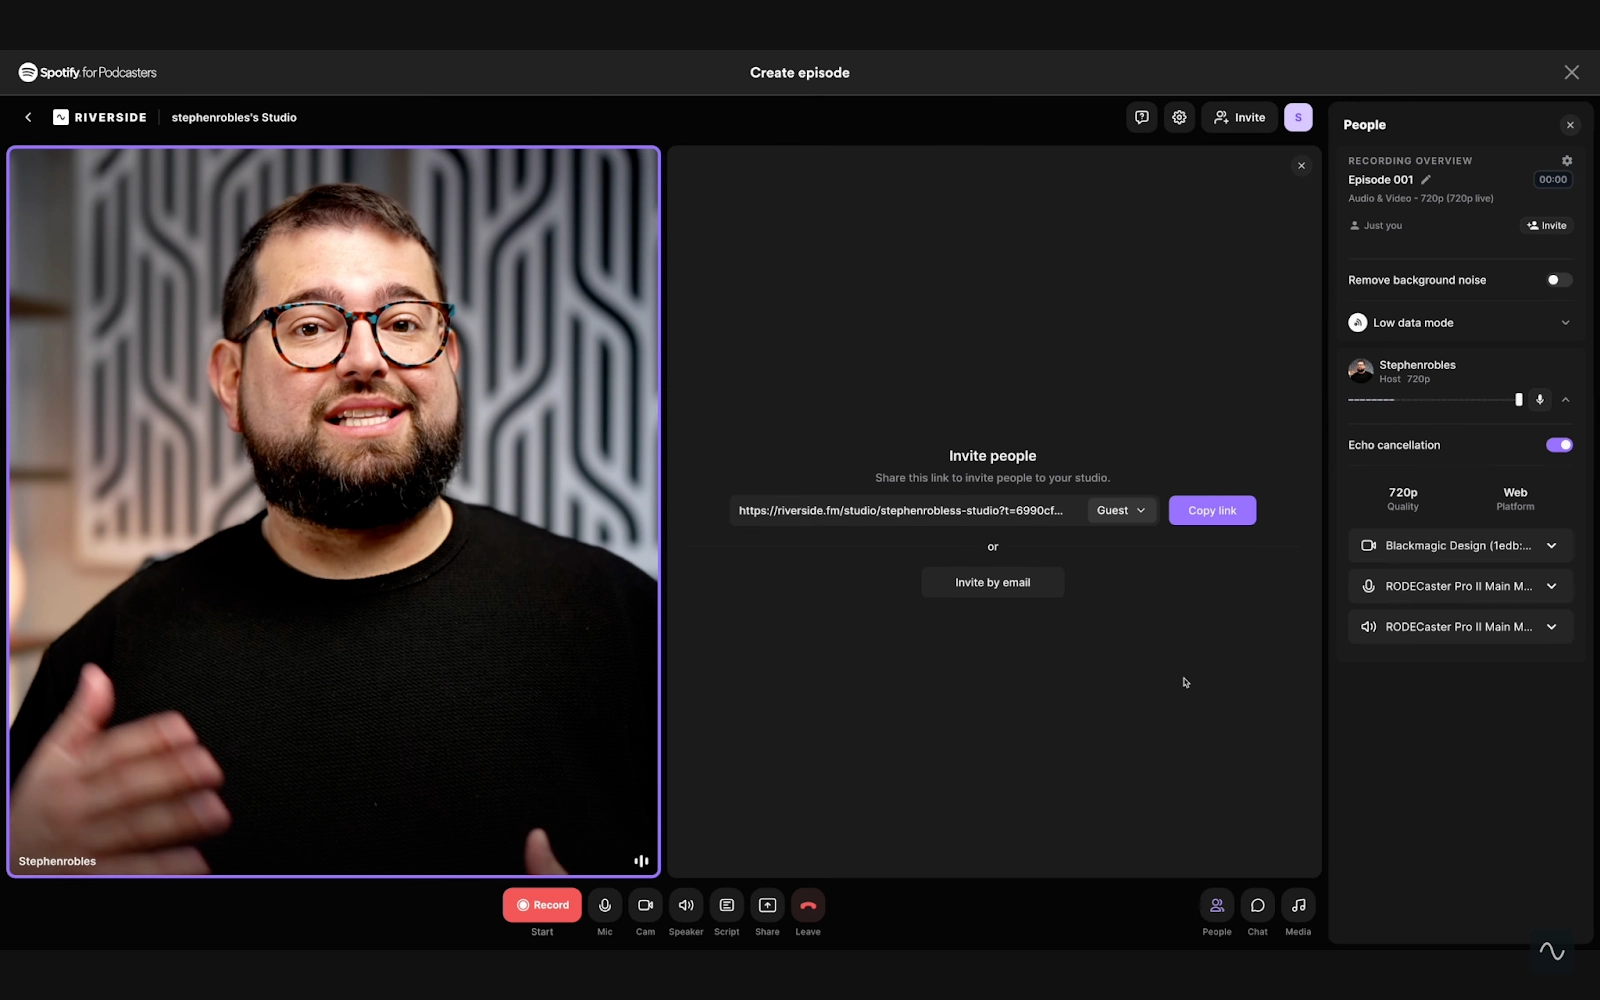
You can also share your screen or add visual media files instead of just music. Click the “Share” button to share your screen and the “Media” button for music or visual files.
As for the rest, you can follow the same workflow for audio.
You can select:
- “Invite” to send a joining link to guests.
- “Record” and the Stop button to start or end a recording.
Editing videos
You can still use the text-based editor, timeline, and audio enhancement tools. Same as with an audio recording, you can remove filler words and silences, clean up background noise, and normalize audio levels automatically.
But you’ll find more tools to customize your video, too.
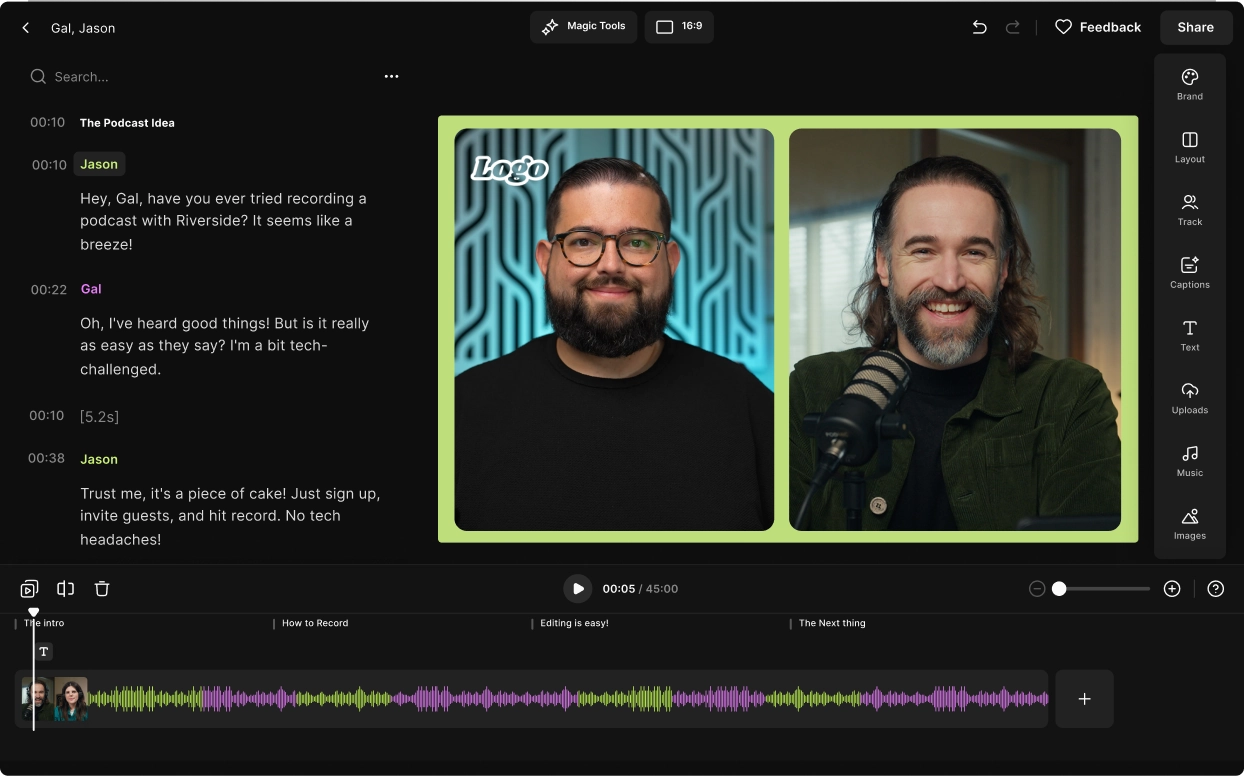
The side toolbar includes:
- Captions: Add your own dynamic captions and style them as you like.
- Text and image overlays: Create lower thirds or images for more context in your podcast.
- Brand: Upload your logo or a stylish background to weave your brand aesthetic.
- Layout: Choose between a grid view or an automated speaker view.
And more!
Exporting videos
Start by clicking “Export” in the top right corner, just like you did for audio.
You’ll get a video and audio tab. In the video tab, you can choose your video quality, normalize audio levels, and remove the watermark.
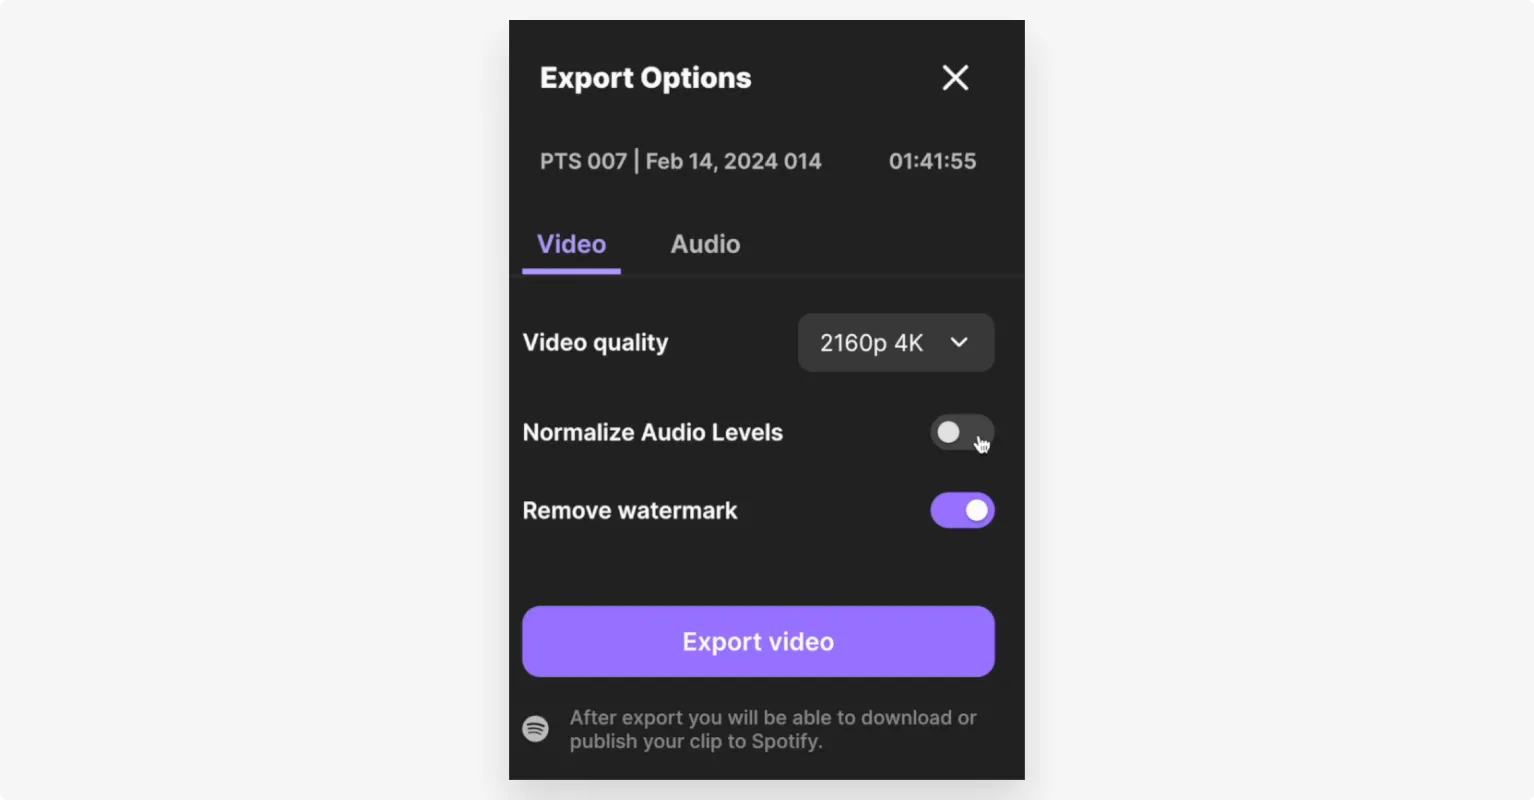
When you’re done, you can select “Export video”. Then select “Go to Exports” on the pop up that appears.
Here you’ll find the exported file. Hover over it and click the “Download” button. Your podcast will automatically appear on Spotify.
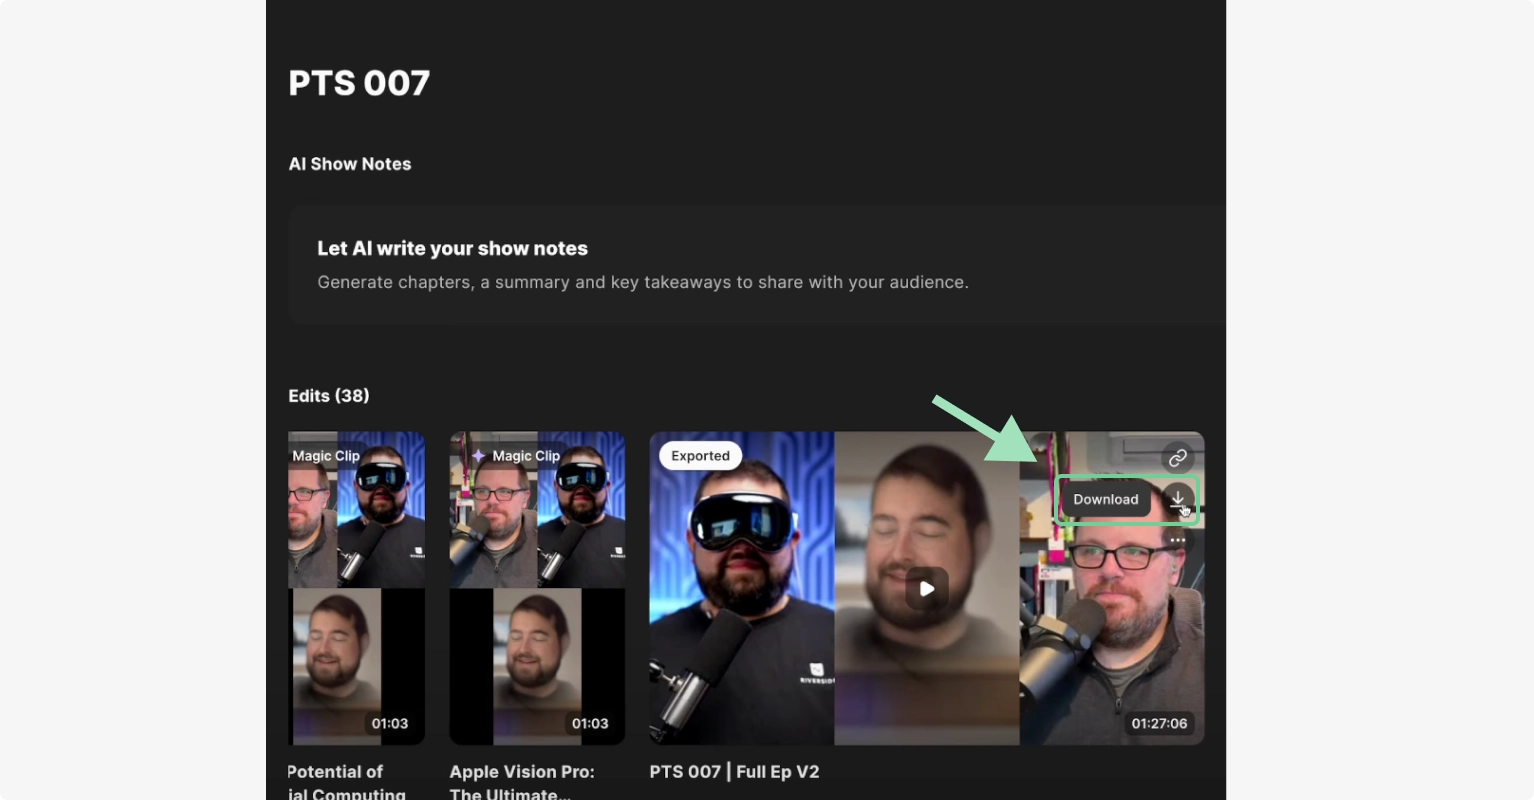
Note: You can export your video as an audio file if you want to save it as an audio-only podcast as well. To do this, select the “Audio” tab, adjust settings, and export. You can also check this podcast production checklist from Focus and Bloom Studios for some quick tips.
4. Optimizing your podcast on Spotify
To improve your podcast’s visibility on Spotify complete the following steps while uploading:
- Fill in all relevant details for each podcast episode.
- Use a unique and descriptive podcast name and episode titles.
- Provide thorough descriptions and use relevant keywords where possible.
- Choose appropriate categories to help listeners find your podcast.
.webp)
Riverside's Show Notes lets AI do your podcast summaries, takeaways, chapters and show notes—all in one click. So, you get the job done faster.
5. Publish and distribute your Spotify podcast
Enter the episode title, description, and other details on the displayed fields. You can choose to publish immediately or schedule for later. Specify if it’s a trailer, full episode, or bonus episode.
Click “Next.”
Enable comments or add polls to your episode if you like. Select “Next.”
Review all details and hit “Publish.
Boom! Your recording is now live on Spotify.
Read More: How to Publish a Podcast | Full Guides for Any Platform
Spotify’s podcast requirements
When uploading your own pre-recorded video or audio, these are the requirements you need to hit:
Audio formats
Spotify is compatible with:
- MP3, M4A, or WAV audio file formats.
They don't have a size limit, but using a smaller file size means faster uploads.
They recommend:
- A high bitrate of 128kbps+ for MP3s and MP4s with AAC-LC.
- A maximum episode length of 12 hours (roughly 2 GB @ 320 Kbps).
Image formats
Podcast cover art should:
- Be JPEG, PNG, or TIFF.
- Use a 1:1 (square) aspect ratio in the highest resolution possible.
- Have a max 640px - 10000px width and length.
- Encoded with an sRGB color space, 24bits per pixel
Video Files
Videos must:
- Be a MOV or MP4 format
- Have a single audio and a single video track.
They suggest the following settings:
- H.264 High Profile
- Aspect ratio:16:9
- Bitrate: Maximum of 25 Mbps for a video with 1080p resolution, or 35 Mbps for a 4K video
- Video resolution:1080p
- 8-bit color depth and 4:2:0 subsampling
There’s no size limit, but your video can’t be longer than 12 hours.
Metadata
- Besides podcast and episode descriptions, consumer-facing elements should not exceed 20 characters.
- Your RSS feed must include a unique podcast title, cover artwork, podcast description for at least one episode recorded, and the audio file uploaded to your host.
Check out Spotify's full guides for audio, images, video and their Podcast Delivery Specification guide
Note: If you’re recording your podcast on Spotify with Riverside, you’ll automatically meet the upload requirements.
How to upload an existing podcast on Spotify
If you already have a podcast on a hosting platform, link it to Spotify using an RSS feed from your host.
Besides meeting the above requirements, follow these steps:
Step 1: Go to Spotify for Podcasters and click “Get Started” to begin the setup process.
Step 2: Log into your existing Spotify account using the email associated with your podcast host to avoid any upload errors. If you don’t have an account, create a new one.
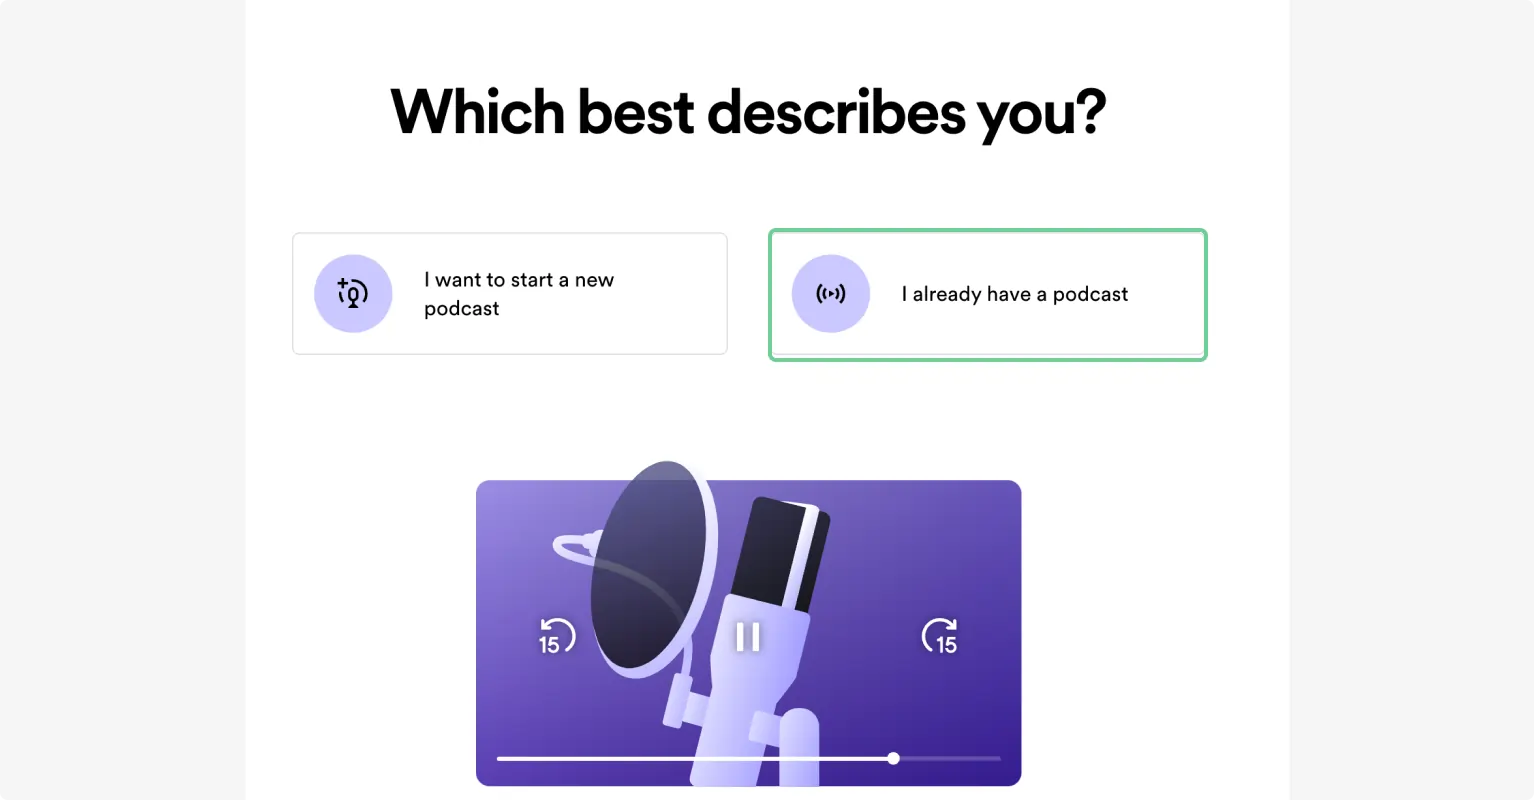
Step 3: As you already have a podcast, select “I already have a podcast.”
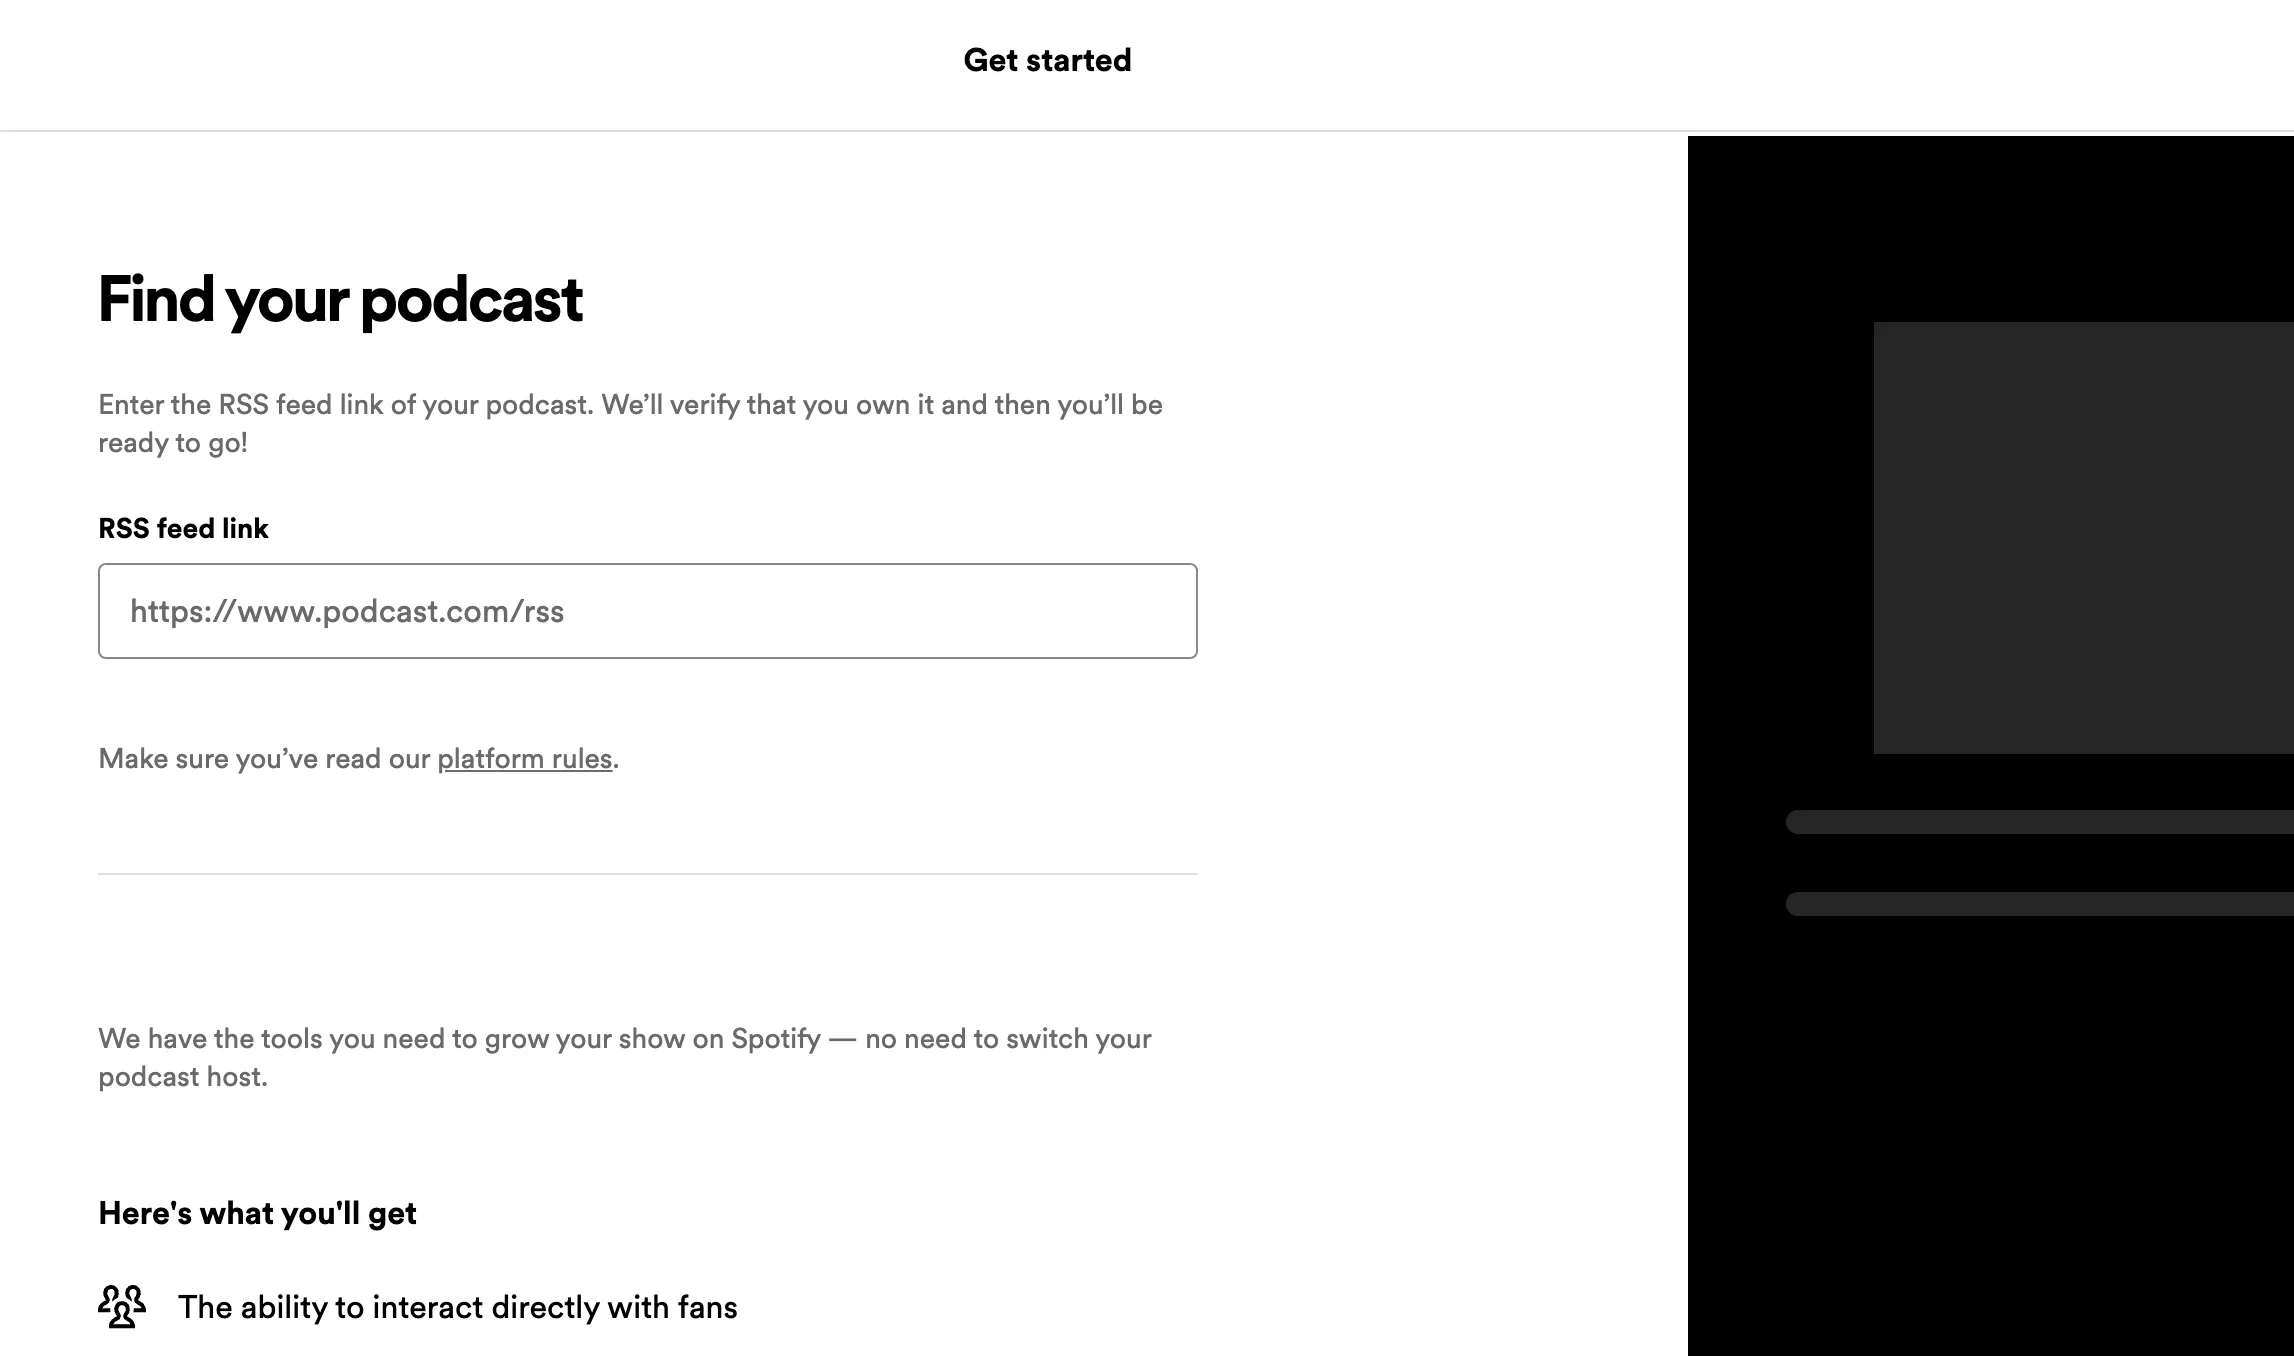
Step 4: Paste the RSS link of your podcast into Spotify’s entry box.
Step 5: Spotify will ask you to verify your podcast and that you are the podcast owner, by submitting a code sent to the associated email address.
Step 6: Add additional details like podcast category (you'll have a variety of topics to choose from), language, and country.
Step 7: Click “Submit.”
Seeing an error when adding an RSS feed link?
If you encounter an error while adding your RSS feed, it might be due to:
- Missing GUID: Your RSS feed is empty. Upload at least one episode to your host before submitting it to Spotify.
- Missing or unverified email: Ensure your RSS feed includes a valid email address and that it’s verified.
Keep this in mind to ensure a smooth upload process.
Additionally, note that Spotify won’t notify you when your show goes live, so keep an eye out. Once it’s live, share it on social media and use podcast-specific marketing tools for the best results.
FAQs on How to start or upload a podcast on Spotify
How long does it take for a new podcast episode to appear on Spotify?
Once you submit a new podcast episode, it usually appears on Spotify within a few hours to a day. The exact timing can vary due to server load and verification checks.
How do I change my podcast category on Spotify?
To change your podcast category on Spotify, just update the
How much does it cost to have a podcast on Spotify?
Listing your podcast on Spotify is free since the platform isn’t hosting your files but rather streaming them from your podcast host.
And Spotify for Podcasters is a free hosting service from Spotify if you need a place to host your files too.
Do Spotify podcasts make money?
Spotify itself does not pay you directly for podcasts. However, you can monetize your podcast through Spotify for podcasters’ monetization tools. This includes services for ads, paid subscriptions, and donations.
You can learn more below or in our full Spotify for Podcasters review.
How to monetize a podcast on Spotify?
Monetizing your podcast on Spotify is simple with these methods:
- Podcast Subscriptions: Offer exclusive episodes to subscribers. You need at least two published episodes and 100 listeners in the last 60 days.
- Listener Support: Accept monthly donations from your audience. This is available in the U.S. with the same requirements as subscriptions.
- Ads: Add sponsor-read ads to your episodes. This is invite-only and available in the US, UK, and Australia.
How do I see how many listeners I have on Spotify?
Here's how to check your Spotify podcast's analytics:
- Log in to Spotify for Podcasters.
- Navigate to your dashboard by clicking on your profile.
- View detailed analytics including unique listeners, total streams, and followers.
How does Spotify’s RSS Feed work?
Spotify uses your podcast's RSS feed to grab new episodes and updates automatically.
Once you submit your RSS feed, Spotify regularly checks for new content and updates your podcast’s page with any fresh episodes. This means your listeners always get the latest content without you having to lift a finger. Just make sure your RSS feed includes the essentials: podcast title, description, and at least one episode.
How do I find my podcast’s "Listen on Spotify" Badge?
You can find your podcast’s “Listen on Spotify” badge in the Spotify for Podcasters dashboard. After logging in, go to the "Marketing" section, where you can generate and download the badge. You can use the badge on your website, social media, or any promotional materials to guide listeners to your Spotify podcast.


%20(1)%20(1).webp)


-%25255B2021%25255D.webp)

.webp)


