


Table of contents:
What is a Split Screen Video Recording?
Why Make a Split Screen HD Video Recording?
How to Make a Split Screen Video With Any Video Maker
How to Make Split Screen Videos on a Mac
How to Make Split Screen Videos on a PC
How to Make a Split Screen Video on a Mobile Device
How to Make an HD Split Screen Video With the Riverside.fm Editor (The Easy Way)
From podcasters to TikTok personalities, every type of content creator has found ways to use side-by-side videos to make engaging content their followers love.
A split-screen video presents eye-catching podcast interviews, live streams, and other forms of content, but creating one can take a lot of time and effort. Although, with the right tools, you can streamline the process and complete side-by-side video editing in only minutes.
We’re here to show you how to make a split screen video the easy way. Read on to learn what a split screen is, and how you can record one in HD easily.
What is a Split Screen Video Recording?
A split screen video is a video with two or more shots in a single frame. You can apply this effect in many ways:
- Podcasters employ side-by-side video during interviews to show hosts and guests onscreen at the same time.
- Musicians use it to perform duets with other artists across the globe.
- Video influencers use YouTube split-screen videos to show their reactions to other content that's popular on social media.
We'll explore how to put two videos side by side to make a split-screen video on a PC, Mac, or mobile device. Tools like the Riverside Editor let you do it in no time at all.
Why Make a Split Screen HD Video Recording?
A split-screen HD video recording will make your content look polished, professional, and help you stand out from all of the other video content out there. But creating a quality HD split-screen video can take time, and not everyone chooses to spend the effort performing all of the editing necessary. The Riverside.fm Editor gives you an advantage because it simultaneously improves your video quality and reduces the amount of time you spend doing side-by-side video editing.
How to Make a Split Screen Video With Any Video Maker
Every video editing program is going to be a little different, but, no matter the software, you can expect the following steps to put multiple videos side-by-side on one screen:
Step 1: Import your files
No matter what split-screen video editor you’re using, your first step is to import your recordings into your editor.
Make sure that your video files are compatible with your editing software before uploading. Then, select the recordings you’d like to create a split-screen video with and add them to your computer so you can import them into your editing software. Some editing software might require you to import in a specific way, but generally, there will be an import or upload button that should allow you to upload files from your media library.
Step 2: Organize your files
Your next step is to place your video files in the timeline of your video editing software and organize them for editing. You might want to place them in a specific order.
Step 3: Split your recordings into side-by-side videos
First, click on the video files to use them in your side-by-side video. Some software might have an automatic split-screen button or feature that will create a split-video-screen layout for you. In this case, you may have to choose if you want to split your screen horizontally or vertically, or you may have to decide on a layout.
Other software might require you to split your screen manually. While this might take longer, this could give you more control in terms of what dimensions you want for each side-by-side video. For example, if you want one video to be much smaller than the other, this might be a better way to get your desired look.
You’ll likely have to overlay your two videos and then resize or crop them in order to do this.
Step 4: Edit your split screen video
Complete any edits you need to make to your videos. This includes syncing it, adding EQ (and making other audio edits), improving the video quality, adding frames to your files, and reframing your footage.
Step 5: Export your split screen video
When you’ve finished editing, render your final file and export it to share on your favorite platforms.
Make sure you’re exporting your video in the right format, suitable to where you intend to post.
Set aside enough time, as editing a side-by-side video can take quite a while. You can save time with the Riverside Editor. This feature streamlines the process and does the editing for you. You can spend less time doing post-production work and more time recording quality videos.

How to Make Split Screen Videos on a Mac
Creatives celebrate Macs for the power they offer when it comes to designing and editing media. It comes as no surprise you can find many exceptional video editing programs for Mac to make a split-screen recording.
How to Make a Split Screen Video for Free Using iMovie
iMovie, the built-in program for video editing, is great for creating split-screen videos. Plus, you don't have to worry about downloading or paying for a new program. Follow the steps below and you’ll have a side by side video you can use for your podcast or any other type of content:
Step 1: Create or open an iMovie Project on your Mac.
Step 2: Select the clips you want to use in your split-screen video and drag them into the timeline.
Step 3: Drag the first clip you want to use. Place it above the second clip in the timeline. Then, release it.
Step 4: Go to the top of the viewer and click the "Overlay Settings" button.
Step 5: When the dropdown appears, select "Split Screen"
Step 6: Once you can see your videos in a split-screen view, arrange them how you want them to appear by selecting "Overlay Settings" and then "Position".
Step 7: Complete any edits you need to make to sync the videos and improve the quality of the audio and video.
How to Make Split Screen Videos in Adobe Premiere Pro
Adobe Premiere Pro provides a powerful video editing program that's part of the Adobe Suite of programs. You can create a split-screen video in many ways using different plugins. We'll cover how to do it using Adobe Premiere Pro by itself:
Step 1: Import the video files into Premiere Pro from your computer.
Step 2: Place the video clips over the top of one another in the timeline.
Step 3: Edit the clips and make both files the same length.
Step 4: Select your first video clip and click "Effect Controls". Under the "Motion" section, find the "Position" option. Change the position proportion to 1920.0, 960.0 (This creates a split screen where the screen is split 50/50 between the two clips.)
Step 5: Select "Effects" from the control panel and use the search bar to find the "Crop" option. Drag the "Crop" option to your timeline and place it on top of your first clip.
Step 6: Click on your first clip and select "Effect controls". Find "Crop" in the menu. Use the position slider to adjust the size of your video and crop it to fit inside the split-screen frame the way you want it.
Step 7: Complete steps 4-6 for the second video clip.
Step 8: Complete any edits you need to make to improve the audio and video quality of your videos.
How to Make Split Screen Videos on a PC
When searching for a split-screen video maker for your PC, you can find many options on the market that let you create one.
Making a Side By Side Video in Corel VideoStudio
Many creators trust the Corel VideoStudio video editing software for their video editing needs. Follow these step by step instructions for how to make a split-screen video using Corel VideoStudio:
Step 1: Open Corel VideoStudio. In the Edit workspace, click the "Instant Project" button.
Step 2: Select "Split Screen" from the list of folders.
Step 3: Find the template you want to use for your video and drag the thumbnail onto the timeline.
Step 4: Locate the first video clip you want to use for your side-by-side video from your Library. Drag the video into the placeholder in your timeline and press "Ctrl" on your keyboard to replace the placeholder.
Step 5: From the "Player" panel, select the "Resize/Crop" dropdown. Click "Scale" mode. From here, you can resize your clip so that it fits inside the template window. You can also move the clip around and position it so that it fits into the window.
Step 6: Repeat steps 4 and 5 for the second video clip in your split-screen video.
Step 7: Make any adjustments needed to improve the audio and video quality of the clips for your side-by-side video.
Making a Side By Side Video in PowerDirector
PowerDirector's Video Collage Designer plugin uses templates to make side-by-side videos. Here's how to make a split-screen video with PowerDirector:
Step 1: Select "Video Collage Designer" from the "Plugins" drop-down menu in the top bar.
Step 2: Import the video clips you want to use into the Video Collage Designer.
Step 3: Select the preferred layout for your split-screen video from the available options.
Step 4: Drag your video clips into the numbered panes in the layout template you selected in step 3.
Step 5: Place your mouse over your video to access adjustments you can make to the video.
Step 6: Make any adjustments to the video, such as changing the sound volume, zooming in or out, and video framing, so the video fits inside the template frame.
Step 7: After framing the clips, adjust the border settings in the control panel on the right of the window. Change the border size and turn off "Frame animation" to create a traditional split-screen video.
Step 8: Open "Advanced Settings'' to make adjustments to the playback of your clips. Under "Match collage duration", select "Shortest Clip". If your clips are two different lengths, the shorter clip frame will show a frozen frame until the other video ends. So make sure to edit down your video clip, creating a split-screen video (if your clips have vastly different run times).
Step 9: Click "Ok" to add your split-screen video to your timeline.
Step 10: Make any adjustments needed to improve the audio and video quality of the clips for your side-by-side video.
How to Make a Split Screen Video on a Mobile Device
For the content creator on the go, a split-screen recording app for your mobile device provides the perfect solution when away from your computer. This option may not have all the capabilities of editing on a computer, but iPhone and Android recording apps enable you to create and upload a split-screen video from anywhere.
Here's how to make one using a recording app on your mobile device:
Make a Split Screen Recording With an iPhone or iPad
The same iMovie program available on Mac desktops is also available for iPhones and iPads. Follow these steps to create a basic split-screen recording on your iOS device:
Step 1: Create a new iMovie project or open an existing project in the iMovie app.
Step 2: Place your first clip in the timeline. You can also select a clip from a project you previously created.
Step 3: Tap the b sign to add the second video clip for your side-by-side video to the timeline.
Step 4: Select the second video. Tap the "More" (three dots) button.
Step 5: Click "Split Screen" from the menu. You can now view your videos on split-screen.
Step 6: To create the traditional split-screen look, place a line between your two clips. Do this by selecting "Overlay". Then tap the "Line" button.
Step 7: You can now adjust your images to how you want them to appear in your video. Your options include: moving the images from the left frame to the right frame (and vice versa). You can zoom in and out to frame the images. (Zoom using your fingers the same way you would when zooming in on anything while using your iPhone or iPad.)
How to Make an HD Split Screen Video With the Riverside Editor (The Easy Way)
The Riverside Editor feature takes out the complications of creating a side-by-side video. This feature significantly reduces time spent on making a video by streamlining the process using automation.
Instead of spending hours editing and adjusting your files, you can use the Riverside Editor to create an HD split-screen video the easy way with just a couple of clicks. The Editor will automatically do all of the work for you by improving the audio and video quality of your video. This feature produces high-quality HD split-screen video that will set you apart from other content creators.
Here's how to make one in just a few minutes using the Riverside Editor feature:
Step 1: Record your video on Riverside as usual and then go to the Recordings tab of the studio you captured them in.
You should be directed there automatically after recording, or you can go to your Riverside dashboard and select “View All Recordings” on your selected studio.
Step 2: Once you’re in your studio recordings select the exact recordings you’d like to edit.
Click on the “Go to Editor” button at the top right of your page to go to Riverside’s Editor.

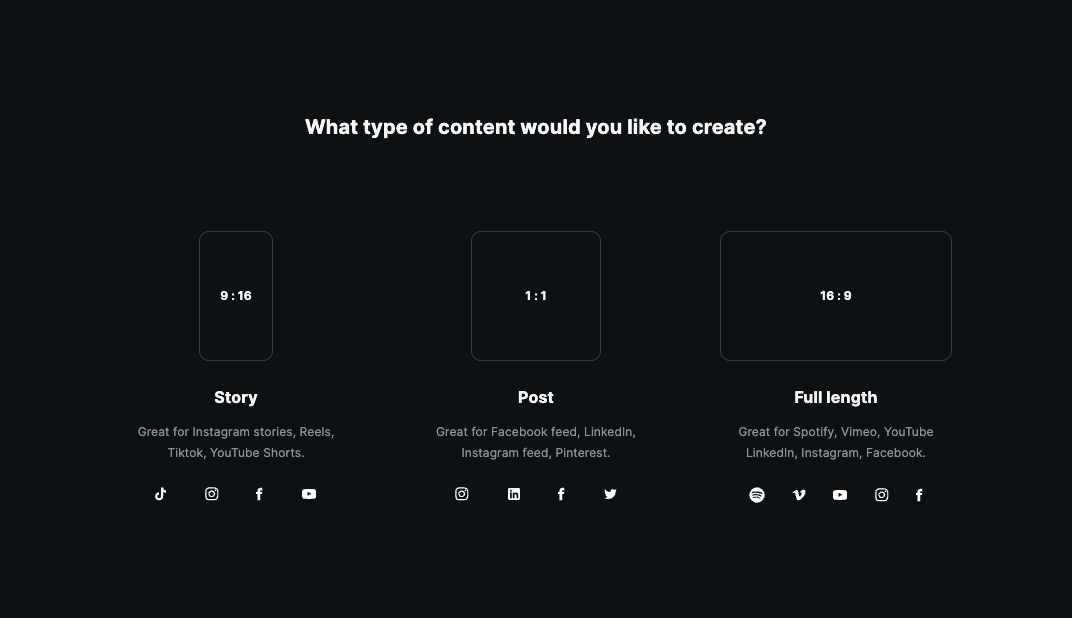
Step 3: Choose the type of content you’re creating, so you get the right video dimensions.
Step 4: In the editor, select the ‘Layout” icon to choose how you want your side-by-side video to look.
You can choose between:
- A grid side-by-side split video with or without gaps
- Shared or Splited AI Speaker Views: These layouts use artificial intelligence to display the current speaker as your main screen, with the rest of your participants on the side.

Step 5: Once you’ve chosen your split screen video layout, you can customize your video as you desire.

Step 6: Finally, name your file and select the “Export” button on the top right of the editor. Here you can choose what exporting options are suitable for your video before finally exporting.

Just like that your video is ready to be exported and shared online!
With the Riverside.fm Editor, you can easily make an HD split video online with just a couple of clicks. Take a look at this YouTube tutorial to watch the Editor in action and see in real-time how fast you can edit your content and create an HD split screen video:
Ready to create your own split-screen? Sign up on Riverside, to do it the easy way.
FAQs on How to Make a Split Screen Video
Is there an app where you can put two videos side by side?
Yes! As shown above there are various split-screen video apps. If you’re particularly looking for a split-screen app for your phone you can try:
- iMovie for iPhone
- Video Merge for Android
How do you do a 4 way Split Screen video?
If you’re using a good side-by-side video app the process shouldn’t be any different if you want to split a video screen into two or four. Although, be aware that not all editors are capable of this. With Riverside, you can record with up to 8 participants at a time and still split your screen in the Editor with all the tracks included.
Conclusion
Sure, you have plenty of options when trying to figure out how to make a split-screen video for your podcast. But most video editing software requires a lot of time adjusting your audio and video files to produce a video with decent quality. The Editor feature from Riverside.fm streamlines the process. You can make a split-screen recording that will make your content stand out with just a few clicks.


