---Riverside.webp)


Table of contents:
How to edit YouTube videos on your computer
How to edit YouTube videos with YouTube Studio
How to edit YouTube videos with Riverside
How to edit YouTube videos on an iPhone or Android device
How to edit YouTube videos on an iPhone or iPad
How to edit YouTube videos on an Android device
Basic video editing techniques to try for YouTube videos
TL;DR
- YouTube Studio has a robust set of video editing tools. You can trim your videos, blur certain screen areas, and add background music.
- Riverside offers an extensive range of video editing tools. In addition to standard video editing, you can automatically enhance audio quality, add captions and titles, plus so much more.
- Level up your next video production with advanced editing techniques such as using transitions, adjusting audio levels, applying visual effects, and other basic animations.
You’ve recorded powerful, engaging video content for your audience, and you’re ready to share it on YouTube. Except for one thing: editing your masterpiece.
Don’t worry, we’ve got you!
Whether you’re editing YouTube videos on your Mac or Windows device, or wanting to transform your mobile phone into a video editing tool, we’re here to hold your hand every step of the way.
In this article, we’ll give you easy-to-follow, step-by-step instructions to edit your YouTube videos directly in the platform.
Ready? Let’s get started.
Table of contents
- How to edit YouTube videos on your computer
- How to edit YouTube videos with YouTube Studio
- How to edit YouTube videos with Riverside
- How to edit YouTube videos on an iPhone or Android device
- How to edit YouTube videos on an iPhone or iPad
- How to edit YouTube videos on an Android device
- Basic video editing techniques to try for YouTube videos
- Bonus: Courses and resources for YouTube video editing
- FAQs on How to Edit YouTube Videos
How to edit YouTube videos on your computer
OK, so you’ve recorded your video, but what options do you have when it comes to editing directly on the YouTube platform?
Here are step-by-step instructions on how to edit with YouTube Studio and Riverside.
How to edit YouTube videos with YouTube Studio
With YouTube Studio you can trim, blur, and add music to your videos. Here’s how to do it.
How to trim a video in YouTube video editor
The video editor in YouTube Studio lets you easily cut the beginning, middle, or end of your videos. You can even do this on an existing video; the URL, view count, and comments will all stay the same.
Step 1: Log in to your YouTube account, and head over to “YouTube Studio.”
Step 2: Select “Content” on the left-hand side, and select the video you would like to trim.
Step 3: On the left-hand side select “Editor.”
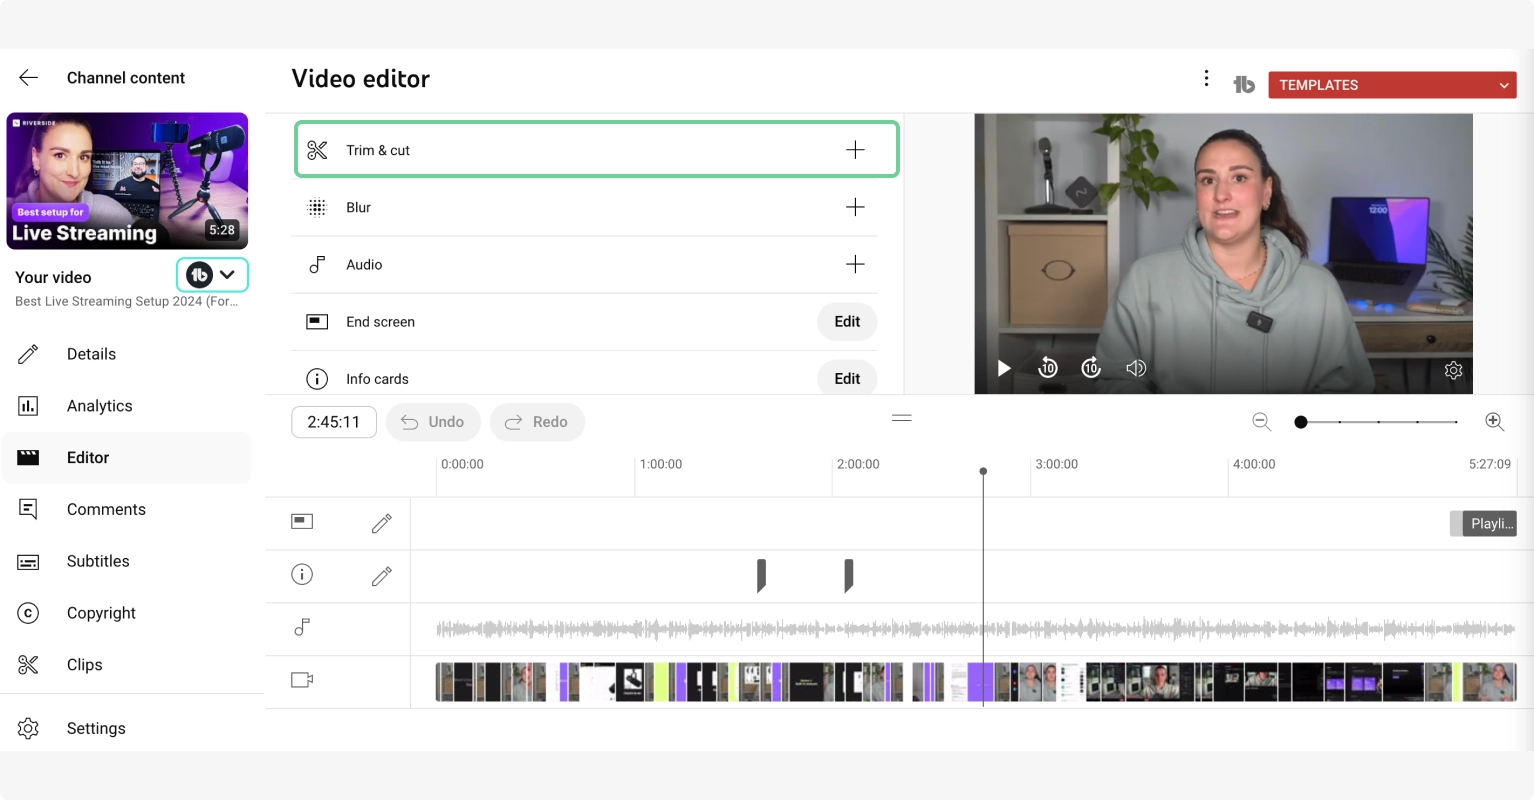
Step 4: When you click “Trim and cut,” just underneath the video editor, a blue box appears.

Step 5: Drag the ends of the blue box to cut out any unwanted content. Content that is not in the blue box will be removed. Use the video preview located top right of the screen to check your edits.
Step 6: To trim the middle of your video, you’ll need to select “+ NEW CUT.”
Step 7: Once selected, you will see a red box appear.
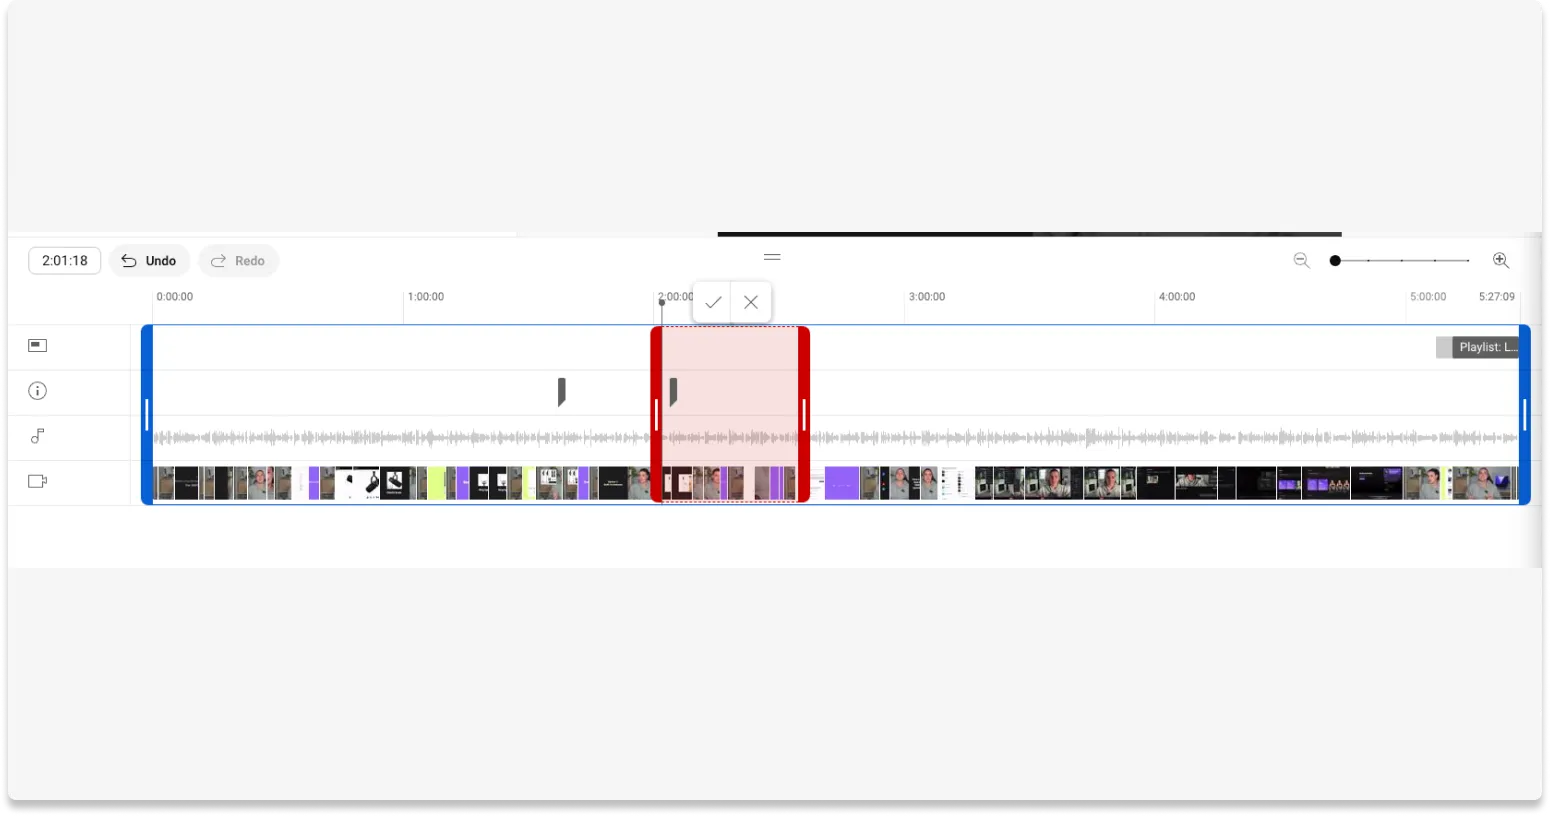
Step 8: Again, you can drag the ends of the red box to cut out any unwanted video content. Anything that is outside the red box will remain.
Remember that you can use the video preview located at the top right of the screen to check your edits before finalizing them.
Alternatively, you can enter a specific time in the box at the top, if this is more convenient for you.
Step 9: Be sure to confirm your changes by selecting the “✔” icon.

If you want to make another cut, simply drag the playhead to a different region, and then select “+ NEW CUT.”
Step 10: To preview your edits, either select “PREVIEW” or select the “Play” button on the video preview.
If you change your mind anytime, select “Undo” in the timeline at the bottom of the screen.
You can also edit and delete changes that you have made in the middle of the video using the pencil or trash icons.
You can also choose to “DISCARD CHANGES.” This will revert all your changes.
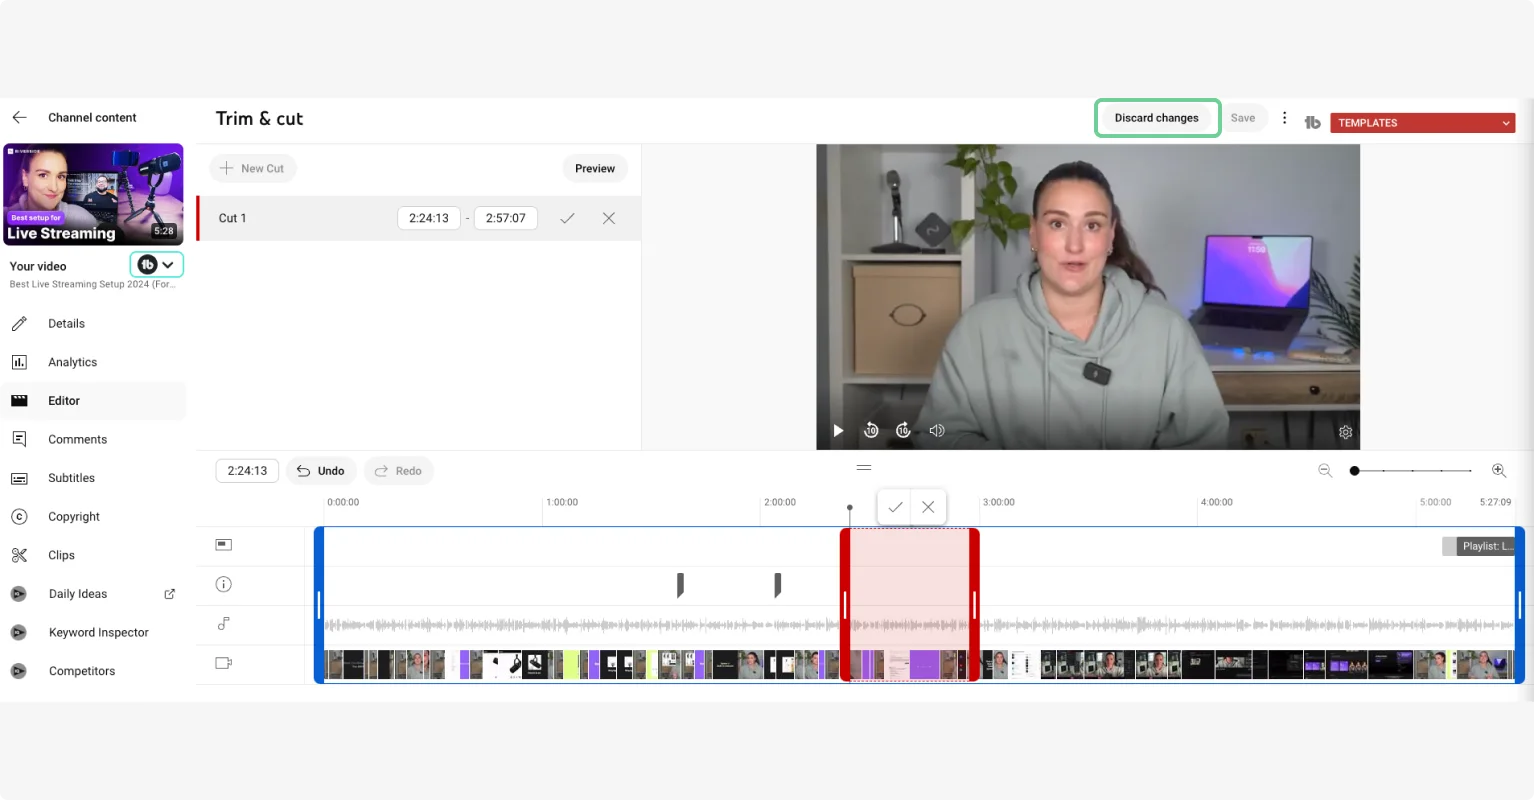
Step 11: Once you're happy simply click “SAVE.”
After your changes have gone live, you always have the option to go back into the video editor and revert your changes. Nothing is permanent.
How to Blur a Video in YouTube Video Editor
Need to blur certain areas of your video for privacy reasons? The video editor in YouTube Studio has you covered.
Step 1: Head on over to “YouTube Studio” and under “Content” choose the video you would like to blur.
Step 2: Head on over to the “Editor” and select “Blur,” located just beneath “Video editor.”
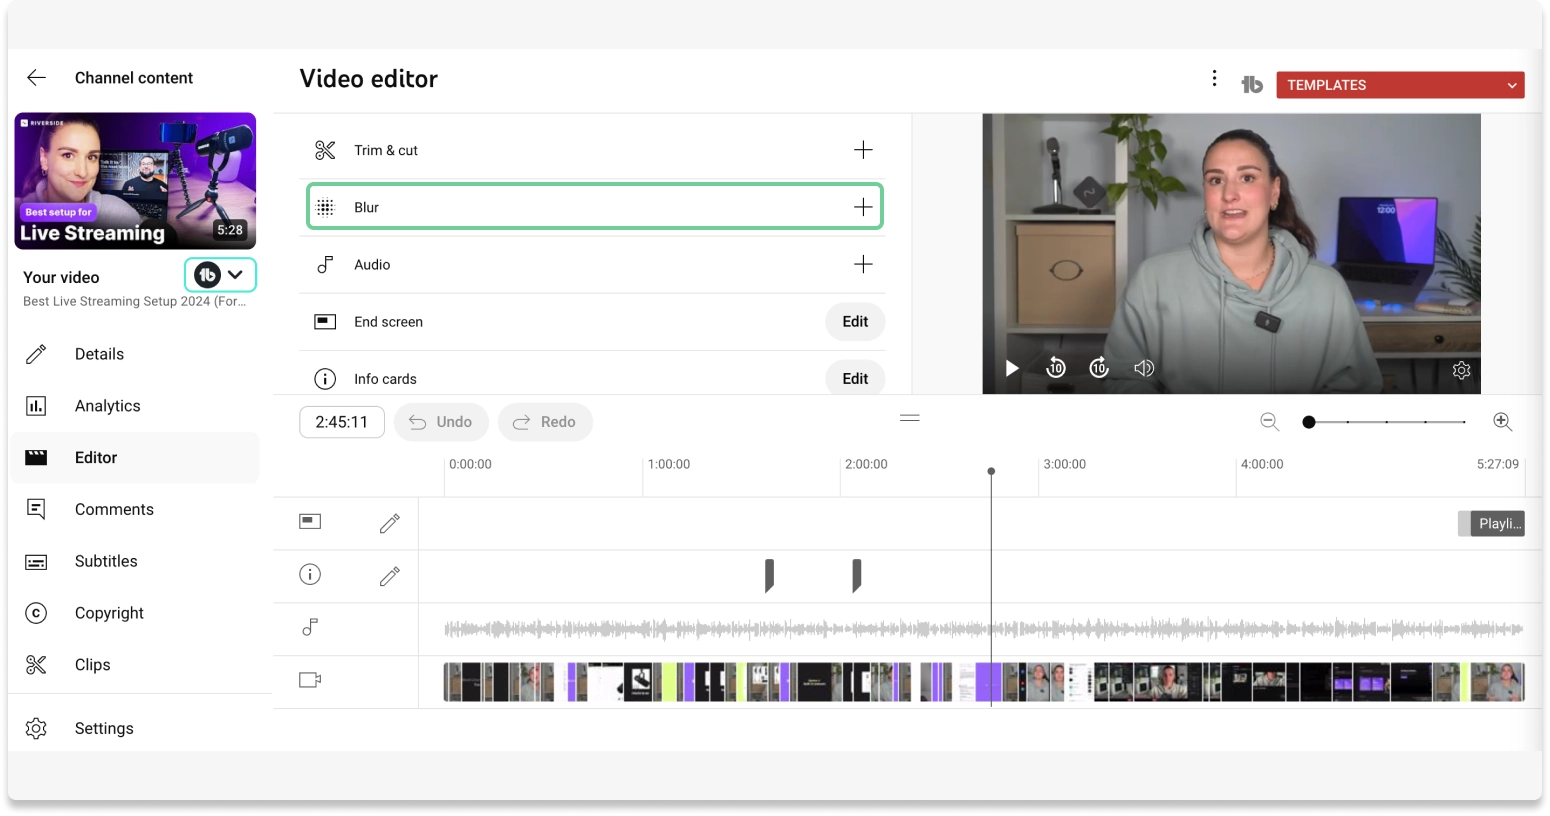
Step 3: Once selected, you’ll see that you have two options:
Face blur
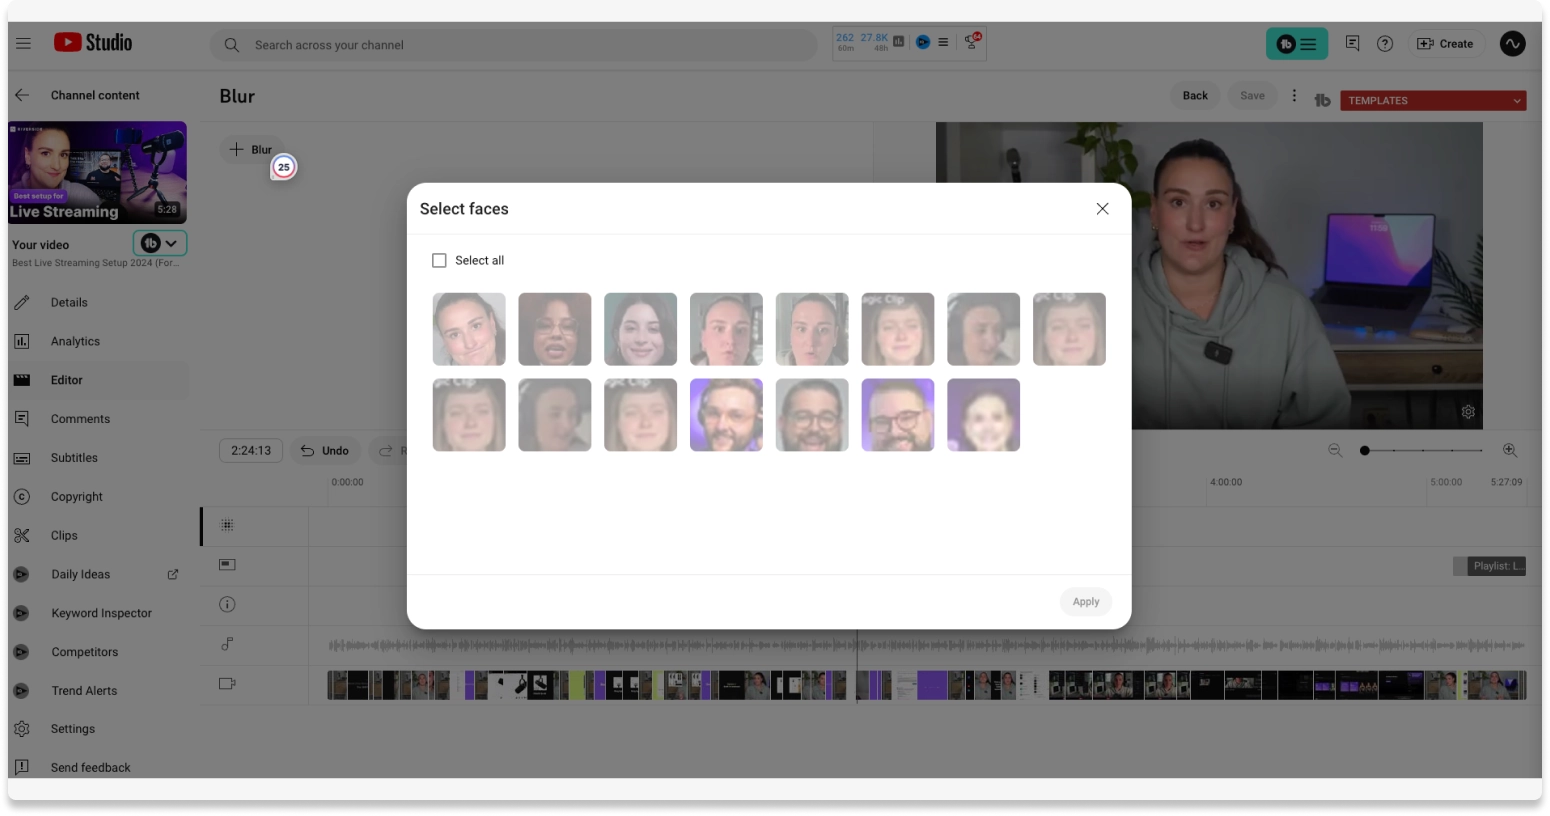
When selecting “Face blur,” YouTube will process your video to automatically detect faces. Depending on how long your video is, this can take a few minutes.
Once it has finished you can either “Select all,” or individually select the faces you would like to blur. Hit “Apply.”YouTube will take a few more minutes to apply those changes.
Once finished, you can preview the changes, move the position of the blur, or change the shape and size.
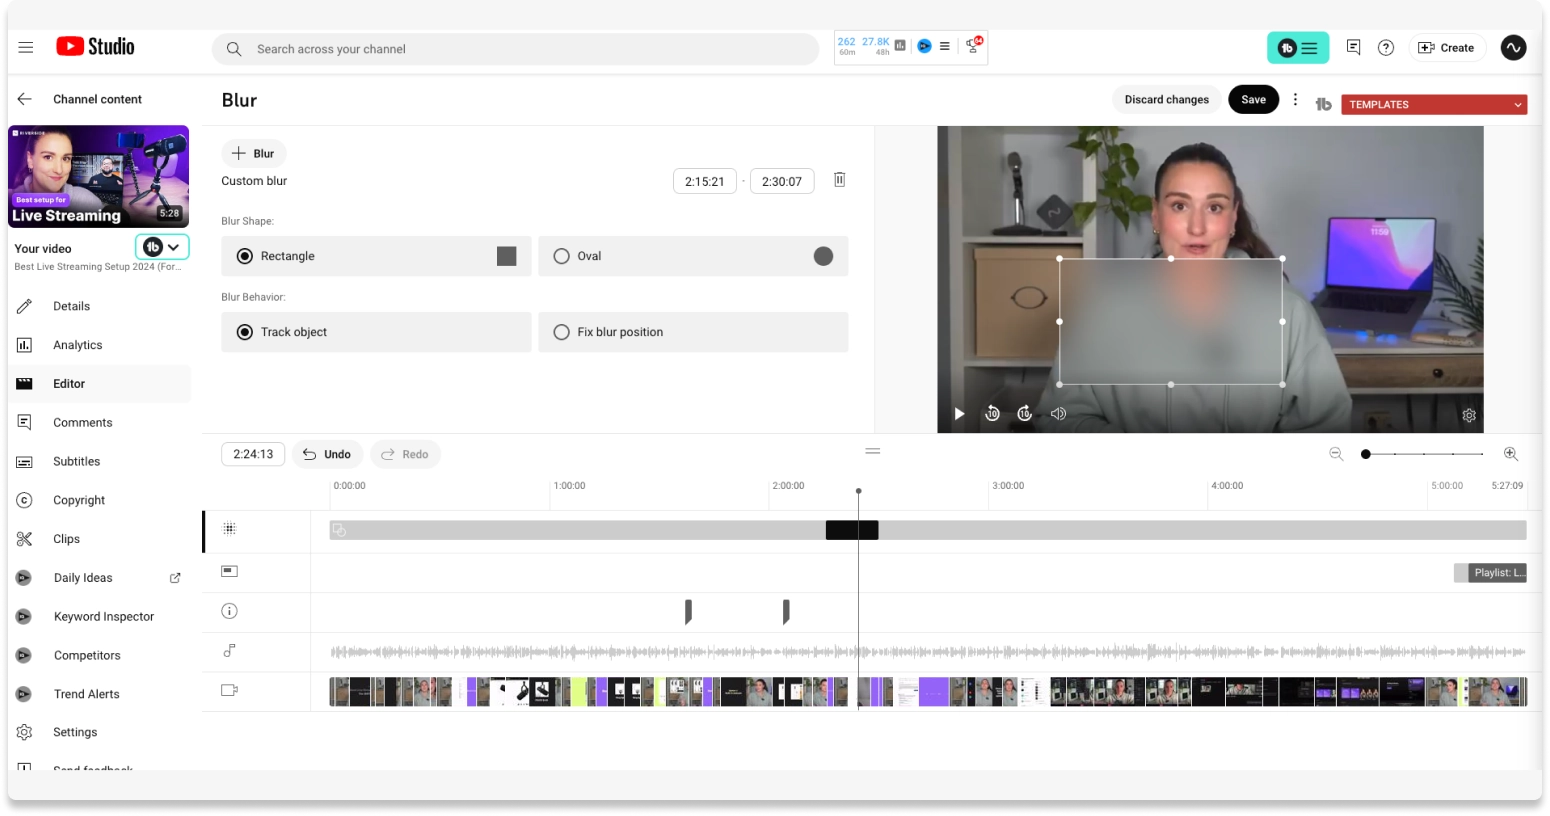
Custom blur
When selecting “Custom blur,” YouTube will need a few minutes to process your video
Once your video has been processed, you can start blurring parts of it. You can use a rectangular-shaped blur, or an oval. You can also change the behavior. “Track object” moves the blurred area with the object on the screen, while “Fix blur position” ensures the blurred areas stay in the same place.
Either use the timestamps in the top left to select the parts you want to blur, and change the blur position, or use the timeline below. Add multiple blurs by selecting “+ BLUR.”
Step 4: If you change your mind simply hit the trash icon, or click “DISCARD CHANGES.” You can also select the three dots, and choose “Revert to original,” if you decide that you don’t want to save your changes.
Step 5: Hit “SAVE.”
How to add music in YouTube video editor
Add a level of professionalism to your videos with music, making your content more engaging.
Music can also be used as part of your branding. Having a distinct and recognizable sound makes you more memorable, and helps to establish an overall tone instantly. For example, use upbeat music if your brand is fun, exciting, and lighthearted.
Here’s what to do:
Step 1: Select the video you want to enhance with music and head over to Editor.
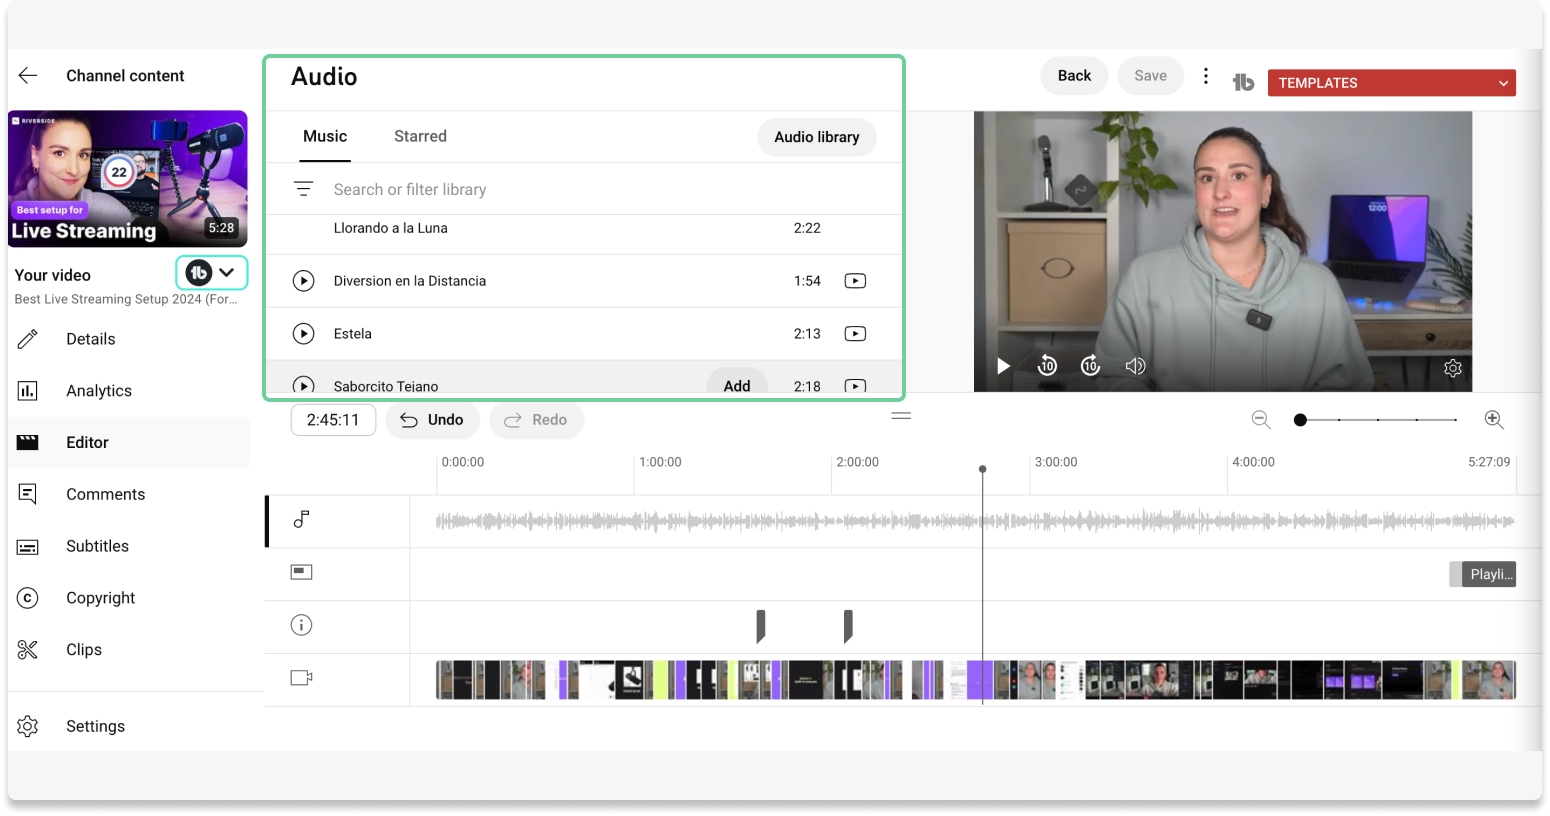
Step 2: Hit “Audio” and you’ll be taken to a screen displaying YouTube’s music library.

Step 3: Browse and listen to the music tracks by using the “Search or filter the library” tool.
Selecting “AUDIO LIBRARY” will take you to a new tab. When searching on the screen you can use a keyword or use YouTube’s predefined options, such as track title, genre, mood, artist, name, or duration.
You can also filter by “Attribution required” which means you’ll need to credit the composer. Or, you can choose “Attribution not required” which means you don’t need to credit the composer. Always check the small print!
Step 4: When browsing, you can instantly include the music to your video by clicking “ADD.” If you change your mind simply hit “REMOVE.” Opening the library in a new tab gives you options to download the different music tracks.
Your chosen music will appear on your video timeline at the bottom of the screen. Make sure to factor in the length of your video, to make sure you have enough music.
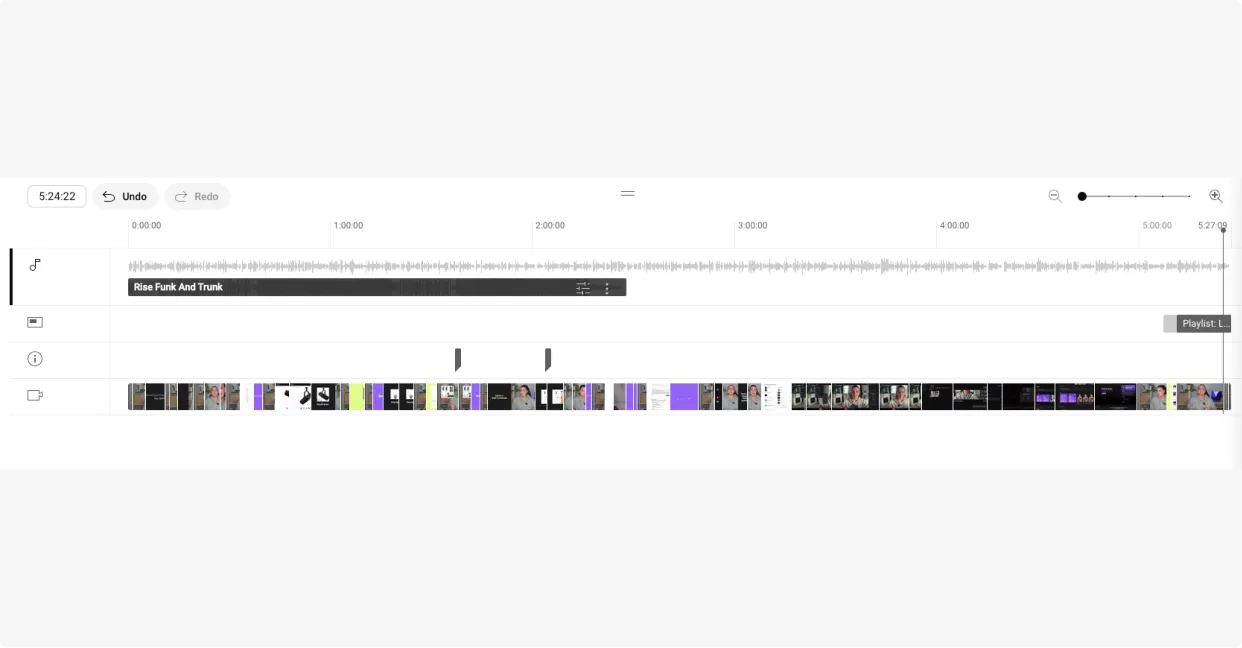
Step 5: You can drag the end of the music track to make it shorter, adjust the mix level, get license information, or remove it.
Step 6: You can add multiple different tracks using the same steps as above and then just drag them to the correct position on the timeline.
Step 7: If you’re happy with your creation, hit “SAVE.”
You can “DISCARD CHANGES” at any time, and “Revert to original.”
How to edit YouTube videos with Riverside
If you find YouTube studio limiting, or you want to record an edit all in one place, then Riversid ecould be a better alternative for you.
You’ll get recordings in up to 4K video and 48kHz audio resolution. Then, in our editor you’ll find an array of tools that cut down on editing time. From text-based editing to automatic audio enhancement you can polish your video in a few clicks.
Here’s how to use Riverside to edit a YouTube video.
How to trim a video in Riverside
Riverside allows you to trim videos with ease using the text-based editor. Here’s how to do it:
Create a free account with Riverside and log in. Select the recording you would like to edit. Click on “Edit” located at the top right of the screen and then click “Create new edit.”
.webp)
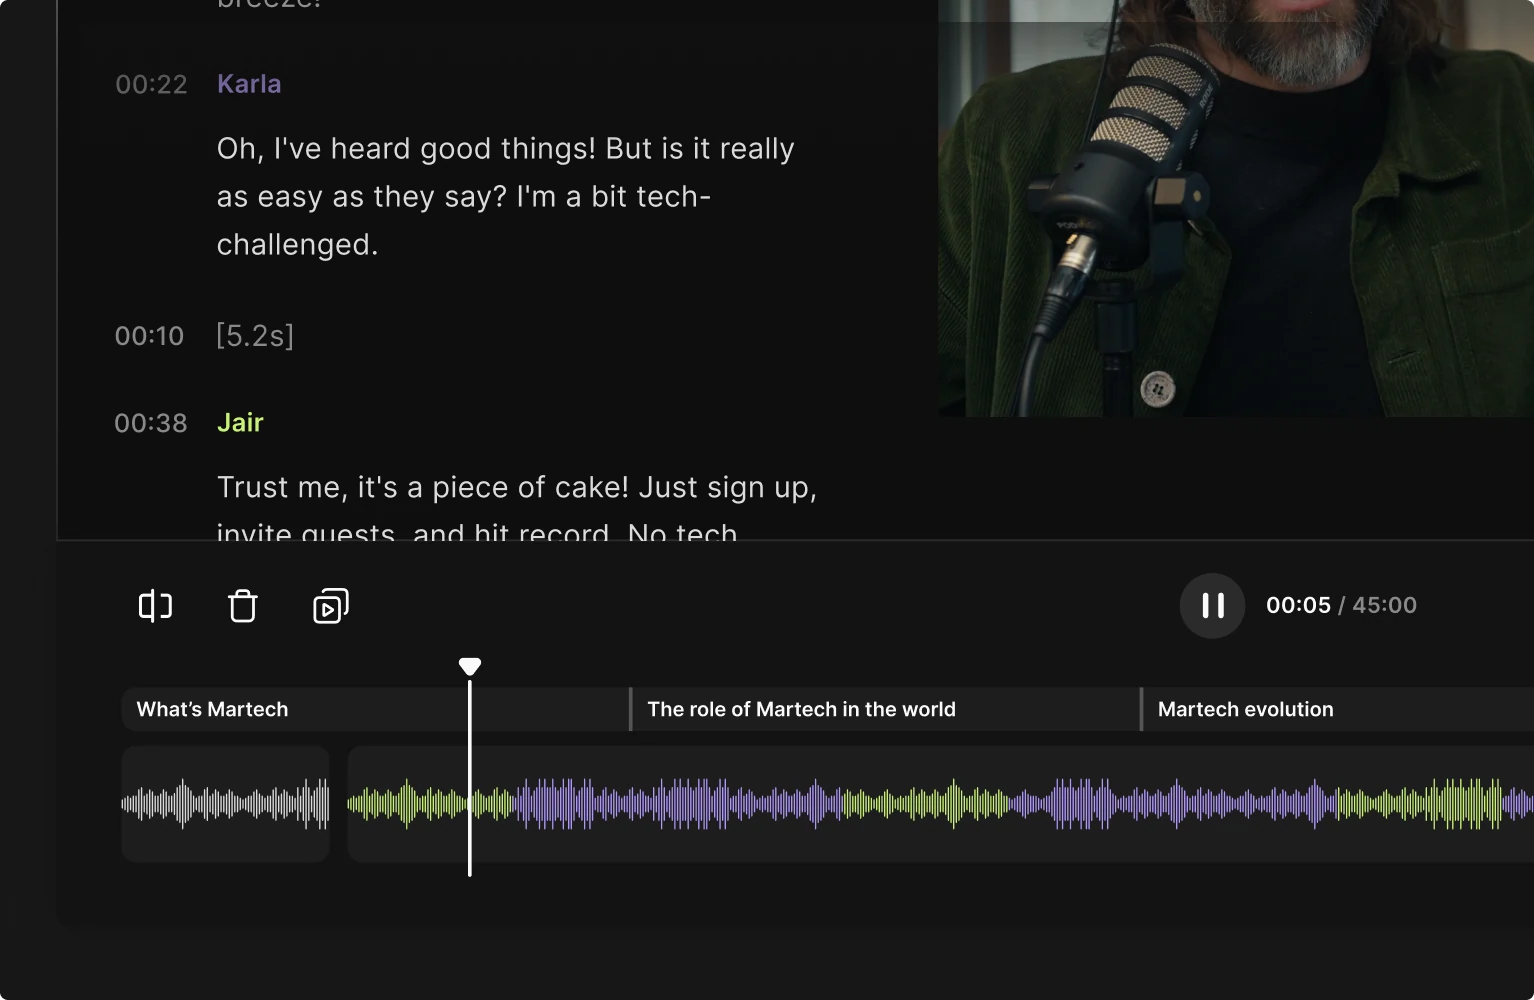
You can use the text-based editor (left-hand side of the screen) or the video editing timeline (at the bottom of your screen) to trim your video.
With the text-based editor, simply highlight the text you want to delete. Toggle between “Show deleted text” to either display or hide the text that you delete.
.webp)
Alternatively, the “Timeline” is just as easy to use. Drag the cursor to where you want to trim. Hit “Trim” to split the audio. Select what audio you would like to delete, and hit the “Delete” key on your keyboard or hit the “Trash” icon.
You can zoom in and out of the timeline to make it easier to find what you want to delete.
If you’d like to add recordings or external media click the “+” icons at the beginning and end of the timeline to upload music and other media tracks. You can also import other recordings saved in your Riverside library.
You can also add other media in the middle of your Timeline, just use the “Split” command, and click the “+” icon that appears.
Customizing your YouTube video with Riverside:
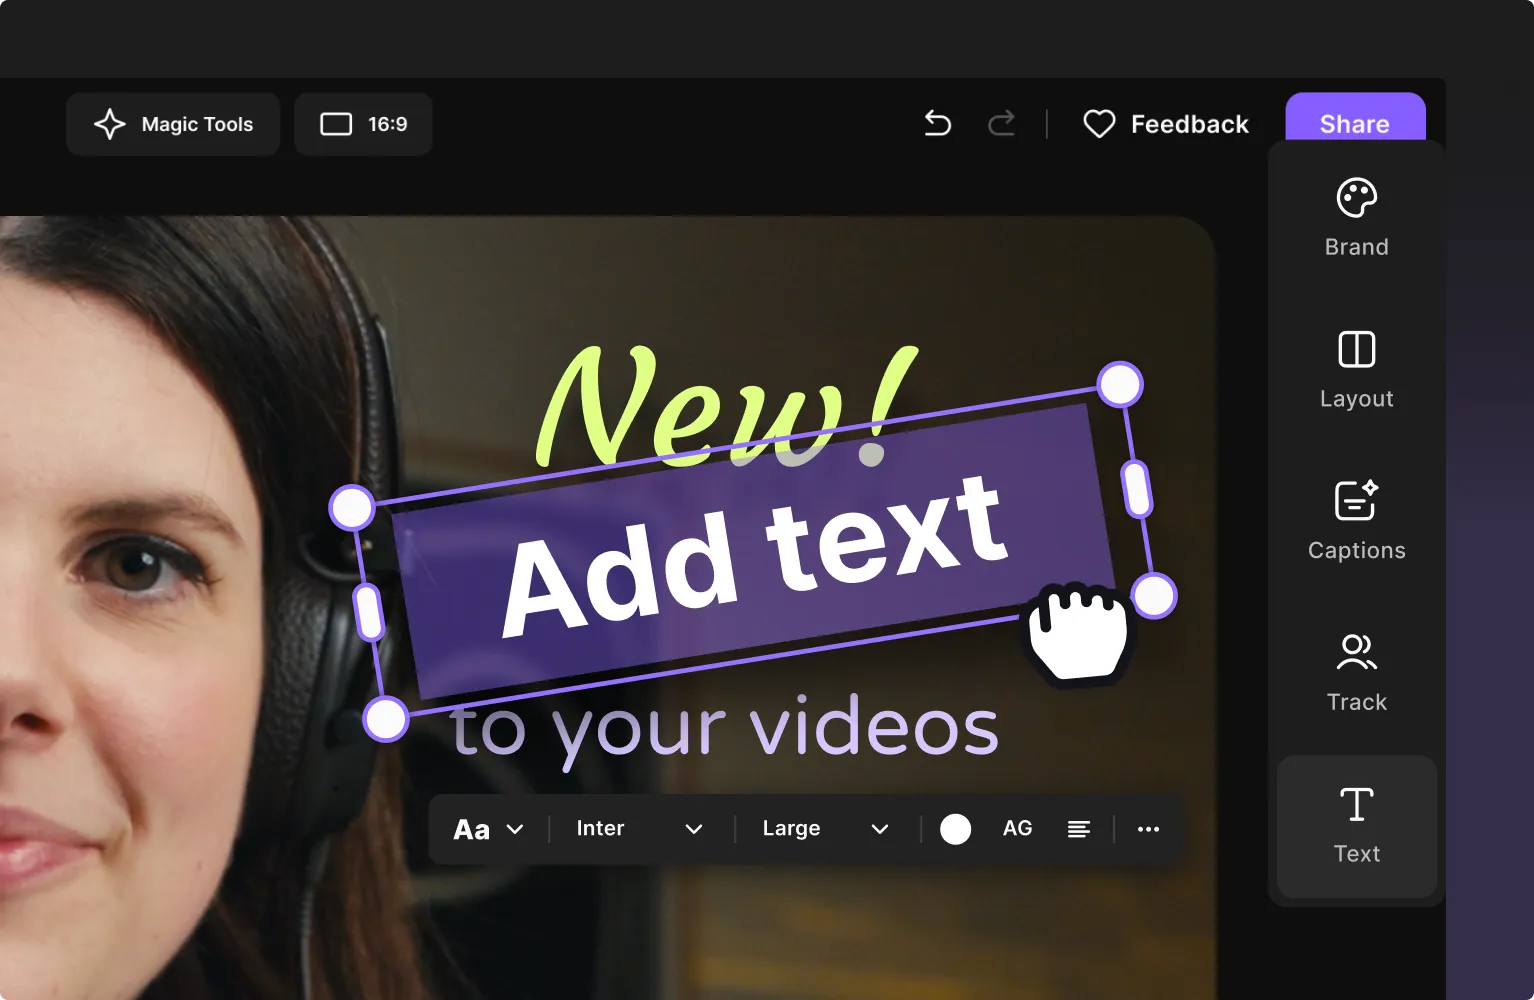
If you look at the left toolbar, you’ll see an array of tools for customizing your video.
.webp)
Select:
- “Brand” to add branded assets such as logos and backgrounds.
- “Tracks” to enhance individual tracks, and either hide or mirror the video.
- “Layout” to change between a Grid, Fullscreen, Picture in picture, or Split screen layout.
- “Captions” to add your own dynamic captions with your own choice of font, size and positioning.
- “Text” or “Images” to add your own overlays.
You can also enhance your audio. Select “AI Producer”. You can click:
- “Set pace” to remove pauses, and improve conversation flow.
- “Smooth speech” to remove filler words and any unwanted sounds.
- “Magic Audio” to enhance your recording and emulate a rich and immersive studio sound experience.
End off, by downloading a text or subtitle transcript for closed captions and other purposes. Click the three dots at the top of the text based editor and select “Download transcript” or “Download subtitles”.
Whenever you’re done, hit “Export” on the top right and follow the prompts. You can then upload your new YouTube video and share it.
Bonus: Creating YouTube Shorts and descriptions with Riverside
Outside of the Editor you’ll be able to also create Shorts and get AI descriptions in a few quick clicks.
For YouTube Shorts:
- Go to the recording. Hit Generate Magic Clips at the bottom of the right screen.
- Using AI, Riverside will generate short clips from your recordings.
- Edit the clips as you like and download the final product for YouTube Shorts.
.webp)
For AI descriptions:
- Go to the recording click “Generate show notes.”
- Riverside will generate a summary with takeaways, chapters, a title and description.
- You can copy each of these options into the “Description” field on YouTube.
Learn more, or start editing YouTube videos effortlessly on Riverside!

How to edit YouTube videos on an iPhone or Android device
While it’s easiest to edit YouTube videos on your desktop or laptop computer, it’s possible to edit them from your mobile device as well.
Note that you aren’t able to do this directly on YouTube. Instead, you’ll need an external video editor. You can check out our whole list of video editing apps for iOS and Android.
How to edit YouTube videos on an iPhone or iPad
The easiest way to edit videos on an Apple mobile device is to use the built-in video editor in your Photos app. Simply open the video you wish to edit for YouTube and tap “Edit” at the top of the screen to access the video editing tools.
Trim the video by dragging the ends of the bar at the bottom of the screen. Adjust the exposure, contrast, brightness, and more by clicking the adjust icon.
Tap the filter icon to choose from among the available filters. Crop and rotate the video by clicking the crop icon.
Click “Done” to save your changes when you’re finished.
If you want to use more advanced editing options, some of the most popular third-party video editing apps for iPhone and iPad include:
- iMovie
- Video Editor by Luni
- Adobe Premiere Rush
- FilmoraGo
How to edit YouTube videos on an Android device
If you have an Android phone or tablet, your Google Photos app has the limited ability to cut or trim videos you’ve recorded on your device. Simply open the Google Photos app and select the video you’d like to edit.
Tap the screen to reveal the editing tools. Click on the “Edit” icon.
Drag the handles on either end of the video bar to adjust its start and ending points. Tap Save when you’re finished.
If you’d like to do more than trim or cut your videos, consider using a third-party app like:
- Quik
- Adobe Premiere Rush
- CapCut
- InShot
Basic video editing techniques to try for YouTube videos
Want to level up your YouTube videos? We have you covered with basic video editing techniques to make your videos more professional and engaging.
Trimming and cutting footage
Polish up your video before sharing and cut out any mistakes or repetition. You can cut out any long pauses, or anything else your audience doesn't need to see. Get to the main content and point of your video as quickly as possible - and get rid of the fluff.
Transitions
Transitions are a creative way to move from scene to scene, or connect one shot to another. They’re used all the time in films and TV shows. An example of a video transition is where the end of one scene fades into the beginning of the next scene.
Adjusting audio levels and adding background music
Poor audio is distracting and can detract from the overall impact of your video. One way to improve audio quality is adjusting levels, making sure that the volume is not too loud or quiet.
Adding background music is a great way to enhance and make your video more engaging with your audience. Most editing tools will have a library of royalty-free music, meaning you don’t have to give credit to the composer.
Applying basic visual effects
Another great way to enhance your video and make it more engaging is by applying basic visual effects. What visual effects you can apply depends on the tool you are using. Some of the most common ones include adding filters, or manipulating the playback speed. Don’t overdo these effects, as you don’t want to take away from the main message you want to portray.
Adding text overlays and titles
Hook people in and entice people to listen and watch your videos by adding text overlays and titles. For example, use overlays to reiterate a main point, or use titles to label who is talking on the screen.
Incorporating basic animation
Most of you will have experience with animation. Think back to the last PowerPoint presentation that you created. Did you make text appear in a fun way on the screen? You can apply basic animation to your videos too. For example, you can add moving illustrations and graphics to your video, or apply fun special effects to objects or people on the screen.
Bonus: Courses and resources for YouTube video editing
Perfect your video editing skills with the following courses and resources:
- Riverside YouTube Channel (Free)
- Riverside Blog (Free)
- Riverside University (Free)
- Premium Beat (by Shutterstock) Blog (Free)
- Filmsupply Resources (Free)
- Udemy Courses (Prices vary)
- Skillshare Courses (Prices vary)
Final Thoughts
Editing your YouTube videos can feel overwhelming, especially if you don’t have experience. However, once you have edited a few videos, you’ll start to get the hang of it. It might even become fun!
Don’t be afraid to experiment and try different ways to create engaging videos for your audience. This is how you’ll learn about all the different ways to enhance your video - and how to avoid overdoing it.
You’ll be editing and sharing your video masterpiece with the world in no time at all!
Frequently Asked Questions
What are YouTubers using to edit their videos?
There’s a whole host of different software that YouTubers use to edit their videos for Mac, Windows, iOS, and Android devices. Some are free, others you have to pay to use.
We recommend Riverside. It’s easy to use, can be used for free, and provides a full suite of tools that allows you to easily record, edit, and upload videos to YouTube.
How do I edit someone else's YouTube video?
To edit a video in YouTube Studio, you need to either be the owner or have access to the account where the video was uploaded.
There is a workaround, though. Download the video, and then use an external editor such as Riverside to edit the video. Always make sure you have permission to use the video and content to avoid getting into any trouble.
Is it legal to edit YouTube videos?
As a general rule of thumb, you cannot use someone’s video content without getting prior consent. If you don't have consent, it is illegal copyright infringement. Check out YouTube’s rules and policies about copyright.
What are some common challenges when editing YouTube videos?
The first challenge is the learning curve that comes with editing YouTube videos. It can be frustrating when you are learning something new, but be patient and give yourself time. Everyone has been a learner at some point, and has felt the same feelings and frustrations as you.
Another challenge is ensuring you don’t get into trouble by using someone else's music or content. Always read the small print, and make sure the content you’re using is free to use, or you’re given the required accreditation.
Lastly, make sure to save your work or have backups of your original video footage. You don’t want to spend hours perfecting a video only to lose it to a software glitch. Also, although most software tools will give you options to revert your changes, always have a backup of your raw video before you start editing.


.webp)
.webp)


