


Table of contents:
Why is your interview setup important?
How to film an interview: Step-by-step
Pre-Production: Interview Preparation
Production: Filming the interview
Post-production: Editing your interview
How to film an interview remotely with Riverside
Professional interview examples to learn from:
Filming an interview sounds easy enough. But pulling it off like a pro takes know-how, the right tools, and practice.
There are a lot of different elements that come together to make up a professional-standard video interview. These include: framing, lighting, recording quality, and how you edit it all together.
In this article, we’re walking you through each stage step-by-step. You’ll find equipment recommendations, tips and tricks for optimizing every element of your setup, and some good examples to learn from.
Why is your interview setup important?
There are so many reasons that your interview setup is important. And it goes way beyond how your video interview looks (though that definitely is part of it!):
- Ability to record high-quality audio and video. Your setup will heavily influence your ability to capture the best quality audio and video possible.
- Look and feel of your interview. Undeniably, your interview setup is key to creating the right look for your interview. This includes the tone of the lighting, the overall background, and how professional it feels.
- Your guest’s comfort level. You shouldn’t overlook the effect your interview setup will have on how your guest feels or performs.
- Time during post-production. If you get your interview setup right, this will minimize the amount of time you need to spend during post-production fixing your footage.
How to film an interview: Step-by-step
Now that we’ve established just how important your interview set-up is, let’s go through how to actually film one, successfully:
Pre-Production: Interview Preparation
Before you jump into filming your interview, you need to do invest enough time in preparing for it. Good preparation is really important because this is what sets you up for success:
Goals
First, determine your goals for the interview. This may be as simple as getting to know the interviewee. Or you might have a more focused outcome in mind, such as learning about their latest project or venture. Either way, pinning this down will help you to guide the flow of the interview when you’re recording it.
Researching topic (and person).
As the interview host, you need to know your stuff. You need to verse yourself on the wider topic you’ll be speaking about as well as your guest’s background, specialty, and experience. This will help you to give a compelling and engaging interview.
Creating Questions
After you’ve familiarized yourself with the topic at hand, you need to come up with questions to ask your interview guest. It’s a good idea to also think about the general conversation arc you want to follow.
Sometimes, you won’t get the chance to ask all the questions you had prepared because the conversation takes a slightly different turn. We've prepared a guide for crafting interview questions to streamline the brainstorming stage.
Location
Finally, you need to decide where you’re going to film your interview. You can choose between remote recording with a platform like Riverside or an in-person interview on-location or in a studio.
Equipment setup and placement
After completing your preparation, it’s time to set your equipment up. Depending on what kind of interview you’ve decided to do (remote vs in-person), your equipment requirements will vary.
Here’s a quick recap of the equipment you’ll need for each type of equipment with some recommendations:
Microphone
When you’re choosing your mic, you should be thinking about a few different factors including your mic’s:
- Type: dynamic vs condenser, handheld vs lavalier
- Connection: USB vs XLR
- Polar pattern: cardioid vs unidirectional
In general, a lavalier mic works best if you’re filming the interview seated on a set. But if you’re going for a more video-podcast style interview, you can definitely get away with a mic mounted on a boom arm, for example.
Remember, if you’re recording in person, you’ll need enough mics for you and your guest. Here are a few of our recommendations:
- The Rode VideoMic Go sits on your camera and will work well for in-person interviews.
- The VideoMic Me is a mic for recording with your mobile phone.
- If you want a Lavalier mic, then the Sennheiser ME 2 is a good choice.
Camera or webcam
When it comes to picking your interview camera, you again need to think about the kind of interview film you’re trying to produce. Naturally, if you’re going for a remote interview recording a webcam will suffice. If you’re on set, you’ll probably want to invest in a standalone high-quality video camera.
- The Logitech Brio is a 4K HDR webcam ideal for remote interviews.
- If you want a mirrorless camera, then go for the Canon EOS R6.
Note: If you’re using a Logitech with Riverside, please follow our Logitech recording guidelines.
Read more: 10 Best Cameras for Interviews for 2024 | In-Person & Remote
Computer
If you already have a computer, then you can use that. An important consideration for a lot of interviewers is portability. A laptop gives you the ability to record interviews on the fly and edit on the move. If you want to invest in a new one:
- The Macbook Pro is an obvious choice for Apple lovers.
- For those who prefer Windows, try the Razer Blade 15.
(Remote) recording software Riverside is the ideal recording software for a high-quality interview. You can record remote audio and video with up to 10 participants. Riverside offers up to 4K video and 48kHz audio recording without having you worry about your internet connection. We use local recording so everything records directly on each person’s device instead of relying on your web connection.
We also capture each person’s video, audio and screen shares on a separate track so you will have much more freedom when editing. After recording, you’ll find all you need to polish up your recording with our video editor.
Our Editor has a seamless color-coded editing timeline, or you can use text-based editing for easy trimming. You’ll also find AI tools for audio enhancement, captions and customization so you can edit your video in less time.
Pop filter
A pop filter helps to optimize the quality of your audio recording by minimizing the impact of ‘plosives’ meaning the ‘ps’ and ‘ts’ in your speech.
- Try the Aoeko pop-filter for an affordable and effective option
Wind shield (if you’re on location)
If you’re shooting on-location, then you should do everything you can to protect your mic from wind. A wind-shield is the answer and won’t break your bank.
- Amazon offers a five-pack for under $10
Artificial lighting
Finally, lighting makes a huge difference to how your final interview looks. Investing in artificial lighting will result in a far more polished looking interview. Find the best lighting kit for you and your setup in our blog all about setting up your lighting.
Lighting your interview
As we’ve touched on, lighting your video interview is one of the most important steps for recording a high-quality video. Here are some tips for how to do it properly:
Know your recording space
- You need to be familiar with your recording space to be able to light it properly and effectively. This means understanding how big the space is, how much natural light it usually gets and what artificial lighting already exists there.
Learn about and implement ‘three-point lighting’
As the term suggests, this refers to lighting your interviewee (and yourself) from three different lighting sources. These three sources are called the key, fill and backlight. This is a good strategy for achieving the best lighting possible. As the name suggests, your backlight should be behind your subject. The key light is, in many ways, the most important in your setup. It should be the brightest light and be set up diagonally in front of your subject. Finally, the fill light stands opposite your key light.
Adjust your camera settings to match your lighting
- You’ll want to make sure your cameras is optimized for the lighting you’ve set up. We suggest you try some test recordings before jumping into the real interview to master this.
Take advantage of natural lighting
If you enjoy ample natural lighting in your recording space, make the most of it. This is the most-budget friendly way to use light, but you’ll obviously have much less control.
Audio setup
In order to capture the best-quality audio, you need to know how to set up your audio properly. Here are some tips:
Think about mic positioning
It’s really important to optimize your mic positioning. This not only refers to your mic’s physical location in your recording space, but your own in relation to the mic. Remember, depending on the kind of mic you’re using (shotgun, lavalier, handheld), the best positioning will be different.
Coach your guest (especially when you’re shooting remotely)
Don’t be afraid to give your guest some guidance on how best to place their mic.
Get a producer on board.
If you’ve got the budget, inviting a producer onto your team is a great way to guarantee that your audio levels will be optimized throughout your recording session. .
Framing your interview
Your creative freedom when it comes to framing your interview will depend on how many cameras you have. If you’ve only got one camera available, then you can repurpose your mobile as a second-angle camera using the Riverside app.
Here are a few things to think about when framing your interview:
Set up your background
Setting your background properly for an interview involves a fine balance. You don’t want it to be too busy or distracting, but you also want it to look purposeful, even if it’s intentionally simple.
Think about angles
You have the creative freedom to choose your angles according to the look you want to achieve. You don’t have to stick to the standard ‘straight’ or ‘side’-on shots.
Consider the rule of thirds
This is at the very basis of achieving good and interesting composition. The rule of thirds means dividing your frame into thirds along both the horizontal and vertical axis. You’ll end up with nine different equal parts. Your subject should be within these lines or where they meet.
Change your framing for different interview questions
Once you’ve achieved framing that you like, you don’t have to stick to it all the way through. Feel free to change things up as you go (although be wary of your guest’s time).
Production: Filming the interview
Now comes the fun part: actually filming the interview. Here are some things you should think about when you’re interviewing your guest:
Building rapport
You don’t need to be totally serious and focus only on your interview questions. You can ease into the interview by building rapport and building your guest’s energy. This will make for a far more human interaction.
Maintaining a good pace
It’s easy to get distracted by a guest’s answers or digress from the original question. As the interview host, it’s your responsibility to maintain a good pace and keep the conversation flowing.
Don’t be afraid to stray from your questions
As we suggested earlier, think about a general trajectory for your conversation. But don’t be too obsessed with asking all your pre-prepared questions. Sometimes, questions that you come up with at the moment are more suitable.
Post-production: Editing your interview
Once you’ve wrapped your recording, it’s time to edit it all together. In fact, the easiest way to edit a video is using a text-based editor like Riverside’s. You can make changes to your transcript as if you were editing a Google doc and see those changes reflected in your video instantly.
Plus, Riverside’s intuitive color-coded timeline and clear division of your content into chapters makes navigating and editing your content even easier.
Whatever editor you’re using, though, here’s what to think about:
- B- Roll footage can be a great way to add more context and interest to your video interview. This will create a more dynamic and compelling narrative too.
- Keep your narrative arc in mind. You want to draw your viewers in with an engaging conversation. This should be your priority when you’re deciding which elements of your footage to cut.
- Make sure to create social media clips. A huge part of promoting your content these days is using short-form video clips to market your upcoming video. Riverside makes this part of your general workflow with its Magic Clips feature.
Read more: How to Edit an Interview Video & Make it Engaging: 5 Easy Steps
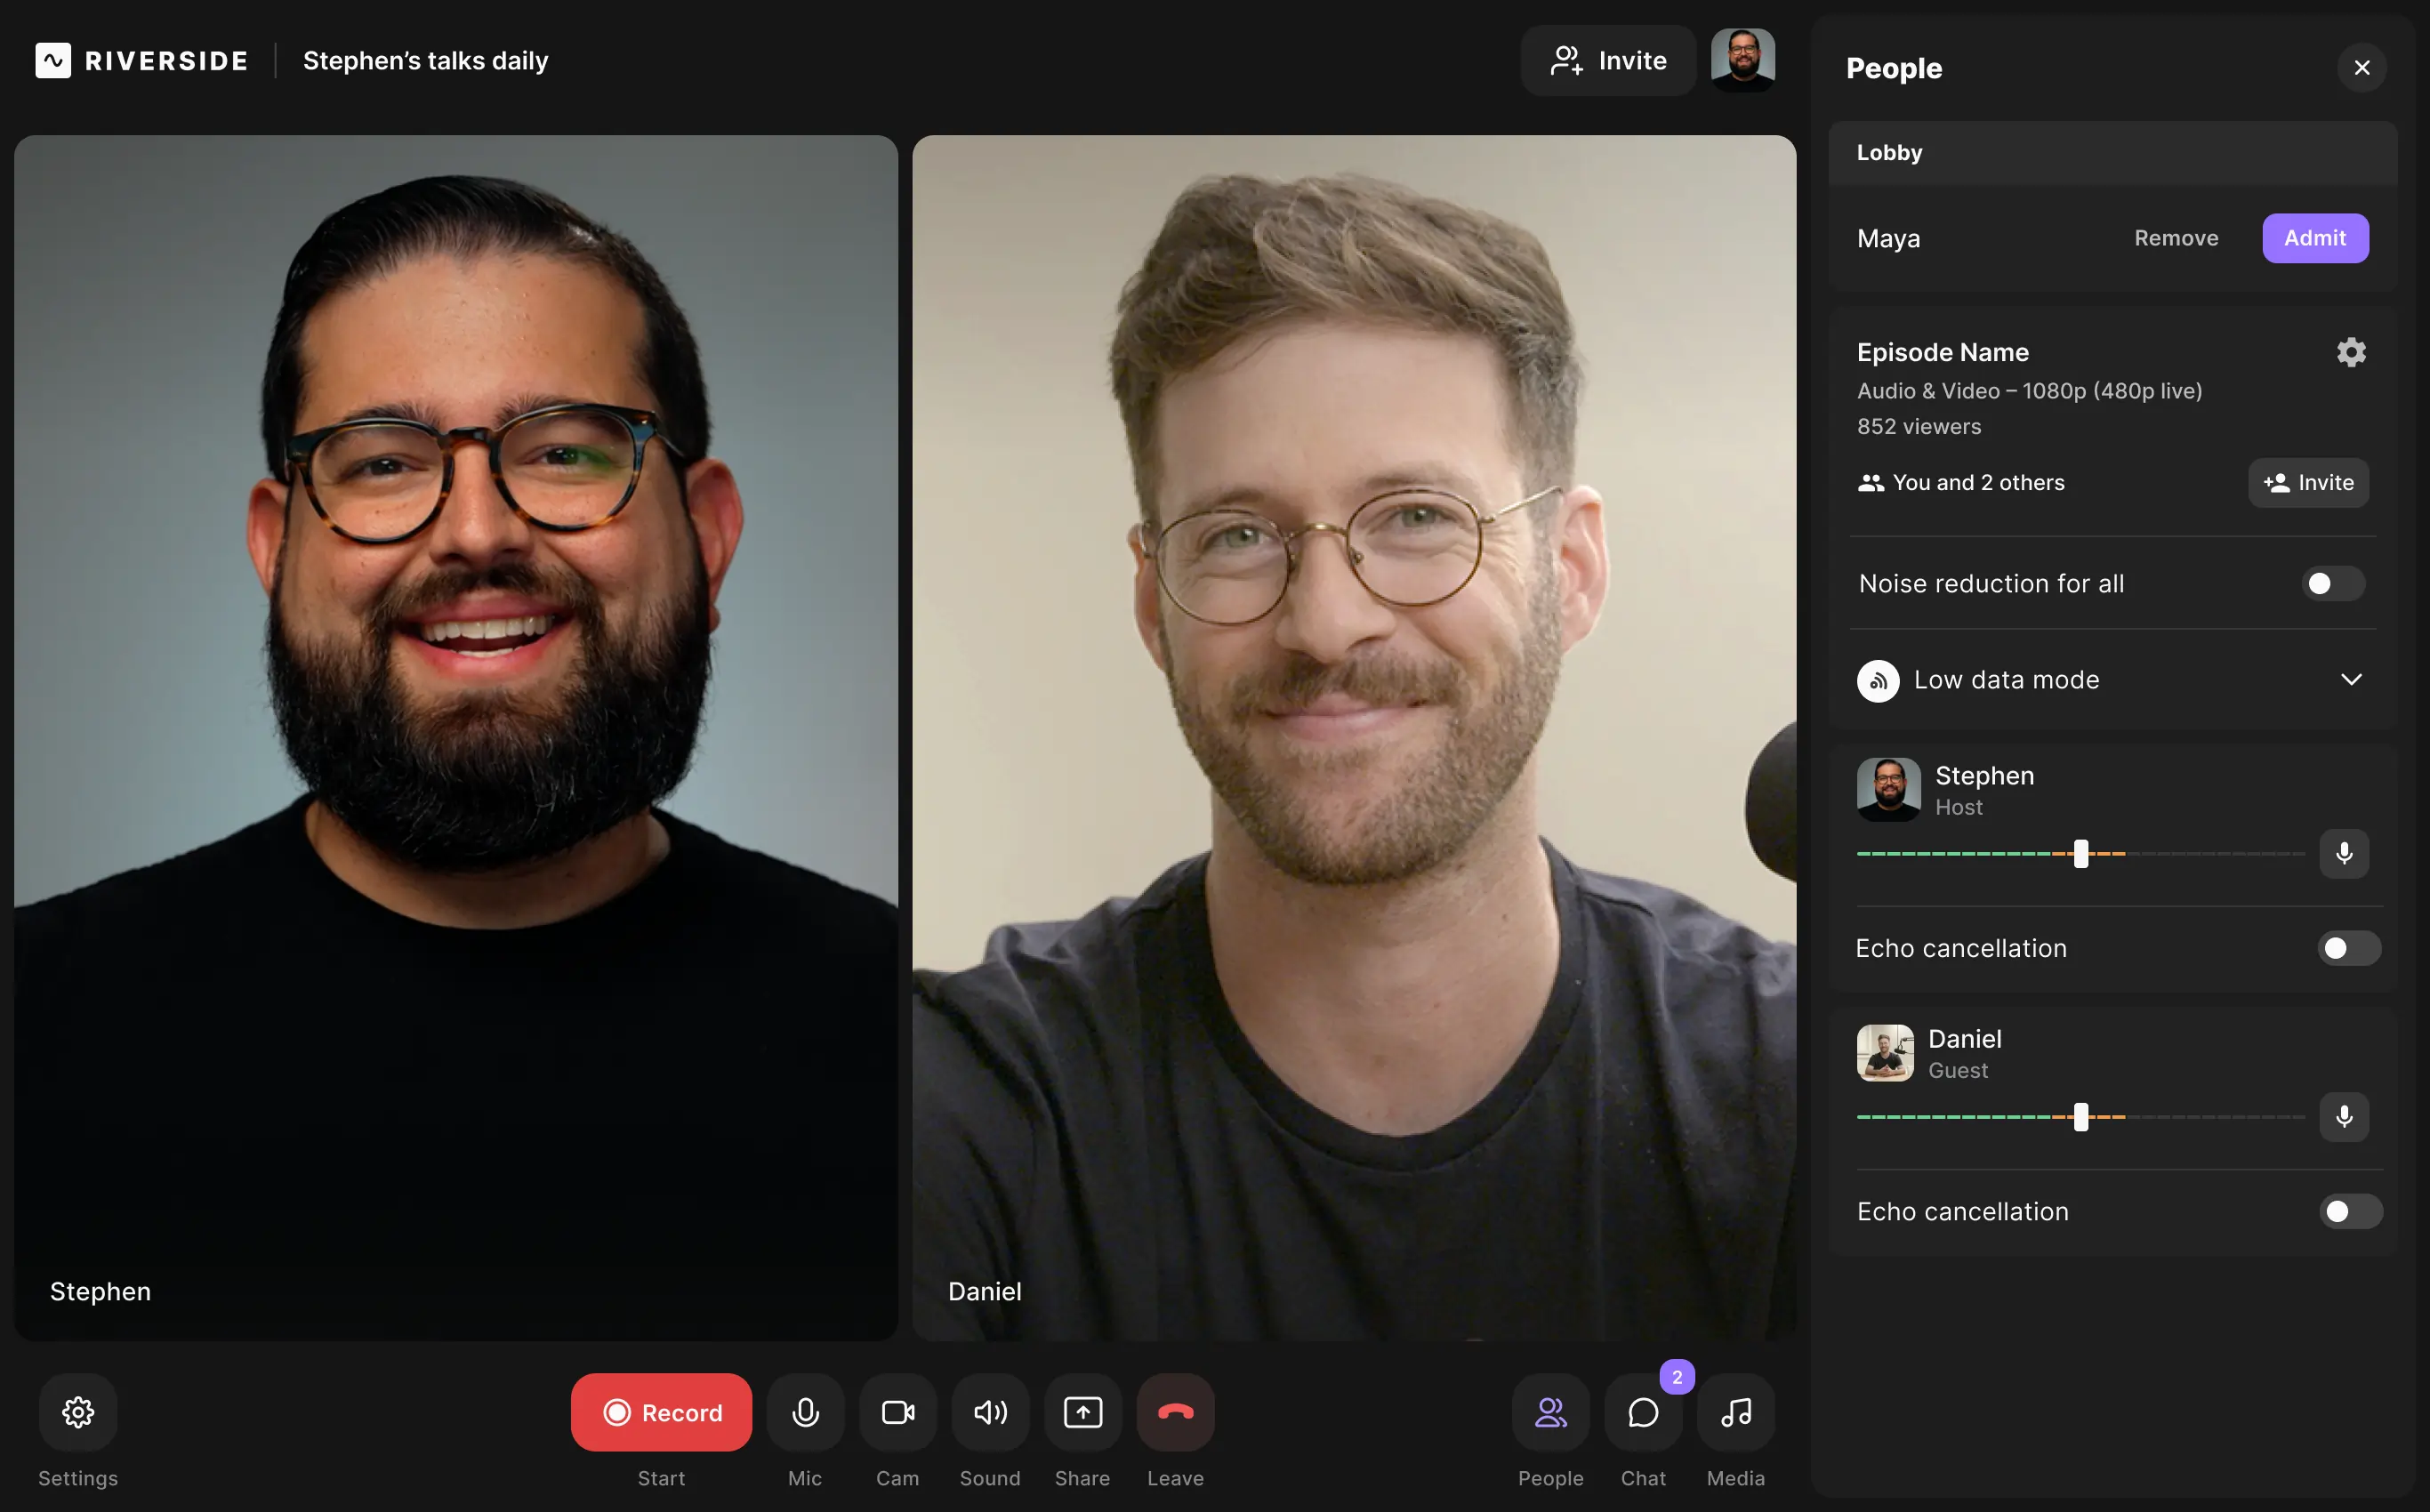
How to film an interview remotely with Riverside
Riverside makes recording remote interviews as enjoyable and stress-free as it should be. You’re guaranteed high-quality audio and video because Riverside records each interview participant locally. This means that it records each individual on their own device rather than over the internet, so you don’t have to worry about weak wifi affecting your recording.
Key Features:
- Local recording where each participant records on their own device instead of over the internet for the highest-quality recording
- High-quality video and audio with 4K video and 48kHz audio that you can export in lossless and uncompressed format
- Easy to use for both you and your guest with a whole range of intuitive features.
- Multitrack recording so that each participant’s audio and video is on a separate track
- Easily screen share during your interview for added interest.
- Presentation recorder lets you upload pre-prepared slides to complement your interview conversation
- Background noise removal tool during your recording and in post-production
- Browser-based and mobile app with no need for your guest to sign up to join your recording session
- Built in editor for quick editing of your interview. You can edit your recording like a Google doc with the text-based editor.
- Ultra-accurate AI transcriptions and captions in over 100 languages
- Ability to livestream your interview to all major platforms
- AI powered Magic Clips feature lets you create short-form videos of your interview for sharing on social media
- Media board lets you live mix with music, sound effects and other media during your interview
- Async recording means that even when your schedules don’t align, you can record your guest responding to your interview questions.
- Teleprompter lets you upload an interview script or plan so that you never lose your place or interrupt the flow of the conversation.
- AI shownotes with an automatically generated summary, chapters and key takeaways.

Step-by-step walkthrough:
Here’s a quick guide to filming a remote interview with Riverside:
Step 1: Create a Riverside account. Then, from your dashboard, click the ‘+’ button on the left-hand panel.
Give your studio a name, select ‘audio and video’ as your recording type, and set the transcription language.
At this point, you can also schedule the studio if you’ve already confirmed the recording date. When you’re done, click ‘Create’.
Step 2: When you’re ready to record your interview, hover over your newly create studio in the left hand panel and then click the camera icon to go to your studio.
You’ll then land in the Lobby where you can set your name and indicate whether you’re using headphones or not. You may have to give Riverside permission to access your mic and camera.
Step 3: When you’re ready, click “Join Studio”. Once you’re in the recording studio, invite your interview guest using the ‘Copy link’ or ‘Invite by email’.
Step 4: When your guest has joined, hit the red ‘record’ button at the bottom of your screen.
Step 5: When you’re finished, hit the red hang-up button to ‘End the Session for All’.
Step 6: After our recording finishes uploading, you’ll be able to look through all the different track recordings.
You can head to our Editor to polish your recording off effortless, or you can download the RAW files.
Here, you’ll also find Magic Clips for automated highlights of your recording and depending on your plan, you’ll also get access a full AI transcription and summary of your recording.
Bonus: How to film an interview on your phone with Riverside
If you or your guest doesn’t have a computer or would prefer to use a phone, you can do so using the Riverside iOS or mobile app. If you want to use your phone as a secondary camera angle for your interview, you can do this using the app too.
Here’s a guide to filming an interview with your phone using Riverside:
Step 1:. In the app, click the “+” button to create and setup a studio.
Step 2: In your studio dashboard, click on the three-dotted button on your top right and then select “Invite to studio” to invite guests, or audience members.
Your invitees will receive an email invite in their inbox. They can join on desktop, or from the mobile app.
Step 3:When you’re ready, select “Record” in your studio dashboard. You’ll go to the lobby first to sort your camera and mic out. Here, select “Join” when you are ready.
Step 4: You’re now ready to record just like on the browser-version! You can also toggle between your front-facing and back-facing camera.
Note that the above guidelines are using the Android app, and this may differ slightly if you’re on iPhone.
Professional interview examples to learn from:
The Barack Obama Interview | 360 with Speedy Morman
This is an on-location interview with Barack Obama. The interview itself is an hour-long, and they cover a number of different topics ranging from politics to hip-hop.
Things to learn:
- Notice that they switch between close-up shots of Obama and wide-shots that include Speedy Morman too.
- Inclusion of chapters in the interview description. This makes it easier to navigate the interview to different segments.
Riverside automatically generates your shownotes to reduce the time you need to spend writing a summary, naming chapters and coming up with key takeaways.
Kim Kardashian | Jay Shetty Podcast
Kim Kardashian joins Jay Shetty in the studio to record a video interview about her career, life and family.
Things to learn:
- Notice how the background is very intentionally propped in a certain style. It’s not distracting, but makes it look like they’re sitting in a cozy environment.
- The intro pulls an interesting quote from Kim and uses text overlay to capture the viewer before the interview begins.
- All their camera shots are at an angle to both the speakers, but they switch between close-ups and wider shots of them individually. There are also some wide-angle shots of them both.
- The lighting in this interview is really soft and warm.
Tim Cook | DealBook Online Summit | NYT Events
In this remote interview, Tim Cook from Apple shares his visions for the future of the internet, as well as crypto, and mental health.
Things to learn:
- The editing style that switches between showing both the host and the interviewee on the screen and just the person talking.
- Both participants are well-lit and equally framed even though they’re recording in separate locations. This creates a sense of balance.
- Both the interviewer and interviewee have a professional background or backdrop too.
- The video is in high-quality and looks crisp and clear. (This video was actually recorded on Riverside, which you can use too, to create studio-quality recordings.).
Best practices for filming interviews like a pro
Here are some tips to ensure that your interview looks as professional as it can:
- Value good lighting. Don’t underestimate the importance of good lighting. It will make all the difference to the visual production value of your interview.
- Record in a quiet space. Give yourself the best chance of recording a high-quality interview by choosing a quiet recording environment.
- Set your guest’s expectations. You don’t want your guest to feel overwhelmed or uneasy. Make sure they know exactly how everything is going to happen.
- Set your background properly. The last thing you want is to look back at your footage and discover something in the background of your interview. Easily avoidable by taking the time to design your background.
- Don’t sweat the mistakes. As the host, your job is to make your interview guest feel at ease. That’s why it’s important to smooth over any hiccups and keep the interview going.
- Make the most of your tools. Get to know your equipment and make sure you’re taking advantage of all their available settings. For instance, if you’re using Riverside you should most definitely enable background noise removal.
FAQs about Filming Interviews
How do you film an interview?
Filming an interview sounds intense, but tools like Riverside make it super easy. With Riverside, you can use your phone or your computer to film your interview. And you’re guaranteed high-quality audio and video every time because Riverside locally records each interview participant.
How long does it take to film an interview?
Filming the interview itself should only take the time you carve out for it. In general, an hour or so is a good amount of time. Bear in mind, though, that the preparation in the lead-up and post-production add substantially to the time it takes to film an interview.


%20(1).webp)


