


Table of contents:
Key takeaways:
- Using Continuity Camera is the easiest way to turn your iPhone into a webcam on Mac.
- If you're on Windows, try using software like Riverside to connect your iPhone as a webcam.
- Make sure you meet software requirements. (For requirements you'll need macOS Ventura 13.0 or newer and iOS 16 or later).
There are many reasons why you might want to know how to use your iPhone as a webcam. The most obvious one is to use a high-quality camera since the standard webcam embedded in your laptop doesn’t cut it.
You’ve already spent a big chunk of change on a great phone like the iPhone 14 Pro Max, which boasts one of the best cameras on the market. Why drain your wallet even more for a professional camera?
Without further ado, let’s dive into the steps to set up your iPhone as a camera on your Mac or PC.
Table of Contents:
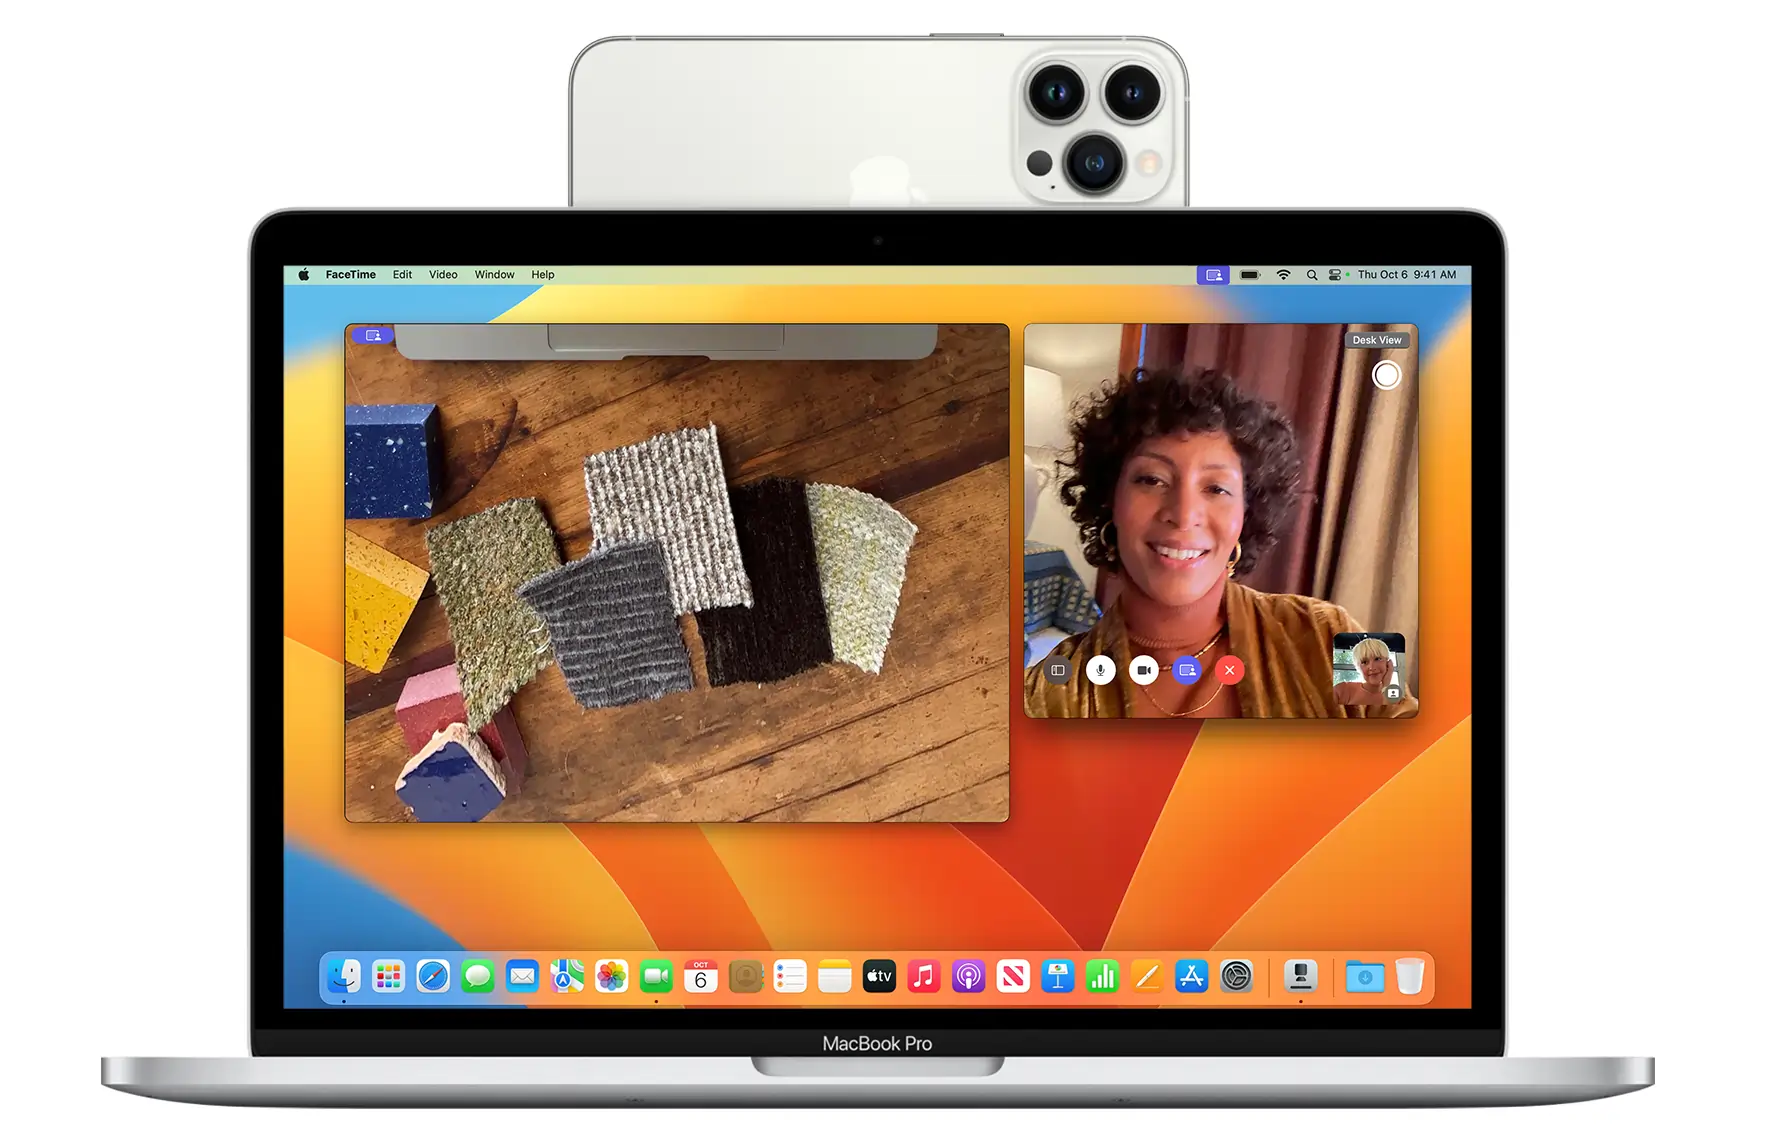
How to Use Your iPhone as a Webcam with Continuity Camera
Continuity Camera is the iPhone’s default feature that allows you to use your iPhone as a webcam on a Mac, taking full advantage of its powerful high-res, high-quality camera and microphone.
If you don’t want to use any third-party software, Continuity Camera is the simplest way to use your iPhone as a webcam, as long as you meet the requirements.
However, Continuity Camera is capped at 1080p. So, if you’re looking for 4K recordings, you'll be better off using another platform like Riverside.
Requirements
Here’s how to use your iPhone as a webcam on a Mac with Continuity Camera. Let’s start with the requirements:
- A Mac running macOS Ventura 13.0 or newer
- An unlocked iPhone with iOS 16 or later (all iPhone models introduced from 2018 onwards)
- Some features, such as Center Stage, Desk View, or Studio Light, are available only from certain models onward, like the iPhone 11 or 12 and later.
- Wi-Fi and Bluetooth should be turned on for both devices
- You can also connect your iPhone to your computer via USB
- A mount like the Belkin iPhone Mount with MagSafe, a tripod, or even just a stack of books to support your iPhone
Setup Instructions
Setting up Continuity Camera is a very straightforward process:
Step 1: Make sure that both your iPhone and Mac are connected to the same Wi-Fi network, paired via Bluetooth, or linked with a USB cable.
Step 2: Verify that both devices are logged into the same Apple ID
Step 3: Make sure that your Continuity Camera setting is turned on.
On your iPhone, open the Settings, then click on “General” then click on “AirPlay & Handoff”
Step 4: Turn the “Continuity Camera” switch on.
Step 4: Open any application, such as FaceTime or QuickTime Player, that uses your webcam, and you’ll see your iPhone available to choose as your video input.
That’s literally all you need to do!
When your iPhone is being used as a camera, you’ll see a message indicating it’s currently in use. To turn your device back to normal, you can either click on “Disconnect” on your iPhone or close the application that was using it as a camera.
Lastly, if you're having any hiccups with Continuity Camera, fear not! You can consult our handy guide on how to fix and troubleshoot the most common issues.
How to Use Your iPhone as a Webcam on a PC
Using your iPhone as a webcam on your PC isn’t much different from doing that on your Mac. However, the main difference is that you can’t use Continuity Camera. Instead, you’ll need to install third-party apps like Riverside, iVCam, or EpocCam.
With Riverside, you can leverage the full capabilities of your iPhone’s camera to record at up to 4K video quality with Standard plans or higher. It’s really easy to use, and you can use it to host and record video calls.
And don’t forget, Riverside works cross-platform, so everyone can connect with their devices, whether they’re iPhone, Android, macOS, or Windows PC.
This means that you can also use Riverside to connect your iPhone to a Mac, not just a PC!
Plus your guests won’t need to log in or create an account to connect their devices. Just downloading the app is enough!
Everything you record is integrated with Riverside Studio, making it a breeze to edit your videos, add captions, or reduce noise later on.
.webp)
Riverside’s key mobile app benefits:
- Up to 4K video quality (only for Riverside Standard accounts or higher)
- Easy-to-use interface where guests can join at the click of a button
- Can be used to host and record video calls
- Separate audio and video track recording so you have more flexibility editing
- Multi webcam feature where you can add your phone as a second camera angle.
The whole process is very simple. Let’s have a look.
Requirements
Here’s how to use your iPhone as a webcam on your PC. Let’s start with the requirements:
- A third-party app like Riverside, iVCam, or EpocCam
- Wi-Fi and Bluetooth should be turned on for both devices
- You can also connect your iPhone to your computer via USB
- A mount like the Belkin iPhone Mount with MagSafe, a tripod, or even just a stack of books to support your iPhone
Setup Instructions
The steps to follow will differ depending on the platform you’re using. Here, we’ll walk you through how to turn your phone into a webcam with Riverside.
Step 1: Log into Riverside on your desktop and go to an existing studio or create a new one. (You can learn how here.)
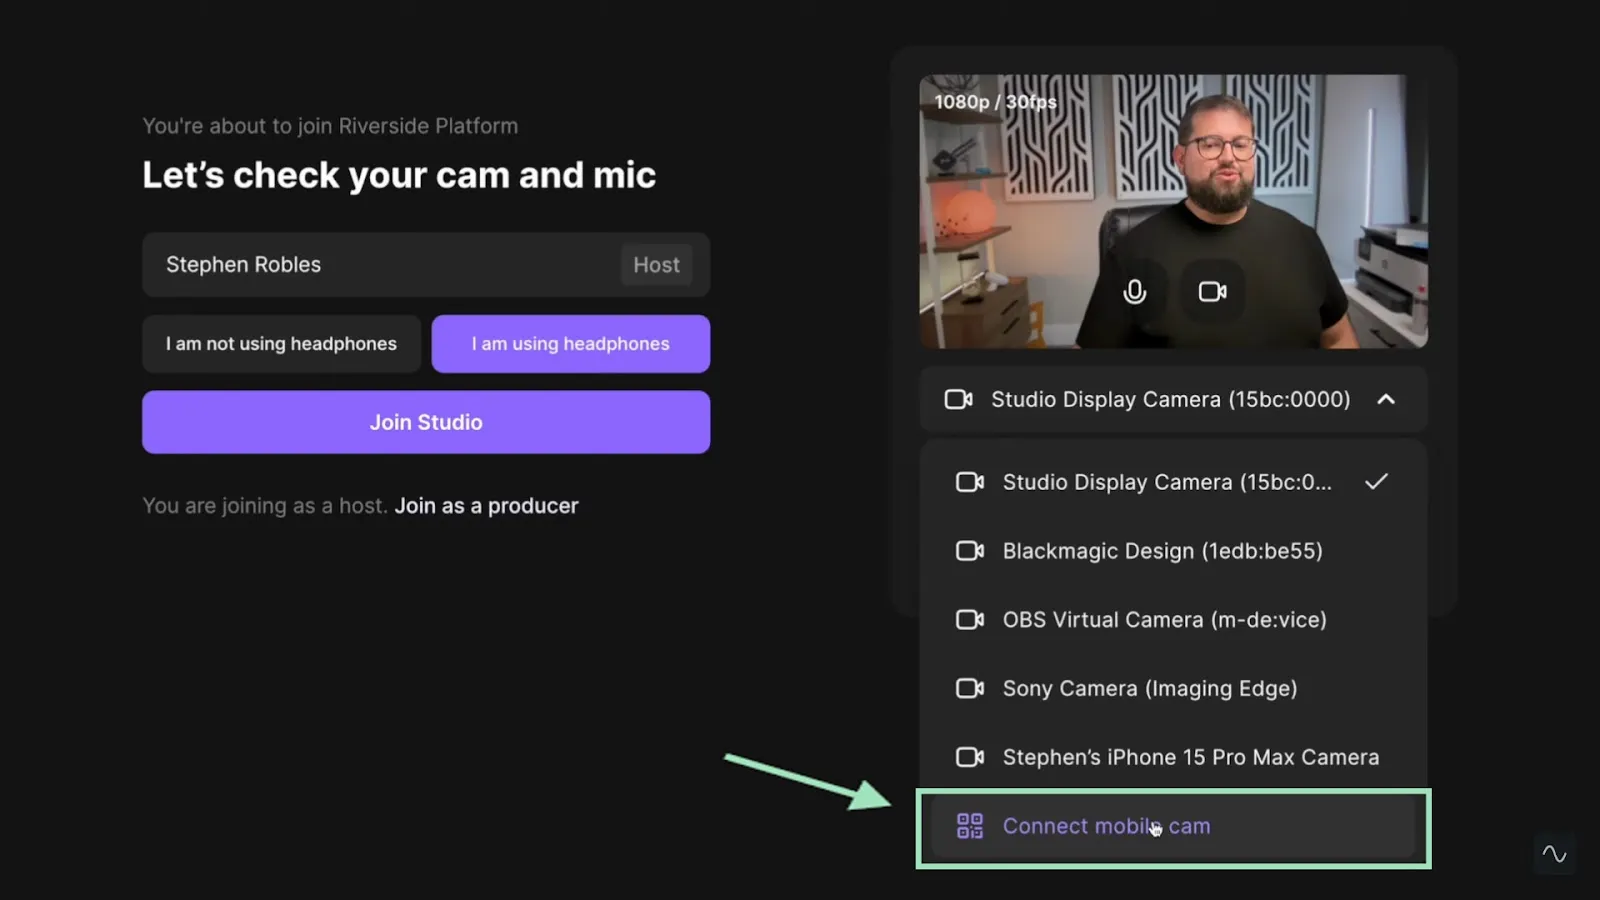
Step 2: In your studio dashboard, click on “Go to Studio” to access the lobby.
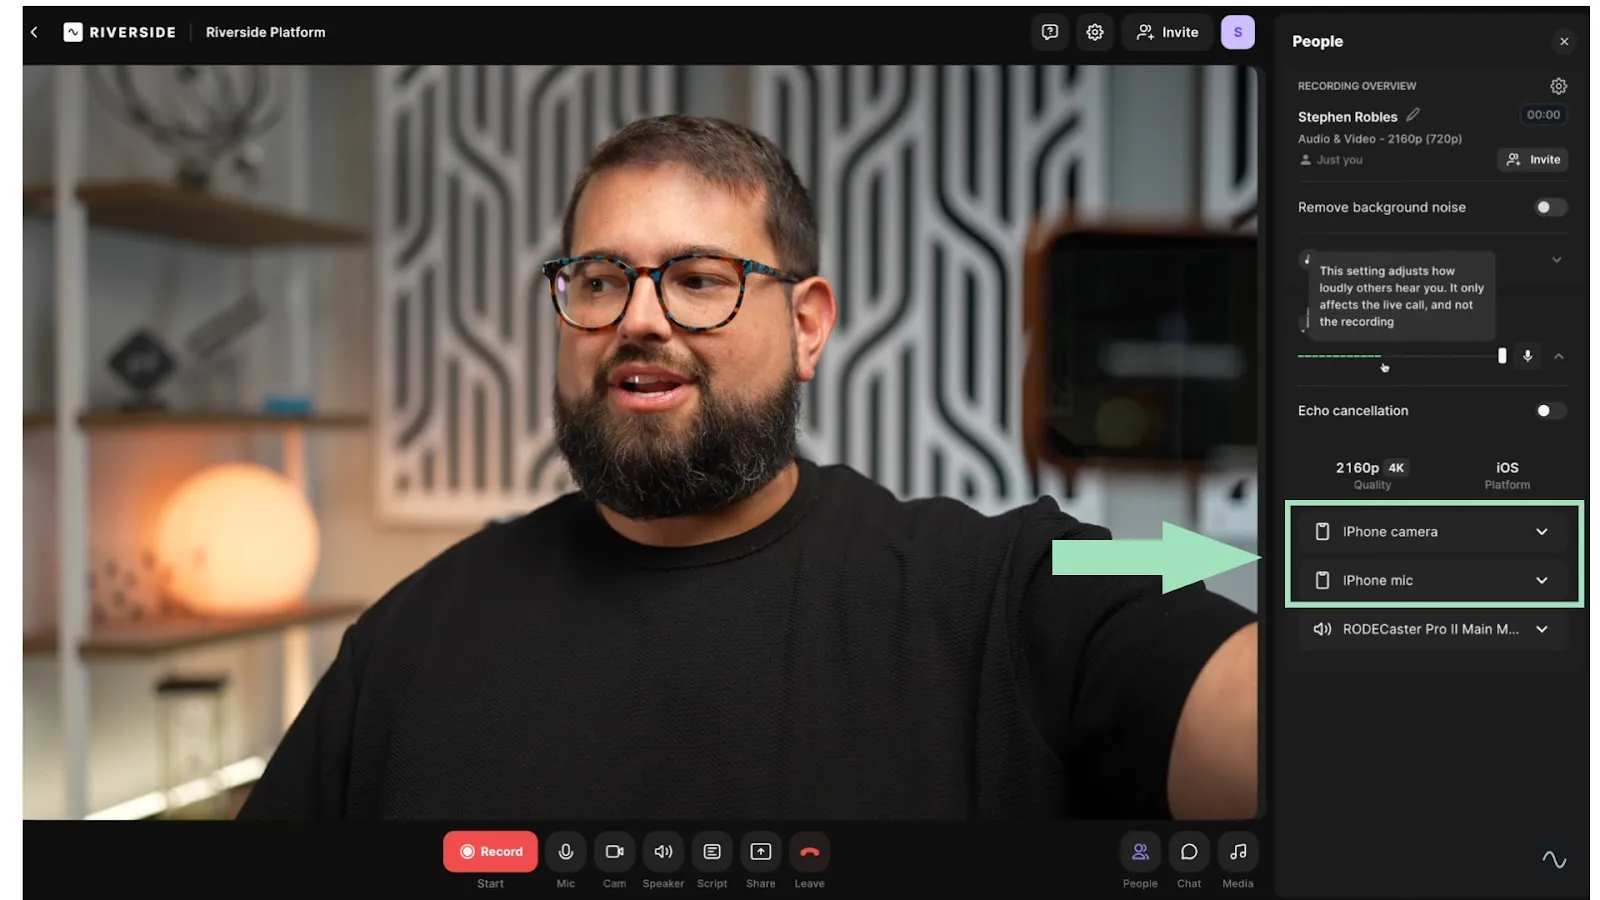
Step 3: On the right side of the lobby, you’ll see your video preview. Click on it, and in the drop-down menu where you normally choose your video input, you’ll see a new “Connect mobile cam” option at the bottom.
Step 4: A QR code will pop up in the middle of the screen. Scan it with your iPhone, then click on the yellow link at the bottom.
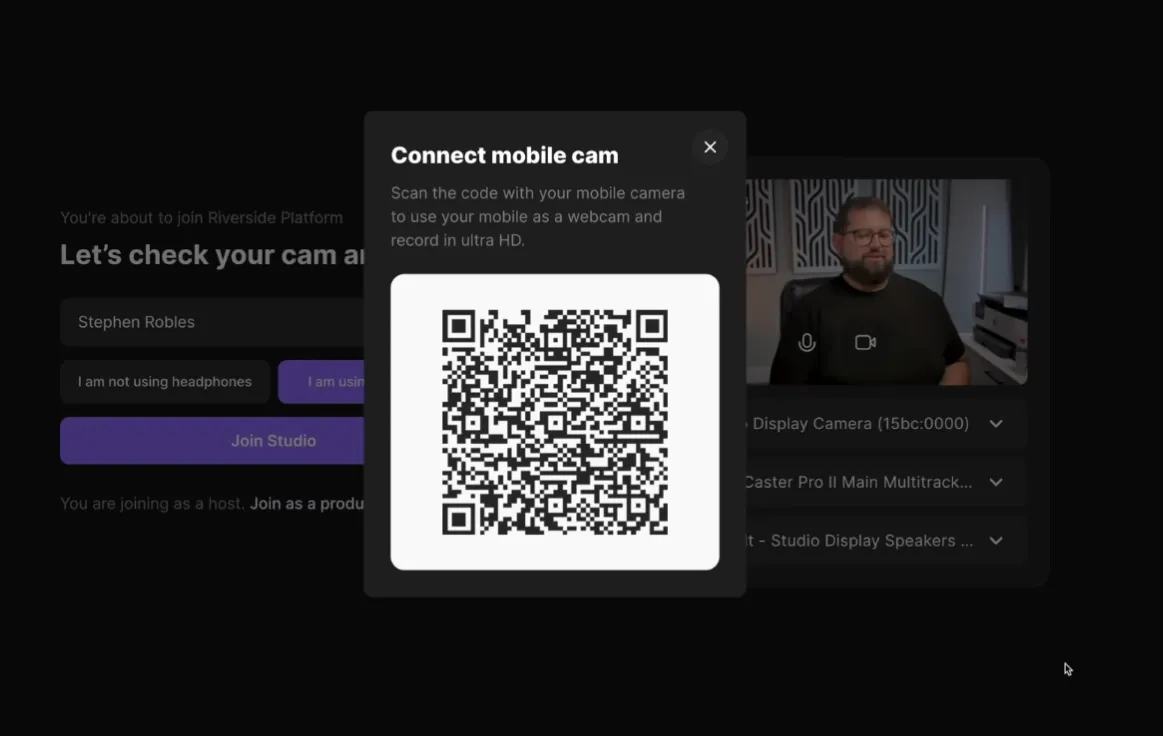
This will automatically open up your Riverside app, and you'll see that your camera is now connected.
The iPhone camera should now be your new video input. If you click on the microphone tab, you can also choose your iPhone microphone for your audio input.
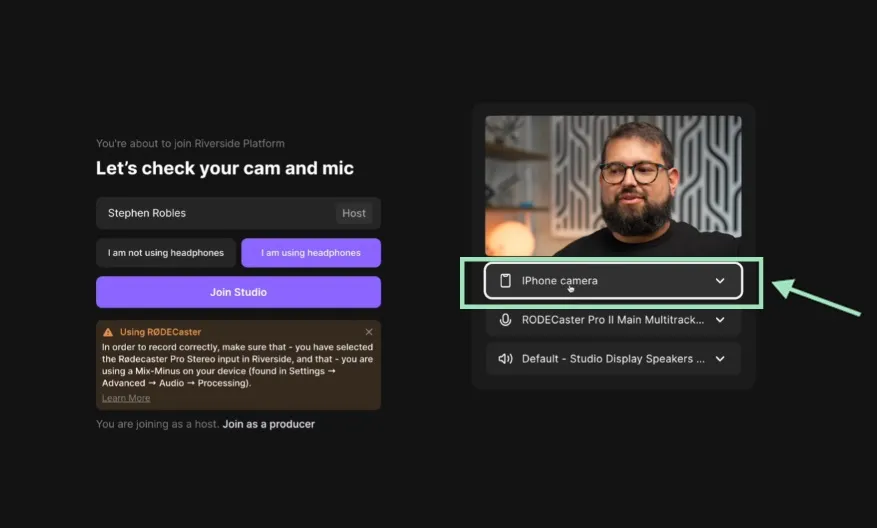
Step 5: Click on the “Join Studio” button. Once here, you can double-check that everything is set up correctly in the Riverside Studio's right-hand panel.
If you own a Riverside Standard plan or higher, you'll also notice how clear and crisp the image quality is while you’re recording in 4K resolution!
How to Use Your iPhone as a Webcam for Zoom and Google Meet
Zoom and Google Meet are popular platforms because they’re very user-friendly and many people are familiar with them. They’re used for a broad range of different other uses such as webinars, interviews, and video conferencing.
However, what Zoom and Google Meet can’t do is to provide the quality and reliability required to produce stunning content, rather than just average. Additionally, each participant's feed isn’t recorded locally, so if the internet connection isn't stable, the result will be of even lower quality.
In the world of podcasting, Zoom and Google Meet are like bread and butter — good, but nothing extraordinary, with a maximum resolution of just 1080p.
While you can't utilize the full resolution capabilities of the iPhone camera on these platforms, you might still want to use it as a wireless, easily portable webcam.
Here’s how to use your iPhone as a webcam on Zoom and Google Meet.
Requirements
To use your iPhone as a webcam for Zoom and Google Meet you need to set up a few things first.
Please note that while Mac users can easily enable the Continuity Camera feature, things are a bit more complicated for Windows PC users as you’ll need a third party app like Iriun or EpocCam.
- An unlocked iPhone with iOS 16 or later
- Wi-Fi and Bluetooth should be turned on for both devices
- You can also connect your iPhone to your computer via USB
- A mount like the Belkin iPhone Mount with MagSafe, a tripod, or even just a stack of books to support your iPhone
- A Mac running macOS Ventura OR a third-party app like Iriun or EpocCam (Windows PC only)
Setup Instructions (Mac)
Step 1: Setting up your iPhone as a webcam on Zoom is really easy if you’re using a Mac. You only need to turn on your Continuity Camera feature. You can check how to do this by following the instructions we provided above.
Step 2: Open Zoom or Google Meet on your desktop, and launch a mock session.
Step 3: Access the camera settings at the bottom (Zoom) or the general settings by clicking on the three vertical dots (Google Meet). A new “iPhone camera” option should appear. Depending on your iPhone model, you might also have access to additional Continuity Camera features like Desk View or Center Stage.
Setup Instructions (PC)
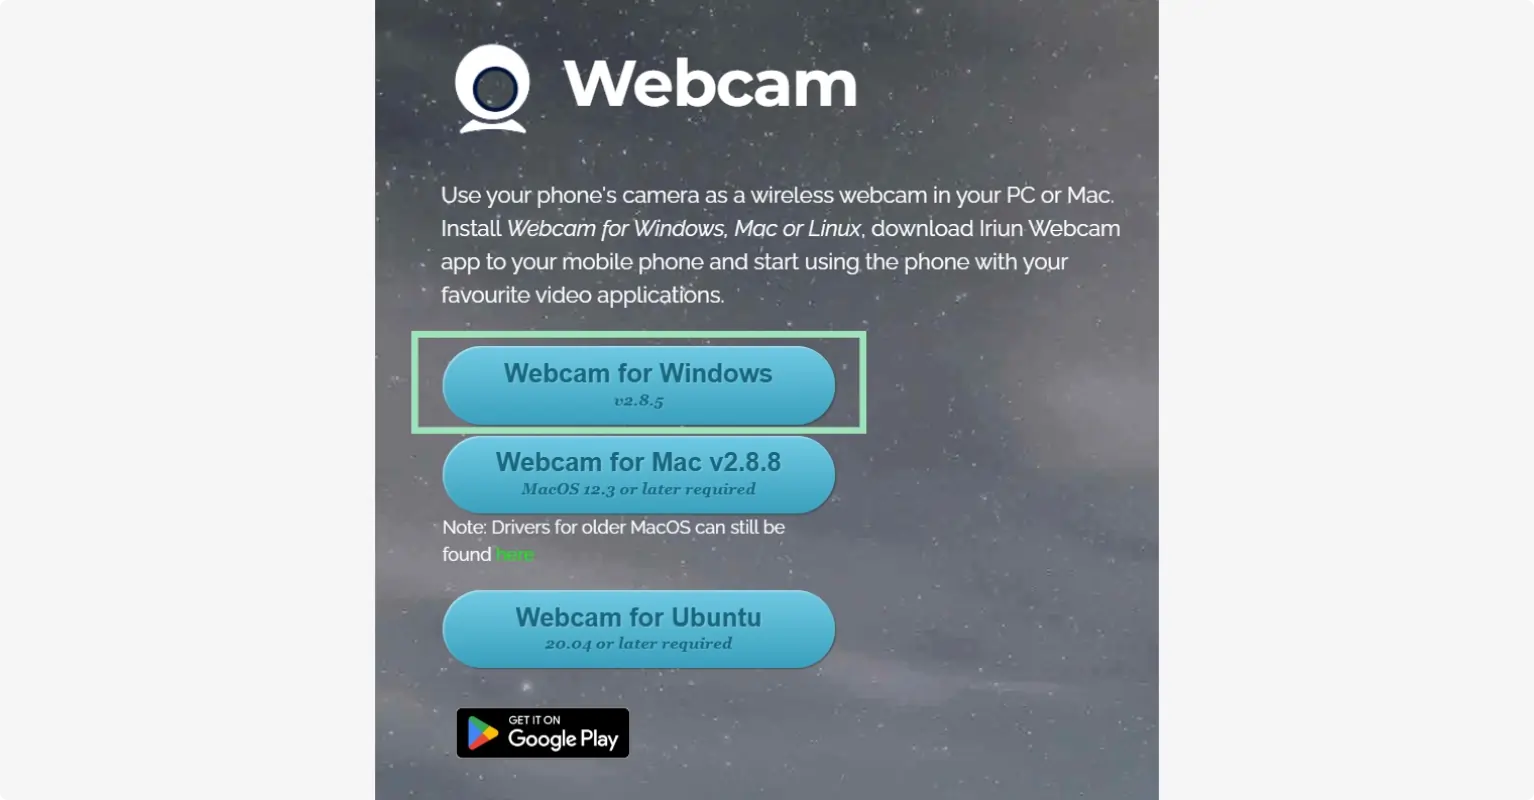
If you are on a Windows PC, you can’t use Continuity Camera. Therefore, you’ll need to install a third-party app like Iriun or EpocCam. In this example, we’ll go with Iriun.
Step 1: Go to https://www.iriun.com/ and click on “Webcam for Windows” to download and install the app on your PC.
Step 2: Return to your iPhone and download the "Iriun Webcam for PC and Mac" app.
Step 3: Make sure both your iPhone and PC are connected to the same Wi-Fi network.
Step 4: Open the app on your iPhone, follow the instructions, and click on “Let’s Go!”
Step 5: Once the app displays "Waiting for connection," also open the Iriun app on your PC and wait for the two apps to connect. If everything worked, you’ll see the live feed from your iPhone camera.
Step 6: Finally, open Zoom or Google Meet on your desktop. Start a mock session, then access the camera settings at the bottom (Zoom) or the general settings by clicking on the three vertical dots (Google Meet). You should see a new option labeled "Iriun camera". Click on it, and you're all set!
Zoom and Google Meet prioritize speed by compressing video and audio, making them less than ideal for podcasting. Riverside, on the other hand, prioritizes quality and can leverage your iPhone camera’s 4K resolution.
Things to Consider
If you’re struggling with Iriun, or if you're using an older iPhone or Mac that doesn't support Continuity Camera, there are other options available. Apps like EpocCam, Camo, or Shoot all work in a similar manner.
Simply install the app on both your iPhone and your PC or Mac, and then run them simultaneously. Once they're synchronized, you should be able to select your iPhone from the camera settings in Zoom or Google Meet.
If you want to know more, you can check our guide on how to use your phone as a webcam to record HD videos here.
How to Use Your iPhone as a Webcam for Streaming
Before you upgrade your webcam for live webinars, podcasts or Twitch streaming sessions, remember that you've already got an iPhone, which is likely better than any camera you might consider buying!
Take, for instance, the iPhone 13 Pro and Pro Max – they boast fantastic picture quality thanks to their three-lens camera setup.
You’ll need to use dedicated streaming software such as Riverside to do this.
So, let’s get into how to set up your iPhone to become your ultimate streaming companion!
Requirements
While you can choose from a variety of platforms, here’s how to use your iPhone as a webcam for streaming with Riverside. Let’s start with the requirements:
- A Riverside Standard account or higher
- An unlocked iPhone with iOS 16 or later
- Wi-Fi and Bluetooth should be turned on for both devices
- You can also connect your iPhone to your computer via USB
- A mount like the Belkin iPhone Mount with MagSafe, a tripod, or even just a stack of books to support your iPhone
Setup Instructions
Step 1: Connect your iPhone as a webcam on Riverside. You can do that by following the instructions provided above for Windows PC.
Step 2: On the Lobby page, enter your details and click “Join Studio”.
Step 3: Once you’ve created a new studio, you can send an invite link to your guests and audience by clicking on “Copy link” or by manually copying and sharing the link displayed in the middle of the screen.
Step 3: At the top of the Studio, click “Live Stream off” and then choose the icon of the social you want to stream on under “Stream to social”.
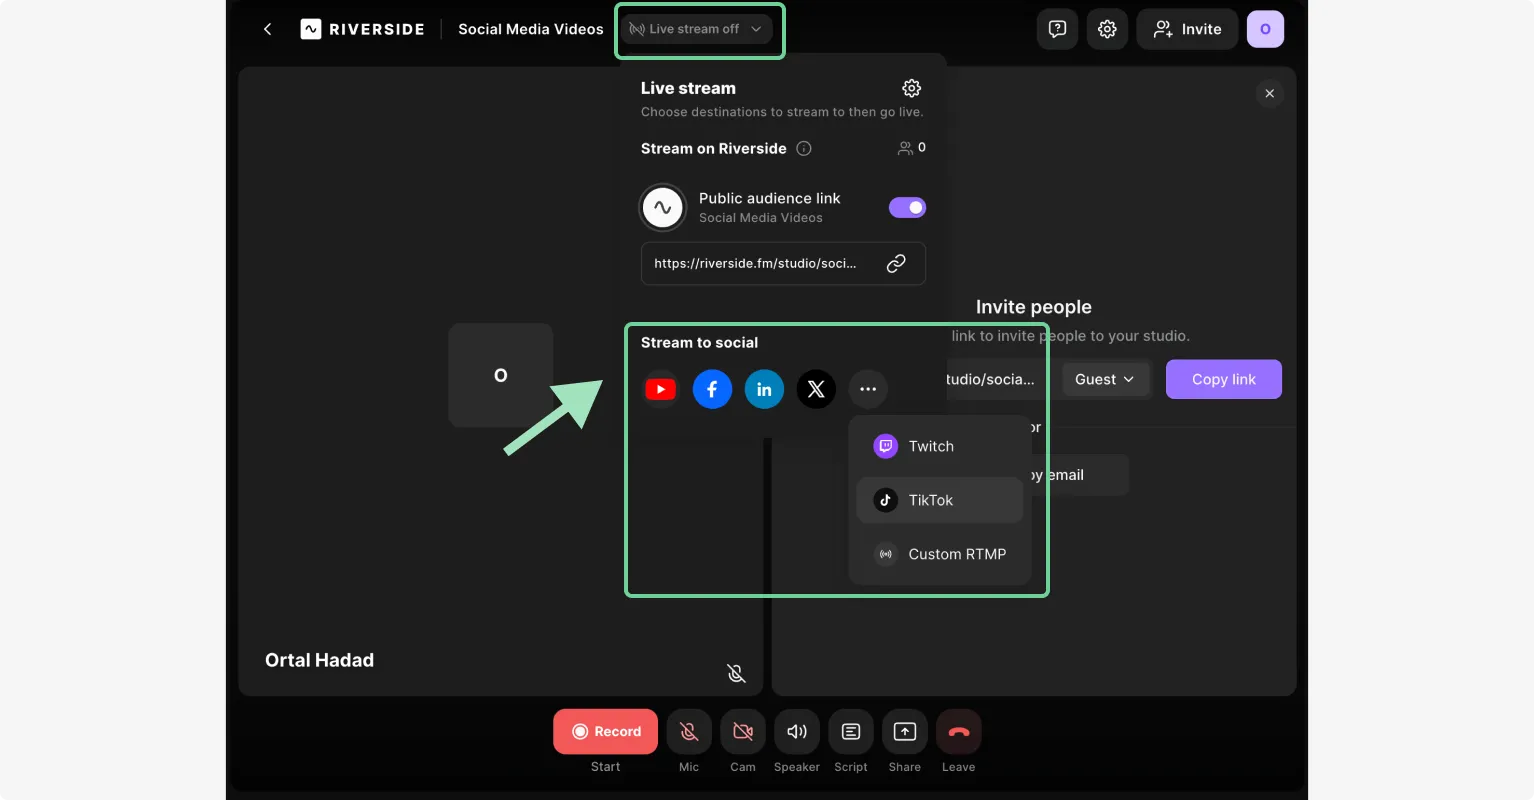
Step 4: Log into your social media account. Give Riverside’s authorization for the social media platform.
All your connected accounts will now show up under “Stream to social”. Make sure that the platforms you want to stream to are toggled on.
(You can also enter a title and description by clicking “Welcome to our live show!”)
You can also connect to any custom service by entering any RTMP address.
Step 5: You’re now ready to go live. Just click on the “Record” button to start recording on your Riverside Studio panel.
Note: Your recoridng settings need to be set to public for this to work. You can do this by going to “General” and ensuring your “Security” setting is set to “Public” to enable live streaming.
Things to Consider
To prevent any risk of your video cutting out or dropping frames during recording, you might want to avoid using a wireless connection between your iPhone and computer. Instead, connect your iPhone to the computer with a USB cable.
Use an iPhone as a Webcam: Key Tips
- Make sure your iPhone is compatible: Ensure your iOS version is updated to 16.0 or higher, and make sure your iPhone is unlocked!
- Anything can work as a stand for your phone: If you don’t have a Belkin iPhone Mount with MagSafe, you can use any kind of stand — from a tripod to just a stack of books.
- Choose software that offers high-quality recordings: Continuity Camera is the default way to go and it’s super quick, but it doesn’t capitalize on the full capabilities of your iPhone since it’s capped at 1080p resolution. If you want to make high-quality recordings, you will need a third-party app that supports 4K resolution like Riverside.
- Don’t forget to plug in your battery: If you’re going for a long recording session, you might want to connect your iPhone via a cable to avoid draining its battery.
Final Thoughts
In many ways, an iPhone is a superior alternative to many commercially available webcams. It has one of the most powerful cameras available, can be moved around or fixed with a tripod, and can serve as a secondary webcam.
Using an iPhone as a webcam is simple and straightforward, whether you're on a PC or a Mac. With Riverside, it’s even easier to set up and fully utilize its capabilities, such as 4K resolution!
FAQs on How to Use an iPhone as a Webcam
Is an iPhone a good webcam?
An iPhone can serve as a powerful webcam. Its camera features a high megapixel count and large sensors, and it's lightweight and easy to set up. However, using it extensively can quickly drain its battery, so be sure to keep it plugged in during longer sessions.
How do I turn on camera access?
Go to Settings > Privacy, then click on Camera to see a list of all apps with access to your camera. To allow access for an app, simply turn on the switch next to it.
How to use your iPhone as a webcam on Windows 10 and 11?
Some apps, like Riverside, can recognize your iPhone on your Windows PC by following a simple procedure. However, if you need to use your iPhone as a webcam on platforms like Zoom or Google Meet, you might need to install a third-party app such as Iriun, EpocCam, Camo, or Shoot.
Why can't I find Continuity Camera on the App Store to install it?
You can’t find Continuity Camera on the App Store because it isn’t an app, but a built-in feature of iOS and macOS. In order to use it, you simply need to update the operating systems of your Mac and iPhone to macOS Ventura 13.0 and iOS 16 or later.


.webp)

