Table of contents:
Closed captions vs. open captions
Why should you use closed captions?
How to add closed captioning to a video manually
How to add closed captions to a video automatically
How to add captions with Riverside
How to add closed captioning to a video on Mac
Closed captions for videos on social media
Key takeaways:
- Enhance video accessibility: Use closed captions to reach viewers with hearing impairments or those watching without sound.
- Improve video SEO: Closed captions help search engines index your content, boosting visibility and ranking.
- Choose the right tools: Use platforms like YouTube, iMovie, or Riverside to add captions manually or automatically.
- Simplify with Riverside: Generate accurate transcriptions in 100+ languages and export SRT files easily to create closed captions.
Captions are vital; if your video doesn’t include them, you're not catering to the large percentage of audiences who watch videos without sound. Let's look at how to add closed captions to videos manually and automatically, as well as on platforms like YouTube, TikTok, Facebook, and Instagram. We’ll also give you free tools to instantly generate closed captions by just uploading your video.
What are closed captions?
Closed captions are captions users can toggle on or off in a video.
Captions are text versions of a video's dialogue and audio. Unlike subtitles, they include text descriptions of background noise, sound effects, and other audio besides spoken words.
Captions are common across video and distribution channels, including television and social media. They often appear at the bottom of a video and show its transcript in real time.
People use captions to make their videos more accessible. For example, some viewers may have difficulty hearing, whereas others prefer to watch content without sound.
Read more: What is Closed Captioning?: Best Practices, Formats & Guidelines
Closed captions vs. open captions
Closed captions and open captions are very similar, with only one key difference.
Closed captions are available at the viewer's discretion. This means you can turn captions on or off using closed caption settings depending on whether or not the viewer wants to see them.
Conversely, open captions are always on. Creators usually burn open captions onto their videos during editing, making it impossible fo viewers to turn them off.
“In one social media campaign, we created bite-sized promotional videos for a brand launch. These featured open captions because they were designed to grab attention as people scrolled. By placing the text in vibrant, eye-catching formats, we increased click-through rates significantly.” - Roland Jakob, Managing Partner at BlazeKin.Media
Why should you use closed captions?
If you're creating video content, closed captions offer several advantages and benefits.
Increased accessibility
One of the key advantages of closed captioning is its capacity to improve accessibility.
Sound-driven video content can be inaccessible and difficult to understand for some viewers when interpretation relies on audio information. This is true for people with hearing difficulties, people who speak another language, or even people who simply prefer to keep sound off.
By including closed captions in your videos, you can invite all viewers to participate in your content, expanding your audience.
Improves SEO and searchability
Closed captioning can enhance your reach by boosting your search engine optimization (SEO). Good SEO helps improve your content’s chances of ranking high on search engines. In turn, this makes your content easier to find and discover.
Closed captions allow you to incorporate video metadata, including SEO keywords. When audiences search these keywords, it’s more likely your content will show up. The more you optimize, the better chance your videos have to climb to the top of search results on Google, YouTube, or other platforms.
“For educational content or webinars, I prefer using closed captions. For example, during a recent online course I produced, I provided closed captions to accommodate international students who might benefit from reading along in English while listening to the lecture. This flexibility has been well-received and has enhanced the overall learning experience.” - Erika Mac Donald - CEO at Engaging New Media
How to add closed captioning to a video manually
Step 1: Generate a transcript
First, you must generate an accurate transcript for your video content. You can do this by manually transcribing audio information or using automatic captions with a tool like Riverside. This can help you obtain a written transcript quickly and easily.
Step 2: Save an SRT file
Next, save and export your captions as a TXT or SRT file. TXT files are text-only files, while SRT files are specifically for video use. Generally, SRT files are the best choice for fluid, reliable captions. You can open your SRT file and make changes, such as correcting errors or adding action and music tags to illustrate sounds.
Step 3: Combine video and subtitle files
Finally, it's time to combine your subtitles with your video. You can create closed captions by simply uploading the two files (video and SRT) to your chosen publishing platform.
How to add closed captions to a video automatically
Some tools allow you to access automatically generated captions with ease. Let's take a look at some of the best options available.
How to add captions with Riverside
Riverside is a platform that allows you to record high-quality videos (up to 4K) and upload them to social media platforms such as YouTube, Facebook, Instagram, TikTok, and LinkedIn.
Riverside's greatest strength is that it can generate accurate transcripts in over 100 languages, which can then be downloaded in SRT format. These transcriptions also differentiate between speakers, so you can see who is talking.
How to add captions with Riverside in-app
If you want to record a video using Riverside and download captions, here’s how:
Step 1: Log in to your Riverside dashboard. Then, record a video using Riverside.
Step 2: After recording, a “View recordings” pop-up will appear at the bottom left. Click on it to view your recording.
Step 3: Click on the thumbnail of the video. Scroll down. You should see an option for Transcript at the bottom marked as “Ready.” This means your transcription is done.
To download your transcription, click “Download.” Click “Transcript” if you want a TXT file of your conversation divided by speaker. Or click “Subtitles” to get an SRT file with timestamps.
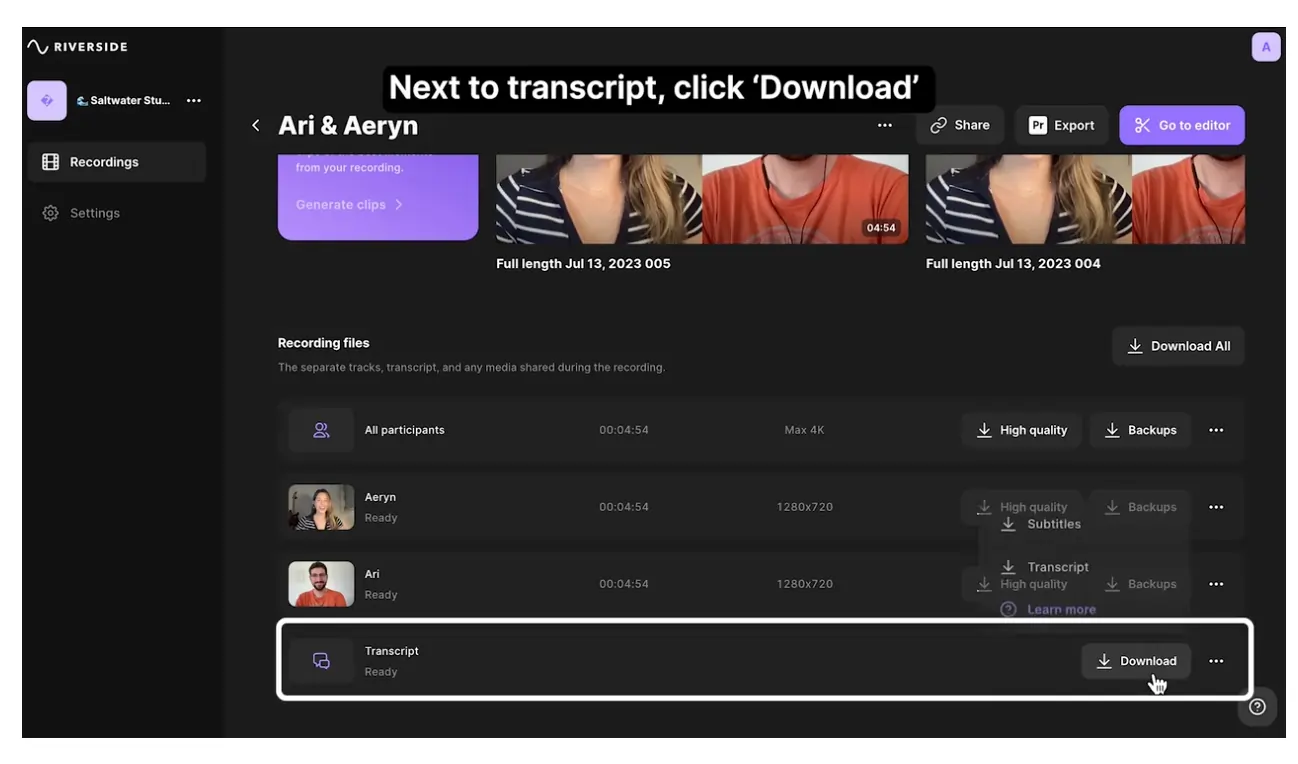
We suggest SRT files as they’re better for captions.
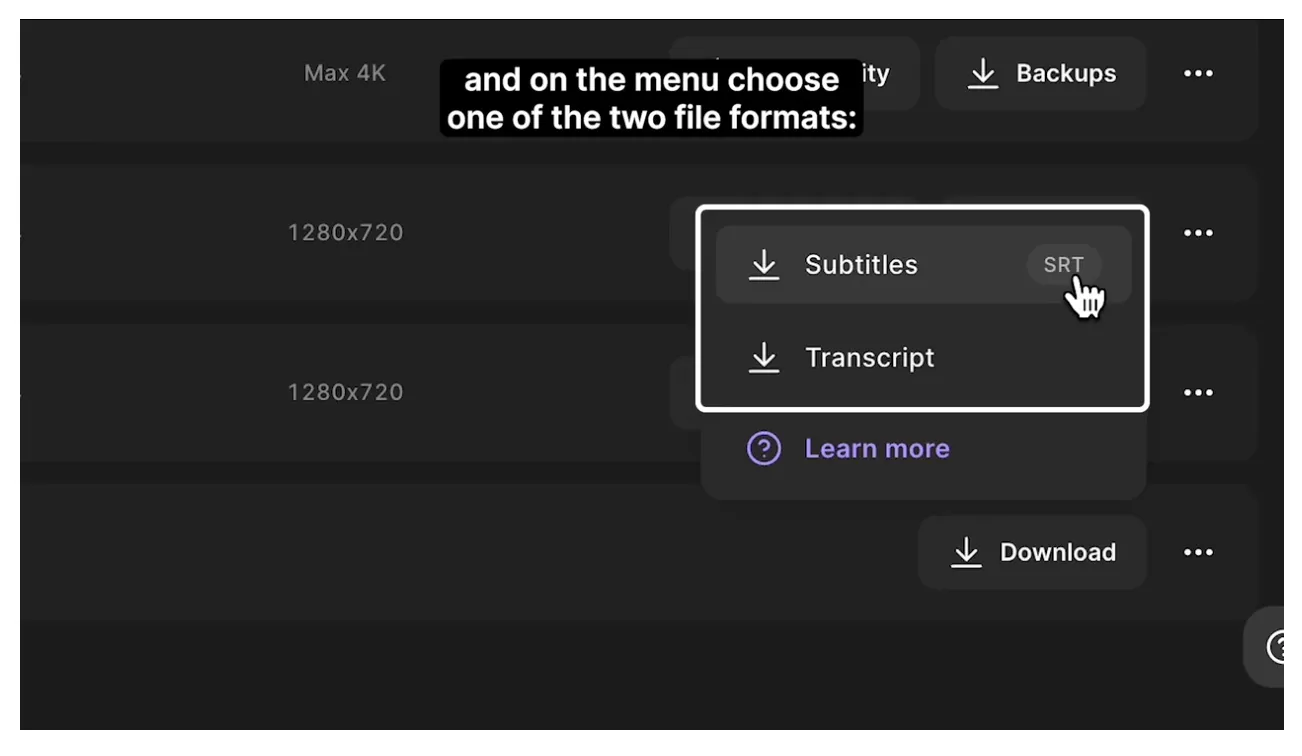
Step 4: Upload captions and video content to your chosen publishing channel.
How to add captions using Riverside’s free online transcription tool
Riverside has a free online transcription tool to drop an audio or video file and get transcription in 100 languages. Here’s how to access and use the tool:
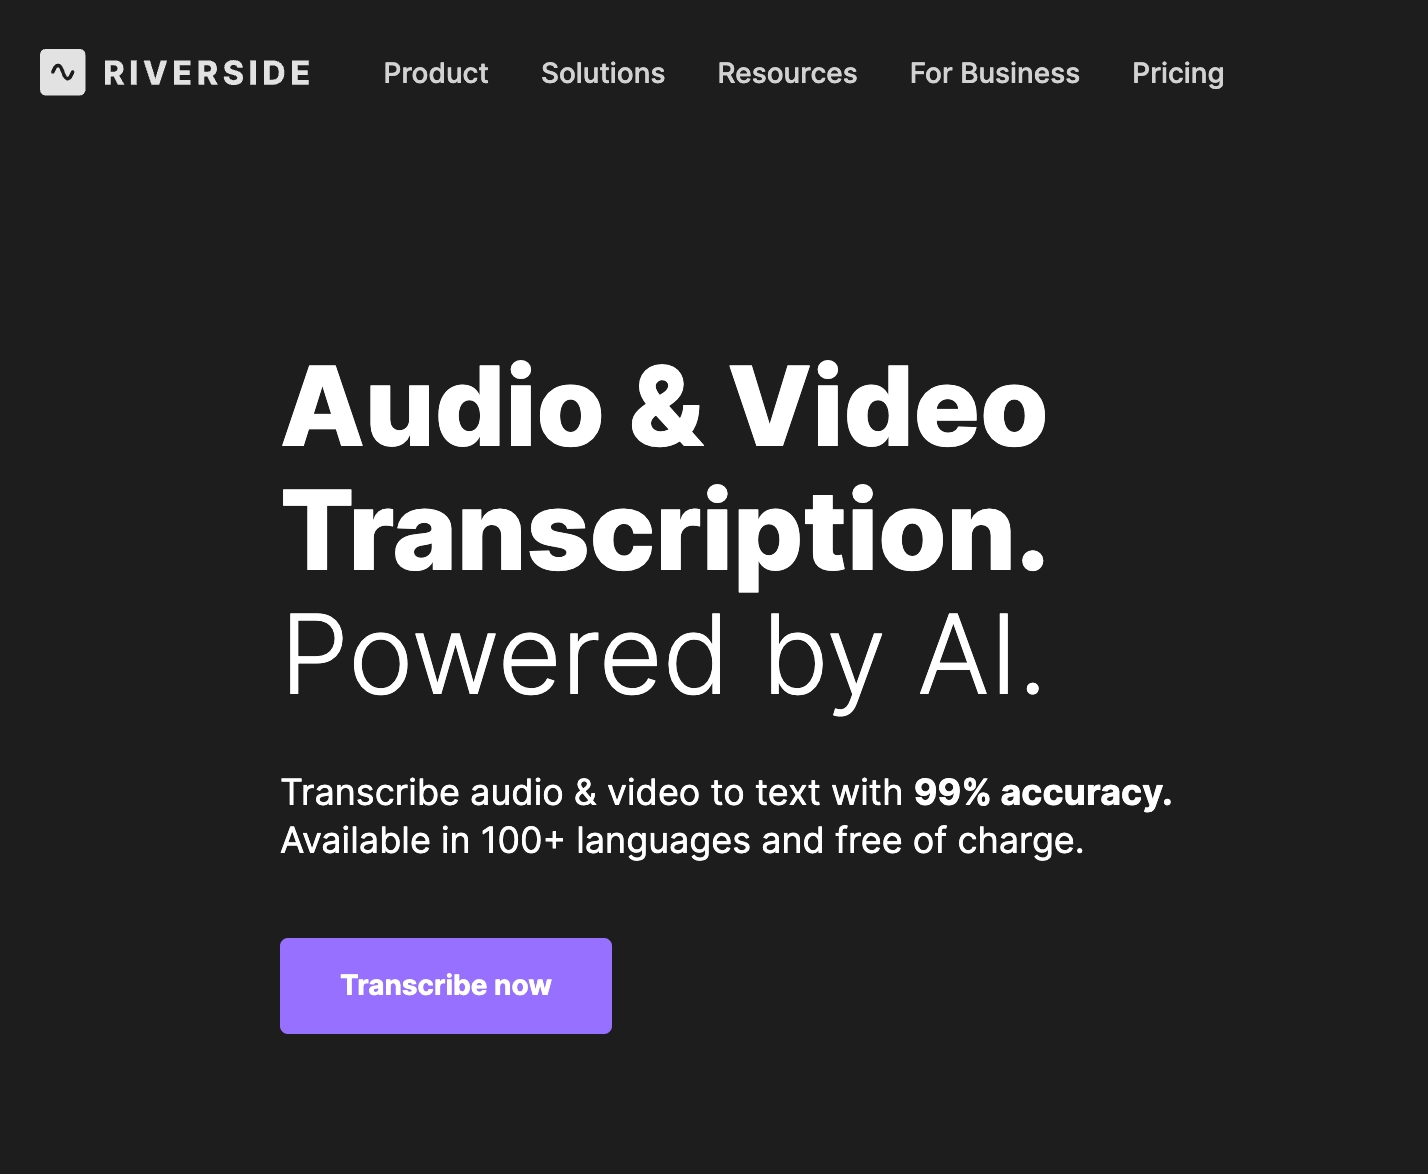
Step 1: Click on the audio and video transcription link. Then click on “Transcribe now.”
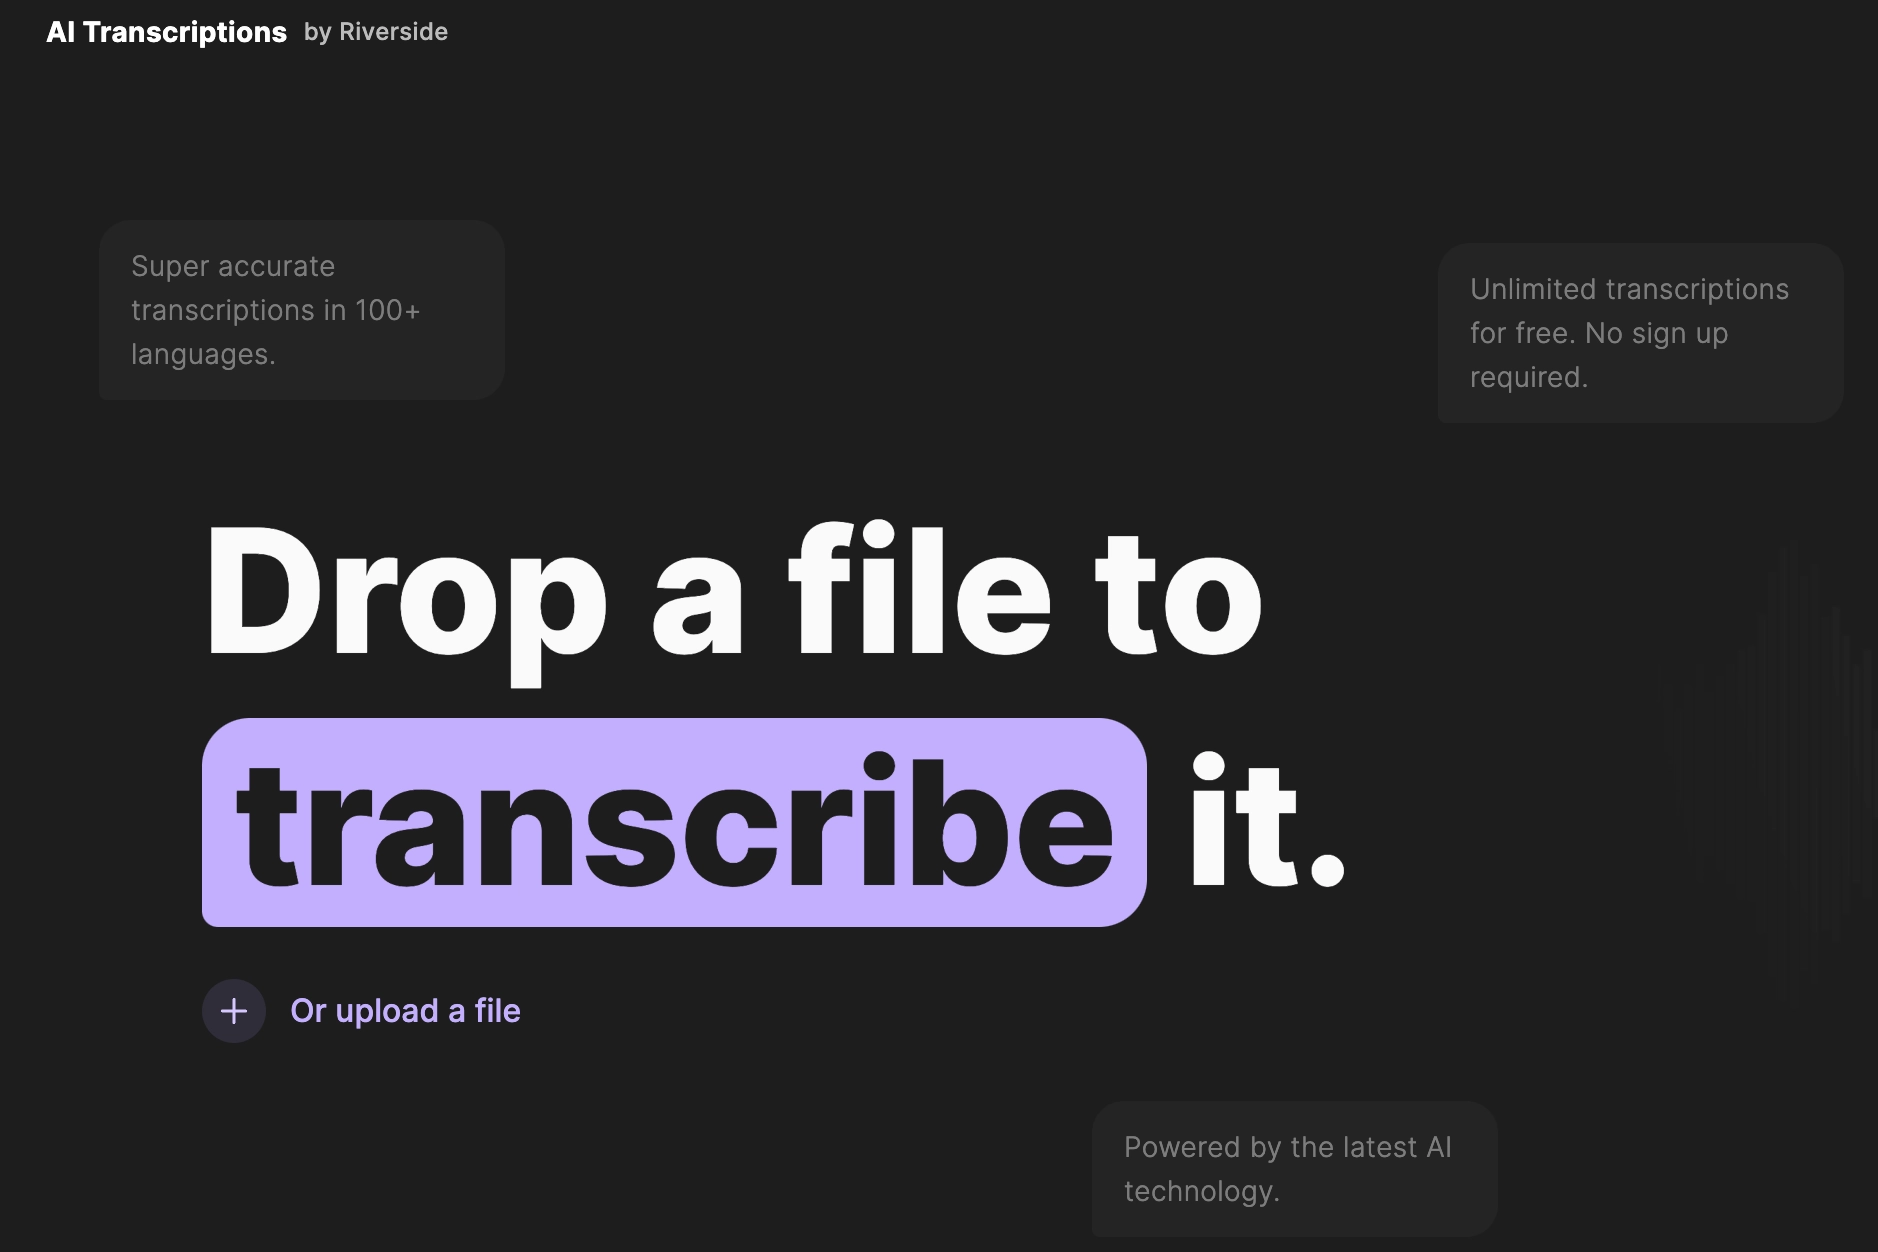
Step 2: Choose your audio/video file (MP3, WAV, MP4, MOV) from your device and drag and drop it onto the page. Alternatively, press the “+” icon and upload your file.
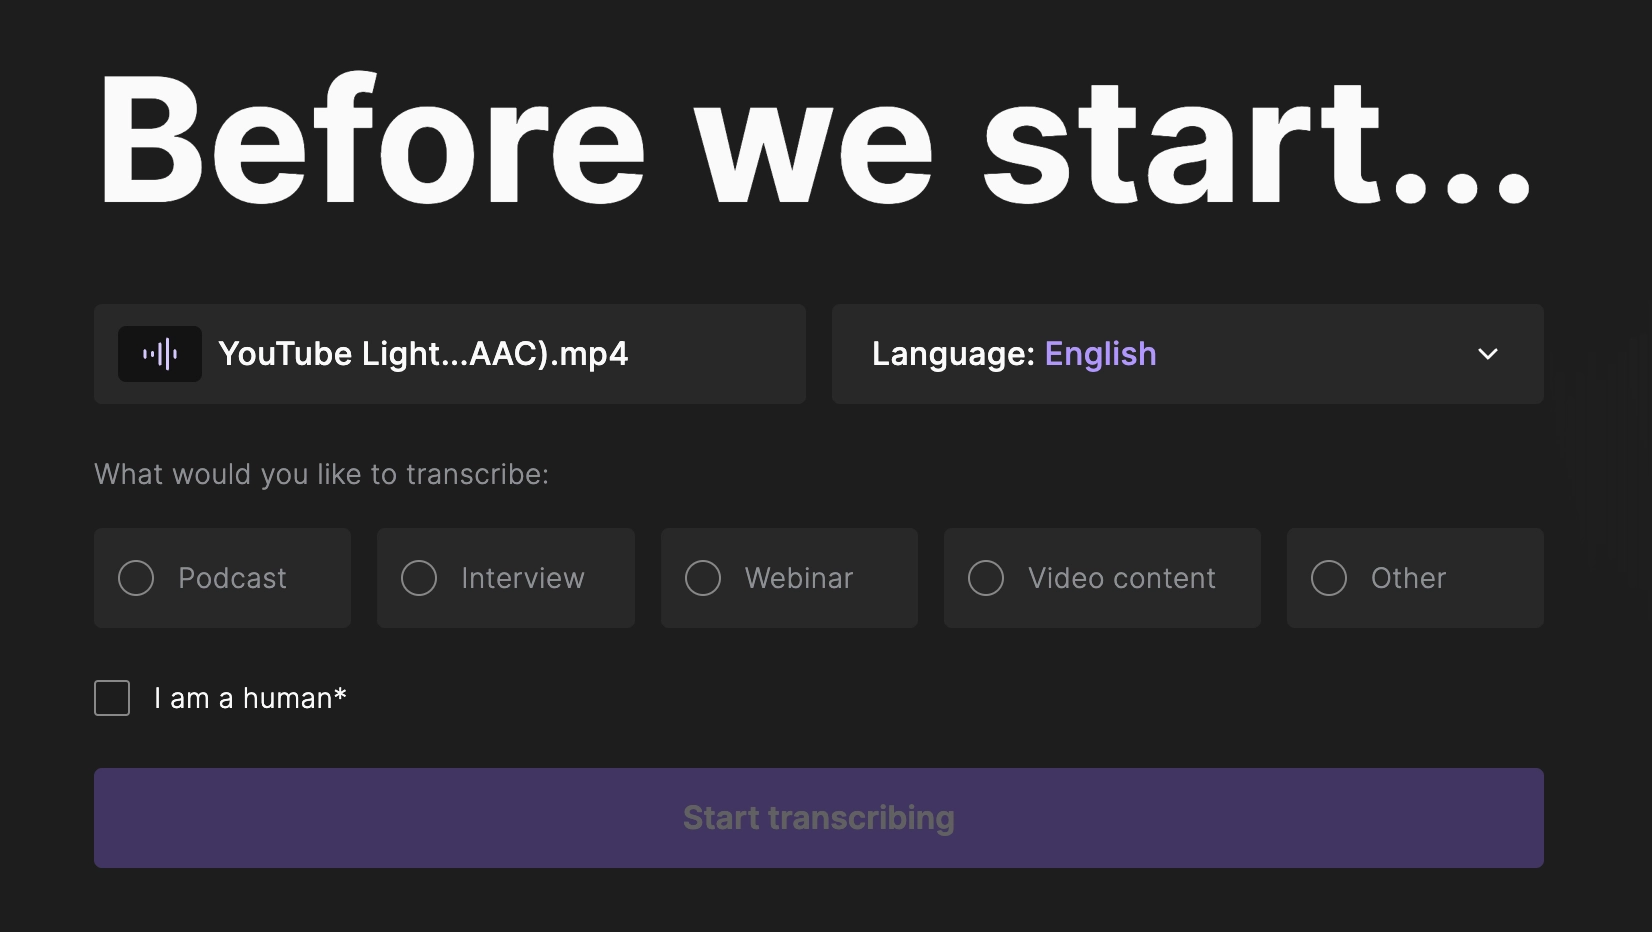
Step 3: On the following page, choose among the 100+ languages to generate a caption in that language. Then decide what kind of video you’re transcribing (podcast, interview, webinar), click “I am a human,” and click “Start transcribing.” Then, wait for the transcribing to get over.
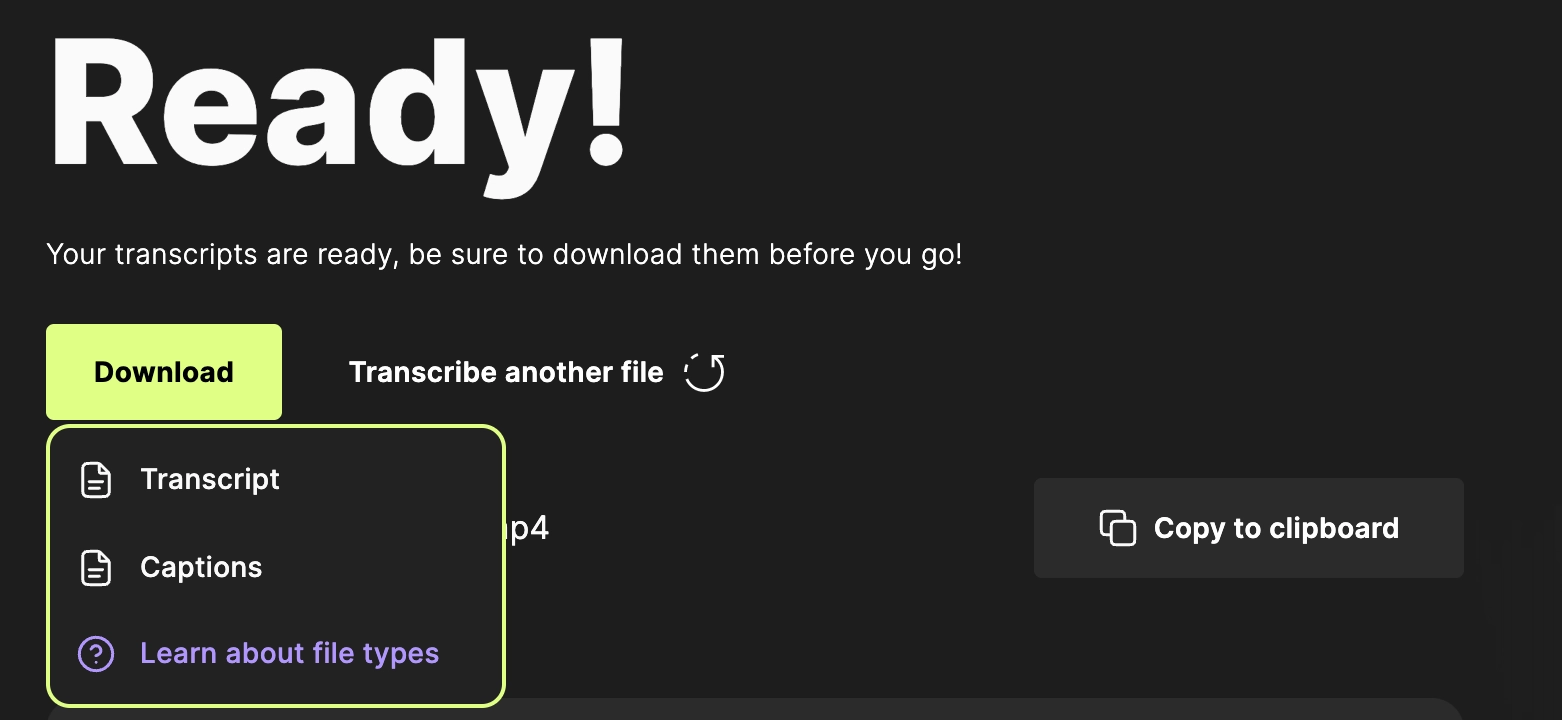
Step 4: Wait for the transcription to be done. Then, choose between transcript (TXT file) and captions (SRT), and download the file.
How to add closed captioning to a video on Mac
Here are some steps to add closed captioning to a video on Mac:
Step 1: Open iMovie and create a new project.
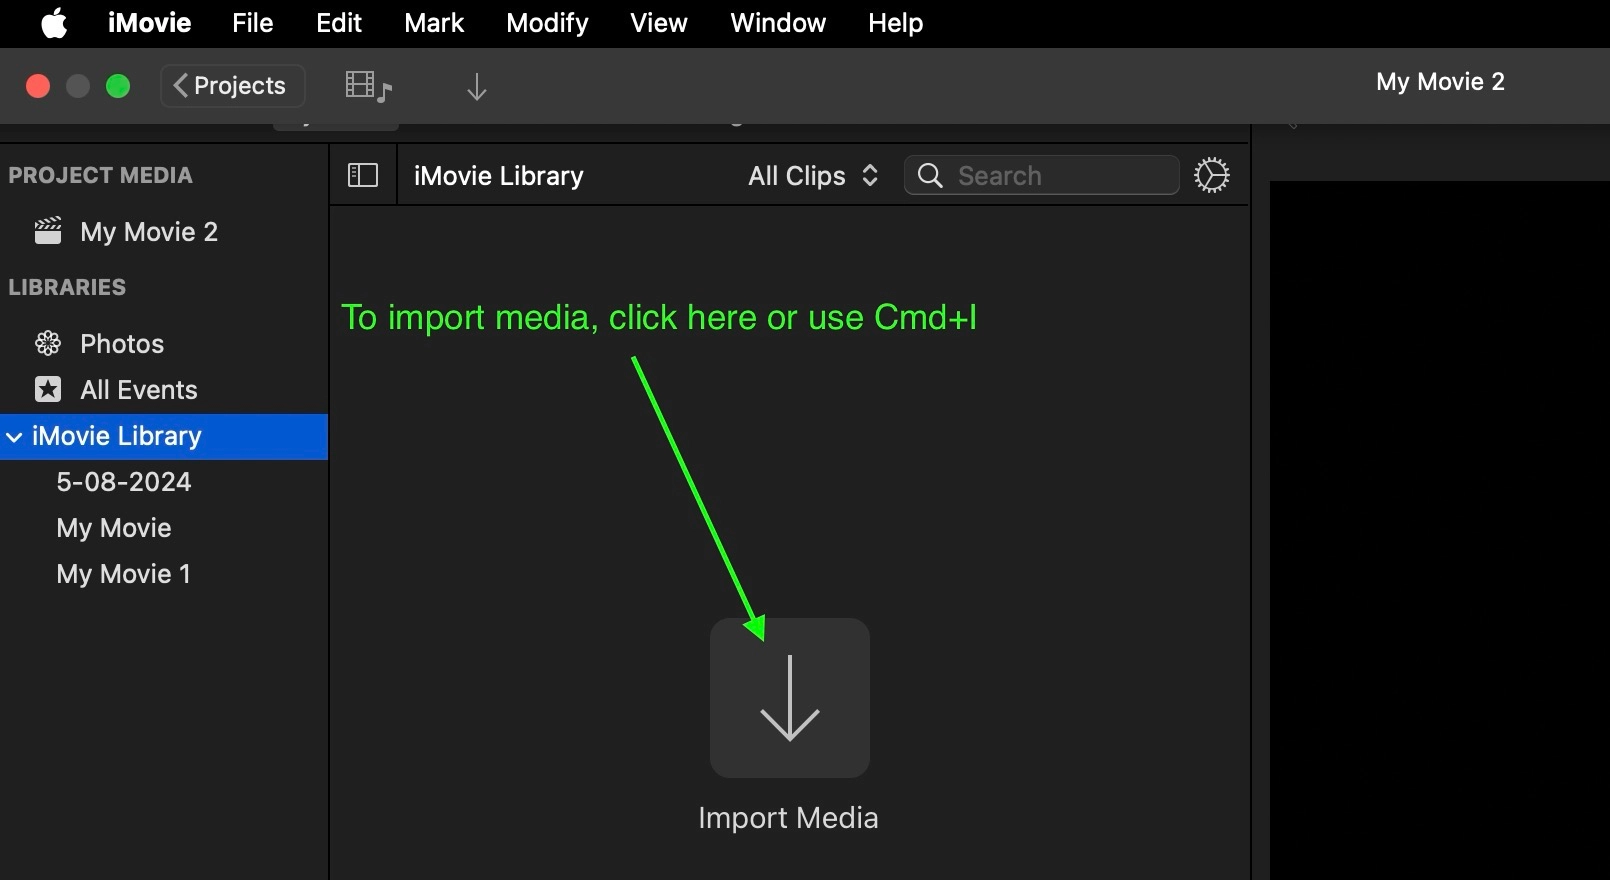
Step 2: To import the video you want closed captioning for, click on File, then “Import Media.” Alternatively, you can click “Cmd+I” or the prominent “Import Media” button.
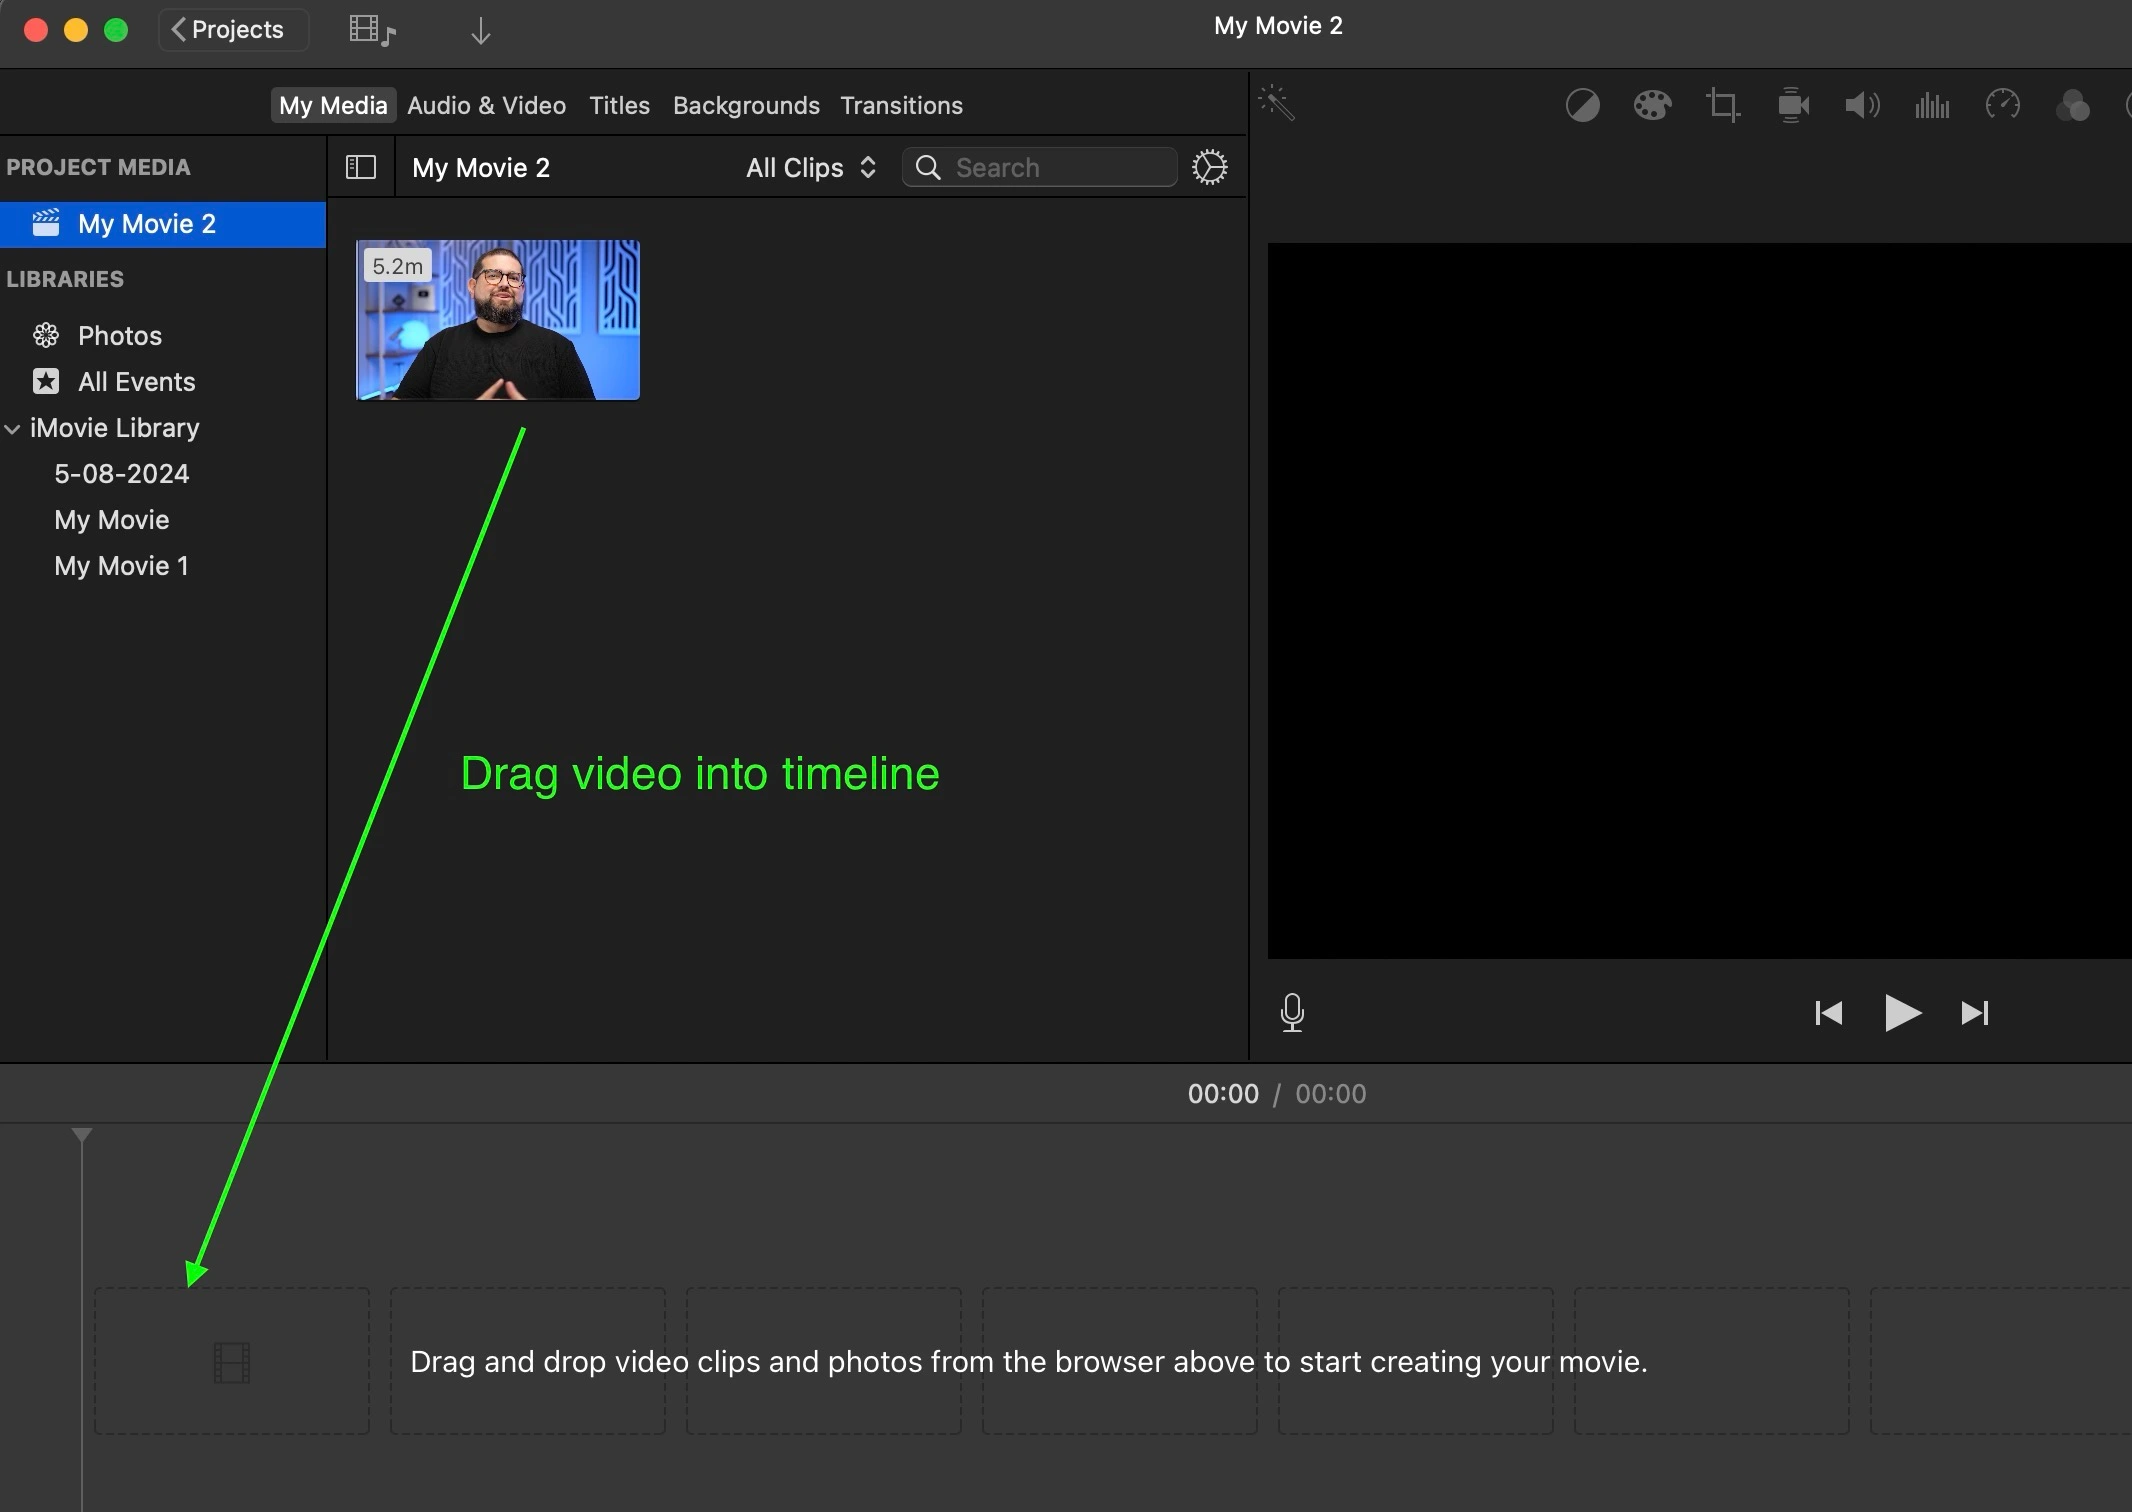
Step 3: Drag your video to the timeline at the bottom of the iMovie window.
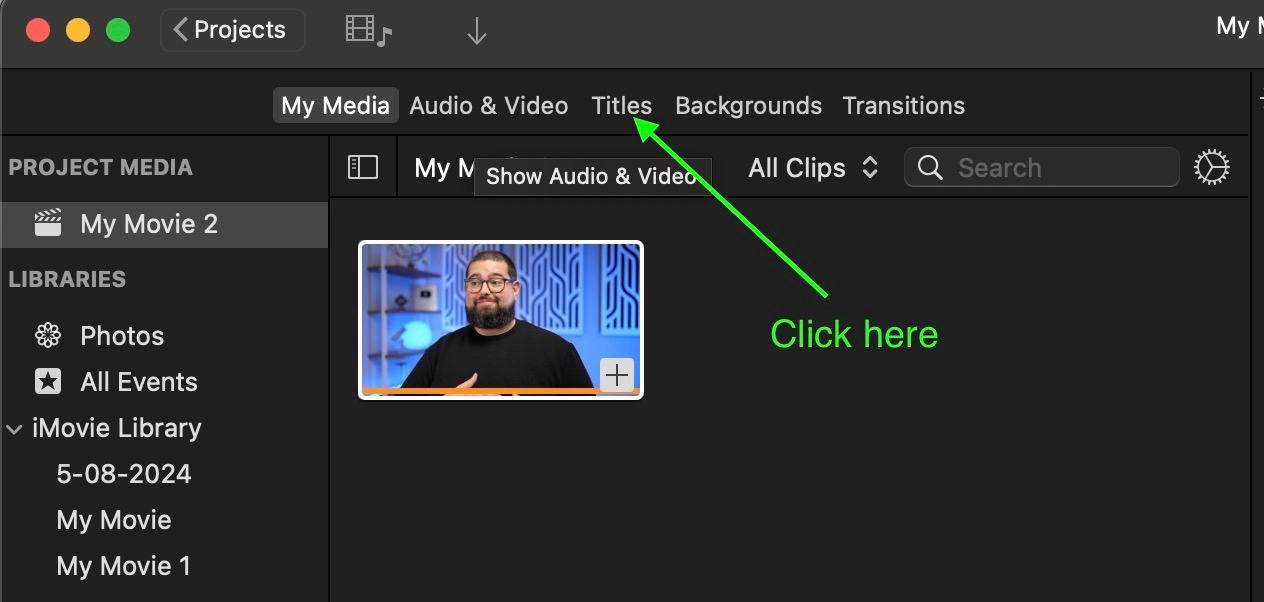
Step 4: Click the “Titles” button in the toolbar above. Select a title style for your captions. Then, drag and drop the title above the video clip in the timeline.

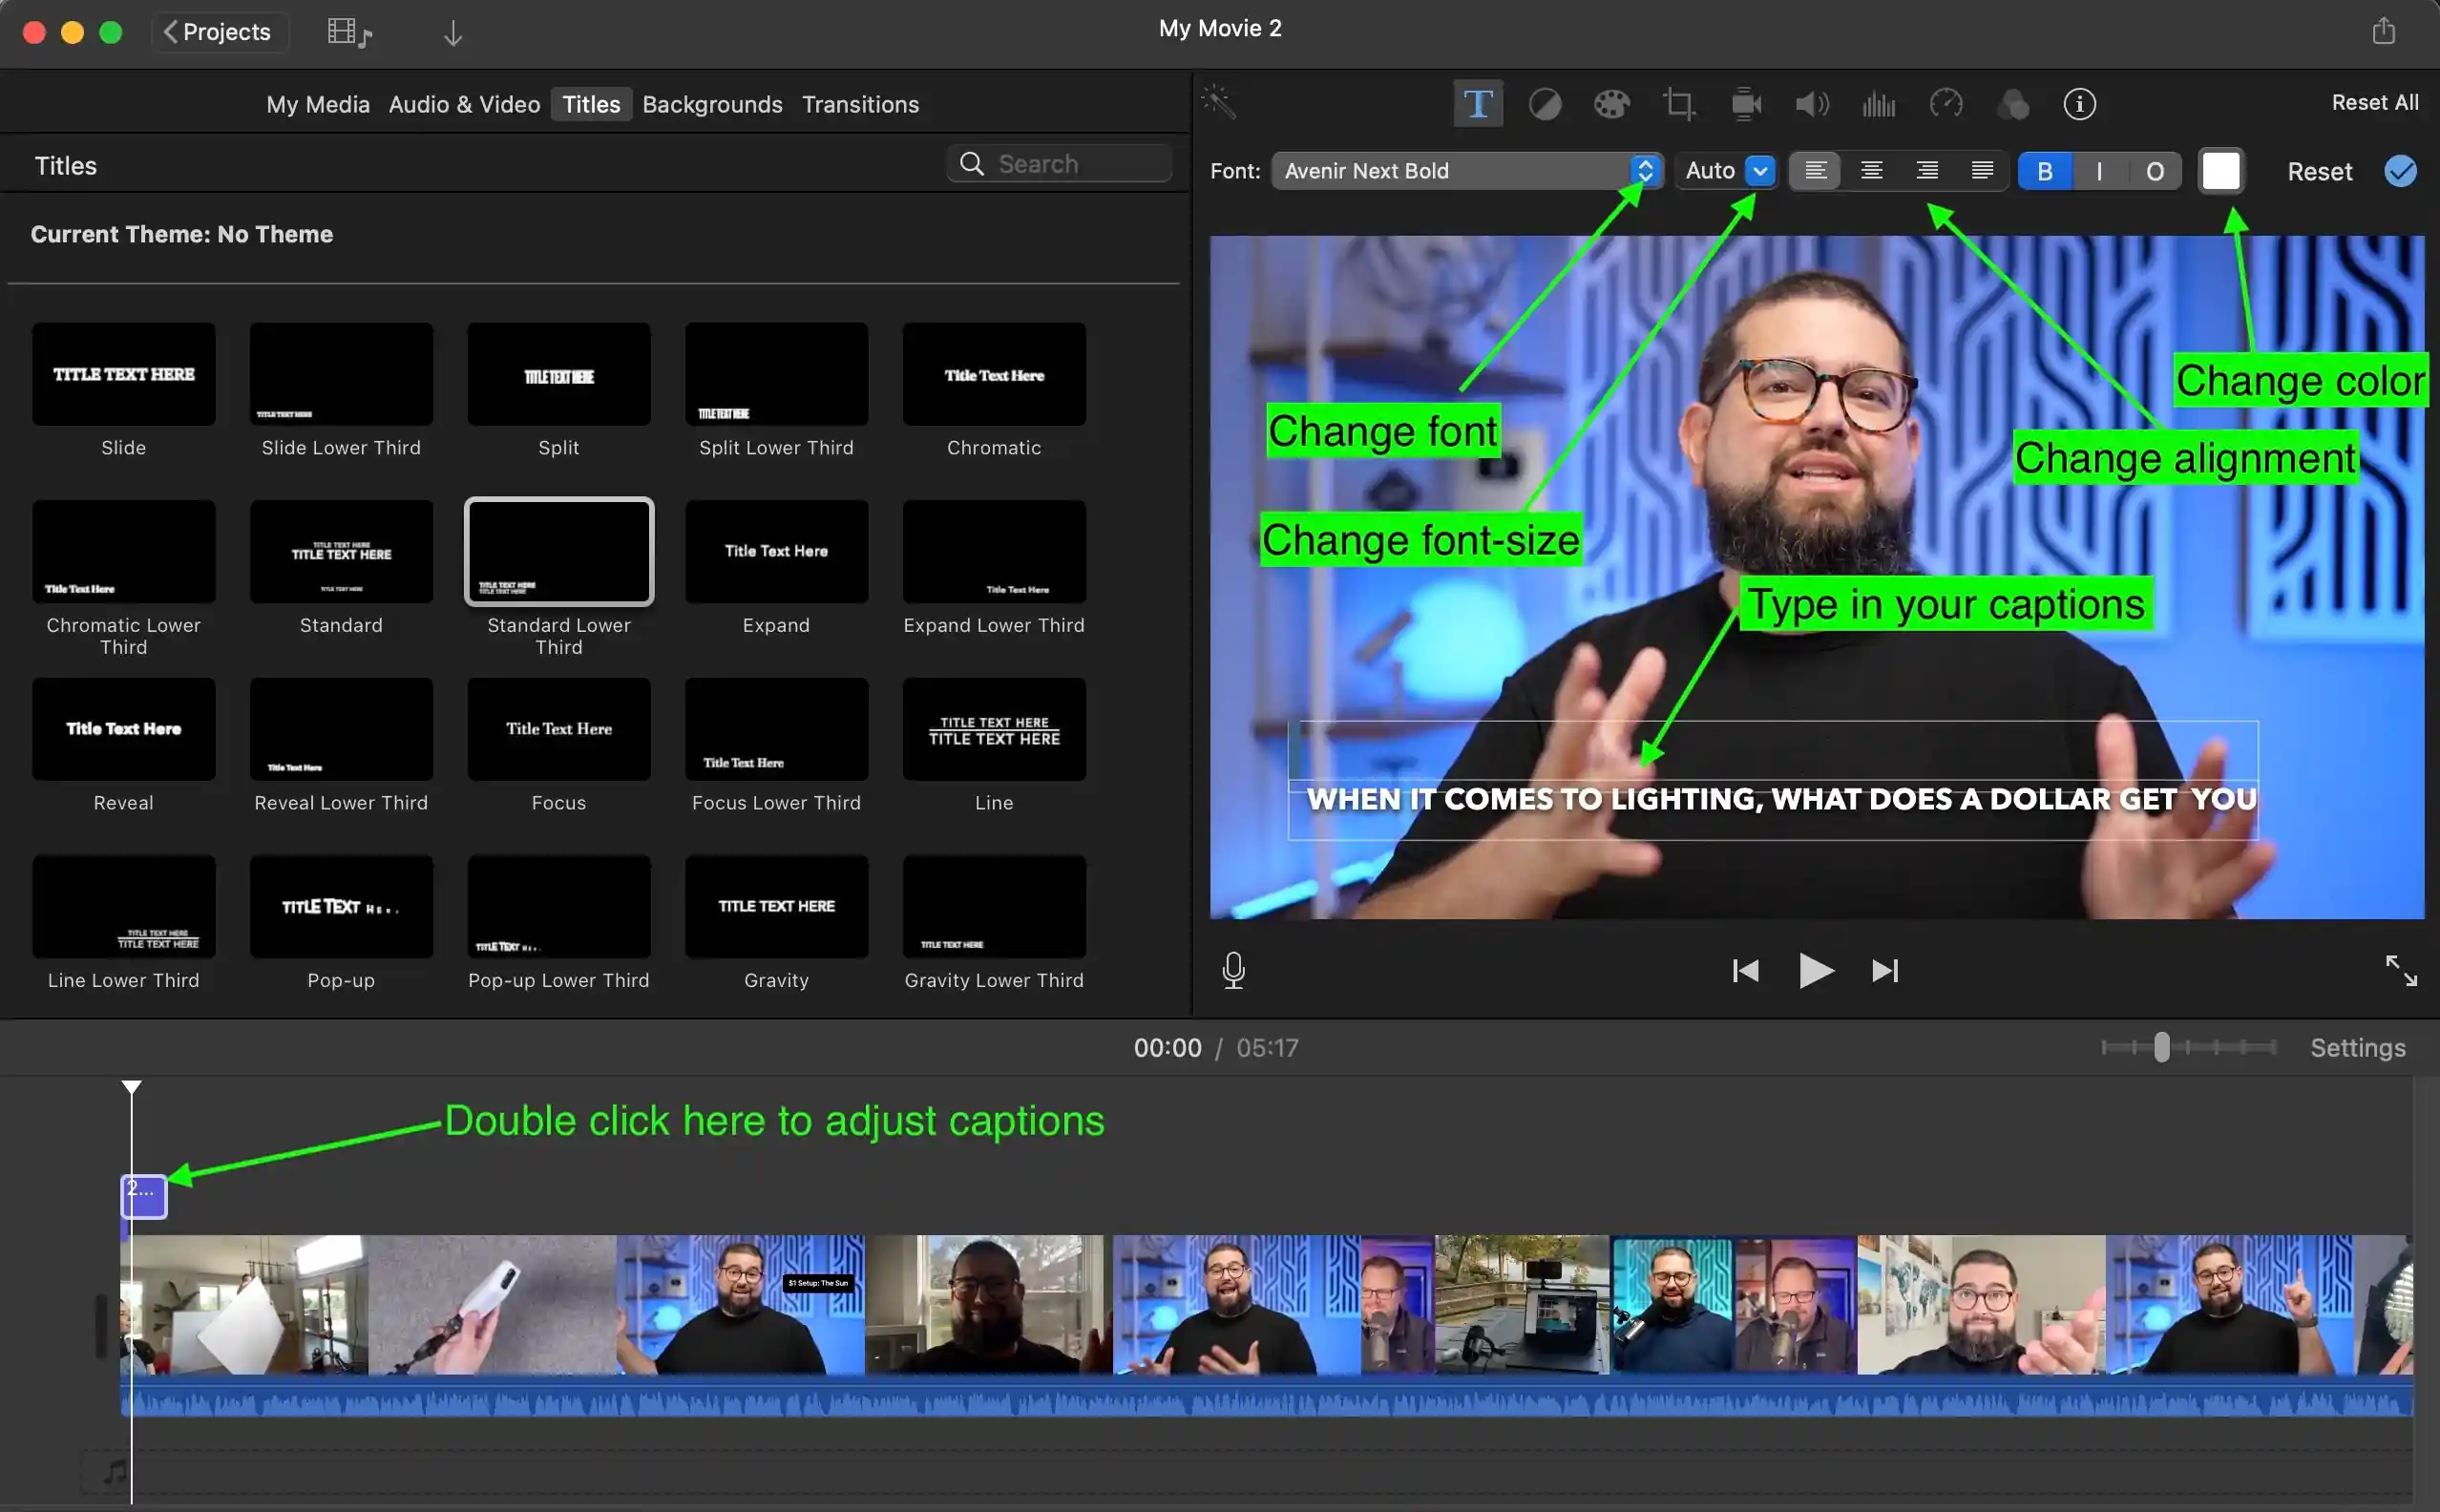
Step 5: Double-click the title box in the timeline to type in your captions. You can adjust the text's size, color, and alignment using the text editing options at the top.
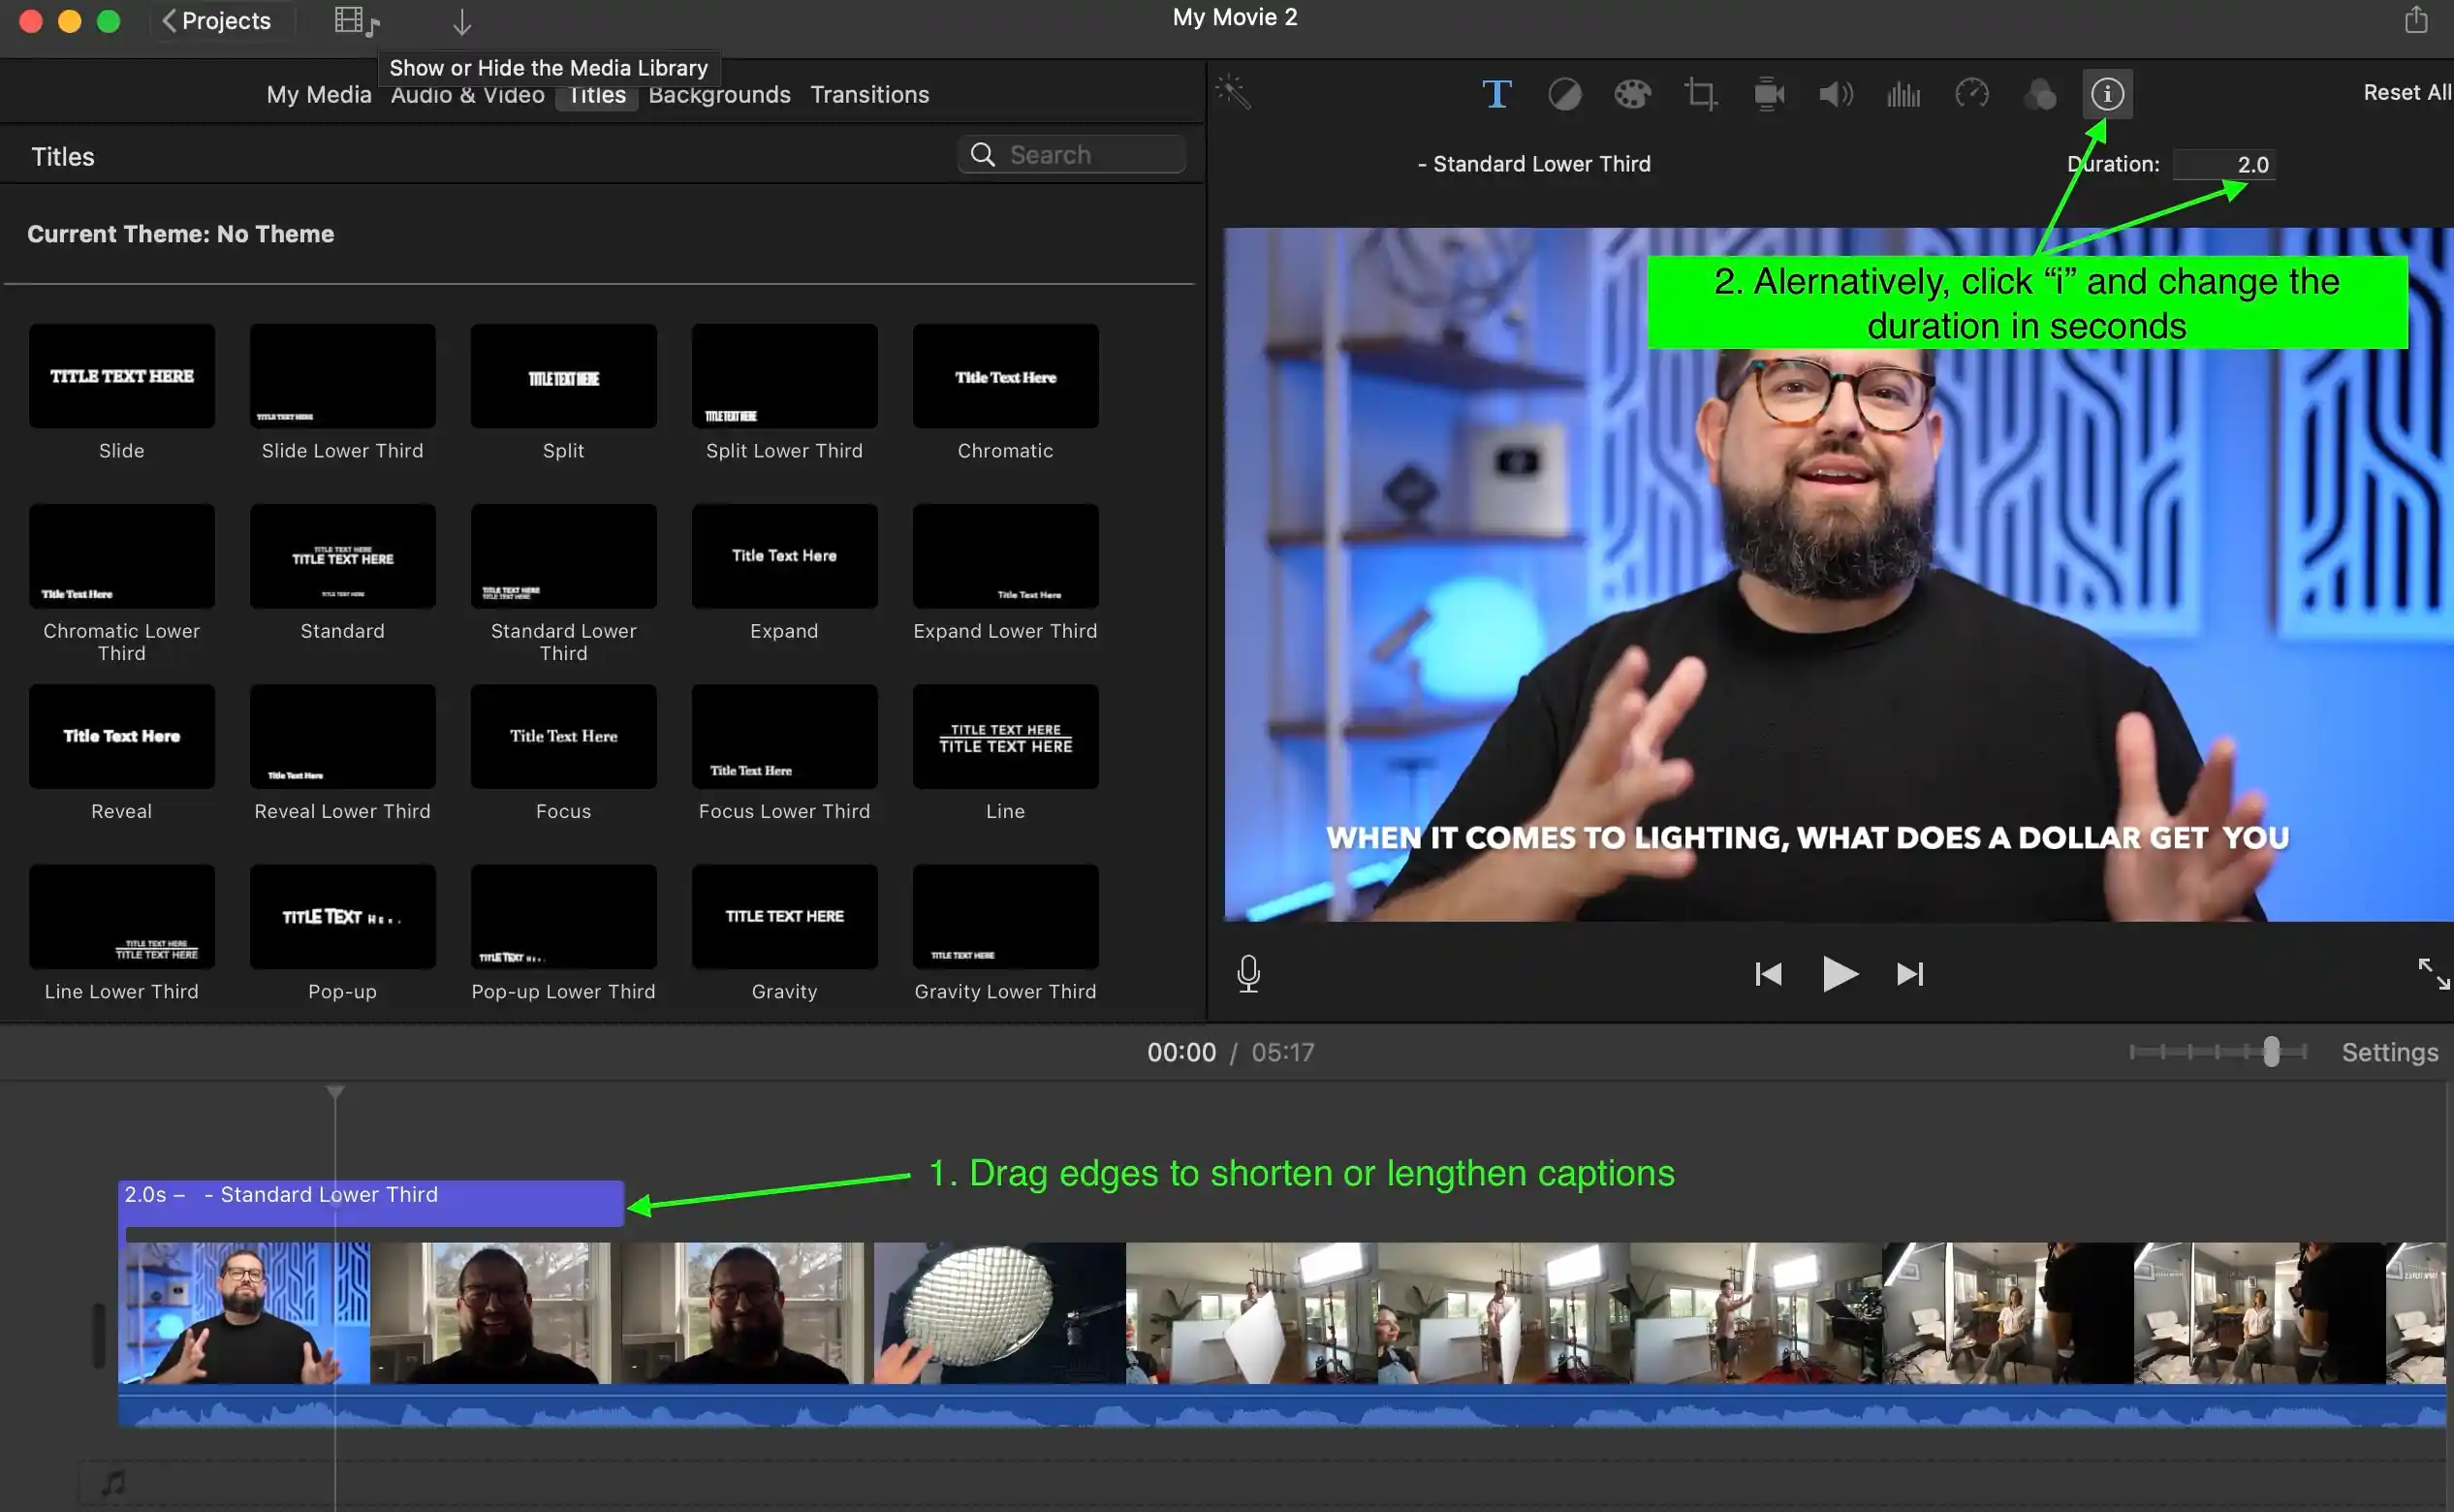
Step 6: Make sure your captions are synchronized with the audio by adjusting the duration of each caption. Drag the edges of the title box in the timeline to shorten or lengthen the time the caption appears onscreen. Alternatively, click the “i” button on the top panel and manually enter the caption length in seconds.
Step 7: Repeat steps 5-6 for each caption you want to add to your video.
Step 8: Save your video by clicking on “File,” “Share,” and then “File.” Name your video and share it.
Closed caption options for videos on social media
Closed captions on YouTube videos
You can add closed captions to your YouTube videos. Here's how:
Step 1: Sign in to the YouTube Studio.
Step 2: Select Subtitles from the left menu, and choose the correct video file.
Step 3: Click Add Language to choose your language settings.
Step 4: Under subtitles, select Add.
Step 5: Upload a time-stamped SRT file or manually type subtitles before using the Auto Sync feature.
Step 6: When subtitles are ready, publish your video.
Closed captions on Instagram
Instagram lets you burn and edit open captions for your videos. However, there is no option to edit and adjust closed captions for your videos is impossible. You can toggle captions on and off for other videos you watch, though. Here's how:
Step 1: Log in to your Instagram account.
Step 2: Navigate to your settings and select Account settings.
Step 3: Choose the Captions option and toggle your captions on.
Step 4: When you watch videos in your app now, you'll see automated closed captions appear.
Closed captions on TikTok
TikTok is the same as Instagram. You can only turn on closed captions for videos you watch:
Step 1: Log in to your TikTok account.
Step 2: Navigate to your account and then to Settings and Privacy.
Step 3: Select the Accessibility tab and then toggle on Captions.
Step 4: You'll see automated closed captions when watching videos.
Closed captions on Facebook
Follow these steps to add subtitles to a Facebook video:
Step 1: Navigate to the top of your timeline and select Photo/Video in the post section.
Step 2: Upload your video file to Facebook.
Step 3: Select video options.
Step 4: Choose to add captions.
Step 5: Upload a final SRT file.
Step 6: Click post to publish your video content.
Tips on how to style and customize your video captions
When working with captions and subtitles, there are things that you can do to make the text stand out and be in line with your brand style guide or chosen video aesthetic.
Adjust your settings
Depending on the tools and platforms you use, you may be able to adjust your text's font, color, and placement. You might also be able to change how your captions respond to background noise and other audio interruptions.
Proofread your transcriptions
When creating captions or subtitles, keeping quality at the heart of your approach is a good idea. Whether you rely on human transcription or automatic caption generation, it's essential to revise and thoroughly proofread your caption files to ensure they are as accurate as possible before they go live.
Check that captions are clear
Also, check that your captions are visually clear and easy to see against the background of your video. Likewise, ensure that timing works well with captions appearing to keep up with the video's audio track.
FAQs on how to add closed captioning to a video
Still trying to figure out the process of adding closed captions to video content? Here are our answers to a few frequently asked questions.
Can you automatically add subtitles to a video?
Many systems allow you to add captions to videos automatically. This makes captioning quick, easy, and more efficient than ever before. The process for automatically adding captions to videos will vary depending on the system you're working with. This is why it's a good idea to review the specific instructions your chosen software tool provides.
Is there a free auto-closed captioning app?
There are several apps that provide auto-closed captioning functionality, and many of these have both free and paid options available. Do your research, and review a few software options before selecting the best solution with your goals and needs.
How do I add closed captions to my video for free?
There are multiple ways to add closed captions to videos for free. The top ways to do so include:
- Riverside’s free online transcription tool adds captions in over 100 languages.
- YouTube’s auto-caption feature, which is available when you upload a video
- Adobe Express online caption generator
What is the easiest way to add captions to a video?
The easiest way to add captions to a video is to use Riverside’s AI transcription tool, which can add captions in 100+ languages. If you’re uploading to YouTube, it’s the auto-caption feature.

.webp)
%20(1).webp)


.webp)

.webp)


