


Table of contents:
Streaming video online is a great way to engage with your audience, but the last thing you want is technical difficulties getting in the way.
Whether your video is lagging and buffering or your resolution drops, online issues can drastically reduce the quality of your stream. If you’re just streaming with a friend this can be annoying, but if you’re trying to grow your audience, this can completely push them away. The higher quality your streaming content is, the more you’ll impress your viewers with your brand value and professionalism.
If you’re looking for an easy way to improve your streaming quality, you’ve come to the right place. Read on to discover the top tips and tricks you should keep in mind!
What affects streaming quality?
Streaming quality can be influenced by a range of factors. Knowing what these are and how to address problems as they arise can help you quickly and efficiently enhance the quality of your content.
Some of the most common factors that may affect streaming quality include:
Internet connection
Your internet connection can make or break the quality of your streaming content. While a stable internet connection will allow for clear, consistent streaming, an unstable connection could cause your audio or video to cut in and out – or disappear completely!
Device functionality
Streaming quality can also be impacted by the functionality and the CPU (central processing unit) of your device. An older phone with a poor camera and microphone quality may lead to a low-quality streaming experience. On the other hand, an up-to-date device with great in-built or external technology compatibility, as well as a powerful CPU, could take your stream to the next level.
Streaming software
Finally, the software or platforms you use can influence the quality of your streaming results. Some streaming platforms include great resolution compatibility and adjustable settings that make it easy to broadcast excellent content. Other platforms may lend themselves to more crackly audio and more pixelated video.
Why is your stream such low quality?
If you’ve noticed that your streams are low in quality, there might be a few factors to blame. You may have issues with one of the factors we mentioned above. By evaluating the steps in your streaming setup and production process, you can identify and plan to resolve the problem.
Your stream may be working poorly as a result of unstable internet, a poor software choice, or a device that isn’t up to the task. There may also be other factors that influence your content quality, including lighting and other setup considerations.
What do you need for smooth streaming?
If you want to stream content more smoothly, there are a few things you’ll need:
- Suitable streaming software
- A good camera
- A high-quality microphone
- Headphones
- A reliable device with stable internet connection
It’s a good idea to minimize distractions as much as possible while streaming. Try to host your streams from a quiet environment where you can reduce noise that might disrupt the viewing experience.
10 tips on how to improve stream quality
Enhancing the quality of your streaming is important for keeping viewers, so it’s always a good idea to do what you can to improve.
Fortunately, many of the best tips for improving stream quality are simple and easy, allowing you to make a difference in no time. Here are 10 of our top stream quality tips!
1. Optimize your encoder
When you produce a live stream, you’ll probably use a video encoder. A video encoder converts raw video into a format compatible with streaming. By optimizing this, you can enhance stream quality and stability.
For the best streaming results, set your encoder to support constant encoding with 48kHz audio, a 128 kbps audio bitrate, and a frame rate between 25 and 30.
2. Enhance your internet connection
Internet connection is another key factor in determining the quality of your streaming content. By improving your connection, you can reduce the risk of slow streaming or dropout.
Before you begin streaming content, use an application like Speedtest and ensure that you have an upload speed of at least 13Mbps (for 1080p streaming). Ensure that you have plenty of bandwidth and that you are located in a place where your internet connection is relatively stable.
3. Use an ethernet cable
Using an ethernet cable instead of WiFi can improve your content quality as well. It helps your connection remain as stable and consistent as possible for the duration of your live stream.
Purchase a reliable ethernet cable, and set this up with your device. Before you begin streaming, test your ethernet connection to ensure that everything is working smoothly. Resolve any issues before you go live so that you can guarantee a great streaming experience.
4. Close your tabs
If you are using WiFi connection for your stream and find that your internet connection is too slow, you may be able to boost internet speed by closing unwanted tabs and thus reducing pressure on your device.
Before you log in to start streaming content, evaluate all the currently running tabs, windows, and applications that might be slowing down your device. One by one, close these extras and re-check your upload to speed to ensure you’re within the optimal zone for stable streaming.
5. Set video bitrate
Your video bitrate is another important consideration when you are streaming content live online. Bitrate refers to the amount of audio and video data that appears each second during your video clip. This can influence the speed of your video stream, as well as altering resolution and visual quality.
In most cases, it is best to set your video bitrate to 1080p using the settings built in to your streaming platform. This bitrate allows for a clear, mostly unpixelated image while not drastically increasing file sizes and making it difficult for audiences to access your live stream.
6. Choose great equipment
When you have good equipment on your side, it can make a big difference to the quality of the content you produce. Effective equipment can help you enhance video resolution, and some equipment tools may even include special streaming features.
For streaming, it can be helpful to use a professional camera and microphone, allowing for greater video and audio clarity than is possible using in-built device features. If you are choosing external equipment, make sure that they are device-compatible without the risk for glitches while you stream.
For some top recommendations, you can read our guide on creating an ideal streaming setup.
7. Improve your lighting
Lighting may seem like a simple factor, but good lighting can have a huge impact on the look and feel of your video content, making it easier for you to achieve excellent streaming quality.
Light your room well so that your space is clear and bright with no large distorting shadows. Aim to reduce glare in your video content. If possible, working with natural light – often through a window – is frequently the best choice for professional yet authentic results.
8. Reduce background noise
Background noise can be distracting in a live stream, distracting the audience from the star of the show and getting you off topic. Reducing unwanted noise can help to keep you focused and your audience interested.
Whenever possible, host your live streams from a quiet, insulated environment where noise is minimal. Turn off noisy machines and devices, and set your phone to silent so that your stream can focus centrally on your voice and what you have to say throughout the stream.
9. Choose your platform
When planning to stream content live, it’s essential that you select the right video production and distribution channels. This will affect your content quality, as well as determining how audiences find you online.
Ask yourself where your audience is most likely to find your content – and when. Try to choose a streaming platform that aligns with your target audience while allowing you to access all the quality settings and streaming features you need to produce incredible content.
10. Do a trial run
Lastly, there is always room for error when you’re working online! To reduce the likelihood of something going wrong with your stream, it can be helpful to conduct a quick trial in advance.
Leaving enough time to resolve any problems that arise, log in to your chosen platform and get set up to stream before your live stream is ready to begin. If you can, you might even conduct a few trials in the hours or days leading up to your streaming event, ensuring everything is working well.
Stream seamlessly with Riverside
If you want to stream content seamlessly, we recommend using Riverside, where you can make the most of unbeatable quality and advanced streaming tools, all as part of a user-friendly interface!
If you’re interested in getting started with Riverside streaming, follow these simple steps.
Step 1: Log in to Riverside, and navigate to the Studio dashboard.
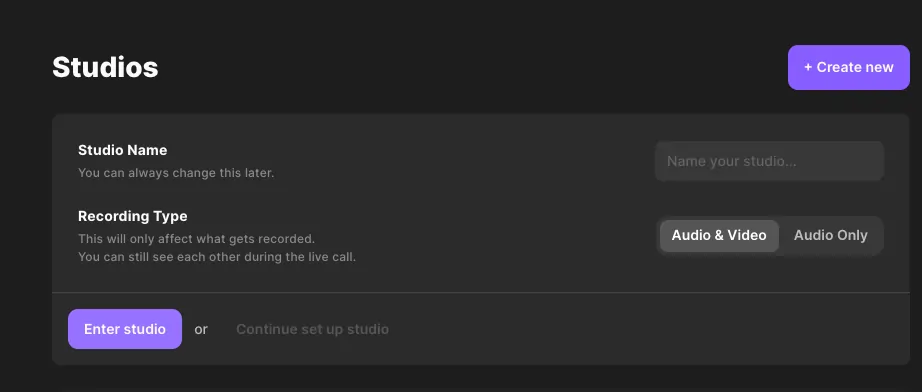
Step 2: Select + New Studio at the top right side of your screen. Follow the prompts to name your studio, and choose Audio & Video recording type. Then Enter Studio.
Step 3: On the next screen, check your camera and microphone input, and select whether or not you are using headphones before choosing Join Studio.
.webp)
Step 4: On the right side of your screen, choose to Invite People if needed. You can invite audience members to watch live on Riverside or to use the call-in feature.
You can also invite other participants in the dashboard, before entering the studio.
Use the side panel to name your recording and adjust noise settings.
.webp)
Step 5: Next, navigate to the settings icon at the bottom left of your screen. Press this to launch the settings menu.
Step 6: From the left-side menu panel, select Live Stream to Launch Riverside’s streaming suite.
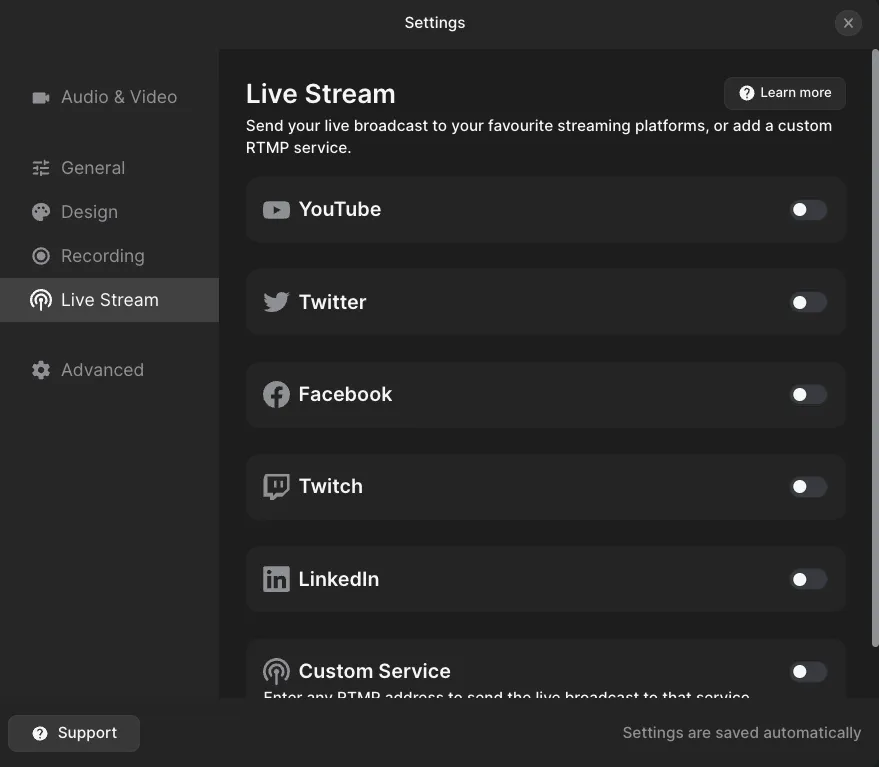
Step 7: Select platforms you’d like to stream to and set up a connection through a stream key and stream URL. You can find more about this in our support guidelines.
Step 8: When you are ready for your stream to begin, save your setting and press the record button.
Riverside will automatically push your stream to the platforms you selected.
Step 9: After your stream is complete, press the stop button to end the session.
Step 10: Once you’ve finished recording your live stream, wait for your recording to finalize before selecting View Recordings on the left of your screen.
This will take you to your recordings, where you can either download them as separate tracks or use the editor to polish them directly on Riverside.

FAQs on how to improve streaming quality
Still unsure about how to improve stream quality? Here are our answers to a few frequently asked questions.
How do I make my stream 1080p on OBS?
If you want to select 1080p for your stream, you can do this easily using OBS. Open OBS, and navigate to the settings menu. Here, select output settings, and choose 1080p. Easy!
How can I improve stream smoothness?
Improving stream smoothness doesn’t have to be a challenge. There are a lot of things you can do to make a difference! Before you begin streaming, make sure that your internet and equipment are working properly, and eliminate any disruptions that could jeopardize these things.
How do I improve stream quality on OBS?
If you’re using OBS studio, the easiest way to improve quality is by adjusting your video bitrate. You can do this in your system settings. Generally speaking, 1080p is the best choice for streaming. This will improve visual quality without slowing down your broadcast or putting too much pressure on software or devices.
How do I make my stream less pixelated?
Pixelation is often a key concern for video streamers! Adjusting your video bitrate is the best way to avoid pixelation content and improve the overall quality and professionalism of your streaming content.
If you’re searching for studio-quality streaming potential, Riverside can help! Try our user-friendly, premium-quality recording studio today.


-(1)-(1).webp)
.webp)
-(1)-(1).webp)
.webp)


