


Table of contents:
Key takeaways
- You can go live on the Instagram mobile app as long as your account is 30+ days old.
- To go live on Instagram through a desktop, you need a Professional account and third-party streaming software.
What is Instagram live?
Introduced in 2016, Instagram Live is a feature that lets users stream videos to their followers and engage with them in real-time.
You can go live from your mobile app to share daily experiences or host Q&As, gaming sessions, interviews, and more. Once the live session ends, the app saves your video to your Live Archive. You can also download it to your phone's camera roll to reshare it with your followers later on.
Instagram Live Producer is available for those wanting to go live from a desktop computer. But, this is only available to ‘Professional’ Instagram account owners. This feature lets you go live through streaming software like Riverside or OBS Studio.
This way you can use a professional webcam, external microphone, and other equipment beyond your standard smartphone camera.
Instagram live requirements
Going live on Instagram is simple enough and can be done with any mobile device. Here's a full list of what you need to run a livestream session on Instagram:
- An Android or iPhone smartphone or tablet with the Instagram app installed.
- An account that is more than 30 days old.
- Permissions granted to Instagram to access your camera and microphone.
Although not mandatory, you may want to consider these additional items:
- A battery charger or power bank for livestreams longer than a few minutes.
- A tripod to keep your phone stable and your hands-free during recording.
- An external microphone to make sure you capture high-quality audio.
- Good lighting to ensure your recording isn't too dark or bright.
Learn more and check out our full guide of live streaming equipment.
.webp)
How to go live on Instagram on your Phone (iPhone & Android)
In this section, you will find a step-by-step tutorial on how to go live on Instagram.
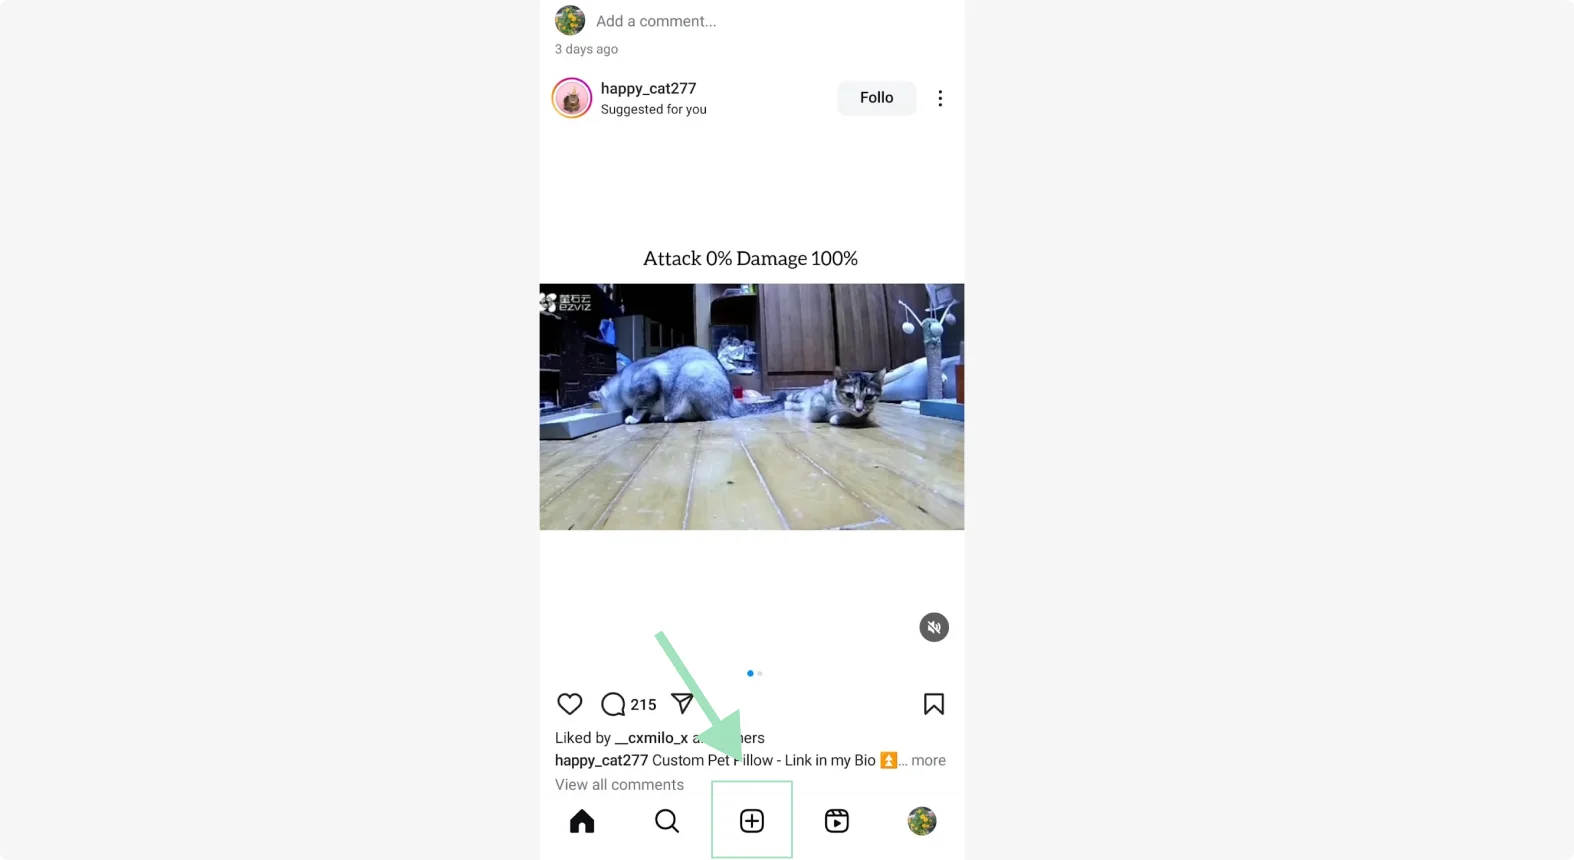
Step 1: Create a new live post
Open the Instagram app and log in. Tap the “+” (plus) button at the bottom of the screen.
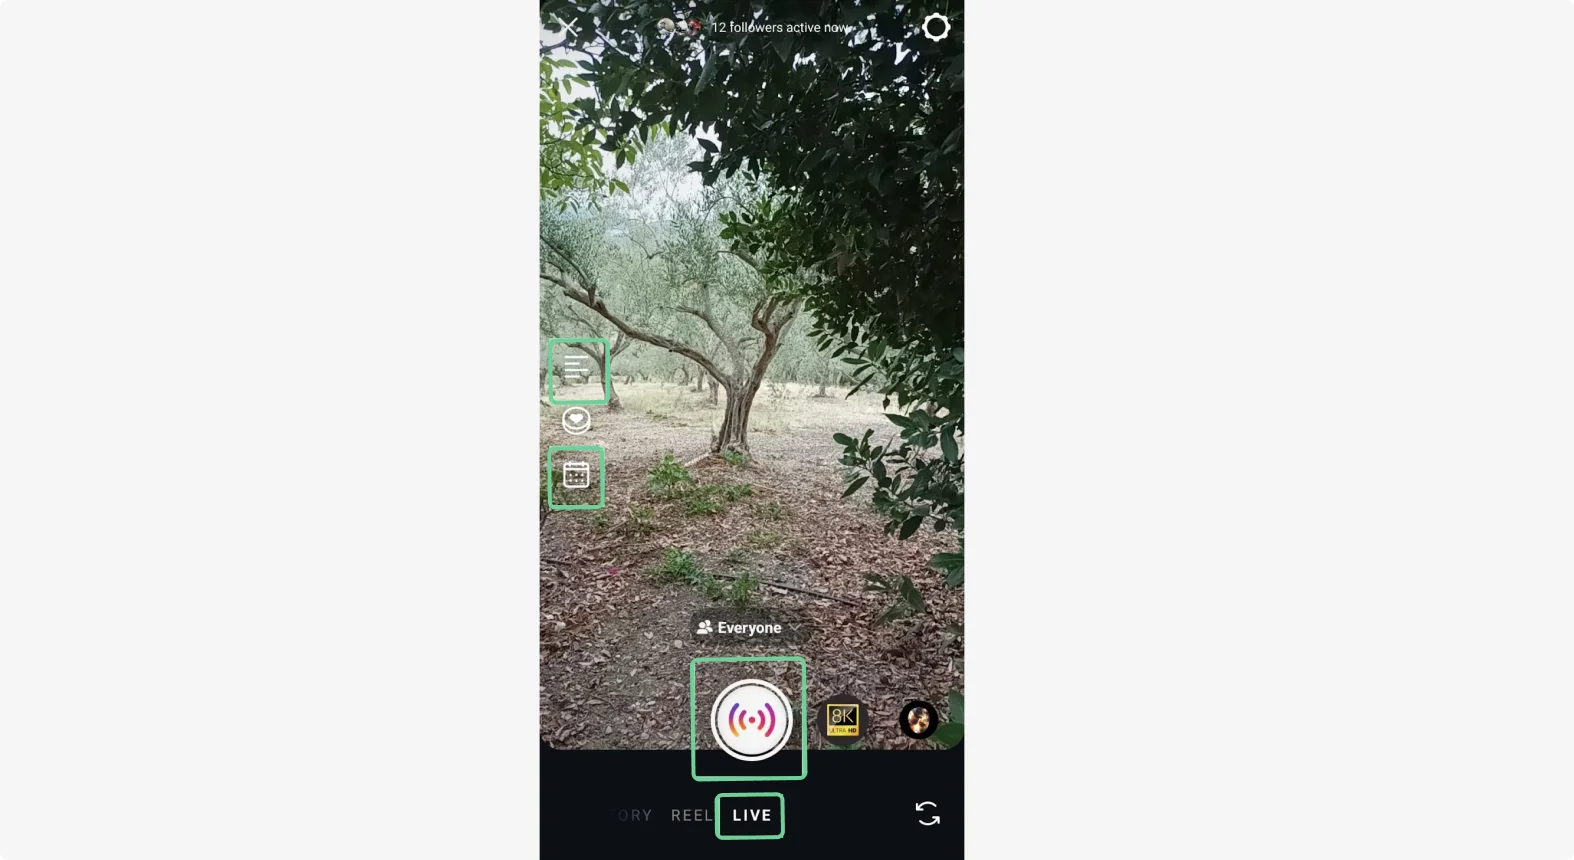
Step 2: Launch your Instagram live
Select "Live" from the bottom list.
From the left sidebar, click the top 'lines' button to add a title for your livestream.
You can also click the calendar icon to schedule your IG live for a later time.
To select your audience, click where it says “Followers”. You can choose whether to show your live to your close friends, followers or just to practice.
Once you're ready to go live, tap the large button at the bottom to launch your IG live session.
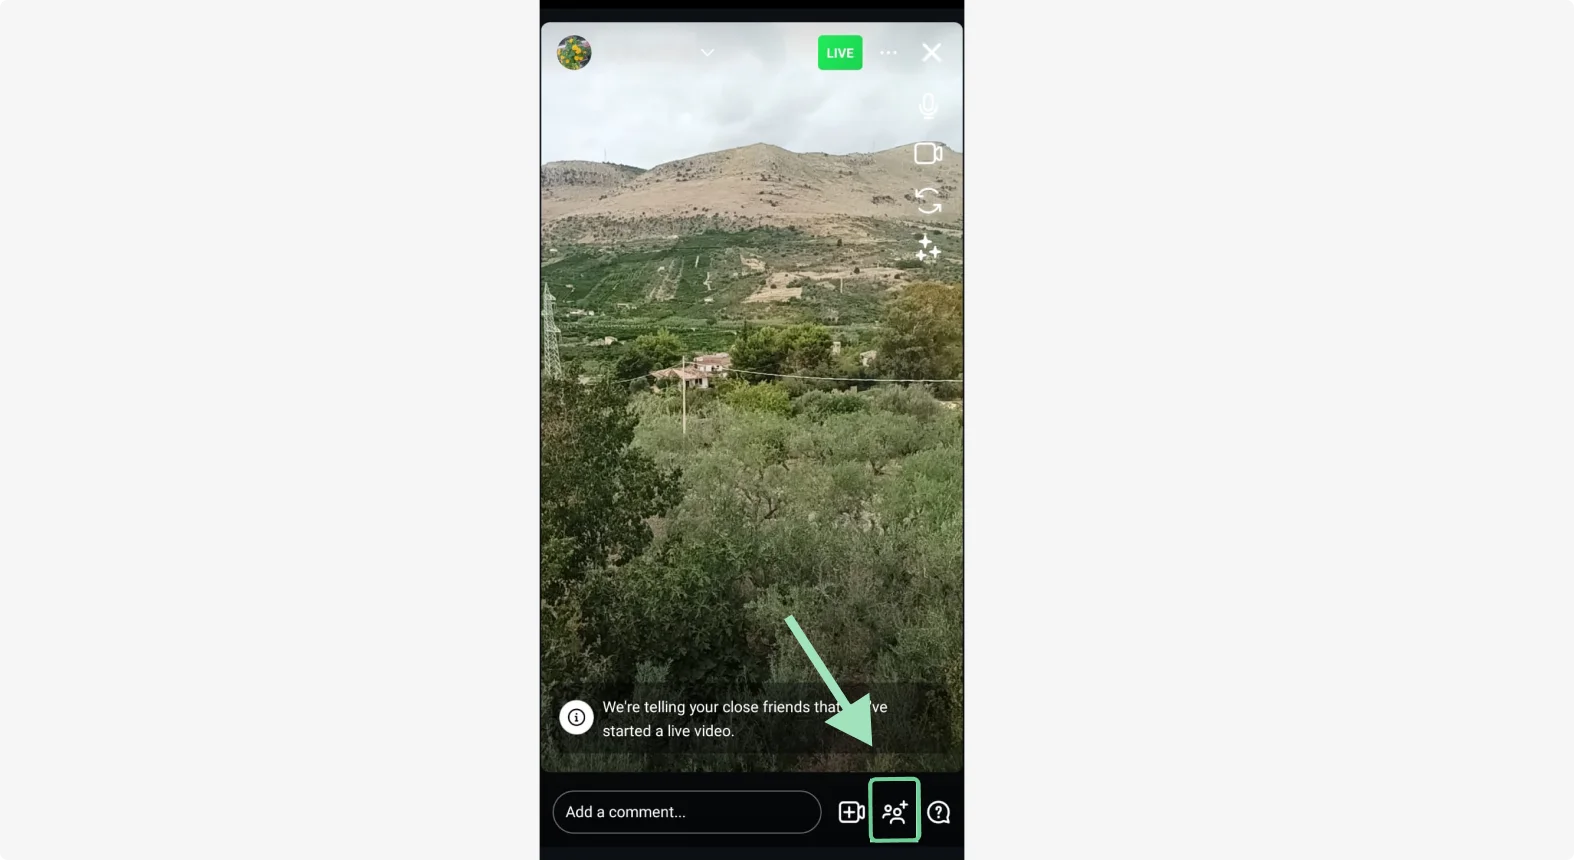
Step 3: Invite guests or add another person to your Instagram livestream
If you want to add another person, like a co-host or guest speaker, to your Instagram Live broadcast, tap the two-person icon in the bottom right corner of the screen.
Find the person you want to add to your live stream by typing their name or handle. You can also see “Suggested” options listed below.
Tap on the blue “Invite” button to send them an invitation to join your live session.
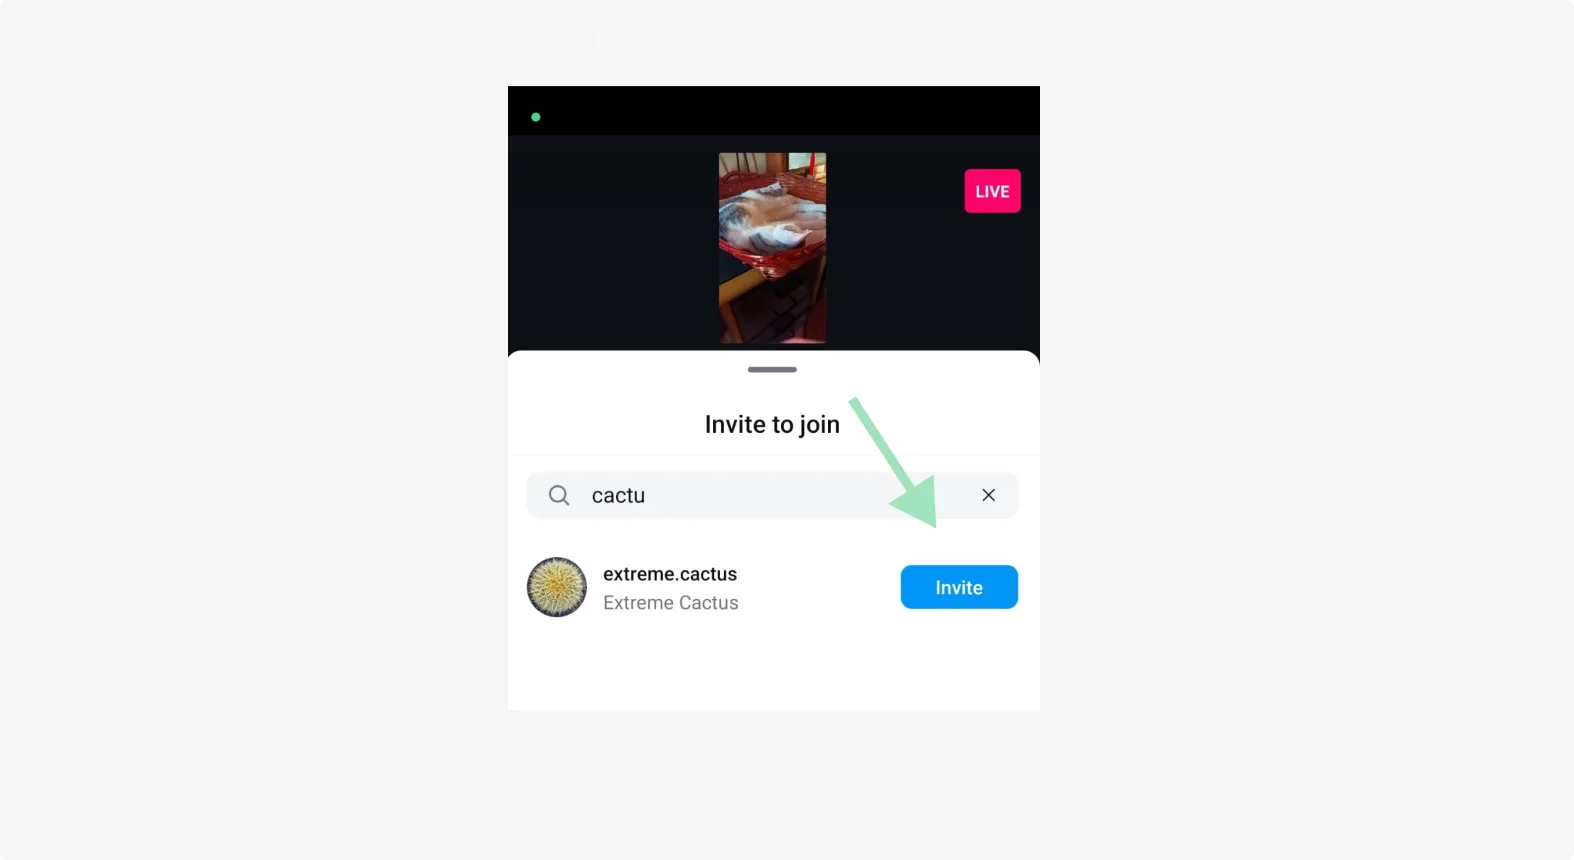
Once your guest accepts your invitation, both of you will appear on screen. You can switch between the two of you by tapping the screen of your live room.
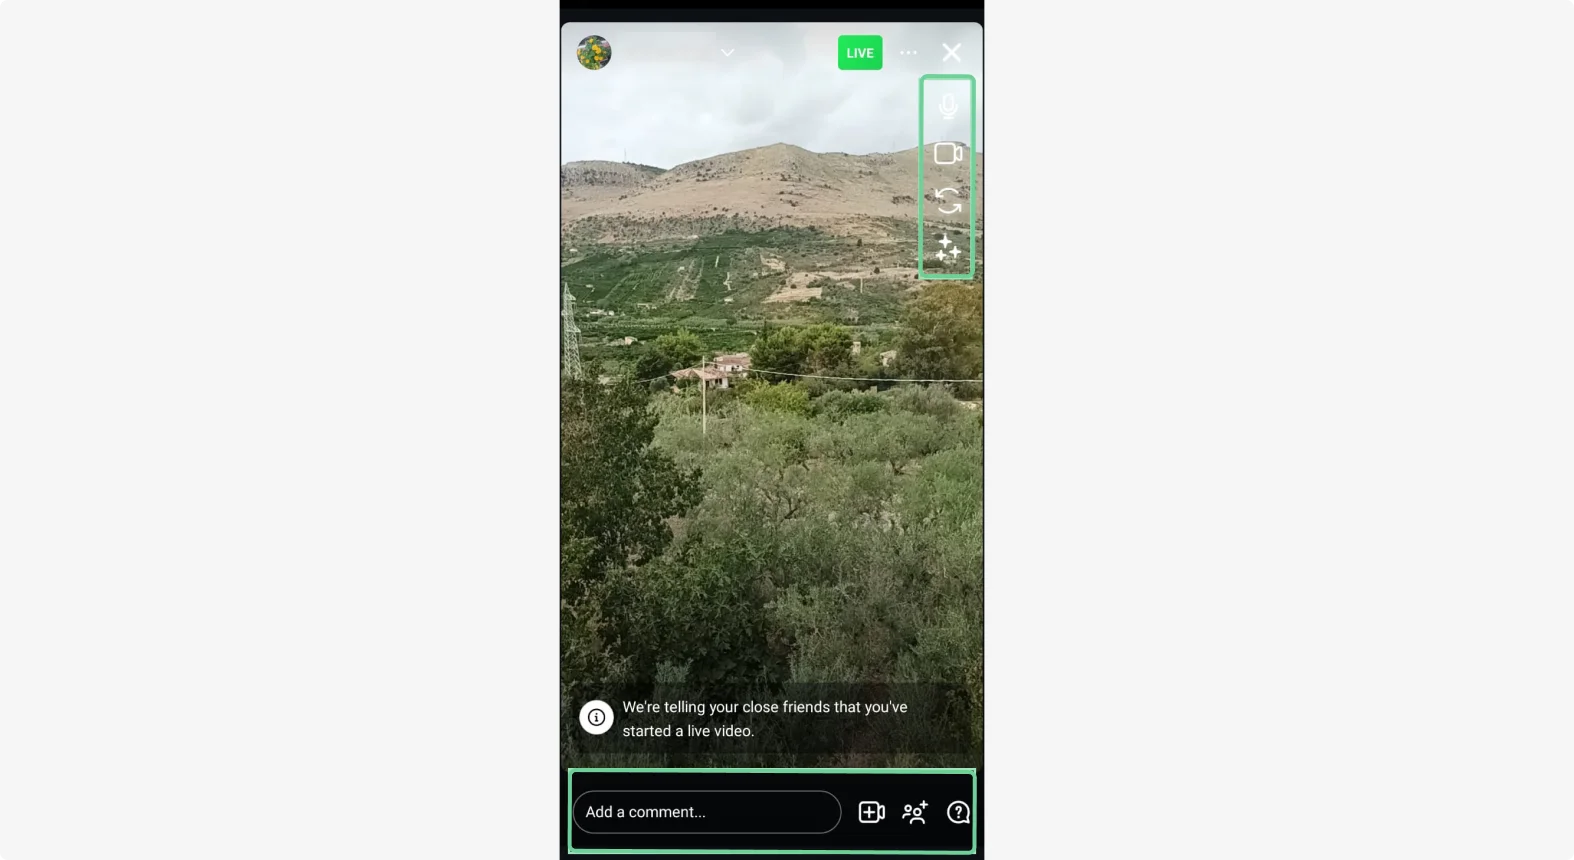
Step 4: Go Live and engage!
You can add filters, post comments, or answer questions during the live stream to foster audience engagement.
- To add a filter: Click the three-star icon in the top right toolbar. You can choose from a variety of filters.
- To write a comment: Type your comment in the “Add a comment…” field.
- To answer a question: Click on the question mark icon in the bottom right.
- To accept a guest caller: Tap the video icon with the plus in the bottom right menu.
Viewers and comments will appear on the screen, and you can pin comments if you wish. The number of people watching will also appear at the top of the screen.
Step 5: Share the live video
When your live session is over, click on the “X” on the top right corner of the screen to close it. Then click “End now”
Once you're done, you can choose to discard the recording or share it with all of your followers on your Instagram stories.
How to go live on Instagram from a desktop
Instagram has launched its Live Producer program, allowing users to go live from desktop computers using streaming software like Riverside. This integration requires a Professional Instagram account but gives content creators the chance to use more advanced production hardware and software.
For example, you can use additional cameras, professional microphones, and advanced recording software like Riverside.
With Riverside, you can elevate your production quality with features like our online Media Board to add pre-recorded videos and sounds effects during your IG livestream. You can also record each participant's track separately with our native multitrack Recording, and invite a Producer to help you behind the scenes.
Plus, you can reach more viewers by multistreaming on all social media platforms at once, and engage with all your followers effortlessly with the omnichat.
Let's see how you can set this up. Watch the video below or read on for a full step-by -step.
Step 1: Create a professional Instagram account
To go live on Instagram from your desktop, you need to create a Professional Instagram account (don’t worry, it’s free!).
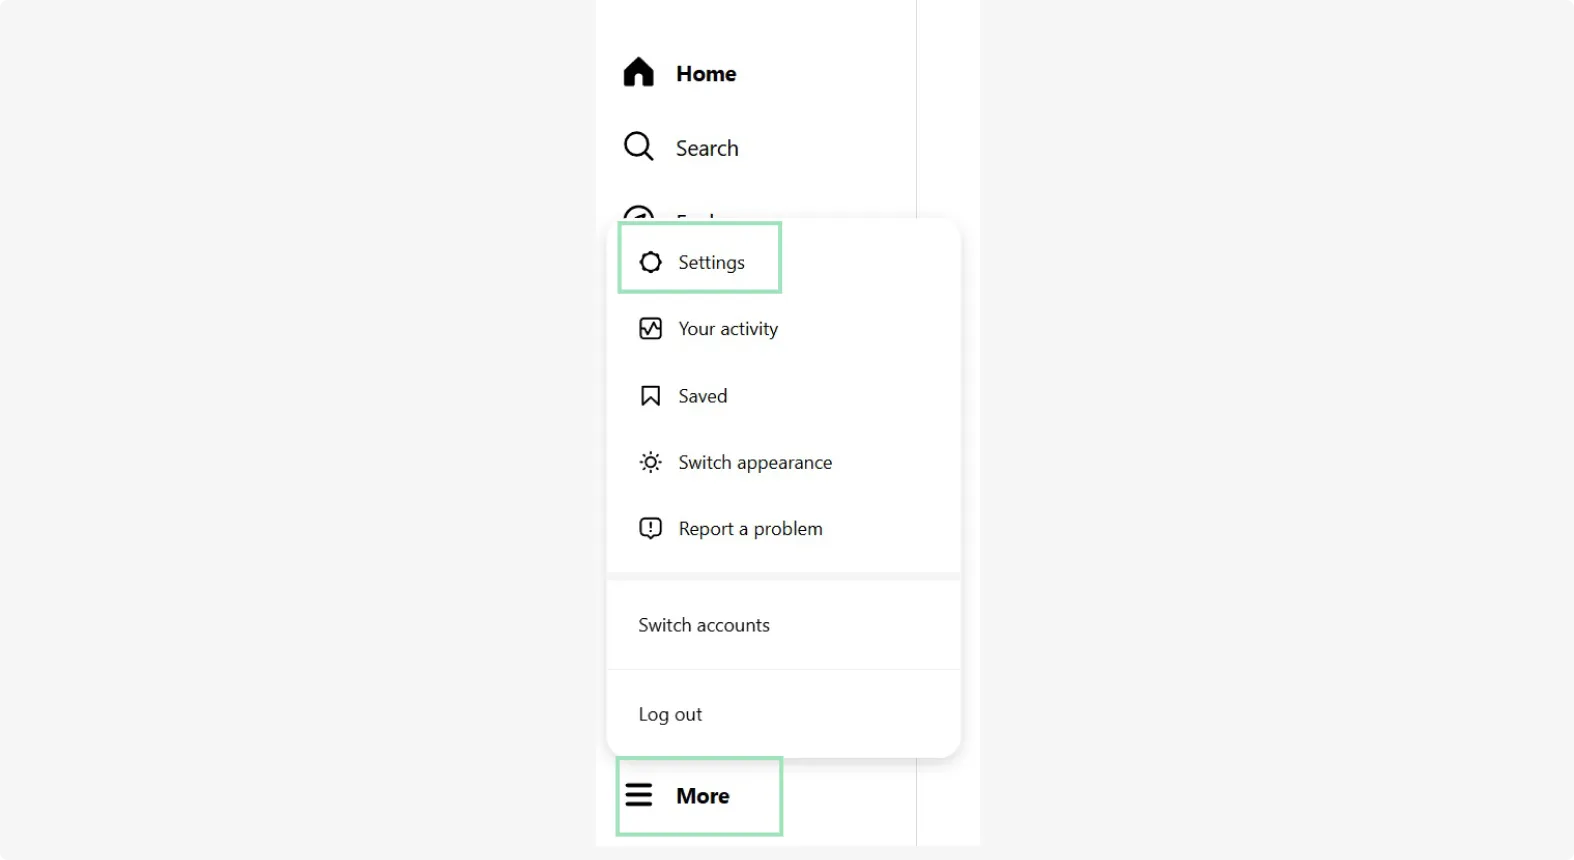
Go to your Instagram homepage on your desktop, and click on the ☰ (three lines) “More” button on the left side bar, then click on “Settings”.
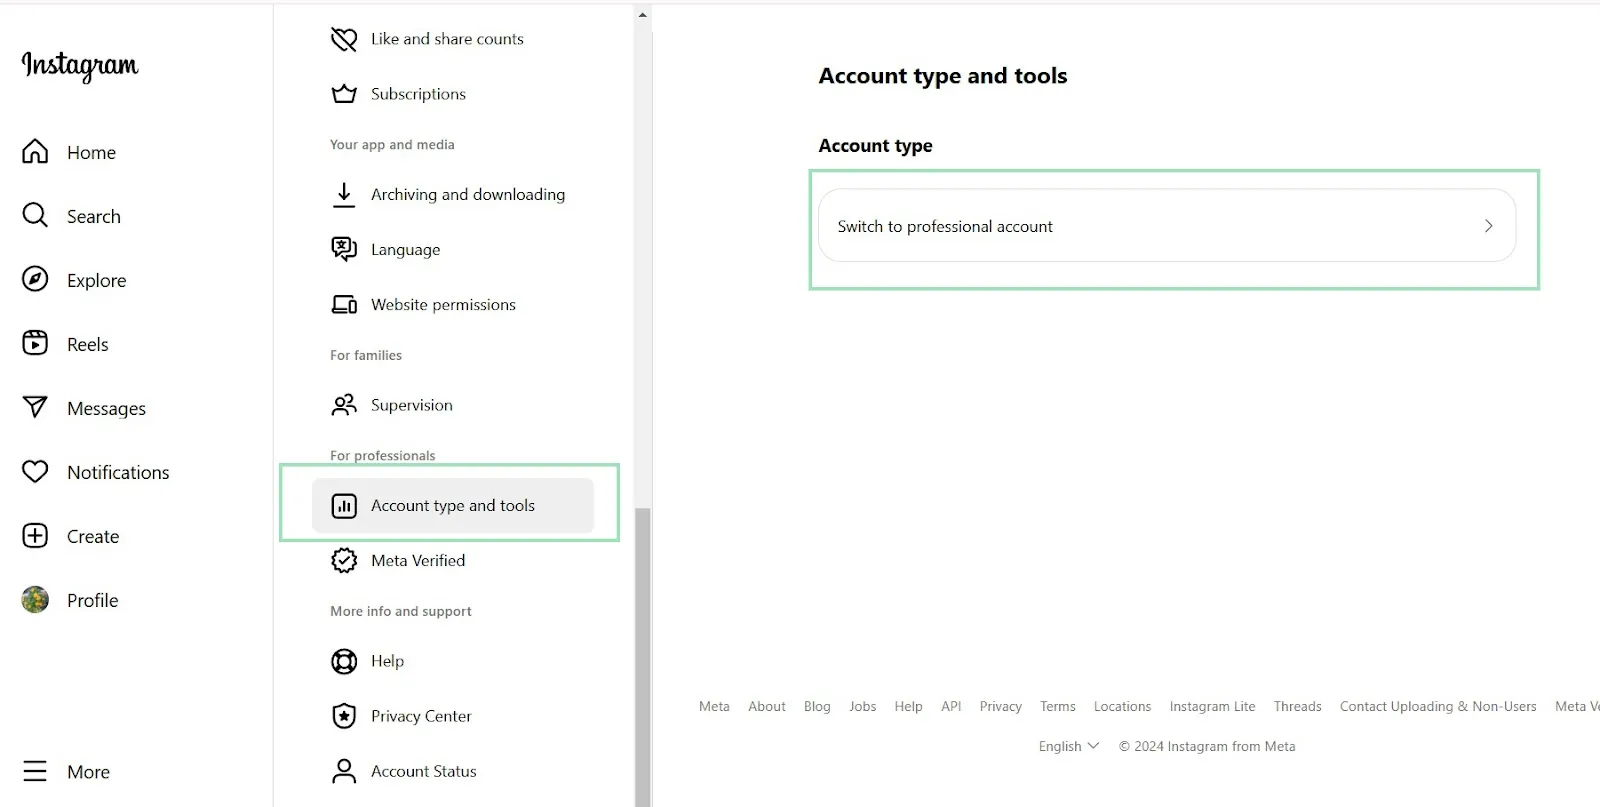
Scroll through the "Settings" bar on the left until you find "Account type and tools" under "For professionals."
Click on "Switch to professional account" and follow the procedure to choose your niche and the type of creator that best describes you.
Note that, unlike other social media platforms, creating a Professional account on Instagram has no requirements such as minimum number of followers or views.
Complete the process by clicking on the blue "Done" button.
Step 2: Open a Recording session on Riverside
Login into your Riverside account, and select your recording studio from the left sidebar. To create a new studio click the “+” on the top of this left sidebar. (You can learn more about setting up a studio here).
From here, click on the “Record” button at the top of the screen to start a new recording session.
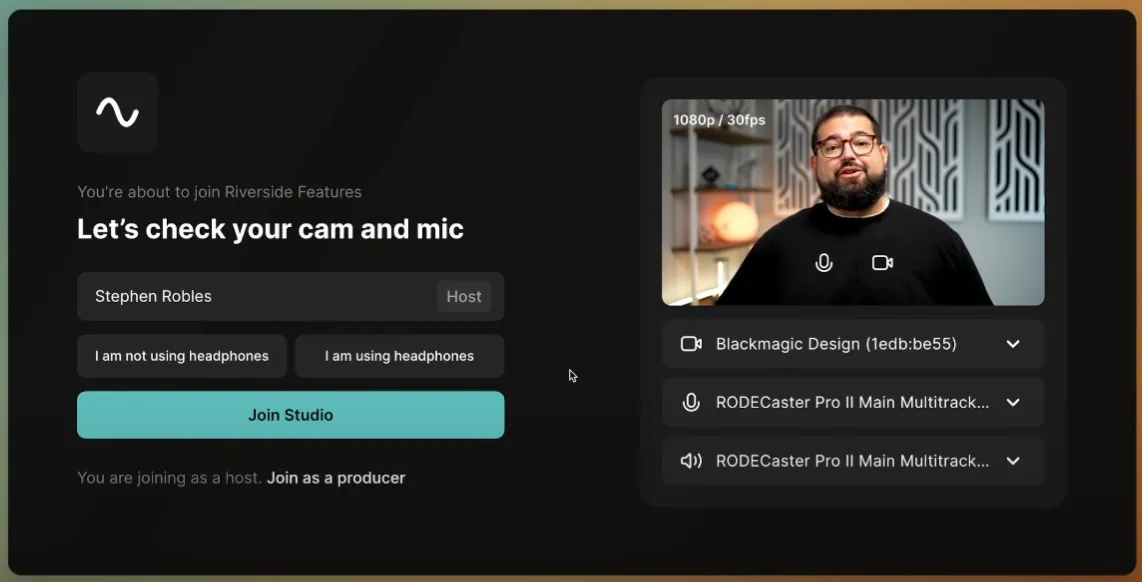
From your lobby, select your camera, microphone, and speaker output. Select whether you’re using headphones, then click on “Join Studio” to launch your Studio.
Step 3: Setup your Instagram Live RTMP connection
Once inside your Studio, click the "Live Stream - ready" button at the top of the screen. Then click "Stream to social" and choose "Custom RTMP" from the drop-down menu.
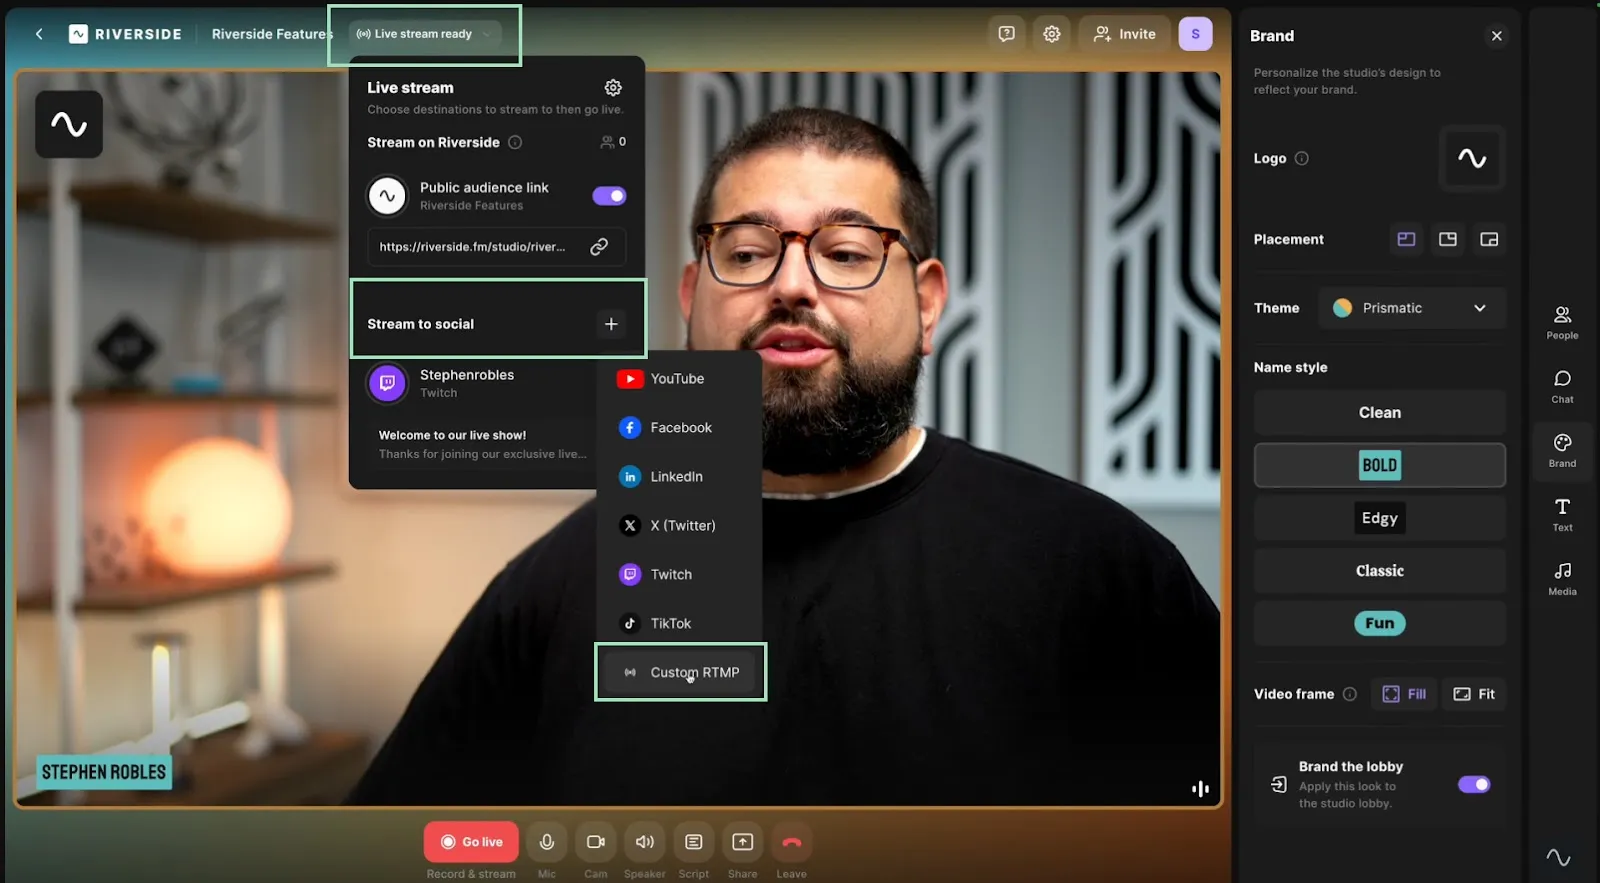
A new window will open asking for the Stream Key and Stream URL for your live session.
You'll need to launch a live stream on Instagram to get these, so keep this window open.
.webp)
Find your Stream Key and URL by launching an Instagram Live
In a new tab, open your Instagram homepage and click on the “Create” button with the “+” button on the left side bar. If you’ve correctly created a Professional Instagram account, a new “Live video” button should appear.
Click on it to open a menu where you can type your live session’s title and choose the audience. Once you’re done, click on the “Next” button.

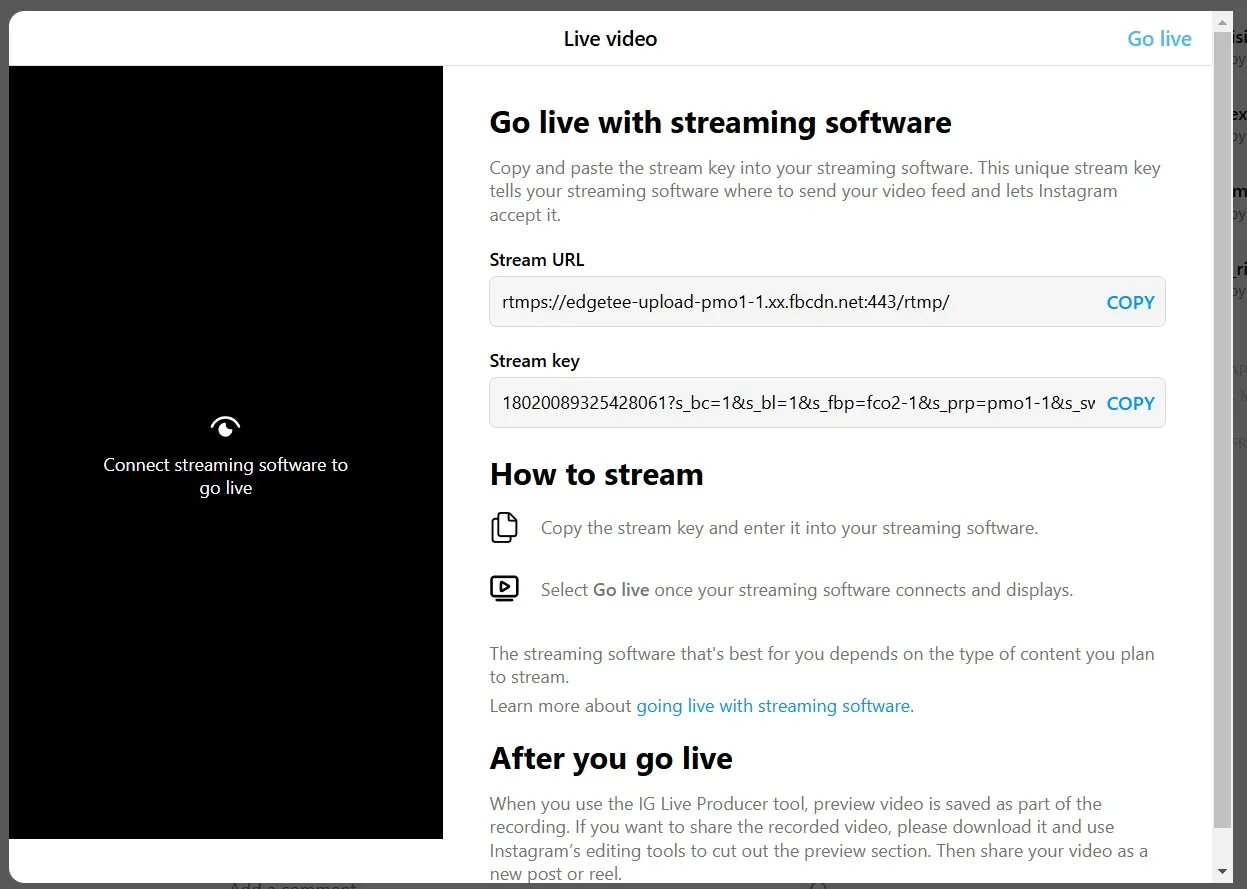
Copy your Stream Key and Stream URL into Riverside
In the new window that will open, you’ll find the “Stream Key” and “Stream URL” needed to launch your live stream from Riverside.
“Copy” each of them, then paste them into the respective fields of the Riverside Studio page you previously left open. Don't close this Instagram page yet!
Click "Add" when finished.
Step 4: Start your Instagram Live from Riverside
In your Riverside Studio, click on the red “Go live” button at the bottom of the page.
Note: You can add more streaming channels, such as Facebook or YouTube, before starting your livestream.
.webp)
Step 5: Go Live from Instagram
Return to your Instagram page (the one you left open). You should see a preview of the video you're recording on Riverside on the left side of the screen.
Click "Go live" in the top right corner to launch your live session on Instagram.

Step 6: End your Instagram live stream
To stop your livestream, simply end it from Riverside by clicking the same button you used to go live. This will turn off both live streams.
You can now download the video directly from Riverside and upload it to Instagram as a new post or reel if you want to share it again.
Better yet, you can polish up and repurpose up the live in Riverside’s editor.
Here you can:
- Turn your long IG live into multiple short-form reels with our Magic Clips tool.
- Add captions, text, music, a logo, and background to customize your live.
- Trim your recording using the timeline or text-based editor.
- Fix up your audio with filler word removal, volume normalization, and background noise removal.
And much more!
Bonus step: How to promote your Instagram Live
When you go live, you want to reach as many people as possible to watch your live stream. Here are a few tips to build anticipation and promote your upcoming Instagram Live:
Choose a catchy title:
A compelling or attention-grabbing title can increase your audience's curiosity. Make sure the description is clear and concise, avoiding clickbait or overly long content.
Use Instagram Stories:
Post eye-catching stories sharing your event and announcing your live session's date and time. You can even use countdown stickers to increase the excitement.
Schedule with due anticipation:
Give your followers plenty of time to prepare themselves for your IG live session. You can share calendar invites so they can save the date on their devices.
Ask your audience questions:
Increase your audience’s engagement by asking questions about the upcoming broadcast. What would they like to see? What topics would they want you to cover?
Advertise your IG live on other social media platforms:
Reach a wider audience by cross-promoting your live event on all your social channels, such as TikTok, YouTube or Facebook. Use popular or targeted hashtags to increase your discoverability.
Post regular updates:
Share posts with snippets, previews or behind-the-scenes looks to pique your followers’ interest. Post regular updates at different times of the day, so everyone can get a heads-up.
Collaborate with other influencers:
Having a co-host in a joint live session can greatly increase your reach. Coordinate your promotion together to leverage all your social channels at once.
Send direct messages:
Ensure your most loyal followers or important guests don’t miss your event by sending personalized invitations via DMs.
Check our guide:
We've prepared a short checklist to help you leverage your livestreams to maximize engagement. Feel free to check it out!
Why can't I go live on Instagram: Troubleshooting IG Live
If you're having trouble going live on Instagram, here is a list of common issues and quick fixes:
‘My live stream stopped abruptly’
Instagram live streams have a maximum time limit of one hour. If your live exceeds this time, the platform will automatically end your streaming session. Also, do not close your Instagram Live tab, or the session will end.
‘My stream key doesn’t work’
Each stream key works for one session only. They are not permanent and will expire after a while. You'll need a new one for every new stream you launch.
‘The quality of my live stream is very low’
Check your connection by running a Speed Test before launching your live session. Close any unnecessary tabs or applications which may consume your bandwidth.
While you're recording, try to use a device that is physically connected to your router with an ethernet cable. If that's not possible, Wi-Fi is generally more reliable than cellular data for live streaming.
‘My microphone and/or camera are off’
Make sure that Instagram has permission to access your camera and microphone in your device settings. Note that even if you granted permission on the desktop version of Instagram, you still need to provide them on your smartphone when you’re streaming from the app (and vice versa).
FAQ's on How to Go Live on Instagram
What are the benefits of going live on Instagram?
According to Statista, as of April 2024, Instagram is the third most popular social network globally.
An Instagram live video is an excellent way to stand out and boost your visibility since the algorithm prioritizes live streams in the Stories Feed. Live sessions also provide an efficient opportunity to build stronger connections with your followers through direct communication and feedback.
Can you save an Instagram Live video after the broadcast ends?
Yes, after a live broadcast on the app. Instagram offers options to download the video to your device, save it to your Live Archive, or share it to your Instagram Story for 24 hours.
If you streamed from your desktop using Riverside, you can download the recording from your studio page and then upload it to Instagram as a post or reel.
How can I moderate comments during my Instagram Live?
During a live broadcast, you can moderate comments in real-time from your live room.
Tap the three dots next to a comment to pin, hide, or report it, or manually block a specific user.
If you're broadcasting via Riverside, you can invite a moderator in Producer mode to manage the comments section behind the scenes during the live session.
How do I notify my followers that I am going live on Instagram?
Instagram automatically sends a notification to your followers when you start a live video. However, it’s always better to promote your upcoming lives in advance, to ensure everyone knows when the event will take place. Use Instagram's "Live Scheduling" feature to set a time, and then remind your followers about it with posts, live stories, or direct messages.
How many followers do you need to go live on Instagram?
None. Unlike other platforms, there’s no minimum requirement here, so you can start a live session with any number of Instagram followers.
That said, having more followers can naturally increase the reach and engagement of your live video.
Why does it say my account is not eligible to go live on Instagram?
To be eligible for live streaming, your Instagram account must be more than 30 days old and in good standing.
If you still read a message saying you’re not eligible to go live, you may have violated community guidelines or your account could be under a temporary restriction after other users reported you. If your account is in good standing and the issue persists for more than a day or two, contact Instagram support for assistance.
How do you turn on live status on Instagram?
Default, your live status should automatically change to “live” when you start an Instagram live video.
If it doesn't, go to your profile, and tap on the ☰ (three lines) to access the “Settings and activities” tab.
Here, tap on “Messages and story replies” under “How others can interact with you” and then on “Show activity status” to make sure it’s turned on.


