


Table of contents:
It’s a great time to be a YouTuber.
In 2021, the highest-earning YouTuber made $54 million. That’s almost double the amount earned by the top creator on the platform in 2020 ($29.5 million).
But if you’re just starting out, producing the professional-looking videos you’ve seen on top performers’ channels can seem daunting.
We’re here to tell you that you, too, can create professional-quality videos. Whether you have thousands of subscribers or have yet to post your first video, read on for a simple step-by-step guide to filming an at-home YouTube video at the quality of a studio production.
What You Need to Film a YouTube Video
At a minimum, you need a smartphone and basic free editing software to film a professional YouTube video. Many successful creators use this setup!
But if you want to level up your videos, we recommend investing in a few crucial pieces of gear and a subscription to advanced editing software.
Here’s what you’ll need.
Hardware
Your video is only as good as your hardware, so investing in top-quality equipment is essential.
iPhone or Android
The iPhone 14 Pro and the Samsung Galaxy S22 Ultra both record up to 4K video resolution at 60fps (full HD). They also record slow-motion and time-lapse videos, have advanced video stabilization and have up to 1TB of storage. And yes, you’re seeing that right—the Galaxy S22 Ultra has no less than five cameras.
That’s why you could easily record high-quality YouTube videos with either phone.
But many creators use an external camera and microphone for even smoother, crisper videos and clearer audio. So if you’ve got the budget you may want to invest in a dedicated camera instead.
Camera
There are numerous cameras to choose from:
- DSLR (Digital Single-Lens Reflex) cameras are a versatile option because they allow interchangeable lenses
- Mirrorless cameras are lightweight and portable
- Point & shoot cameras are a simple, beginner-friendly choice
- GoPros are action cameras which you can mount to your head, chest, bike handlebars, surfboard, or other adventure gear
- Drones provide unique aerial shots
The type of camera you choose should depend on the content you’ll be shooting. If you’re an adventure vlogger, consider a compact camera with image stabilization. If you are filming hair or makeup tutorials, you can get away with sacrificing portability for video quality.
Whatever type you choose, opt for a camera that can record in up to 4K resolution.
For more about how to choose the best camera for your setup, check out our article on The 13 Best Cameras for YouTube Vloggers & Creators (2024).
Tripod
While you can always prop up your phone with a stack of books, that gets old quickly—and a handy stack of books isn’t always around. That’s why a tripod is an important addition to almost any YouTuber’s kit.
Many creators use either a telescoping tripod or both a shorter and a taller tripod.
You can set a shorter tripod on a table to film yourself from a flattering angle while you’re sitting. Or you can position it on a countertop pointed downward to film the meal you’re making. Taller tripods are better if you prefer to stand in videos or if you want to capture an entire room.
If you’re an outdoor videographer, you may want a tripod with flexible legs that can balance on uneven surfaces or wrap around tree branches.
And if you’ll be vlogging while driving, doing makeup tutorials, or just want ample natural light in your videos, there are suction cup tripods that attach to your windshield, bathroom mirror, or windows.
Microphone
Your phone or external camera’s microphone probably won’t give you professional audio. It may not even give you intelligible audio.
That’s partly because it’s difficult to stand close enough to a camera for its mic to clearly pick up what you’re saying (it’s ideal to be within 2–12 inches). This is why it’s best to get an external microphone.
How to Choose a Microphone for YouTube
The biggest thing to consider when choosing a microphone is where you’ll be filming.
If indoors, look into condenser mics—specifically shotgun mics—which provide crisp, clear sound.
If outdoors, look into dynamic mics, which pick up less background noise. You can also try lavalier mics, which are useful for their portability and are best for someone who’d like to move around without wires.
Read more: The 10 Best Microphones for YouTube Videos (Based on Top Creators)
Headphones
You may think headphones are only necessary for streaming gaming content, but they’re a great way for all creators to know how they’ll sound to their audience. They also help prevent audio bleed (which happens when your microphone picks up the audio coming through your speakers).
It’s a good idea to film a short test video on location. Among other factors, the distribution of hard vs. soft surfaces will affect the way your voice sounds, and your mic may pick up more ambient wind or traffic noise than expected.
After you’ve recorded your test video, listen to it in your headphones. That’ll give you the best idea of how your content will sound to your audience.
External Hard Drive
Although the cloud is the most convenient way to store your footage, it’s always good to have a backup in case your files fail to upload or accidentally get deleted.
That’s where an external hard drive can be useful.
External hard drives are simple to use. Just plug it into your computer, install the software, and it will periodically back up your files.
Of course, since you can only access the files on an external hard drive while it’s plugged into your computer, we don’t recommend using one as your only storage solution.
Software
Many new YouTubers simply record and edit videos using their phone’s camera and native photos app. These apps can do basic edits like cropping, rotating, and retouching.
But there are better free and low-cost options—such as Riverside.
All-in-One Software
Anyone trying to produce professional-quality YouTube videos should try Riverside, an all-in-one recording, editing, and streaming software.
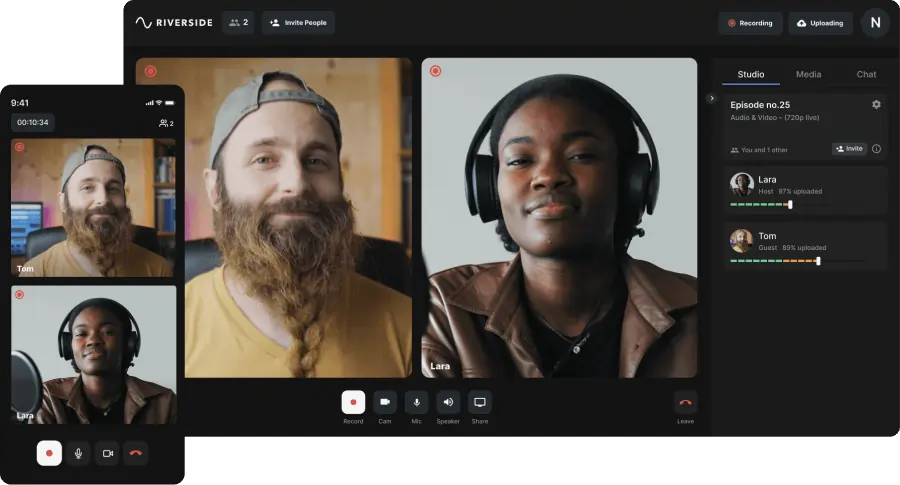
Riverside.fm is designed for high-quality video recording and sharing. Not only does the platform capture up to 4K video and uncompressed, lossless 48kHz audio, it offers plenty of features that benefit YouTube creators specifically. Riverside's text-based video editor uses Ai transcriptions to make video editing as easy as editing a text document. You can use these transcripts to edit and navigate through your video without rewatching anything. You can then top it off, by turning these Ai captions into burnt in video captions, or you can download them to have closed captions ready for your Youtube video.
For a smooth workflow, you can also repurpose your long-form recordings into shareable Shorts. All it takes is a touch of Ai. Our Magic Clips tool uses Ai to find key moments in your recording and transform them into short 15-90 second clips.
Here are some of Riverside’s features useful to YouTubers:
- Local recordings to each participant’s device (so you aren’t reliant on the quality of your internet connection).
- Separate audio and video track recordings for each participant.
- Text-based video editor so anyone can make professional content as easily as editing a text document.
- Invite up to 9 remote guests so you can interview and collaborate with people from anywhere in the world.
- Use producer mode to invite a producer to adjust settings and assist in sessions without ever being recorded.
- Invite audience members to call in live during a stream.
- Record yourself and your screen simultaneously for easy and professional presentation recordings.
- Film on the go with Riverside’s mobile app for iOS and Android.
- Automatic video transcriptions for easy video captioning.
- Add your channel’s logo and customize your background or layout with Riverside’s built-in editor.
- AI Magical Clips tool to easily repurpose your long-form videos into Shorts.
Sign up to try out Riverside’s features for yourself!

Advanced Editing Software
After polishing your video with Riverside’s Editor, you can use advanced editing software to add your own finishing touches. You can easily export to a Descript or Adobe Premiere Pro timeline.
With these popular software tools, you can perform advanced editing features like:
- Underlay music to set the tone of your videos
- Color grade
- Add filters
- Add text and graphics—including your own hand-written and hand-drawn content
- Add special effects
And much more. Adding these elements to your videos goes a long way toward creating a professional look and feel.
Tip: For more effect options, download plug-ins for your editing software. A few good ones to start with are Motion VFX, MLut, and Movie 2.
How to Film a YouTube Video Professionally in 7 Steps
1. Make a loose script
First, decide what you want your video to be about. Consider your target audience’s interests and cater your content to them.
At the same time, be genuine. Don’t lose yourself in your audience’s preferences, and don’t try to do exactly what another YouTuber is doing. Your content will be exponentially more engaging if you’re yourself—and audiences have a knack for picking up on disingenuous content!
Scripting is another area where it’s important to strike a balance. You may not sound natural or conversational if your script is too detailed. But if it’s too generic, you may forget what you want to cover or simply get distracted.
Jot down the key points you want to make, but otherwise, let the content flow naturally while you’re filming.
2. Set up your studio
Your recording studio could be anything from a room in your house to a street corner where you’re interviewing passersby.
Regardless of the nature of your space, here’s what you should do before filming:
Choose a quiet location
If you’re filming outdoors, a completely quiet spot is likely impossible. Just move as far away from potential noise sources as you can, even if they seem quiet as you’re setting up. This could include windchimes, roads, parking lots, buildings (think about doors opening and closing), or running water.
If you’re filming indoors, spend a few minutes in each potential filming spot. What noises do you hear?
Be sure to do this at the time of day when you’ll be filming. Things like traffic and bird noise change throughout the day!
It’s also a good idea to soundproof the room you choose. This means creating as many soft surfaces as possible. You can even just lay blankets or yoga mats on the floor!
Set up lighting
It’s hard to overstate the importance of choosing good lighting for your video.
If you’re outdoors, this means facing toward the sun and, if you can, filming when the light is softer—during the hour after sunrise or the hour before sunset.
If you’re indoors, try standing close to a window, facing that window. Of course, that method doesn’t work well on cloudy days when the light is inconsistent.
A popular alternative is using a ring light for even lighting across your face.
Regardless of your light source, it’s also a good idea to use a three-point lighting system, as in the image below. Note that the key light should be brighter than the other two. If you look backlit, dim the backlight!
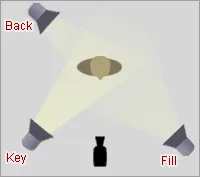
Always avoid using ambient overhead lighting as your only light source. It creates harsh, unwanted shadows and does not illuminate your face.
Choose background
If you can, avoid using a plain white wall as the background of your videos.
Instead, use something visually engaging that matches the tone of your channel and your video. Just be sure to strike a balance between boring and cluttered.
3. Test your equipment
Even if you’ve previously recorded in the same spot at the same time of day and with the same equipment, you should do a test recording before filming your video.
Maybe your AC wasn’t running when you filmed there last time. Or, perhaps your camera’s battery is unexpectedly low.
Be sure to use all the hardware and software you’ll need for your video during the test recording.
4. Action!
Once you’re happy with your setup and you’re sure everything is charged and working correctly, just start talking!
Here are a few things to keep in mind when filming.
Film an intro
One of the easiest ways to enhance your video’s smoothness and professionality is by filming a short introduction to transition your viewers into your video gently.
This could be a clip of yourself explaining the topic of your video, clarifying something from your previous video, or discussing recent life events.
Your intro could also provide background for the content you’ll show at the start of the video. For example, you could film a timelapse of overnight snow accumulation outside your house if you know the first scene of the video will be you exclaiming in amazement at how much snow you received.
Film transition shots
Similarly, a good way to transition between scenes is to film clips providing the background for the next scene. For example, to transition from a night scene to a morning scene, you might film a timelapse of the night sky from sunset to sunrise.
You could also film a clip of yourself walking into a room to transition your viewers into a scene filmed in that room, or a clip of yourself leaving through your front door before a scene filmed in your car.
Switch up the shots and camera positioning
Filming yourself from different angles and positions can also make your videos more dynamic.
Try filming wide shots to capture others around you or the background of an activity you’re doing. Then mix in some close-up shots of you talking to your viewers.
And get creative with camera placement—do a few test clips with the camera in various locations, at various heights, etc. You might be surprised which ones look really cool!
Film an outro
An outro serves the same purpose as an intro—to segue your viewers. Your outro gently transitions them out of your video and back into the real world.
You could film an outro that mirrors your intro, or you could film a clip of yourself talking to your viewers to finish out your video.
5. Add finishing touches
You’re almost done! There are just a couple more boxes to check:
Take a thumbnail photo
The thumbnail photo is your video’s preview image. It’s what your viewers will see when they search for your video.
Your thumbnail photo should reflect your video's content and your channel's aesthetic.
Tip: Choose a thumbnail photo with at least 720p resolution, so it doesn’t look grainy on YouTube. For compatibility, ensure it’s in a JPEG, GIF, BMP, or PNG format.
Watch your footage
It’s better to learn that you aren’t happy with some of your shots while you’re still on location (or while your studio is still set up) than while watching your footage for the first time days later.
Especially if there are shots you’re unsure about, go through the footage immediately. Then re-record if necessary.
6. Immediately save your footage
Sooner or later, most creators have the awful experience of forgetting to download their footage before formatting their SD card.
If it hasn’t happened to you, maybe we can save you the headache of trying (and usually failing) to recover the footage by warning you to save footage to your computer as soon as possible!
7. Edit
Now you’re ready to sit at a computer and start turning your raw footage into the masterpiece you’ve imagined.
When editing, your goals are to make your video smooth and engaging, create an easy-to-follow narrative, and keep the pace moving so your viewers don’t lose interest.
Here are a few ways to do that.
Add music
Adding music to your videos can keep viewers engaged and help them understand the intended tone of the video. Fading the music out at a transition point can also ease viewers into the next scene.
Add text and graphics
Use the rule of lower thirds.
This rule refers to overlaying text and graphics onto the lower third of some of your shots. The most traditional way to do this is to add a banner with the name and title of the speaker, but you could add any text explaining the shot.
Of course, if your video is informal, you could add text and graphics anywhere you want—just make sure they don’t obscure important content.
Some YouTubers even overlay a tongue-in-cheek written commentary on their videos or have a graphic pop up at an opportune moment for comedic effect.
Create an intro clip
If you don’t want to film an intro for each video, you could use a single clip as your standard introduction across all videos.
Alternatively, each video’s intro could be a clip taken from an interesting scene later in that video.
Add to your outro
Whether or not you filmed an outro for your video, try transitioning viewers out of your video by fading the video out and letting your music continue to play for a few seconds over a black screen.
Some creators will also overlay text onto the black screen.
Tips on Filming a YouTube Video
We’ll leave you with just a few extra tips for creating a stunning video and ensuring it meets YouTube’s guidelines.
1. Film in landscape orientation
This one may seem obvious, but if you’re used to taking photos for Instagram, it’s a mindset shift!
Unlike Instagram, which displays videos in portrait orientation, YouTube displays videos in landscape orientation. (YouTube shorts are in portrait, however.) That means that for most YouTube content, you’ll need to turn your phone sideways when filming.
Note that external cameras record in landscape by default. But if you’re recording with Riverside, you can easily shift layouts in our editor.
2. Look at the camera lens, not at yourself
Let’s be honest—most of us look at ourselves while filming videos or sitting in video meetings.
But it’s good to shake that habit while filming YouTube videos. Looking at the camera lens rather than at your picture on the screen simulates eye contact with your viewers. Not only does that make your videos more engaging, but not doing it can be distracting.
3. Don’t talk about it; show it
This filming rule of thumb means that if you find yourself describing something you or someone else did, either:
- Stop describing what happened and simply show a clip of it, or
- Overlay your audio description on a clip of the event
A picture (or in this case, a video) really is worth a thousand words.
4. Use a music library
While music can enhance your video, it can also detract from it if YouTube mutes the video because of a copyright claim!
YouTube enforces artists’ rights to their music, so if a song is copyrighted, you can’t use even a few seconds of it in your video. If you do, the artist has the right to seize your video and monetize it on their own channel—and YouTube has the right to mute it or take it down.
Luckily, there are music libraries you can use without worrying about copyright claims. Here are a few free and paid options:
- YouTube’s audio library (free)
- Promo.com (free)
- Audio Jungle (paid)
- Epidemic Sound (paid)
Some music libraries, like Epidemic Sound, even have sound effects you can add to your videos.
5. Be careful about filming strangers
It’s illegal in the U.S. to film someone without their permission in a setting that could reasonably be expected to be private.
That means you should avoid filming anyone on private property (other than your own). You can, however, film people in public areas, because by being in a public area they are legally giving their consent to being recorded. This does not apply to private spaces within public areas such as restrooms or fitting rooms.
That said, it’s still a good idea to ask permission before filming anyone—including asking permission to post the footage. It’s also good manners to blur out people’s faces if they are unknowingly in the background of your video.
Bonus: How do you promote your YouTube video?
The last thing you want is to invest time, energy, and money into a video that no one is going to watch.
That’s why we’ll tell you about a few video marketing tips for getting your video in front of your viewers and growing your YouTube channel:
- Use SEO (search engine optimization)—add keywords for which you want your video to rank to your title, description, and tags
- Run contests and giveaways to attract viewers
- Cross-promote your content on other channels by making collaboration videos
- Promote your content on other social media
- Create a website and add your YouTube videos to it
- Do live streams to engage with viewers and subscribers
The general principle of video marketing is that you can’t expect your audience to come to you. It’s up to you to put your content where they will find it.
FAQs on How to Film a YouTube Video
How much does it cost to film a YouTube video?
Filming a YouTube video is free for many creators.
A YouTube account is free, and if you already have a smartphone you can use it to film videos and its photos app to edit.
However, if you want to do advanced editing, you’ll need to pay for software (and a computer if you don’t have one).
How do you film quality videos on YouTube?
For professional-quality YouTube videos, we recommend first getting a good camera, tripod, and microphone. You can find great equipment from our following guides:
- The 13 Best Cameras for YouTube Vloggers & Creators (2023)
- The 10 Best Microphones for YouTube Videos (Based on Top Creators)
You should also consider investing in advanced editing software like Adobe Premiere Pro or Final Cut Pro; editing can elevate a subpar video to a studio-quality production!
In addition to the right equipment, it’s good to learn a few principles of videography like the rule of thirds and how to use a three-point lighting system. It’s also important to understand YouTube's community guidelines to avoid copyright claims and video takedowns.
How do you film a YouTube video on a computer?
The best way to film a YouTube video on a computer is by using recording software like Riverside.
Make an account with Riverside, create your own online recording studio, and start filming! You can even edit your recording using Riverside’s Editor and export it in a format compatible with YouTube.
We do recommend investing in an external mic. While Riverside can record in up to 48kHz audio quality, most computers’ built-in microphones won’t produce professional sound.
How do you film your first YouTube video?
All you need to film your first video is a smartphone!
Simply ensure you have plenty of storage space on your phone, choose a quiet, well-lit spot to record, jot down a few notes about what you want to say, and hit Record.
After you’re finished recording, you can just edit your video in your phone’s photos app. If you have an iPhone, you can also edit in iMovie for free.
That being said, a simpler way to record your first YouTube video in studio quality and easily edit and export it is by using Riverside.


.webp)
.webp)
-(1).webp)

