Table of contents:
Green screens are a crucial tool for video content creators. After all, with a green screen, you can go anywhere in the world without leaving your house.
But assembling a green screen and adding a fake background to your videos can be daunting.
We’ll simplify it with a comprehensive guide to building a DIY green screen. Then we’ll tell you how to add a fake background that looks real.
And the best part? You can do it all from the comfort of your home.
What is a green screen?
A green screen is a large piece of green material in the background of a video. It could be cardboard, cloth, or even a green wall—it just has to fill the camera screen.
Creators use green screens to replace their real background with a different background. For example, you might want to film yourself at the beach without driving hours to get there. To do that, film yourself in front of a green screen. Then replace the screen with a video of gently rolling waves. Voilà—you’re at the beach.
How does a green-screen video work?
Green-screen videos use a technique called chroma keying. It involves removing, or “keying out,” one color from your video using editing software.
The software removes that color from the entire video—not just your background. For example, if your pants are that color, your legs will disappear. That’s why most creators choose neon green; clothing in that color is uncommon, and it isn’t a natural hair or skin color.
The software then combines your real and fake backgrounds. Videographers call this process “compositing” or “chroma key compositing.”
You can also add CGI (computer-generated imagery) special effects. If you’ve seen an action movie, you’ve seen CGI. You can do almost anything with CGI—including making Chris Pratt fight raptors!
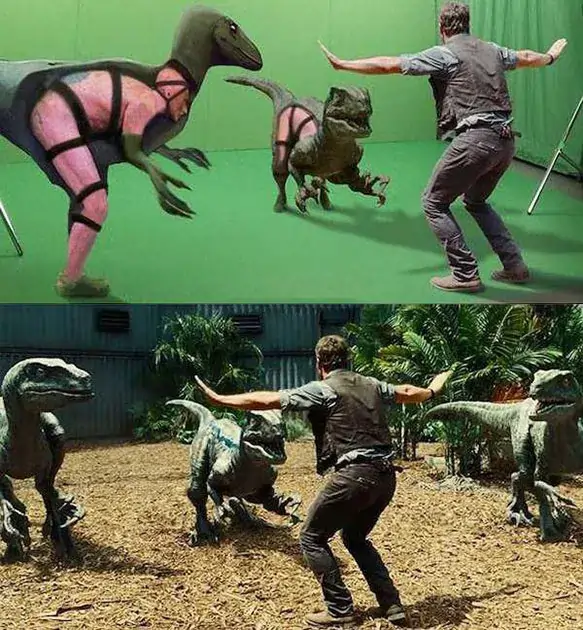
What do I need to make a green-screen video?
The right software and equipment for you depends on your goals and the complexity of your video. But below, we’ll walk you through the basic tools every creator needs.
Equipment
Green Screen
First, to make a green-screen video, you need—you guessed it—a green screen.
You’ll need enough green material to fill your camera frame. If you’re filming a close-up, you might be able to get away with a single green poster board. Choose one with a matte finish (a glossy finish reflects too much light, which makes chroma keying difficult).
If you’re filming your whole body, use enough green material to cover the area behind you and beneath your feet. If you don’t want to paint it, buy a large sheet of green fabric. Craft stores like JOANN Fabrics sell green fabric specifically for this purpose.
Lighting
Next, you’ll need lighting for both yourself and your green screen.
It’s important to light the screen separately from yourself. If you don’t, you may cast shadows on the screen that are hard to edit out. The screen may also cast a green hue onto your face—and “sickly” is not the look you’re going for.
Choose large, soft lights that will light the screen evenly. If the lights are too harsh, hang thin fabric in front of them to diffuse the light.
Then, use a three-point lighting system to light yourself. That requires three separate lights: a key light, a fill light, and a backlight. You can buy a three-point lighting kit or make your own; the important thing is that the key light should be brighter than the other two.
The setup will look like this:
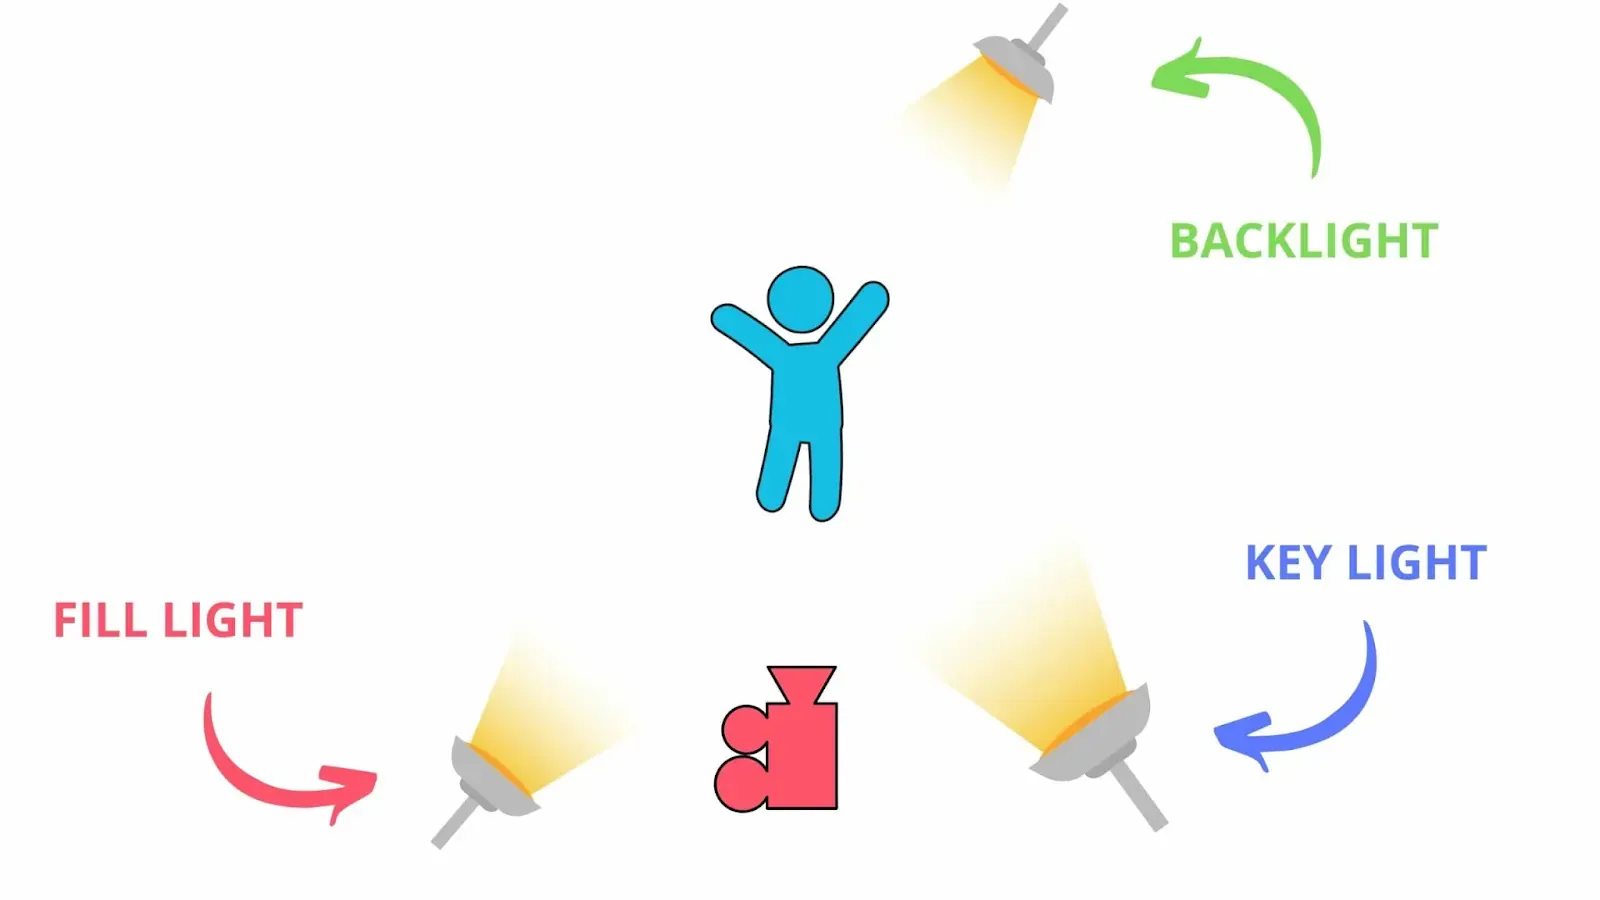
You can read more about how to create an effective three-point lighting system in our three-point lighting guide.
Camera
You can film with your phone or laptop’s built-in camera, but the footage will be better quality if you use an external camera.
For the best footage, choose a camera that can record in up to 4K video resolution. Then, we recommend connecting your camera to your laptop. That gives you the flexibility to use recording software, which vastly improves video quality.
Microphone
Investing in an external microphone is even more important than buying a camera. Most cameras’ built-in mics don’t produce high-quality audio. They’re especially bad at picking up sound more than a few inches away.
You’ll want a mic that records up to 48 kHz audio—but beyond that, the right microphone for you depends on what and where you’re recording. For a simple guide, check out our article on how to choose the best microphone.
Software
Last, you’ll need both recording and editing software to make green-screen videos.
Recording Software
Recording software ensures your footage is of the best possible quality. It also comes with several upsides, like adjusting your video settings while filming, live-streaming videos, and interviewing remote guests.
And the best recording software will automatically produce a transcript of your video. A transcript lets you make subtitles and captions, which increase your video’s accessibility and audience reach.
Riverside’s recording software is perfect for anyone making a green-screen video.
Riverside records in up to 4K, ultra-high-definition video. That means the quality of your video will match the quality of your added background. It also records lossless, uncompressed, 48 kHz audio for crystal-clear and lifelike dialogue.
And even better, Riverside records videos locally—recording using your computer instead of the internet. Local recording ensures any internet issues don’t interrupt your video. After all, it’ll look strange if there’s lag in your video, but not your background!
With Riverside’s recording software, you can also:
- Record with up to 10 remote participants
- Adjust video settings while recording
- Screen-share in full HD while recording
- Record separate audio and video tracks
- Create shareable clips at the touch of Ai with our Magic Clips tool
- Burn highly accurate captions directly into your video
Even the best editing software can’t make up for poor recording quality, which is why it’s important to record with software like Riverside. Try it out today at Riverside.
Editing Software
The last tool you’ll need to make a green-screen video is editing software. While you can perform basic video editing functions with Riverside’s Editor tool, you’ll also need a specialized green screen editor change backgrounds and finalize your presentation.
We’ll get more into how that process works below. But first, we’ll explain how to use the equipment we listed to make a DIY green screen for your videos.
How to Make a Green Screen for Videos
You won't have to assemble anything if you use a poster board for your green screen. Just place the board behind you and start filming.
If you use fabric, you’ll need a way to hang it smoothly—without folds or wrinkles. Chroma keying won’t work seamlessly unless your background is completely smooth.
Here’s how to assemble a fabric green screen:
Step 1: Buy materials
Keep your fabric tight and wrinkle-free by building a PVC pipe frame. You’ll need PVC pipe, 90-degree elbows for your frame’s four corners, and a PVC pipe cutter.
You’ll also need a stand to hold up your frame and clips to attach the fabric to the pipe.
Step 2: Cut fabric
Next, cut your green fabric to the size you need.
Remember that the fabric needs to cover the entire camera frame. That includes the areas behind and beneath you.
Step 3: Assemble frame
Cut the PVC pipes to the length you need and attach them using the elbows. Set the frame upright on the feet you bought.
Step 4: Hang fabric
Then, attach your fabric tightly to all four sides of your frame. Wrap it around the frame or attach it using strong clips.
The fabric should be long enough to extend horizontally along the floor beneath you. Use a steamer to remove wrinkles.
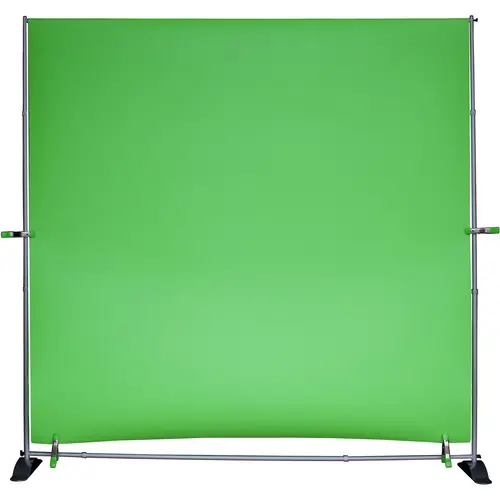
The final product should look something like this, with the addition of fabric on the floor:
How to Edit and Use a Green Screen Video
At this point, you’ve built a green screen and filmed yourself in front of it. Now you’ll chroma-key your green-screen video.
Learning how to make a green-screen video is simple. You can do it with editing software like Descript, Adobe Premiere Pro, or Final Cut Pro. While the process differs by software, the basic steps are the same:
Step 1: Perform basic edits
As we mentioned earlier, it’s best to perform your other edits before chroma keying. That includes removing filler words and background noise. It also includes adding music, logos, and filters.
Step 2: Add footage to timeline
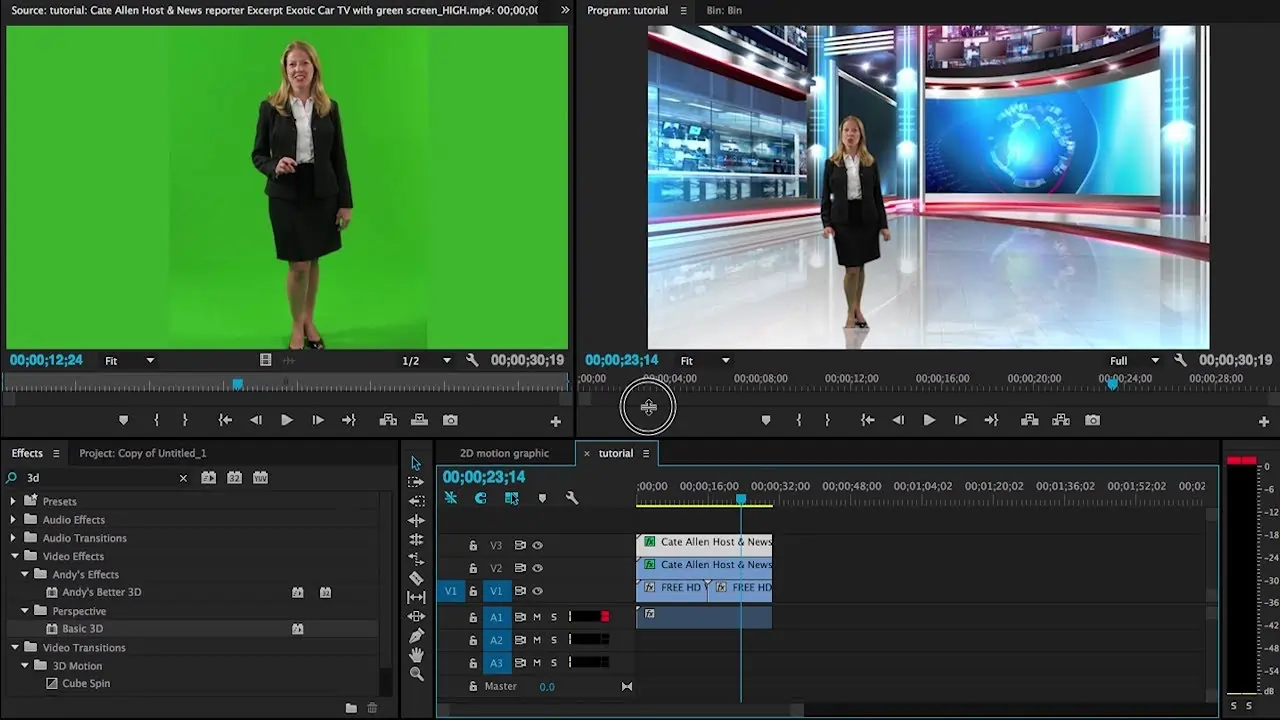
Then, add your footage to the timeline in your editing software. That includes your green-screen video, your background video, and any CGI. In most software, you’ll stack these separate tracks vertically, like this example:
Step 3: Adjust clip length
Next, trim your green-screen footage and background video to the same length. If you’re using CGI, adjust its timing to match the green-screen video.
Step 4: Chroma key
Now for the big reveal—replacing the green screen with your new background!
This step differs across editing software. You may simply have to click a button to add the green-screen effect, or you might have to click on the green background to tell the software which color to key out. Either way, the tool will composite the new video onto your green-screen video.
Step 5: Add finishing touches
Once your new background is in place, make sure it matches your video. You want it to look realistic—like you’re there. That means the lighting and shadows have to match your video. Touch up the lighting on your face if the green bled onto your skin. Note that blonde hair is especially susceptible to turning green.
You can do all that with editing software’s spill suppression and color correction tools.
How to Make a Green Screen Video on Your Phone
It’s easy to learn how to make a green screen video on iPhone or Android.
Many editing tools let you chroma-key on their mobile apps. The process is the same as making a video on your computer. You’ll drag your green-screen video, background video, and any CGI into your timeline; then you’ll edit the clips to match.
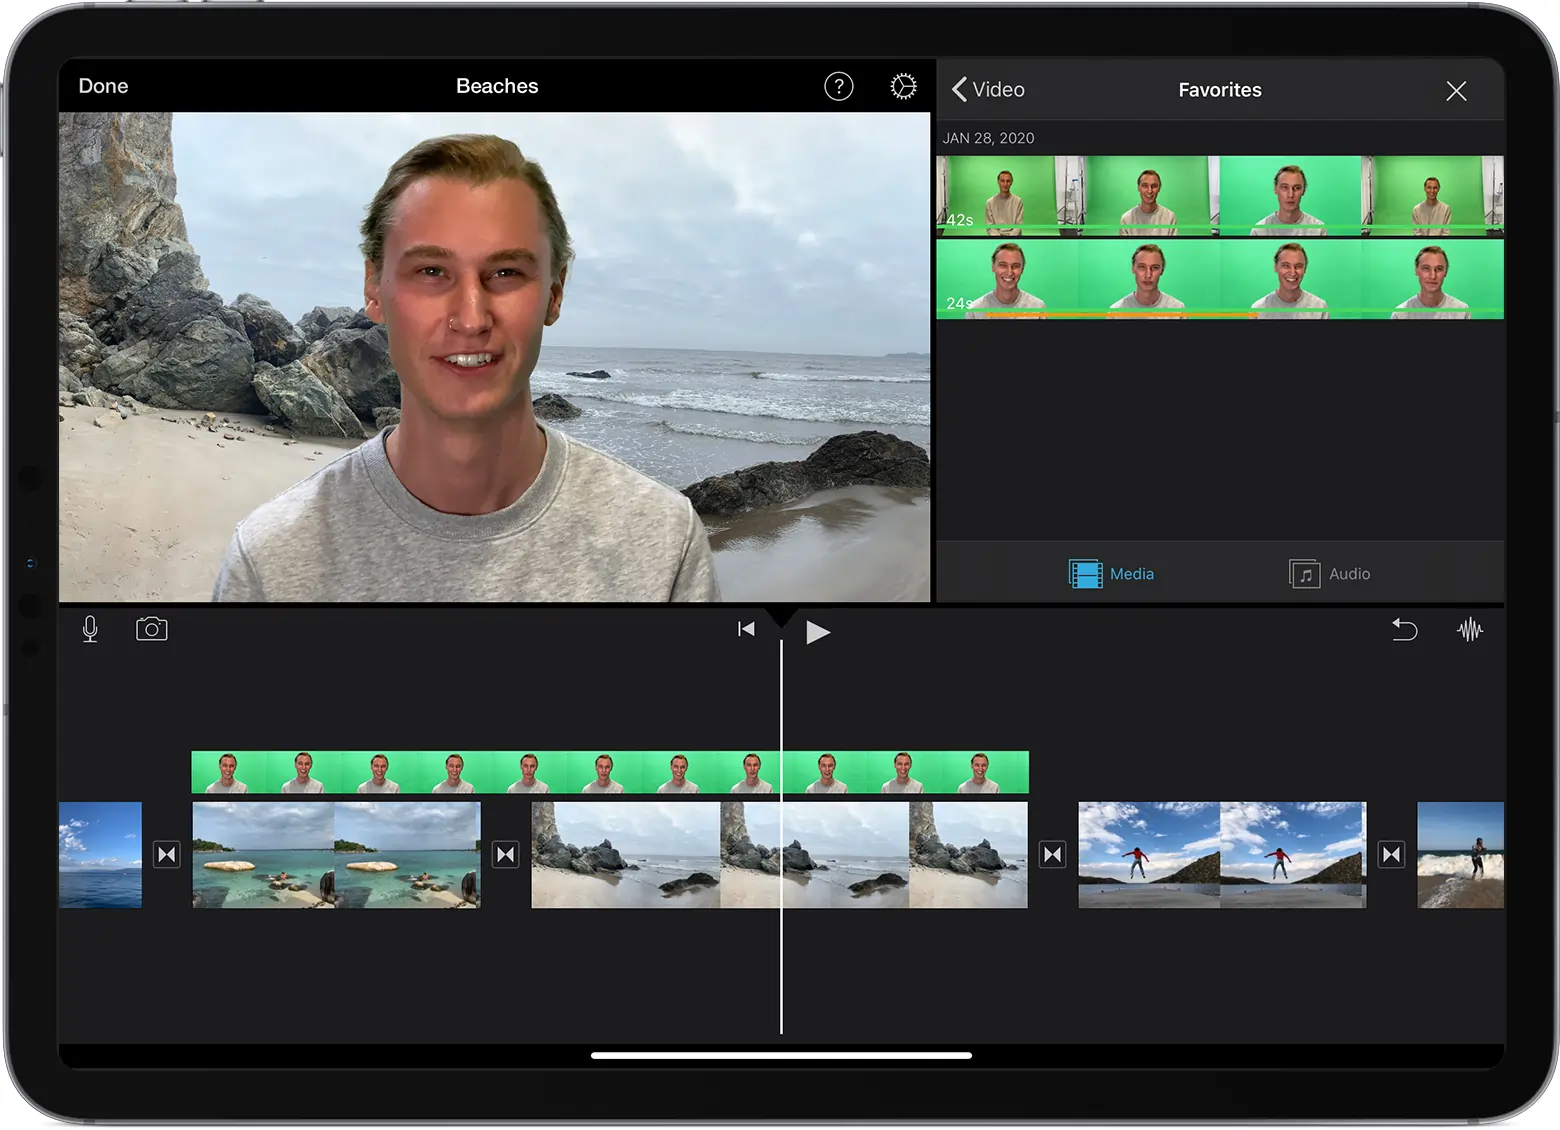
Other software lets you record on your phone but requires you to edit on your computer.
If you want to edit on your phone, research your editing software before buying. Make sure its mobile app has green-screen capability.
Tips and Tricks for Making Green Screen Videos Successfully
We’ve already given you a few rules of thumb for making effective green-screen videos. But here are more pro tips:
Avoid Reflective Material
Don’t wear anything reflective while filming a green-screen video. That includes glasses, large jewelry, and mirrored props. Reflective items absorb green from the green screen. Then, when you chroma key your video, they disappear.
It’s ok to wear a few pieces of small jewelry. If you aren’t sure about something, film a test video.
This rule also applies to oily skin because it can be reflective. Use powder to absorb oil on your face or head before filming.
Avoid Green
Don’t wear clothes with green tones. Even if you don’t think they look green, your editing software might.
For example, some shades of brown—like khaki—have green undertones. They won’t disappear during chroma keying, but they’ll look transparent.
Stand Back from the Green Screen
Leave at least six feet between yourself and the green screen. That helps keep the green from bleeding onto your face. It also helps keep you from casting harsh shadows onto the screen.
Remember that it’s important to have even lighting across your green screen. Any shadows you cast will be hard to edit out.
Use a Gimbal
Use a gimbal to prevent camera vibration. If the surface the camera is sitting on vibrates even slightly, the footage will look shaky. That could happen from a passing car, loud bass music, or a person walking past the camera.
Preventing shaky footage is a way to make sure the subject matches the background setting. You don’t want to look like you’re moving when your new background isn’t.
Use the Right Lighting
Be aware of the direction the light is coming from in your new background. It won’t look natural if the sun is on the left and you light yourself from the right.
If you want to make professional videos, you need consistent lighting.
Bonus: Green Screen Ideas and Inspiration
Last, we’ll share a few examples of how you can use a green screen to enhance your videos.
Add a Still Background
One of the simplest ways to use a green screen is to replace your background with a still image. Suddenly, you’re not standing in your living room—you’re on an exotic vacation!
In this video, two kids show off several backgrounds you can add using a green screen:
Like these kids, you too can “travel the world” from the comfort of your home.
Make a Music Video
Artists often use green screens to make music videos. No, your favorite artist didn’t travel to seven countries to film that video!
This video shows the process of making a music video using a green screen. It stacks the original and new videos side-by-side to give you the inside scoop on how it all works:
These are just a few of the creative ways you can use a green screen to enhance your music videos.
Film an Action Scene
This video shows scenes from Marvel movies that use a green screen.
It gives a behind-the-scenes look into the green-screen filming. Then it shows the scene with the new composited background:
With the tips we’ve given you, you’ll be making studio-quality videos in no time.
FAQs on How to Make a Green Screen Video
How do I turn a green screen into a video?
It’s simple to turn a green screen into a video. Editing software like Adobe Premiere Pro can do most of the work for you.
First, film yourself in front of a sheet of green fabric. Then take a picture or film a video for your background.
Next, open your editing software and drop both videos into your timeline. Last, tell your software to remove the green from your video and replace it with your new background. And just like that, you’ve made a green-screen video.
How to add green screen background to a video without a green screen?
Have you ever used a fake background in a Zoom meeting? Then you’ve added a green-screen background without a green screen.
Some editing software can differentiate between background and subject in videos. In effect, this software skips the green screen; it replaces your real background with a new background in a single step.
But that method doesn’t work as well as a real green screen. Parts of your real background often bleed through. And the software often cuts off part of the video’s subject.
For high-quality videos, we recommend using a physical green screen. Pair it with recording software like Riverside for the most professional result.


.webp)
.webp)


