.webp)


Table of contents:
Video editing effects are a great way to take your content to the next level.
Adding dynamic cuts and eye-catching transitions will keep your viewer’s attention. You can use effects to boost engagement and make visually entertaining videos.
Finding new ideas for editing effects can be challenging. But whether you’re a beginner or a pro editor, we’ve got some suggestions to make your content stand out from the crowd. Our list of 10 must-try video editing effects is full of exciting and creative ideas for you to try out.
What are video editing effects?
Video editing effects might sound complicated, but they’re pretty straightforward. They are ways of enhancing your content with cuts, transitions, and filters. Some effects are simple and commonly used, like jump cuts. Others, like CGI and LUTs, are more complex.
Content creators usually choose editing effects that help them enhance the tone and pace of a video. Editing effects are a great tool for keeping the viewer’s interest as a video plays.
Types of video effects
There are a few different types of video effects. From the epic and cinematic effects used in movies to subtle edits, you may not even notice in your favorite videos.
Certain effects are for specific purposes, like perfecting the mood and viewing experience of a video. To do this, creators use tools including color correcting and frame adjustment.
On the other hand, eye-catching and extraordinary effects exist too. These include green screen creations and dramatic transitions.
Invisible effects vs. visible effects
Invisible and visible video effects are different results that you can achieve through editing. These two categories of editing effects have some key differences. You could use one type or another to enhance your video. Most creators use a combination of both for maximum effect.
Visible effects are edits that look obvious to the viewer, and they can clearly see the video is edited. Changing the speed of the video, adding animations or 3D elements are some examples of visible effects. These effects deliberately stand out. They are used to tell a story or create an atmosphere in the video.
Invisible effects, on the other hand, are not supposed to be noticeable. These subtle edits include color-correcting and stabilizing footage. They help make the video look more realistic rather than being eye-catching features of the video.
Invisible effects are best when viewers cannot tell they are even there. They create consistency and enhance the natural features of the video.
What do you need to add video effects?
To add video effects into your content, you need the right software. Video editing software comes in a few different forms. There are downloadable softwares, apps, and online editing platforms. It’s best to pick a software type that fits with your workflow and lifestyle. For example, if you’re on the go a lot you may prefer an editing app.
Some video editing software is more advanced than others. You won’t find exactly the same effects across all platforms. Think about what type of effects you want to add before looking for software. This will help you choose a basic or more complex platform.
If you want to save on space, you can also try an all-in-one recording and editing platform like Riverside. Riverside records in up to 4K video resolution, and it’s text-based editor makes video editing as easy as going through a text transcript.
Learn more, or start editing videos effortlessly with Riverside.
Video editing software with effects
There’s plenty of software to choose from when you’re searching for video effects. However, every platform is different. If you’re a beginner editor or want a smaller toolkit of effects, you could try Apple iMovie.
On the other hand, more advanced software exists if you’re looking for a greater variety of effects. Adobe Premier Pro and Corel VideoStudio Ultimate both offer a pretty extensive range of transition, color grading and special effects tools. You can use these to unleash your creativity.
10 Video Editing Effects to Transform Your Footage
If you’re ready to enhance your content with video effects, look no further. We’ve got 10 amazing effects for you to try out. The list below is full of ideas for your next eye-catching video. Flex your creative muscles by giving these editing effects a go – the results may surprise you!
Video speed
Switching up the speed of your video is an easy way to catch people’s attention. Slow down a clip to make the scene last longer. This can create funny moments, like watching a person fall in slow motion. Slowed videos can also have dramatic effects, like a bullet leaving a gun at a drawn-out pace.
Speeding up your video is a great way to cover a lot of ground quickly. For example, you can speed up a clip of a person sewing a dress to give an overall sense of the process. This is a really useful effect when the viewer does not need to see every moment of the clip in detail. Using time lapses can also make beautiful, awe-inspiring events like sunsets leave a lasting impression.
Intro title
Many content creators use intro titles to present themselves and the topic of their video. Because intro titles are often the first thing you see when you play a video, they should be attention-grabbing. They are usually no longer than a few seconds, so the viewer can dive into the content without getting bored.
These titles consist of images or text showing the content creator or topic of the video. Your intro should be animated to be eye-catching. Intro titles have many positive effects. They can help with branding and personalizing your video. They also create expectations about the kind of content the viewer is going to see. Because of this, they are a great way to increase viewer engagement.
Filters
Video filters add a special effect to a person or scene. You can use fitlers to create effects like blurring, smoothing, pixelating, and more. There are many reasons to use filters. They can make a scene look dramatic, otherworldly or artistic. Often, they are used to enhance a person's appearance or create an atmosphere in the video.
You can find editing software on mobile and desktop devices that offers a range of filters to try. They are a great storytelling tool accessible to beginners and pros.
Motion graphics
Motion graphics refers to animated graphic design. This means text or images that are animated and move within the video. You can animate a whole image or word, or elements of it can change. For example, you could create a title and have the font or color change.
There are strong reasons for using motion graphics. They draw attention to particular words or phrases, so you can make taglines, brand names, and more stand out. You can also use them to add personality and fun to your video. You can use them to tell jokes or add entertaining features to your narrative.
LUTs
LUTs (Lookup Tables) are color filters you can apply to change the color of your video. A LUT is a set of numbers that remap your image and alter its look. You can get LUTs for free from certain camera manufacturers, editing software, and content creators.
You can use LUTs in video editing software like Final Cut Pro. LUTs give your footage a certain aesthetic. Videographers use them to create a consistent look with their content. They are also a helpful way of preparing your video for color grading.
Color grading
You may not realize how many videos you watch have been color graded. This video effect is an essential step for many creators. It can transform your content in subtle ways to achieve a consistent tone or color.
Deciding on a color palette before you edit your video is a good idea. Your palette will give you direction when it comes to color grading. You can be creative with this effect to set the mood of your video or be stylistic. For example, brightening up the main person’s face in your video. In this way, color grading can help you draw attention to certain parts of a scene.
Color correction
Color correction is a crucial step in the editing process. It’s amazing how making subtle changes to the color of your video can have a powerful overall effect. With color correction, the aim is to fix any problems with how your footage looks. It’s also important to make the colors in your videos match the natural tones in the real world.
You might be wondering why color correction is so essential. Well, through this process you create continuity in the colors between different video clips. This creates a sense of unity to your video. When color correcting, you can also make changes to exposure, contrast, skin tones, hair color and more. This helps create a natural look and feel to your content.
Transitional effects
Transitional effects have one key purpose: to move from one shot to another. They are very handy tools for creating visual interest in your video. You can use them to add fun, creativity, or professionality to your storytelling. For example you could use a fade transition, where one shot gradually dissolves into another. This is a gentle way to move between scenes, and can be used to create a nostalgic or thoughtful tone.
There are many different types of transitional effects to choose from. Some can make your video seem more dramatic or dynamic, while others are best for a serious atmosphere. Popular transitions include: jump cut, cutaway, wash out, fade, wipe, L Cut and J Cut. You can experiment with these types to find the style that works best for your content.
Reverse video
Having part or all of your video played in reverse is a simple way to create an interesting visual. Footage played backwards can be used to entertain viewers, make them laugh, or show a journey from end to beginning.
Editing software like Adobe Express includes features to reverse your video clips. Putting a song or voiceover on top of a backwards video clip is a popular idea. This is because a story can be told while the reverse video plays.
Split screen
Split screen means having multiple shots in frame at once. This effect has a huge benefit: it allows you to show different people’s reactions at the same time. You can use this editing effect for podcasts and interviews.
With certain video editing software, you can even customize the layout of the split screen. You can put coloured borders around different camera angles. Or you could have the shots switch between different people. It’s best not to overcrowd the screen with too many shots at once, or viewers won’t know where to focus.
Tip! Try Riverside’s automated layouts. You can split your screen with just a quick click. Learn more about Riverside’s free online video editor, or start editing seamlessly.
Learn more: Video Editing Terms & Definitions Explained | Beginner's Guide
How to easily add effects to a video
Adding effects to your video doesn’t have to be complicated. In fact, by following the right steps the process is straightforward. We’ve created this tutorial to help you easily add effects using Premiere Pro. The effects in this guide are available with other software too.
Step 1: Record your video with Riverside to ensure you get top-quality resolution. You can record with up to 4K video and 48kHz audio. (Learn how here)
Step 2: After recording, select the take you want to export. Click on the export button, and then select ‘Export to Adobe Premiere Pro’. This exports specifically to a Premiere Pro timeline.
You can also use Riverside’s text-based editor to get your trimming and cuts done before adding video effects. Riverside’s editor uses Ai transcriptions so you can create precise cuts by simply deleting text in your recording transcript. Note that if you use the editor, you’ll have a merged track.

Step 3: In Adobe Premiere Pro, click Window in the toolbar, then select Effect Controls.
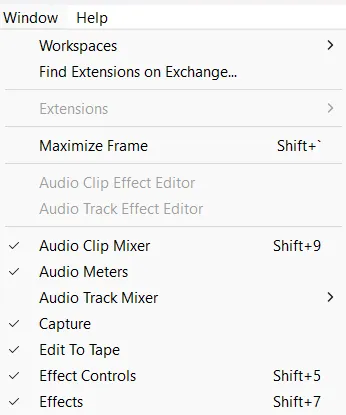
Step 4: Click on the clip that you want to add effects to. You will see the video effects settings appear on the left-hand side of your screen.
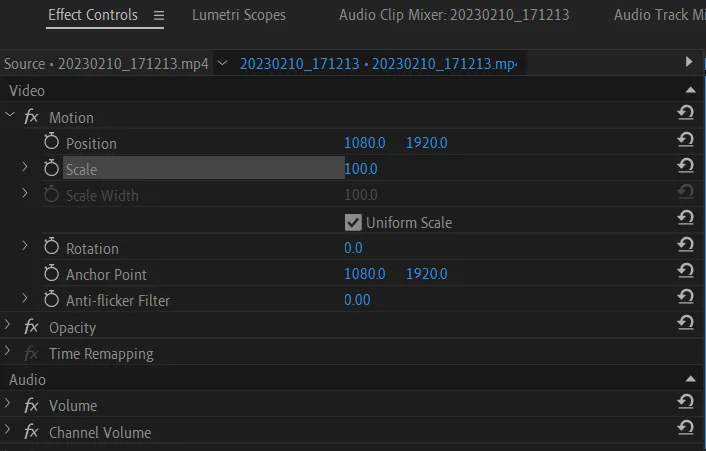
Step 5: In the effects settings, adjust the values for speed, scale, position or rotation to create motion effects.
Step 6: You can animate your motion effects. Do this by moving the blue line in the clip timeline to the place where the animation should start.
Step 7: In the video effects settings, select the stopwatch icon next to the effect you wish to animate. You can then create keyframes to animate one or more effects.
Step 8: You can also drag and drop effects in Premiere Pro. Select Window in the toolbar, then make sure Effects has a blue tick beside it.
Step 9: You’ll see an Effects window on the right-hand side of your screen. It contains both audio and video effects.
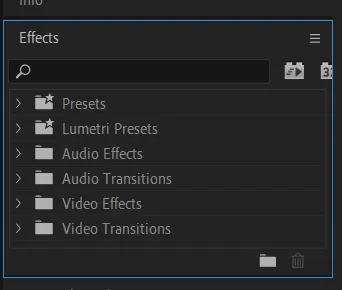
Step 10: You can drag and drop any of these effects, such as blur or color balance, into your video clip.
If you’d like to use video effects in Adobe Premiere Pro but need some more guidance, don’t worry. Adobe has detailed resources to help you learn the ropes. Adobe’s video tutorials will walk you through how to apply different effects to enhance your video.
FAQs on Video Editing Effects
How do you add special effects to a video edit?
You can add special effects to a video using editing software. The specific process for adding effects varies a little from platform to platform. Usually, you can find an effects section within the toolbar of your editing software.
You can either drag and drop effects or select points in your video where you want to add them. You can add special effects with mobile editing apps, online editors or downloadable software.
What are the 5 stages of video editing?
The five stages of video editing are as follows:
Stage one: Organize
Go through your recorded material and sort the clips you want to use. Group and label the clips according to the scenes or takes they refer to.
Stage two: Assemble
Arrange your clips into a timeline. The clips should be put together to match the storyboard or narrative you want to tell with your video.
Stage three: Rough cut
Create a first draft of your video. Make cuts to scenes, add transitions, an intro and any other features you need to enhance the pacing.
Stage four: Fine cut
Go through your video draft and pay close attention to detail. Make smaller edits regarding pacing and framing at this point.
Stage five: Final cut
At this stage, it’s time to review your final cut. It’s important that you watch your video on multiple devices to make sure it comes across well on mobile and desktop. This is also the time for color correction and color grading to add the final touches to your video.
Learn more: How to Edit Videos: Easy Steps and 15 Tips for Beginners
How can I add effects to my video for free?
You can add effects to your video for free by using free editing software. For example, a free version of the DaVinci Resolve video editor is available. This software comes with a range of video editing effects. You can perform edits like color grading, adding transitions and more by finding free software that offers these features.


.webp)
.webp)
.webp)

