


Table of contents:
Can you record your Zoom meeting in full HD?
How to record separate audio tracks in your Zoom meeting in high quality
So, you can’t record in full HD on Zoom, what are your options?
Recording Separate Video tracks in a Zoom meeting using QuickTime
How to Record Your Zoom Meeting Using QuickTime:
Recording separate video and audio tracks in full HD using Riverside.fm
Are you trying to figure out how to record all your participants in separate HD video tracks on Zoom? Whether you’re recording a vibrant podcast discussion or an engaging digital webinar, you want each guest to look and sound their best.
While high-quality resolution is essential, separate video and audio tracks are important, too, as they give you more editing control. Only some recording platforms offer this, and –spoiler alert– Zoom is not one of them. Zoom offers separate audio-track recording, but you must try a workaround if you require individual video tracks.
We’re here to help. In this article, we’ll explain why Zoom doesn’t quite cut it and how to do the best with it anyway. Then we’ll look at two workarounds that will give you the professional-quality video and audio separate tracks.
Table of Contents:
- Can you record your Zoom meeting in full HD?
- How to record separate audio tracks in your Zoom meeting in high quality
- So, you can’t record in full HD on Zoom, what are your options?
- Recording Separate Video tracks in a Zoom meeting using QuickTime
- How to Record Your Zoom Meeting Using QuickTime:
- Recording separate video and audio tracks in full HD using Riverside.fm
- How to record using Riverside
- Your Guest’s Workflow with Riverside
- FAQs on Zoom Separate Video Tracks
Can you record your Zoom meeting in full HD?
Zoom has gained vast popularity, quickly becoming a household name. For this reason, our first instinct when hosting a digital podcast, webinar, or whatever it is - is to use Zoom. It’s familiar, easy to use, and affordable - a no-brainer, right? All you and your guests have to do is download the application and you’re good to go. There is a ‘join from browser’ option, but the host of the meeting must enable this setting.
But what about when it comes to recording individual participants in full HD?
Unfortunately, Zoom doesn’t have this function. The host can remotely record the meeting, but you can only capture guests’ audio individually. You cannot record separate video tracks. When it comes to resolution, the quality of the download will be the same as what you see on your call. This means your final outcome is completely dependent on your wifi connection.
Plus, Zoom defaults to low-resolution 640 x 360-pixel video files, unless you select otherwise, with both audio and visual streams compressed into a single file. Zoom uses compressed lossy files - mp4 video and m4a audio - which provide a smaller file size in a trade-off for suboptimal quality.
Finally, you will only receive your audio and video recording once you conclude your meeting. This translates to a much higher risk of losing all your files.
Overall, given the lackluster quality and the compressed file formats that Zoom offers, your post-production capabilities are limited and your recording is likely to be punctuated by glitches, courtesy of unstable internet.
How to record separate audio tracks in your Zoom meeting in high quality
As we’ve learned, it’s not possible to record your Zoom meeting participants’ video, individually, in full HD. However, here’s how to capture separate audio tracks on Zoom:
Pre-Recording Settings:
Step 1. Make sure you and your guests have a good set-up.
Maximizing the quality of your webcams, lighting, and mics will vastly improve the chances of a good quality recording.
.png)
Step 2. Enable HD video in Video Settings.
Go to Preference > Video and select: Enable HD.
This should, in theory, allow you to broadcast 720p video (1080p with a Business or Enterprise account). In reality, however, there is likely to be very little difference because of Zoom’s reliance on internet connection.
Remember: the quality of your recording also depends on each participant’s camera.
Step 3. Toggle your recording preferences to optimize the quality and to enable separate audio and video recording.
Go to Recording Preferences > Recording and select:
- Optimize for third party video editor
- Record separate audio file for each participant (this allows your to work with separate audio tracks)
- Record during screen-sharing

Step 4. Choose your mic.
You can use either your computer’s internal mic or an external mic. Go to Audio Settings (find this in the arrow next to the Mute button) >Advanced and select:
- ‘Show in-meeting option to “Turn On Original Sound” from Microphone under ‘Music and Professional Audio’
- If you have a good setup, it’s recommended that you enable the High Fidelity Audio Option, which enhances the audio quality of your recording.

Step 5. Ensure that your and your guests’ internet connection is stable.
Of course, this is easier said than done. However, as mentioned, Zoom audio and video recording depend upon the strength of your internet, so if you do happen to lose connection or your wifi is unstable, your recording is likely to suffer.
Recording your Zoom meeting:
Step 1. To record on Zoom, simply click the ‘Record’ button on the menu bar at the bottom of your screen.
Note: If you are interviewing someone and would like to only record their video, ensure to pin their video, otherwise the screen will cut back to you every time you speak or inadvertently make a noise.
Step 2. Once your meeting is over, simply click the ‘Stop Recording’ button, then when you end the meeting, the mp4 and m4a files will be automatically downloaded to your computer.
Read our blog on how to improve Zoom video quality for more tips.
To conclude, you can do your best, but given Zoom’s reliance on the internet connection, there’s really no surefire way to control video parameters when recording your meetings. It’s also not ideal that you can’t easily record each participant, individually, in full HD video…
So, you can’t easily record in full HD on Zoom, what are your options?
When it comes to recording each of your participants in full HD, video, Zoom is underwhelming. Luckily, you have two workarounds which we’ll look at in detail:
- You and your guests can each record locally (i.e. on your computer) from your webcams using QuickTime
- You can use a software solution such as Riverside.fm to record separate HD video and audio tracks.
Recording Separate Video tracks in a Zoom meeting using QuickTime
The first workaround is to use QuickTime to record your Zoom meetings. This is a good option for later editing of a Zoom session because the audio and video feed are recorded locally from each computer, rather than over the internet - preserving the maximum quality.
Advantages:
- This option allows each participant to record themselves at their computer and camera’s native resolution, instead of being limited by Zoom’s low functionality. This preserves as much quality as possible.
- Recording locally means the meeting recording will not be affected by internet drop out, buffering, or any other auditory or visual glitches.
- QuickTime is included with Mac, so there is no need to install any additional software or pay for third-party services.
- Separate recordings at a high resolution mean greater scope for post-production editing and cutting.
Disadvantages:
- Using QuickTime and Zoom simultaneously is intense for your computer and could result in a slower processing time or worse, a crash.
- Using QuickTime to record your meeting makes it each participant’s responsibility to manually record, save and upload their recording. This is less than desirable for you and your guests - it’s on them to make sure it’s all working smoothly and you may have to wait around for all the recordings.
- Each person must have enough space on their computer to save their QuickTime recording.
- With QuickTime, you’re recording one combined audio and video track for each participant. While you receive separate recordings for each participant, you’re not receiving separate audio tracks to the video recordings. This gives you a little less editing control.
How to Record Your Zoom Meeting Using QuickTime:
Note: because each participant will have to do this locally (i.e. by themselves on their computer) ensure that you’ve instructed them clearly on how to set up their QuickTime recording before you begin.
Step 1. Open QuickTime player, choose File > New Movie Recording

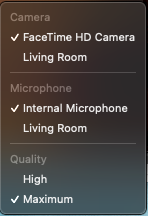
Step 2. Click on the drop-down arrow next to the Record button and choose the camera and microphone that you want to use.
Step 3. In the same place, change the quality setting to Maximum ( 1280 x 720, 30fps ProRes 422. Mov file)
Step 4. Once your Zoom meeting is over, each participant needs to click ‘Stop’ in the menu bar or press ‘command + control + escape’ to end the recording.
This option is not exactly ideal because you, as the host, have no control over the individual recordings! You can only hope that each of your participants remembers to record, save and send you their recording. You also can’t easily separate audio into individual tracks from the video recordings.
Recording separate video and audio tracks in full HD using Riverside
The second workaround is to abandon Zoom altogether in favor of a software solution such as Riverside. Opting for Riverside will eliminate the hassle of using multiple applications and worrying about suboptimal quality, meaning you can concentrate on getting the best out of your session.
Read a full comparison of Riverside.fm and Zoom
Advantages:
- Riverside allows you to record separate audio and video files in full HD for each participant! Separate files mean enhanced editing capabilities. You can edit out disruptive noises or interruptions and cut clips together as you see fit.
- Riverside functions as a double-ender, meaning it records audio and video directly from the source, just like QuickTime, but then additionally uploads it automatically to the cloud.
- Riverside uploads progressively, meaning each file is being uploaded automatically as they are being recorded. Combined with an automatic backup for loss of connection, Riverside minimizes any risk of losing your precious data. You can track the progress and monitor the size of each upload throughout your session.
- Like QuickTime, local recording means that there is no reliance on the internet, meaning even if your connection drops, your recording is safe.
- Riverside’s local video and audio recordings are always of the highest quality, the only constraint is your equipment.
- For quick and precise editing, Riverside has a text-based video and audio editor. It's as easy as editing the text of a document. Any text you delete in your recording transcript automatically deletes the matching audio and video. Plus, no matter how many edits you make, all your tracks will stay in sync.
-
- Download automated Ai transcriptions with unbeatable accuracy in over 100 languages. You can choose between SRT files for easy captions or TXT files for repurposing your recordings into written materials such as blogs or meeting notes.
- All Riverside’s local recording files are ‘raw’ (uncompressed), meaning you will never lose quality. Audio is recorded as a WAV file. Video quality can go up to 4k (depending on what your camera supports).
- You can optimize your recording settings by changing the recording resolution or changing the studio mode. You can adjust audio levels instantaneously throughout your recording.
- If you’ve got a producer on your team, bring them onto your session in ‘Producer Mode’ - this allows them to control the show without being recorded and to communicate with each participant without their interventions being seen or heard!
- An optimized guest experience. Riverside is easy to use - there is no need to download any additional applications or plugins, as it is browser-based. One-click on a URL and you’re in.
- Just like in Zoom, you can also share your screen and this is recorded as a separate video track, should you want to include it in your final edit. You can even upload and locally record presentation slides.
“Riverside is far better than Zoom for recording interviews.” - Seth Godin, author, entrepreneur and marketing leader.
Disadvantages:
- Riverside is optimized for Google Chrome, meaning some participants may have to download the Chrome application.
Learn more, or start recording separate tracks seamlessly on Riverside!

How to record using Riverside
Step 1. On your Riverside dashboard, click ‘Create New’ to make a new studio and give it a title. You can also choose a transcription language and recording type.
Step 2. You can select 'Continue set up' to adjust more of your studio settings, or you can select 'Enter studio' to get going.
Step 3. You will then be taken to the lobby. Here, you can set your preferences for your mic, camera, and speakers. When you’re happy, click ‘Join Studio’. Here you can also choose to join as a producer, and your audio and video will not be recorded.
Step 4. Once you’re on the show, you can invite your participants either by clicking ‘copy link’ and sending it to your participants or ‘invite by email’ and inputting each person’s email address. You’ll find both of these buttons on the right-hand side.
Step 5: Once your guests have joined your session, you can start recording. Do so by clicking the big red ‘record’ button which you’ll find at the bottom of your screen.
Your Guest’s Workflow with Riverside
As outlined above, once you’ve joined the session you’ll have the option to send the invitation to your guests. This is how your guests join your session:
Step 1. Once you’ve sent your guest the invite, there is no need to download any additional software or sign up, all they have to do is click the link. Note: ensure your guest is using Google Chrome.
Step 2. Once your guest follows the invite link, they’ll find themselves in the Green Room. Here, they can check their audio and video, and set their display name.
Step 3. Once they’re happy your guest can click ‘Join the Show’ to enter your session.
That's it. Super easy, right? Once your session is over ensure your guest leaves their tab open a little longer so that their upload can be completed.
FAQs on Zoom Separate Video Tracks
Can you record only audio on Zoom?
If you’re on a paid plan you can choose to only record audio of a Zoom meeting. You’ll have to go to your settings to do this and select ‘Record an audio only file’. If you’re on a free plan, you do have the option to record separate audio tracks for each participant, but this won’t record the audio of the whole meeting merged together.
Can you record on Zoom with multiple cameras?
If you’d like to record on Zoom with two or more cameras at the same time, you can enable multi-camera mode. In order to do this you need to have access to Zoom Rooms. If you don’t have Zoom Rooms, then a workaround this might be to connect your second camera to a different device and join the meeting on both devices.
Even better, you can just use another platform like Riverside that supports multi-camera views. You can even use your phone as a secondary webcam.
Final Thoughts
So what’s the best option for recording each of your podcast, webinar, or conference participants in full HD?
Whilst a great communication interface, Zoom’s recording function just doesn’t hold up against local recordings. Unfortunately, Zoom’s reliance on internet connection makes its recordings vulnerable to interference or even data loss.
Local recording via QuickTime is a solution that reaps high-quality results. Although QuickTime recording means the onus lies with your participants to ensure it’s all working correctly.
If you’re looking how to create a video with separate audio tracks for each participant, Zoom or QuickTime might suffice. Although, if you’re looking to record HD separate video tracks for each participant, as well as separate audio tracks, then there’s a better option for you.
Software solution like Riverside represents a convenient, professional, and worry-free option. But don’t just take our word for it, try it for yourself with our free trial!


