Table of contents:
If you work with audio in any capacity, chances are you’ve heard of Audacity. That being said, you may still be reticent or skeptical about using Audacity for podcasts. Since it’s free and open-source, Audacity is actually a really great choice for podcasters - especially for beginners and those who are contending with a tighter budget. In this article, we’ll walk you through how to get the best out of Audacity so that you can produce a professional-sounding podcast right away.
TL;DR
- Audacity is a free, open-source audio software
- You can record live audio, edit, mix and process multi-track audio
- It works with MacOS, Windows, Linux, and more.
What is Audacity?
Audacity is a free and open-source audio software that works on Windows, Macs, GNU, and Linux. You can use it to record live audio or computer playback, edit and process multi-track audio, add-in effects or music to your recording, and more.
Is Audacity good for podcasts?
Using Audacity for podcasts is a great option, especially for podcasters on a budget. Since Audacity is free, open-source, and works on every operating system, there are no restrictions to who can use it.
That being said, Audacity isn’t the most intuitive interface out there, and podcasters who appreciate and value UX/UI and sleek features may find they wish for more. Plus, since Audacity doesn’t allow for remote recording, if you’re wanting to include remote participants in your podcast, you’ll need to use separate software.
Key features of Audacity
To get a better feel for what Audacity has to offer, here is a brief introduction to the platform’s main features:
Record live audio
Record straight into Audacity with your mic or mixer.
Free to use
Audacity is free to use, which is a huge plus in terms of accessibility and availability - perfect for podcasters on a tight budget. Plus, since it’s compatible with all operating systems, it’s not restrictive about who can use it.
High-quality audio
Audacity supports 16-bit, 24-bit, and 32-bit audio.
Beginner-friendly
Though Audacity is arguably not the ‘sleekest’ platform out there, it’s definitely easy to use. It’s a simple and straightforward software that gets the job done.
Stable & secure
One feature that shouldn’t be overlooked is how reliable Audacity is. You won’t be dealing with any unexpected crashes or risk losing your work without warning.
How to create a podcast with Audacity
In order to get the most out of Audacity, follow our Audacity podcast tutorial below:
Setting up Audacity for podcasting
Step 1: If you haven’t already, download Audacity.
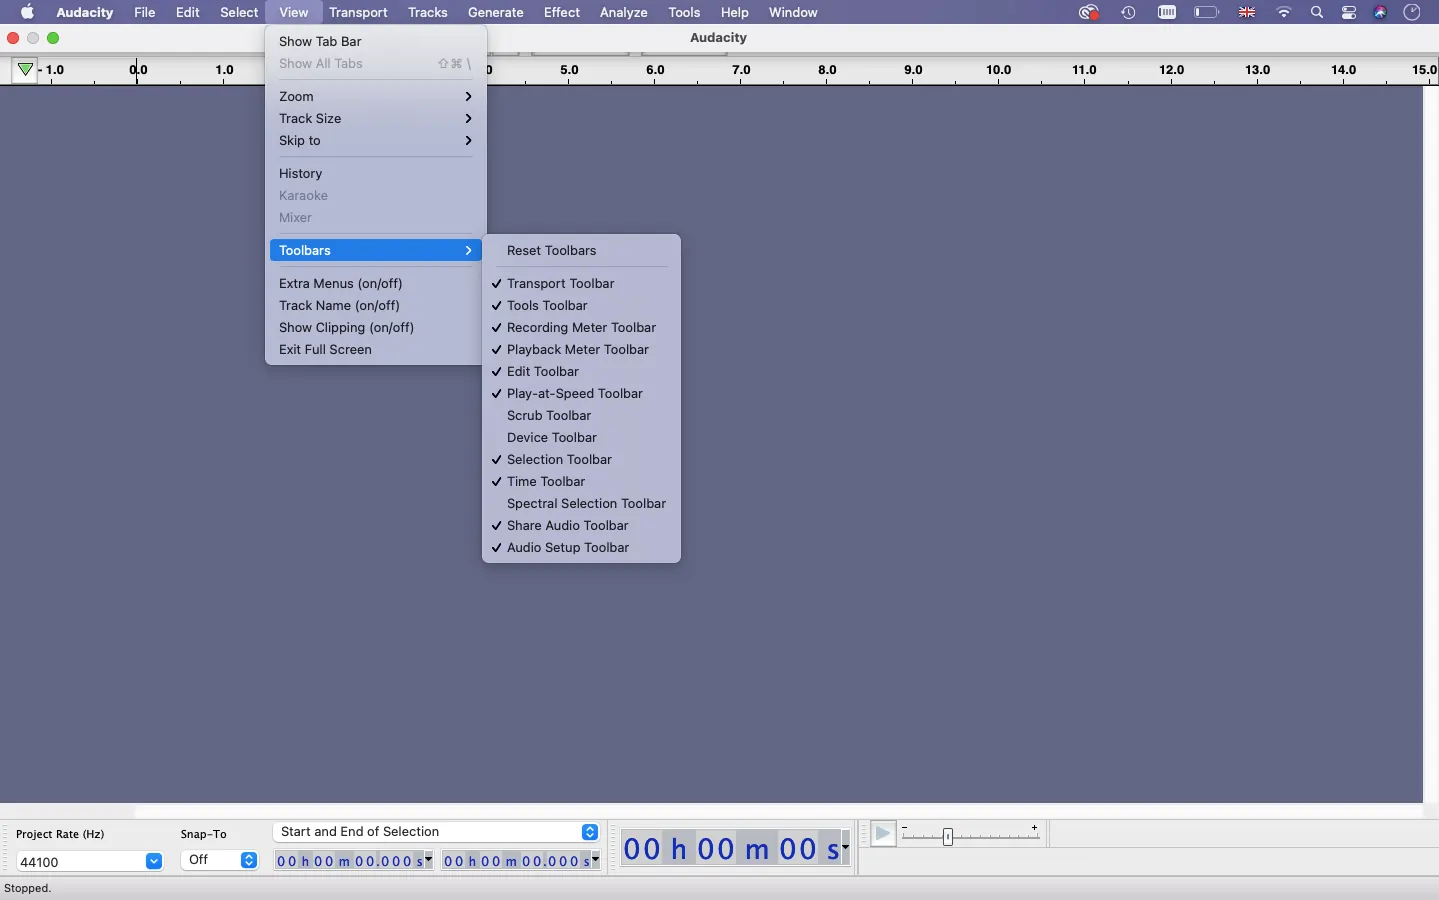
Step 2: Next, you should take the time to customize Audacity to suit your needs. This includes changing up the toolbar so that the tools you often reach for are right where you need them.

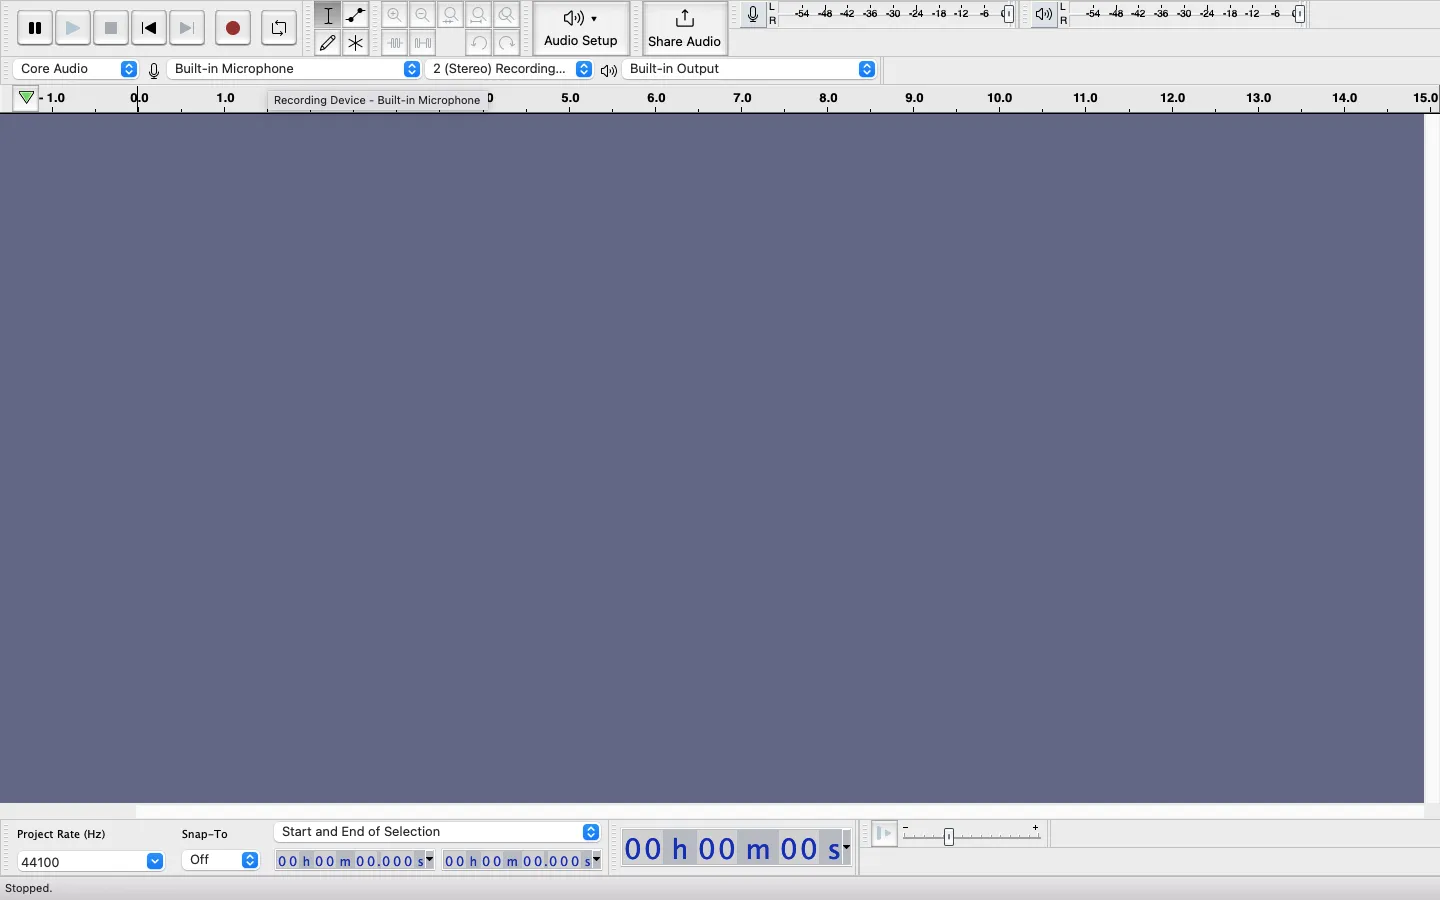
Step 3: Make sure that the correct devices are selected in the device tool-bar. This means checking that the right mic is set as your recording device, that it’s recording to the correct channel and that it will playback to the right device.

Step 4: Make sure that your recording channels are set up correctly. For example, if you’re recording with two people in the studio, you need to make sure you choose Stereo Recording Channels.
Note that you will need to manually split the track into two mono files for editing after you’ve finished recording.

Step 5: Before you jump into recording, make sure to test your mic to check everything is working as it should be. You want to look at the mic meter and click ‘Click to Start Monitoring’ and start speaking into your mic. Toggle the volume so that your voice is captured at your desired level (ideally no higher than -12dB).


Recording a podcast on Audacity
If you’ve already recorded your podcast, and just want to use Audacity for post-production, ignore this section and skip straight to importing and editing your audio.
Once you’ve wrapped up the setup process, you’re ready to start recording.
Step 1: Click the record button (or press R on your keyboard) to start your recording.

Step 2: When you’re done, press the spacebar on your keyboard to finish the recording or the black Stop button.

Editing a podcast with Audacity
Editing your podcast with Audacity is really straightforward. Once you’ve wrapped your recording, you can also choose to import (or drag and drop) any other audio such as music or any other recordings into Audacity. Anything that you add will appear in a separate track.
Editing with Audacity is fairly intuitive and is all based around your toolbar at the top of the window. Here you’ll find the selection tool that lets you select specific parts of your recording and the envelope tool that helps you to add fade-ins and outs, for example.
Some of the basic editing tasks you can do include:
- trimming and splitting your audio
- rearranging and moving your tracks around
- adjusting certain characteristics of your audio such as the volume in certain moments
Exporting and distributing a podcast with Audacity
When you’re happy with the final product, it’s time to export your podcast. It’s best to export your audio recording in a lossless file format so that you preserve the original quality of your recording.
To do this:
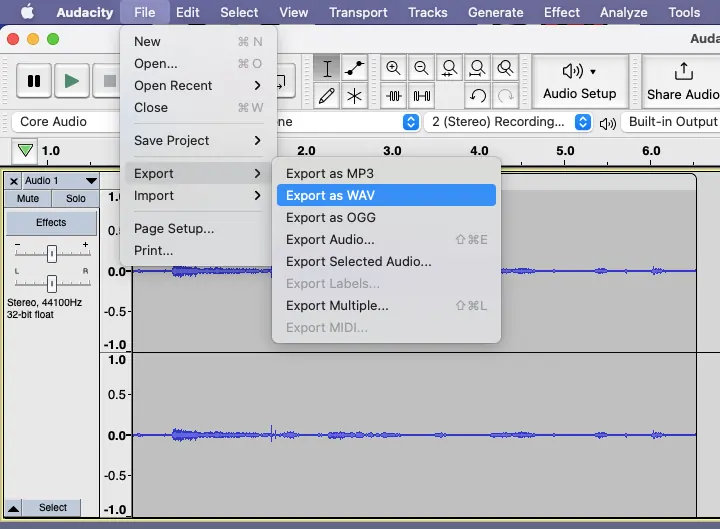
Step 1: Head to File > Export and then Export as WAV.

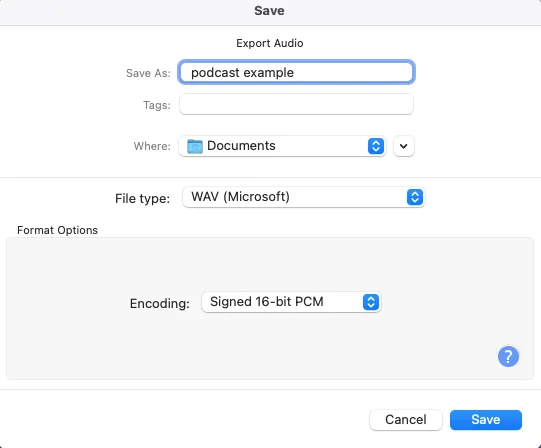
Step 2: Give your file a name, choose where you want it to be saved.
Step 3: Select your desired bit-depth.

Once your recording is saved onto your computer, you can upload it to your podcast host for distribution.
Tips on making a podcast sound better on Audacity
Your podcast will only sound as good as your equipment. But, you can help yourself a bit by making sure you use the best Audacity settings for podcast. Here are some tips:
Equalization
Make use of Audacity’s Equalization tool to help optimize the quality of your vocal recording. Do this by clicking on the track and then heading to Effect > Equalization. This will open a box where you need to click on the blue line and move it around in order to boost your low frequencies and decrease any frequencies at the higher end.
Compressor
Even if you’ve got perfect mic etiquette, chances are your audio is a little inconsistent in places. The compressor helps to balance your audio by reducing the dynamic range of the audio. Click on the track and then head to Effect > Compressor. Set your thresholds so that your audio doesn’t have radical highs and lows.
Riverside: An Alternative to Audacity for Podcasting
Though Audacity for podcasting is certainly a strong contender, it’s not the only option out there. As we’ve seen, Audacity’s main appeal arises from the fact that it’s free, open-source, and simple to use. But it’s let down by its slightly outdated interface and the fact that you can’t record with remote guests within the software.
Riverside, by contrast, offers users a whole suite of high-caliber features including the ability to record HD video and audio remotely, livestream, and edit your audio for free on the most basic tier. You can upgrade to the Standard plan for just $15/month.
If you’ve got a bit of flexibility in your budget, opting for Riverside over Audacity opens up a whole world of opportunities for just a fraction more.
Riverside’s key features
If you’re not convinced, here is a quick overview of Riversides key features:
Local Remote Recording
Record with remote participants without worrying about your internet connection. Riverside automatically records locally, so that even dodgy internet won’t impact the quality of your final recording.
Up to 10 participants
Don’t cut back on your invite list. Record with up to 10 remote participants simultaneously.
Live Podcasting & Live Streaming
If you want to branch out into live podcasting and live streaming, you can with Riverside. Stream to Twitter, Facebook, Twitch and LinkedIn - all at the same time.
Multitrack recording
Riverside automatically records each individual onto a separate track. This gives you invaluable control in post-production to edit to your hearts content.
HD quality
Your recording will always be the maximum HD quality with Riverside - enjoy 48kHz audio and up to 4k video.
Producer Mode
If you’ve got a producer onboard, make use of Riverside’s dedicated Producer mode. This gives your producer technical control over your entire podcast recording - allowing them to adjust participant volume settings and critical oversight over everything that’s happening. The best bit? They won’t be recorded so you don’t need to worry about any unexpected noise.
Text-Based Video Editor & Magic Clips Creator
Get your podcast ready for publication and social sharing with Riverside’s editor and clips creator. With Riverside's editor podcast editing is as easy as editing a text document. Any changes you make to your transcript automatically reflect in your recording. Save yourself hours of time rewatching everything!
You can save yourself even more time with our Magic Clips tool. Take one long-form recording and repurpose it into multiple short videos ideal for promoting your podcast with Reels, Shorts, TikToks or any type of social media. All you need to do is click the 'Magic' button and our Ai will identify key moments in your recording and turn them into short, shareable videos.
You can edit these in the Editor and add your own captions, customize the background and layout or fine-tune your audio.
Quick and easy, so you can go from recording to a fully publishable podcast in no time.
Mobile App
Riverside’s Android and Apple mobile apps make it easy to record on the go, wherever you find yourself.
Podcast Transcriptions
Lastly, make sure your content is as accessible and reusable as it should be with podcast transcriptions. You can download TXT or SRT files straight after recording.
Start recording with Riverside for professional podcasts with ease. Sign up today for free!
FAQs on Audacity for Podcasting:
Is Audacity really free?
Yes, Audacity is totally free and open-source.
Can you edit podcasts on Audacity?
You can definitely edit a podcast on Audacity. Editing podcasts on Audacity is really easy. Follow our Audacity Podcasting Tutorial above to familiarize yourself with the interface.
How do I upload a podcast to Audacity?
If you’ve already recorded your audio then all you need to do is import it into Audacity.
Which is better GarageBand or Audacity?
Audacity vs Garageband is a good question. And the answer is that it depends on what you’re looking for. If you’ve already got an Apple device, then we’d say that Garageband is a safe bet - especially in terms of useability and just how simple the interface is. However, if you’re not an Apple user, then it obviously makes sense to go for Audacity.
Who uses Audacity?
Audacity is free and open-source, which means that anyone can use it. It’s definitely a favorite amongst podcasters and music producers, although if you’ve got a bigger budget or ambitions to play with, you may want to upgrade.


_-Introductory-Guide-to-Get-Started-(1)-(1).webp)
-(1).webp)


