.webp)


Table of contents:
One of the best ways to capture your audience’s attention is with stunning, high-quality videos. It’s amazing how much video quality impacts a viewer’s experience. By improving your video quality your content can generate more likes, views, and follows.
So, how can you improve your video quality?
From changing your recording set-up to editing, there are loads of ways to get the best results. You can find a full list of the top fixes for video quality in this article. Following these suggestions will help you make the most of your creativity.
Why is video quality important?
The quality of your video gives your viewers a first impression of your content. Nobody wants to sit through blurry, low-resolution content where it’s hard to see the details. Low-quality videos can make your channel or company seem unprofessional. They also struggle to stand the test of time. With 3.7 million videos uploaded to YouTube each day, make your video stand out from the competition with high quality content.
High-quality videos demonstrate that care and thought have gone into their creation. They can also be more immersive, cinematic, and eye-catching. Through crisp, clear videos, you invite viewers to pay more attention to what’s happening on-screen.
Understanding video quality: What should you focus on improving
When it comes to improving video quality, a few key factors make all the difference. You can enhance your video quality by changing your recording equipment or adjusting your settings with these factors in mind:
Resolution
Video resolution refers to the number of pixels in each video frame. A higher-resolution video contains more pixels. This makes the video appear clearer and more detailed.
If you’re creating videos to share on platforms such as YouTube, the optimal resolution is 1080p. At this resolution, the video has 1920 pixels horizontally and 1080 pixels vertically. You could record 4K resolution videos for an even sharper image, although not every viewer can watch these on their device.
Bitrate
You may have encountered the term ‘bitrate’ before, but what does it mean? Well, it helps to know that bitrate refers to the amount of information, or data, in each second of your video. The bitrate of a high-quality 4K video will be higher than that of, say, a live stream with lower-quality video.
Having a higher bitrate often correlates with a better-quality video. When changing the bitrate of your video, you should consider your storage. Higher bitrate videos have larger file sizes and require more storage. This can make them trickier to work with, so it’s important to consider which bitrate would be best for you.
Frame rate
Although videos appear seamless to the naked eye, they are, in fact, made of multiple images called frames. These frames play quickly one after another, so they appear like an uninterrupted recording. Frame rate measures how many frames of your video appear in one second. It’s also referred to as FPS, frames per second.
The standard frame rate of most videos shared on social media, video platforms, live streams, and even TV broadcasts is 24fps. This is because it looks most natural to the human eye. A higher frame rate, such as 30fps or 60fps, produces a smoother and higher-quality image. This is beneficial for cinematic videos or recording video game playthroughs, which are fast-moving.
7 Ways to Improve Video Quality
Lighting
Lighting can have a huge effect on the appearance of your video. Low lighting makes it harder for viewers to see details, and overexposure can wash the details out. Using equipment such as a ring light or a softbox produces a more even lighting distribution around the subject. This reduces shadows and improves video quality.
One of the best lighting setups for a high-quality video is three-point lighting, which involves the following:
- A main (key) light is used as the brightest light. It faces the subject and off to one side to give a sense of dimension.
- A fill light is set up opposite the key light, also at an angle. The fill light should be much dimmer than the key light. It helps reduce contrast.
- A backlight is needed to give a sense of separation between the subject and the background. The backlight goes behind the subject, highlighting their outline.
Read more: Video Lighting: How to Setup & The Best Lighting Kits
Camera settings
Adjusting your camera settings can help you capture higher-quality content. Set your video resolution to at least 1080p to record clear, detailed footage. If you’re using a mobile, you can do this from the settings in your camera app.
With a professional camera, check your shutter speed settings. Generally, your shutter speed should double the frame rate. A common frame rate for YouTube videos is 30fps, meaning a shutter speed of 1/60 per second. This prevents your videos from being blurry.
Framing
The way you frame your shots affects the overall appearance of your video. Camera framing is all about where you position the subjects in your shots. Follow industry-standard framing techniques to enhance how professional and high-quality your videos look.
One of these techniques is the rule of thirds. Imagine there is a grid across your video, with two vertical lines and two horizontal ones spread apart evenly. For a full-body shot, position the subject of your video on the left or right of the shot, where the first vertical line would be. Their head should intersect with the highest horizontal line.
In general the practice with rule of thirds is to place the focal point of your video where the lines of the grid intersect. The viewer’s eye will naturally be drawn to this position, so it’s a great way to highlight points of interest.

Internet speed
Having a good internet connection is essential if you’re live streaming or recording online. Check your internet speed for free by searching ‘internet speed test’ on Google and using the inbuilt tool.
Your speed should be at least 25 Mbps for HD video streaming. You can improve your internet speed by making sure nothing is blocking your router, moving it closer to your device or using an ethernet cable.
With certain platforms, such as Riverside, you don’t need to worry so much about your connection. Riverside records your video locally to a computer rather than over the internet. If you have issues with your connection, your file still remains in high quality.
Edit for pacing
Edit your video using downloadable software like Adobe Premiere Pro, or online video enhancers including Riverside, Flixier, and more. These tools offer a variety of features to improve the quality of your raw footage. Not all editors are suited to beginners, so it’s important to check out your options and choose a platform that suits your abilities.
Your priority when editing should be to improve the pace of your video. This means cutting long pauses, tangents, and anything that interrupts the flow of your video. With strong pacing, your content will appear more professional and easier to follow.
You can also use a range of cut types to create more cinematic and atmospheric results. A J cut, for example, involves the audio from the previous scene overlapping with the next scene. This helps with the continuity and immersiveness of your video.
Further editing
With an editing platform, you can enhance your video by using certain tools. Adjusting your video's saturation, color, and brightness can improve how crisp your content appears. Ensure your video is not overly bright or dim, and your contrast is not too high so you don’t lose any details.
You can add in extra features like special effects and transitions to make your video appear more cinematic, but be careful to use them sparingly. It’s also important to balance your audio levels with an editor. This means making sure that the audio recorded by each speaker is at the same volume, so everyone can be heard.
Adjust file types
The file type of your video can have an impact on its quality. Typically, larger file types preserve higher quality footage, as they are less compressed. However, working with large file types can be a challenge as they require more storage space. This can make it more difficult to edit them.
We suggest file types such as AVI, MOV, and MP4 for high-quality videos. When it comes to audio, uncompressed WAV files are a great way to retain high sound quality.
How to Improve Video Quality with Riverside: Step-by-Step
Riverside is an online video creation platform packed with features to help you create high-quality content. With Riverside you can record in up to 4K video quality, with crisp 48kHz WAV audio. Invite remote guests to join your recording for interviews, podcasts and more. The user-friendly interface is ideal for even beginner content creators.
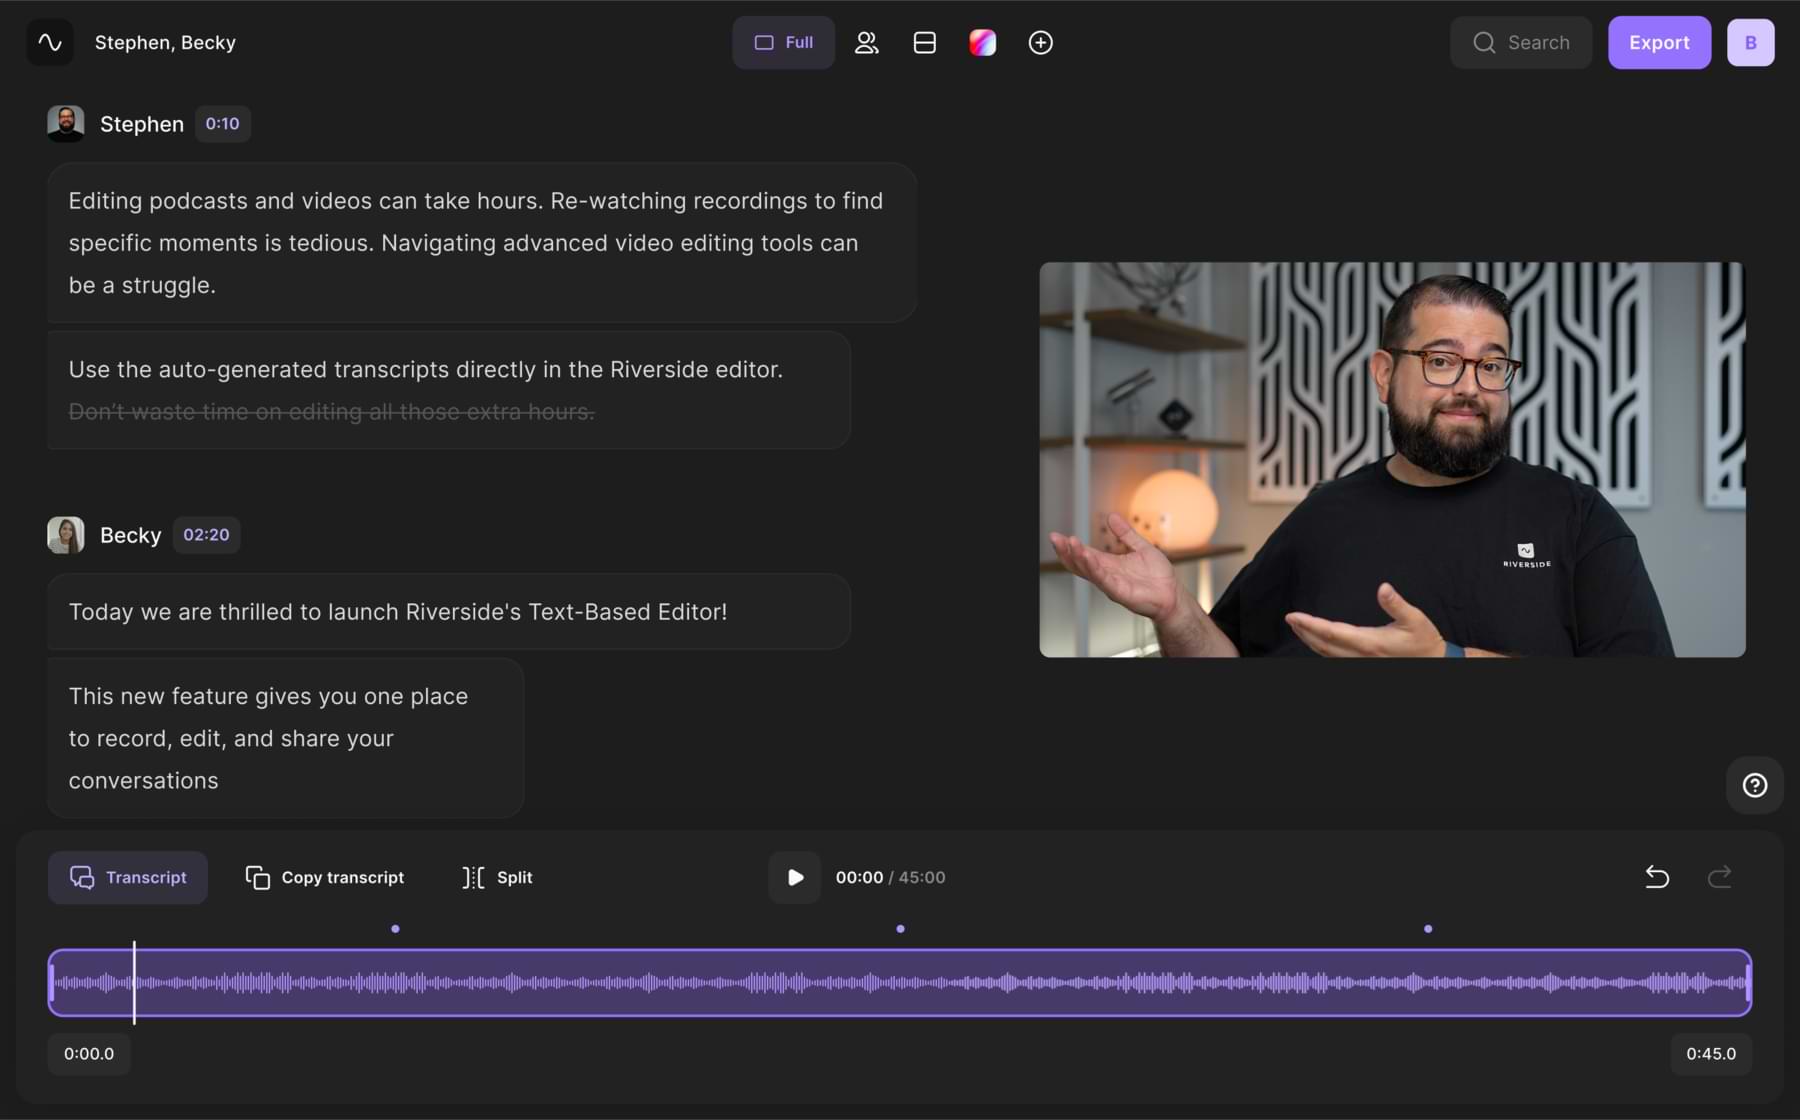
Capture your content with separate audio and video tracks, making your life easier when it comes to post production. That said, editing on Riverside is a breeze. Use the text-based Editor to change your video by editing a highly accurate AI transcript. Add a logo or change the layout of your video with just a few clicks.
Easily produce studio quality content with Riverside by following these simple steps. You’ll get professional, eye-catching results ready to share with the world.

Steps for Improving Video Quality With Riverside:
Before recording, make sure you’ve set up the following:
- Choose a quiet room to record your video
- Use an external mic to record with. This could be a USB or professional microphone, or even one built into your earbuds.
- Use wired earbuds or headphones while recording for higher quality results.
Step 1: When you’re set open your Chrome browser, then go to riverside.fm. Log in or create an account.
Step 2: Click on ‘+ New Studio’, then name and enter your studio.
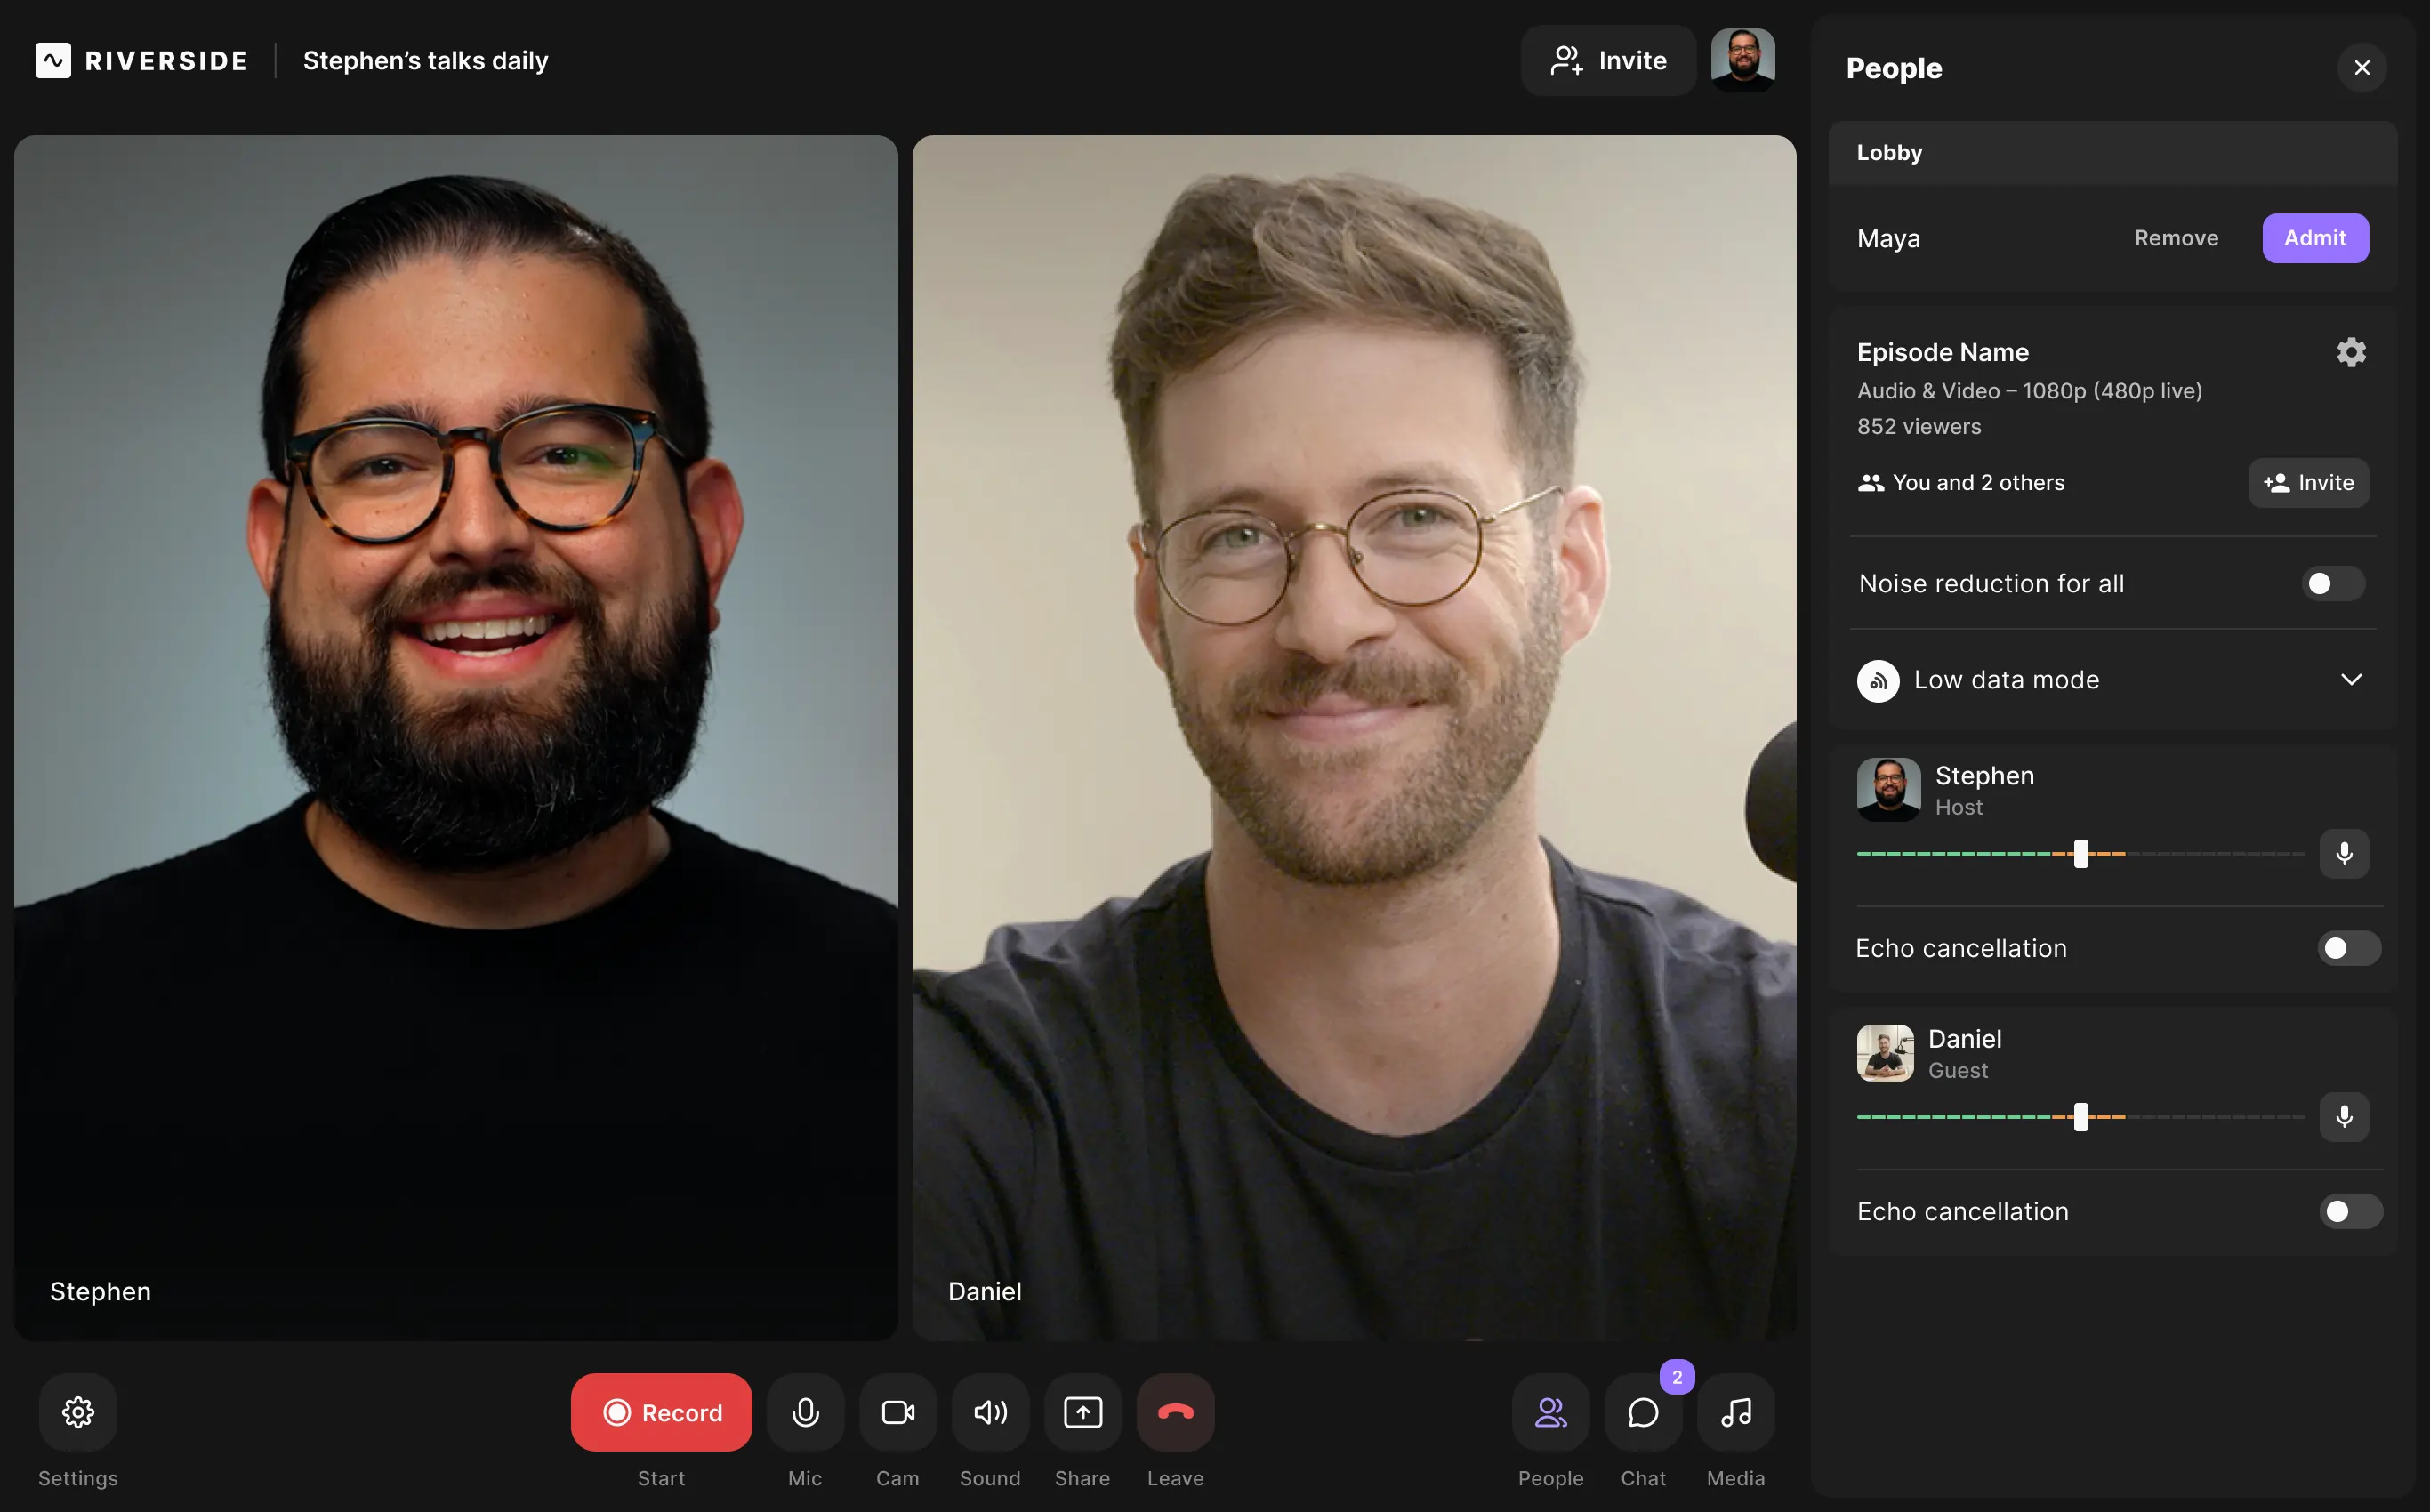
Step 3: In the lobby, select your equipment from the drop-down menu and choose the ‘I am using headphones’. Then ‘Enter the studio’.
.webp)
Step 4: Invite remote guests to join your recording. You can do this by copying the invitation link. Your guests’ footage will be recorded in separate tracks.
Step 5: We automatically enable echo cancellation if you’re not using headphones. But, if you’re still hearing echo:
- Click on the three dots beside the Host or Guest you’re hearing an echo from.
- On the right-hand side and select ‘Enable echo cancellation’.
Step 6: Press Record to begin filming. Everyone’s video records locally to your device instead of over the internet. This means even if your internet connection dips your video quality won’t suffer.
Step 7: Once you finish recording, click Stop. Wait for your files to upload, then click View Recordings.
Step 8: Select the recording and click on the Go to editor button in the top right-hand corner. In the editor you can:
- Choose an aspect ratio and layout for your video
- Edit your video using our Ai transcriptions. Any text you delete in your transcript deletes the corresponding video in your recording.
- Add highly-accurate captions to your video at the tap of a button.
- Automatically remove long silences, as well as fine-tune your audio with background noise removal and audio normalization.
Step 9: When you finish editing your final video, click on Export. You’ll receive an email when your video is ready to download.
Other tools you can use to enhance video quality
There are a range of tools available to boost the quality of your videos. They include online video editors as well as downloadable software. For a full list of video quality enhancers, check out this article. Some of the tools you can use for better video quality are:
Wondershare Filmora
Filmora is a video editor suited to beginners who want access to basic editing tools without being overwhelmed by options. Though it lacks the complexity of editors like Adobe Premiere Pro, Filmora has plenty of features to help you quickly and easily improve your video quality.
How to enhance video quality with Filmora:
Step 1: Open Filmora and choose ‘New Project’. Drag and drop a pre-recorded video file into the program.
Step 2: Drag and drop the video file you want to edit into the timeline. Right-click on a selected clip to bring the editing window into view above the timeline.
Step 3: Click on the Color tab in the editing window. There you can adjust saturation, contrast, hue, and brightness by moving the sliders.
Step 4: Color correct your video to resemble the colors of the natural world. This will look best to viewers of your video.
Step 5: Click on ‘Audio’ in the editing window. Use the sliders to adjust output volume and pitch to improve your audio quality.
Step 6: When you finish, click on the ‘Export’ button in the right-hand corner. Or use the Export tab at the top of the interface to export directly to YouTube and Vimeo.
Kapwing
Kapwing is a video creation platform where you can record and edit content. It includes AI tools, templates, and collaborative editing features. The software is simple and intuitive to use, helping you to quickly enhance your videos. This platform is available online, and there’s a free membership option you can try out.
How to enhance video quality with Kapwing:
Step 1: Go to the Kapwing website and make an account. Log in to see the video creation and editing interface.
Step 2: Drag and drop your video file into the media panel on the left-hand side.
Step 3: Select your video, then click on the ‘Edit’ tab of the right-hand sidebar.
Step 4: Adjust the sliders for opacity, brightness, contrast and saturation. Aim to make your footage look clear, with colors resembling the real world.
Step 5: When you’re done, click Export in the upper right corner. You can export videos at 1080p and even 4K resolution.
FAQs on How to Improve Video Quality
Can you enhance video quality?
There are many ways to enhance the quality of your videos. Taking certain steps like adjusting your equipment settings and lighting, can help you capture higher-quality recordings. Using a video editor can also improve the quality of a video you’ve already recorded. We’ve got plenty of great tips for improving video quality in this article, so check them out to boost your content.
How do you increase the resolution of a video?
The best way to increase video resolution is to use the right camera. You can capture higher-resolution videos by using more professional equipment. Make sure your camera can record 1080p footage for you to upload.
If you’ve already recorded a video and want to change its resolution, there are certain tools you can use. That said, it’s usually much harder to improve a video’s resolution after recording.
Is there an app you can use to improve video quality?
There are a range of apps that offer tools for improving video quality. While there are many editors available, it’s best to think about what you’re recording with first. It’s harder to save a video after recording.
A good option is Riverside, a video recording app that captures high-quality locally recorded footage. The app saves all your files to the cloud, so you can easily edit them from your desktop with Riverside’s text-based editor. You can expect up to 4K video resolution, background noise removal and easy Ai captioning.


.webp)

