


Table of contents:
LinkedIn video specs and requirements
How to share a LinkedIn video to your feed
Sharing a LinkedIn video in your feed as a link
How to share a LinkedIn video on a company page
How to create a live-streamed LinkedIn video on LinkedIn Live
How to share a LinkedIn video in a direct message
Make the most of LinkedIn by taking advantage of video-sharing
Key takeaways:
- Video content is growing in popularity: The amount of video content on LinkedIn is growing, as is the number of video views on the platform.
- Share videos in multiple ways: You can share videos in a few different places on LinkedIn: Your personal feed, a company page, an Event, on LinkedIn Live, and through a direct message.
- Use Riverside to livestream on Linkedin: You need third-party software like Riverside to stream video to LinkedIn Live.
LinkedIn, the social network for businesses and professionals, has rapidly expanded its video-sharing capabilities over the years, making video a central part of content strategy on this platform.
If you want to use videos to increase engagement, make your brand more relatable, and ultimately reach more people, check out this complete guide to LinkedIn video sharing.
LinkedIn video specs and requirements
Videos that don’t meet LinkedIn’s requirements can be cut off, low-quality, and deliver a poor user experience. And that probably isn’t the impression you’re looking to make! Here’s a quick rundown of the video specs and requirements for LinkedIn.
- Video length: LinkedIn videos can be 3 seconds to 10 minutes long.
- File size: Limit file size to 5GB.
- Video resolution: 1080 x 1080 (square), 1920 x 1080 (landscape), or 1080 x 1920 (vertical).
- Video format: LinkedIn recommends MP4 videos. It also supports MOV, AVI, WMV, and FLV.
- Aspect ratio: 16:9 (landscape), 1:1 (square), 9:16 (vertical).
- Frame rate: LinkedIn supports frame rates from 10 to 60 fps.
- Bit rate: 10 Mbps is recommended for 1080p videos; 5 Mbps is recommended for 720p videos.
- Resolution quality: 720p or 1080p.
Now let’s look at some ways you can post videos to LinkedIn.
How to share a LinkedIn video to your feed
Like a regular text or image-based post, videos published to your feed will appear in your connections’ or followers’ feeds. Your video will also appear in the “Activity” section of your LinkedIn profile under “Posts” and in the “Video” section of LinkedIn mobile.
Your video could appear in related search results or, if you use a hashtag, in a hashtag feed.
How to do it on desktop
Step 1: Log in to LinkedIn and start a post
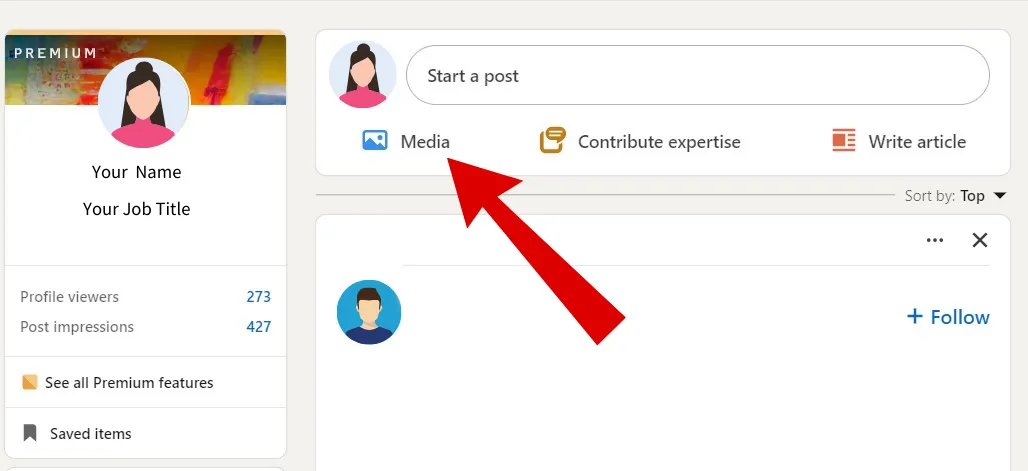
When you log in to LinkedIn, you’re automatically directed to your main feed. At the top, you’ll see the option to start a new post.
Step 2: Click “Media”
Step 3: Select the video file from your computer
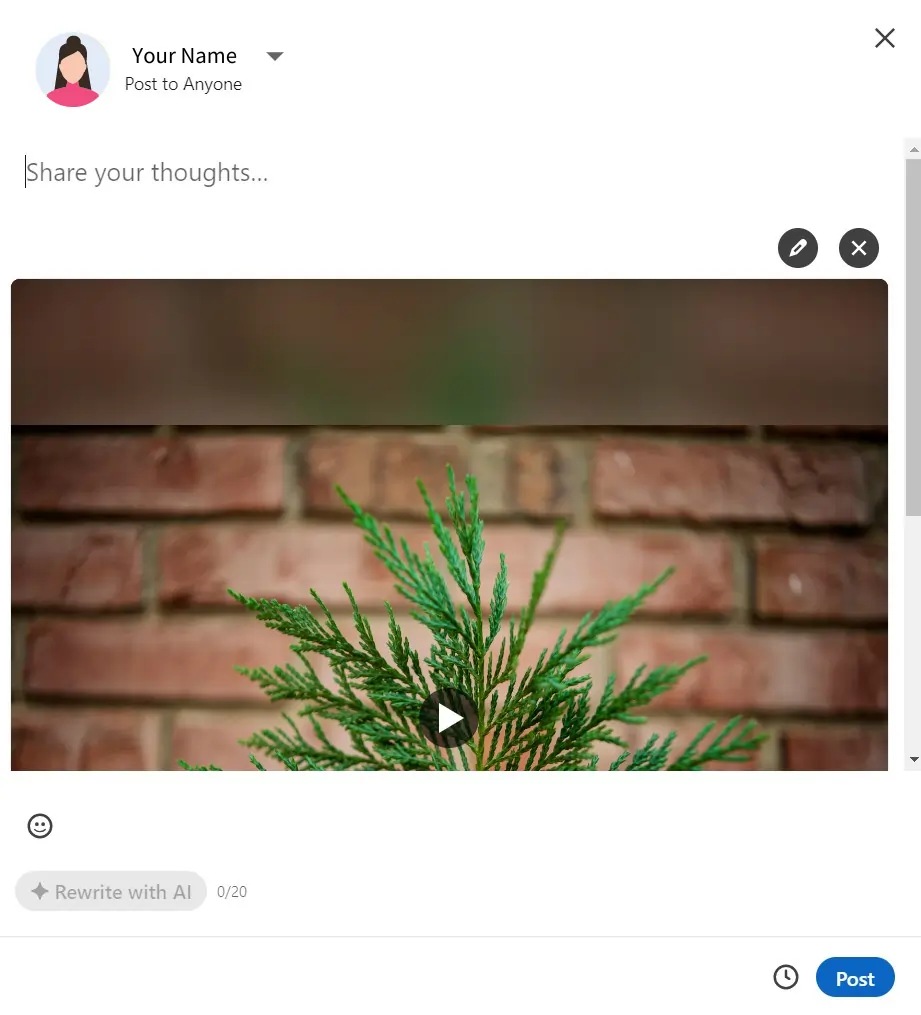
Once the file is uploaded to LinkedIn, you’ll see it in the editor.
Step 4: Add captions (optional) and a thumbnail
Adding captions to your video will make it more accessible. LinkedIn can do this automatically for English-language videos. Just click the “CC” button at the bottom of your screen and toggle on “Add auto captions.” You can add your own captions by uploading an SRT file to ensure that your captions are as accurate as possible. If your video is in a language other than English, you can use Riverside to create captions for it in 100+ different languages and then upload the newly created video with captions directly to LinkedIn.
Once the video is uploaded, you can also add a thumbnail by clicking the image icon on the bottom right of your editing screen and selecting an image. This is what will show in the LinkedIn preview of your video in the feed as well as on your LinkedIn profile. LinkedIn will choose the first frame from your video as the thumbnail if you don't select one yourself.

Once you’re happy with your video settings, click “Next.”
Step 5: Write your post
Write your post to give context to your video and tell your audience why you’re sharing it. Here, you can also add emojis and hashtags to make your post more engaging and increase its reach.
Step 6: Post or schedule your video
Now, you can either post your video immediately, or schedule it for later by clicking the “clock” icon and selecting a day and time for the post to go live.
You can also decide who can see your video (anyone on LinkedIn, only your connections, or a group) and determine who can comment on your video: anyone, only your connections, or no one.
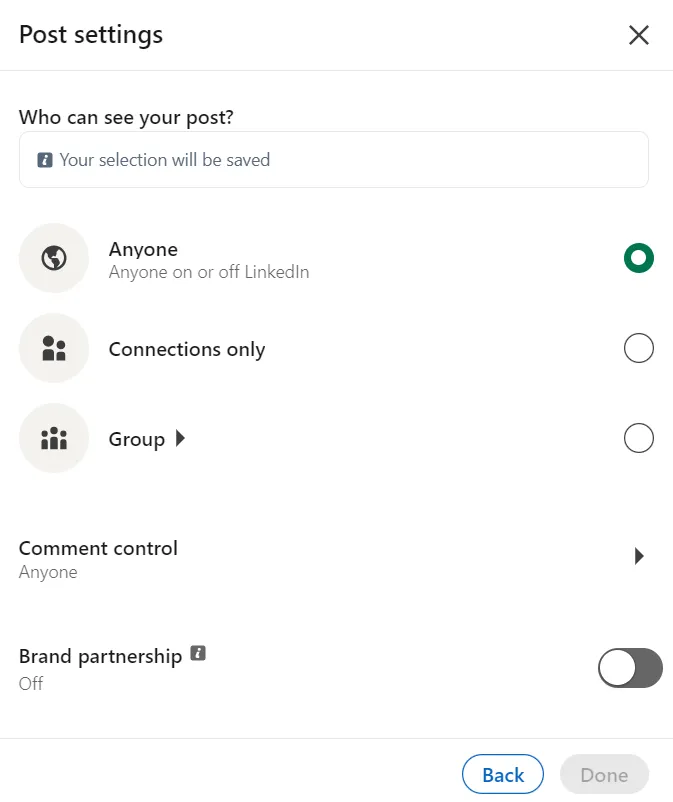
Once you’ve adjusted all your settings, click “Post.”
If you want to make more adjustments to your video, click the “pencil” icon to return to the editor.
Step 7: Promote your video
Now that your video is out there on LinkedIn, you can expand its reach in several ways. You can:
- Cross-post it to a group
- Re-post it to a company page you manage
- Shart it in a direct message
- Share it with the attendees of an Event you manage, either in the Event’s chat, pinned to your event feed, or on Event invitation or registration pages.
How to do it on mobile
Step 1: Log into LinkedIn on your mobile device
You will be taken to your feed.
Step 2: Start a post
You can do this by tapping the “+” button at the top of your feed. Write whatever you’d like to say here. You can also write this after you add your video in the next step if you prefer.
Step 3: Add your video
Tap the “+” at the bottom right of your post, then tap “Media” to upload your video.

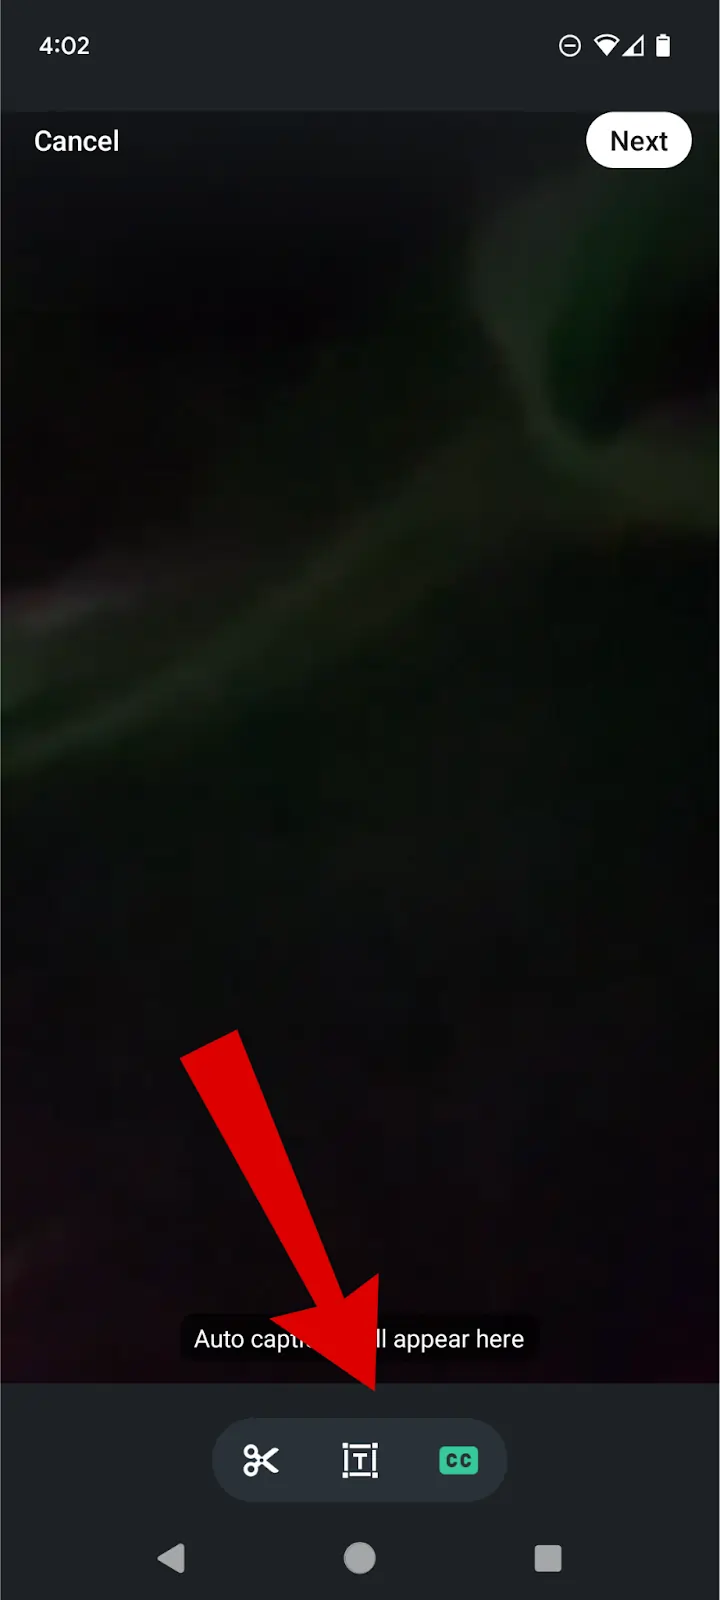
Step 4: Adjust your video
Now that your video is uploaded, you can:
- Trim the length from the beginning and end using the “scissors” icon. You can do this by using the slider that appears below the video.
- Add text to your video using the “T” icon. You can then adjust your text's font, color, and alignment.
- Opt to add automatic captions to your video by selecting the “CC” button.
Again, if you want to edit your video before uploading it to LinkedIn, you can upload it to your Riverside Studio and use the Riverside editor to trim it, add captions, and even clean up the audio.
When you’re happy with your video, tap “Next” in the top right corner of the screen.
Step 5: Schedule or post your video
Now, you can post your video immediately or schedule it later, just like you would on desktop. Like when sharing via desktop, you can also decide who can see your post and who can comment on it when sharing videos from your mobile device.
If you want to make more adjustments to your video, click the “pencil” icon to return to the editor.
Sharing a LinkedIn video in your feed as a link
If you want to share a video from YouTube or another video platform, sharing it on LinkedIn is faster and easier than uploading a video as a post. All you have to do is:
- Start a post.
- Paste the video URL into your post.
- Add your post copy. You can also use the “Rewrite with AI” to help you refine your post.
- Post your video.
LinkedIn will automatically generate a video preview, and it will appear in your feed.
How to share a LinkedIn video on a company page
When you share a video on a company page, it’ll become available to everyone who follows that page. If your followers engage with the content, it may also be shown to their followers and connections.
Sharing videos on a company page has many of the same benefits as sharing them on your personal feed. As we’ve learned, videos tend to be shared on LinkedIn, which can be excellent visibility for a business. They can also be a better way to tell a visual and compelling story about a brand.
Note that you need to have “Content Admin” or “Super Admin” access to the page to publish a post. If you don’t, you could ask whoever is the admin to provide you with access or post it for you.
To post a video on a LinkedIn company page, log in to LinkedIn and navigate to the Company Page. Then, all you have to do is create a video post just like you would for your feed (detailed instructions above.)
How to create a live-streamed LinkedIn video on LinkedIn Live
LinkedIn Live allows you to broadcast live video content on your LinkedIn profile, LinkedIn Page, or an Event. It’s a great opportunity to expand your reach and visibility through real-time interactions. In a professional setting, it’s also a great place to share real-time events and conduct professional networking.
To livestream on Linkedin, you must meet the following criteria:
- Your Profile or Company Page has to have more than 150 followers or connections.
- You must have a history of abiding by LinkedIn’s Professional Community Policies.
- You can’t be based in mainland China.
- Your account or Company Page must have been created at least 30 days ago.
LinkedIn Live will automatically be available to you if you meet these criteria.
It’s also important to note that you can only live stream on LinkedIn Live using third-party streaming software, like Riverside. You cannot livestream directly through the LinkedIn platform like you can on most other social media platforms.
Step 1: Create your event
On your LinkedIn Profile, click the Events link from the left-hand menu in your Feed. Then click “Create an Event.” Under “Event Format,” select “LinkedIn Live.”
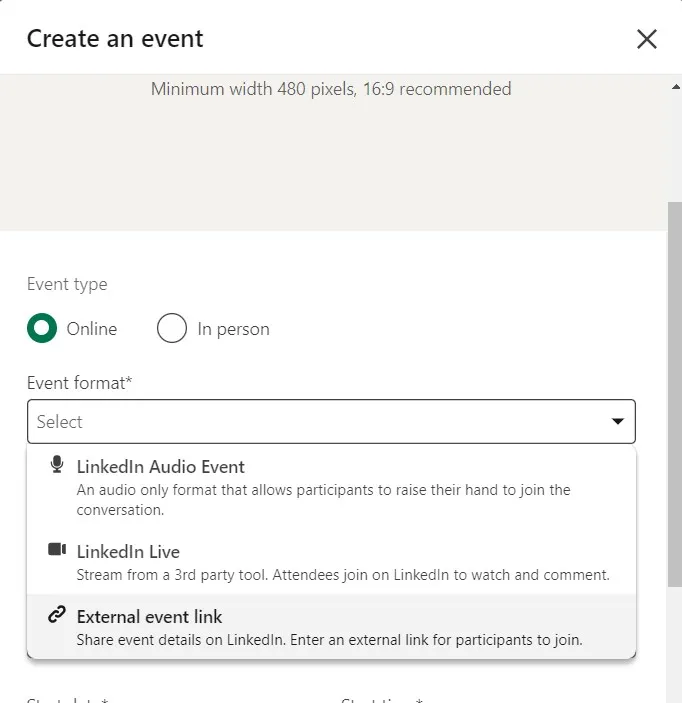
Step 2: Add event details
Set up the details of your event. You can add a cover photo for your event and provide details, including:
- Event name
- Start and end date/time
- A description of your event
- Speakers (you can tag them if they are on LinkedIn)
When you’re done, click “Next.”
Step 3: Promote your event
Once you’ve set up the details of your event, you will be prompted to promote it as a post. This finalizes the creation of your event.
You can post the event to your LinkedIn feed or to a company page you manage.
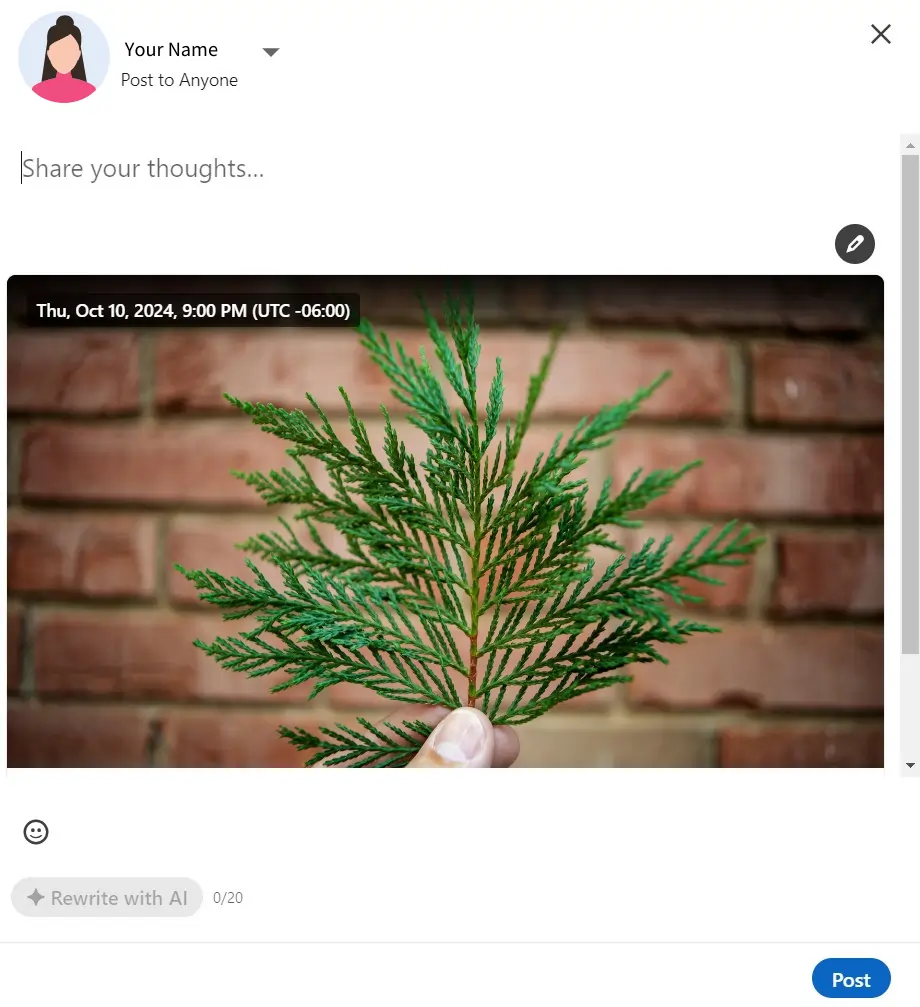
Now that your event is set up and scheduled, the post will appear in people’s feeds. The event details will be visible to anyone who accepts an invitation or joins an event in their notifications. Finally, your event will be recorded and saved to your feed so you can continue sharing it after it’s over.
Step 3: Promote your LinkedIn Live
You had to post your event on your LinkedIn feed or a company page to set it up, but there are other things you can do to expand its reach. These include:
- Post your event to a LinkedIn Group(s).
- Invite people from your network.
- Use LinkedIn Sponsored Content (ads) to promote your live stream.
Step 4: Go live with Riverside
When it’s time to go Live, you can’t record directly from LinkedIn like you can on Instagram or TikTok. You need to connect LinkedIn to a third-party recording app. Riverside is the perfect fit because you can livestream in ultra-high quality from our platform straight to LinkedIn.
Here’s how to do it.
- Log in to your Riverside account, click “Record,” and enter your Studio.
- Click the “Settings” wheel at the top of your screen and select “Live Stream.”
- Select LinkedIn and opt to connect your account to Riverside.
- Invite guests to your live by sending them a link. (They don’t need to have a Riverside account.)
- Enter the details about your live stream.
- Press the Record button on the lower left-hand side of the page. The platform will count down, and you will immediately go live on the platform. You are now live on LinkedIn!
If you livestream with Riverside, you will also get a high-quality stream recording to download and repurpose as you wish. You can edit and post the video on other platforms, like YouTube. You could also use our Magic Clips feature to create short, shareable clips to help promote future events or prompt people to watch the LinkedIn recording.
With Riverside, you’re not only getting a third-party platform that enables you to go live on Linkedin Live, but you’re also getting video recording and editing tools that you can use to amplify the reach of your video and promote it on other social media platforms.
How to share a LinkedIn video in a direct message
Sharing a video via direct message is another great option on Linkedin. Maybe you’re sharing a portfolio with a prospective client or employer or providing a live demo to a prospect. You could also offer a personal recap after an interview or meeting or use a video to introduce yourself to a recruiter.
Interestingly, this is the only space on LinkedIn where you can record a live video directly through the platform, and you can only do it on mobile.
Step 1: Log in to LinkedIn and go to Messaging
You’ll find the messaging chat bubble at the top right of both LinkedIn desktop and mobile. Click on it and click the “pencil” icon to start a new message. Select your recipient from your list of connections.
Step 2: Add your message and video
Write a message to your connection. You can:
- Click the “media” icon or the “attachment” (paperclip) icon to select a video from your computer. They both work.
- On mobile: Click the “+” icon, then select “Media” to upload a video from your phone. You can also select “Camera” to record and send a live video.
Step 3: Send your message
Depending on your LinkedIn settings, you can send your direct message by clicking “Send” (or the send arrow on mobile) or hitting the “Enter” key.
Make the most of LinkedIn by taking advantage of video-sharing
Adding videos to LinkedIn can be a great way to get people’s attention, especially as LinkedIn prioritizes more video content on the platform. According to LinkedIn research, members are 20 times more likely to share a video than any other type of post.
If you’re looking for a video recording and editing platform to help you create professional videos for LinkedIn, Riverside is hard to beat. You can use it to record and edit high-quality videos and post them on LinkedIn.
It’s also the perfect livestreaming platform for sharing live video content directly to a LinkedIn Live event. Riverside is designed to be easy to use while providing high-quality video to stand out professionally. Start a free studio and give it a try.
FAQs about LinkedIn video sharing
Still looking for information? Here are the answers to some frequently asked questions.
Can I edit a video post after sharing it on LinkedIn?
You can always edit the text on a shared post, whether it’s shared on your personal profile or a company page. Other media - including videos - can’t be replaced or edited. If you need to change your video, you must delete the original post and create a new one.
Can I schedule a LinkedIn video post for later?
Yes, you can. Whether you are posting to your feed or a company page, you will see a “clock” icon next to the “Post” button in the bottom right corner when creating a post. Create your video post, then click the “clock” to schedule the time and date you want your video post to go live.
You can also use third-party social media management platforms like Hootsuite, Buffer, or Sprout Social to schedule any LinkedIn content in advance.
Can I share YouTube or external links to videos on LinkedIn?
Yes, you can. All you have to do is copy the video link and add it to a post. LinkedIn will automatically pull a video thumbnail for your post.
However, unlike videos you upload to LinkedIn, external videos will not play directly on the LinkedIn platform. When viewers click on the video, they will be sent to YouTube to watch it. LinkedIn also tends to prioritize native video uploads over external links, which could result in lower visibility. However, your followers and connections can like, comment, and share the post just like any other LinkedIn post.
What type of videos should I share on LinkedIn?
LinkedIn is a professional social media platform, so the videos shared there are of a professional nature. But that doesn’t mean you can’t get creative. Especially with LinkedIn’s TikTok-style mobile video feed, creative, short-form videos are becoming more common. Here are a few types of video posts to try:
- Product demos or workflows: If you have an exciting product demo or have created a unique workflow you think your connections will find value in, sharing it in a video can be a great way to communicate the message.
- Personal takes: LinkedIn is a great place to show your expertise. You can do that by providing your take on a hot topic, showing how you succeeded in your job, and more.
- Business/strategy/career advice: “How to do X” is an excellent hook on LinkedIn in text and video. Show your connections how you solve a problem or succeed at a task.
- Something fun: LinkedIn’s integration of video feeds has led to the creation videos that adopt a style similar to what you’ll see on Instagram, TikTok, and YouTube. While these videos still have a professional angle, they are also engaging and fun.
On Riverside, you can use Magic Clips to create short, shareable videos from longer ones instantly. This can be a great way to promote video Events or easily repurpose other video content for sharing.
Can I post multiple videos in one post on LinkedIn?
No, LinkedIn does not currently support posting multiple videos in a single post. You can combine multiple video clips into a single file using video editing software like iMovie, Premiere Pro, or DaVinci Resolve.
You could also link to multiple videos on external platforms like YouTube. However, the post will only display a preview thumbnail for the first one in the list.
Can I add closed captions to LinkedIn videos?
Yes, you can. There are a few ways to do this:
- You can use LinkedIn’s automatic closed captioning. This is for English-language videos only. You can switch it on (both on mobile and desktop) by clicking the “CC” icon after you’ve uploaded your video to a post.
- You can upload your own SRT file (desktop only). After you’ve uploaded your video, click the “CC” icon. You’ll see the option to “upload SRT.” Click it to upload the SRT file from your computer. You can easily create an SRT file by recording your video with Riverside. It will be automatically transcribed. Then, all you have to do is download the “Subtitle” version of your transcript.
You can add captions before you upload your video. The benefit here is that you can review them and style them how you want. With Riverside, you only need to click on the “Captions” icon inside the editor. This will add captions to your video instantly. You can choose your captions' font, color, and placement before saving them and uploading them to LinkedIn.


.webp)


