Table of contents:
Key takeaways:
- Cropping is a quick way to highlight the main action in your videos and keep viewers focused.
- Whether you're on iPhone or Android, PC or Mac, tools like iMovie and Clipchamp make it easy to crop videos right on your device.
- Social media platforms require specific aspect ratios. With tools like Riverside’s automatic layouts, resizing your video for each platform is quick and seamless.
Cropping videos lets you zero in on the main action, cut out distractions, and ensure your video looks great on different platforms. Whether you’re polishing up a travel vlog or adjusting a clip for Instagram, a quick crop can make all the difference.
In this guide, we’ll show you how to crop a video on your phone or computer using user-friendly video editing software.
How to crop a video on your iPhone
You can easily crop a video on your iPhone using the built-in Photos app. Here’s how.
Step 1: Open the Photos app
Locate and tap the “Photos” app on your iPhone's home screen.
Step 2: Find your video
Browse through your albums or the Recents folder to find the video you want to crop.
Tap on the video to open it.
Step 3: Open the Editor
Tap the “Edit” button located at the top-right corner of the screen.
Step 4: Use the crop tool
At the bottom of the screen, tap the “Crop” icon (a square with overlapping lines).
Step 5: Choose what to keep, or select a predefined aspect ratio
A grid will appear over your video. Drag the corners or edges of the grid to define the area you want to keep.
💡Top Tip: To maintain a specific aspect ratio, tap “Aspect Ratio” on the top right-hand corner (two overlapping rectangles icon) at the top-right, and select options like 16:9 or Square
Step 6: Preview your changes
Tap on the “Video” icon, then “Play” to see how the cropped video will look. If you aren’t happy with it, you can click “Revert” to undo the changes.
Step 7: Save your cropped video
If you’re happy with the crop, tap “Done” in the top-right corner. Photos will save the cropped version of your video.
How to crop a video on your Android phone
On an Android device, you can use the Google Photos app to crop videos. Here’s how to do it.
Step 1: Open Google Photos
Locate and tap the “Google Photos” app on your device.
Step 2: Open your video in Edit mode
Select the video you want to crop. Then, tap “Edit” at the bottom of the screen.
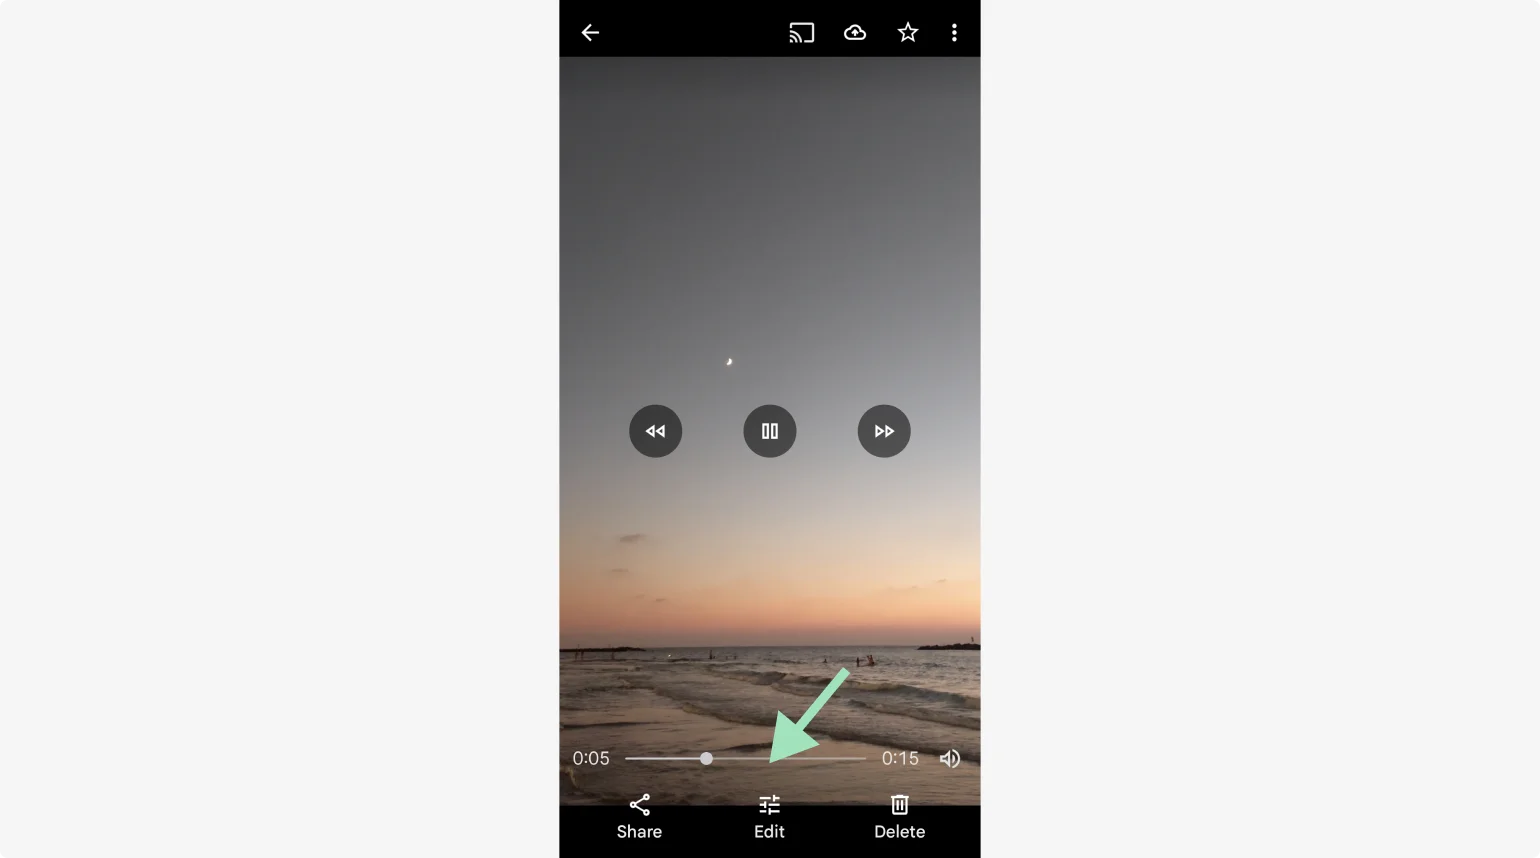
Step 3: Open the cropping tool
In the editing interface, tap “Crop.”
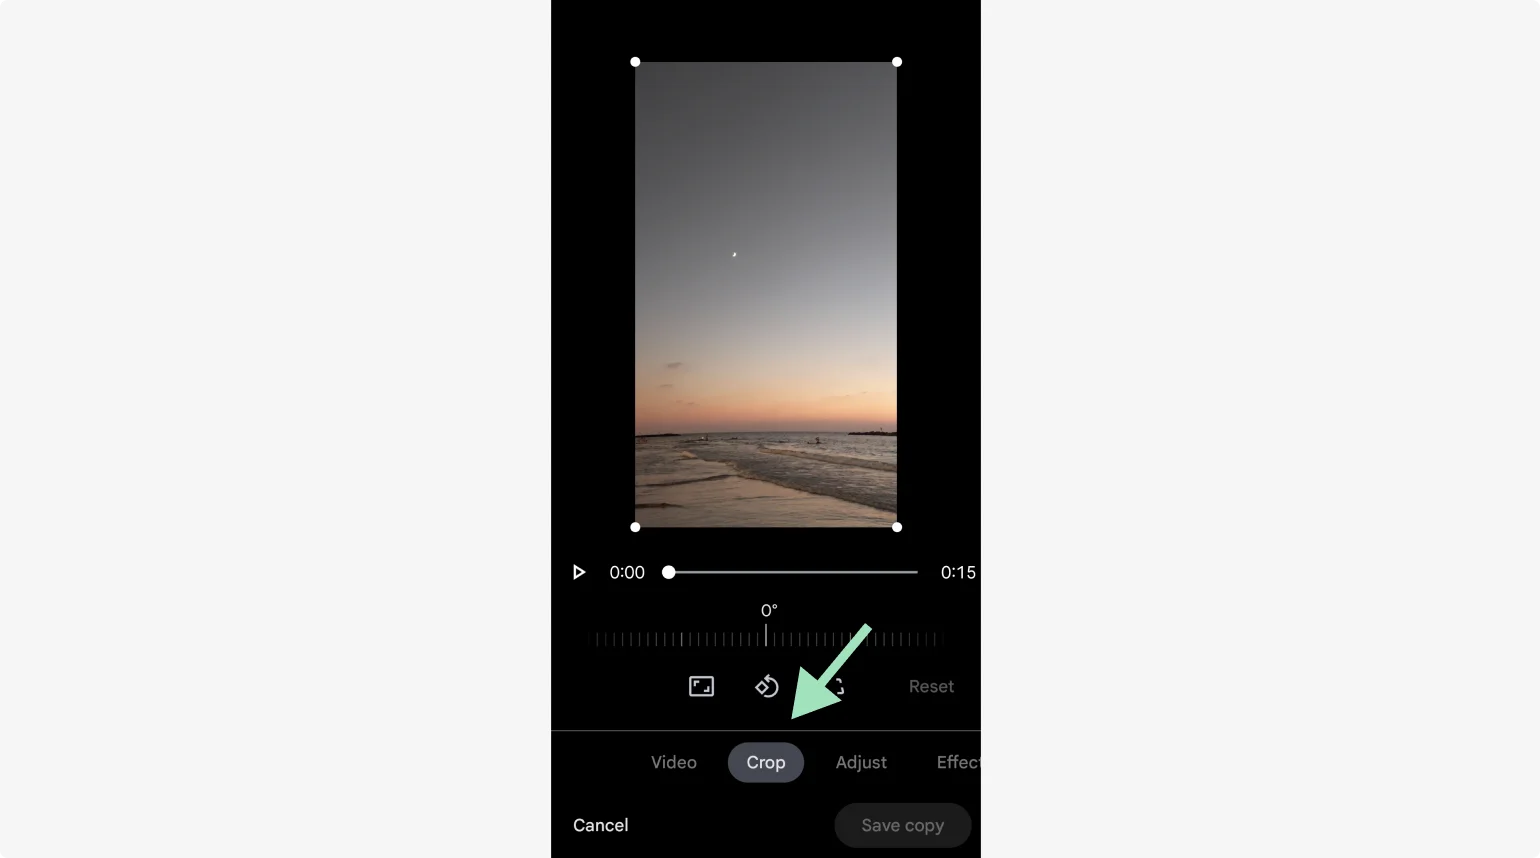
Step 4: Crop your video
A grid overlay will appear on your video. Drag the corners or edges of the grid to select the desired area to keep.
You can also click on the aspect ratio button to select a preset. This looks like a rectangle with two outward arrows inside.
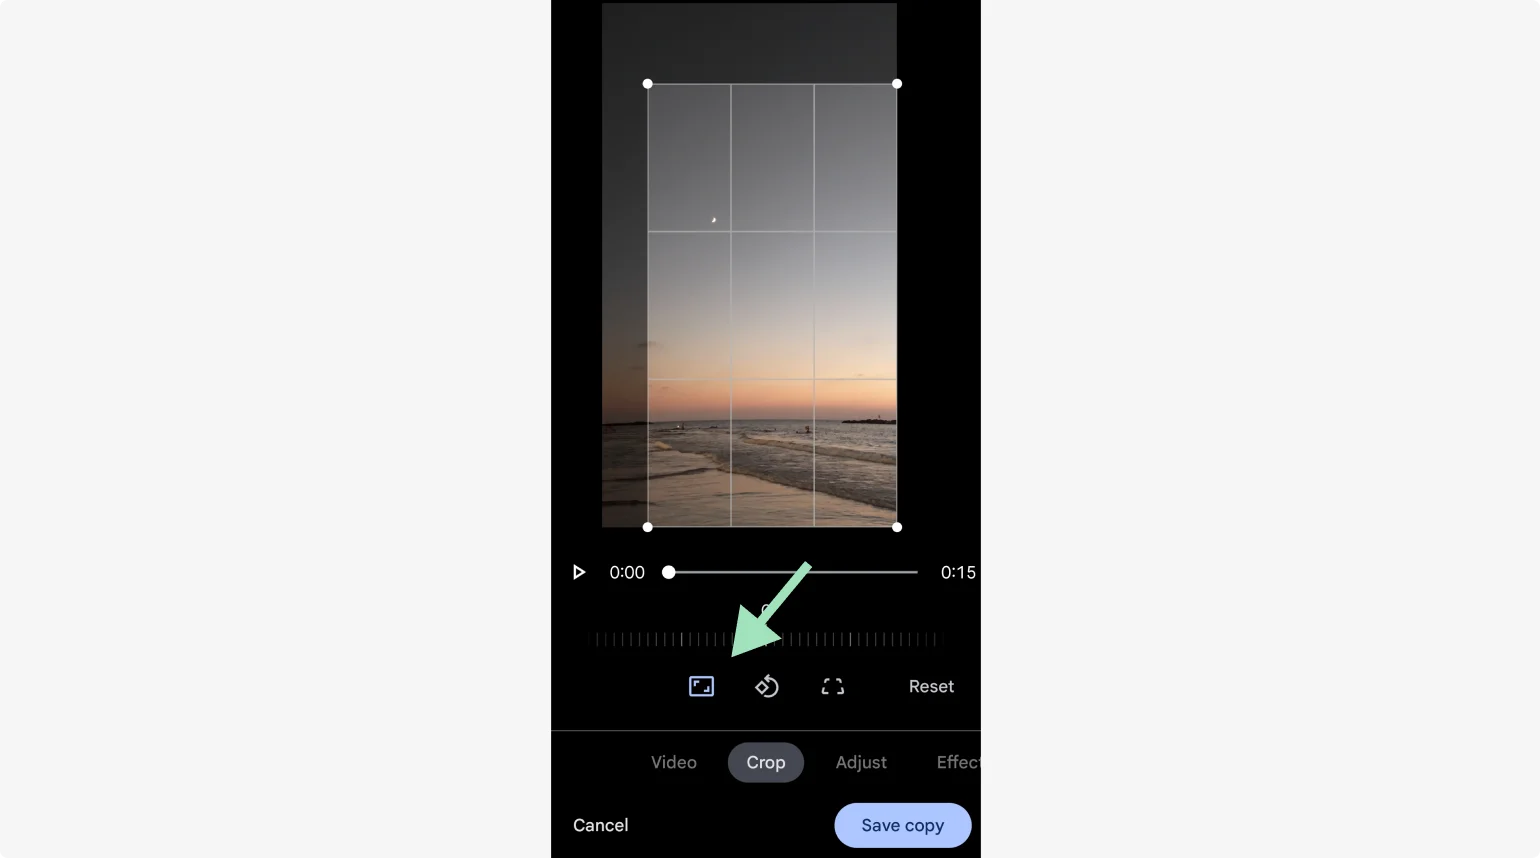
Step 5: Preview your changes
Tap the “Play” button to preview the cropped video.
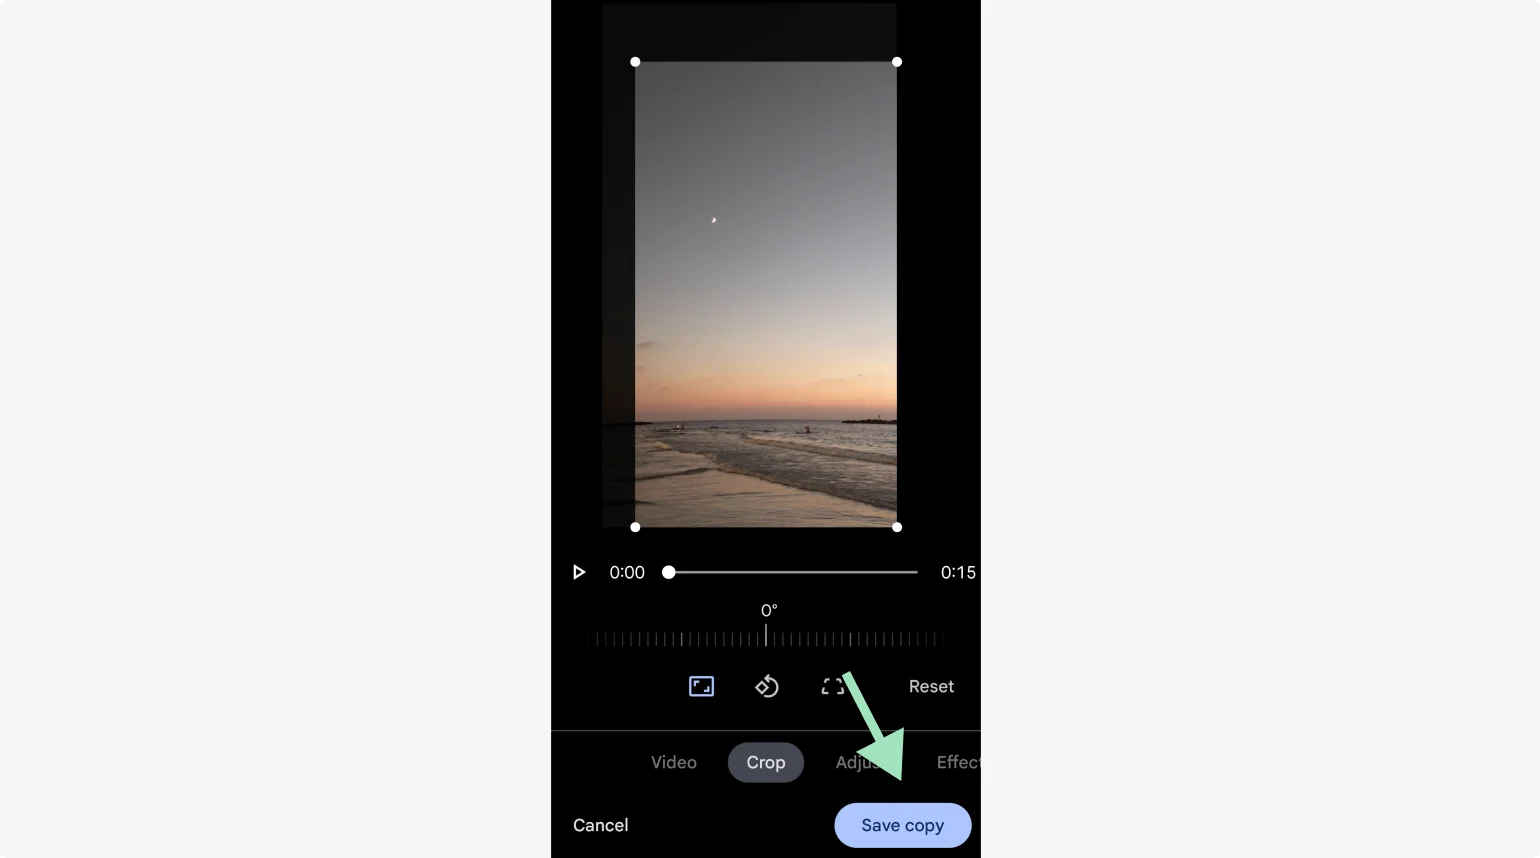
Step 6: Save your video
Once satisfied, tap “Save Copy” to create a new video file with your edits. This will preserve the original as is.
How to crop a video on your computer
If you’re working on your computer, you can crop a video just as easily as on your phone. You’ll likely even have access to more editing features.
You can do this online or directly with your Mac or Windows native software. Let’s dive in.
How to crop a video online
There is tons of video cropping software online.
Riverside’s editor is best for cropping online videos for social media. We have built-in aspect ratios just for this. And if you want to lay out two videos in your cropped grid, you can do this too.
After cropping, you can touch up your video with image and text overlays dynamic captions and background music.
Here's how to do it.
Step 1: Access the Riverside Editor
Log into your Riverside account.
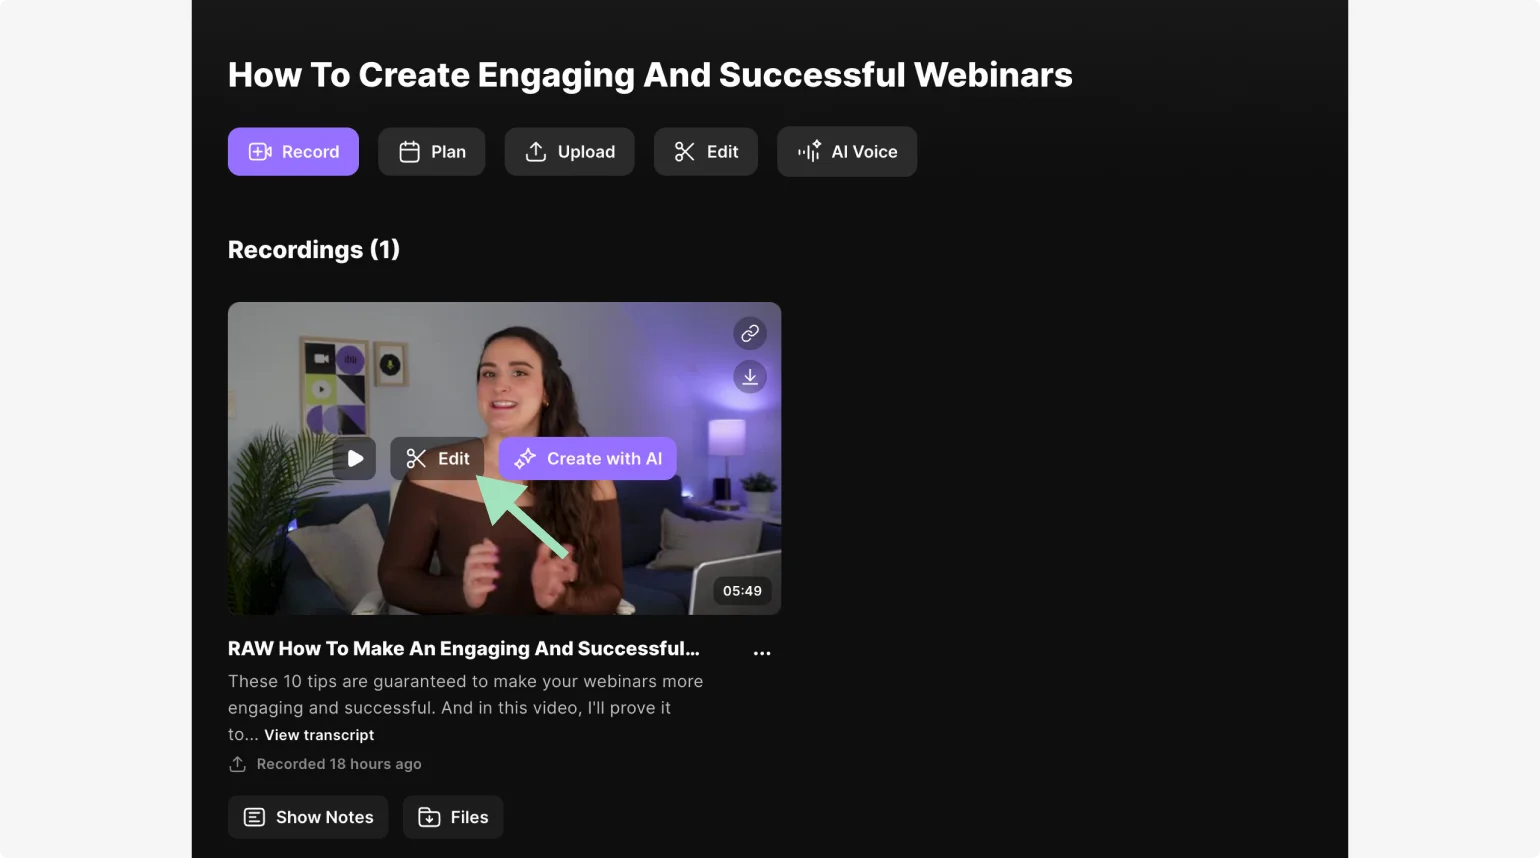
Head to your recordings, pick the one you want to crop, and click “Edit.”
Step 2: Open the aspect ratio tool
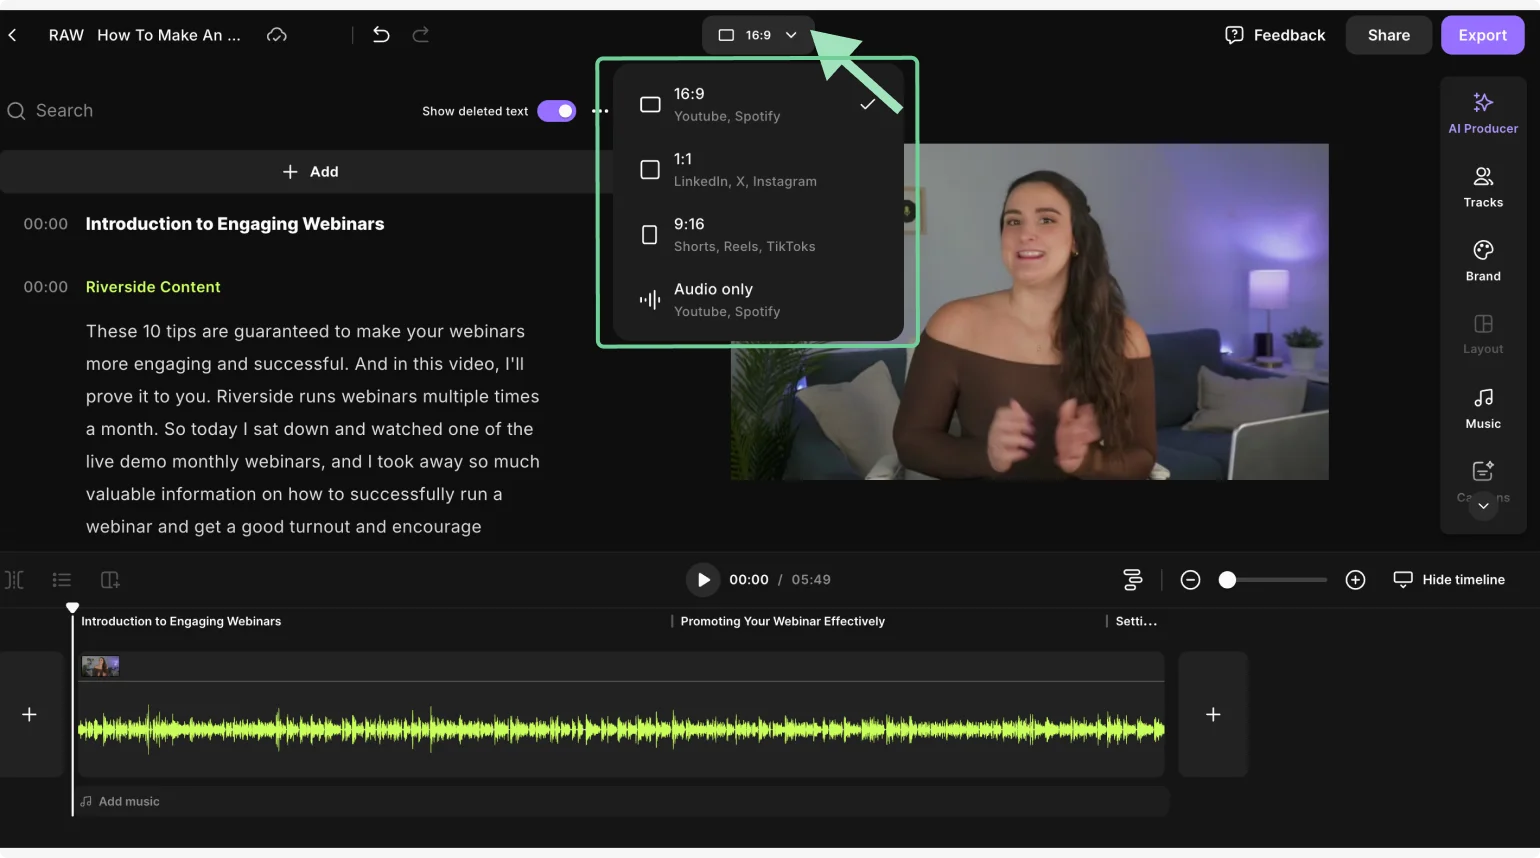
At the top of the screen, you’ll see a dropdown with your video’s current aspect ratio displayed. Click it to open a dropdown:
- 16:9 Full Width (for YouTube and widescreen)
- 9:16 Vertical (for Instagram Stories, TikTok, and YouTube Shorts)
- 1:1 Square (for Instagram feed and Facebook)
Step 3: Crop your video
After selecting your aspect ratio, you can crop it to fit in the dimensions better.
Click on your video. A toolbar will appear. Click on the crop button.
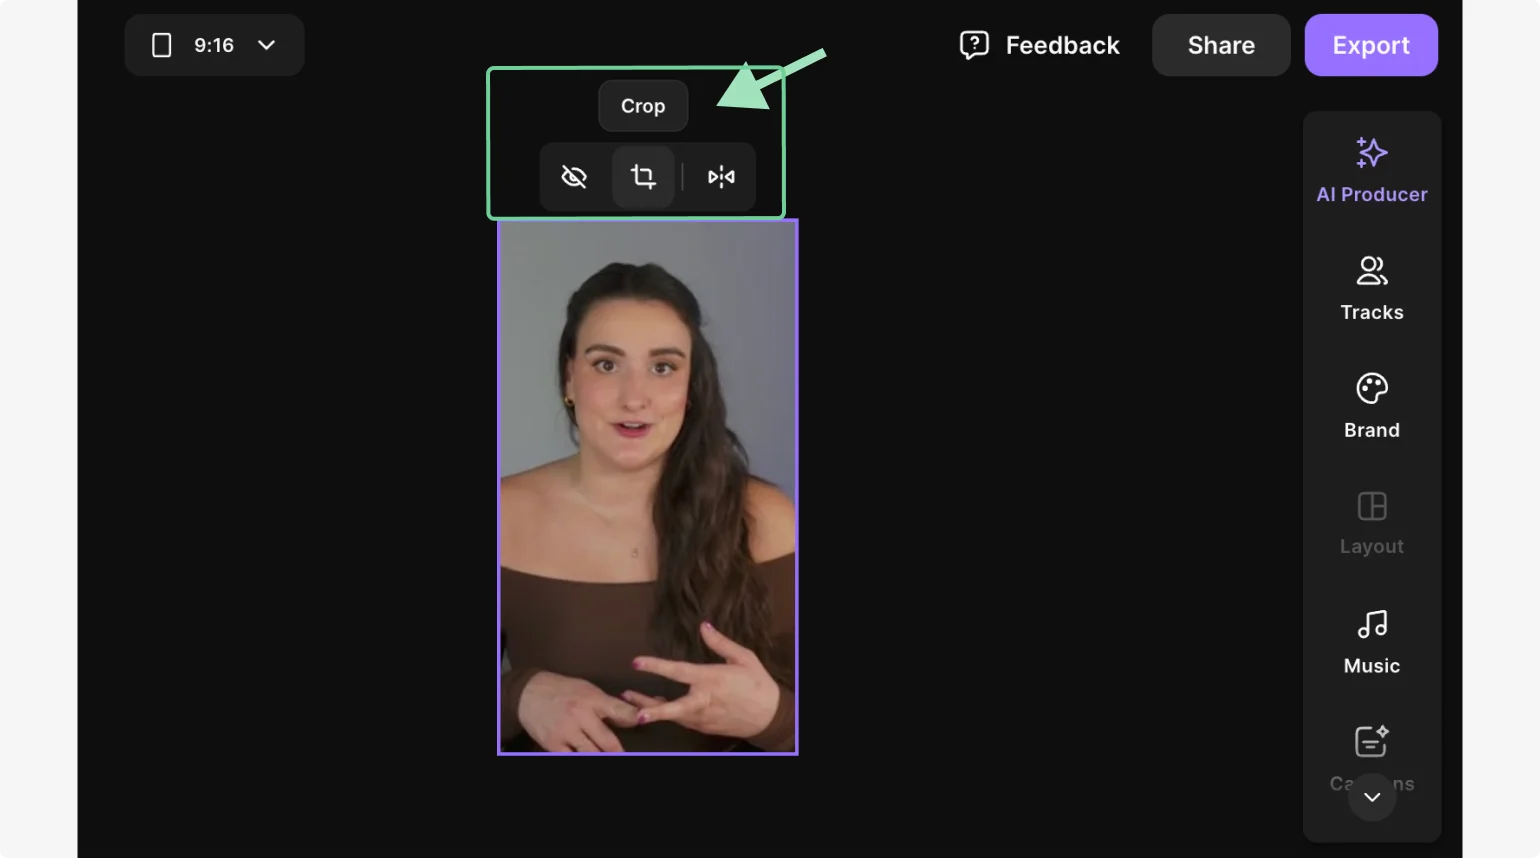
Tap the “+” button to zoom in on your video and the “-” button to zoom out. If you want to reposition your video, click on it and drag it to move it around in the frame.
Step 4: Preview your changes
Play back your video by clicking the “Play” button just below your video to see how it looks with your selected ratio and layout.
Step 5: Save and export your video
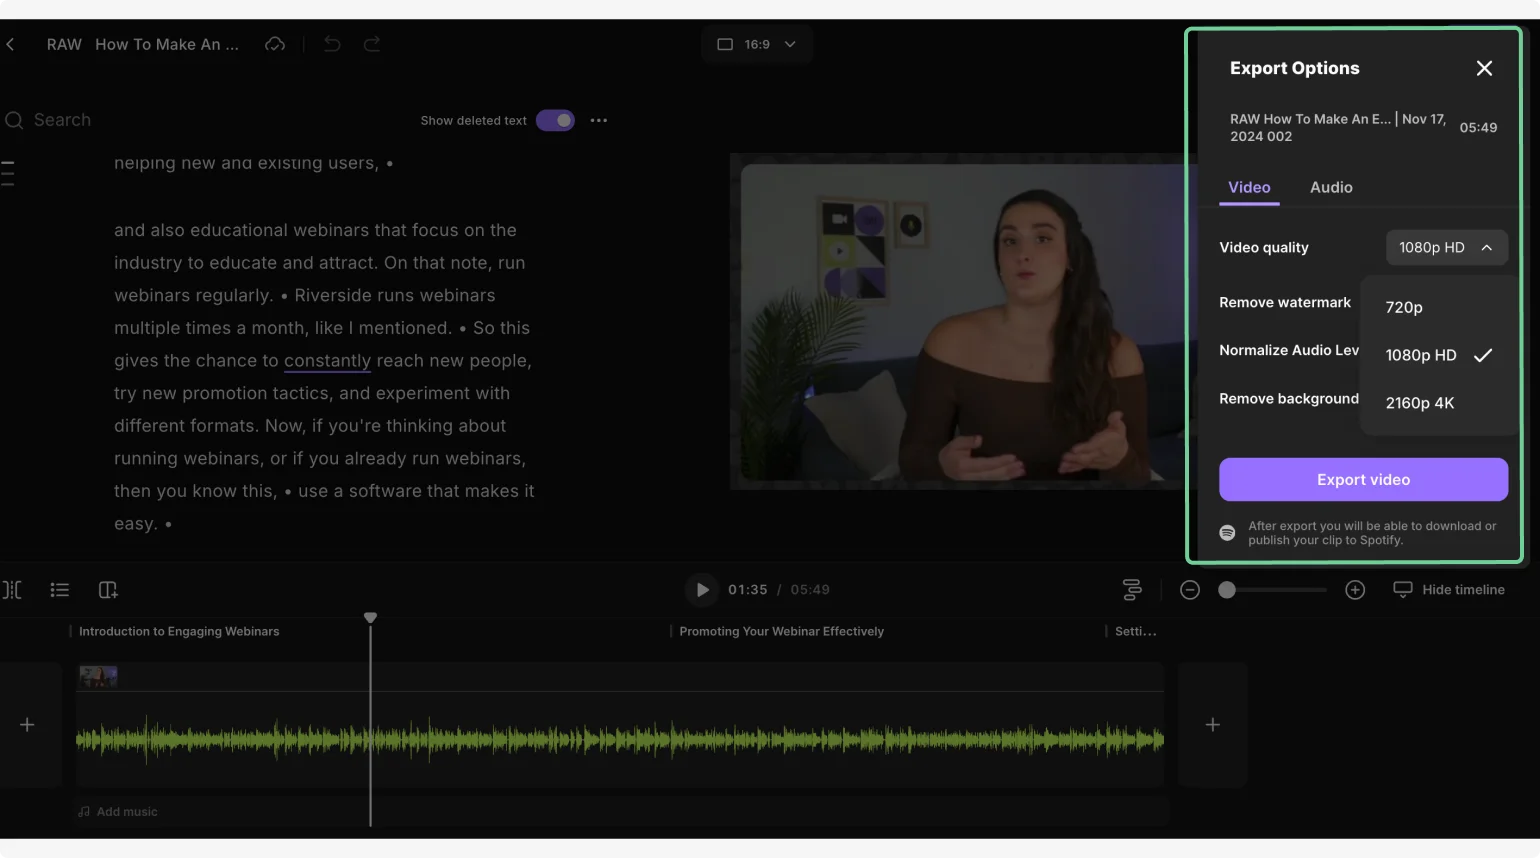
When you’re happy, click the “Export” button in the top-right of your screen. Select your desired resolution, then click “Export video.” Your edit will be saved to your dashboard. From there, you can download it to your computer, or share it directly to social media platforms.
How to crop a video on Mac using iMovie
iMovie video. Mac’s native editor makes it super simple to crop videos. Here’s how.
Step 1: Open iMovie
Head to your Applications folder and launch iMovie.
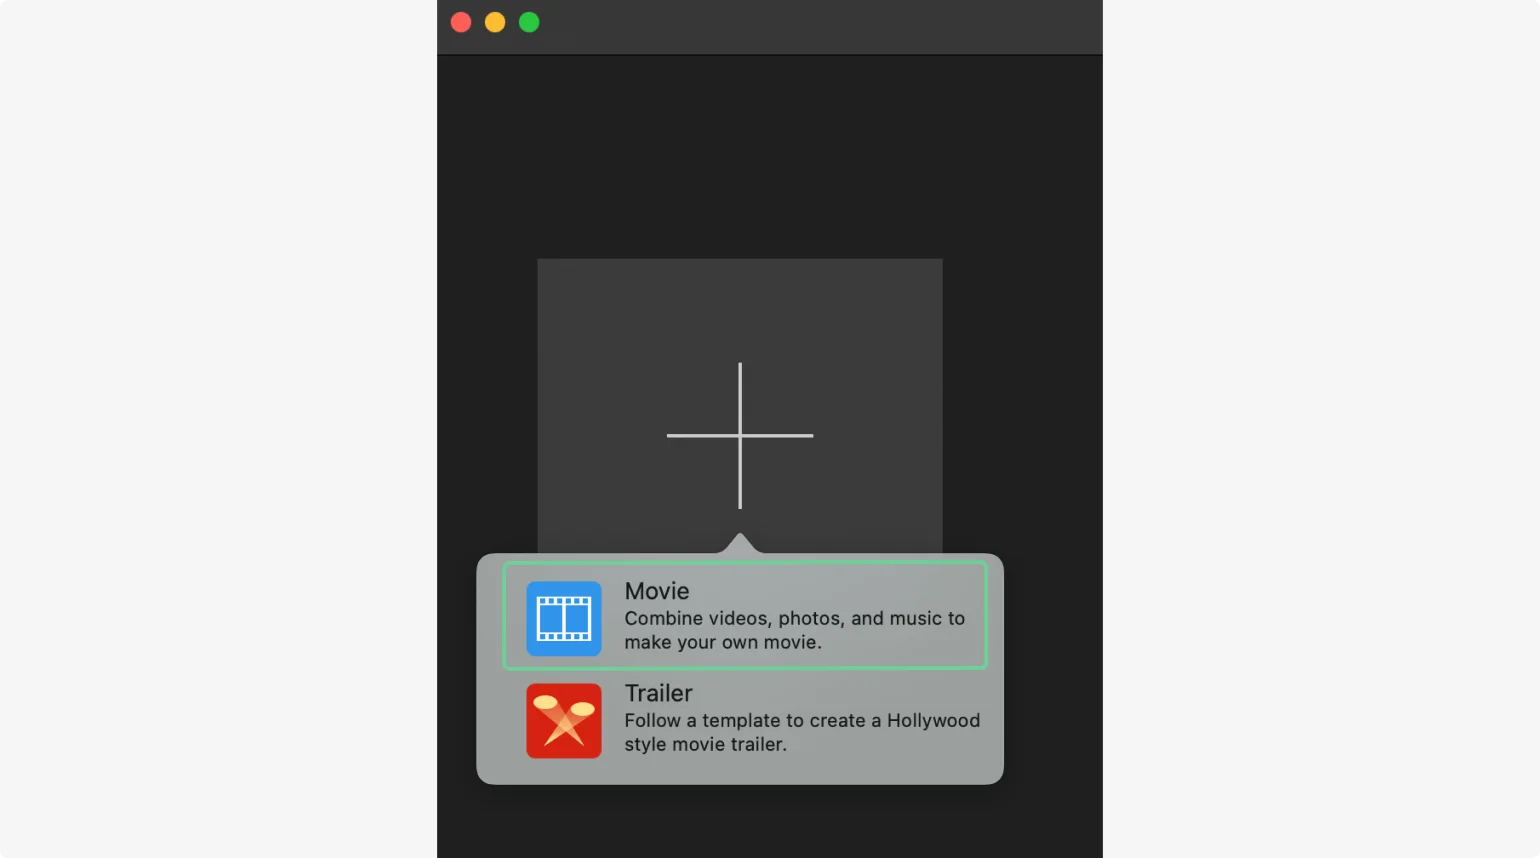
Click “Create New” and select “Movie.”
Step 2: Select the video you want to edit
At the top left, go to “File” > “Import Media,” then find and select the video you want to crop.
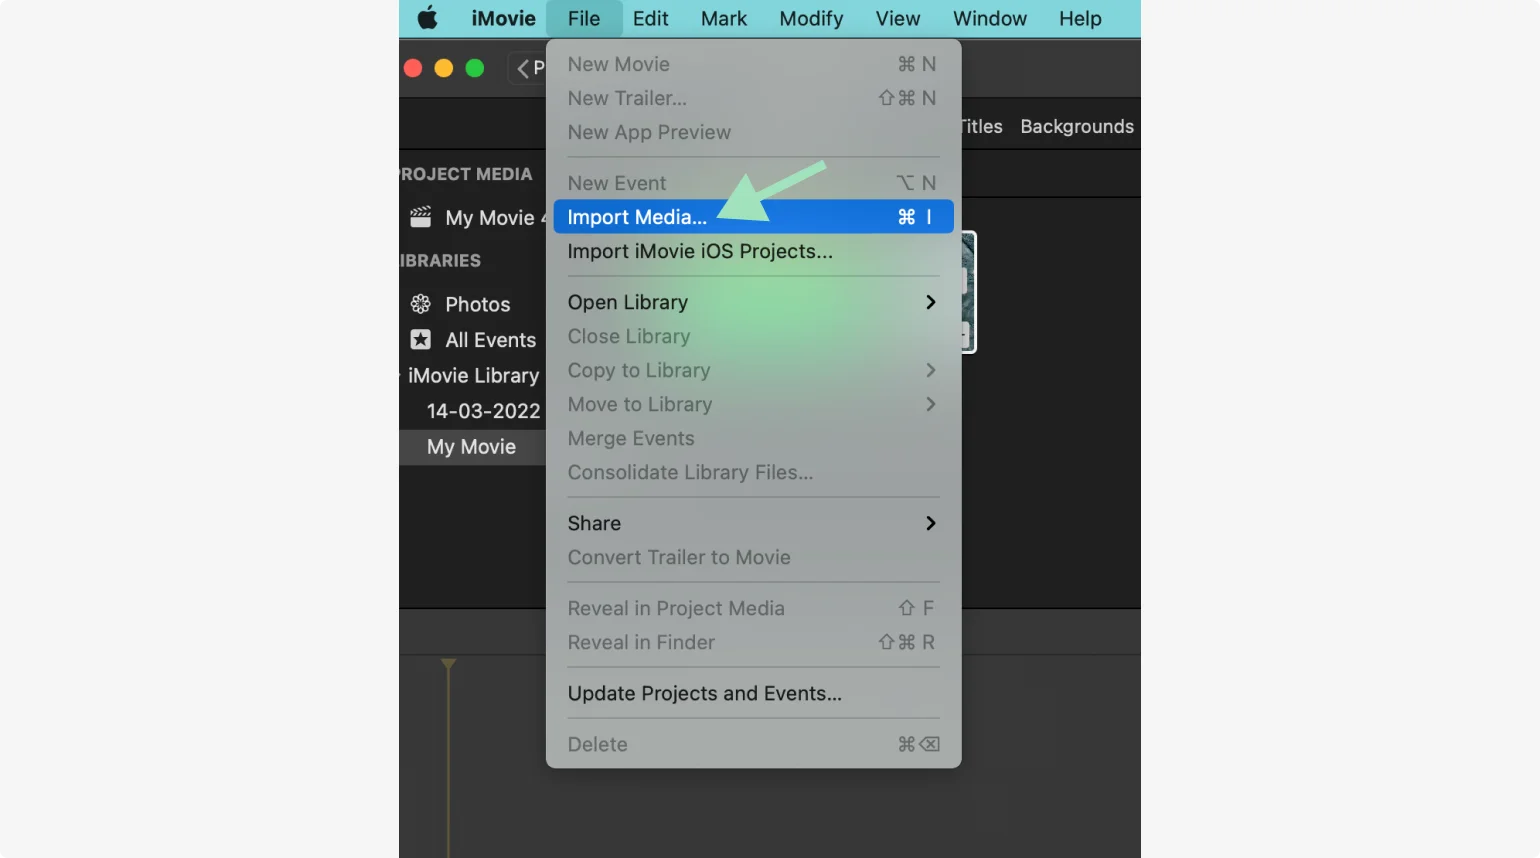
Drag your video from the Media section down into the Timeline at the bottom on your screen.
Step 3: Select the cropping tool
Above the Preview pane, click on the “Cropping” icon, then choose “Crop to Fill.”

Step 4: Select your desired crop area
Drag the edges or corners of the frame in the Preview pane to get your desired crop area.
Step 5: Apply your changes
When it looks just right, click the Apply (✔️) button.
Step 6: Save your video
Go to “File” > “Share” > “File,” set your export options, then click “Next” to save it.
How to crop a video on Windows using Clipchamp
When it comes to cropping videos on Windows, there's Clipchamp. It comes pre-installed on Windows 11 devices. Windows 10 users can download it from the Microsoft Store. Here's how to use it.
Step 1: Launch Clipchamp
Launch Clipchamp from your Start menu or desktop shortcut.
Click on “Create a new video.”

Step 2: Select and open your video
Click “Import media,” and select and open the video file you want to crop.
Drag the imported video from the Media library to the Timeline at the bottom of the screen.
Step 3: Open the crop tool
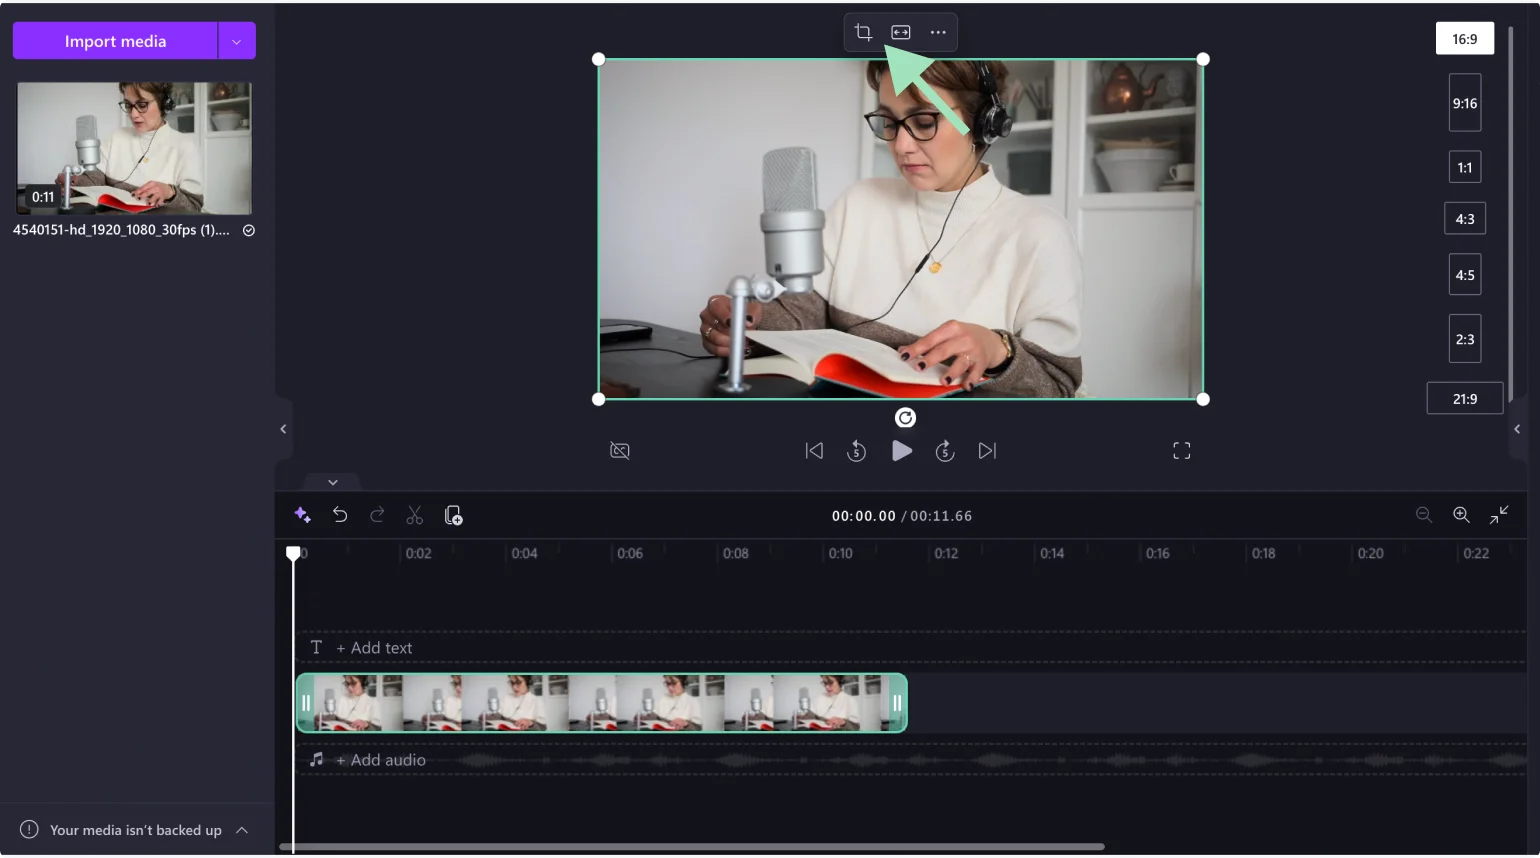
Click the video clip in the Timeline to highlight it, then select the “Crop” icon in the Preview pane.
Step 4: Crop your video
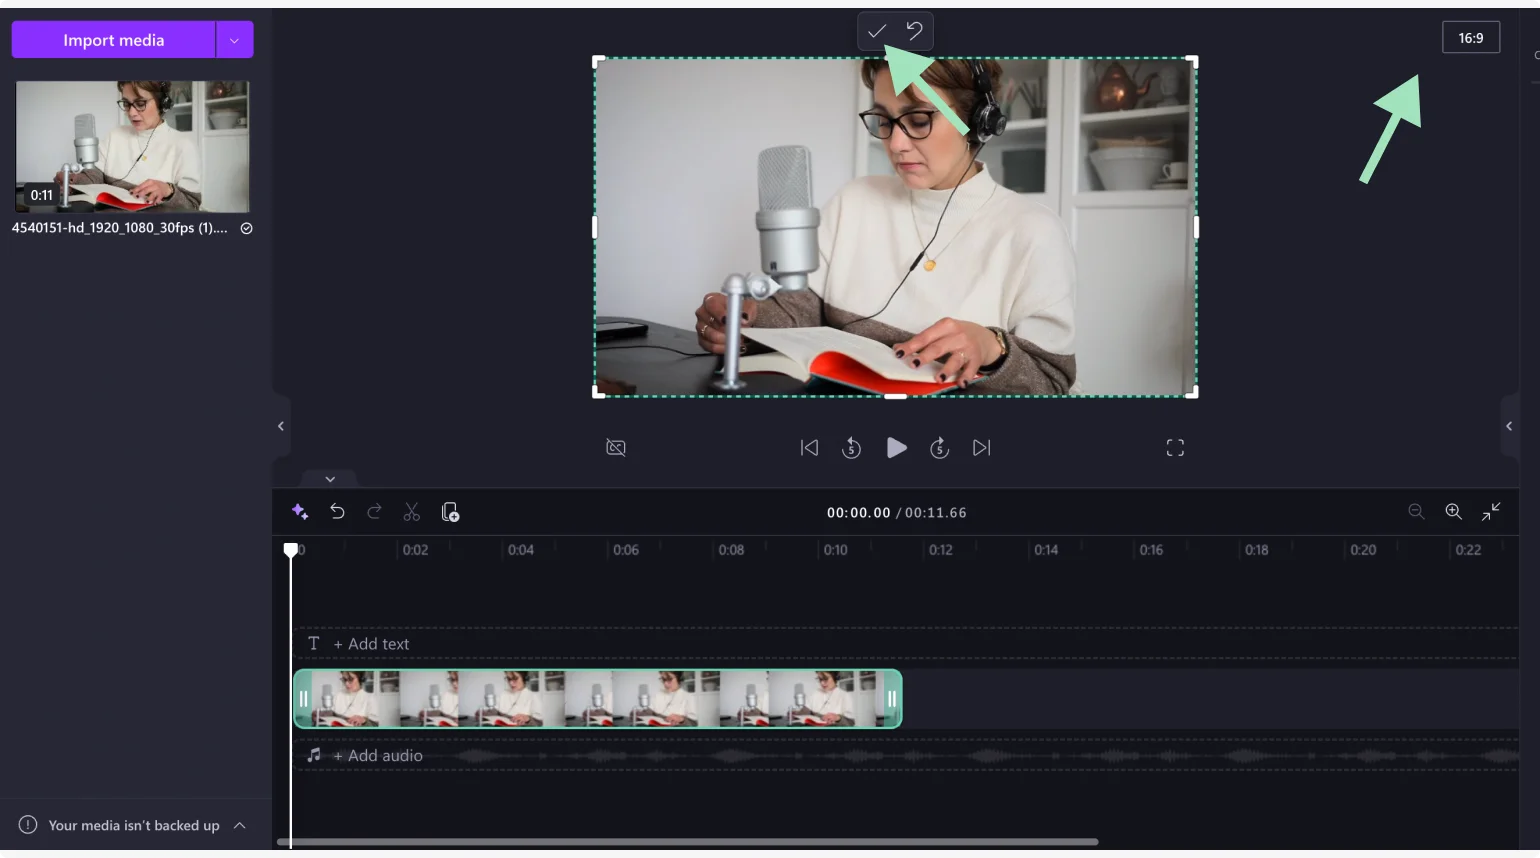
Adjust the cropping box by dragging its corners or sides until you get the area you want. You can also select the aspect ratio box on the top right to choose a preset.
When you’re happy with your crop, click “Done.”
Step 5: Save your video
To save, click “Export” in the top right, choose your resolution, and click “Export” again. Your video will be saved as an MP4 to your computer.
Bonus tip: How to crop videos for social media
Making your videos look great across different social media platforms is all about nailing the right aspect ratios. Every platform has its own ideal video size, and sticking to these makes your content look polished and helps boost audience engagement.
Here’s a quick rundown:
Common social media aspect ratios
Instagram Feed Posts
- Square: 1:1 (1080 x 1080)
- Portrait: 4:5 (1080 x 1350)
- Landscape: 1.91:1 (1080 x 566)
Instagram Stories and Reels
- Vertical: 9:16 (1080 x 1920)
Facebook Feed Videos
- Square: 1:1 (1080 x 1080)
- Vertical: 4:5 (1080 x 1350)
Facebook Stories
- Vertical: 9:16 (1080 x 1920)
TikTok Videos
- Vertical: 9:16 (1080 x 1920)
YouTube Videos
- Standard: 16:9 (1920 x 1080)
- YouTube Shorts: 9:16 (1080 x 1920)
Using these ratios prevents issues like black bars or awkward cropping so your videos display just right! Fortunately, most tools like Riverside include these as presets.
Final thoughts
Whether it’s a quick personal clip or a polished piece for social, cropping lets you cut out distractions and highlight what really matters. It’s all about making each frame count and shaping your video to fit wherever it’s going to shine.
So next time you’re editing, don’t skip the crop! It’s your chance to bring focus, keep things clean, and make your video look just right for its audience. Riverside makes this easy by providing pre-set aspect ratios that do the work for you. You can even save your edits directly to social media platforms. Try Riverside for free today.
Video cropping FAQs
What’s the difference between video cropping and trimming?
Cropping changes the visible area of the video by removing outer parts of the frame. Trimming adjusts the video’s length by cutting from the beginning or end, affecting the duration but not the frame itself.
What’s the difference between video cropping and cutting?
Cropping modifies the visible frame to focus on specific content within the video. In contrast, cutting removes segments of the video timeline, deleting entire sections rather than altering the frame.
Does cropping a video affect quality?
Yes, cropping can reduce quality, especially if you zoom in on a small area. This may lower resolution and make the video appear pixelated or blurry.
Does cropping a video reduce file size?
Cropping alone doesn’t usually reduce file size significantly. However, the file size may decrease slightly if you export the cropped video at a lower resolution or re-encode the video after cropping.


.webp)
.webp)
.webp)
.webp)

.webp)
.webp)


