.webp)


Table of contents:
Whether you’re hosting a podcast interview or you want to publish a screen-sharing presentation, side-by-side videos can be a great tool in your arsenal—and they’re easy to create!
You’ve definitely seen a side-by-side video. They’ve become increasingly popular for reaction videos, interviews, duets, and, more. With their rise in usage, many video apps have created features specifically for this layout. This makes it easier than ever to make your own split-screen.
In this post, we’ll walk you through everything you need to know about side-by-side videos, from what they are and how to record them, to the best split-screen video making and editing apps out there.
What Are Split-Screen (Side-by-Side) Videos?
A split-screen, or side-by-side, video is made up of two or more videos placed next to each other and played simultaneously. Video creators use this technique to compare, contrast, or simply show multiple related shots in the same frame for creative or educational purposes.
There are plenty of uses for these kinds of videos. You might see split-screen tech being used to create:
- Reaction videos
- Before and after shots
- Then and now videos
- Comparisons (“who wore it best?”)
- Video collages
If you’ve seen the popular TikTok reaction trend where the creator records an image of themselves reacting to another creator’s existing video on the other half of the screen, you’ve seen a side-by-side video.
What Is A Side By Side-Video-App?
As mobile camera and video technology has skyrocketed in both popularity and functionality in recent years, the demand for advanced mobile video tools has increased as well. One such demand is for apps that let creators make video collages and side-by-side videos.
A side-by-side video app is a tool that lets creators use their mobile device to cut, place, arrange, and export split-screen video.
Some of these apps have simple or precise functionality, while others are more like tiny all-in-one production studios that let you record, edit, and play the video in one place.
The Best Side-by-Side Video Maker App for iOS and Android
Below, we’ll take a look at four of the top video apps used for recording and arranging interviews in a side-by-side format.
1. Riverside
.png)
Compatibility: iOS, Android and PC
Price: Free plan, paid plans starting at $15/month
Type: Online side-by-side video creator for recording and editing
Best video-side app for podcasts, interviews, and remote recording
Riverside’s video recording software is an all-in-one solution that makes it easy to create studio-quality videos all from your browser. The powerful tool records in 4K resolution and captures all audio locally to each participant’s computer, meaning you won’t be dependent on the speed of your internet connection for the quality of your recording.
Riverside is a great option for split-screen recording. All of your guests can join with one click using their browser, with no need to download or install anything. Once you’re done recording, use Riverside’s Editor to create a split-screen video automatically in HD. You can even create short clips in this side-by-side format. This is great if you want to repurpose your long-form recording into short shareable social media content.
And if you’re looking for ways to record side-by-side videos on the go, download the Riverside mobile app available on both Android and iOS. With the mobile app, both you and your guests can join your studio with a single click and record in HD audio and video from anywhere. Everything is automatically saved to the cloud, so you can edit your video from your desktop straight after recording.

How to Record and Edit Side-by-Side Videos Using Riverside
It couldn’t be simpler to make an HD split-screen video with Riverside. The Editor reduces the time you need to spend in post-production by using automation to streamline the process.
Because the Editor does all the work for you to generate a perfect side-by-side video in full HD, you’ll easily set yourself apart from other content creators—while doing half the work.
To record and edit side-by-side video using Riverside, simply:
Step 1: Create a studio and select your preferred settings.
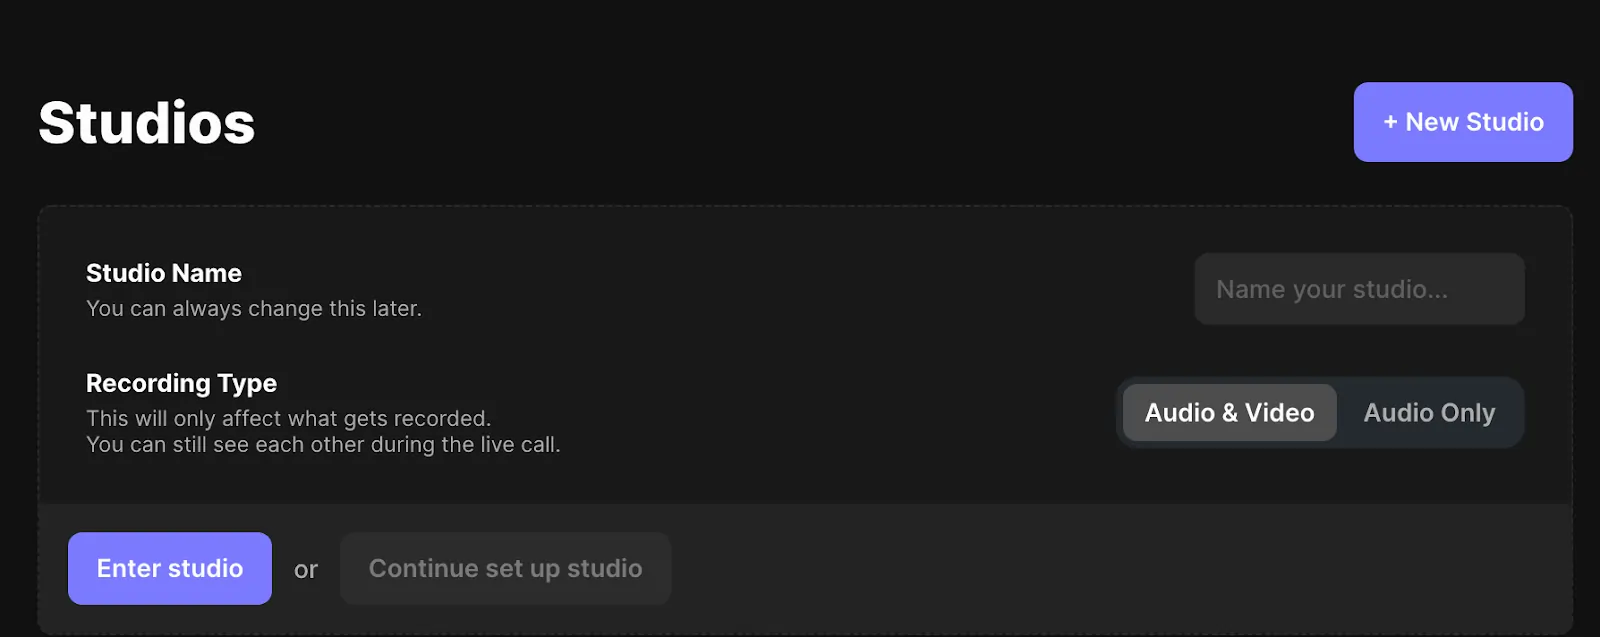
Step 2: Send an interview link for your guests to join with one click.
Step 3: Enter your studio and test your equipment in the green room before selecting Join Studio.
.webp)
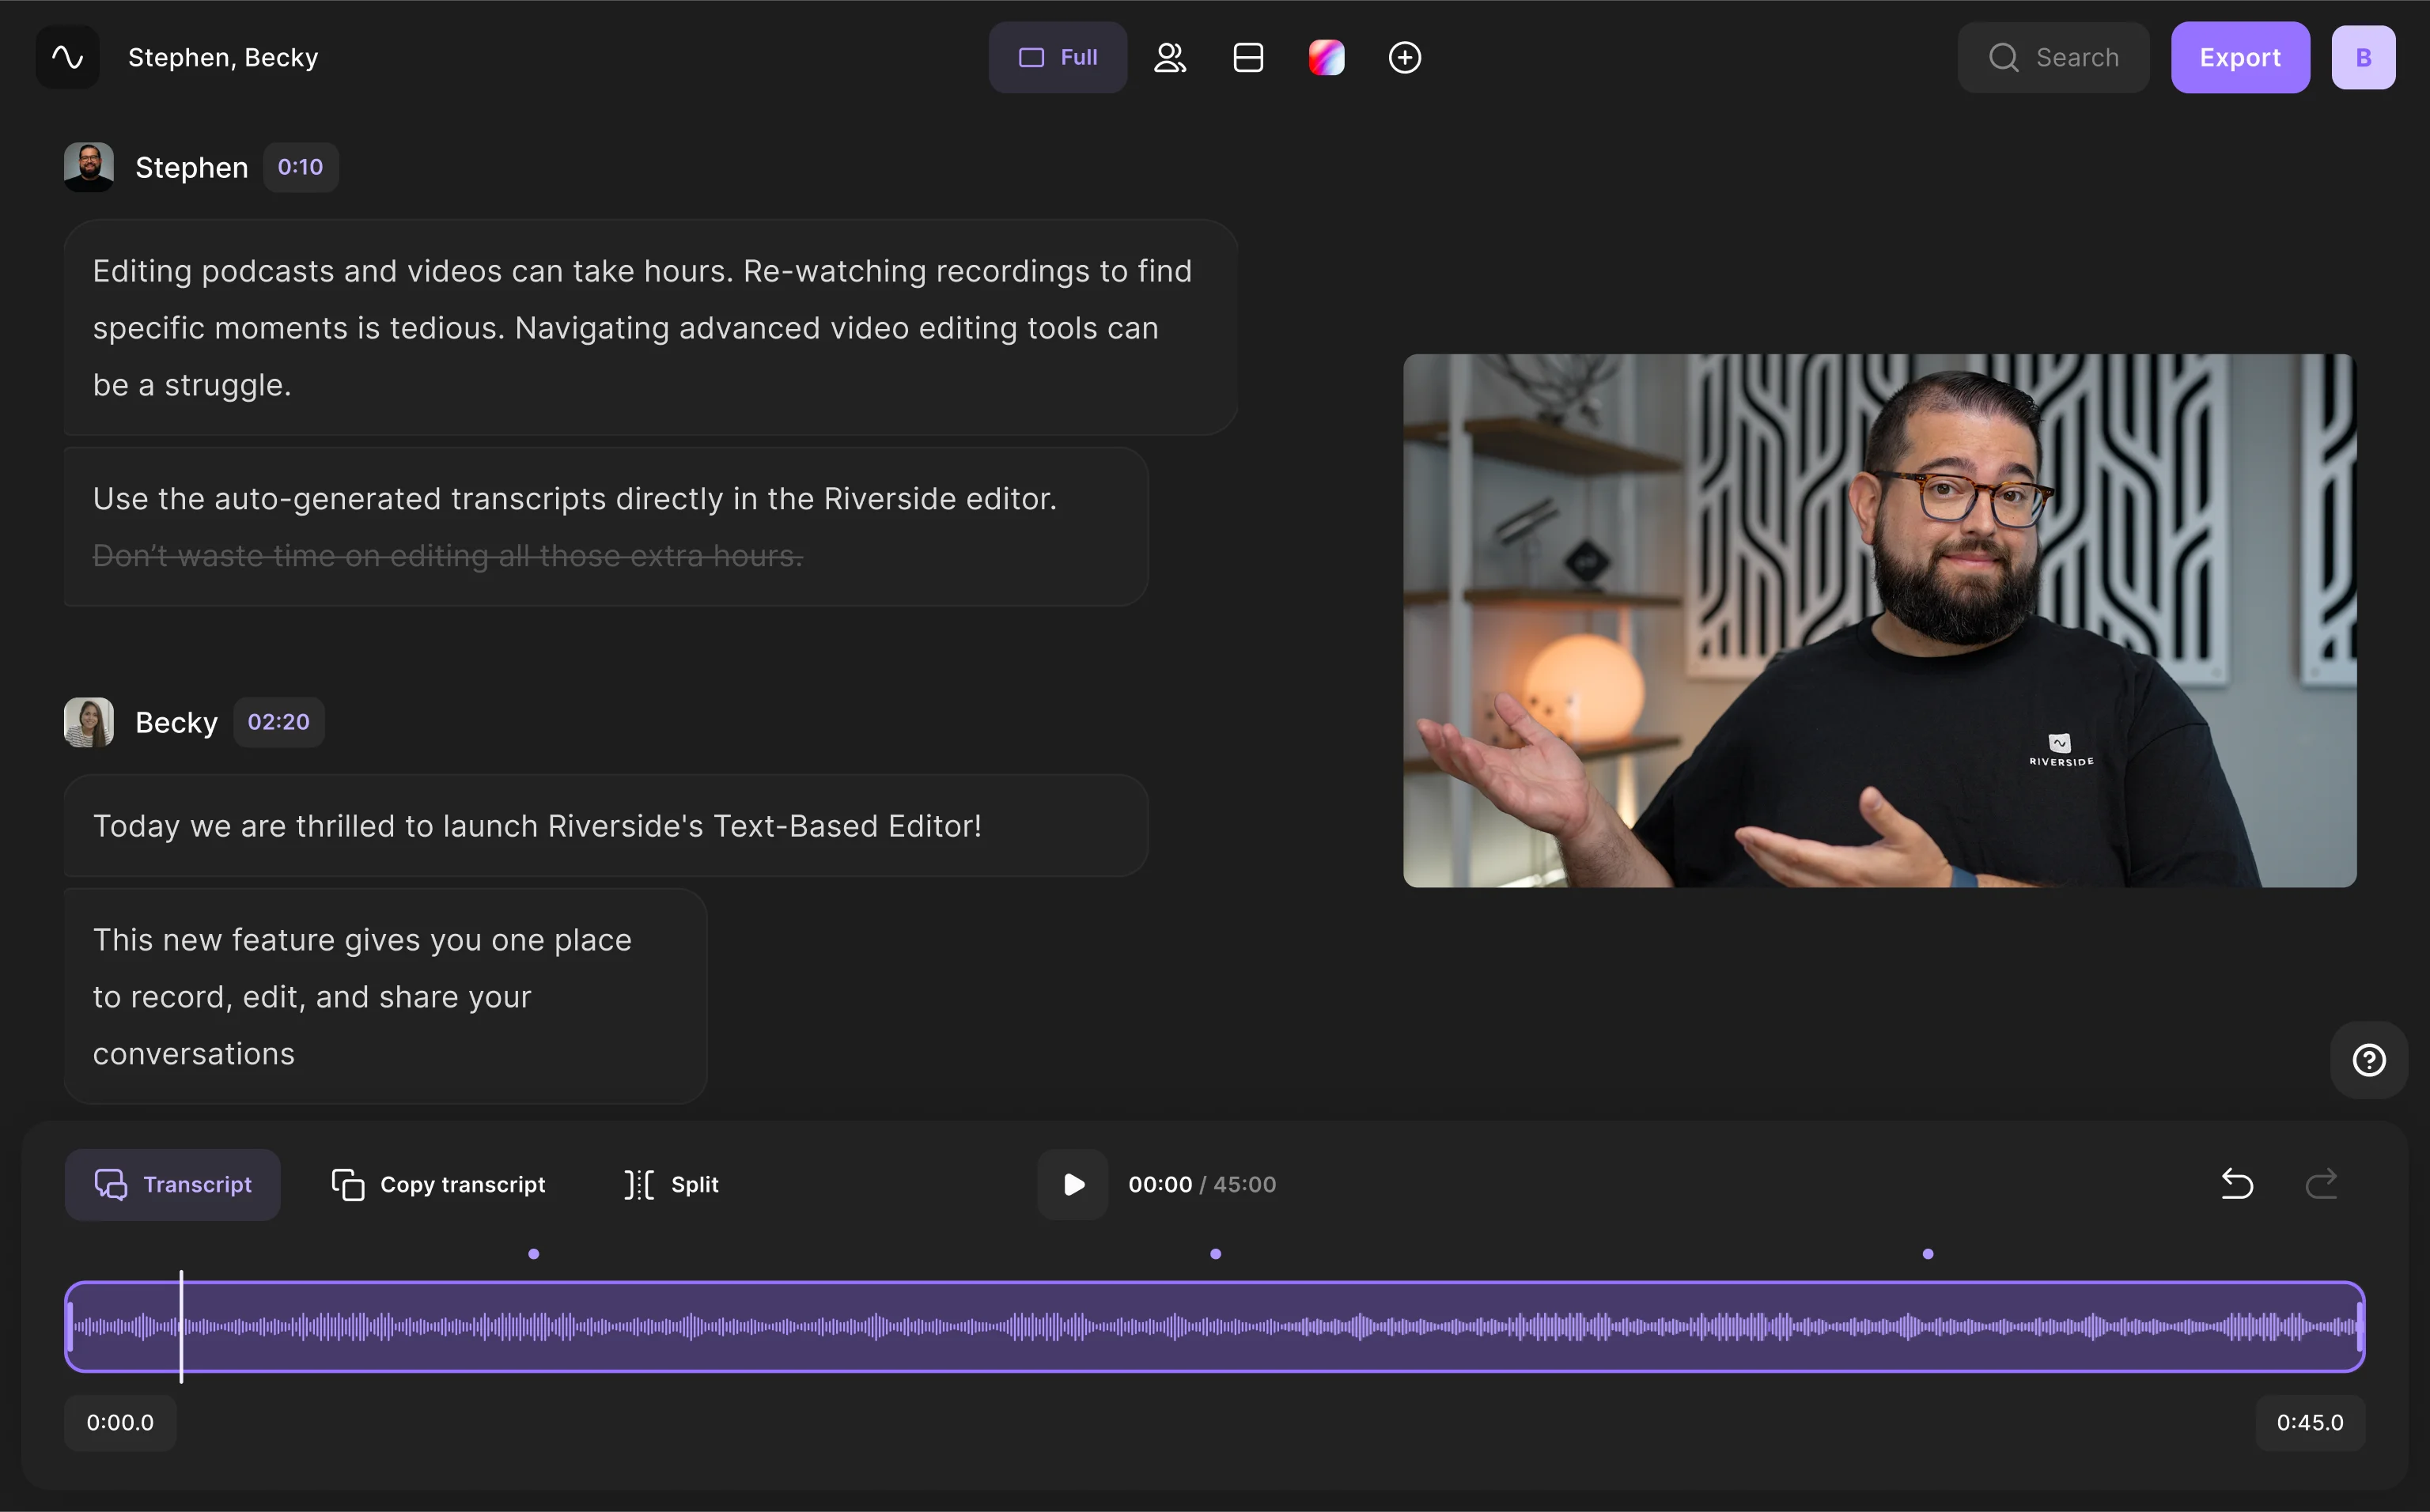
Step 4: Once you and your guests have all entered the studio, hit Record.
.webp)
Step 5: When you're ready stop the recording and wait for all your files to upload. Select view recordings then choose the take you'd like to make side-by-side and click 'Go to Editor'.
Step 6: Select your aspect ratio and in the editor you can trim and navigate through your video using the text-based editing tools.
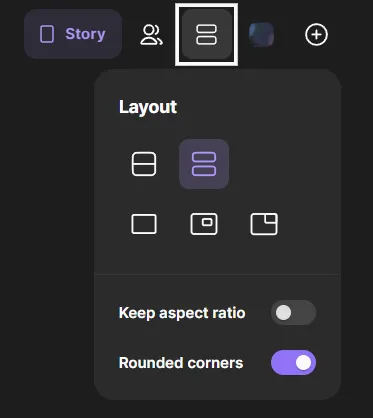
Step 7: Once you've got a final cut, click on the layout button from the top tool bar to choose what side-by-side video view you'd like. You can choose to have gaps between the videos and you can choose between multiple layout options.
Step 8: Continue editing and add professional details, such as a logo or frame, under the Customize option. You can also create short shareable clips in just one click using, our Magic Clips tool. (You'll find this in your recording dashboard and all you need to do is select 'Generate Clips'.)
Step 9: When you’re ready, choose a name for your file and select the export quality under Export. Your video is ready to be downloaded and/or shared online!
See! It's just as easy as that! Don't take our word for it? Create a side-by-side video and check it out, yourself.
2. Zoom
Compatibility: iOS, Android and PC
Price: Free plan, paid plans starting at $14.99/month/user
Type: Online side-by-side video recorder
Best for side-by-side video calls or webinars.
Zoom, a staple of pandemic work life, is a popular choice for recording video calls due to its internet connection consistency and good audio quality compared to Skype. It’s also relatively easy to use and very affordable, which makes it appealing to beginners.
However, Zoom does come with several disadvantages that it’s important to be aware of. Because Zoom was designed primarily for video calls, NOT recordings, its software sacrifices audio and video quality in favor of connection speed. Zoom uses compressed audio and video, which means it removes parts of the track to make the file smaller. Zoom recording also depends on a live internet connection, so if your internet speed suffers or the connection drops altogether, the final video file will suffer.
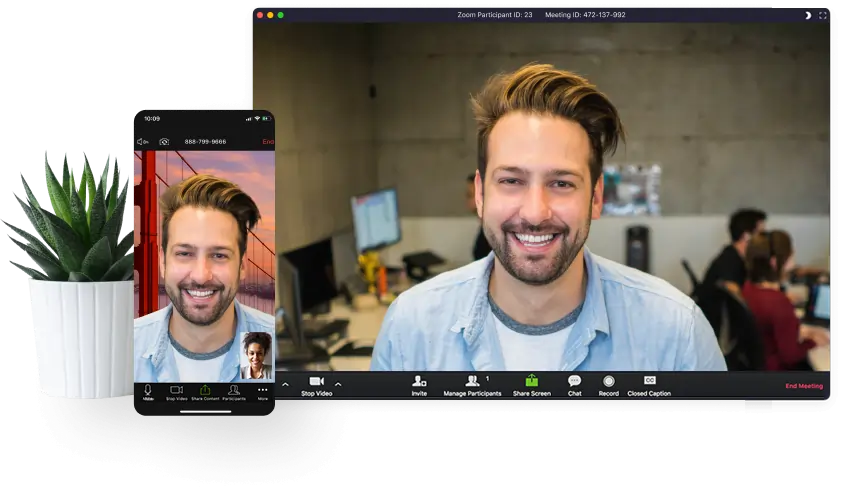
If you record presentations using Zoom, you can switch to side-by-side mode with a shared screen option. This option is useful for presenters who would like to record both their face and their screen at the same time.
When in a meeting or webinar, simply click View Options and select Side-by-side mode. From there, you can hover your mouse over the boundary line between screens and adjust the size of each view.
Automatically Entering Side-by-Side Mode in Zoom
If you use Zoom often and want side-by-side view to be your default, simply follow these steps:
Step 1: Sign in to your Zoom desktop app.
Step 2: Click your profile picture, then click Settings.
Step 3: Click Share Screen.
Step 4: Check the box next to Side-by-Side Mode.
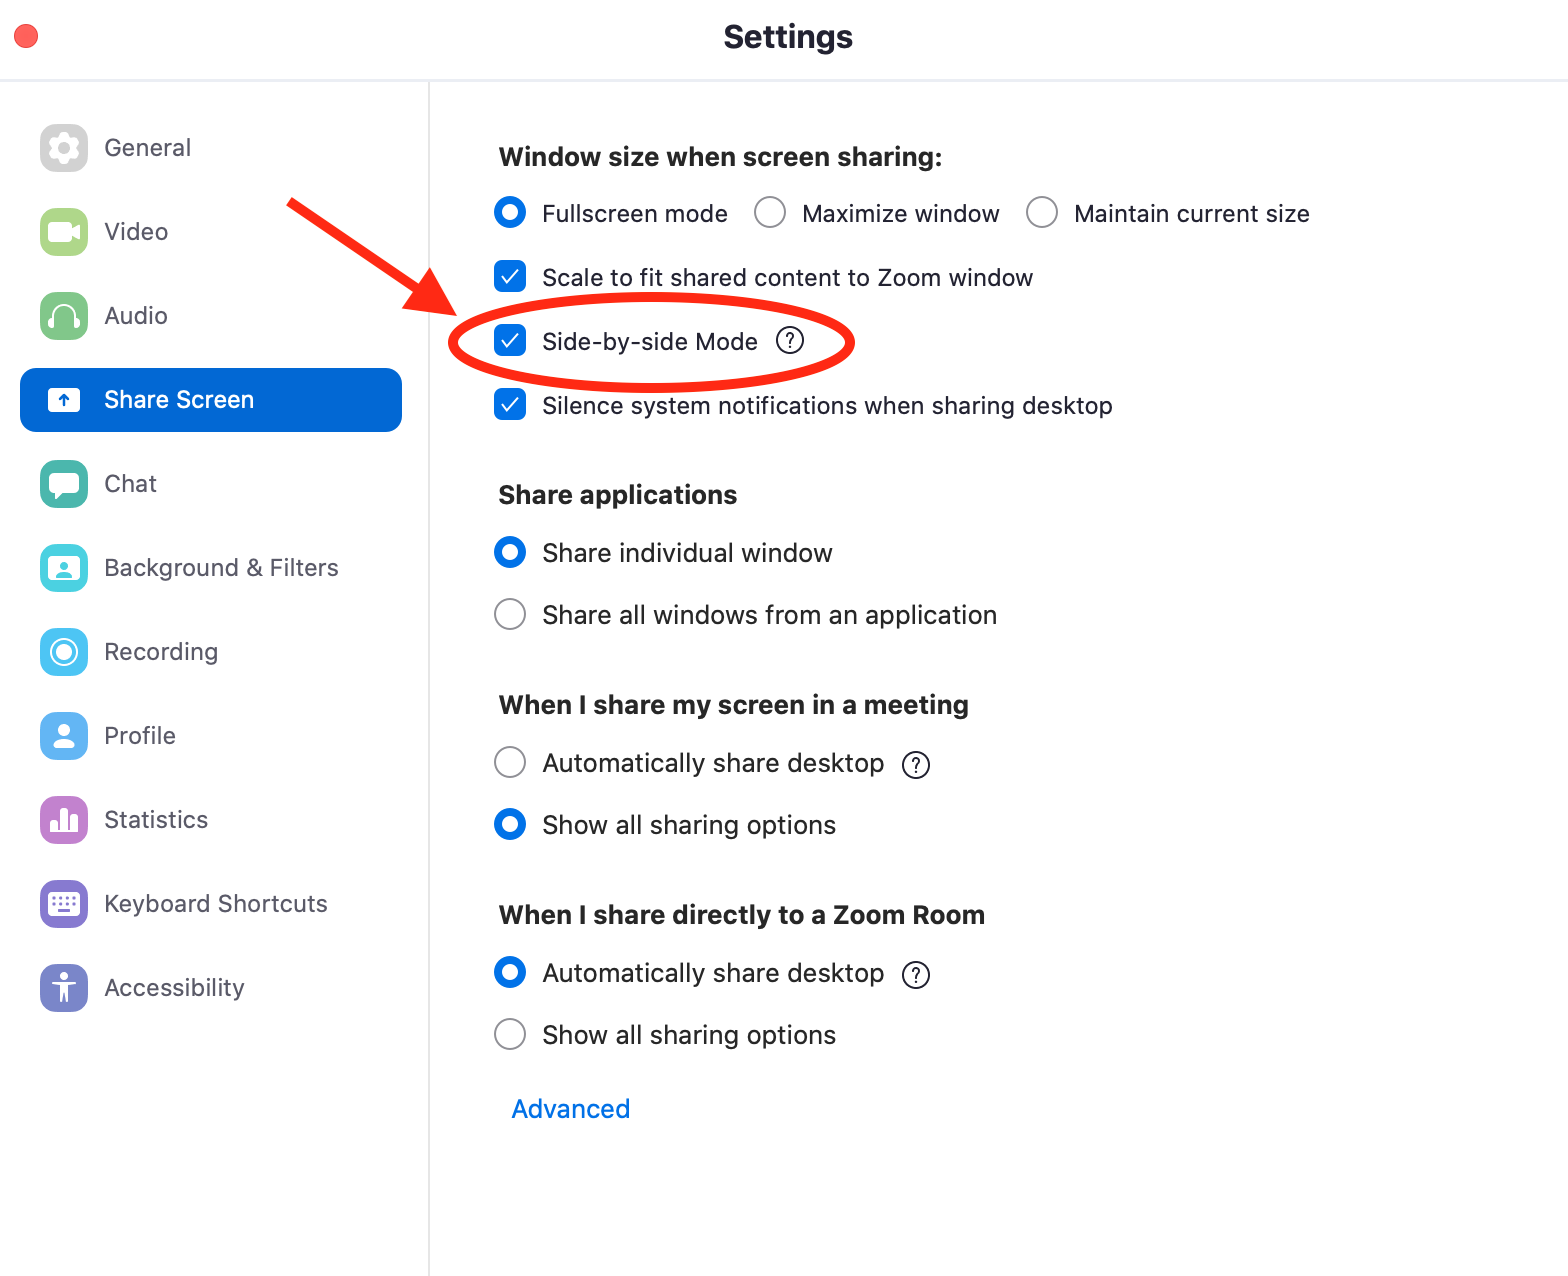
Zoom will now enter side-by-side mode in your app as soon as a meeting participant begins sharing their screen.
3. Skype
Compatibility: iOS, Android and PC
Price: Free plan, pay as you go plan or subscriptions starting at $3.59/month depending on calling location.
Type: Online side-by-side video recorder
Best for side-by-side video calls or meetings
Another popular side-by-side video call tool, Skype is a free way to record video and audio files in the cloud. Many podcasters and content creators use Skype for their remote interviews, since it’s free and easy to use.
However, keep in mind that because Skype was designed primarily for use as a video call tool, not a recording software, there are a few drawbacks to recording content with Skype. Like Zoom, Skype compresses your video and audio files, meaning the end result will be of a lower quality than if you’d used a professional recording software.
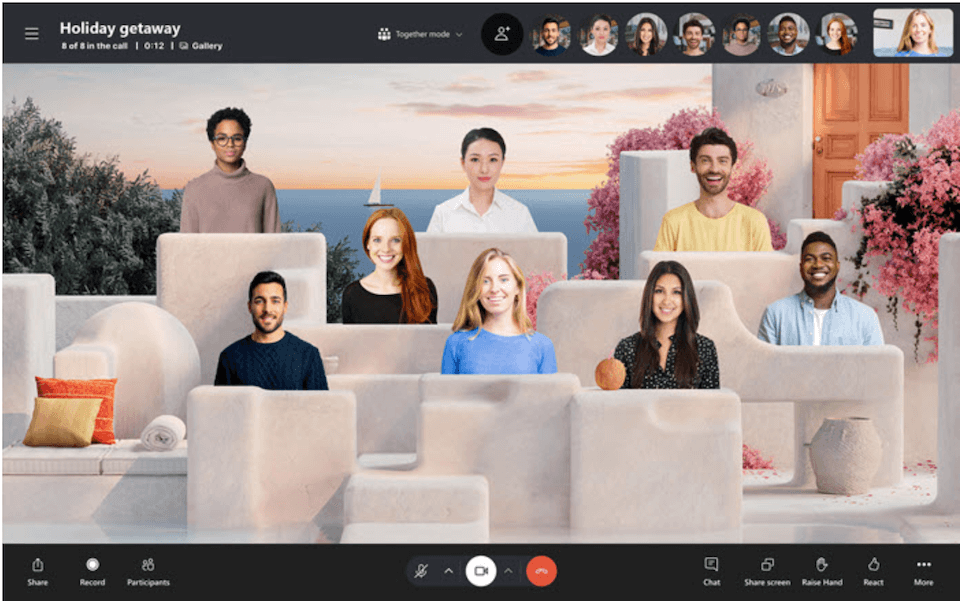
If you’re using Skype to record video, you can choose from various participant views—including Grid (or Large grid) view, Speaker view, and even Together mode, which places your participant video feeds into a virtual space to make it look like everyone is in the same room.
For your purposes, you’ll probably want to use Grid mode. To switch views in Skype, simply select the Call layout button and select the view mode you’d like to use during your video call.
4. Discuss.io and other Corporate-Focused Interview Apps
.png)
Compatibility: iOS, Android and PC
Price: Customized pricing
Type: Online side-by-side video recorder
Best app for recording interviews and video conference in a side-by-side layout for corporate or private use.
Not everyone wants to record interviews for publication on podcasts or a YouTube channel. Sometimes, you need to record an interview for internal use, such as recruitment, marketing research, or staff meetings.
One great option is Discuss.io, a video conferencing tool and smart video platform used for market research, meetings, and video creation. The platform also offers a mobile screen sharing app that was designed primarily for customer conversion campaigns, but can be used by content creators as well.
If you’re creating a side-by-side presentation video, Discuss.io can record the presenter’s face while capturing their mobile device’s screen as well—including letting the audience see where the presenter is tapping on the screen and how they navigate their device in real-time.
To use Discuss.io for your split-screen video creation, simply download the app from iTunes, Google Play, or the app store of your choice, enter a secure code to join a presentation, and share your screen with the virtual meeting room to begin the presentation.
There are plenty of corporate-focused SaaS tools out there if your split-screen video needs are less public-facing. Many tools incorporate useful functionality for teams.
For instance, if you’re looking for video apps to conduct recruitment interviews with a split screen, Interviewer.ai and MyInterview are both top-rated tools that combine smart pre-screening, data-sharing, and video conferencing in one app.
5. iMovie
Compatibility: iOS an d Mac
Price: Free
Type: Side by side video editor for iPhone
Best as a free split screen video editor app on iPhone and Mac devices
If you want to use Apple devices to create side-by-side videos, iMovie is a great choice. It’s a free app that lets users record, edit, and publish their videos all in one place. Even more importantly for our purposes, iMovie supports split-screen options—though its editing functionality is not as advanced as many professional creators require. Professional users often find themselves switching to Final Cut Pro X, Apple’s more advanced editing tool.
In order to create a side-by-side video on iPhone you can follow these steps on making a split-screen effect in iMovie, simply:
Step 1: Select a portion of a video you’d like to clip. Drag it above a clip in your timeline until you see a green + icon, and then release the mouse button.
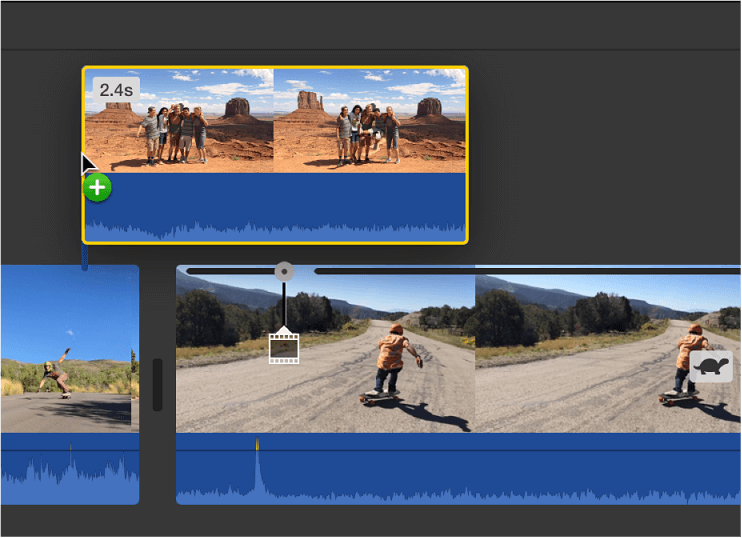
Step 2: Click the Video Overlay Settings button to show the video overlay controls

Step 3: In the pop-up menu on the left, select Split Screen. The two videos will appear side by side, and the split screen menu will be displayed at the top.
.png)
6. Filmora Video Editor
Compatibility: iOS, Android and PC
Price: Plans start at $49.99/year
Type: Side-by-side video editor software
Best for editing with side-by-side video
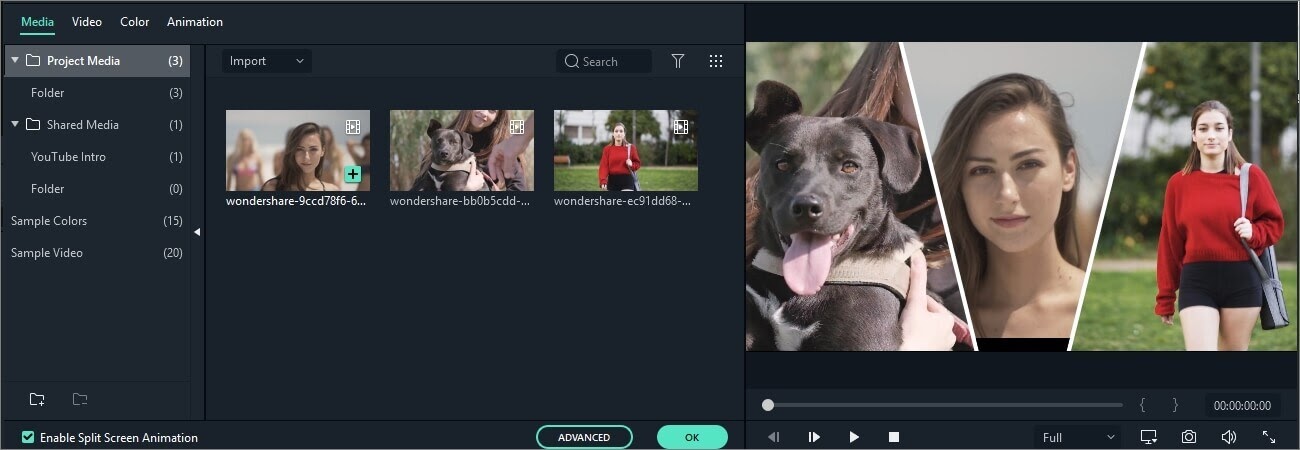
Wondershare Filmora is a highly popular and user-friendly video editing software. You can use Filmora to import audio, video, or pictures and edit and arrange them on a custom timeline. You can also add effects and filters, as well as music and graphics, before sharing your creation to social media or exporting it in all the common video formats.
To create a side-by-side video in Filmora, select the Split Screen tab to choose from several layout templates. Pick the one you want and drag it into the video track on your timeline.
.png)
Double-click the Split Screen effect in the timeline to make edits to it. You can adjust the length of your split screen effect, as well as drag and drop video clips into the split screen window of your choice.
7. Movavi Video Editor
Movavi is an easy-to-use video creation and editing tool that lets you create videos and clips without an overwhelming number of advanced options. The platform has a minimalistic interface and lets you either import video or record it directly from the app. You can also include transitions, filters, and various video collage elements such as picture-in-picture effects and split-screen videos.
To use Movavi as a split-screen video editor:
Step 1: Upload or create the video footage you’ll be using.
Step 2: Select one video and drag it above the Timeline to create an Overlay Track above the main Video Track.
%20(1)%20(1).png)
Step 3: Double-click the overlay track to enter editing mode.
Step 4: Above the Preview window, select Side by side. Select which window (left or right) you want the overlay track to fill.
%20(1)%20(1).png)
How To Make A Side-By-Side Video
The exact steps needed for recording a split-screen video varies depending on the tools you’re using. But the basic process can be broken down into three parts:
1. Record and Import Your Videos
Take a video as you usually would using your favorite recording software. This may be the same software you’re using to edit the clips later, or it may be a different tool.
2. Resize and Arrange the Videos into the Proper Format
Using your video editing tool of choice, play with the two videos so that their size and placement meets your creative vision. This is the step where you make sure both videos fit together well on a single screen.
3. Edit the Audio Track
Visuals aren’t the only component to your video! In the last step, you’ll want to make sure the audio sounds right to you. You’ll probably do one of the following:
- Play the audio from only one of the videos
- Mix the audio from both videos in a way that isn’t distracting
- Select a completely different background music to play over the video collage
Read More: How to Make an HD Split Screen Video
How Do You Split a Screen To a Side-By-Side Layout On a Video Call?
While you may prefer to record two videos separately and merge them together with a side-by-side video editor, in some cases you’d rather record like this directly live. This may be especially the case if you’re recording an interview.
As mentioned in our list various online calling software gives you the option to choose a side-by-side layout. You can do this in video conferencing software like Zoom or Skype, but also in dedicated high-quality remote recording software like Riverside.
All you have to do is:
- Download a compatible side-by-side video maker and recorder
- Adjust your layout settings (this will differ depending on your software)
- Record your video side-by-side
- Save your recordings and edit them for publishing.
Recording a call and want to only focus on the current speaker talking? Create side-by-side videos with Riverside's Shared and Split AI to do this at the click of a button.
Using Side-by-Side Video Apps Effectively
The ability to create a split-screen video opens up a world of creative possibilities. Whether you’re recording a remote video interview, compiling a tutorial or how-to video, or conducting a market research interview video, side-by-side functionality is endlessly useful.
That’s why it’s so important to have recording and editing tools—with key features such as split-screen video—in your arsenal. Riverside is your one-stop software for professional-quality, user-friendly audio and video recording. Start recording for free today!
FAQs on Side by Side Video Apps
Is there an app to put two videos side by side?
As covered above, there are many apps that can join two videos side by side. Some apps that you can use to put videos together include:
- Riverside
- iMovie
- Flimora
- Movavi
Go over our list above to learn more.
How do you put videos together side by side?
To create a side-by-side video you can use an app that puts videos together. We’ve covered this above, but all you’d have to do is:
- Download or sign into your side-by-side video app
- Record your two videos
- Merge them together into one split video with your side-by-side video creator.
Note that some side-by-side software also lets you record directly with a multi-screen view. This is usually the case for interview or guest-based video calling software where it’s best to have a split-screen view with you and your guests.
How do I combine two videos into one screen on my phone?
To combine two videos into one screen on an iPhone or Android, you’d have to follow the same steps as if using a PC. The only difference is that you would have to use side-by-side video apps compatible with Android or iOS.
For iOS devices, you can always use iMovie which is a free side-by-side video editor. If you’re an Android user, you can Riverside, Flimora or any of the above options besides iMovie.
How can I record a side-by-side video interview remotely?
You can easily record a side-by-side interview remotely with Riverside. We’ve covered how to in the article above, but to summarize follow these steps to record a side-by-side video remotely:
Step 1: Login to Riverside and choose an existing studio or create a new one.
Step 2: Invite your remote guests and enter your studio.
Step 3: Start recording your remote side-by-side video interview and stop when you are done.
Step 4: After your files have uploaded, go to the editor to choose which side-by-side layout suits your video best.
Just like that you’ve created a side-by-side video with Riverside. This platform is best for remote recording interviews as it offers local recording. Local recording captures everything directly on your and your participant’s devices so that no internet connection gets in the way of high-quality recordings.
How do I put videos side by side in PowerPoint?
Creating a side-by-side video layout on Powerpoint is simple. Follow these steps:
Step 1: Open your PowerPoint Presentation and select the page you’d like to add your side-by-side video to.
Step 2: Insert each video into the presentation. To do this select the Insert menu tab and then Video. Choose the video you want to add and then repeat the same process for the second video.
Step 3: Adjust your videos’ size and drag them around to lay them out as you’d like.
Step 4: If you’d like them to play at the same time in your presentation, go to the Animations tab and under the timing section click the Start drop down menu and select With Previous.
You should know have a side-by-side video in your PowerPoint presentation.
If you’d like to record a PowerPoint presentation while recording your own video as well, we suggest using screen recording software like Riverside. This will let you screen share your presentation and record it simultaneously with your video and audio.


