Table of contents:
How to remove background noise from video or audio with AI
How to remove background noise during a recording session
How to remove background noise in post-production
How to remove background noise while exporting a file
How to remove background noise from video on a phone (iPhone & Android)
Why choose Riverside to remove noise from your audio online?
TL;DR
- Background noise comes in many forms. It can be a buzz, murmur, hiss or high-pitched sound, and it can make your audio sound blurry.
- You can filter background noise during a recording, or use a tool to remove it during editing or when exporting.
- Riverside offers AI-powered background noise removal features, which means no manual cleanup during post-production.
Background noise can be annoying, but it is by no means permanent. In fact, new AI-powered tools make background noise removal easier than ever.
This article will walk you through how to remove background noise from your audio or video, and clear up the quality of your audio tracks.
How to remove background noise from video or audio with AI
Background noise is any unwanted ambient sounds in your video recording's audio such as a buzzing, a hum, or a high-pitched tone. It includes pops and crackles originating from plosive sounds and electrical equipment.
Can you remove background noise from a video? Yes! Removing background noise from your videos is easy with the right background noise removal tools. In fact, Riverside uses AI to help clean up unwanted noise automatically.
There are several ways to set it up, so let’s start with the first one.
How to remove background noise during a recording session
The best way to handle background noise is to prevent it from being recorded in the first place. By enabling Riverside’s Noise Reduction setting during your session, you can apply a filter that minimizes unwanted sounds, such as a participant’s computer fan or ambient noise from the room.
This filter works across all participants' tracks during the recording, targeting frequencies that are too high, too low, or outside the typical vocal range. The tool’s impact on spoken vocals will be negligible, and only ambient noise will be filtered out.
Here’s how to set it up.
Step 1: Start a new recording session
Log into your Riverside account and, from the left sidebar, select your Studio. To create a new one, click the “+” (plus) button on the top of this sidebar.
From here, click on the “Record” button at the top of the screen to start a new recording session.
.webp)
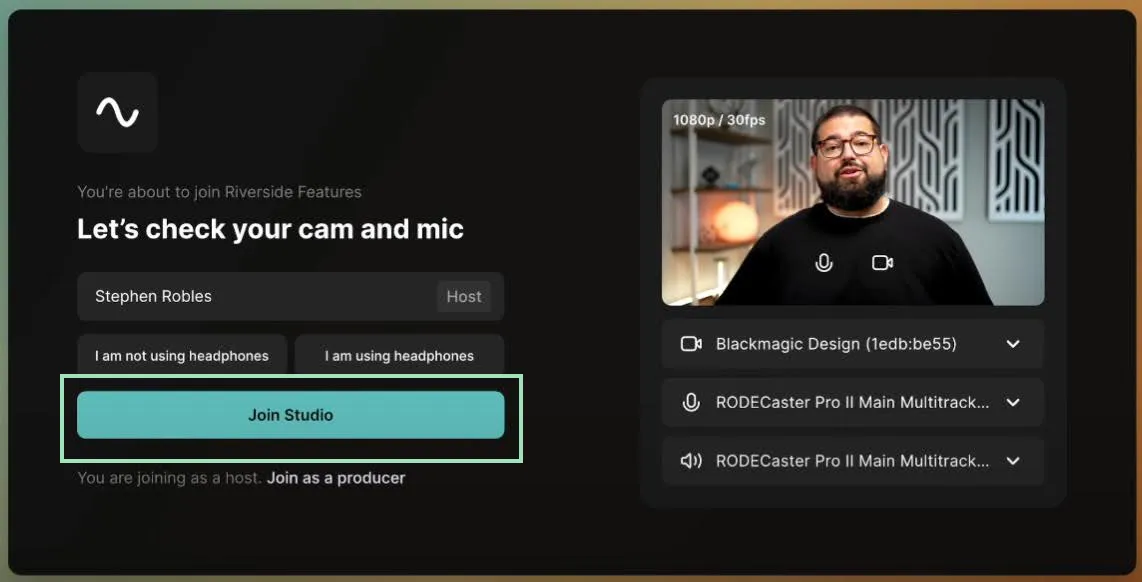
In the lobby, select your camera, microphone, and speaker output. Select whether you’re using headphones, then click on “Join Studio” to enter the recording studio.
Step 2: Turn Noise Reduction on (during a recording)
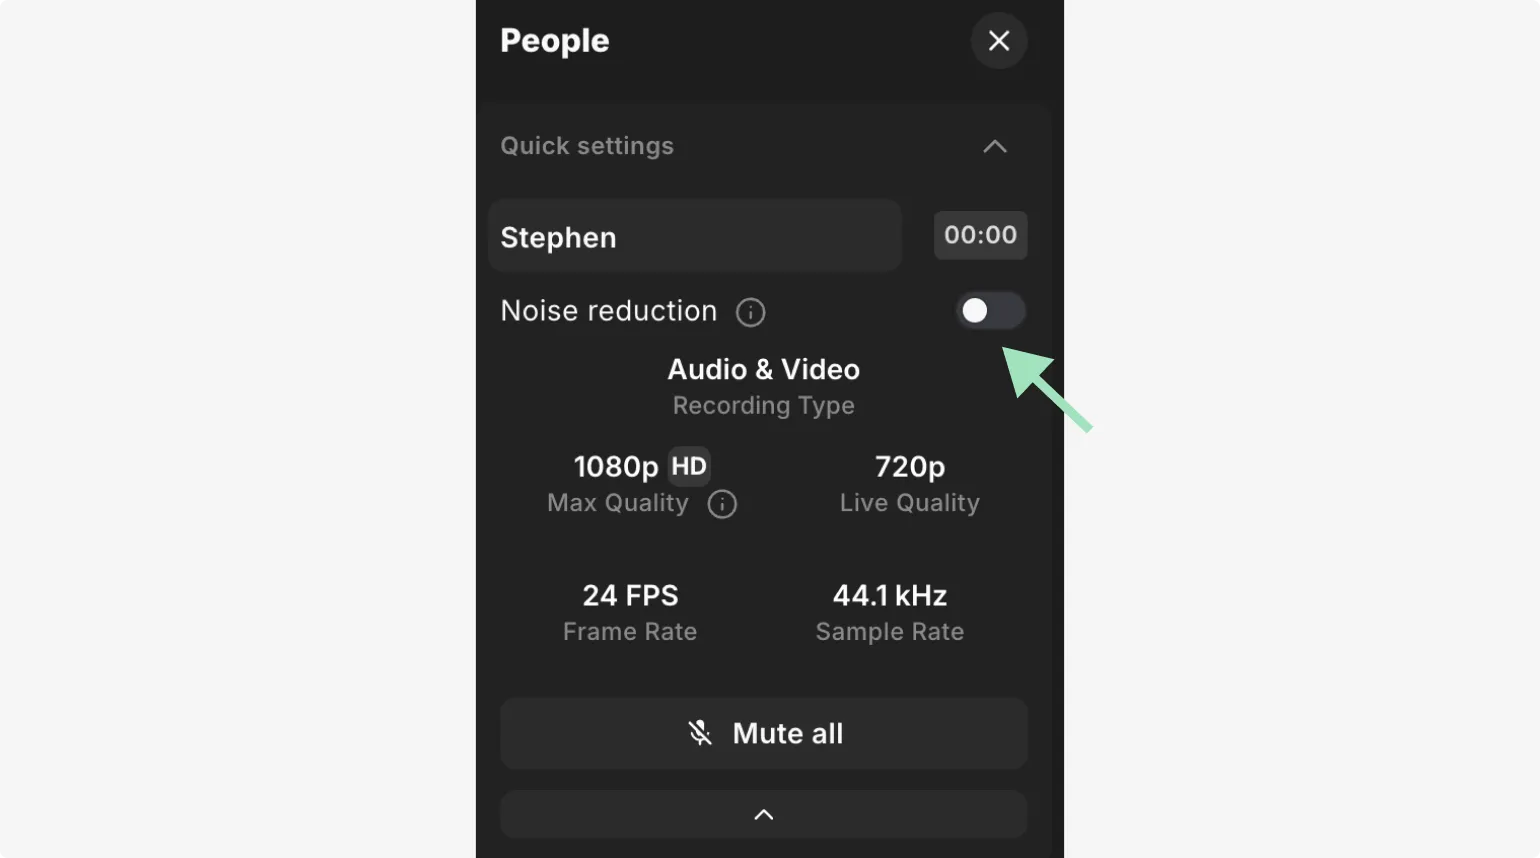
Once in your Studio, click on the “People” icon on the right to open the sidebar. Here, under “Quick settings” you can turn on the “Noise reduction” button for each participant.
Step 2b: Turn Noise Reduction on (during all recordings from that Studio)
If you prefer, you can enable automatic noise reduction for all future recordings in that Studio. From your dashboard, hover on the Studio’s name on the left bar, and click on the three dots ••• that appear.
Select “Settings,” then scroll down to the “Audio” section on the new page.
Here, toggle on the “Noise reduction” button. This will enable automatic background noise reduction for all future recordings in that Studio.

How to remove background noise in post-production
Notice persistent background noise? Or, do you want to fix a low-quality audio or video recording? You can clean it up directly in Riverside’s video editing software.
You can do this for audio and video you’ve recorded in the Riverside studio or upload your own content.
Step 1: Open your project in the Riverside editor
From your Riverside dashboard, click on the relevant Project.
Hover over the recording you want to edit, then click “Edit” to open the editor.

Step 2: Apply Magic Audio to all tracks
Magic Audio is an AI-powered feature that enhances sound quality through automatic equalization, echo cancellation, and background noise reduction.
Click “AI Producer” from the toolbar on the right. Then, select “Magic Audio” and click “Apply.” Magic Audio will be applied to all audio tracks in the recording.
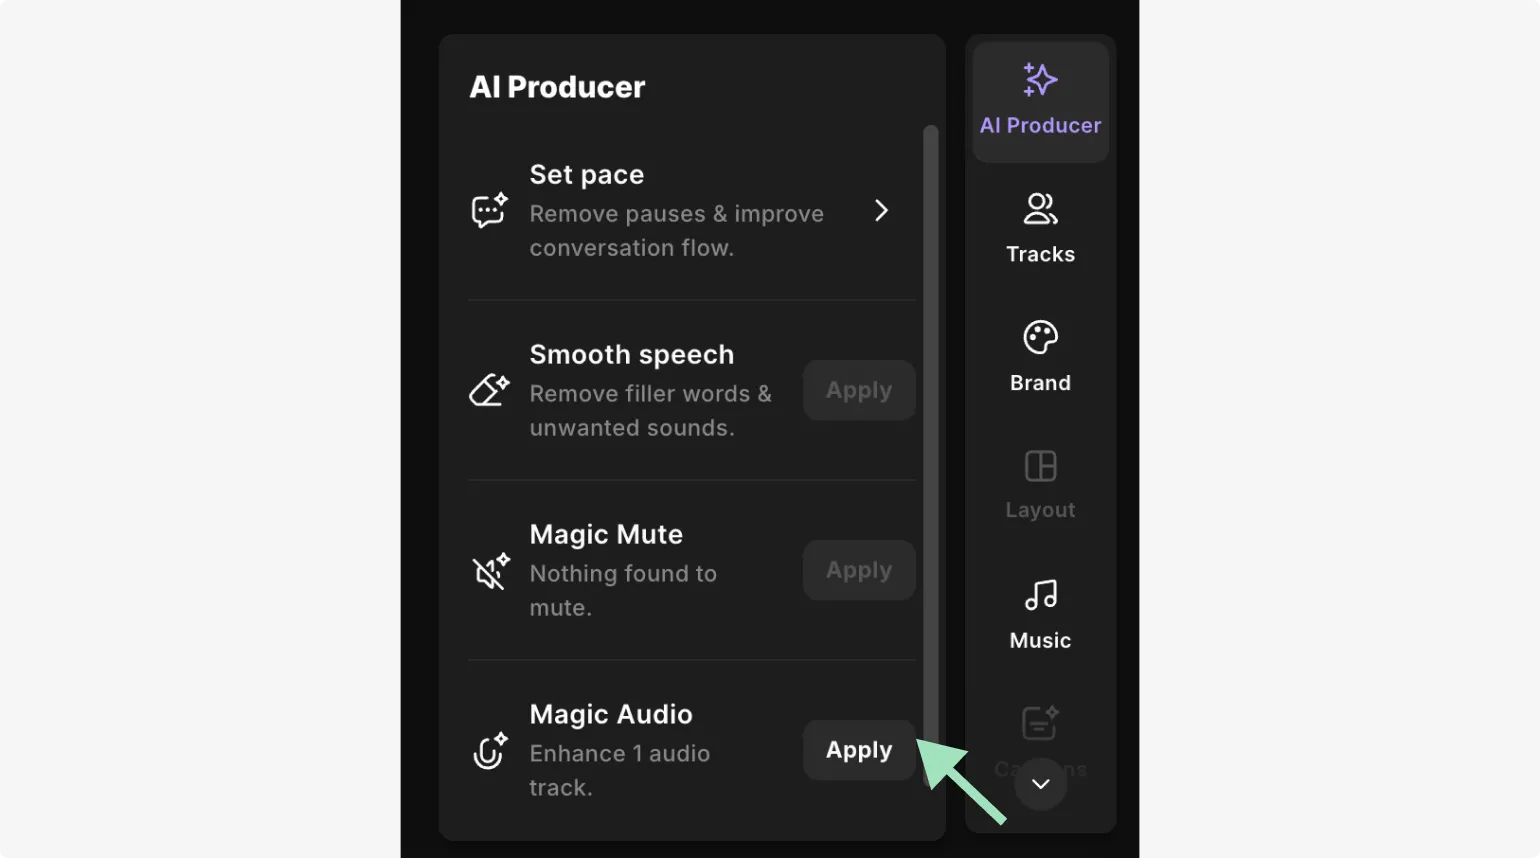
If you're not satisfied with the results, you can revert to the original version by clicking “Revert to original.”
Step 2b: Apply Magic Audio to individual tracks
For more precise editing, you can apply Magic Audio to individual tracks instead of all of them at once.
In the editor, click “Tracks” from the toolbar on the right.
Here, select the track you want to improve, expand the details, then click the toggle next to “Magic Audio.”
How to remove background noise while exporting a file
If the background noise is steady or continuous, like an air conditioner or a fan, you can simply get rid of it by applying audio processing as you export the file.
Step 1: Finish your edit and click Export
In the top right corner of the Editor, click the purple “Export” button.
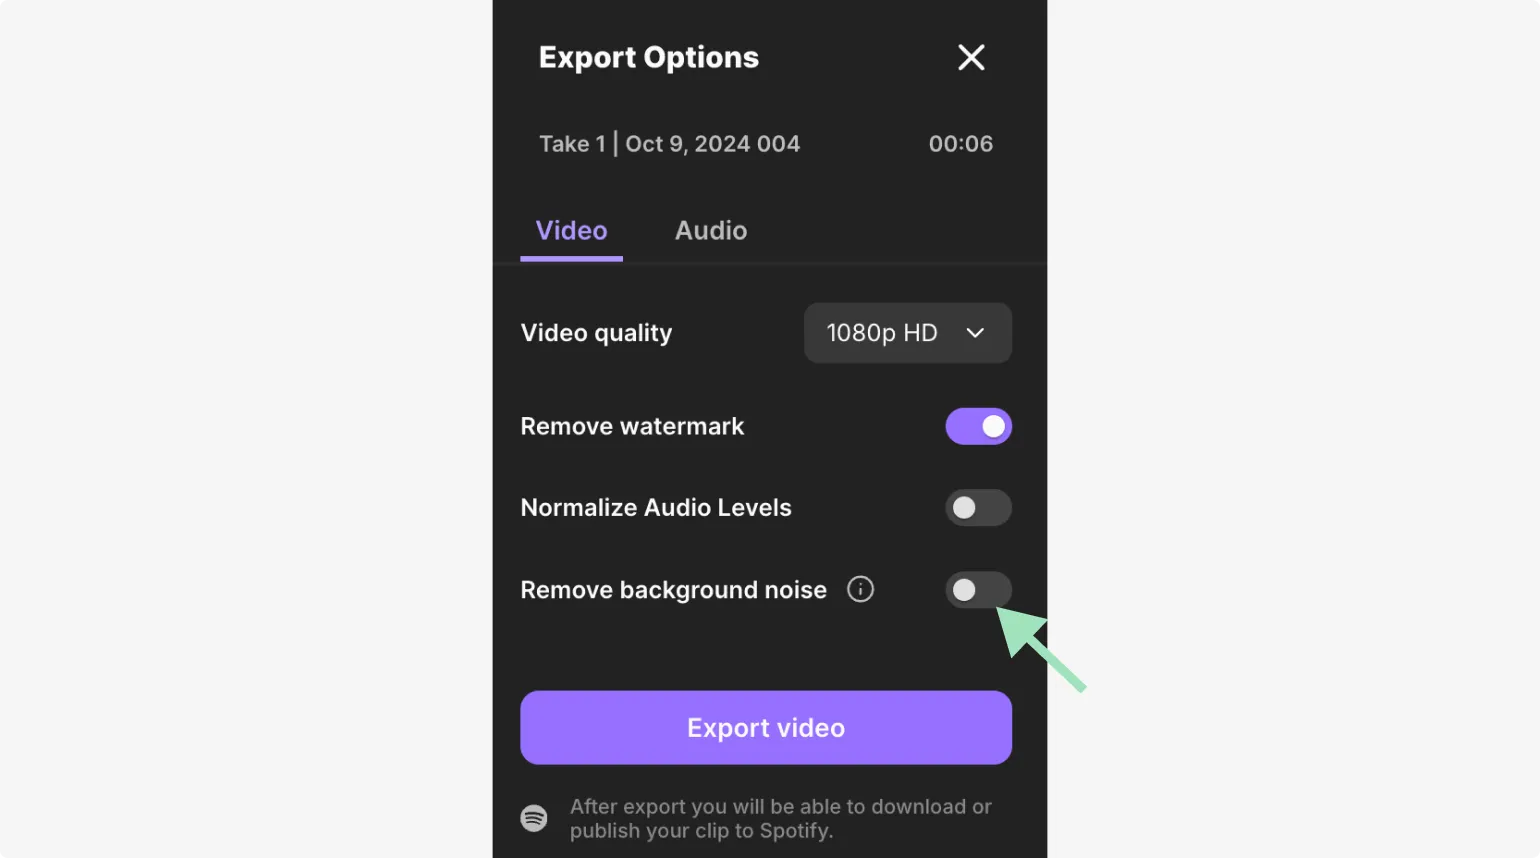
In the “Export Options” dialog box, toggle on “Remove Background Noise,” then on the purple “Export video” button right below.
How to remove background noise from video on a phone (iPhone & Android)
With Riverside’s mobile app, you can easily clean up your audio recordings and remove background noise from your videos on the go. Whether you're using an iPhone or Android device, Riverside’s background noise removal feature is right at your fingertips, available directly within the built-in app editor.
Step 1: Open the Riverside mobile editor
Login into your Riverside mobile app. From your dashboard, select the audio or video recording you want to edit.
In the new window, click on the purple “Create new edit” button to access Riverside’s mobile editor.
Step 2: Remove background noise while exporting
Click on the purple icon in the upper right corner of your screen to access the “Export” dialog box.

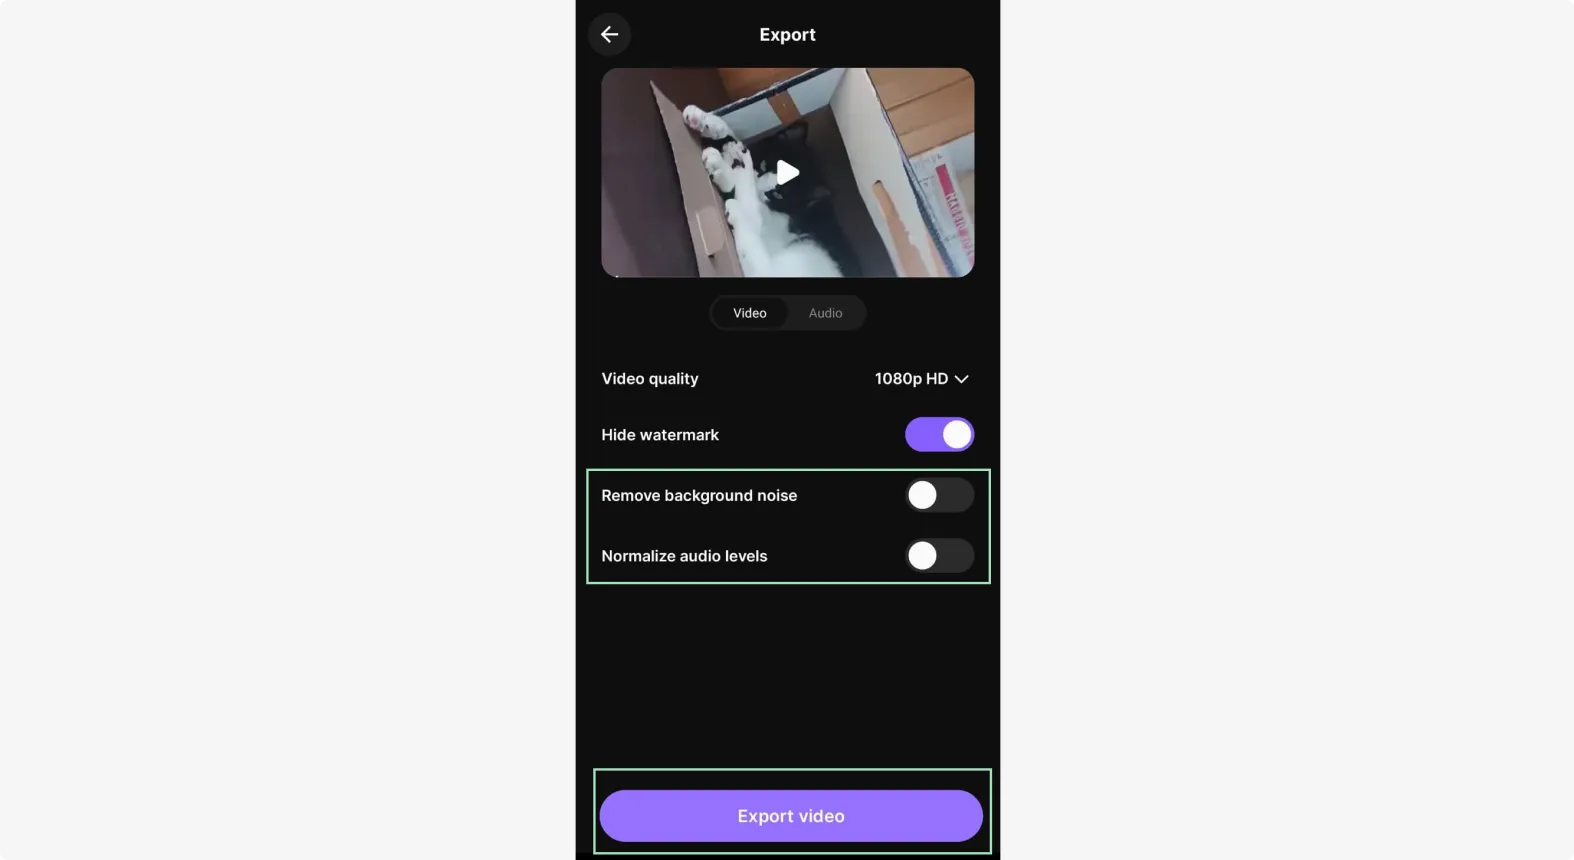
Inside the “Export” window, turn on the “Remove background noise” toggle on to clean up your audio. If you want to further refine the quality of your clip, you can also turn the “Normalize audio levels” toggle on.
Once finished, click on the purple “Export video” button at the bottom to export your file.
Why choose Riverside to remove noise from your audio online?
The right background noise removal tools and features are key to making your life as easy as it should be. That’s where Riverside can make all the difference.
Here are a few reasons to use Riverside to clean up your audio:
It’s really easy
Removing background noise on Riverside doesn’t require expert knowledge or know-how. In fact, all you have to do is toggle a switch.
Plus, you can enable background noise removal during your recording. This filter applies to both your live studio audio and each participant’s recording.
It’s super fast
With Riverside, you don't need to spend hours in post-production cleaning all your audio tracks. The AI-powered Magic Audio feature equalizes and normalizes audio, removes echo and unwanted environmental noise, and enhances the quality of all your tracks, so each person sounds crystal clear. Best of all, it does this instantly, cutting down editing time and saving you precious hours.
It uses the most advanced AI
Riverside's Magic Audio feature leverages the most advanced machine learning algorithms, trained on millions of hours of recordings. Even if you record with your laptop’s built-in mic, it’ll sound like you recorded in a professional studio.
It’s convenient
Riverside is browser-based so you can use it from any Windows PC or macOS computer. There’s also a mobile app for recording on the go on both iPhone and Android smartphones.
Plus, because Riverside allows you to record in up to 48 kHz audio, it helps provide everything you need to create the highest quality recordings in one place.
FAQs on how to remove background noise from video and audio
What apps remove background noise from videos?
You don’t need to add another app to your recording and editing workflow. Simply use Riverside’s native background noise removal tools as part of your existing content creation process.
Does noise cancellation remove background noise?
Riverside’s noise cancellation feature uses advanced algorithms to reduce or eliminate unwanted background sounds. It can filter out steady environmental noise, such as a fan, electrical interference, or distant traffic noise, ensuring crystal-clear audio for all participants.
Is there a way to block out background noise?
The most obvious answer is to record in a quiet place. However, if that’s not possible, you can use Riverside for free to block out background noise while you’re recording, so you don’t have to edit it out during post-processing. You can also enable automatic noise removal by default for all future recordings in your Studio.


.webp)


.webp)
%20(1).webp)


