.webp)


Table of contents:
Podcasts are more popular than ever—which means competition for listeners is fiercer. To be successful, podcasters must be as creative as possible with their format and content.
No matter where you are or the format of your show, you need high-quality recording. You might be hitting the streets interviewing passersby—or you might be in another country where you don’t have all of your normal recording equipment with you. And if you’re on a tight budget, phones make it possible to pursue your creative passion, even if you can’t afford a laptop.
Those are just a few reasons why creators record podcasts on their phones.
Whether you want to take your show on the road or finally chase your podcasting dreams, this step-by-step guide to recording a podcast on your phone is the perfect place to start.
Can you record a high-quality podcast on any phone?
All modern smartphones have the bare bones required to record a high-quality podcast.
Their built-in cameras can record at least 720p video resolution—the industry standard for high-definition video. Androids and iPhones have a free built-in voice recording app useful for audio-only podcasts.
Technically, you can even use your phone’s built-in mic for podcasting—but we don’t recommend it.
Among other problems, these mics tend to pick up unwanted background noise and emphasize plosive sounds like “p” and “d” when you’re speaking.
Fortunately, you don’t have to spend top dollar to get a high-quality podcast mic for your phone. For example, the compact, plug-and-play Movo PM10 is only $14.95 on Amazon at the time of this writing.
With nothing more than a small monetary investment, you can begin producing high-quality audio and video content on any smartphone.
Of course, with a more advanced podcasting setup comes the need for more video podcasting equipment.
What do you need to record a podcast on your phone?
The simplest way to record a podcast on your phone is to record audio-only, indoors, with no co-hosts or guests. But that doesn’t give you much scope for creativity, does it?
Below, we’ll list a few ways to optimize your phone’s recording quality in the most common podcasting scenarios. Then, we’ll tell you how to use your new portable podcast setup to get your creative ideas out into the world.
Hardware
Microphone
An external mic may be the most essential hardware for recording on a phone. And you don’t need to worry about lugging a bulky microphone around; there are compact, portable mics explicitly made for phones.
But how do you choose the best mic for your needs?
First, we recommend choosing a wired mic. They’re typically more reliable than wireless mics. We recommend a TRRS microphone. TRRS stands for tip-ring-ring-sleeve, referring to the makeup of the mic’s connector. You’ll know you have a TRRS mic if its connector looks like the image below.
If your connector looks like the image below (referring to the tip, not the black portion), then you have a TRS connector. Note that there are two black rings on the tip of the connector below, compared to the three black rings in a TRRS mic.

While TRS connectors will fit into your phone’s audio jack, they are incompatible with the audio systems of modern phones, so your audio will not work!
Finally, if you’re recording multiple people in the same room, it’s usually best if everyone uses a cardioid microphone. These mics only pick up sound directly in front of them, so your mic is less likely to pick up your co-hosts or guests. The mic in the image below is a great ultra-compact option!
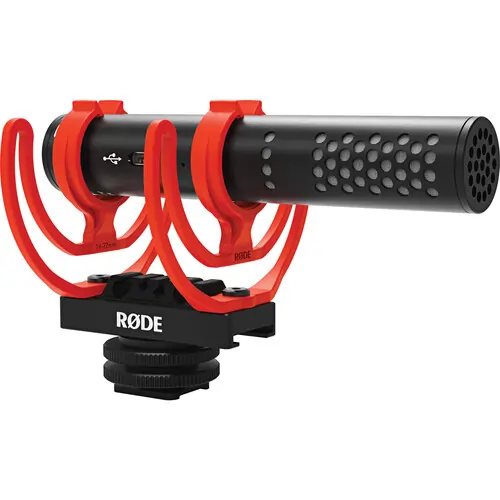
The microphone you choose depends on your studio setup, the content you’ll be recording, and your budget.
Learn more:
- Best External Microphones for iPhone & iOS Recordings
- Best Android Microphones For Podcasters & Video Creators
Adapters
That brings us to the next category of hardware you may need to record a podcast on a phone—adapters.
You probably already know that newer iPhones require a lightning to 3.5mm adapter if you want to plug in headphones. This is also true for other external audio devices like microphones.
An adapter will also come in handy if you already have a TRS mic and don’t want to buy a new one. Just get a TRS to TRRS adapter to ensure compatibility.
Headphones
If you’ve ever listened to a recording of yourself and thought, “Is that really my voice?!” then you’ll understand how important it is to know how you sound to your listeners rather than in your own head!
You can start with our guide to best headphones for podcasting.
Note that when recording on a phone, you may be unable to listen to yourself speak in real-time. A device simultaneously receiving audio and playing it back to the speaker is known as mic monitoring or sidetone. No matter which headphones you’re using, most phones simply don’t have the right technology for it.
To get around this, you’ll just need to do a short test recording and then play back the audio to detect any problems.
Splitter
If you’re using a wired mic and wired headphones, you’ll also need an audio splitter with a microphone and a headphone port. With a splitter, you can make a recording and immediately check your sound quality.
Audio Interface
Lastly, if you want to record multiple people in person on the same phone using separate mics, you’ll need an audio interface.
Like a mixer, an audio interface routes the audio signal between all your devices.
Simply plug each person’s mic, headphones, and any external cameras into your audio interface, plug the audio interface into your phone, and you’ll be ready to record!
That might sound like many devices pulling power from just one phone—and it can be. If you plug your audio interface into your phone and receive a “Cannot use accessory: This accessory uses too much power” error message, a simple solution is to buy an inexpensive powered USB hub like this one:
All you’ll need to do is plug your audio interface into the hub, plug the hub into a standard wall outlet, and plug your phone into the hub.
Software
Here you have two basic choices: record using your phone’s built-in tools or record using a third-party tool.
Record Using Your Phone’s Built-In Tools
You can use your phone’s built-in high-quality camera if you're recording a video podcast. And for those who want to record audio only without downloading new apps, both Androids and iPhones have built-in sound recording software—Sound Recorder and Voice Memo, respectively. These even allow you to do basic edits on your recording.
Keep in mind, though, that your recording quality is limited to the capabilities of that software. You’ll also have to figure out how to transfer your recording to your computer for uploading to editing or hosting software. (Audio or video recordings are often too large to simply send in an email.)
You may also have to convert your recording to a format compatible with your editing or hosting software.
If you want to avoid these inconveniences, there are free or inexpensive third-party tools that give you more robust features than your built-in apps and camera can provide.
Record Using a Third-Party Tool
A better way to make a podcast on your phone is to use an all-in-one recording, editing, and streaming software like Riverside.
Although the quality of your hardware will still limit your recording quality, Riverside can produce uncompressed, lossless 48kHz WAV audio and 4K video. You’ll feel like your viewers or listeners are right there in the room with you.
And unlike your phone’s built-in recording app, Riverside automatically uploads your recording to your Riverside studio so you don’t have to figure out how to send a large file from your phone to your computer.
Simply log in to your studio on any computer to edit your footage using Riverside’s text-based editor. You can use Ai transcriptions to edit and navigate through your content. Any text you delete in your transcript, automatically deletes the corresponding audio and video in your recordings. Plus, there's easy automated tools for audio-fine-tuning and customizing your video layout. With our Magic Clips tool, you can even create audio or video clips of your recording to advertise your show on social media, making it easier to promote your new podcast. It's as simple as clicking one quick button.
Key Features
With Riverside’s mobile app, you can:
- Record in up to 4K video resolution for crisp visuals
- Record lossless, uncompressed 48kHz WAV audio so your audio recording recreates your voice near-perfectly
- Create local recordings to each participant’s device so that no call participant’s internet problems affect the quality of the recording
- Record yourself and up to 7 co-hosts and guests
- Edit video recordings as easily as editing a text document with our text-based video editor
- Live stream your episodes to social media and YouTube for maximum audience engagement
- Capture separate audio and video tracks for each host and guest for full control in post-production
With Riverside’s mobile app, Android and iPhone users can produce studio-quality audio and video podcasts virtually anywhere they want to go. You can learn more about what we offer here or start recording to see how seamless podcasting with Riverside is.

How to Record a Podcast on Your Phone in 6 Steps (Android & iPhone)
Now that you know what equipment you need, let’s cover the steps required to record a podcast using your mobile device.
Step 1: Set Up Your Hardware
The first thing you’ll need to do is set up your studio, which includes all the physical aspects that should be in place before pressing “record.”
1. Choose Your Space
If you’re recording outdoors, find a place to sit or stand where you can interview passersby (or a spot that fits your podcast’s aesthetic).
If you’re recording indoors, choose a small room with as many soft surfaces as possible to prevent echoes. For remote recordings where your guest is in a different location, remind them of the same tips to optimize the sound quality on their end.
2. Optimize Lighting
If you’re recording a video podcast, set up your lighting system.
One of the most important lighting principles is to avoid backlit light by making sure the sun or other brightest light source is in front of you, not behind you.
If you record indoors, you can set up a three-point lighting system. This involves the strategic use of three lights:
- A key light as your primary light source
- A fill light to reduce shadows and keep the video subject(s) from looking flat
- A backlight to create visual depth
Similar to the image above, set up the key light and fill light in front of you, both at 45-degree angles from you, with the key light twice as bright as the fill light. Then put the backlight behind you and at a 45-degree angle from you, making sure it is also dimmer than the key light. Then you’re all set!
3. Set Up Mics, Headphones, and Cameras
Next, plug everything in—don’t forget those adapters—and ensure each host and guest has their own mic and headphones.
If you’re recording in person with one or more co-hosts or guests, minimize interference by enabling echo cancellation and telling everyone to mute their mic when they aren’t speaking.
If you’re recording video, choose your camera setup. You could set up just one camera with everyone in the frame, or you could have a dedicated camera for each host and guest.
Don’t forget to ensure all your devices are plugged in or charged and have sufficient storage space for your recording.
Lastly, be sure to test device compatibility and the quality of your audio and video (if applicable) before beginning your recording by recording a short test clip.
4. Check Your Internet Connection
If you’re recording a remote podcast or streaming while recording, you’ll also want to ensure you have a strong internet connection.
If you’re indoors, you can ensure a strong internet connection by using an Ethernet cable instead of Wi-Fi or moving close to your router. If you’re outdoors, ensure you have a strong cell signal and plenty of data on your phone plan.
Step 2: Set Up Your Software
After setting up your studio space, you’ll need to set up your recording software. Follow these steps to record a podcast on your iPhone or Android using the Riverside mobile app.
1. Download Riverside's mobile app and create an account
After downloading the app, you’ll see the screen in the image below. This is where your podcast guests would access your show.
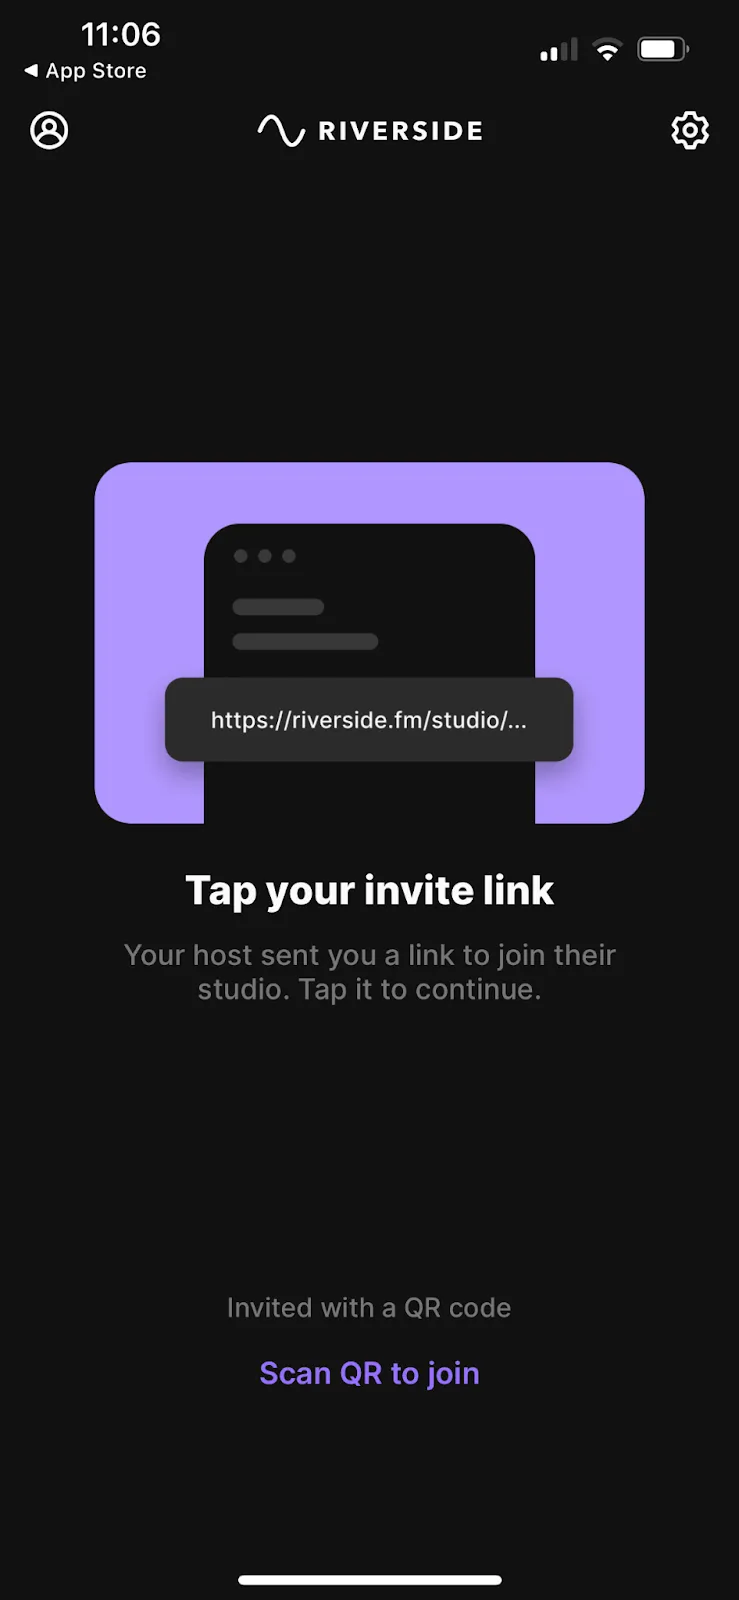
To create an account and begin recording as host, swipe left, then tap Sign Up at the bottom of the screen.

2. Set up a studio
Once you’ve created an account, tap Create a studio, then choose a name for your studio.
You can give your studio your name, your company’s name, or the name of your podcast!
3. Record a test clip
Enter your studio by tapping on the studio name at the top of your screen. You’ll be taken to your studio’s lobby.
Tap Join at the top right of the screen to enter your studio.
Once in your studio, just hit “REC” at the top left to begin recording. After the recording begins, “REC” will be replaced by the time elapsed.
When you’re finished with your test recording, hit the red phone icon in the top right to end the call.
4. If needed, send your guests a link to join your studio
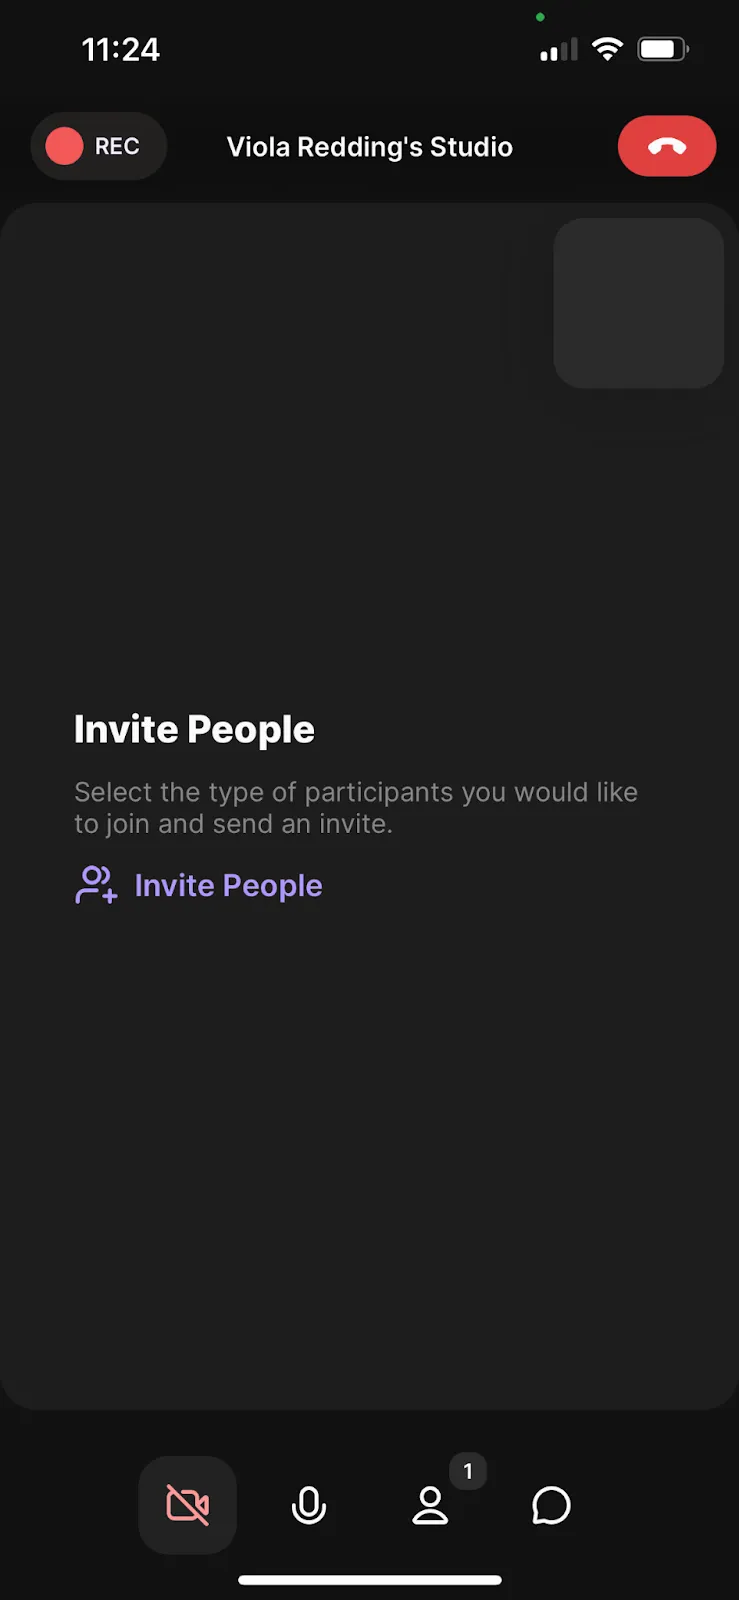
If you’ll have guests on your episode, you can send them an invite link straight from your studio by tapping Invite People.
You can also do this from your Riverside home page by tapping the three dots beside the name of your studio. Then choose Send guest invite.
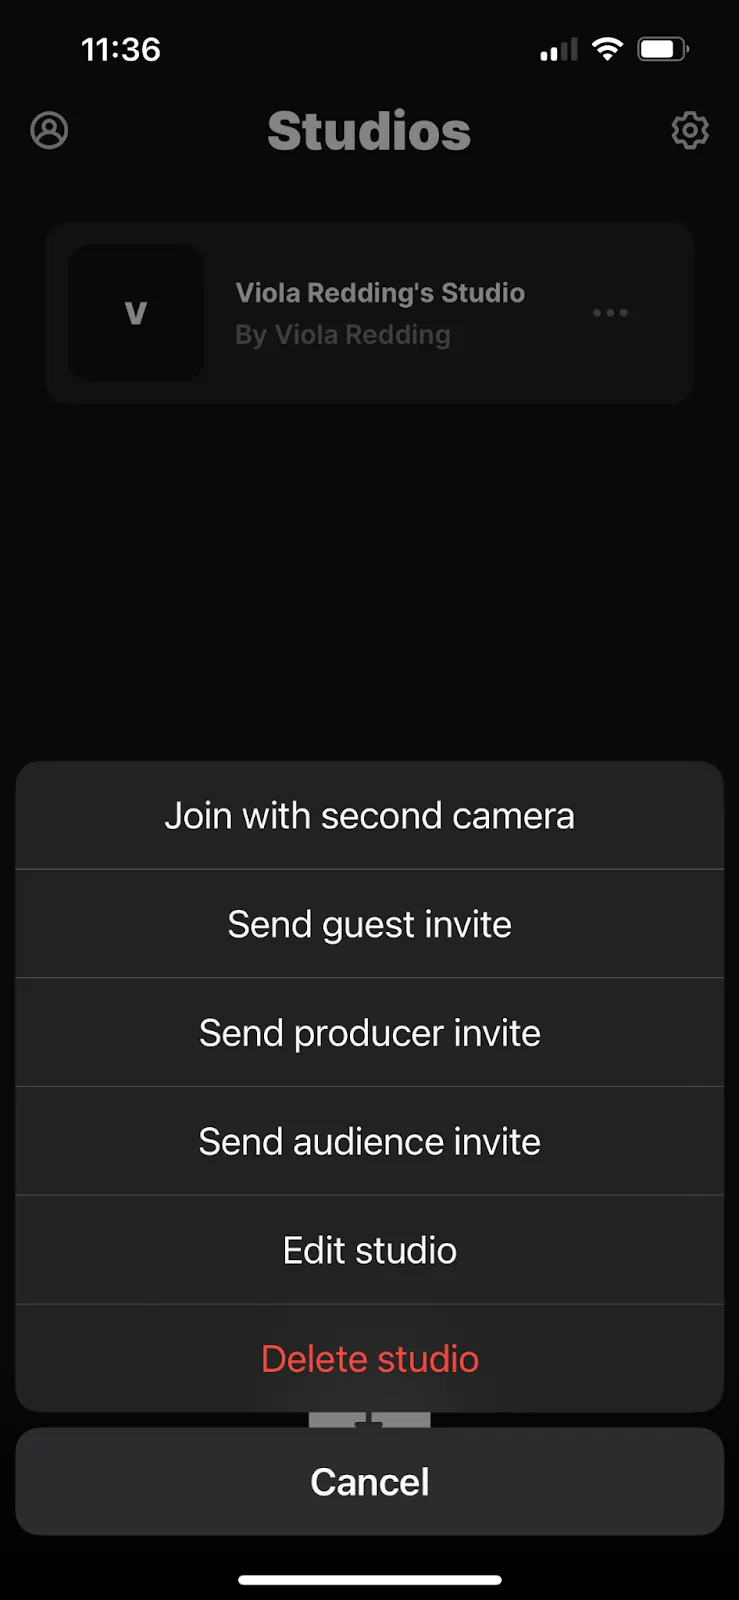
Note that you can also invite a producer or audience member. Neither will be recorded, though you can choose to record audience members who call in with a comment or question.
For more detail on software setup, take a look at our Best Practices for Recording on a Mobile Device.
Step 3: Record
Now, just hit record and enjoy the conversation!
Here are a few tips for achieving a high-quality recording:
- Rehearse what you plan to say before filming
- Sit or stand with good posture
- Maintain a relaxed demeanor
- Speak slowly, conversationally, and with consistent volume
- Be intentional about avoiding filler words such as “um” and “like”
- Maintain a distance of 2–12 inches from the microphone
Step 4: Edit
If you're new to editing, or just want to save yourself a ton of time, it's worth starting off your editing workflow with Riverside's text-based editor. You can trim and cut your video as easily as editing a text document, so no matter your skill you can create precise cuts fast and seamlessly. Our Ai transcriptions come in over 100 languages and give you the freedom to simply delete text in your transcript, and watch the corresponding video or audio cut from the actual recording. You can also use these transcripts to search through your video without rewatching anything.
If you'd like more complex editing features, you may need to turn to tools like Adobe Premiere Pro. Premiere pro is one of the most popular dedicated editing apps on the market—but if you’d prefer a scaled-down, more beginner-friendly version, try Adobe Premiere Rush.
While editing will look different depending on the software you’ve chosen, for an overview we recommend our article on Podcast Editing: How to Do It In 10 Steps (Complete Tutorial).
Step 5: Upload Your Recording to a Media Host
At this point, you finally have a finished podcast—congratulations!
All that’s left is to get your creation out into the world. To do that, you’ll first need to upload your recording to a podcast-hosting site. You can choose any of the apps we mentioned earlier; just make sure your recording is in a compatible format.
In addition to storing your files, podcast hosting sites also prepare your RSS feed. An RSS feed is a file containing continually updated information from a website. In this case, that information is the new podcast episodes you’ve recorded and uploaded.
Without an RSS feed, podcast directories—and thus your listeners—would never know when you release new content.
Step 6: List Your Recording on Podcast Directories
When publishing your first episode, you’ll need to send your RSS feed to podcast directories manually. The process varies by directory, but it’s typically as easy as copying your RSS feed and pasting it into a text box on the directory’s website.
After you’ve done that once, every time you click “publish” on a new episode, your hosting app automatically updates your RSS feed and pushes it to your chosen podcast directories.
You should submit your RSS feed to as many directories as possible, but especially the following:
Read more: Ultimate Podcast Directories Guide: Where to Submit Your Show.
FAQs on How to Record a Podcast on Your Phone
What is the best app for recording podcasts?
Riverside is the best app for recording a podcast on Android or an iPhone!
It’s an all-in-one recording, editing, and streaming app compatible with both Android and iPhone. Riverside records lossless, uncompressed 48kHz audio and 4K resolution video and automates mundane editing tasks for you, making it easy to create professional-quality podcast episodes from your phone.
Do you need a mic to start a podcast from your phone?
While you could technically record a podcast using your phone’s built-in mic, we recommend purchasing an external mic for better audio quality.
Need help choosing a mic? Check out our guide to the 9 best podcast microphones for every need and budget.
Can you record a video podcast on your phone?
Most modern phones have cameras capable of recording in HD, so yes, you can record a video podcast on your phone!
However, most phones’ built-in mics are not as high-quality as their cameras, so we recommend getting an external microphone for professional sound.
Can you record a phone call for a podcast?
There are a few different ways to record a phone call for a podcast. You can use a video call recording app like Rev Call Recorder or Google Voice—though note that with many call recording apps, you can only record outgoing calls, not incoming calls.
You can also use a Bluetooth call recorder. This does require purchasing an external device, but it will wirelessly connect to your phone and record both ends of your conversation.
But your best option is to use an app made specifically for podcasting, like Riverside, which lets you easily record calls in studio quality.
Download Riverside’s mobile app for Android or iPhone to get started!


%20(1).webp)

.webp)

