Table of contents:
5 simple ways to compress a video
1. Compressing a video using an online compressor
2. Compressing a video file into a ZIP file
3. Compressing a video by trimming it
4. Compressing a video by changing the resolution
5. Compressing a video by changing the file type
Bonus: How to compress a video on an iPhone or Android
Key takeaways:
- Use free online tools: Platforms like Riverside's Video Compressor allow you to shrink video sizes while maintaining high quality, making it ideal for sharing and uploading.
- Change resolution or file type: Lowering the video resolution or switching to a more efficient file format like MP4 can significantly reduce file size without degrading quality noticeably.
- Trim video length: Cutting unnecessary parts of a video is a straightforward way to reduce file size while keeping essential content intact.
- Create a ZIP file: For quick sharing or storage without specialized tools, compressing the video into a ZIP file is a simple and effective option.
Struggling with massive video files that eat up your storage and take forever to upload? Compressing video doesn’t have to mean sacrificing quality—there are smart ways to shrink those file sizes while keeping your content crisp and clear.
We’ll show you different methods of video compression as well as step-by-step instructions for how to compress videos, whether you’re using a Mac, Windows PC, iPhone, or Android.
5 simple ways to compress a video
Compressing a video doesn’t have to be complicated or require fancy software. Whether you want to share it online, save storage space, or speed up uploads, there’s a method for every need. Here are five simple and effective ways to reduce video file size while keeping the quality intact.
1. Compressing a video using an online compressor
Riverside’s online video compressor is a lifesaver for anyone juggling large video files. It’s designed to minimize file size while keeping your video’s quality intact - perfect for sharing, uploading, or archiving without compromise. Its intuitive interface and efficient compression options make it a go-to solution.
Here’s how you can compress a video using Riverside:
Step 1: Head over to Riverside's Video Compressor.
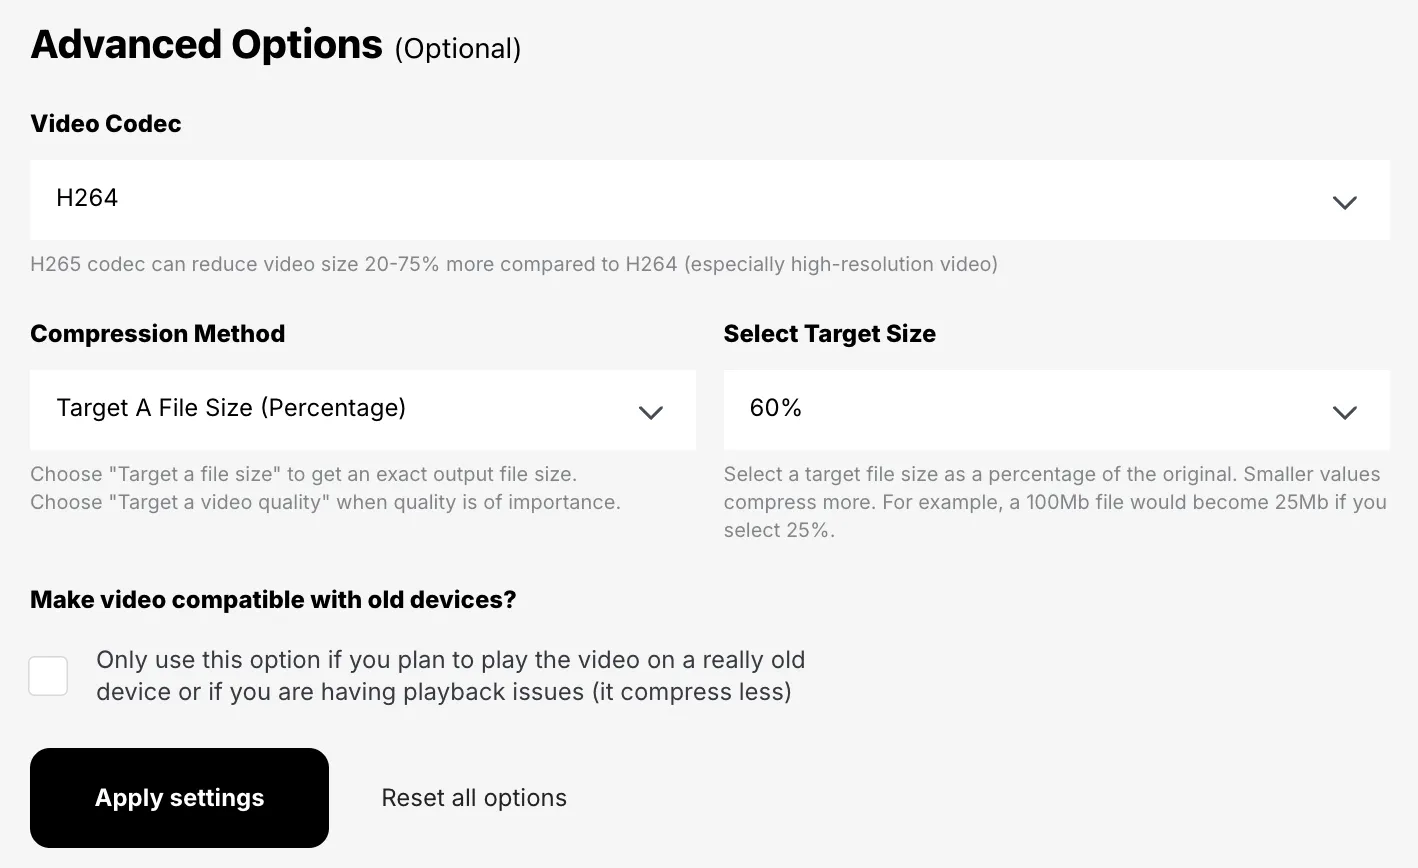
Step 2: Choose your desired compression level. Riverside lets you balance between maintaining quality and reducing file size. Choose between video codecs:
- H264: This is used for HD video. It’s more widely supported across major platforms (like social media) and less demanding on your computer’s hardware.
- H265: Best for high-resolution (like 4K) content. YouTube supports H265 (and H264), but Facebook, Instagram, and Twitter only support H264.
You can also compress it by a specific video quality or for a particular file size.
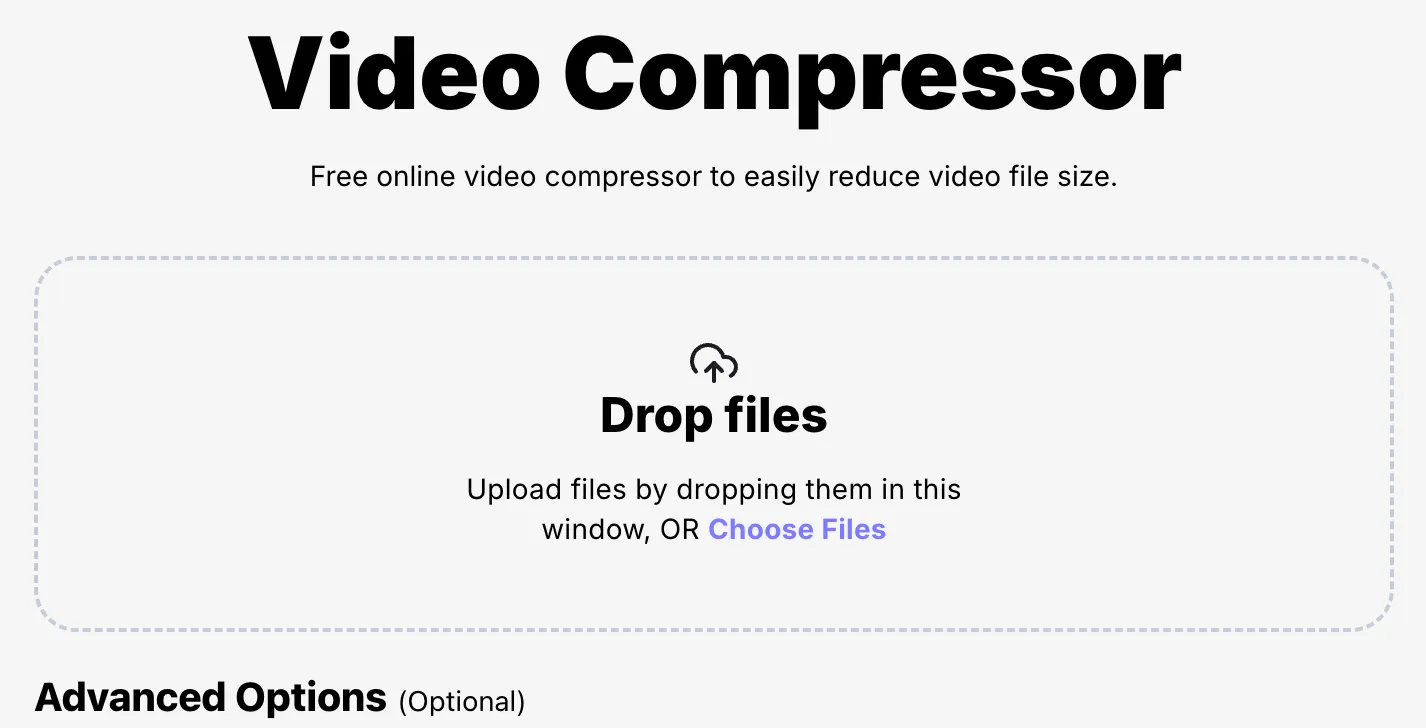
Step 3: Drag and drop the video file you want to compress from your device. Or, select “Choose Files” if you're going to browse and upload. The compression process starts automatically.
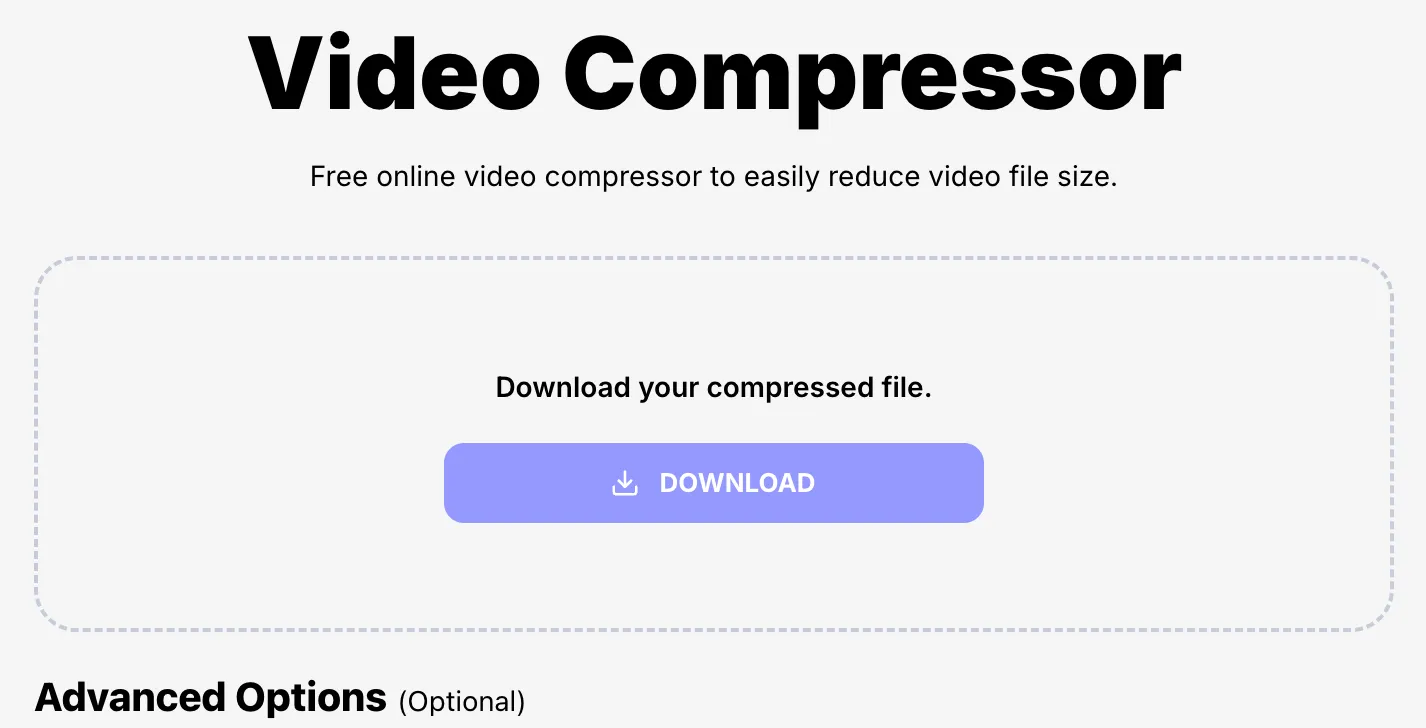
Step 4: Once compression is complete, click “Download” to download the new, smaller video file to your device.
2. Compressing a video file into a ZIP file
If you’re looking for a quick way to reduce your video file size so you can share it with others without specialized tools, creating a ZIP file is a straightforward solution. If you want to share a batch of videos or keep your video in an uncompressed format, creating a ZIP file may be the best option.
Here’s how you can do it on both Mac and Windows:
How to create a video ZIP File on Mac
Step 1: Open Finder and navigate to the video you want to compress.
Step 2: Right-click (or Control-click) on the video file. Then, select “Compress [Your Video File Name]” from the drop-down menu.
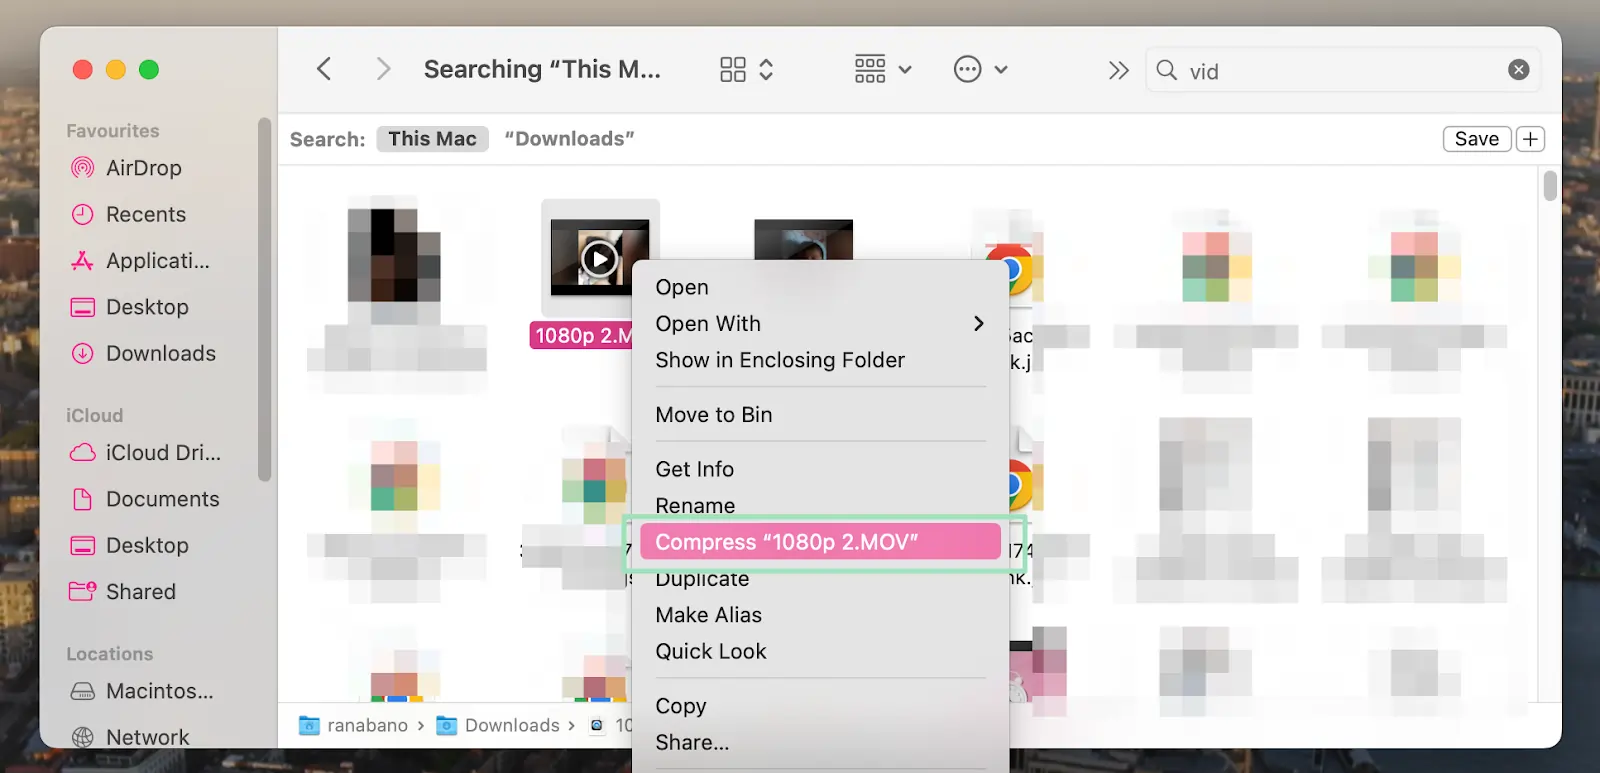
Step 3: A new ZIP file will appear in the same directory as your original video.
How to create a ZIP file on Windows
Step 1: Open File Explorer and find the video you wish to compress.
Step 2: Right-click on the video file. Hover over “Compress to…” and select “ZIP File.”
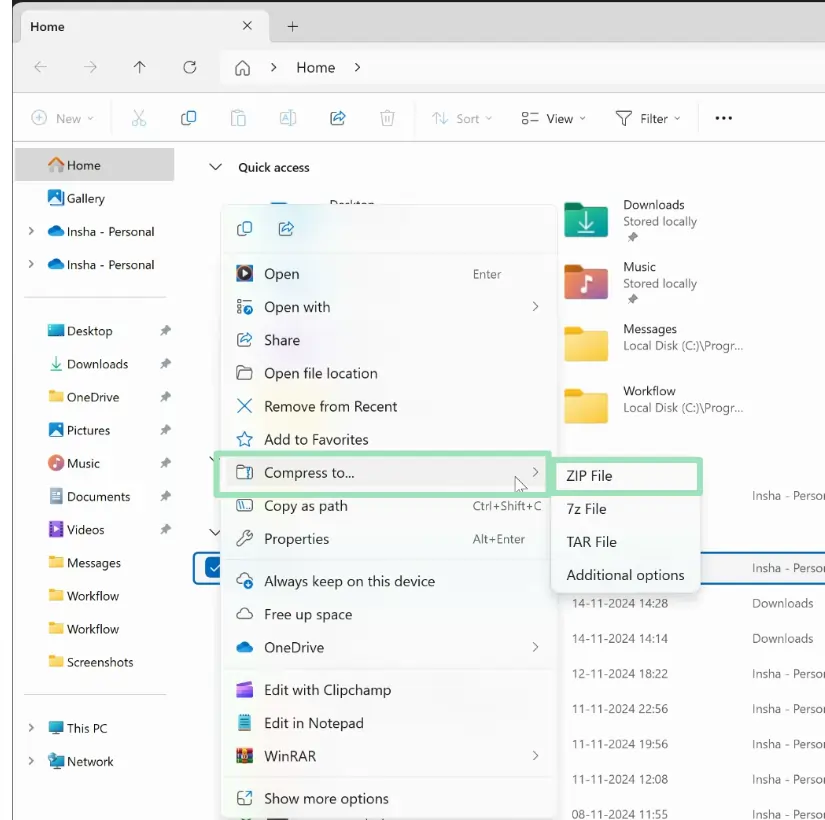
Step 3: A new ZIP file will be created in the same location as your original video.
3. Compressing a video by trimming it
Trimming a video is one of the easiest ways to reduce file size - no fancy tools or advanced skills are needed! Removing unnecessary sections lets you keep your video snappy while making it smaller.
Here’s how to trim videos on Mac, Windows, and with Riverside.
How to trim a video to reduce its file size on Mac
Step 1: Locate QuickTime Player in your Applications folder and open it.
Step 2: Click “File” > “Open File” and select the video you want to trim.
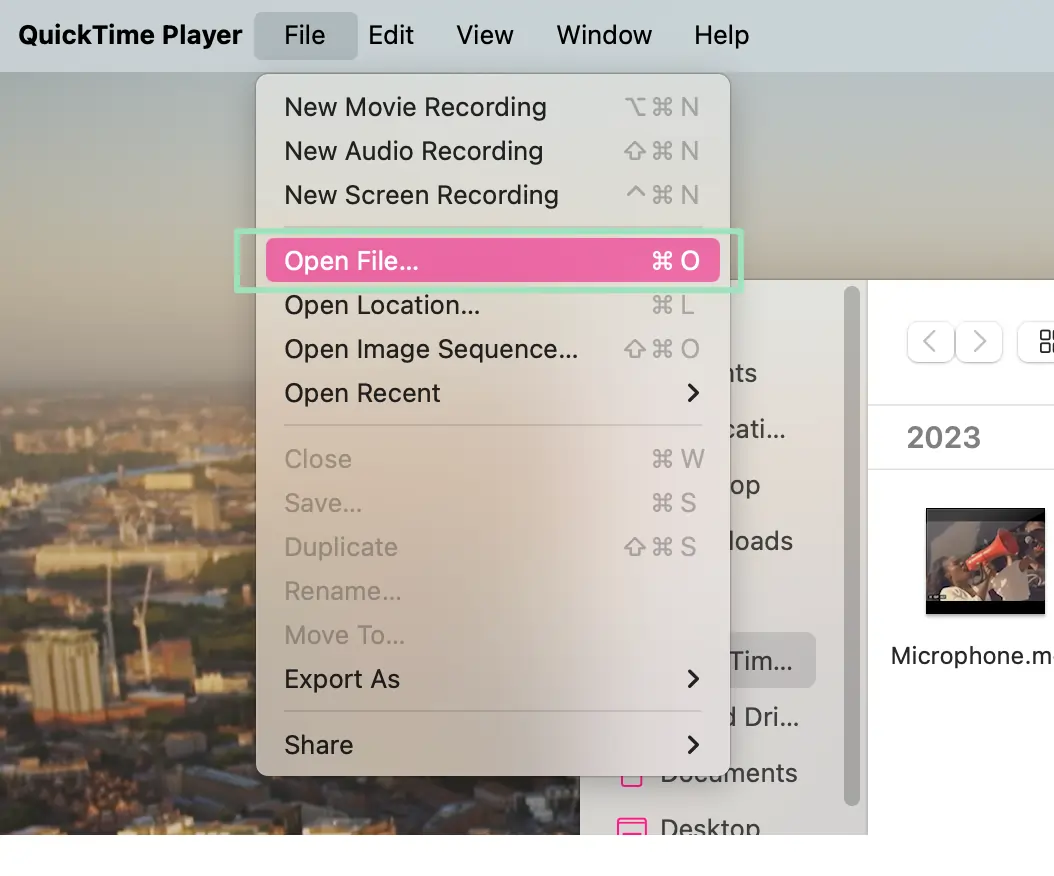
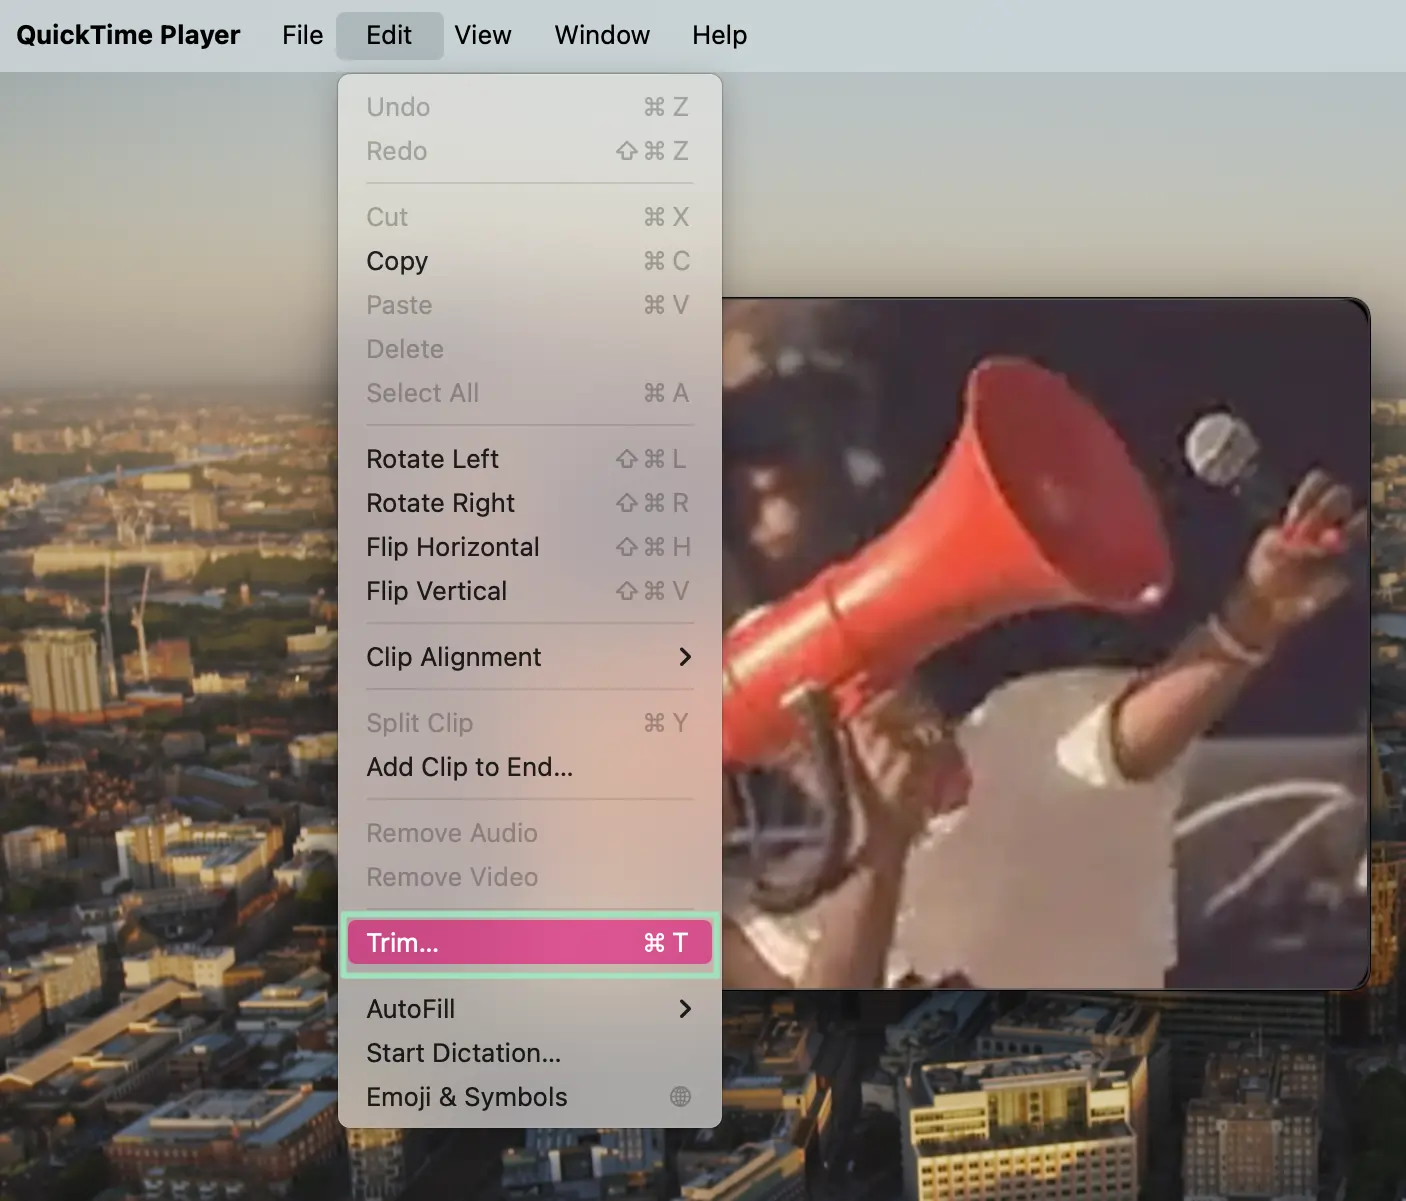
Step 3: Click “Edit” > “Trim.”
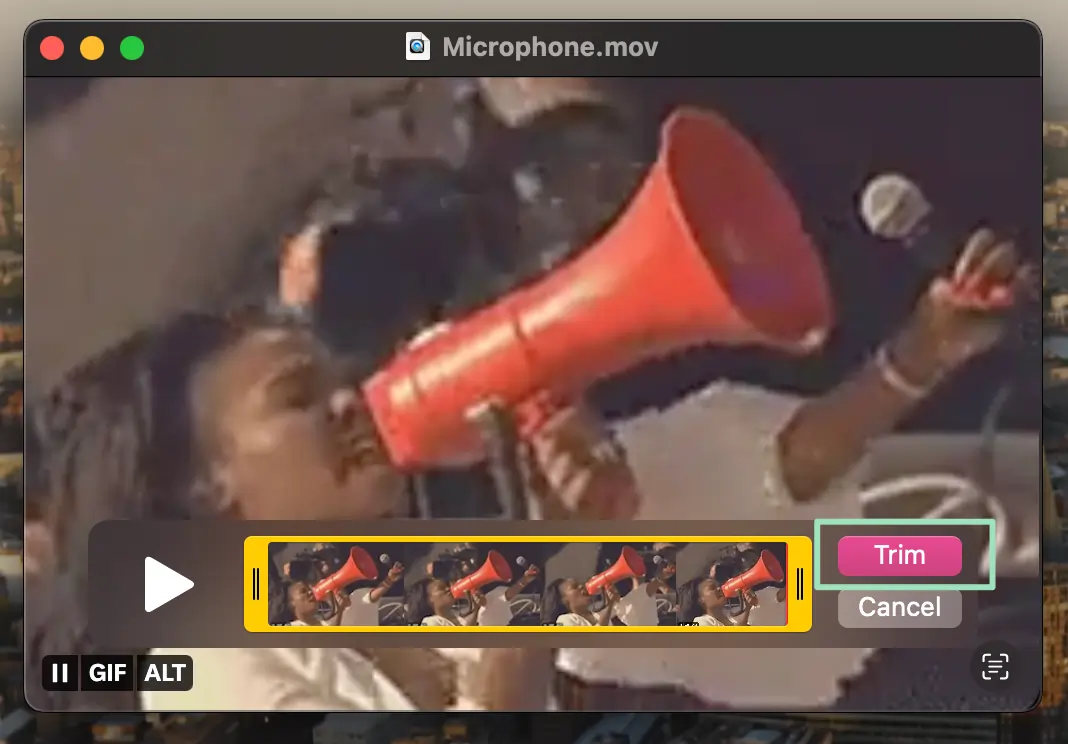
Step 4: Use the yellow trimming bar to select the portion of the video you want to keep. Once satisfied, click “Trim” and save the video.
Step 5: Click “File” > “Save” to save the edited video on your device.
How to trim a video to reduce its file size on Windows
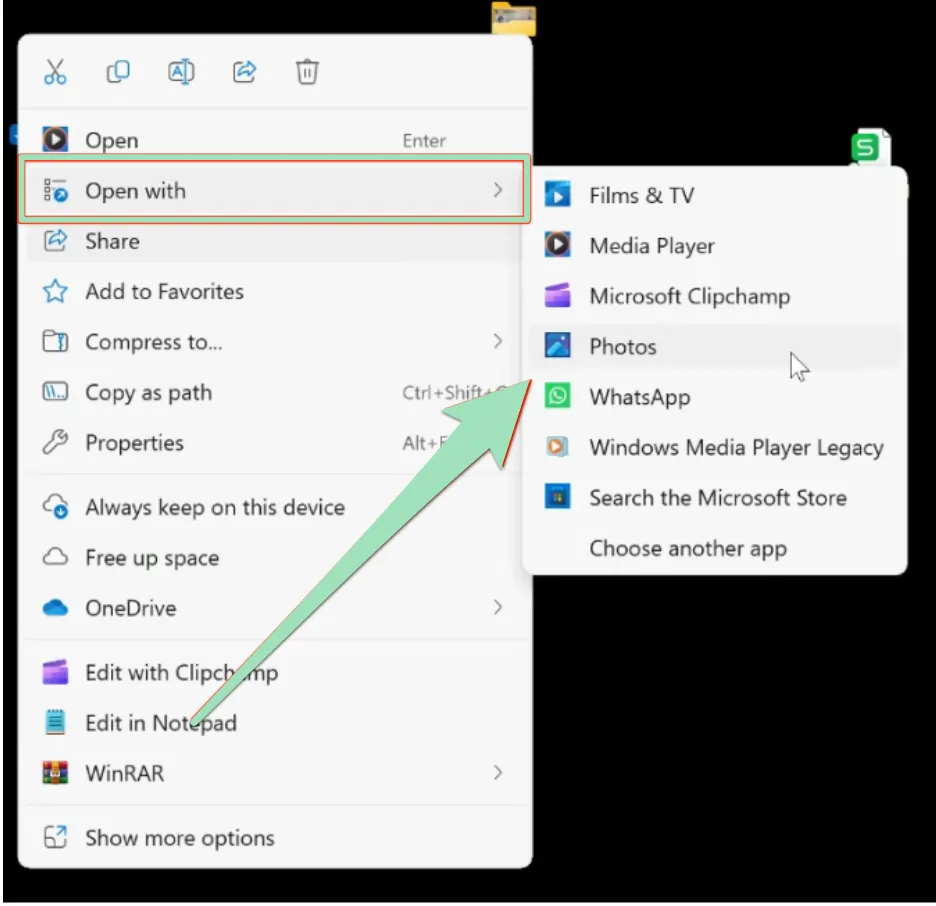
Step 1: Find your video file, right-click it, and choose “Open with” > “Photos.”
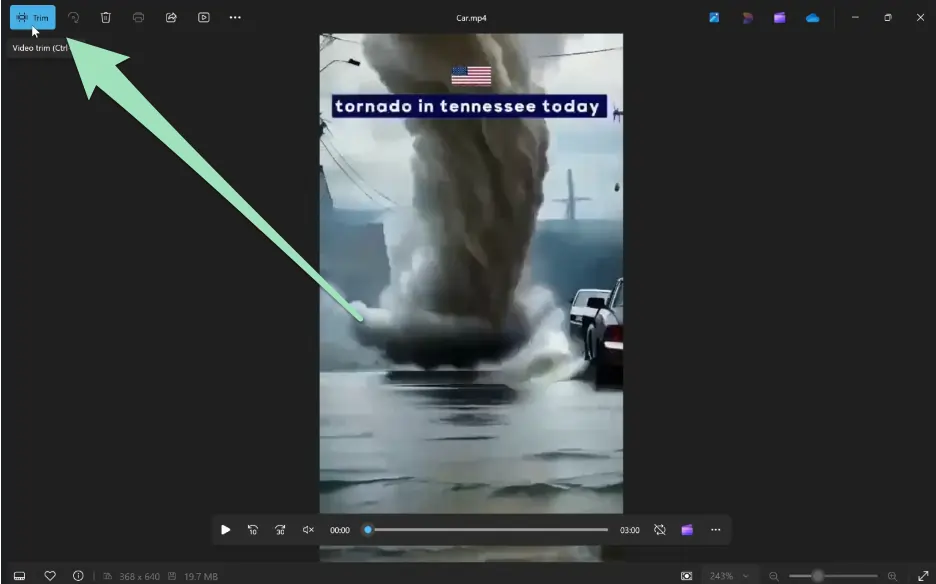
Step 2: Click “Trim” at the top-left.
Step 3: Drag the sliders to select the part of the video you want to keep.
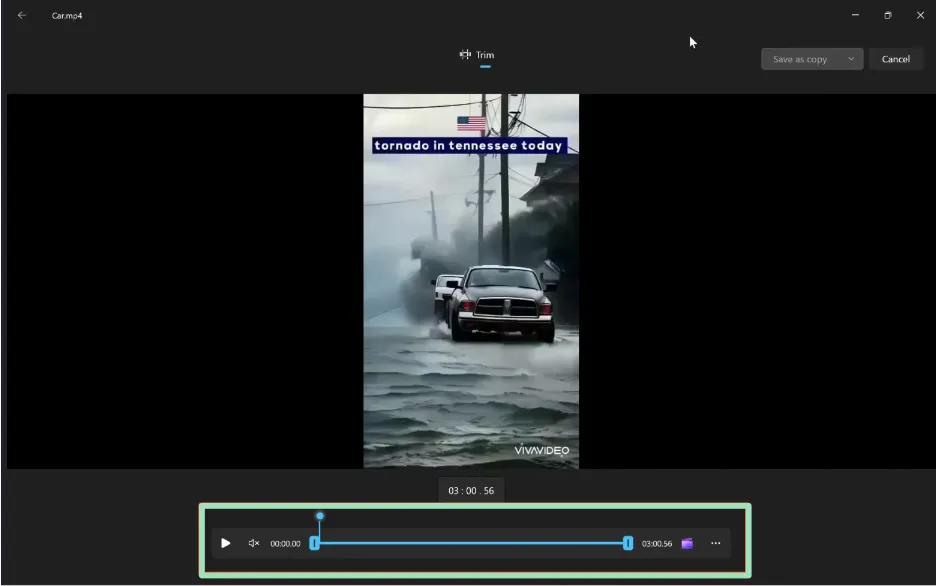
Step 4: Click “Save as copy” to save the trimmed version without changing the original.
How to trim a video and reduce its size online using Riverside
Riverside's online video editor is an absolute gem for trimming a video. It’s user-friendly, works directly in your browser (so you can use it on both Mac and Windows devices), and lets you trim videos with precision. Plus, you don’t need to install a thing.
Step 1: Head to Riverside, login, and upload the video you want to trim.
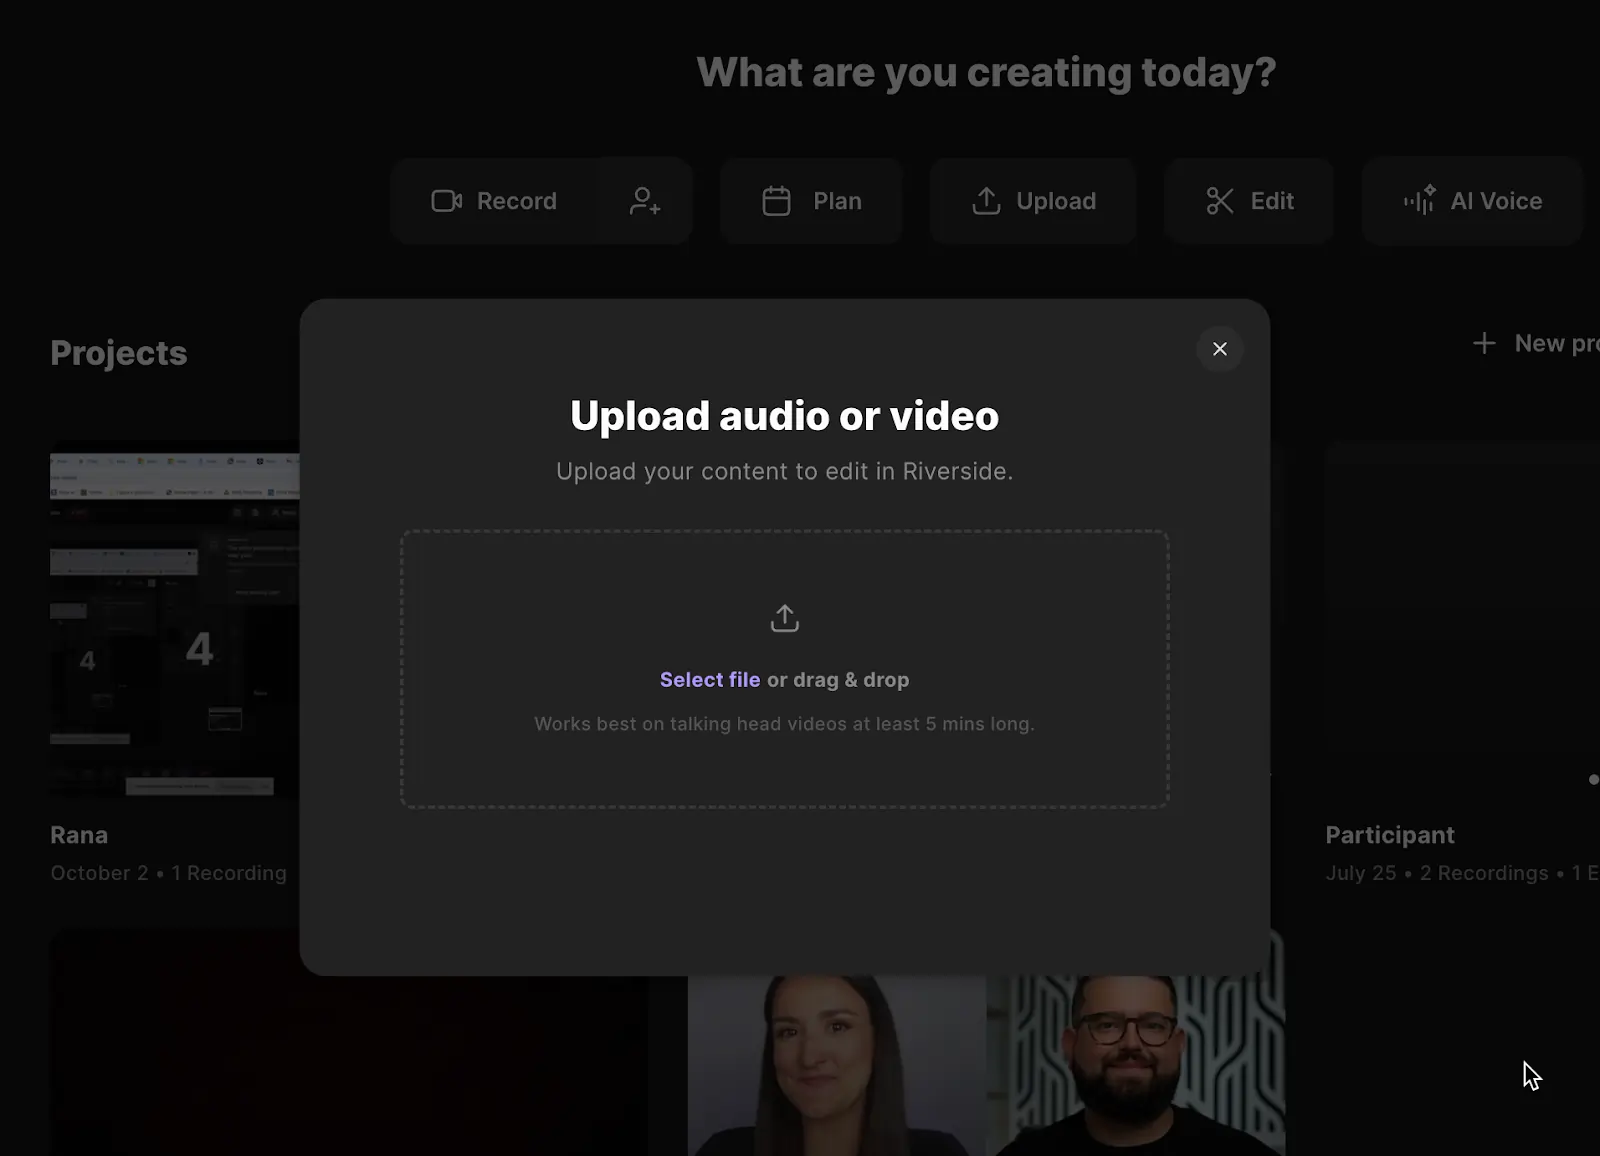
Step 2: Click “Edit” to open the editor once your video is uploaded.
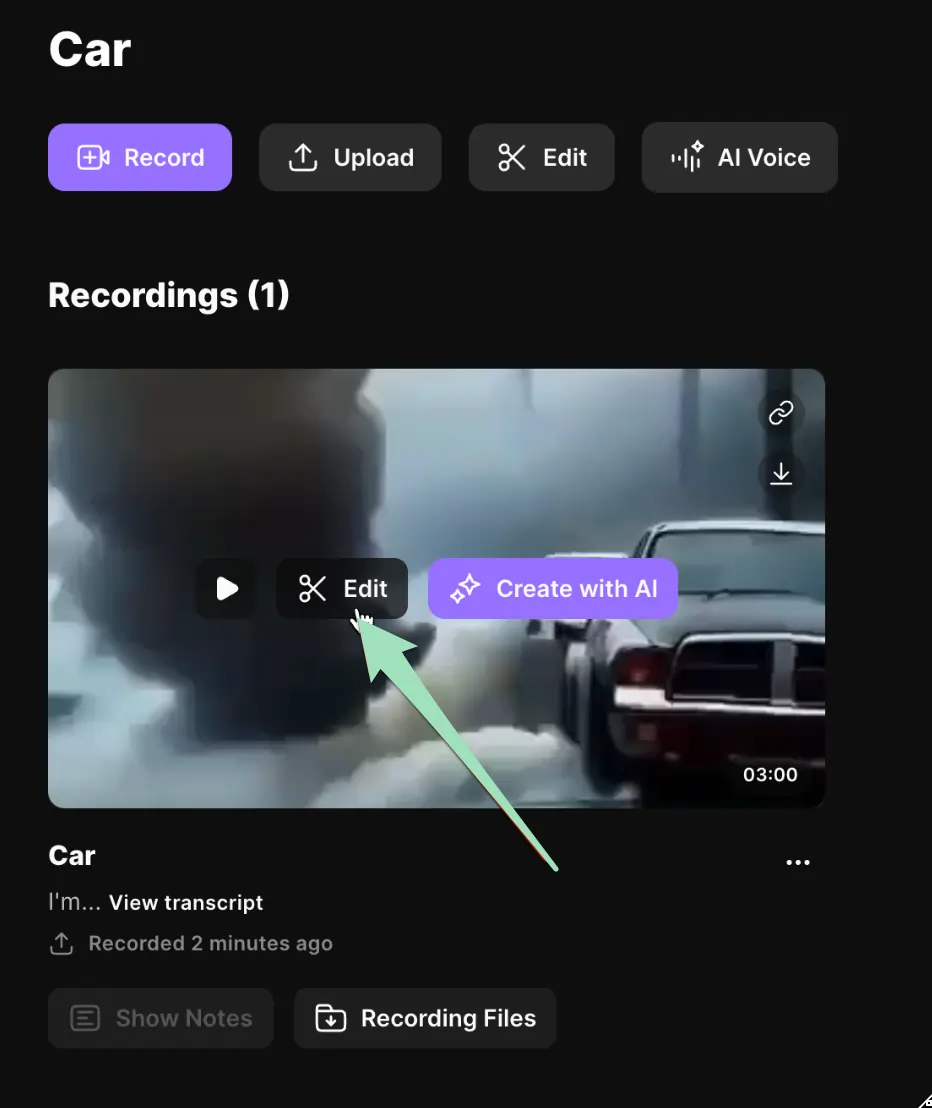
Step 3: Use the trimming handles on the timeline to select which parts of the video to keep or remove. To make more detailed edits, you can split and rearrange sections using the “Split” icon on the top left of the toolbar.

You can also use Riverside’s text-based editor to remove words from your transcript - the corresponding video footage will disappear.

Step 4: When your edits are done, click “Export” in the top-right corner. Adjust additional settings like frame rate or bitrate if needed, then hit “Export Video” to save it to your device - or share it directly to YouTube and other social media platforms.
4. Compressing a video by changing the resolution
High resolutions are great for big screens but can result in unnecessarily large file sizes. Lowering the resolution to match your needs is a smart way to compress your video without sacrificing functionality.
Let’s see how you can do it on Mac and Windows.
How to compress a video by changing resolution on Mac
Step 1: Find iMovie in your Applications folder and open it.
Step 2: Click “File” > “Import Media…” and select the video you want to compress.
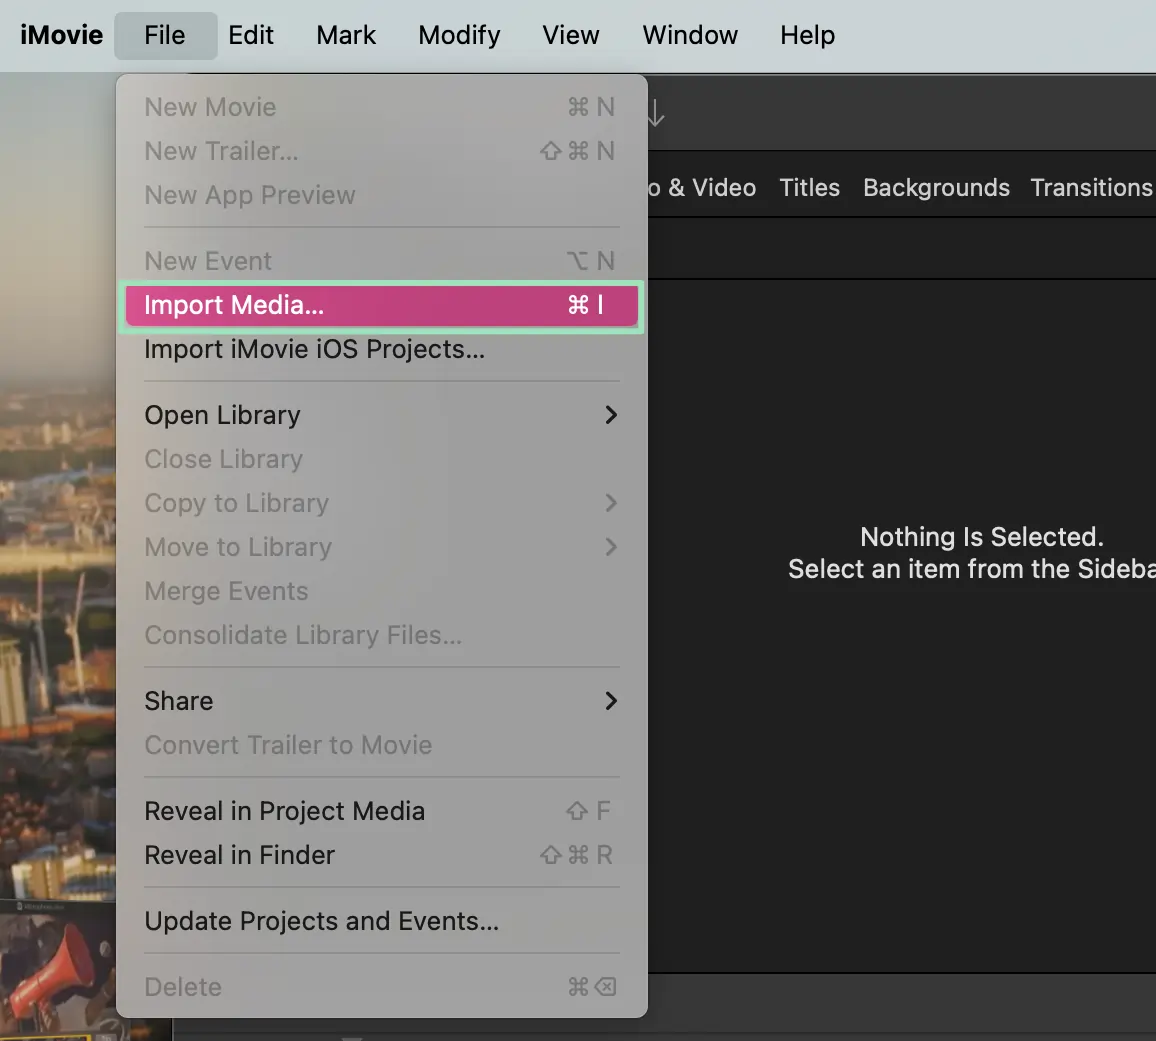
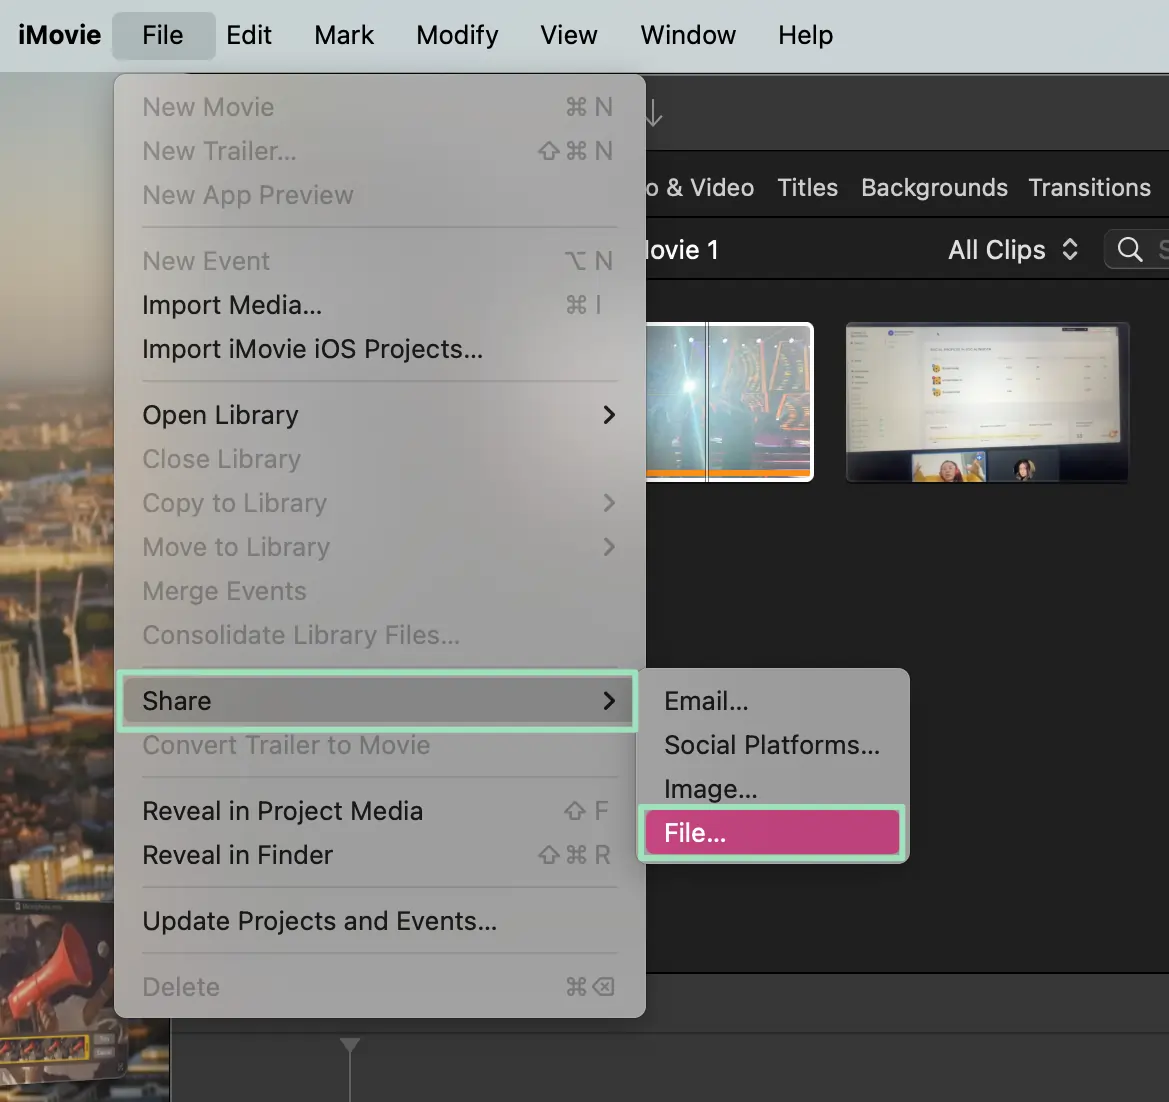
Step 3: Click “File” > “Share” > “File…” to access the export options.
Step 4: In the export settings, choose a lower resolution (e.g., 720p instead of 1080p).
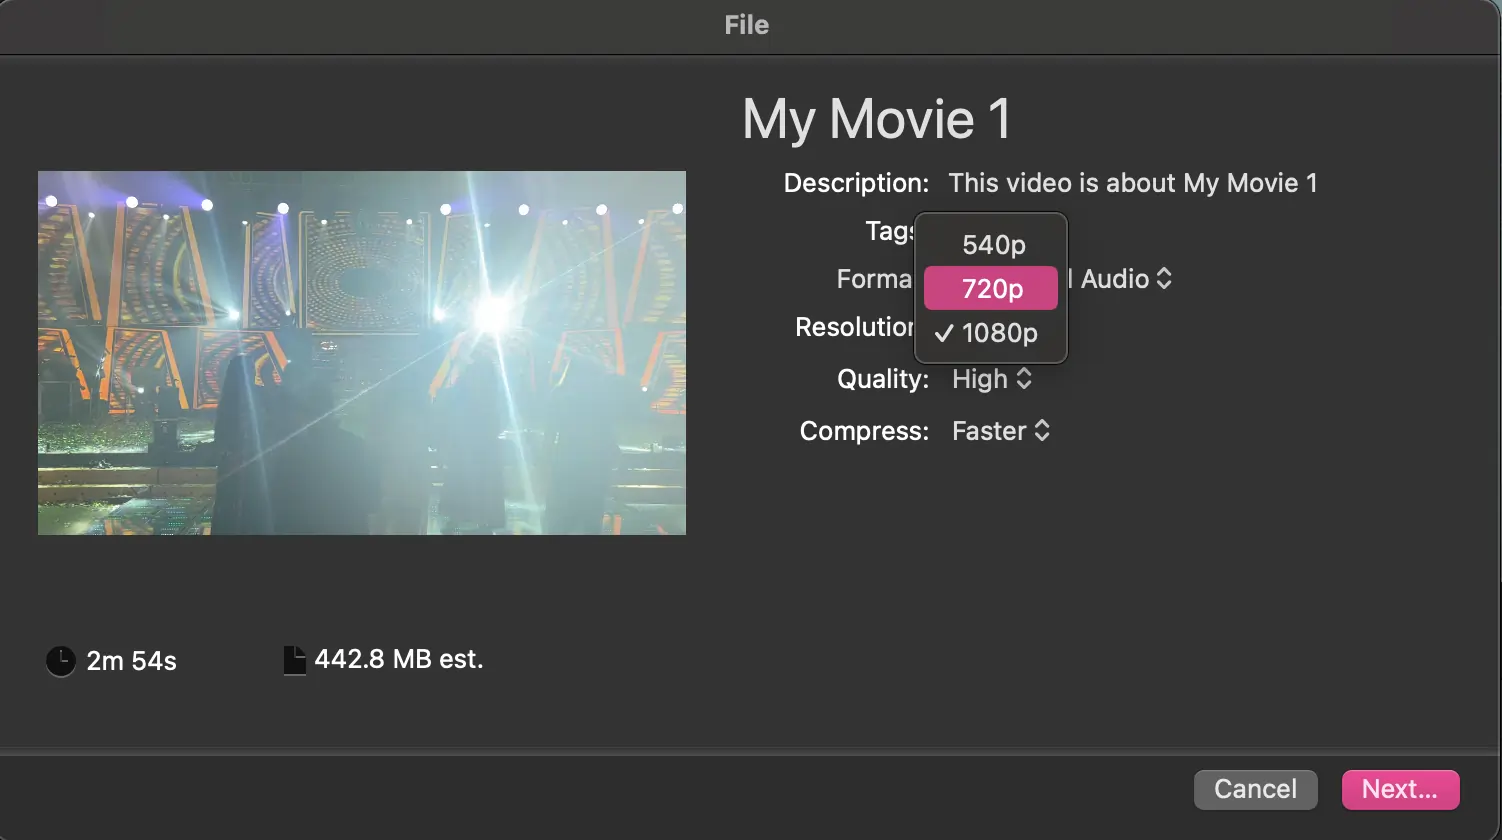
Step 5: Click “Next” and “Save” to finalize and save the compressed video.
💡Pro Tip: While reducing the resolution, remember that lower quality might work for emails or web uploads but not for cinematic displays.
How to compress a video by changing resolution on Windows
Step 1: ClipChamp is native to Windows 11 computers. If you have an older version of Windows, you can download the app from the Microsoft Store or use the web app.
Step 2: Open the app and import your video by clicking “Import media.” Then, drag it to the editing screen on the right.
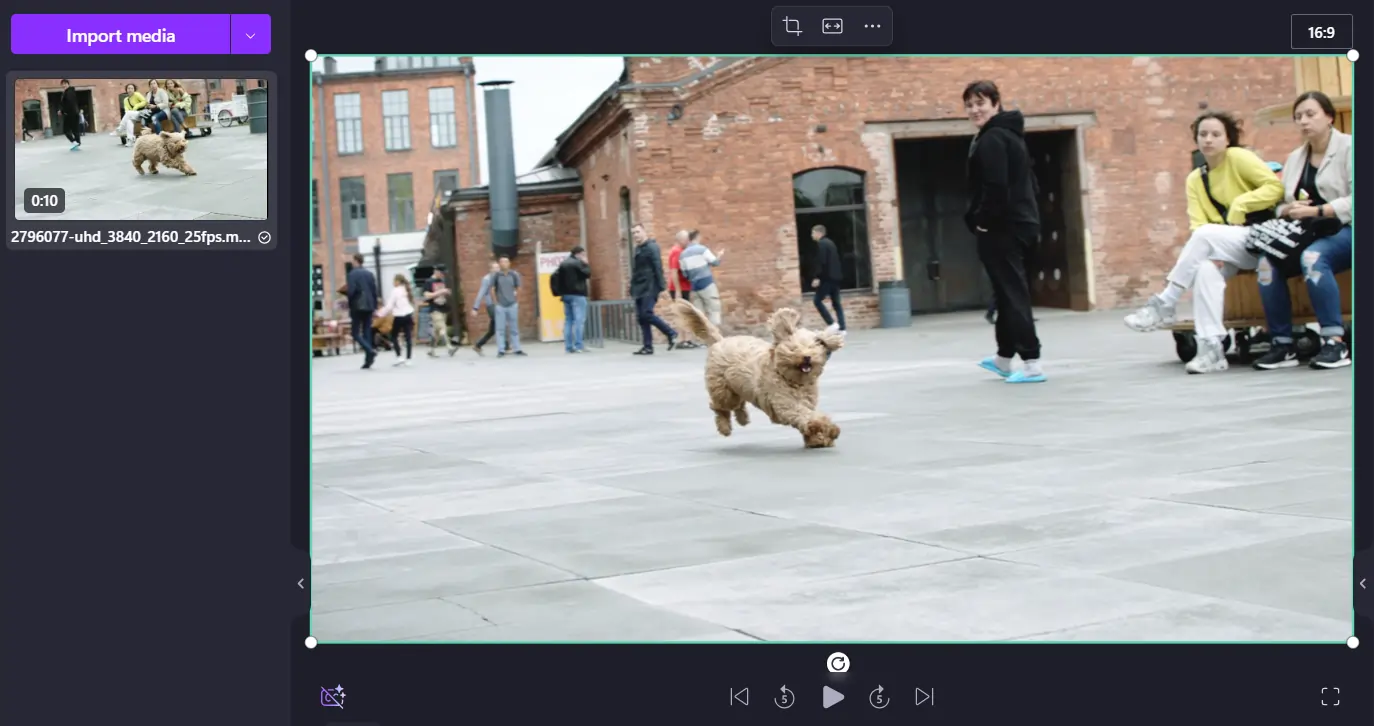
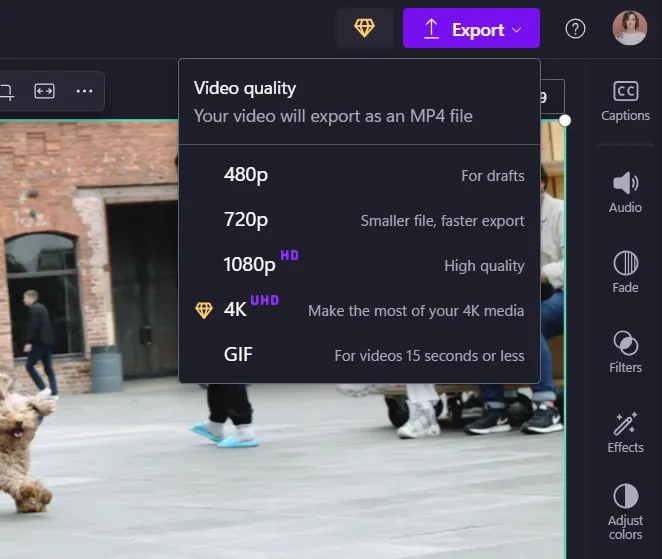
Step 3: When you’re ready to export your video, click “Export” and select your resolution. Choosing a lower resolution than your video’s currently saved at will reduce your video’s file size.
5. Compressing a video by changing the file type
Did you know that the file type of your video can massively impact its size? Some formats, like MP4, keep your video looking sharp while trimming down the file size. Think of it as giving your video a smart, efficient makeover - same great content, but way easier to share, stream, or save.
Here’s how to make it happen on Mac and Windows:
How to change your file type on Mac
Step 1: Find iMovie in your Applications folder and launch it.
Step 2: Click “File” > “Import Media…” and choose the video file you want to convert.

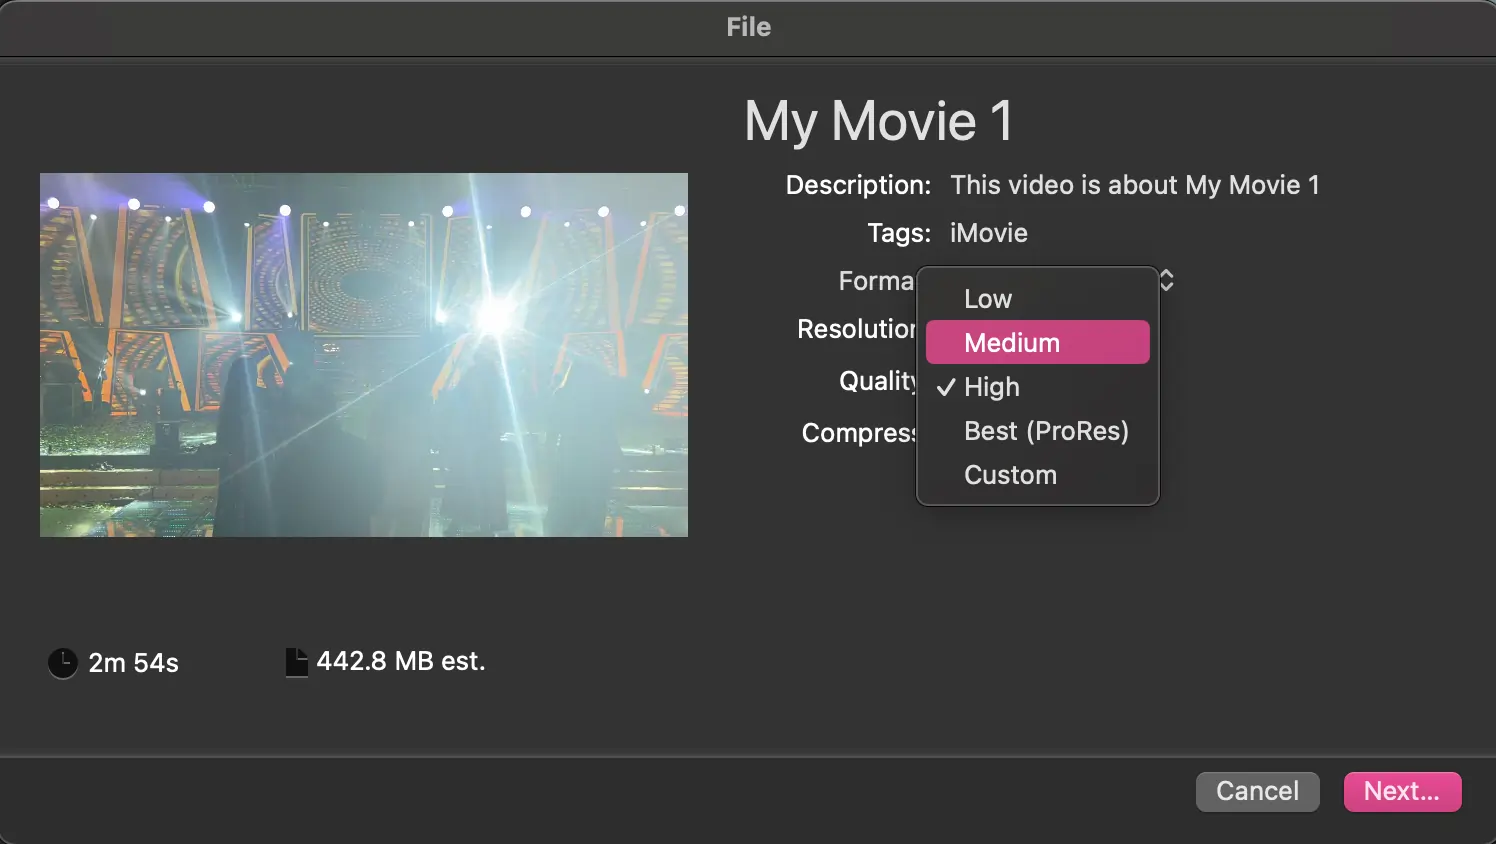
Step 3: Click “File” > “Share” > “File…” to access the various file types.

Step 4: In the export settings, select a more efficient file quality (e.g., Low, Medium). Click “Next,” then choose where to save your newly compressed video.
How to change your file type on Windows
Step 1: Locate and right-click on the video file. Select “Open with…” followed by “VLC media player.”
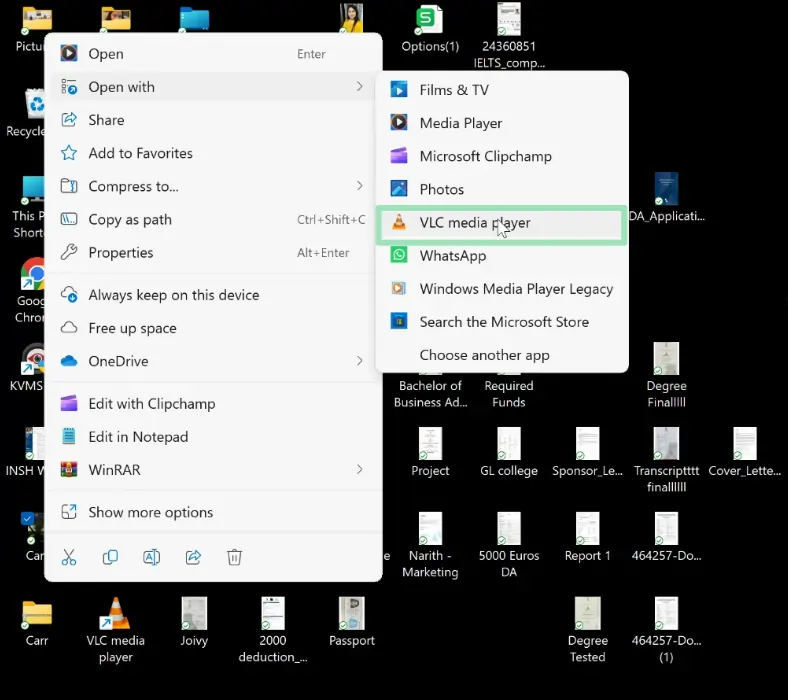
Step 3: Click “Menu” on the top left-hand side, then “Convert / Save.”

Step 4: In the dialogue box, click the wrench icon and choose your preferred format.
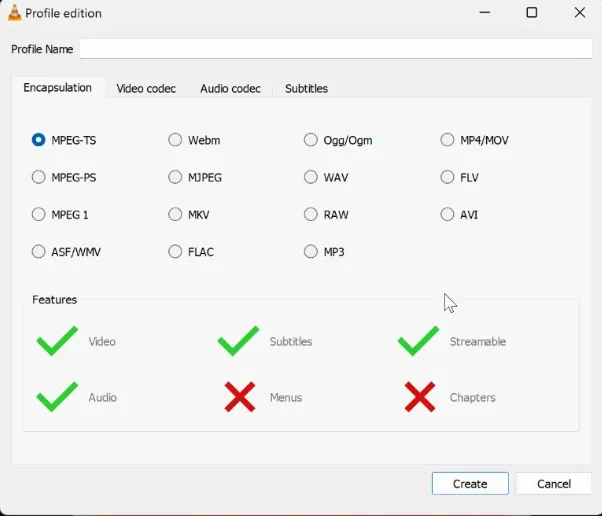
Step 5: Click “Create” to begin converting your video. Your freshly formatted video will be saved in the location you specified.
Bonus: How to compress a video on an iPhone or Android
Compressing videos on your phone is surprisingly simple. Whether you’re using an iPhone or Android, plenty of apps and online tools can help reduce your video file size.
Here’s a general step-by-step guide for both devices using Riverside:
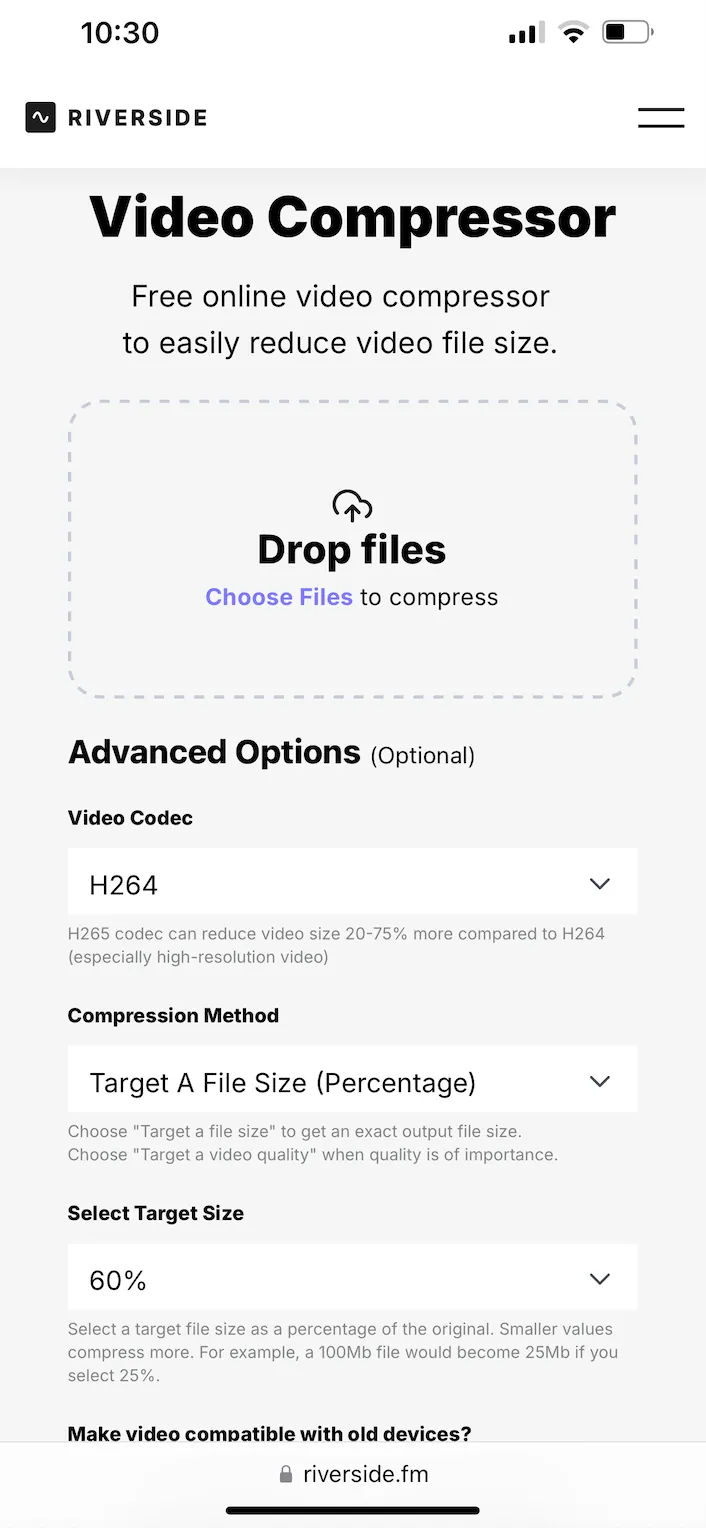
Step 1: Open your browser and look up Riverside's Video Compressor.
Step 2: Choose the desired compression level to balance quality and file size.
Step 3: Tap “Choose Files” and select the video you want to compress.
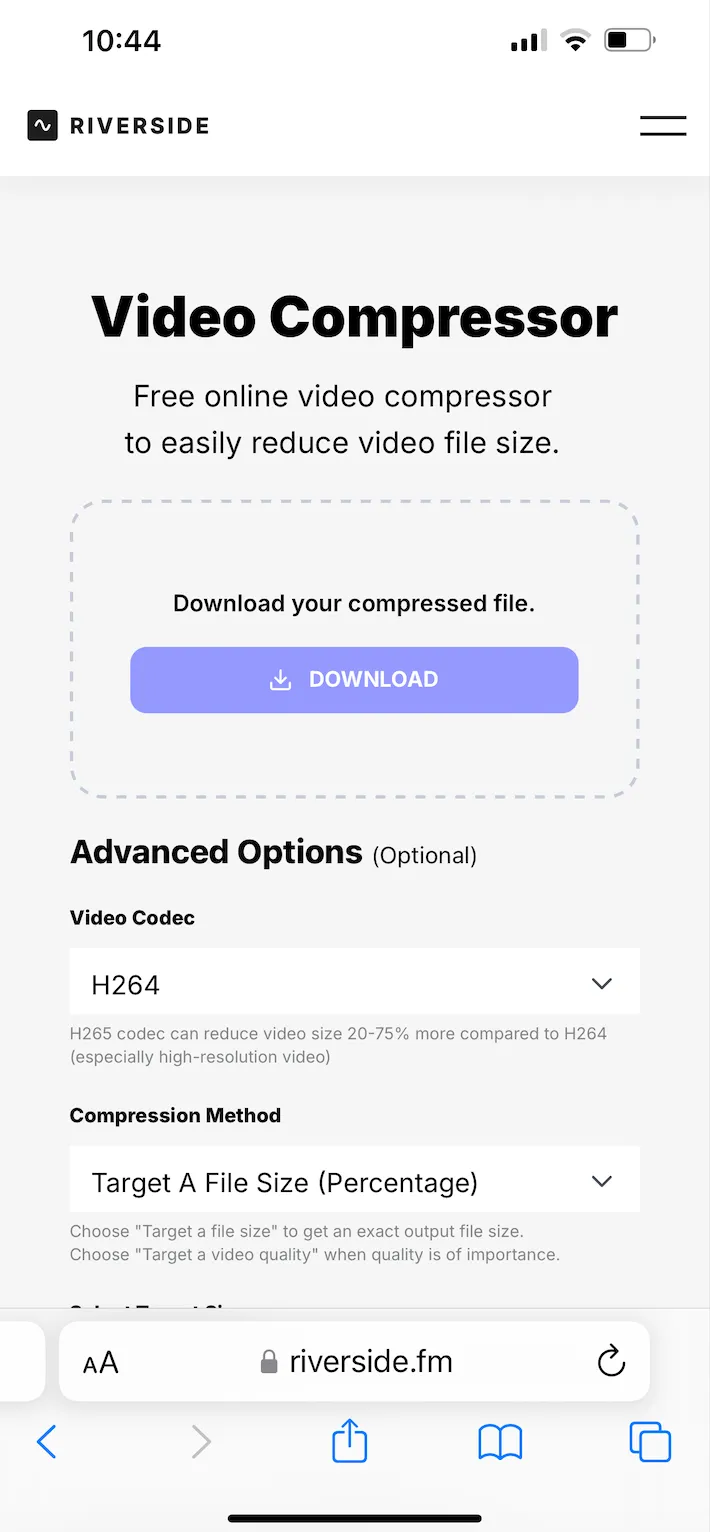
Step 4: After the compression, tap “Download” to download the video to your device.
FAQs about how to compress a video
Still looking for information? Here are the answers to some frequently asked questions.
What is the best format to compress a video in?
While some file formats like MOV or AVI are very high quality, they also tend to be larger. The MP4 file type tends to be smaller but still good quality, and it will work for most types of video.
Unless you need a specific file type for compatibility reasons or need the extra high quality, MP4 is the best overall option as a video format.
How do I reduce the MB and GB of a video?
Megabytes “MB” and gigabytes “GB” are measurements of file size, which is what video compression is all about. You can reduce the file size of a video by using video compression methods like:
- Turning it into a ZIP file
- Trimming the video length
- Changing the resolution
- Changing the file type
- Using video compression software
We’ve covered these options in detail above.
How do I compress a video for email?
If you need to send a video over email, the simplest method is to compress the video file into a ZIP file. If you’re on Mac, right-click on the file and select “Compress [File Name].” On a Windows PC, right-click on the file, then select “Send to” > “Compressed (zip) folder.”
What is the best way to compress videos for online streaming?
Riverside is the best way to compress videos for online streaming. It’s fast and easy and ensures top-notch video quality while reducing file size for seamless streaming.
Final thoughts
Whether you’re uploading videos to YouTube, designing a movie trailer, or simply emailing a video recording to a coworker, the realities of video file transmission affect us all.
The best quality videos come with a vast amount of data, which translates into a large file size that can be difficult to transfer, upload, and store.
Thankfully, you’ve learned many simple ways to compress your videos for sharing, social media, and more. And if you need a quick solution, try Riverside’s Video Compressor.


-(1).webp)


