


Table of contents:
Key takeaways:
- Types of live webinars: Live webinars can serve various purposes, including educational training, Q&A sessions, lead generation, thought leadership, and customer onboarding.
- Key benefits: Live webinars provide real-time engagement, networking opportunities, up-to-date content, cost-effective event hosting, immediate feedback, and a more authentic experience than pre-recorded sessions.
- Best practices for hosting: Successful webinars require careful planning, interactive elements, engaging visuals, and proper timing to maximize audience participation and retention.
- Why choose Riverside: Riverside stands out as a top webinar platform by offering high-quality 4K video streaming, multi-platform live streaming, audience engagement tools, and easy content repurposing features.
Here’s a stat you don’t see every day: A Statista survey found that almost all marketers (99%) consider webinars “a critical element of their marketing plan.”
Live webinars especially offer a unique blend of real-time interaction, engagement, and authenticity that pre-recorded content simply can’t match.
They create dynamic, two-way conversations where audiences can ask questions, participate in discussions, and receive instant feedback.
And with the right tools and strategies, creating a live webinar can be so much easier than you think.
We’re here to show you exactly how to turn your live webinar into a marketing powerhouse that won’t look like just another Zoom call with extra steps.
Let’s go!
Types of live webinars
A live webinar is exactly what you thing it is; a webinar that is recorded and broadcast live. It's an online seminar or presentation held in real-time. The audience may or may not interact with the hosts to ask questions or seek clarifications from the presenters, and the event may be livestreamed on a social media platform as well.
Let’s start by checking some examples of live webinars you might want to run:
1. Educational or training webinars
Educational webinars aim at teach your audience something. They can be deep-dive sessions by experts sharing their knowledge or simpler training classes like university courses or boot camps. Companies often use live webinars to provide product training and demos to customers.
2. Q&A Webinars
Sometimes, people just want answers. A live Q&A is an interactive session where your audience’s voice is heard without filters. Reddit's “Ask Me Anything” sessions are a perfect example of this type of event. They build trust by addressing exactly what the audience wants to know and opening the floor to them and their concerns and questions.
3. Lead generation webinars
Lead generation webinars are about attracting the right people by offering them something valuable (like a solution to a problem) and converting them into leads. For example, you can run a workshop on using LLMs for content generation or offer practical solutions to optimize email marketing campaigns.
4. Thought leadership webinars
Thought leadership webinars dive into broader concepts and big ideas, like cybersecurity or the future of AI. Their purpose is to position yourself or your business as an industry expert by sharing unique perspectives on that topic rather than focusing on selling (think of a TED talk). A best practice to increase the effectiveness of a thought leadership webinar is to livestream it on several social channels simultaneously.
5. Customer onboarding webinars
Onboarding webinars are a surprisingly effective tool to show your customers your product's ins and outs. You can walk new users through the most helpful and often underappreciated features and show customers you’re invested in their success.
What are the benefits of live webinars?
Here are a few reasons why you should consider hosting live webinars:
Live webinars are more engaging
Live webinars are more engaging and dynamic than automated or on-demand webinars. They’re the closest thing to participating in a real-life seminar or classroom environment. The audience can ask the presenter questions, interact with one another, and share their thoughts.
Networking opportunities
Live webinars let you make new friends and acquaintances. You can interact with the other participants who share similar interests to form friendships or business relationships.
Packed with the most up-to-date content
Content on on-demand and automated webinars can become outdated, especially if the recording is a few months or years old. However, content on live webinar platforms is usually the most current and relevant (provided the speaker keeps up-to-date with the latest knowledge in the field).
Cost-effective
Hosting a seminar in person can be costly. You have to pay for travel, venue rental, equipment, staffing, accommodations, and more.
But for live webinars, at minimum, you only need a laptop, a camera, a webinar platform, and a good internet connection. You, however, may want to purchase a good camera and microphone just to make the webinar seem more professional to the audience.
Immediate feedback
When hosting a live webinar, you can ask participants for feedback, get it instantly, and then make changes to the presentation on the fly. You aren’t afforded this luxury when creating on-demand or automatic webinars – you’ll have to wait for a few hours or days.
More authentic
It’s easier to be yourself when you’re live streaming. Pre-recorded or on-demand webinars might look stiff or boring, while live content provides a better sense of authenticity. Be ready to improvise if needed, though!
What do you need to host a successful live webinar?
To host a successful and professional live webinar, you need a few things:
- Reliable internet connection: You’ll be streaming your video live and receiving the feed from participants. The last thing you want is to look all choppy and pixelated for the whole webinar.
- A desktop computer or laptop: You don’t need to spend big here, as most modern PCs can handle a webinar platform without issues.
- Headphones: High-end headphones aren’t crucial during a livestream. Feel free to use whatever earphones or headphones you’re using currently.
- Microphone: Laptop or built-in webcam microphones are usually of poor quality, so it’s best not to rely on them. Instead, look for a good professional microphone, like a Blue Yeti.
- Video recording equipment: An external high-res webcam is a must-have if you want video resolution to look crisp for a higher-quality video.
- Software: Different webinar platforms have different strengths, so it’s good to look for platforms that have strengths you want and weaknesses you don’t care about.
Supposing that what you’re looking for in a webinar platform includes “doesn’t look like it was recorded on a potato” and “doesn’t need a 40-hour crash course just to learn how to register the attendees,” Riverside is your answer.
Picture this: Your webinar in HD, which is actually 4K, not that "HD" that looks suspiciously like 720p, with an audience that isn’t stuck in viewer mode forever.
See someone making brilliant points in the OmniChat from any social media you’re streaming on? You can invite them to join the chat with one click – just like running a talk show.
Did the webinar go well, and do you want to make the most of it? With Riverside, repurposing is as easy as it was to record.
With a few clicks, get automated transcriptions, short social clips for sharing your best moments, cleaned-up audio, timestamped chapters, and more.
Learn more about Riverside's webinar recording solution or sign up for an effortless webinar experience.
How to host a successful live webinar with Riverside: A step-by-step guide
Ready to learn how to make a live webinar that actually gets shared and talked about instead of another boring PowerPoint session?
Here’s a no-nonsense, step-by-step tutorial to help you churn out live webinar content that will keep your audience glued to the screen:
Step 1: Planning your webinar
Making the best live webinar ever doesn’t mean much if no one shows up, right? Planning is definitely less exciting than recording, but it’s no less important.
Start by scheduling your session and sending an invite to all your attendees, guests, and producers (the amazing people who will help you from behind the scenes):
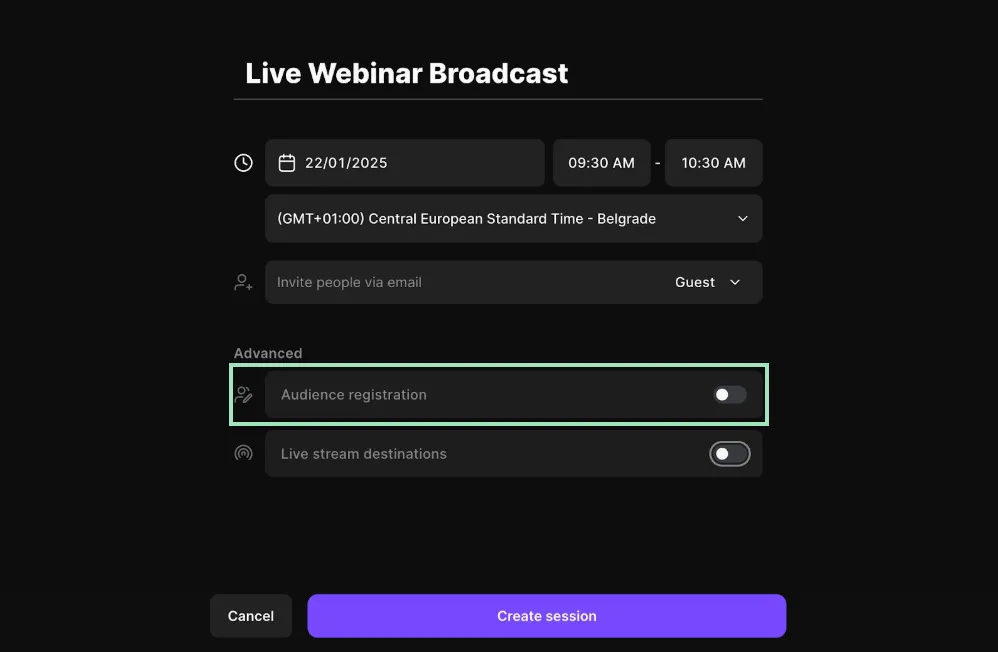
See that “Audience registration” button? Click on it to create custom fields for your attendees to fill out upon registration. This way, you can ask them extra questions before the webinar, profile your ideal customer personas, and just learn more about your audience.
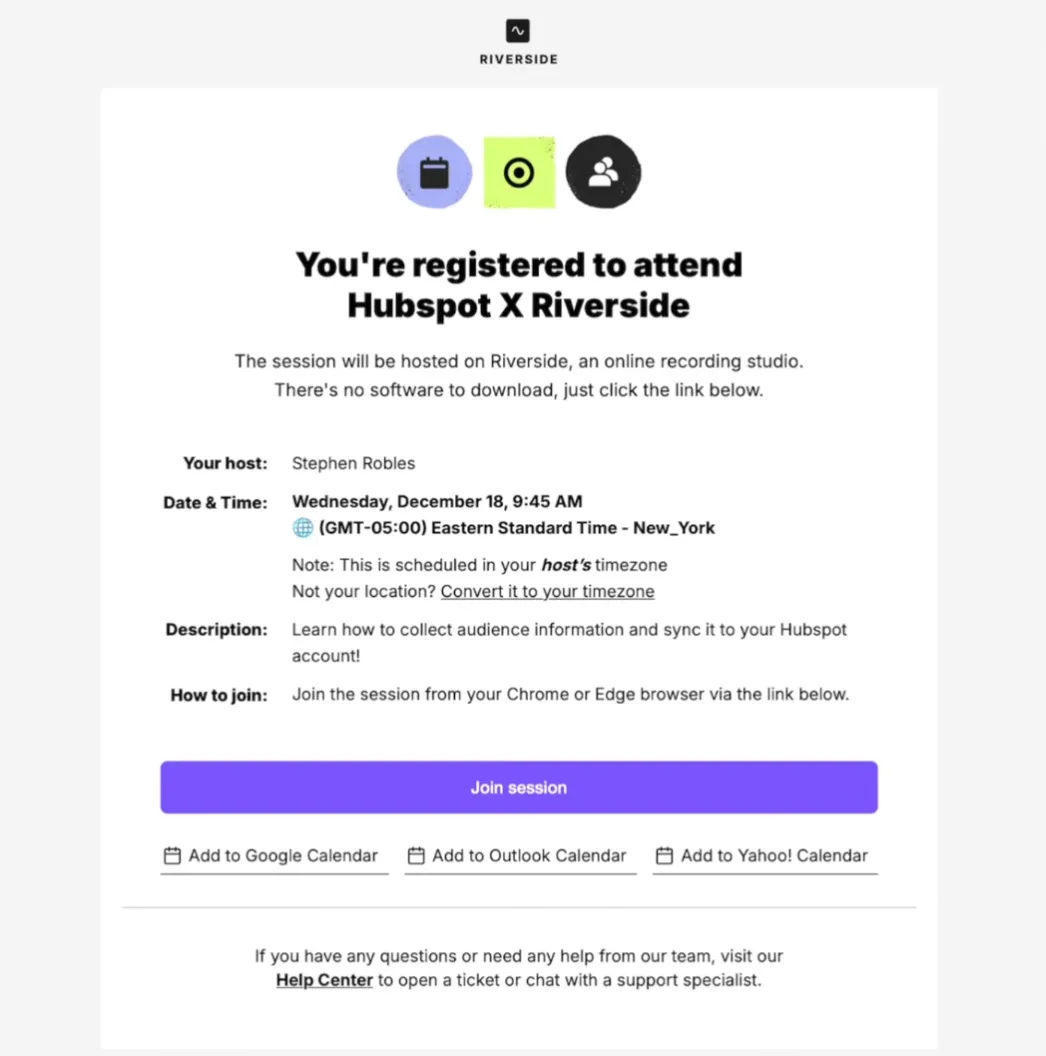
Are you worried that the people you invited can forget about the event when the day comes? It’s a non-issue, as everyone will receive a reminder email with the date and time of the event (converted to the right timezone), a clickable link to add it to their calendars, and a button to join quickly.
Step 2: Preparing your webinar
It’s time to outline, script, and structure the webinar.
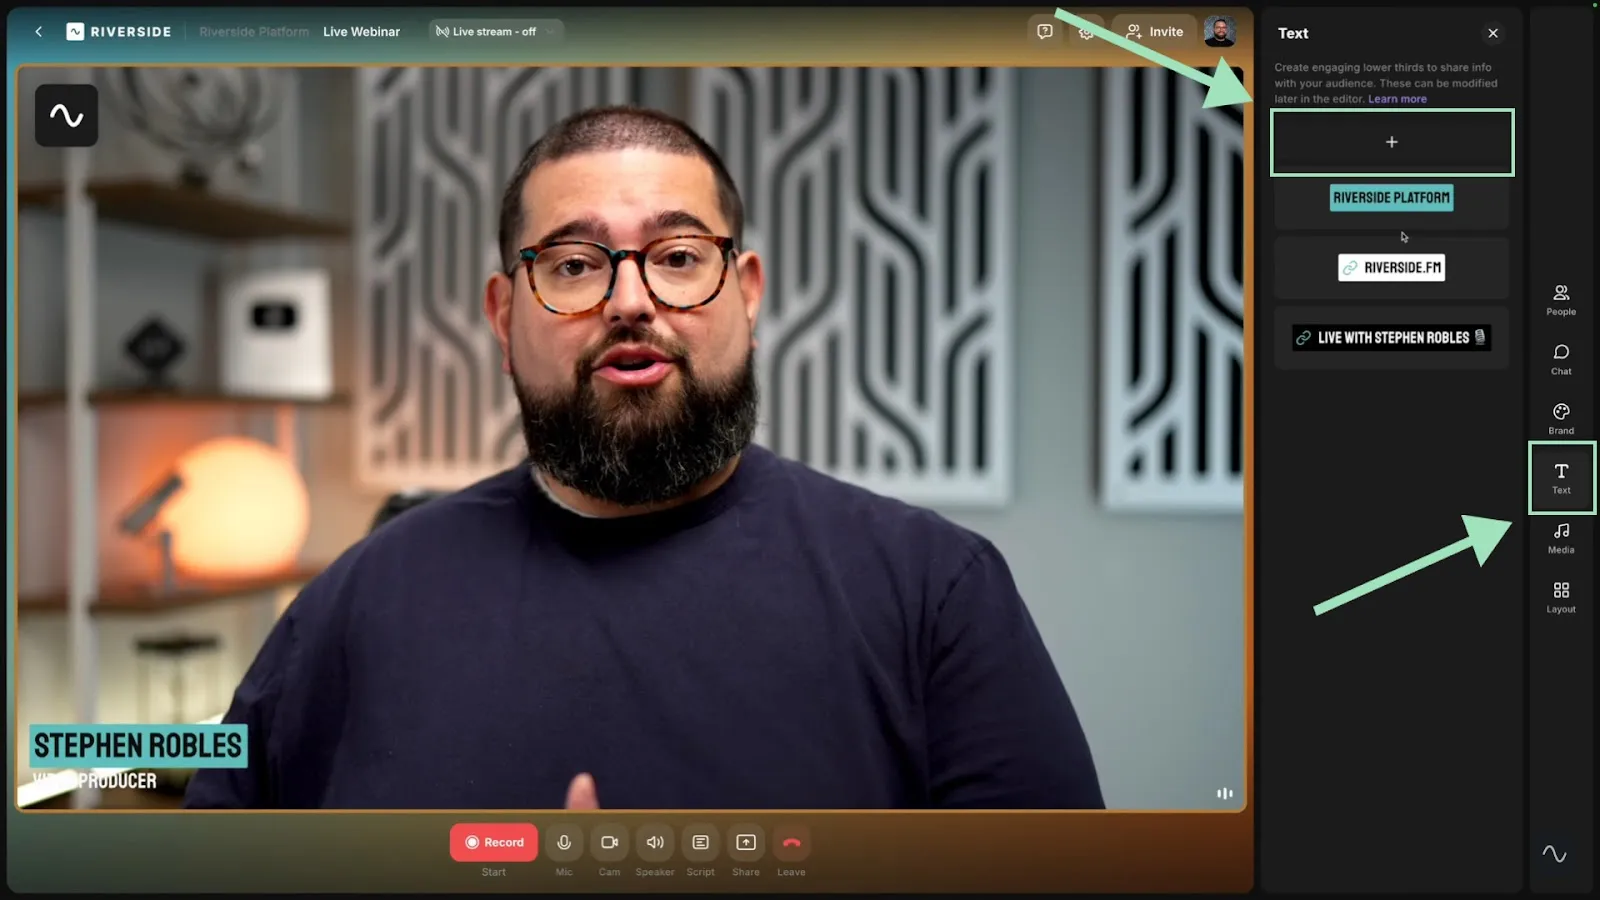
With Riverside, you can prepare by creating colorful, catchy lower thirds with which your attendees can interact. They can be used to embed hyperlinks, present your co-hosts and guests, and highlight key information.
To add and customize the lower thirds you plan to use, click on the “Text” icon on the right sidebar and then on the plus “+” icon.
You can also make your webinar feel more like an entertaining show and less like a boring classroom lecture by adding videos, pictures, sound effects, intro music, and more.
Enter Riverside's media board: you can use free music, sounds, and video clips from our library or add your own media files by clicking the “Media” button on the right sidebar.

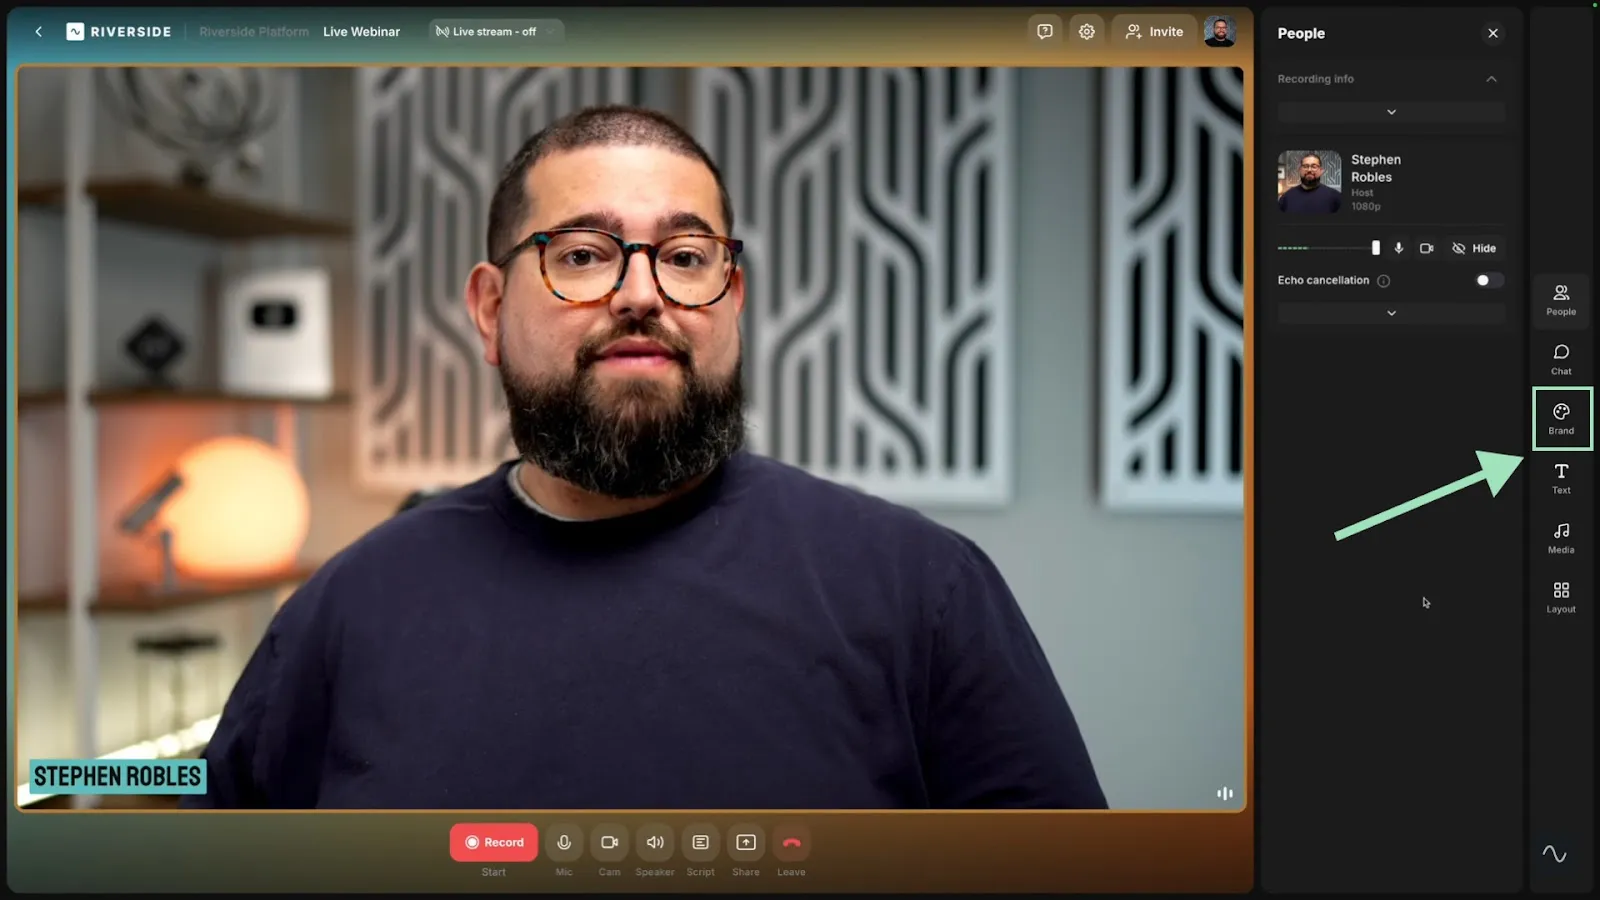
Remember to make your show look unique! Create a custom theme using your brand color and background, and apply this branding scheme to the studio lobby.
Step 3: Recording your webinar
Why stream your webinar on just one channel when you can reach all your followers simultaneously? Make sure your session is livestreaming on all your social channels.
You can reach your audience on YouTube, Facebook, Twitch, TikTok, and even your custom RTMP destinations and engage with all of them at the same time with OmniChat.
Click on the “Chat” button on the right sidebar, select “Live stream chat,” and you’ll see every message that’s sent to you and even see the platform from which it came.
.webp)
Another great way to keep your audience’s attention is by not keeping the screen locked on your mug for the entire show.
If you have more than one host or someone from your audience speaking, you can fix the screen on them or (even better) let Riverside dynamically choose who is in the limelight.
Click the “People” button from the right sidebar, then select the layout you prefer from the “Layout” sub-menu.
.webp)
Remember that you can share your screen live too! Even better, your screen share is saved on a separate track, making your life so much easier during post-production.
Step 4: Repurposing your webinar
Who said a live webinar ends when you press the “Stop” button? With Riverside, you can turn a session into a full content calendar!
Trust Riverside's AI=powered tools to automatically generate a complete transcription of your recording. Then, use it to create additional content, such as blog posts and social media posts.
Match it with our text-based editor, automatic dynamic captions, and automated audio enhancement tools, and polishing your content to perfection.

Ready to go viral? Try Magic Clips and watch your webinar automatically turn into dozens of engaging short clips ready to be shared on social media—all courtesy of our super-smart AI.
Just set up your workflow, and the best moments of your webinar will be instantly shared as social media content.
.webp)
Best practices for engaging webinars
Now that you’ve got the right tools of the trade, it’s time to impress your audience with some top-notch, attention-grabbing content. Here are a few best practices to ramp up your game a notch.
Research
Before starting the webinar, you should understand your target audience. Conduct surveys, reach out on emails, or research your competitors, then brainstorm a topic that aligns with your audience’s interests.
Once you’ve determined the best angle for your event, create a structured agenda to keep it focused and on track. Remember that Riverside’s teleprompter feature allows you to read your script while you’re presenting.
Practice makes perfect
Unlike pre-recorded content, with live webinars, you have only one try once the “live” button is on. Practice as much as possible, and grab a patient friend to let you rehearse the presentation to them.
Ensure you have a strong internet connection and check if your equipment works properly. Test your audio and video before the webinar to make sure everything looks and sounds great before you start recording.
It’s all about timing
If your audience is global, air your webinar at a time suitable for people in most time zones. Log in at least 15-30 minutes before the beginning of the webinar to resolve any last-minute technical issues.
As attendees come pouring in, welcome them with soft background music and a countdown timer to let them know when the event will start. Respect attendees' time by starting and ending on schedule. Include natural breaks to avoid overwhelming the audience and let them chill in breakout rooms.
Less text, more fun, greater attention
Don’t bore your audience to tears with humongous walls of text. Ditch the Jane Austen novels, and keep your slides short and on point.
Don’t be shy about using visual aids like pictures, graphs, infographics, and videos. Keep it professional, but make it look more like entertainment and less like another corporate meeting. Use case studies and anecdotes. People love human stories as they help make your content more relatable.
Keep it interactive
A live webinar allows you to interact with the audience and make them feel part of the show. Use that to your advantage.
Use polls, quizzes, or live Q&A sessions to engage participants actively. Encourage attendees them to use the chat function to ask questions, provide feedback, and interact with each other.
How to promote a live webinar
Promoting a live webinar is just as important as creating one—after all, a great webinar won’t have an impact if no one shows up.
Effective promotion ensures your target audience knows about the event, feels excited to attend, and understands the value they’ll gain.
Your webinar needs a home (page)
While you can promote your webinar with social ads, you need a dedicated landing page that explains the event. This page should contain all the necessary information: the date, time (use a BIG countdown), speakers, topics, and why people should care.
Optimize it for SEO to attract traffic on Google, but keep it clean, clear, and readable.
Email marketing that doesn’t sound like spam
Ditch the spray-and-pray tactics. Target the right audiences and send punchy emails that will pique their curiosity and make them want to click. Then, close with a clear CTA and a sense of urgency (e.g., "Only 150 seats available").
Sweeten the deal
Everyone loves free stuff. Offer your audience something valuable as a bonus: a guide, template, or tool that your attendees can truly feel helpful. Offer them free resources as incentives to invite other people to the webinar.
FAQs on live webinars
Here are the answers to some of the most commonly asked questions about live webinars.
Can people see you in a live webinar?
The answer is – it depends.
Some webinar platforms stream video and audio only from the host, not the participant. Zoom Webinars is one such example. In this case, people can’t see you during the webinar.
Other platforms, like Riverside, let multiple participants turn on their webcams. Here, people can see you if you have turned the webcam on in the platform. However, these platforms also give you the option to switch off the camera.
What is the difference between a webinar and a live webinar?
A live webinar is a subset of the webinar category. Webinars can be live, on-demand, or automated. The latter two types are pre-recorded and not shown in real-time.
Are live webinars really live?
Technically, all live webinars happen in real-time and can be streamed on several social media platforms at once. Hosts and presenters can interact with the audience through Q&As, polls, and chat. However, some "simulive" webinars are pre-recorded and scheduled to play while only appearing to be live.
What is the difference between a live webinar and a live stream?
A live webinar is usually an interactive event in which the host presents a topic accompanied by media such as slides, screen sharing, PowerPoint presentations, videos, etc. Audience participation usually occurs via chat, Q&As, and post-webinar follow-ups. Registration is often required before participation.
Livestreams are one-way broadcasts with little to no engagement besides a chat. They are usually streamed on social media and consist of a presenter (usually an influencer or other online celebrity) talking or doing some activity (like playing a video game). They do not require registration, and everyone can join.


.webp)
.webp)
.webp)

