


Table of contents:
When you’re so focused on shooting the perfect video, it’s easy to overlook the quality of your audio. But your video’s audio shouldn’t be an afterthought.
Bad-quality sound can undermine the overall production value of your video content. That’s why it’s essential to prioritize high-quality audio from the get-go. This means using the right tools, software, and hardware to record the best quality audio possible.
This article is all about recording audio specifically for video. We walk you through the best equipment and software to use and how to harness the power of Riverside to get your audio and video just right.
TL;DR
- You should definitely use an external mic to capture your video’s audio.
- At a minimum, you need a mic, headphones, and high-quality recording software to record studio-quality audio for your video.
- Riverside offers you the easiest way to record top-quality audio and video in one platform.
- Other factors to consider include: your recording environment, mic etiquette, and harnessing the audio-specific features your recording software offers.
What do you need to record audio for video?
It would obviously be easier and more cost-effective to stick with your camera’s in-built mic to record audio for your video. But this is a big mistake if you want to capture high-quality audio that does your visuals justice. Here’s a guide to what you’ll need to record good audio for your videos:
Hardware
First up is hardware. You don’t need to go overboard with your setup, but you’ll need a few basic items:
Choosing a microphone
A microphone is the most important part of recording high-quality audio. Choosing a mic can be intimidating, especially because there are so many different types. Here’s a quick guide to what you need to know:
Pick-up direction
A mic’s pickup pattern tells you how well it picks up audio from different directions:
- Unidirectional mics focus on audio from a single direction, usually directly in front of the mic.
- Cardioid polar patterns are the most common type of unidirectional pickup direction.
- Bidirectional, also called ‘Figure of Eight’ mics, are sensitive to sound coming from the front and behind the mic.
- Omnidirectional can record sound from 360 degrees around the microphone.
The best polar pattern for your setup depends on the type of audio that you’re recording. If you’re recording solo or have the budget to buy a mic for each individual participant, then a unidirectional mic makes sense.
A bidirectional mic makes sense if you typically do interviews with one other person. Meanwhile, an omnidirectional mic is the logical choice if you want a mic that can record a group of people.
Dynamic vs Condenser Mics
Dynamic and condenser mics work in different ways. But we won’t go into the physics of it. What you need to know is that the difference in their construction means they’re better suited for different environments and set-ups:
Dynamic Mics are usually better for recording general vocals. Though they capture audio well, the quality won’t necessarily be as crisp or accurate as a condenser mic. On the flip side, dynamic mics tend to be more budget-friendly, durable, and don’t require a power source to work.
Condenser Mics offer super accurate and clear audio recording. But they also tend to be more delicate and prone to breakages. They’re best suited in protected studio environments but also can come with a much higher price tag.
Types of Mics
Finally, microphones come in all sorts of shapes and sizes. Let’s take a look at when each type is most suitable:
- Lavalier mics are great for on-location, ‘street’ interviews, or if you’re looking for a hands-free solution. Check out the Shure MOTIV MVL or the Rode smartLav +
- Shotgun Mics are unidirectional mics that let you hone in on a single audio source even in busy environments. You can get shotgun mics that sit on top of your camera, which makes for a sleek video recording setup. The RODE NTG3 and VideoMic Go II are great options.
- Handheld Mics are mostly for live recording environments such as panel discussions, presentations, or concerts. Take a look at the Neumann KMS 105 or Earthworks SR314
- Headset mics are attached to headphones and are a favorite among streamers. Not all creators like them, though, because they get in the way visually. The Corsair VIRTUOSO RGB Gaming Headset is a good example.
- Studio / Podcast Mics are microphones specifically for podcasting or studio contexts. These sometimes come with an in-built stand or pop filter and optimized features for capturing voice recordings. The ultimate professional mic is the Neumann U87. For more budget-friendly options, look at the Shure MV7X
Read more: 10 Best Microphones for YouTube Videos (Based on Top Creators)
Microphone accessories
You might want to get a pop-filter, boom arm or mic stand to finish your recording setup. These are important for optimizing the quality of the audio your microphone is able to record. Try the Nady MPF-6 pop-filter and the Rode PSA1 boom arm.
Headphones
Headphones are another important part of an audio recording setup. You might not realize this, but headphones allow you to closely monitor how your audio sounds and ensure it’s top quality.
You don’t need a super expensive or elaborate pair, but make sure to prioritize comfort. You’ll be wearing your headphones for long periods.
The Audio Technica ATH-M30X is a great budget option. For a higher-end alternative, try the Beyerdynamic DT 770 Pro.
Software
Finally, you need software to capture your video and audio recordings. When choosing your audio and video recording software, here’s what to look for:
- Local recording where participants audio and video records on their own devices rather than over the internet. This ensures no internet issues ruin your recording quality.
- Recording quality- Look for a platform with at least 41kHz audio and 720p video, but for the best results choose software with 4K video and 48kHz audio resolution.
- Multitrack recording so that you record each participant’s audio and video onto a separate track. This makes your life a lot easier during post-production.
- Uncompressed and lossless files which preserve the quality of your original recording.
- Accurate Transcriptions to make it easy to repurpose your content and add captions to your videos
- Audio enhancing features such as background noise clean up and auto track syncing
- Easy to use. You want software that proactively improves your workflow rather than getting in your way.
- Built-in editor that speeds up the post-production process
- Other features such as social media Clips and the ability to livestream
- Good value for money, there’s no point in breaking the bank for a software that doesn’t do its job. Your software should give you a serious bang for your buck.
Riverside is one of the best options out there (more on this later).

Tips for Recording Audio for Video in High-Quality
Recording high-quality audio for video isn’t just about your equipment, though. There are a couple of other factors you need to get right.
Choose the right recording environment
If you’re not recording in a professional studio, you need to do everything possible to optimize your audio recording space. Avoid rooms with echoes or a lot of background noise. If you can, try and sound treat your space before recording.
Setting up
Before you jump into recording, you need to set yourself up for success by toggling your audio levels and mic positioning.
Gain Staging & Audio Levels
First of all, you need to gain stage.
Gain is measured in decibels or dB and refers to the amount of amplification that a certain signal gets. You need to optimize your gain levels to ensure you can record your sound sources properly. This is also important for avoiding distortion of your audio.
Ideally, your audio levels should be between -10db to -20db. But don’t stick too closely to the numbers - instead, use your ears to determine the right levels.
Mic positioning
Don’t be too laissez-faire about where you put your mic. This can make all the difference.
Getting your mic positioning right is a delicate balance - you don’t want to be too close or too far. A good rule of thumb is to place your mic around 4 inches away from the sound source. You should then do some audio tests whilst adjusting the distance to land on the optimal position.
Also, if you’re working with a lavalier mic, make sure the mic is pointing directly at the subject’s mouth. Depending on what they are wearing, you might run into trouble keeping the mic stationary or preventing it from rubbing on their clothes.
Recording (separate tracks)
Recording each audio source on separate tracks is essential for high-quality audio. As we mentioned earlier, you should definitely seek out software that does this automatically.
Multitrack recording is important for two reasons:
- During your session, you can customize the audio levels to match the audio source and maintain consistency across the board.
- This gives you the freedom to edit each track individually during post-production rather than one consolidated track.
Wear Headphones
Wearing headphones makes a huge difference when you’re recording audio for video. The ability to hear yourself as you’re recording means you can continually monitor your levels and make sure you’re capturing the best audio possible.
When your microphone picks up unintended sound sources, this is known as ‘mic bleed’ or ‘spill’. This interferes with the integrity of your audio recording quality. This can also happen if your headphones let sound escape too easily. That’s why wearing a high-quality pair of headphones is really important for minimizing mic bleed.
Post-production
Once you’ve got your raw audio recording, it’s time to work some magic during post-production.
Syncing audio
An important step during post-production is syncing up your audio recordings with your video. Depending on the software you’re using, some features may help you do this.
For instance, with Riverside, you can download a synced version of your audio and video tracks. If you edit your recording using Riverside’s new text-based editor, our multi-track sync ensures everything stays aligned even when you make changes.
Mixing
Mixing audio is where you refine and optimize your audio recordings. This involves cleaning up your raw audio, cutting irrelevant segments, adding transitions and faes, and more. Some software has automatic features such as noise reduction to help you get started.
Effects
You can also add sound effects and other media to your recording during post-production. For video productions in particular, you may want to add music or soundtracks to complement the visuals on screen.
Read more: How to Improve Audio Quality of a Recording: 10 Effective Tips
Recording audio and video with Riverside
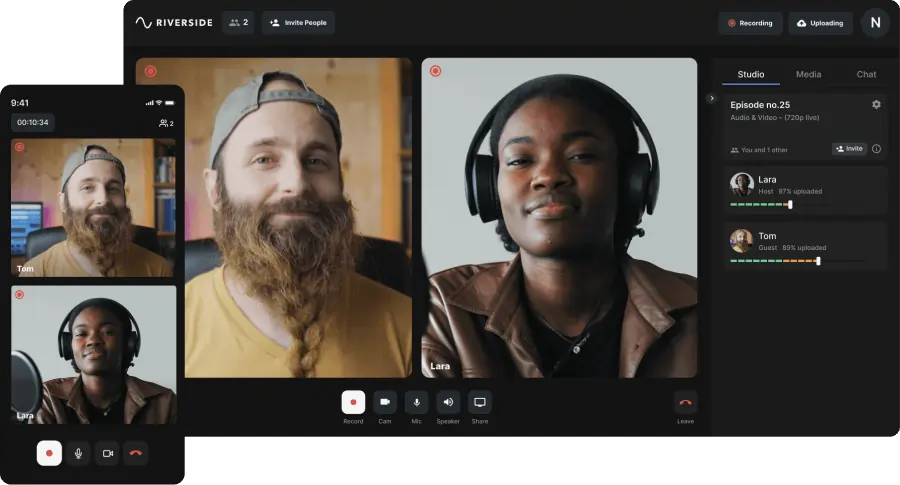
In this section, we’re diving into how Riverside makes recording both high-quality audio and video a breeze.
Riverside is a browser-based recording studio for recording professional-quality audio and video with remote participants. There are no compromises here regarding how good your recordings look and sound. And all the features you could possibly need are packaged in a sleek and intuitive interface that’s a joy to use.
Let’s take a look at some of Riverside’s key features:
- Local recording with up to 10 remote participants
- Records up to 4k video and 48kHz audio, automatically uses lossless and uncompressed file formats (MP4 and WAV)
- Automatic multitrack recording with synced audio and vide tracks for each participant
- Ultra-accurate AI-powered transcription in over 100 languages
- Background noise removal to help you clean up your audio
- Text-based video and audio editor that makes post-production as easy as editing a recording transcript.
- Native media board to help you add effects and music to your project
- Create short-form promotional videos in just one click, using Riverside’s Magic Clips tool
How to record Audio & Video with Riverside
Here’s a quick guide to recording your high-quality audio and video using Riverside:
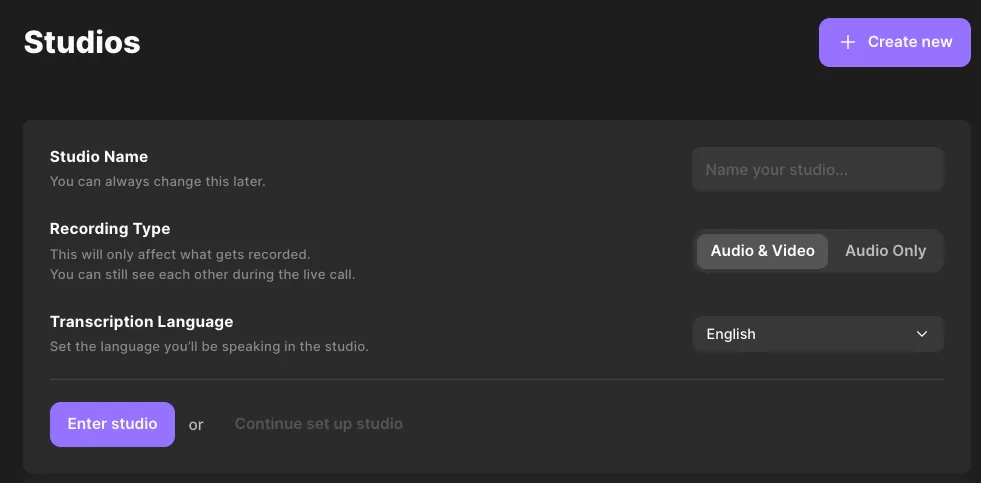
Step 1: Sign up and create your Riverside account. Login and head straight to ‘+ Create new’
Step 2: Add your studio’s name and select ‘audio & video’ as your recording type. When you’ve done that, click ‘Enter studio’.
Step 3: Check your appearance, add your name and make sure your camera and mic are showing up properly. Click ‘I am using headphones’ if you’re wearing any.
.webp)
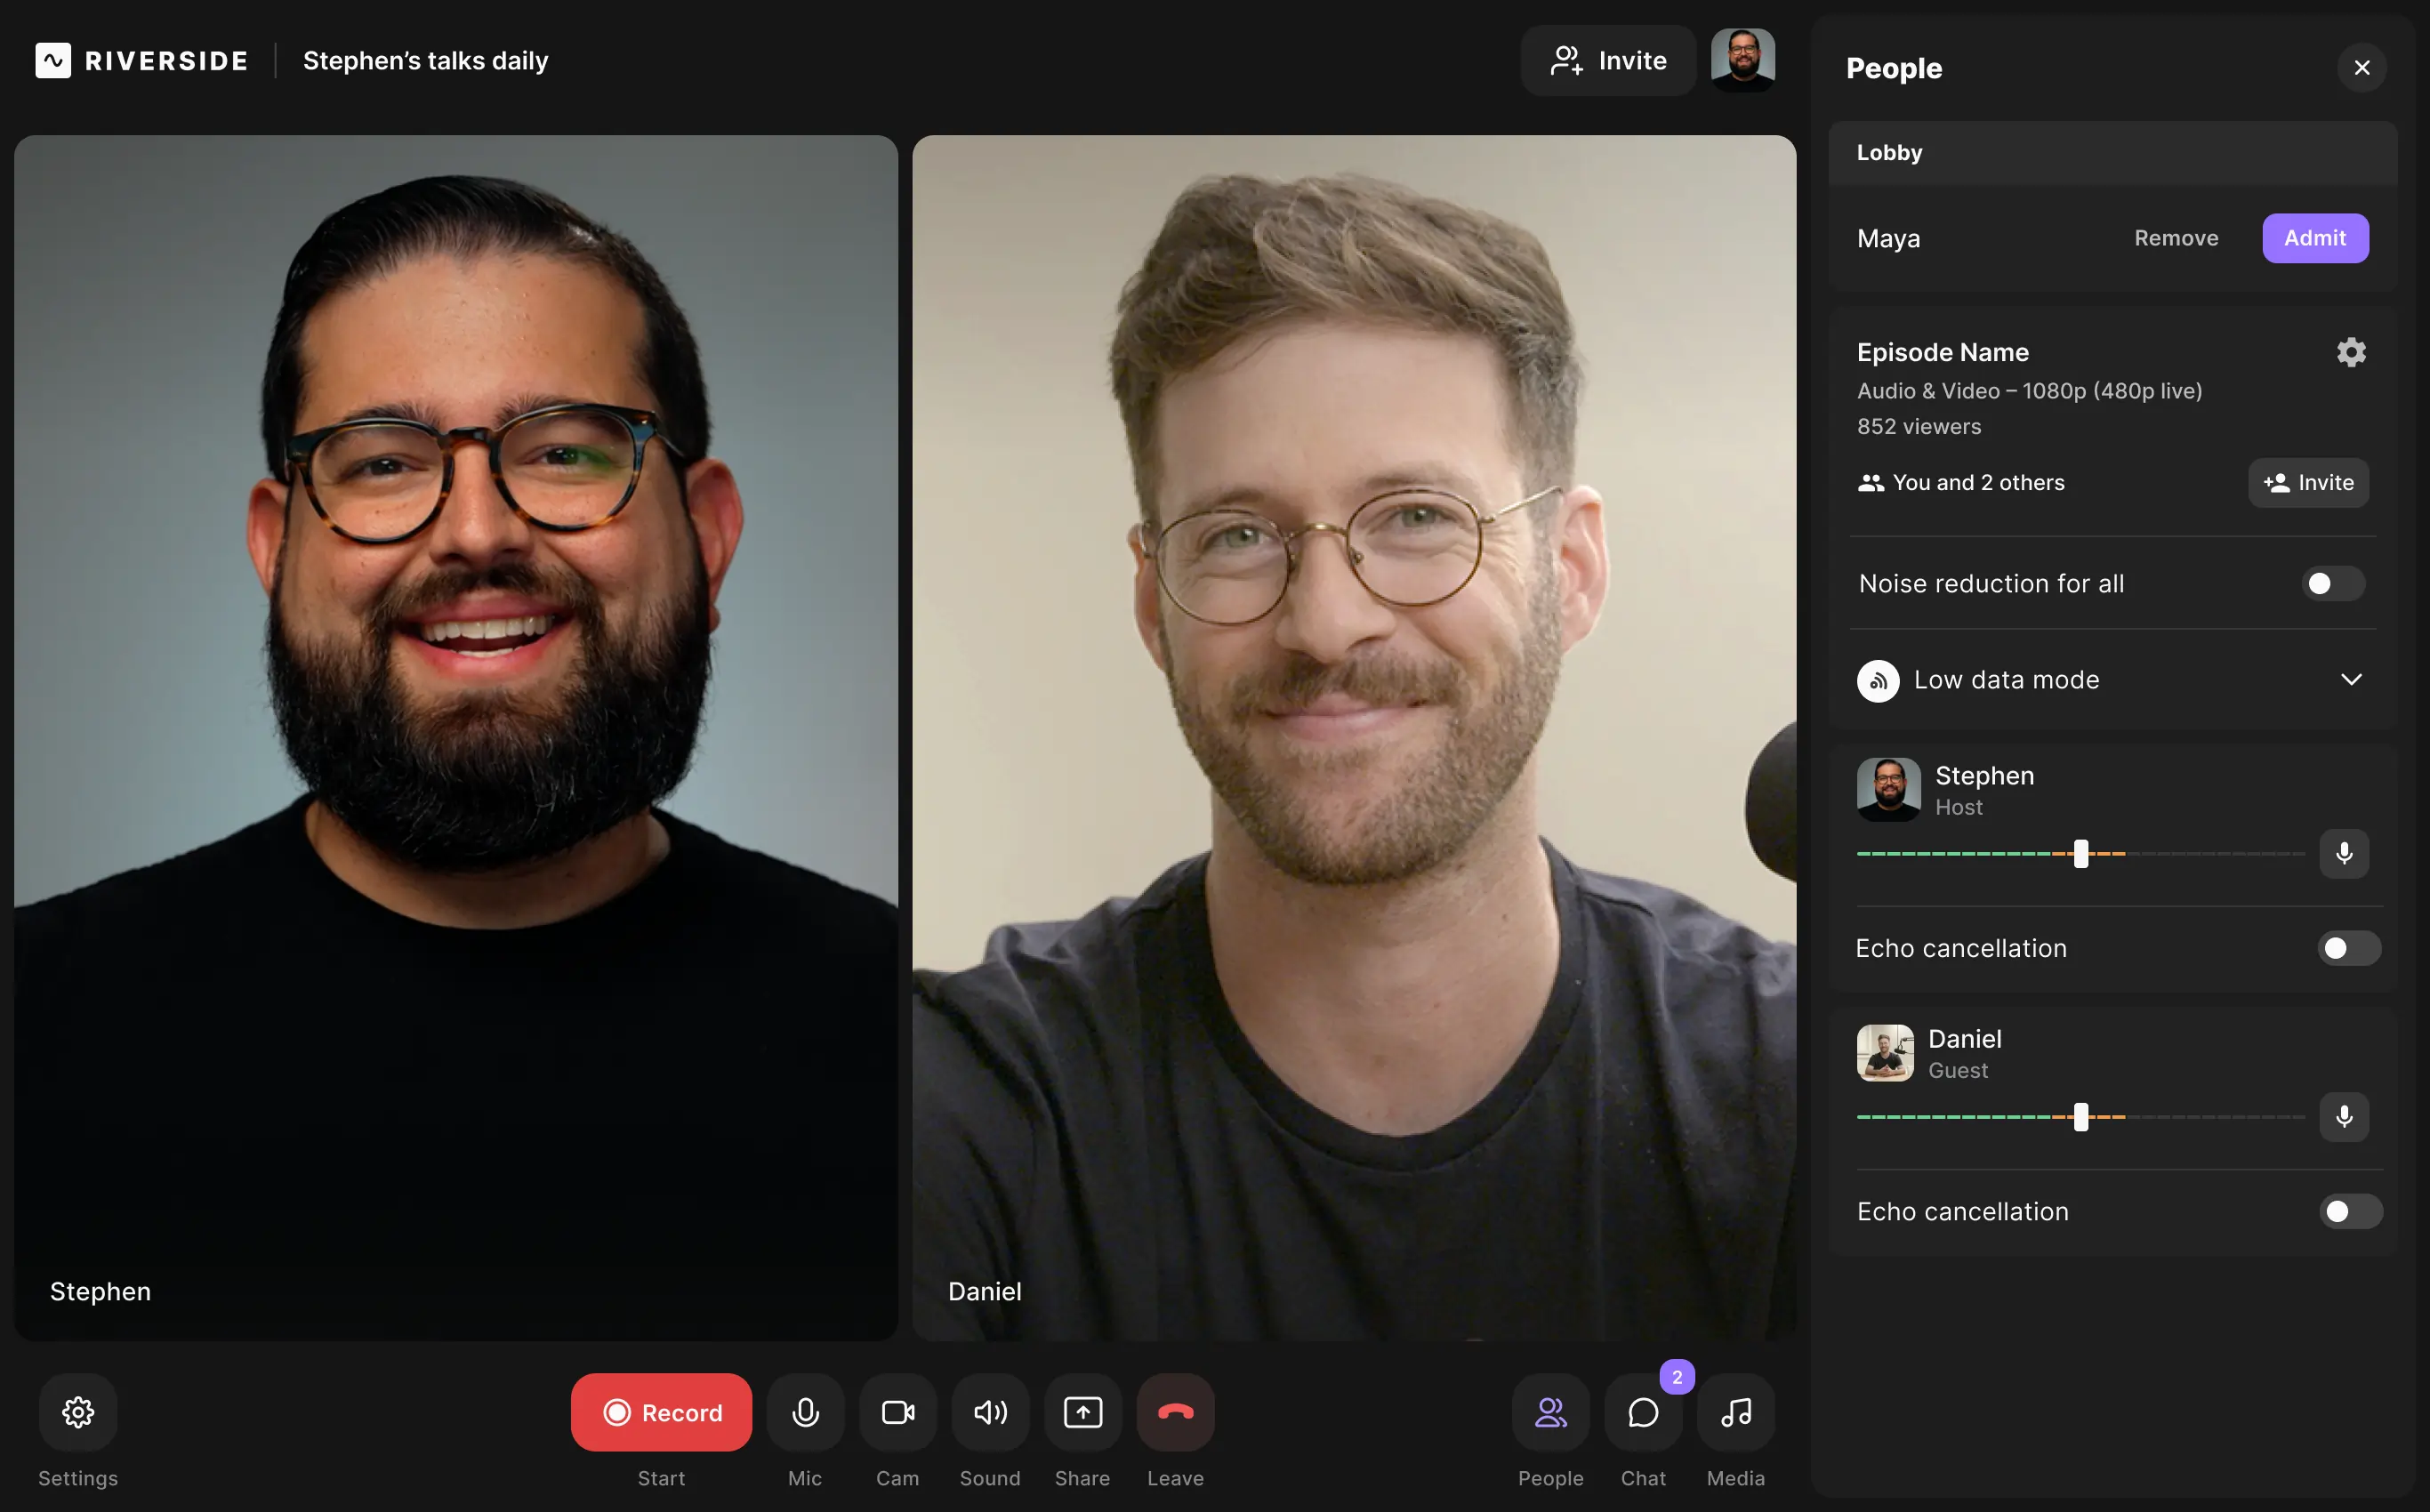
Step 4: Hit ‘Join Studio’. When you land in your recording studio, you’ll need to invite your remote guests by sharing the link. You’ll find the link on the right hand panel of your screen.
Step 5: When everyone is ready to record, hit the red ‘record’ button on the bottom of your screen. You can toggle ‘noise reduction’ and ‘echo cancellation’ for all participants on and off on the right hand side of your screen.
Step 6: When you’ve wrapped up your recording, hit the red ‘hang up’ button and click ‘end session for all’.
Step 7: Riverside will automatically redirect you to your recordings page. Here you’ll find each separate track ready for download. You can also head straight to Riverside’s text-based editor.

FAQs on Recording audio for video
Can you record audio for video only using a phone?
If you’re tight on budget or don’t have a mic to hand, you can definitely use your phone to record audio. If this is going to be your permanent setup, though, we’d recommend investing in a mic that connects up to your mobile for maximized audio quality.
What do YouTubers use for recording audio?
Every creator has their own setup, so depending on who you ask, you’ll probably get a different answer. Some favorites, though, are Riverside, Premiere Pro and Final Cut Pro.
How do I record clear audio for video?
Recording high-quality audio for video requires the right kind of equipment and tools. Make sure to get yourself an external mic wherever possible. And use Riverside to maximize the quality of your remote participant’s audio too.
Should I record audio and video separately?
Recording your audio and video separately is a must if you want the best quality possible. Software like Riverside automatically records your audio and video separately, so you don’t even have to think about it.
Read more: How to Record Audio and Video Separately For Smooth Syncing
How can I record audio and video on my computer for free?
You can use Riverside for free. Since Riverside is browser-based, you don’t even have to download anything to get started. You get unlimited recording time on the free plan, so you can record to your heart’s content.


.png)

