Table of contents:
TL;DR
- Garageband is Apple’s music creation studio that comes free with every Apple device.
- It’s good for podcasting because it’s free, easy to use, and supports MIDI.
- Some cons include the fact it’s exclusively for Apple users & that it may be too simple for pro podcasters
- You can record a multitrack podcast on Garageband, and you can also trim audio and add music.
Everyone is familiar with Garageband. And that’s the reason it’s so popular. Given it’s free (with Apple devices), easy to use, and so ubiquitous, it’s a great choice for podcasters looking for a budget-friendly and intuitive interface to record and edit their audio with. That being said, even if you think you know how to use Garageband, that doesn’t mean you know all the best tips and tricks for getting the most out of the software when it comes to podcasting.
In our full guide, we’ll give you a full walkthrough to Garageband from a podcaster’s perspective, so you find out everything you need to know to start recording and editing like a pro.
Is GarageBand good for podcasting?
Before we dive into how to use Garageband for podcasting, we should stop and ask ourselves whether it’s actually a good choice. Here are some of the pros and cons of podcasting with Garageband:
Pros of Garageband
Budget friendly
The fact that Garageband comes with any Apple device is a huge plus, especially if you’re on a tight budget. If you already own an Apple device, you won’t need to shell out for specialist editing and recording software.
Easy to use
Apple products are notorious for being intuitive and easy to use. And Garageband is no different. There is no steep learning curve or tricky features, you can just dive straight into podcasting.
Use on iPhone & iPad
Another advantage of Garageband is the fact that there are now mobile and tablet apps that allow you to work across devices instead of being tied to your desktop.
Supports MIDI
Garageband supports MIDI, which stands for Musical Instrument Digital Interface. This essentially means that you can record various MIDI inputs and use a MIDI controller if you want to.
Cons of Garageband
No remote recording
One disadvantage may not pose an issue all the time. However, if you’re looking to record with remote guests, the fact that Garageband doesn’t have this as an integrated feature could get frustrating and result in low-quality remote recordings.
Must be using Apple devices
Additionally, although it’s great for Apple users, if you don’t own or like to use Apple devices, Garageband won’t be an option.
Beginner-oriented
If you’re looking for professional-grade software, Garageband probably won’t fulfil your criteria.
Is Audacity or GarageBand better for podcasts?
The answer to this is not straightforward and will most probably depend on who you ask. Here is a brief outline of the key differences:
Garageband is easier to use
We would argue that Audacity can’t really compete with Garageband’s sleek and intuitive interface. It’s super user-friendly and frankly, a delight to use. By contrast, Audacity feels a little clunky or outdated.
Audacity caters to a more professional audience
Though Garageband wins on useability, Audacity is probably stronger when it comes to its actual features and functions. Audacity is a great option for pro podcasters looking for that granular control of their audio.
Audacity is less exclusive
Since Garageband is a purely Apple product, it is not accessible for non-Apple users. Audacity, on the other hand, is available to everyone and anyone that wants to use it.
Garageband supports MIDI recording
Since Audacity doesn’t support MIDI recording, that may be a deal-breaker for some podcasters.
How do I make a podcast in GarageBand in 2022?
Since useability is a fundamental characteristic of Garageband, making a podcast on Garageband is super straightforward. In this Garageband podcast tutorial, we’ll walk you through the process from start to finish. You can start with the video below and then move on to our step-by-step guide.
Setting up GarageBand for podcasting
Before we get to recording, you need to ensure you’ve got everything set up correctly.
How to set up your recording equipment on GarageBand
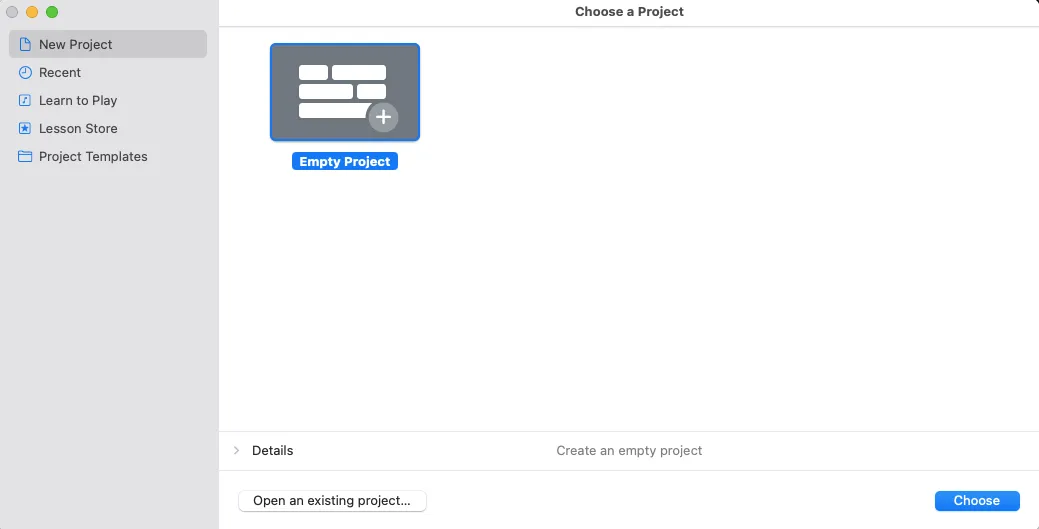
Step 1: Start by opening Garageband and selecting ‘Empty Project’, then name your new project.

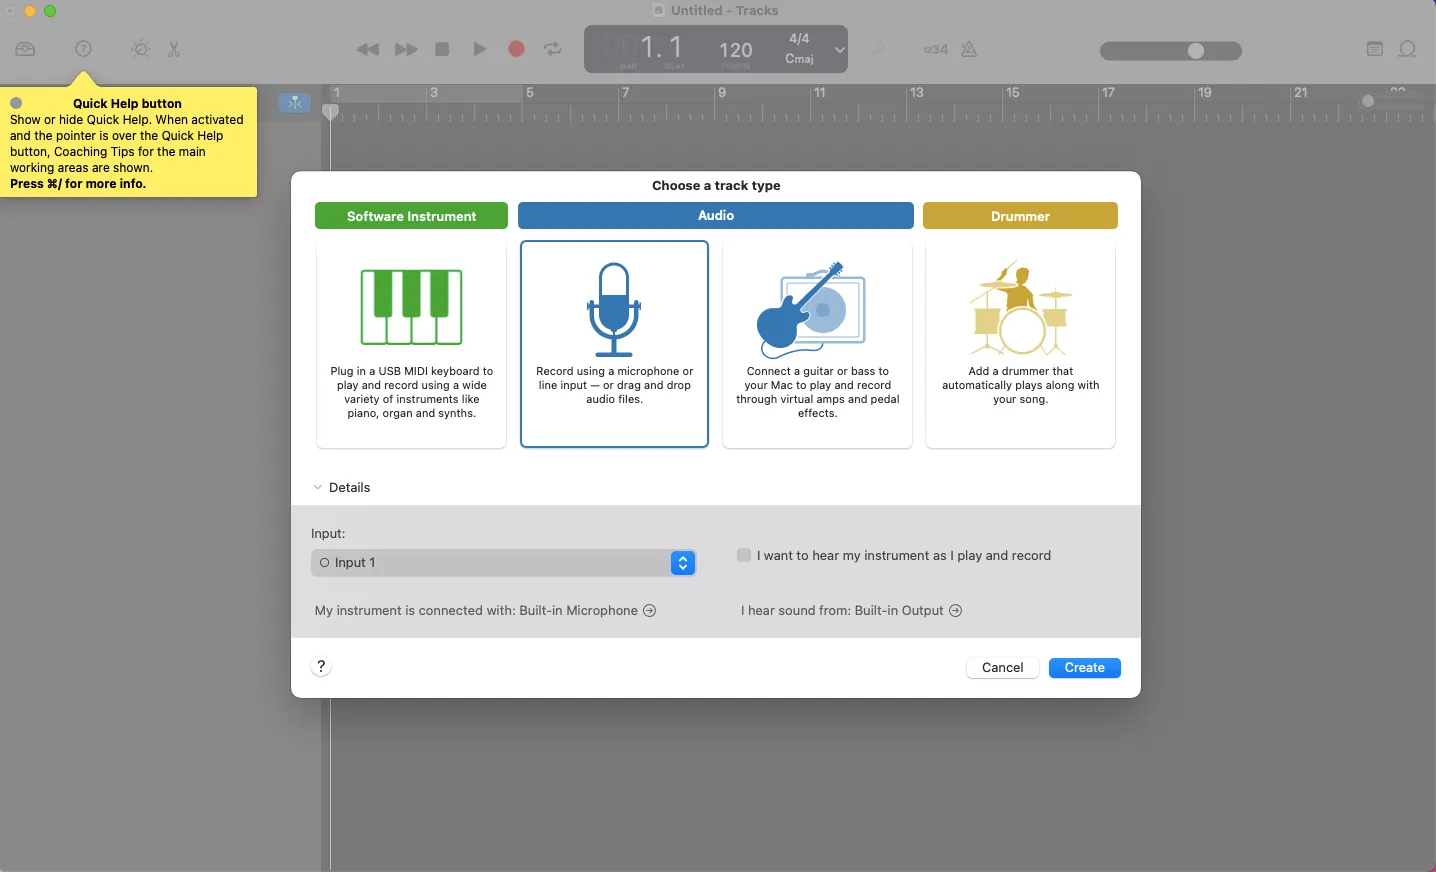
Make sure to choose ‘Microphone’ as your track type and select the right input for your mic.

Note that if you’ve got multiple mics you’ll be recording with, you will need to create a separate track for each. You might also want to add a track for any sound effects or music that you intend to use during your recording.
Make sure to rename each track to reflect which mic/which speaker it’s recording so that you don’t get confused later!
.webp)
Step 2: Make sure to turn off the metronome and count-in features by clicking them in the top right of your window.

How to record a podcast on GarageBand
Once you’ve got everything set up and have added all your relevant tracks, you should be ready to start recording.
Singletrack podcast recording
If you’re recording with a single mic, you can go ahead and hit the record button. You’re ready to go.

Multitrack podcast recording
If you are doing a multi-track recording, then you need to ensure you configure your settings correctly:
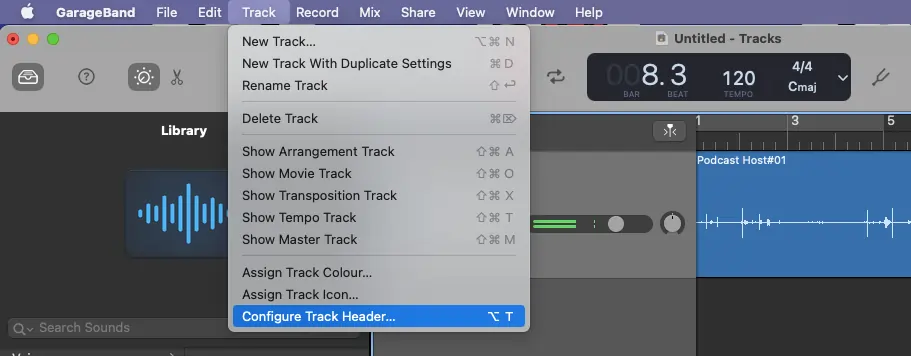
- Click on ‘Track’ in your menu bar and then ‘Configure Track Header’.

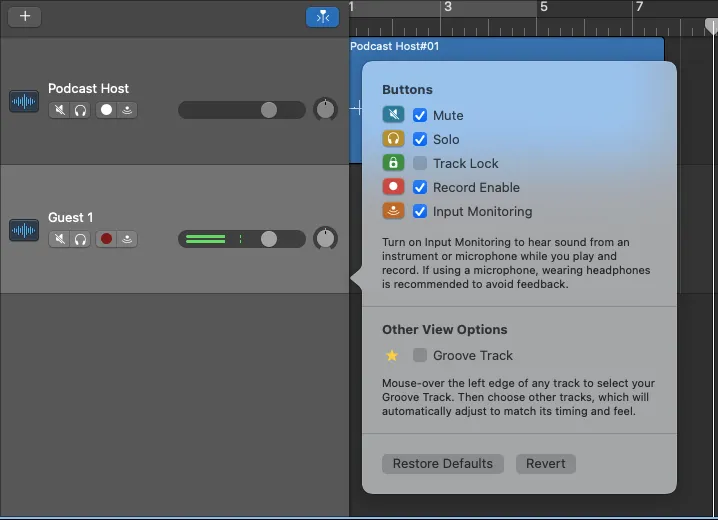
- Make sure that each track that you want to record has the ‘record enable’ button turned on. The button should turn red when the track is set to record.

How to edit podcasts with GarageBand
When you’ve wrapped your recording session, it’s time to edit your podcast and get it ready for publication. Garageband lets you edit, manipulate, rearrange, and embellish your recording to your heart’s content.
If something went wrong during the recording, you can cut that segment out. If you want to rearrange or re-order the various sections of your recording, you can also do that easily. Here’s how:
How to move tracks around in Garageband
To move your tracks or audio clips around, all you need to do is click, hold and drag.
How to trim your audio in Garageband
If you want to edit the length of a specific track, first hover over the edge of the track. When your cursor changes to the double ended arrow, click, hold and then drag the track to the desired cut off point.
How to split your audio in Garageband
If you want to separate two sections of audio, click on the point where you want to divide the track and then press ‘Command + T’ on your keyboard. You can also head to your menu and click ‘Edit’ > ‘Split Regions at Playhead’.
How to delete audio in Garageband
If you want to completely delete a segment of your audio, all you need to do is click on the specific section and then hit the backspace button.
How to add music to a podcast on GarageBand
If you want to add music or sound effects to your podcast, you can simply drag and drop the audio file into your project. You can add it to an existing track or to a new one.
You can also choose to use one of the sound effects or loops included in the Apple Loops catalog. Head to the Apple Loops logo in the top right of your window (it looks like a circle), select the loop you want to use, and then click and drag it onto your timeline. It will automatically be added as a new track.
How to mix your podcast audio on GarageBand
Mixing is a fundamental part of fine-tuning your podcast audio and getting it perfect for publication.
To toggle and adjust a track’s volume level, head to the ‘track header’ and simply drag the volume slider left or right depending on whether you want that track to be quieter or louder.
If you want to add a fade out, you can head to ‘Mix’ in your menu bar and click ‘Create Volume Fade Out on Main Output’. This will insert an automated fade out.
You can also add a manual fade out by pressing A on your keyboard. This will make a yellow line appear along your track. Click on the yellow line and then drag the dots to create a fade out that meets your requirements. You can use the same method to create a fade-in effect.
Exporting your podcast from GarageBand
When you’re happy with your final recording, it’s time to export your podcast from Garageband. Head to ‘Share’ and then ‘Export Song to Disk’. Give your file a name, select where you want the file to be saved and in what format. For the best quality audio choose ‘WAV’ and ‘Uncompressed 16-bit (CD Quality)’.When you’re done, hit ‘Export’.
Riverside: An alternative to GarageBand for podcasting
Though Garageband is definitely a good option for podcasting, it’s not the only (or best) one out there by any means. This is especially the case when it comes to recording with remote guests. That’s where Riverside comes in - a browser-based recording platform that is perfect for all podcasters. Here’s a brief overview of why Riverside is a great alternative to Garageband:
Easily record with remote guests
Recording with remote guests is part of Riverside’s DNA. Since Riverside automatically records locally on each participant’s device, you can record HD audio and video remotely without ever needing to worry about dodgy internet connection.
Lossless multi-track recording
Riverside audio recordings are always HD with up to 48kHz WAV audio and up to 4K video resolution. And each participant’s audio is automatically captured on an individual track so that you have as much control as you need in post-production.
Budget-friendly
Riverside has a free plan. You’ll get unlimited recording and editing, so even if you’re playing with a smaller budget you can enjoy its whole range of features. And if you want to upgrade to the standard plan it starts at only $15/month.
Livestreaming
Beyond simply recording podcasts, Riverside lets users livestream direct to their audience on Twitter, YouTube and Facebook.
Integrated text-based video editor
Just like Garageband, you can record and edit your podcast all in one place with our intuitive text-based editor. Riverside uses Ai transcriptions to make editing videos literally as easy as editing text. With every recording, you'll find a transcript of your video in the editor. Any text you delete in your transcript automatically removes the corresponding sections in your recording timeline. You can also use these transcripts' speaker detection, along with our search bar to find specific phrases and navigate through your video without needing to rewatch anything. Once you've cut out all you want, you can:
- Expand your podcasts reach with short-form content. Our Magic Clips tool uses Ai to transform your recording's key moments into short shareable clips.
- Fine-tune your audio automatically with just a few quick clicks. We have a Magic Tool for removing long silences, but you can also remove background noise and normalize your audio levels.
- Customize your podcast layout. Change your background,or add your own logo.
If you want to speed up your production 3x faster, then Riverside is for you.
Mobile app
You can record your podcast on the move using Riverside’s iOS and Android apps.
Want to see all these features for yourself? Start recording your podcast on Riverside. Sign up today for free!
FAQs on GarageBand for Podcasting
What is the best way to record a podcast on Mac?
If you want to use Apple’s native music creation studio, you can use Garageband. However, you could also opt for Riverside which is browser-based
Can you use GarageBand to edit a podcast?
Garageband has a whole suite of editing and mixing features that make it easy to transform your audio recording into a fully-fledged podcast.
How long can you record a podcast on GarageBand?
As it stands, Garageband has a maximum recording length of 72 minutes.


.webp)
%20(1).webp)
-(1).webp)


