Table of contents:
Facebook Live streaming requirements
How to go live on Facebook from a desktop
How to schedule a live stream on Facebook
How to live stream to a Facebook group
How to live stream to a Facebook page
How to go live on Facebook from the mobile app
How to live stream to a Facebook group from the mobile app
How to live stream to a Facebook page from the mobile app
How to go live on Facebook using streaming software
Tips for successful Facebook live streaming
Key takeaways:
- You can go live on Facebook on a desktop or mobile device.
- You can also use streaming software to push a stream live on Facebook.
- To stream on Facebook you’ll need a streaming device, a webcam, mic and headphones.
People spend 3x more time watching live-streaming content than pre-recorded videos? With 2.09 billion users actively accessing Facebook every day, Facebook Live is one of the platforms you don’t want to ignore.
But Facebook Live’s interface can be a bit confusing at first, and knowing how to maximize the platform’s potential can prove to be a challenge.
In this easy-to-follow guide, we'll provide step-by-step instructions on how to go live on Facebook from a desktop, smartphone, or with streaming software like Riverside.
Keep reading to learn more!
Table of contents:
- Facebook Live streaming requirements
- How to go live on Facebook from a desktop
- How to schedule a live stream on Facebook
- How to live stream to a Facebook group
- How to live stream to a Facebook page
- How to go live on Facebook from the mobile app
- How to live stream to a Facebook group from the mobile app
- How to live stream to a Facebook page from the mobile app
- How to go live on Facebook using streaming software
- Tips for successful Facebook live streaming
- Troubleshooting common issues on Facebook Live
- Final thoughts
- FAQs on how to live stream on Facebook
Facebook Live streaming requirements
Facebook Live is a great platform to gain a following and monetize your content. But you’ll need a few things to get started.
A streaming device
The device you use affects the type of streaming content you can create.
Mobile streaming provides more flexibility. It’s better for streaming on the go (for example, if you're a travel vlogger).
But, you can produce higher quality content on a desktop. You’ll have more control of your studio environment and likely more features from your streaming software.
If you want to stream gaming content on an Xbox or PS5, your console will be your primary device.
Facebook specs
If you use a desktop, your system's specs have a huge impact on your live stream quality.
For consistent video quality, choose a system with:
- An i7 processor or higher,
- 8-16GB of RAM,
- and a graphics card with at least 4-12 GB of VRAM.
This streaming setup will suffice if you're recording with one camera streaming at 1080p. But, if you want to record at a higher quality or with more cameras, you'll need a more powerful rig.
Reliable internet connection
You can't stream content on Facebook without a solid internet connection. Facebook recommends upload speeds of at least 4 Mbps.. The higher the resolution you want to stream in, the more Mbps you'll need in your connection's upload speed.
To check your current internet speed, there are many free online tools like Speedtest.net or Cloudflare’s Speed Test.
However, don’t just focus on the download speed. For live streaming purposes, the upload speed result is even more important.
Also, make sure to check that your packet loss stays under 1% for optimal streaming performance. You can run a specific packet loss test to check this value.
A webcam
You don’t have to fork out money on a streaming camera. But, you’ll want to make sure you’re using a camera with decent quality.
Pay close attention to:
- Resolution (aim for 1080p or higher).
- Field of view
- Lens quality
You can learn more in our full review of the best cameras for streaming. Some good choices include the Logitech StreamCam or the Elgato Streamcam.
If you prefer mobile live-streaming, you can turn your phone into a webcam. Lookfor smartphones with the best cameras, like the Samsung Galaxy S24 Ultra, iPhone 15 Pro Max or Google’s Pixel 8 Pro.
A microphone
A high-quality microphone can significantly improve your stream’s audio quality.
Gain an understanding of microphone polar patterns and know your recording environment to get the most out of the acoustics of your space.
USB mics are an easy plug-and-go option if you’re looking for something simple for your streaming setup. For example, you could try the Rode NT-USB Mini.
Learn more in our guide on the best microphones for streaming.
Headphones
A good pair of headphones let you monitor the quality of your live stream.
You can use any pair of headphones to listen to the general quality of your stream. But, a better pair of headphones with a wider frequency range will let you pick up on small quality issues. Some headphones also come with built-in mics. Gamers often use this as it frees up space while they stream gaming.
How to go live on Facebook from a desktop
It’s easy to start broadcasting on Facebook using a Mac or PC and a webcam. Here’s how.
Step 1: Open Facebook in a web browser on your computer.
Step 2: Click the “Live video” option next to the red camera icon at the top of your newsfeed.
.png)
Step 3: You can now choose whether you want to go live now, or schedule your live event for a later time.
For now, let’s click on “Go Live.” (We’ll cover how to schedule an event in the next section.)
.webp)
Step 4: Grant Facebook permission to access your system’s camera and microphone.
Step 5: Choose a video source. You can choose if you want your video source to be a webcam or streaming software through a stream key.
.webp)
For now, just click on “Webcam.” We will explain how to go live on Facebook using streaming software later on.
You will see a preview of your webcam capture. Here you can also change the microphone or webcam you’re capturing from.
Step 6: Complete your post details by adding a description and a title (optional). You can also choose whether your livestream will be added to your story.
.webp)
Step 7: Choose your audience, when you want to go live, and where to post your stream from the menu on the left of the screen.
Step 8: Click “Go Live” on the bottom left corner of your screen to start your stream. Note that the button will stay grayed out until everything is set up properly.
How to schedule a live stream on Facebook
Want your live stream to go live later? Here’s how to set it up.
Step 1: Open Facebook and launch Live video
Step 2: Click on “Create event” to open the scheduling tab.
.webp)
Step 3: Enter the details about your live stream
Fill in all details about your live stream on the left side of the screen. This includes uploading a cover photo, choosing the event name, setting the start date and time, and deciding who can see your show.
On the right side, you'll see a preview of how the event will appear to people you invite.
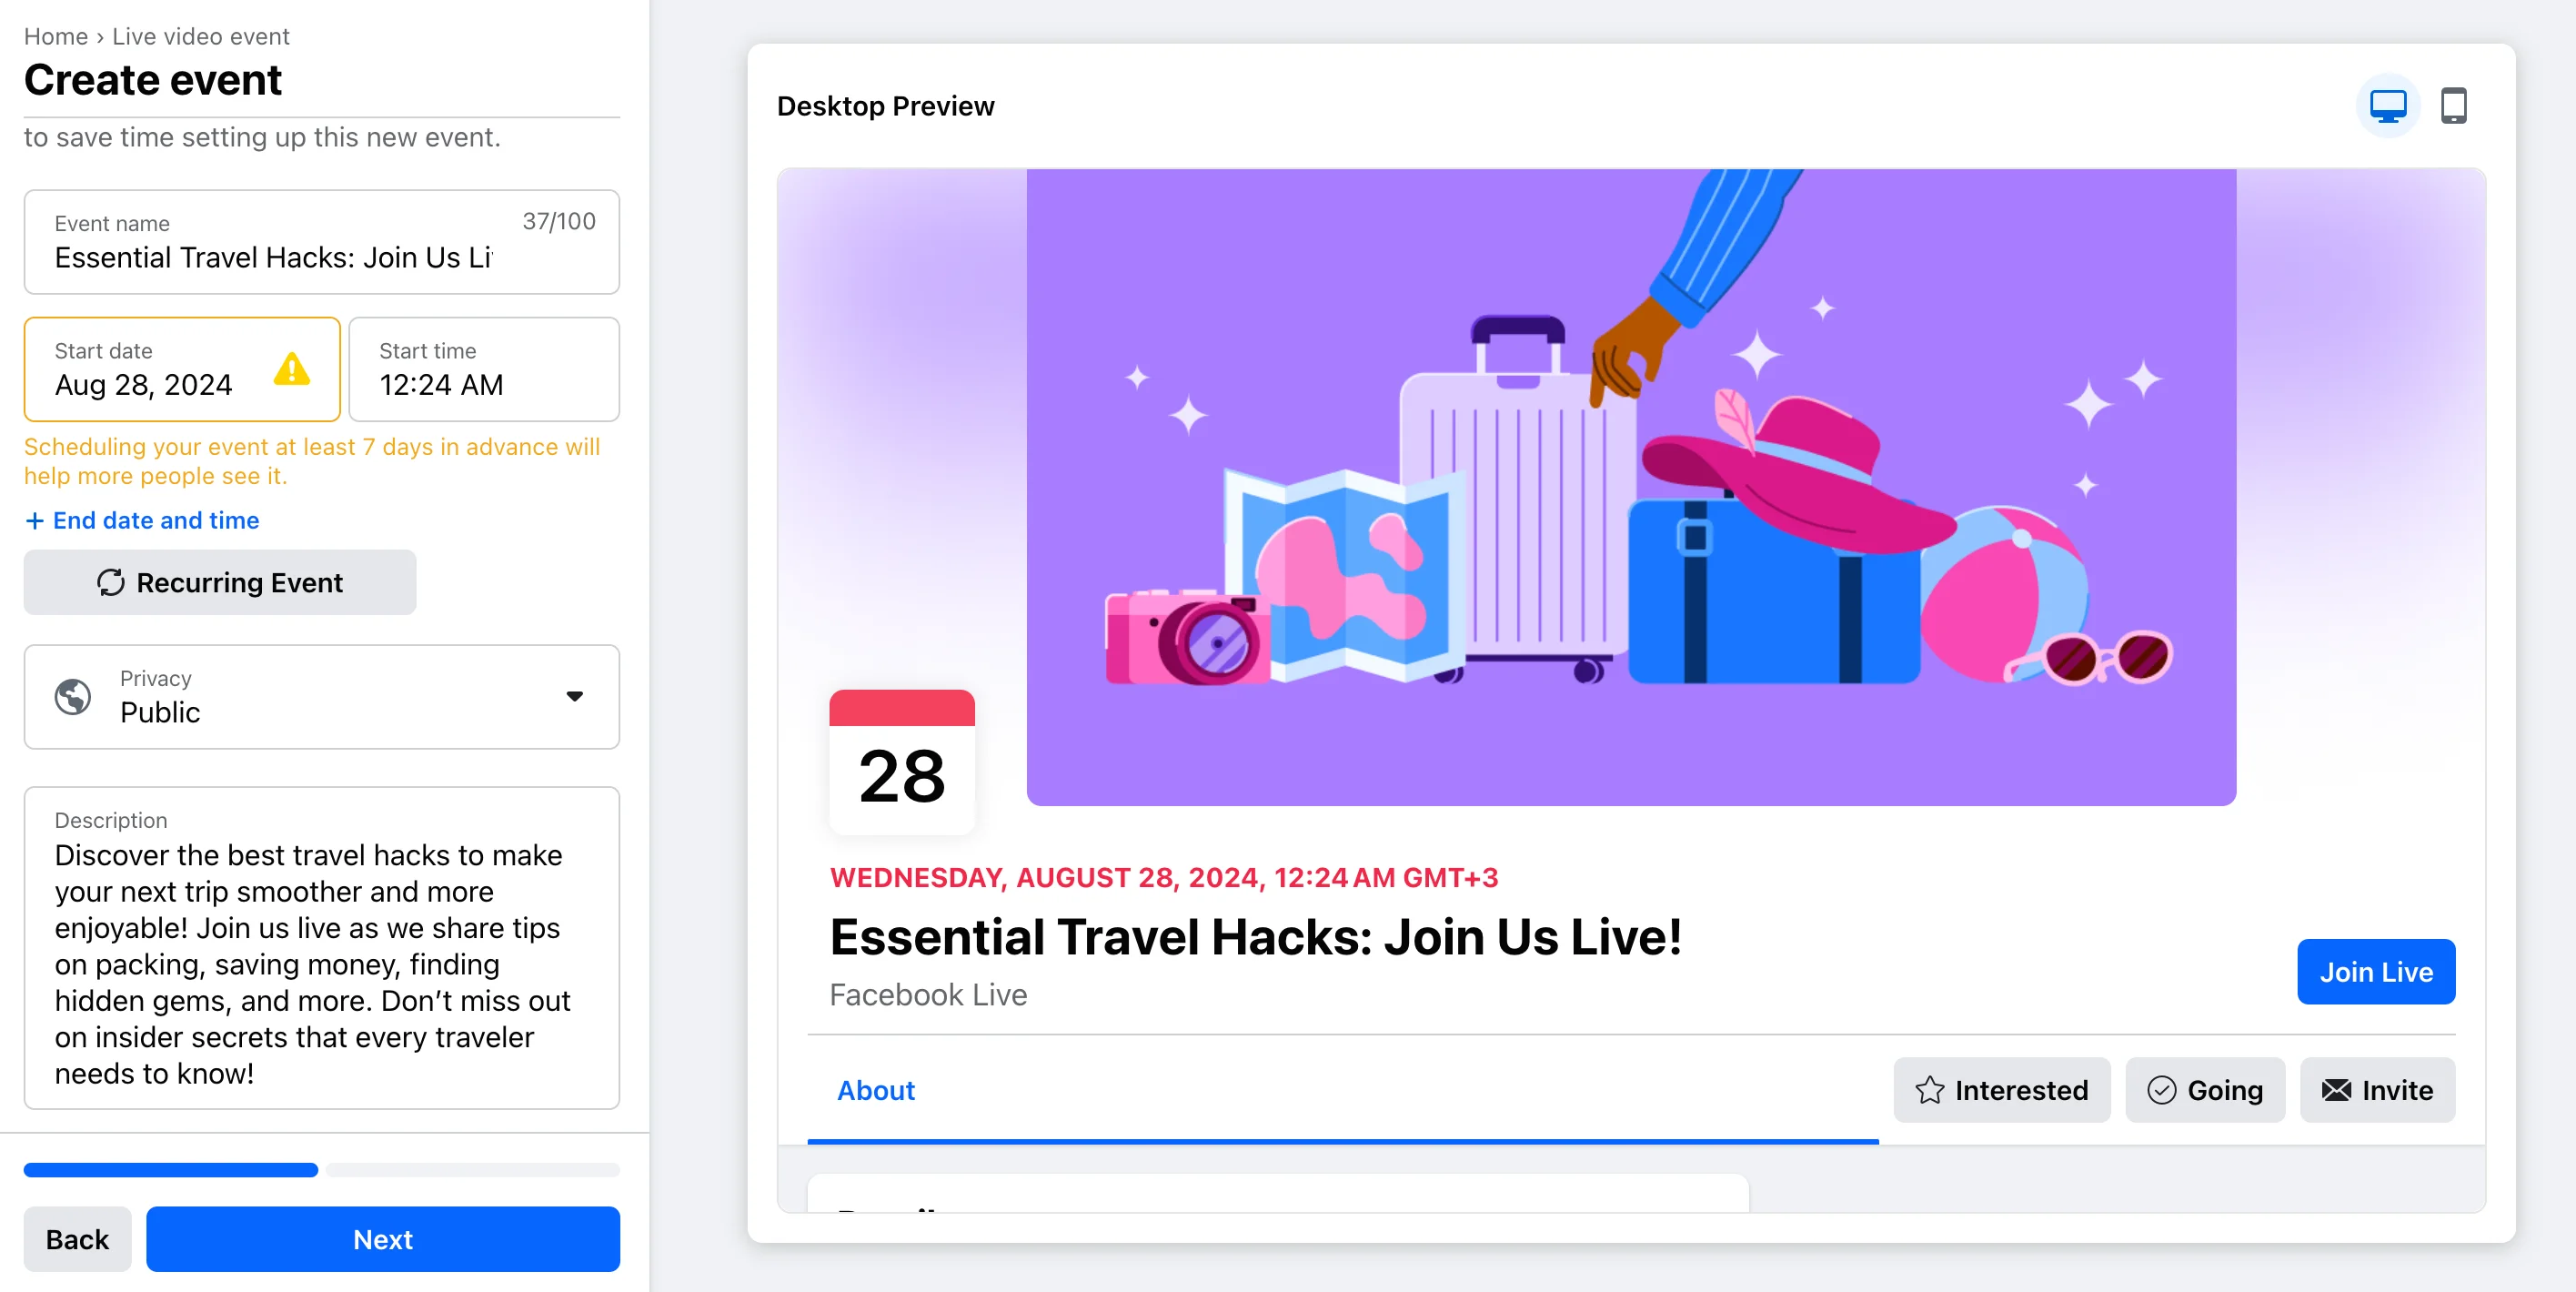
Once you're done filling in the details, click on the "Next" button in the bottom left corner of the screen.
Step 4: You can now add the final touches on the left side of the screen under the “Personalize” menu. You can add co-hosts, set up your encoder, or turn on auto-generated captions.
Once you’re done, click on “Create event” to schedule your livestream.
How to live stream to a Facebook group
Live streaming to a Facebook group is very similar to starting a regular stream. Here’s how to do it.
Step 1: From your feed, click “Groups” in the left menu and select the group you’d like to go live in.
.png)
Step 2: Once you’re inside the group, click on “Write something,” then on the three dots icon “More” to open the options menu.
Step 3: Click on either "Live video" to start streaming right away, or "Create event" to schedule your livestream for later.
.webp)
Follow the steps we described earlier for going live immediately or scheduling an event. Choose a video source and complete your post details before clicking “Go Live”.
Note: In some groups going live or scheduling a live event may be deactivated. If you don’t see the icons, ask that group’s admins whether you need special permissions for live streaming.
How to live stream to a Facebook page
If you manage your own page, you might want to start your live streams from there. Here's how to do it.
Step 1: Click your profile photo in the top right corner and switch to the page you want to use for your livestream.
Step 2: On your page, or back on the homepage, go to the "What's on your mind" status box. Click “Live video”.
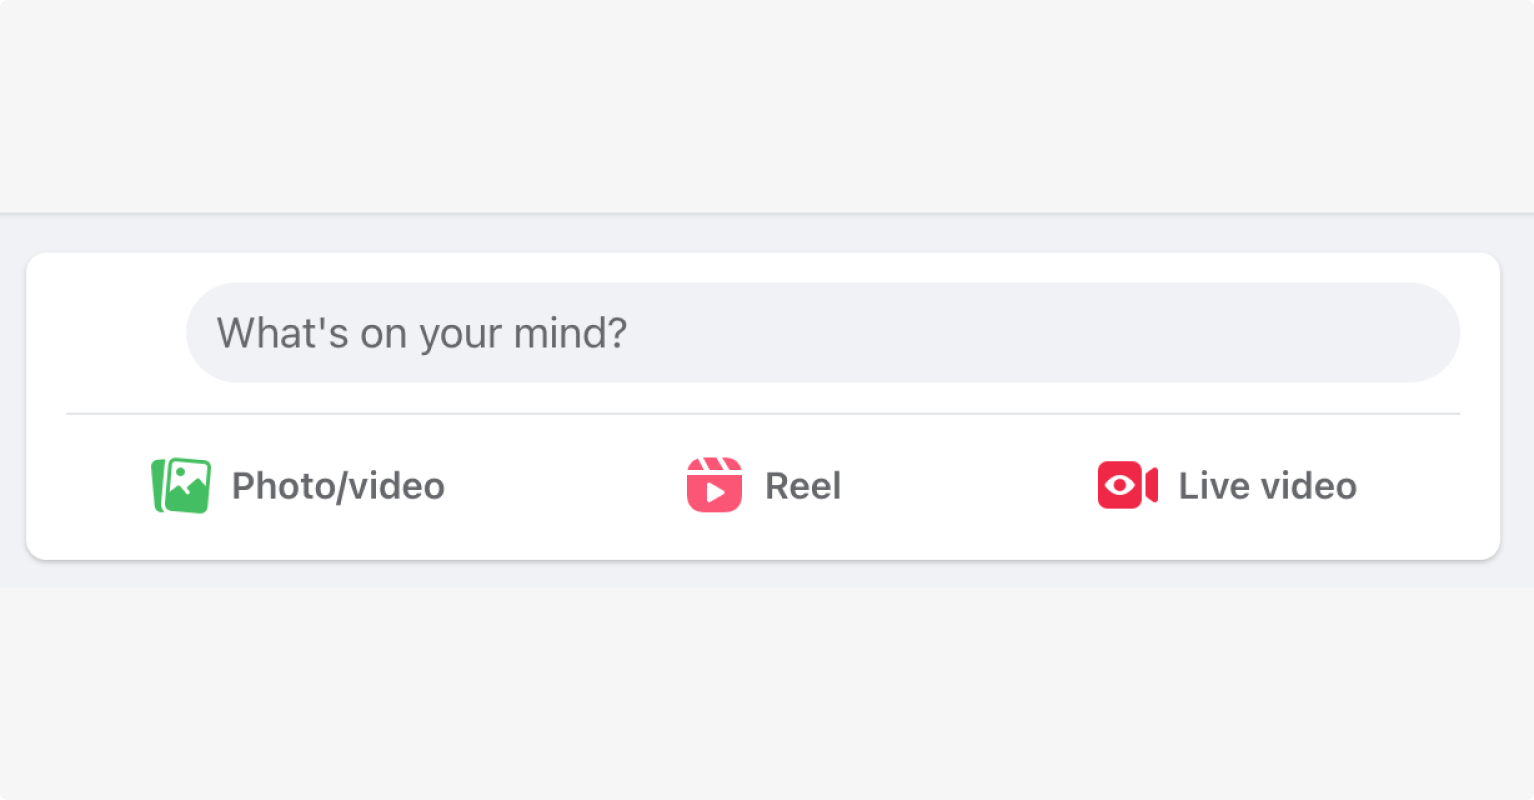
Step 3: Follow the steps we described earlier for going live immediately or scheduling an event. Basically, choose a video source and complete your post details before clicking “Go Live”.
How to go live on Facebook from the mobile app
You can start streaming with just a couple of taps using your phone as a webcam. All you need to get started is the Facebook mobile app.
Here’s how to do it.
Step 1: Open the Facebook mobile app.
Step 2: Click on “What's on your mind?” at the top of your newsfeed, then on the “Live video” icon.
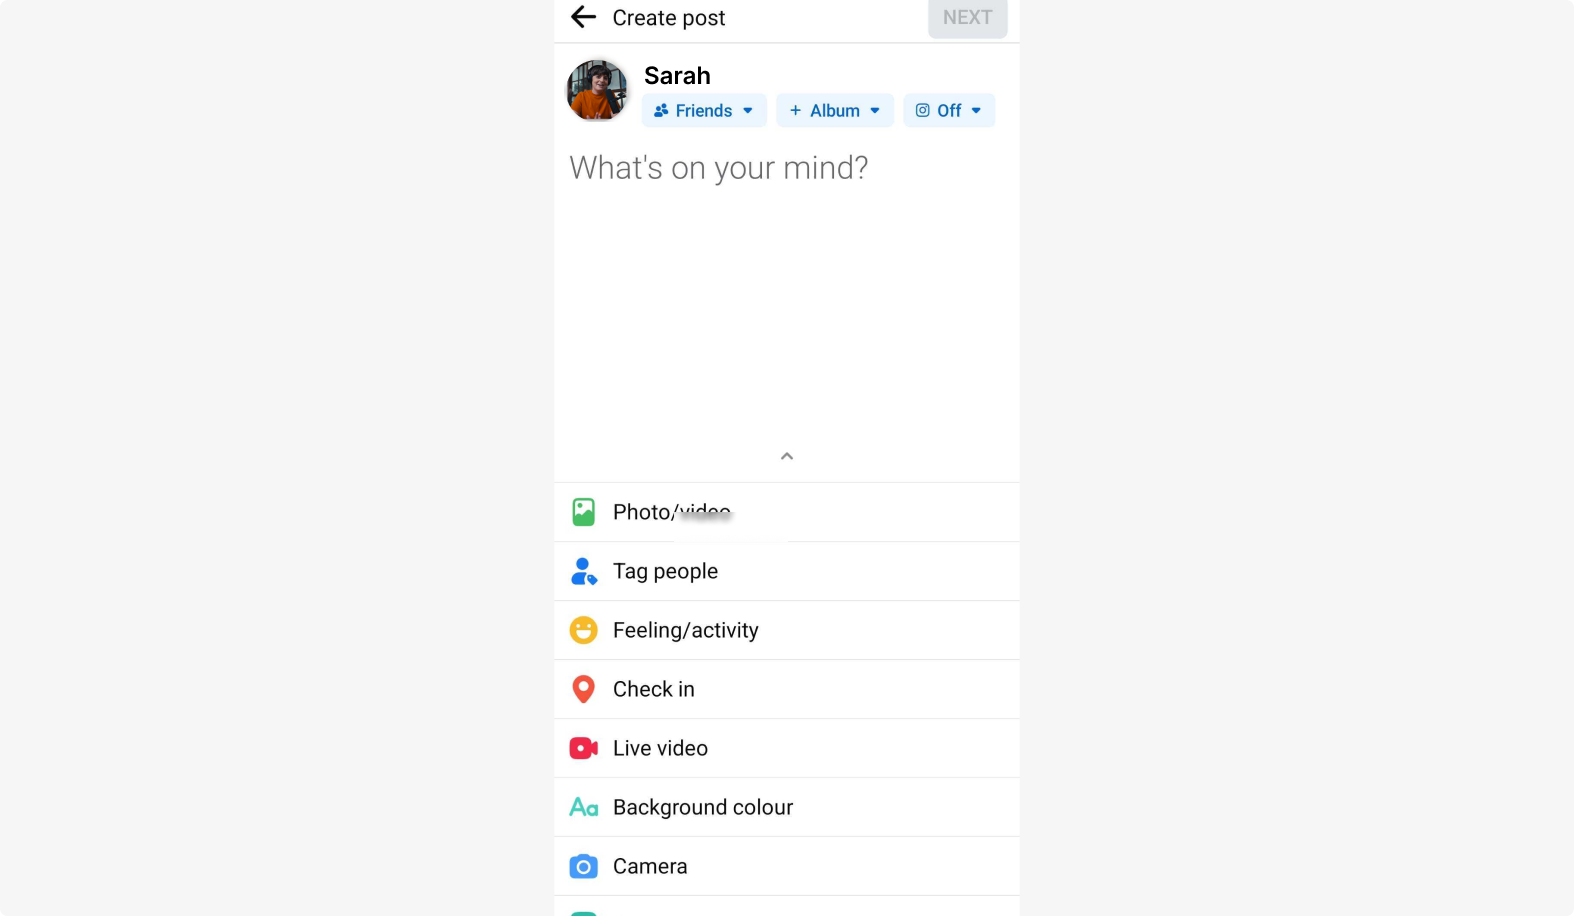
Step 3: If this is your first time going live, you’ll need to give Facebook access to your camera and microphone.
Step 4: To adjust your audience, select the section where it says “Friends” below your name at the top of your screen. Here you can choose whether your audience is public, private, friends or some specific friends. You can also click on the people icon on the bottom left corner to manually send invites to friends in your list.
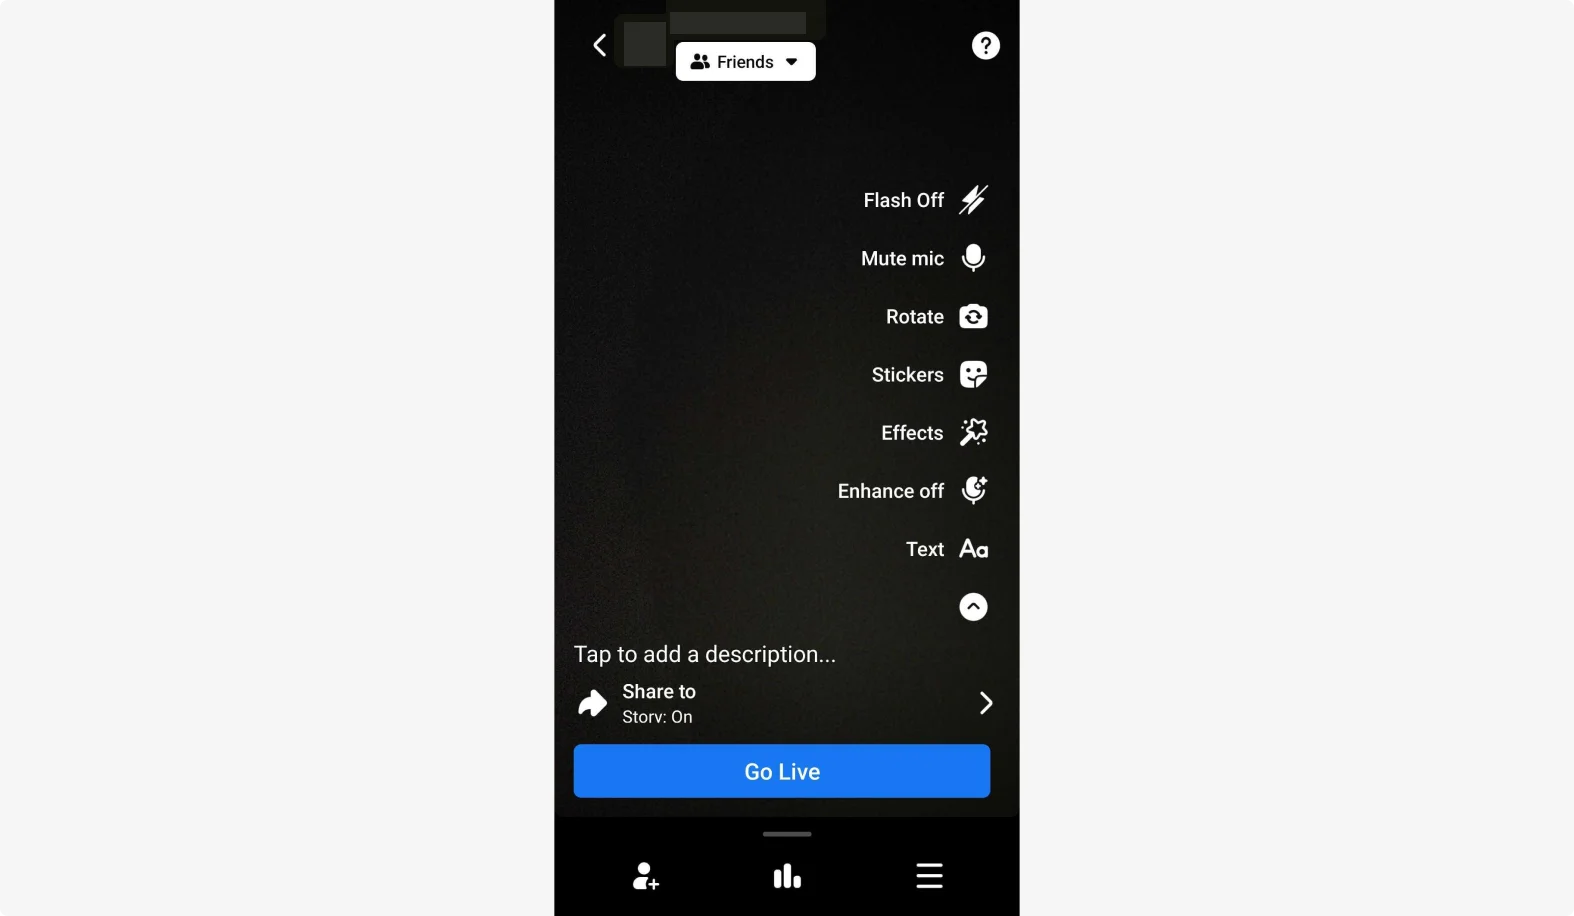
Step 5: Add a short description of your video and then tap “Start Live Video” when you’re ready.
How to live stream to a Facebook group from the mobile app
Live streaming to a Facebook group requires only a few extra steps. Here’s how to do it.
Step 1: Log into Facebook.
Click on the top right icon with your profile picture and then on “Groups.” Select the group you want to post into to open it on a new page.
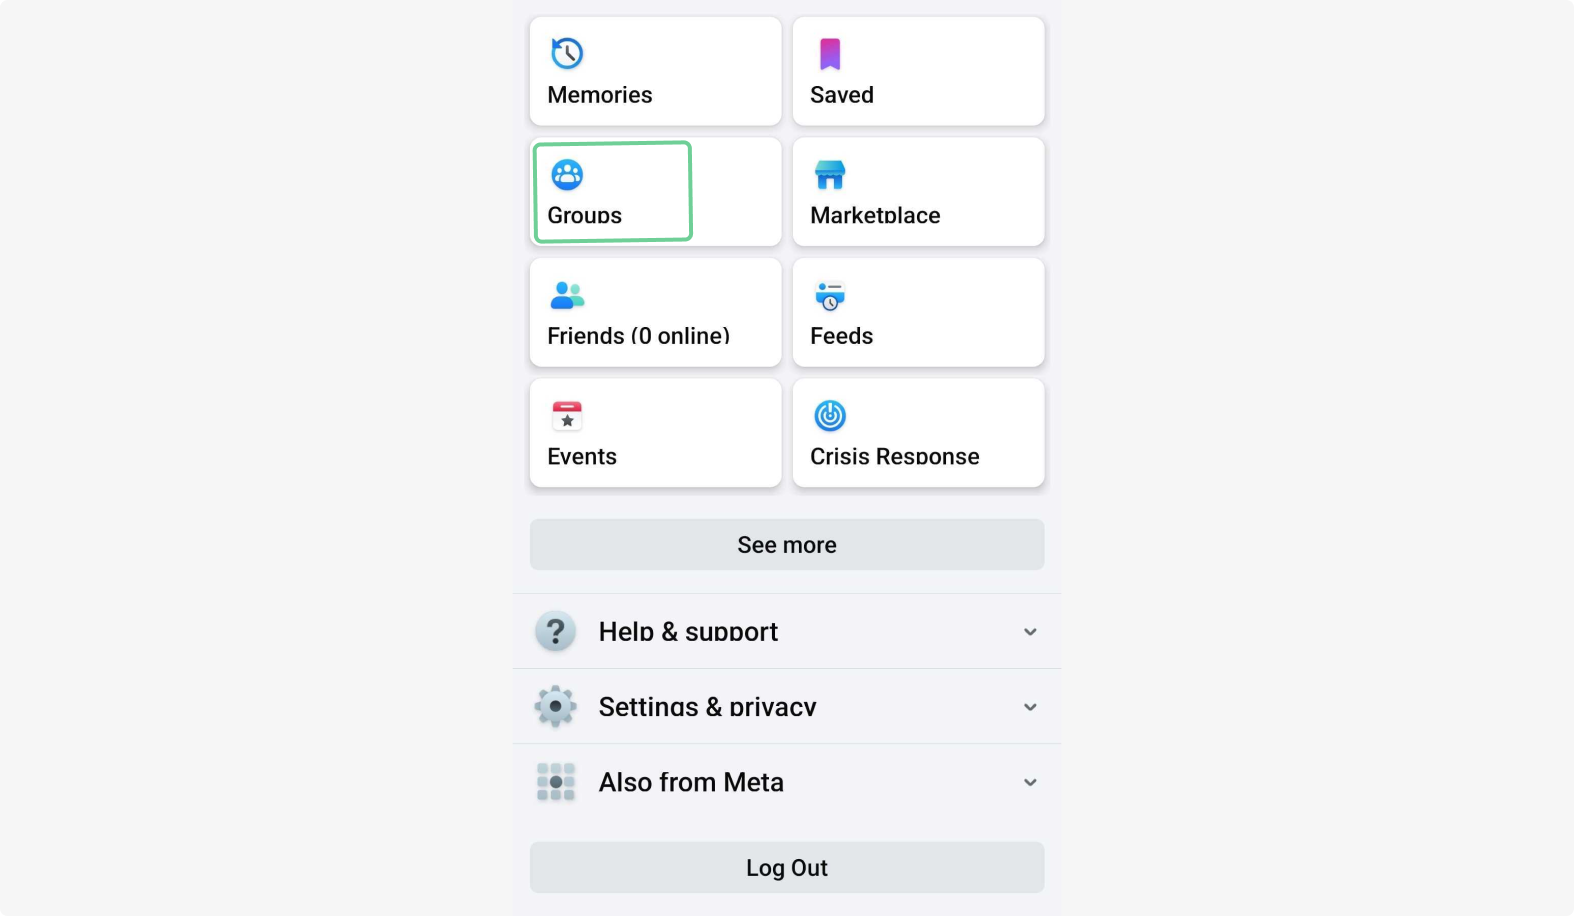
Step 2: Once you’re inside the group, click on “Write something,” then on "Live video" to start your live stream.
Note: in some groups, this function might be deactivated. If you don’t see the "Live video" icon, ask that group’s admins whether you need special permissions for live streaming.
Step 3: Give Facebook access to your microphone and equipment. Then select your audience and privacy.
Click “Start Live Video” when you’re ready to stream.
How to live stream to a Facebook page from the mobile app
If you manage a page, you can also start your live streams from there using the app. Here's how.
Step 1: Click your profile photo in the top right corner and switch to the page you want to use for your live stream.
Step 2: Give access to your mic/camera, select your audience, and go live
Step 3: Fill in your stream details and click “Start Live Video” once you’re set.
How to go live on Facebook using streaming software
Facebook easily integrates with streaming software so you can customize your streams and increase your content’s production value.
You can also record your live stream using third-party software. This means it’ll be easier to repurpose.
For example, with Riverside, you can record in up to 4K video resolution and uncompressed 48 kHz WAV audio. Then, use our video editor to quickly add captions, customize your video, and share it elsewhere.
Using streaming software also allows you to stream to numerous platforms at once. On Riverside, you can push your stream to Facebook, YouTube, and any custom RTMP platform.
Here’s a quick recap on how to go live on Facebook using streaming software:
Step 1: Open Facebook in a web browser on your computer.
Step 2: Click the “Live video” at the top of your newsfeed.
.png)
Step 3: Start your Live event by clicking on “Go live”
Step 4: Grant permission for Facebook to access your system’s camera and microphone
If you need more detailed guidelines on how to do this, check our instructions for going live on Facebook from a desktop, until Step 4.
Step 5: Select “Streaming software,” copy your Facebook stream key, and follow the prompts on your streaming software to connect it to Facebook.
.webp)
Step 6: Choose your audience, when you want to go live, and where to post your stream from the menu on the left of the screen.
.webp)
Step 7: Click “Go live” on the bottom left corner of your screen to start your stream.
How to go live on Facebook with Riverside
For high-quality recording, greater control of your recording environment, and multistreaming across platforms, consider using Riverside to go live on Facebook.
Here’s how to do it.
Step 1: Log into Riverside on your desktop and go to an existing studio or create a new one. (You can learn how here.)
Step 2: Click on “Record” and then set up your camera and microphone.
.webp)
Step 3: Once you’re inside your studio, click on “Live stream – off.” Under “Stream to Social” look for the blue Facebook icon.
.webp)
Step 4: Connect with your Facebook profile or page, then give Riverside permission to access your account.
Once you’re back to your Riverside studio page, you will notice that the button “Live stream – off” has now changed to “Live stream – ready.”
Your Facebook profile is now listed among the socials you can stream on. If you want, you can deactivate it by clicking on the purple switch.
Step 5: Click on the red “Go live” button at the bottom of the screen to start your Facebook livestream with Riverside.
Tips for successful Facebook live streaming
Here are a few steps to uplevel your Facebook live stream and grow your viewership:
- Plan your content: You don’t have to write down every single word. But, make a list of the main messages you want to convey.
- Comply with Facebook standards: Make sure your stream doesn't violate any of Facebook's Community Standards. Avoid streaming copyrighted material like music to prevent being flagged by the platform.
- Stick to a schedule: Tell your followers when you're going to go live and give them plenty of time to join. It's easier for viewers to tune in if you consistently post at a designated time. Try to stick to a schedule that's best for the majority of your audience.
- Tune your content to your audience's needs: You can use live poll features, Facebook groups, or Facebook analytics to help determine your users' preferences. The more your content is tailored toward your audience, the better your engagement will be.
- Consider audio and video quality: A bad connection can mean poor-quality content. You could lose viewers if your stream is laggy and hard to watch. Always test your internet connection before starting a live stream and use a quality camera so your video is clear.
- Entertain and engage your audience: Facebook Live provides engagement tools so you can easily connect with your audience. Ask questions with live polls, engage top supporters with the front row feature, and encourage followers to earn badges by interacting with your content.
- Collaborate with other creators: Teaming up with other creators is a great way to increase your reach. Develop joint topics for your streams, invite them as guests, join them during their broadcasts, and interview each other. This is a way to create more interesting content and tap into new audiences.
Bonus tips: Check our quick guide to maximize engagement during your livestreams.
Troubleshooting common issues on Facebook Live
No matter how prepared you are, Facebook Live will sometimes throw you a curveball. Here's a list of common technical issues you might face, and how to solve them.
- Poor video quality: If your video becomes blurry or pixelated, check your connection speed. Make sure you're connected with an ethernet cable rather than through a Wi-Fi network.
- Poor audio quality: Sometimes, if your laptop or camera has a built-in mic, Facebook may default to it instead of choosing your main one, causing audio quality issues. From the "Camera controls" panel in your Facebook Live panel, check whether you selected the right input device.
- No audio or video at all: If viewers can't see or hear you, first ensure Facebook has permission to access your microphone and webcam. Then, double-check that your microphone is not muted or your camera is not turned off. If nothing works, try rebooting your computer.
- Live stream is freezing or lagging: If your live stream freezes and your connection is fine, the issue might lie with high CPU or GPU usage. Check your CPU and/or GPU temperature, double-check that all internal fans are working, and close any unnecessary applications or tabs to reduce their workload. Lowering the video resolution can also help.
- Going live with two people at the same time: The simplest, most streamlined way to go live on Facebook with two people is using Riverside. Start a new session and click on the "Invite" button at the top of your screen to invite new guests.
Final thoughts
Facebook live provides creators with the opportunity to get their streaming content to audiences across the globe. Whether you’re on desktop or mobile, it’s easy to tap into this platform’s engagement tools to create and grow an audience of loyal followers.
FAQs on how to live stream on Facebook
Looking for more information? Here are some answers to frequently asked questions.
How can I watch a livestream on Facebook?
Open Facebook, go to the News Feed, and click on the “Video” tab at the top of your screen. Then, on the left panel, click on “Live” to browse all live streams from your connections and pages you follow.
How can I do a private live stream on Facebook?
Follow all our steps on how to create a livestream on Facebook Live, either on your desktop or mobile app. Once you get to the step where you should choose your audience, click on “Friends” then select “Only me” to keep your live stream private. Or, if you want it to be private between you and a friend, select that friend.
How can I livestream an event on Facebook?
From your news feed, navigate to your “Event” page from the sidebar on the left of the screen. Create a new event by selecting all details such as title, description and time, and make sure it’s a “Facebook Live” type event. Select your newly created event and click on “Set up live video” on the right of your screen.
Set up your live stream as usual, then check whether your broadcast will automatically begin at your scheduled start time by selecting “Go live automatically at scheduled start time.” Otherwise, you can click on “Go live” when the event has started.


-(1).jpeg)


.png)

-(1).png)
.png)

.png)


