


Video editing can be a challenge when you're a beginner. Luckily, with the right tools and knowledge to help you, it's easy to develop great video editing skills and start producing higher-quality content.
No matter what kind of content you create, it's a good idea to learn the basics of video editing. Whether you're producing long-form video content or just piecing together trailers for other work, a well-edited video can make a big impact in terms of brand reputation and audience engagement.
Before you start editing video content, you'll need to develop your understanding of editing dos and don'ts, as well as choosing the right editing tools to help you on your journey.
By applying yourself ahead of time and learning basic video editing skills, you can create better content than ever before, producing videos fit for social media and other popular video-sharing channels.
Want to edit a great video but unsure of where to start? Here's our step-by-step guide to help you navigate your way through the editing process with ease!
What do I need to make and edit videos?
In today's world, technology advancements make it possible to edit videos any time, anywhere.
While some editing tools produce more professional results than others, most phones and computer systems offer in-built software suitable for basic video editing.
All you need to get started as a video editor is a good camera, a device to to edit on and good video editing software.
When you're just starting out in the world of video production, you can use your phone to film and edit videos, thanks to a range of apps and editing features. Easy!
15 tips for beginners on how to edit videos
Are you pursuing a creative career? Chances are you'll need to produce videos at some point! Even if you're completely new to the field, video editing doesn't have to be difficult. Just follow these simple tips to start developing video editing skills right now!
1. Record your video in the right resolution
Before you can start applying edits, you'll need to film your videos. Using a video camera or the camera on your phone, set up clear shots that will work together to communicate a clear message.
Whenever possible, it’s best to record video content in high resolution, preferably at least in 1080p full HD. Higher resolution files are generally larger in storage size. Although, when it comes to editing they provide more flexibility. You can always decrease a video file’s resolution, but you can’t increase the resolution of a video after recording. On the other hand you’ll want to make sure your video files aren’t too large so it’s best not to shoot in video resolution as high as 8K (7680 x 4320 pixels), unless you have a specific reason why.
Overall, high-resolution videos help to ensure optimal image quality for your final video, giving you plenty to work with when you start editing. HD videos are great for quality and professionalism!

2. Choose the right editing tools
Once you've recorded your videos, you're ready to start editing! The first step is to choose the right editing software. It's important that select an editing tool that is well-suited to your skill level, as well as your content goals.
While more advanced video editors might choose professional-quality programs like Final Cut Pro or Adobe Premiere Pro, you don't have to start here. There are plenty of easy, affordable software options for beginners, like After Effects, LightWorks, and iMovie. If you're working on a mobile device, there are even app-based editing software systems you can use to create videos!
3. Select the right device
Depending on what kind of videos you're editing, you may have different device requirements. For the best chance of success, you'll need to select a device with a fast operating speed and good storage.
Faster-running devices make it easier to edit videos without risking system crashes and lost data. This shortens video editing time and helps to ensure that you don't lose your work. This is a lifesaver for any video editor!
4. Understand your audience
Understanding your audience is central to all kinds of creative pursuits, and video production is no exception. Before you start to edit a video, you'll need to develop a clear understanding of who will watch the final result.
Knowing who your audience is and what your audience is looking for can help you create video content that aligns with consumer demands. As an editor, keeping your viewers in mind throughout the editing process can help you target your market more effectively.
5. Make use of online editing tutorials
Sometimes, the best way to learn a new skill is by practicing it! There are many video editing tutorials online that you can follow step by step to help you improve your editing skills.
Use Google to search for great video editing tutorials, ideally using the same app or software tool that you've chosen. Slowly, follow the editing process from start to finish, learning how to navigate editing systems for future reference.
6. Know your goals
As with any creative project, knowing your goals is essential to effective video editing! By planning what you want to communicate ahead of time, you can predict which edits you'll need to apply and how.
Before you start editing a new video, consider how you want your story to progress. Which scene should come first, and which should follow it? What special effects or extra features could you incorporate to emphasize your message? Clear goals make it easier to edit videos with purpose.
7. Stay organized
The secret to good video production is organization! Maintaining a clear and well-organized workspace can help you keep track of files and effects as you edit and adjust your content.
When working on a video, ensure that you always know where the files you need are located. As much as possible, organize your system logically to avoid confusion or misplaced files and effects. Using a clear file naming system to categorize your content and distinguish between different versions can help you avoid a mix-up.
8. Learn the shortcuts
Many video editing software programs include a range of shortcuts to make editing quicker and easier as you become more experienced. Learning what these shortcuts are early on can save you time and help you edit like a pro.
While shortcuts vary depending on your device and software tool, guides can usually be found online to help you. Next time you need to upload, adjust, or export a file, conduct a basic Google search to check whether there's a simpler way to complete the task.
9. Don't just cut
Some beginner video editors might assume that editing videos is just about jump cuts, cutaways, splices, and montages. In reality, there's much more that you should consider when producing quality videos.
Instead of focusing only on cutting and splicing video clips, look for other editing features, such as color correction, image sharpness, and so on. Applying edits that adjust the visual impact of your video can be powerful in terms of final quality.
10. Add in audio
Video editing isn't just visual! Sound and music are an important part of any video project, so they should never be overlooked during editing. As you adjust other elements of your video, remember to check audio quality and content.
Some videos include native audio. In other cases, you may need to upload audio captured from another source. If your video doesn't include speaking or sound effects, add music to liven it up. Make sure that the music you choose is royalty-free music and well-suited to the tone of your video. Audio content is just as important as visual content!
11. Add graphics
During the editing process, you'll have plenty of opportunities to communicate with your audience. In addition to video and audio, you might choose to add text or graphic effects that support your goals and message.
Text and graphic features can be used to display subtitles or signpost different sections or elements of your video. When possible, try to keep your effects clean and simple in order to avoid detracting from video quality.
12. Always save your progress
There's nothing worse than getting the end of an edit only to lose all your work during the export process! To avoid heartache, make sure you save your work regularly while editing videos, especially if you're working with large files, a slow system, or heavy editing effects.
With short videos, it might be enough to simple save your files to your device as you edit them. However, if you're working on a longer-term project, it's a good idea to consider other file locations. To provide yourself with extra security, save clips to an external hard-drive, or save by sending clips to yourself via email.
13. Check your work
When you're new to video editing, sometimes, things can go wrong. This is why it's always important to check your work for missing files and mistakes that may have occurred during the editing process.
Before you finish editing your video, watch it back, keeping a close eye on any mistakes that pop up along the way. This will allow you to correct problems as needed, improving the standard of your completed project.
14. Export the right file types
When it's time to export your video, you'll have a few decisions to make when it comes to selecting a file type and video format. Not all files are created equal, so it's a good idea to do your research and ensure you're selecting the right one.
In most cases, web versions with the highest possible resolution are the best choice for web-based video content. This ensures that your video is small enough for upload yet large enough to maintain quality. If you plan to upload to social media, consider choosing a smaller file size to facilitate easier playback.
15. Know where to share
When your video is complete, it's time to share it with the world! Decide where to share you video based on the audience you want to target. There are plenty of places to share videos, including YouTube, Vimeo, TikTok, and other social media platforms.
The beauty of videos is that they can often be shared across multiple channels or even adjusted for specific purposes. To honor the time and effort you've put into creating your video, share it in as many locations as you can, maximizing reach.
How to edit videos on a Mac or Windows PC
No matter if you're a Mac or Windows user, if you're recording on Riverside, we suggest you try our text-based video and audio editor. With our Ai transcriptions, video editing becomes as easy as editing a text document.
Follow these steps to edit videos using Riverside:
Step 1: Log in to your Riverside dashboard and either:
- Select ‘View recordings’ on an existing studio with the takes you’d like to edit
- Capture recordings in an existing or new recording studio. (Learn more here).
Step 2: Select the recording you’d like to edit and click the ‘Go to Editor’ button on the top right.
Step 3: Choose video dimensions based on your posting platform.
Step 4: Title your edit on the top left and use the toolbar in the top center of your screen to:
- Adjust the size and dimension of your video
- Choose which tracks you’d like to include in the clip
- Set a video layout
- Customize your background and logo
- Add video captions and style them as you want
Step 5: Edit your video using the transcription or timeline. You can:
- Navigate using the text: Place your cursor on the word you’d like to go to in the transcript, and the playhead in your timeline will automatically move there.
- Search for a phrase throughout your video: Type the term you're looking for in the search bar on the top right. All the matching words will highlight in your transcript, and timeline markers will show where and which speaker uses this phrase.
- Remove sections with your transcript: Select the text of the portion you want to remove and click ‘Delete.’ The editor will automatically remove this section in your video. You can press “Reverse’ to undo this.
- Edit in the timeline: If you prefer, you can split and adjust your recording by dragging in and out points on your timeline. All changes will reflect in the transcript.
Step 7: Click on the ‘Export’ button and adjust your export settings. You’ll receive your final clip in an email.
If you prefer, you can learn how to edit videos on Riverside with the video below:
If you're not a Riverside user, you can try the following tutorials for editing.
On a Mac, the easiest option is to use the in-built iMovie app.
Step 1: Open the iMovie program and choose Create New, then Movie to set up a new project.
Step 2: Upload video files from the media library. You can Import Media or choose something already in your Media Library.
When you’ve uploaded everything, drag and drop which files you’d like to work on and edit, in the timeline bar.
Step 3: Using your mouse to drag the video bar, cut and trim video clips to size as needed. You can also crop your video and adjust colouring with the tool bar on the top-right, right above your video preview.
Step 4: Select the Audio tab to add audio files. You can either import from your own sources or chose from iMovie’s in-built Sound Effects and Music.
Step 5: Use the Transitions tab to facilitate smooth transitions between clips.
Step 6: Add text, backgrounds and other effects as required.
Step 7: Check your video, and once you're happy with it export it into an appropriate video format. You can do this by selecting the Share button on the top right-hand corner and then selecting Export File.
On a Windows PC, the easiest way to edit videos is by using the Video Editor app.
Step 1: Open the Video Editor app. Select New video project, and name your video.
Step 2: Choose Add, and choose which videos you’d like to upload. Drag all files to the Storyboard.
Step 3: Select the video you want to edit. Select duration to change length. Use trim and split tools to cut content.
Step 4: Use the text or motion features to add special effects to your video.
Step 5: Apply Effects such as Filters and Motion effects between video clips. You can also add 3D Objects.
Step 6: Add music to your video, either from the inbuilt Background Music library or an external source.
Step 7: When you've finished editing, Export your video as a high-resolution web file. You can do this by selecting Finish Video at the top right-hand side of your window.
How to edit videos from an iPhone
There are many easy ways to edit videos from an iPhone. The simplest option is to use the iMovie app.
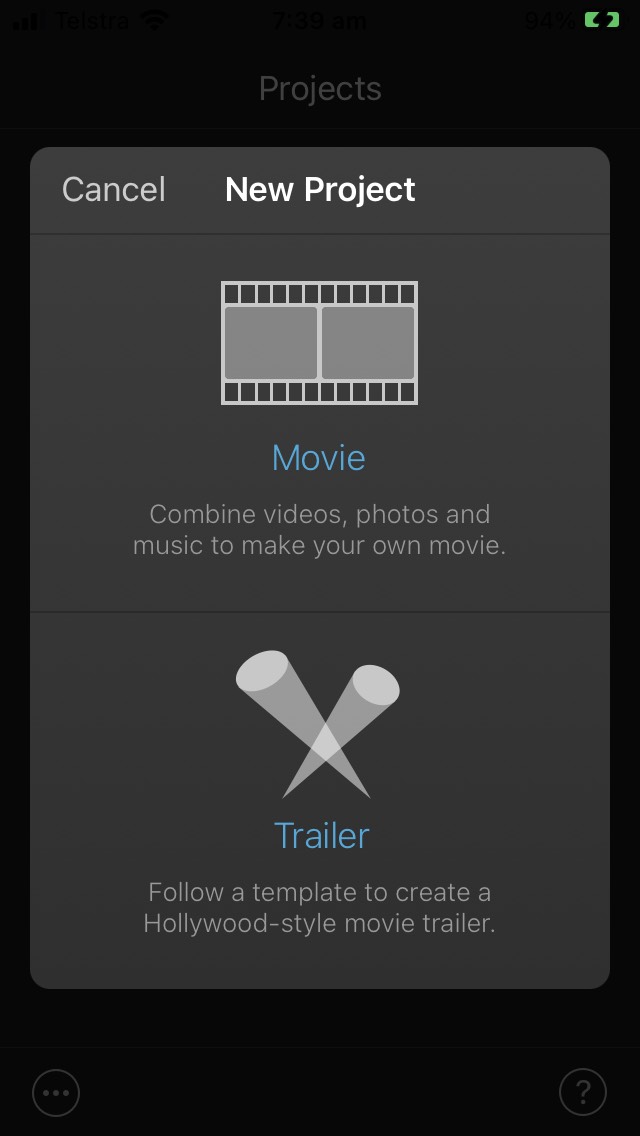
Step 1: Open iMovie and select the + button to create a new project. Select a Movie project.
Step 2: Choose and upload video content from your device's camera library. When you’ve selected your files select Create Movie at the bottom of your screen.
Step 3: Tap to select a clip, and drag to trim it. Alternatively, click split to cut clips in two.
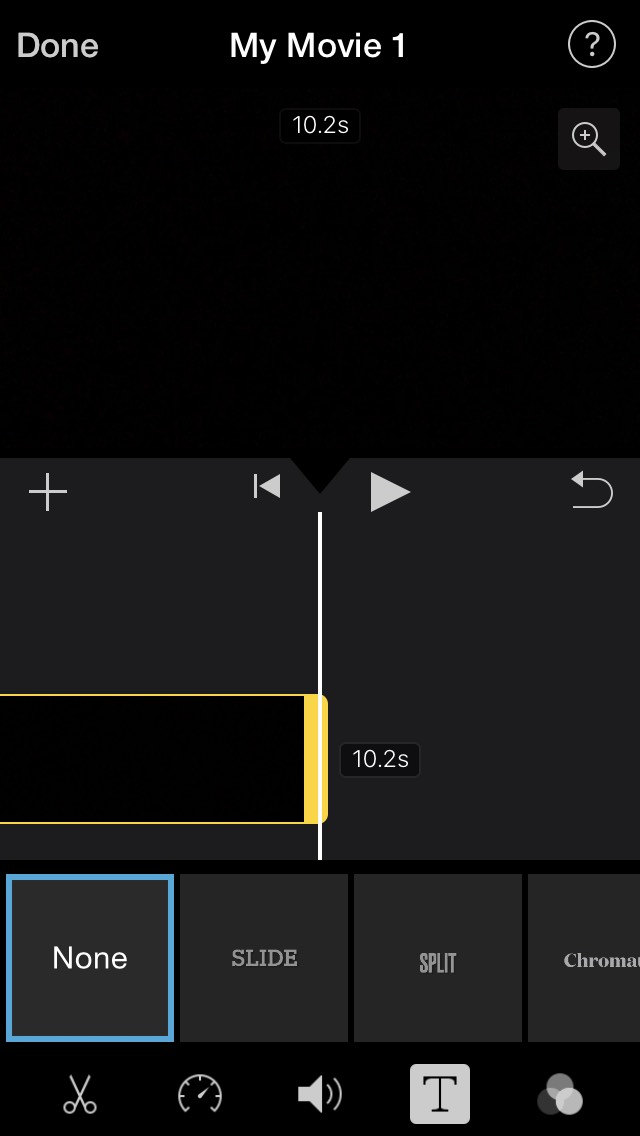
Step 4: Add transitions to your video by tapping the two arrows between two video clips, At the bottom of your screen, use the transitions menu to adjust timing and effects.
Step 5: Use the text feature at the bottom of the screen to add text.
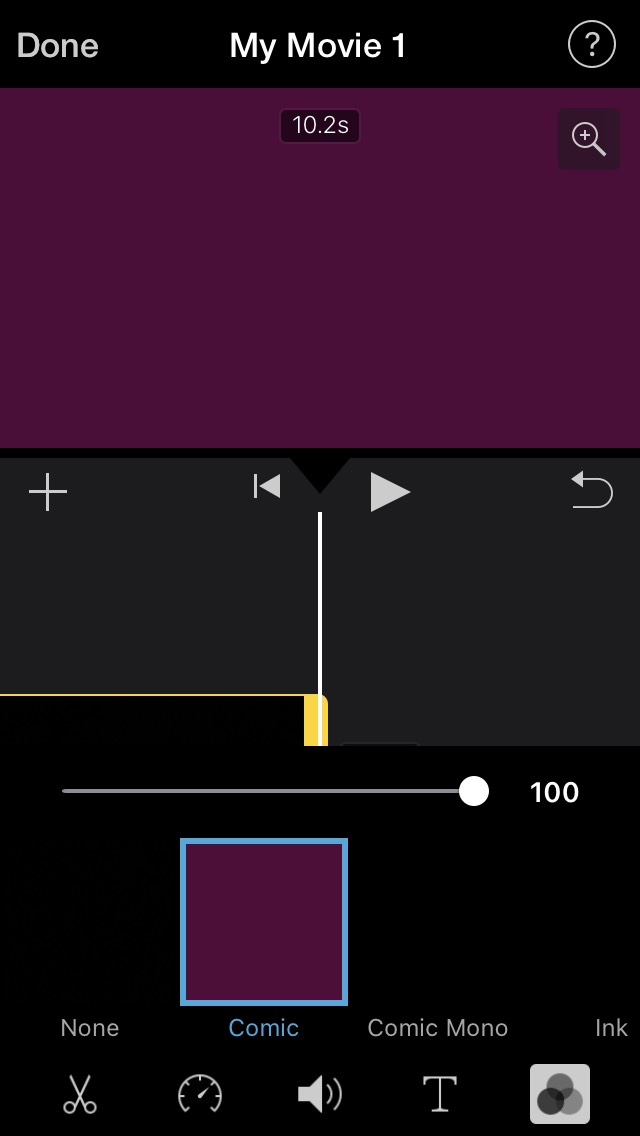
Step 6: Add filters to your video by opening the filters menu at the bottom of the screen.
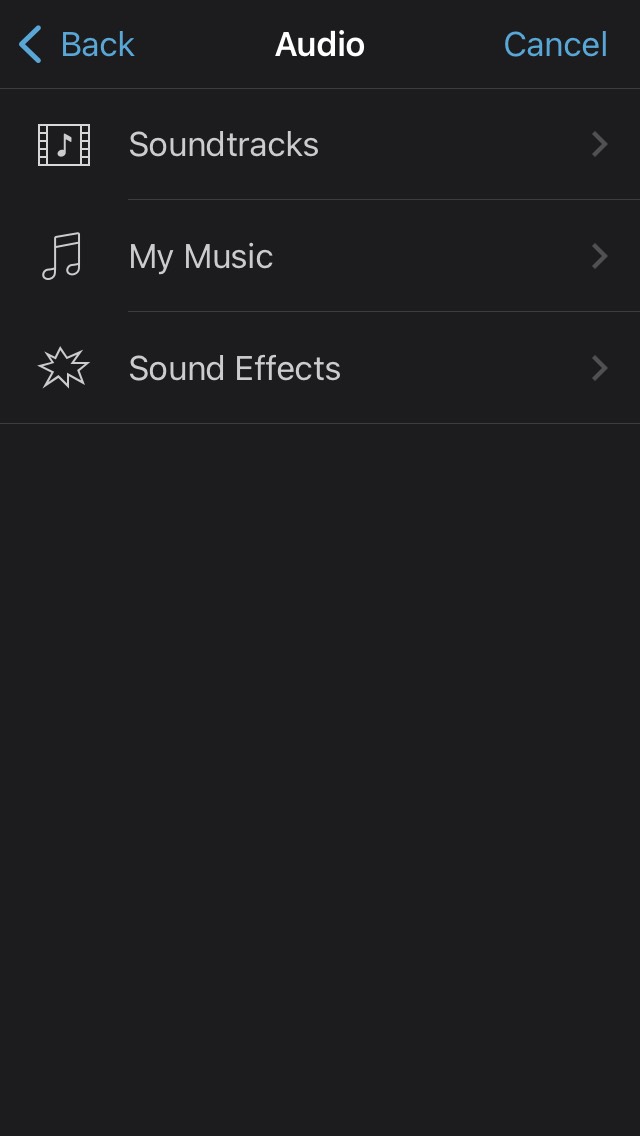
Step 7: To add music to your video, click the plus icon, and navigate to the upload menu. Here, select music, and choose whether to upload sound effects, in-built music, or imported audio.
Step 8: Once you've finished editing your project, click Done on the upper left-hand corner. Select the Export symbol, and choose where you want to save your video on your device.
How to edit videos on an Android phone
Many apps offer video editing tools for Android devices. One option is to use the Google Photos editor tool.
Step 1: Download and open Google Photos.
Step 2: Navigate to library, then utilities. Go to the create new section, and select Movie.
Step 3: Upload the video you want to edit.
Step 4: To trim, tap and drag the trim handles of your clip, selecting the portion you want to keep.
Step 5: Change effects by using adjust menu to alter color, saturation, and other visual features.
Step 6: Add a filter from the edit filters menu. Move the dial to influence strength.
Step 7: When your video is complete, export to your phone's camera roll.
How to edit video for social media
When editing videos for social media, there are a few things you should keep in mind.
First, know your audience. What kind of content will they be looking for?
Next, consider video length. On many social media platforms, short videos are best. However, long-form videos can do well on sites like YouTube.
Then think about files. Is your video high enough in quality? Is the file small enough to playback with ease? Always check your chosen social media platform to find out what video file requirements you might need to keep in mind.
If you want to learn more about video editing for social media, read the Riverside blog post on editing YouTube videos!
FAQs on How to Edit Videos
Still have questions about recording and editing videos? Here are our answers to a few FAQs!
How do beginners edit videos?
Getting started as a video editor is easy when you know where to begin! Start with a simple video and easy-to-use editing software. Take the time to learn your way around new editing systems, and have patience with yourself. Don't forget to follow our 15 tips!
What do most YouTubers use to edit their videos?
All YouTubers use different tools and methods to edit their videos. Often, YouTubers rely on software tools like Final Cut Pro, After Effects, and Adobe Premier Pro to produce consistently high-quality results.
Looking for a great studio-quality audio recording system to make your latest video even better? Give Riverside a try today, and start producing amazing content! Riverside is a remote recording software, but also comes with an Editor so you can polish and edit your video with simple tools accessible to all levels.


.png)
.png)
.png)


