.png)


Want to boost your content reach with low extra effort? It’s time you learn how to add captions to your videos.
Creators looking to level up their content should pay attention to the potential unlocked by captions and subtitles. Captioning your videos makes your content more accessible and engaging, increases comprehensibility, and improves your SEO ranking. Luckily, getting started isn’t difficult either. Many social sites and editors have built-in features, making it easy to add captions and subtitles to videos.
Ready to start captioning?
This article walks you through a step-by-step on how to add captions and subtitles to videos in 5 different ways. We also explain why captions are important and share good captioning platforms to try.
Captions vs Subtitles: What’s the difference?
Though you’ll often hear people referring to captions and subtitles interchangeably, the two are not exactly the same. The major difference lies in what aspects of the audio they convey.
Captions convey all the audio in a video. This extends beyond dialogue to include sound effects and other non-speech sounds. They principally aim to accommodate those who cannot hear any audio at all.
Captions can be open or closed:
- Open captions are always visible, and viewers cannot turn them off.
- Closed captions’ visibility is adjustable. Viewers can switch them on or off, depending on their preference.
Subtitles, on the other hand, only capture dialogue. Their principal use is in the translation of foreign language videos and film, and for this reason, subtitles presume that the viewer can also hear the audio.
Why should you add captions or subtitles to videos?
With so much competition in the online video creation space, exploring new ways to keep your content competitive is important. Adding captions to your video content will help it reach more people and has many benefits. Below are some of the top benefits of captioning your videos.
Increase Your SEO
Captions and transcripts help your video’s SEO score and make it rank higher on Google. Search engines crawl for text, not video content, so having a text version of your video content will significantly increase its performance. Including keywords you’d like to rank for in your transcripts is a good practice.
Make Content More Accessible
Making your content more accessible is not only the right thing to do, but it can also expand your audience. Individuals who are deaf or hard of hearing will be able to experience your content when you add captions.
Improve User Experience
Adding captions to your videos will let users enjoy your content even if they can’t or choose not to use the sound on their device. Captions and subtitles can also help your audience understand your content better. You’ll ensure your message is clear, even if you cover complex themes or use niche jargon.
Make Content International
You can reach a larger international audience by adding captions to your videos. Non-native English speakers can follow along with your video easier if they have captions to reference.
Increase Engagement and Watch Time
Captions grab viewers' attention and make them more likely to watch your video longer. This will increase your video average watch time, which is important if you want to monetize your content.
Repurpose & strengthen your content
You can use your captions or subtitles to repurpose and strengthen your content. You could use your text-based captions to produce a blog post or transcript that you publish alongside your video.
How to add captions or subtitles to video: Step-by-Step
We’ll get into specific platforms later. First, here is a general step-by-step on how to add captions to videos:
Step 1: Record your video in top-quality
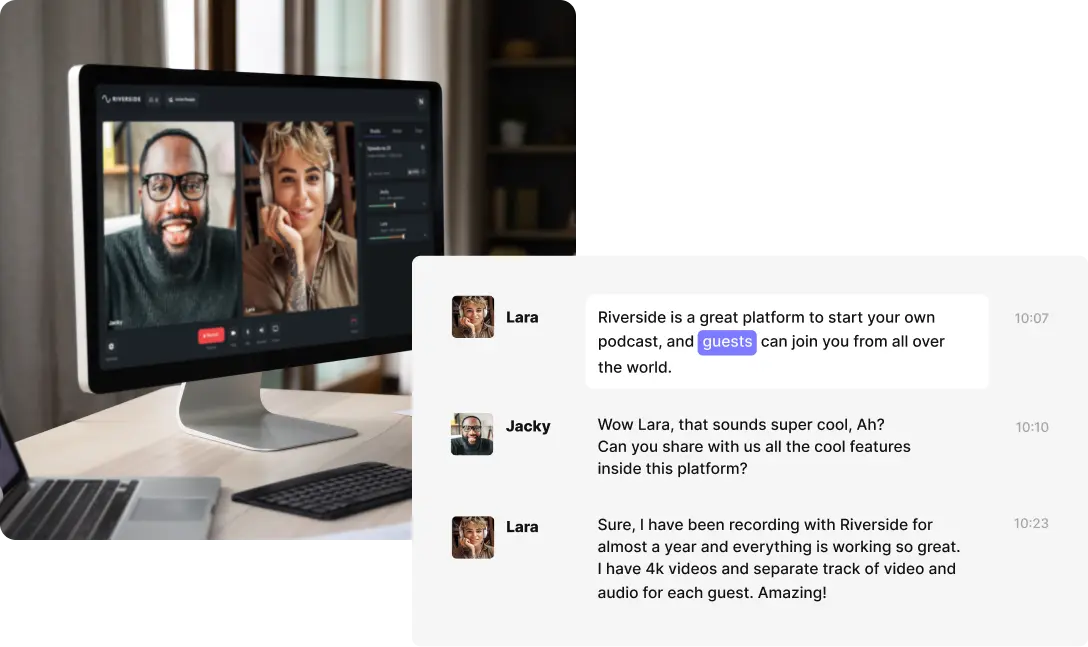
Nothing changes at this stage. Record your video as per usual. Maximize the quality of your audio and video for the best results. The clearer your audio, the better your transcription accuracy. This is why we suggest recording with a platform like Riverside. You can seamlessly record in 48kHz audio and 4K video resolution for crystal-clear content.
Step 2: Generate your captions and subtitle transcriptions
When it comes to transcription, there are a few ways to go about this:
- DIY Manual Transcription: You’ll rewatch your video and type the transcriptions yourself. While free, it can take up much of your time and is often tedious.
- Human Transcription Service: These captioning services often combine automated and manual transcription to yield accurate results faster. They’ll also stylize your transcripts into captions or subtitles for you. You can expect transcripts to be ready within a few hours to a few days.
- Automated transcription software: Automated transcription is your best bet if you want to go the fastest route. You’ll upload your video to transcription software and let its AI speech recognition do the rest. These AI-generated transcripts are not always 100% accurate, so proofreading and stylizing them as needed for your captions is worth it.
Step 3: Edit and style your caption or subtitle transcripts
We always suggest proofreading and editing your transcriptions. You can fix up any mistakes, and you can also style your transcript into captions or subtitles. If you're creating captions, you’ll want to ensure your transcripts include audio besides just dialogue.
Here are a few things to remember when editing your transcripts:
- File formatting: Choose a transcription format that includes timestamps. A popular option is an SRT or SubRip file which is specifically for subtitles or captions. This includes timestamps and usually also differentiates between speakers.
- Styling guidelines: It’s a good idea to check out what style guidelines you need to follow. This includes how to punctuate or display auditory sounds other than dialogue.
- Translation: Consider translating your subtitle and caption transcripts to reach an international audience. Some software and online platforms, like YouTube do this automatically for you.
Step 4: Export and upload your captions or subtitles
Once you finish editing your captions and subtitles, export them (in the appropriate file format).
If you’re creating open captions, you must burn them into your video. You can easily do this using a video editor. On the other hand, if you’re creating closed captions, you’ll have to upload captions or subtitles alongside your video on your sharing platform. We’ll walk you through a few of these in our different methods of adding captions and subtitles to videos.
How to Add Captions to a Video: 5 Easy Methods
We’ve covered the basics, so we’ll get into the specifics. Below we cover 5 different ways to create and add captions or subtitles to videos based on different platforms.
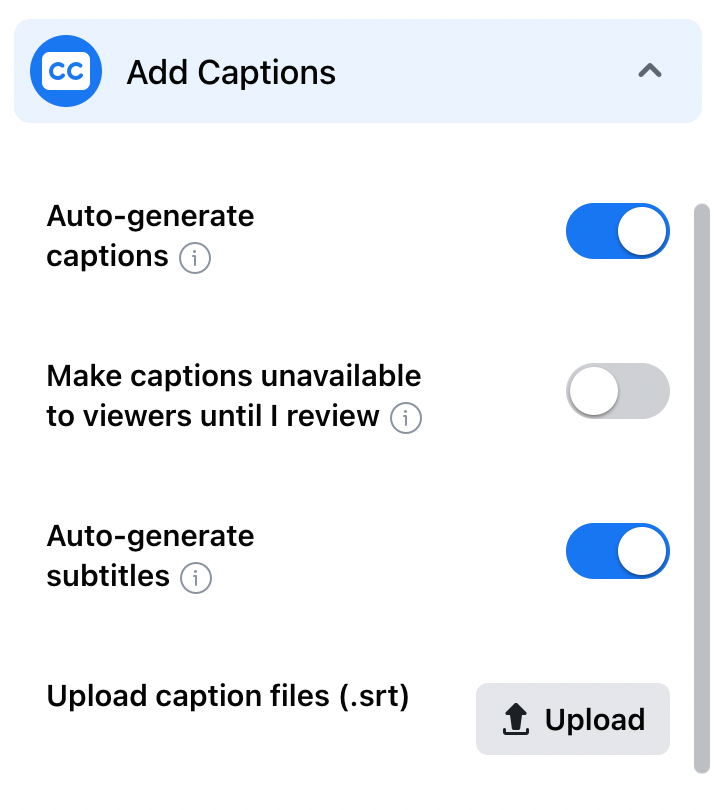
1. Adding captions and subtitles to videos with Riverside
While Riverside is a top-quality video creation software, it also has built-in transcription features for quick and easy captioning. Our highly accurate Ai transcriptions are available at the quick tap of a button straight after recording. You can transcribe in over 100 languages which is suitable if you have a large international audience. With top-quality 48kHz audio and automatic background noise removal, you can expect crystal-clear recordings for even more accurate transcripts.
You can add captions to your videos directly in our editor, if you're going the open captions route. Style your captions and position them as you like, and while you're at it use your transcript to edit your video. Our text-based editor works with our AI transcriptions so trimming your video is as easy as deleting text.
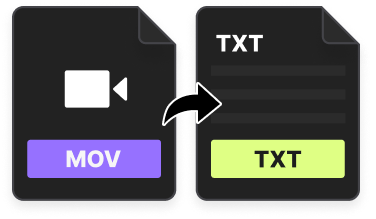
Alternatively, you can download transcript files for quick and easy closed captions. You can choose between an SRT format, ideal for captions and subtitles, or a TXT file format, ideal for content repurposing. Our transcription files also differentiate between speakers so you can easily see who’s talking when.
Learn more, or start transcribing accurately with Riverside.
How to add open captions to videos with Riverside:
Step 1: After recording a video on Riverside, select the take you want to create captions for in the Studio Recordings dashboard. (Learn how to record here.)
Step 2: Click 'Go to editor' to edit your take as is. (You can also repurpose your recording into short shareable videos with Magic Clips first, then hover over one to 'Edit'.)
Step 3: In the editor, adjust your video. You can:
- Trim your recording by editing your text transcript
- Customize your background and layout
- Fine-tune your audio and remove silences automatically
Step 4: When you finish editing, select the Captions button from the top-toolbar. This burns open captions into your video.

You can style your video captions, and drag them around your video to position them as you want.

Step 5: Export your video with ready-made captions.
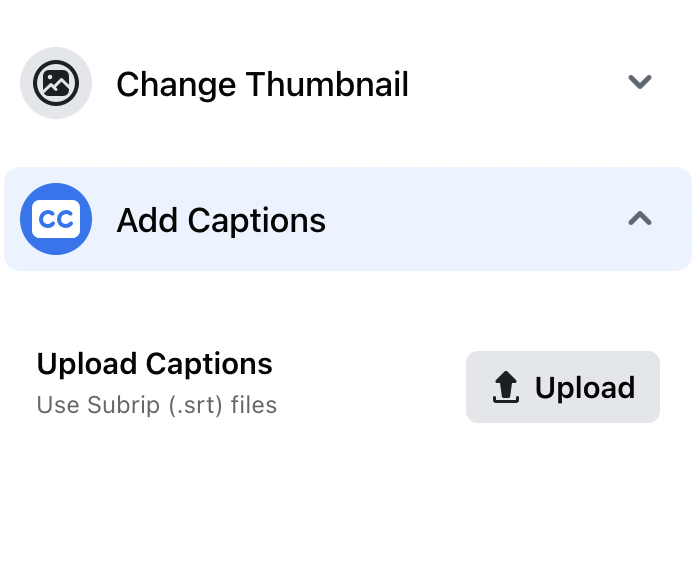
How to add closed captions to videos with Riverside:
Step 1: Just like above go to your Studio recordings and select the take you want to download captions for. (Learn how to record here.)
Step 2: You'll see a preview of your transcript in the recording page. Go to Recording Files and click Download, next to Transcriptions. (Note this is only available on Pro & Business plans)
Step 3: Choose to download a Subtitle (SRT.) or text Transcription (TXT) file. We suggest selecting an SRT file, which includes timestamps perfect for video captioning.
Step 4: Proofread your transcripts and stylize them as you want before uploading them to your platform of choice.
If you don't have a Pro or Business plan, you can try our free AI transcription tool to download transcript files.
2. How to Add Closed Captioning to a Video on YouTube
As the most popular video-sharing platform, it’s no surprise that YouTube has automated captions. You can generate captions directly on YouTube, or you can upload your own transcript file to add captions to your videos.
If automated captions are available for a video, YouTube already adds this in without doing anything extra. We suggest proofreading these, though, as YouTube’s AI can make mistakes.
You can review YouTube’s automated captions by following these steps:
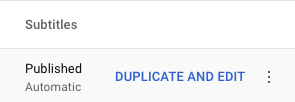
Step 1: Go to YouTube studio and select Subtitles from the menu on the left.
Step 2: Select the video you’d like to review captions or subtitles for, and on the right, select Duplicate and Edit.
An automatic transcript of your video will show up.
Step 3: Edit and adjust your transcripts. You can view your transcript in a text format by selecting Edit as Text, or you can view timestamps with Edit Timings.
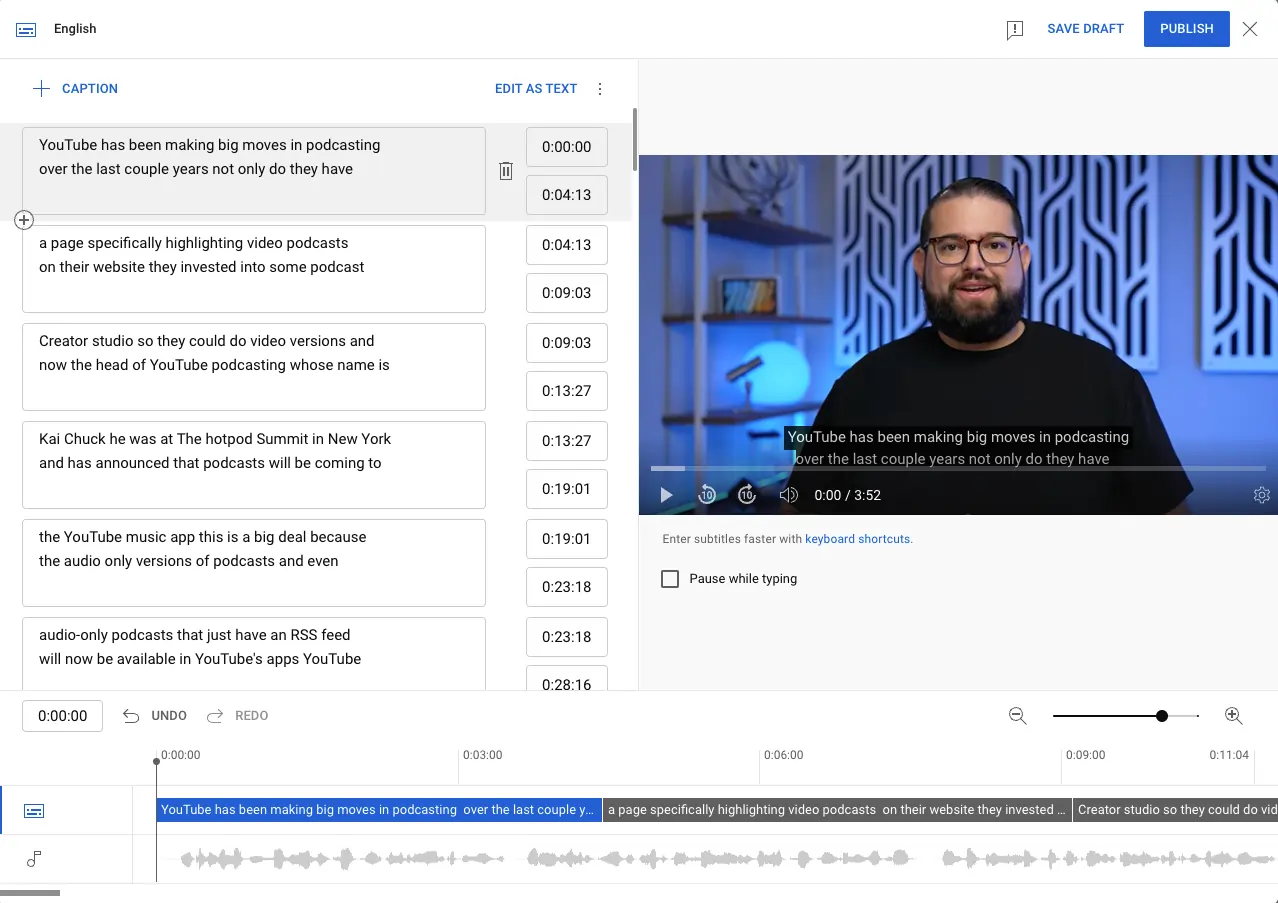
Step 4: When you finish editing, select Publish to add the polished captions or subtitles to your video.
You can then delete the original automated subtitles.
Want to add your own transcripts instead?
Follow these steps to add captions or subtitles to YouTube manually:
Step 1: Go to YouTube studio and select Subtitles from the menu on the left.
Step 2: Choose a video you’d like to add captions or subtitles.
Step 3: Click on Add Language and choose what language you’d like your captions or subtitles to be.
(You can always generate translations of your original transcript to add other languages. )

Step 4: Under Subtitles (on the right), select Add.
Step 5: Select how you’d like to add captions.
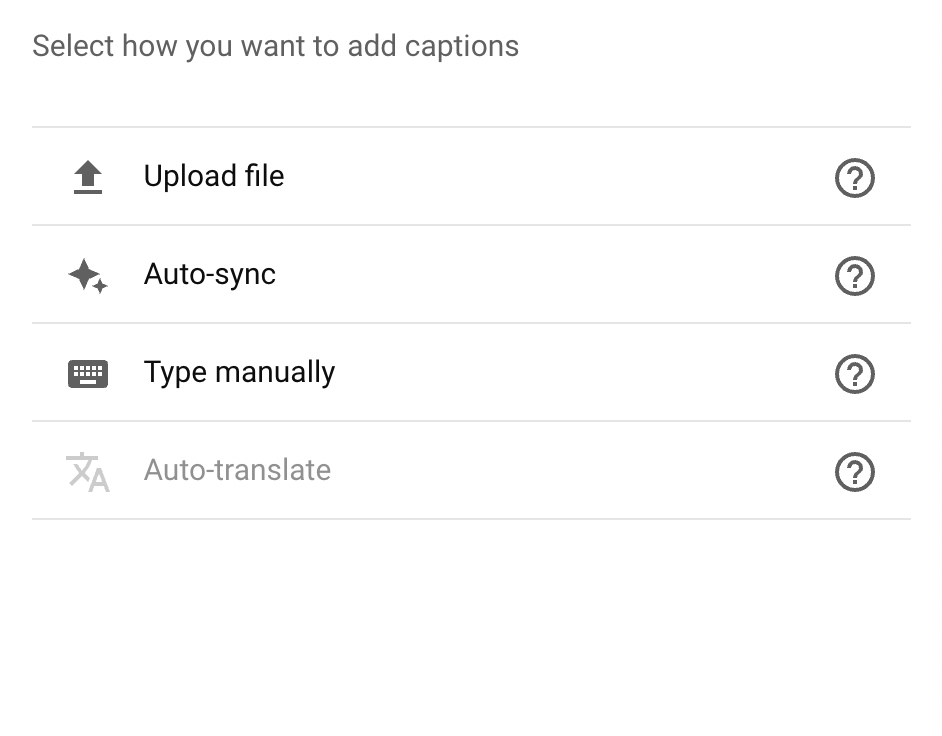
You can either:
‘Upload File’:
This is if you already have your own transcripts. You can upload caption and subtitle transcripts with or without timestamps.
‘Auto Sync’:
You can type out or upload your own file, but YouTube will automatically sync these captions to your video.
‘Type Manually’:
You’ll type out captions by hand. YouTube has some shortcuts to speed up this process.
‘Auto translate’:
This is for translating subtitles and captions.
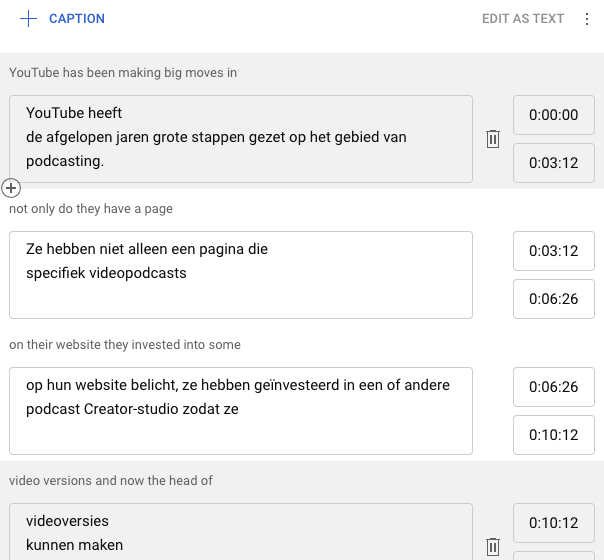
First, create captions or subtitles using the original video language with the steps above. Then follow these same steps to create a second set of subtitles in the language you’d like to translate to.
When you click Add for the second set of subtitles, the Auto Translate feature should become available to translate your subtitles automatically.
Step 6: Review your captions and subtitles, then press Publish when your captions and subtitles are ready.
3. How to Add Captions to a Video on Facebook
Facebook also uses AI to automatically generate captions after you upload a video, but only if you have a Facebook Page for a business or organization. If you’re uploading a video to your personal account, you must create a SRT. file and upload it yourself.
When you upload a video to a Facebook Page, you can review and edit auto-generated captions or upload your own SRT file before publishing your content. After uploading a video, you can click on Subtitles and Captions on the right of your screen to edit the captions Facebook created or upload your own.
Follow these steps to add captions to a video on a Facebook Page:
Step 1: Navigate to the News Feed and click Pages in the menu on the left.
Step 2: Select your Page.
Step 3: In the Whats on your mind… section, select the Photo/Video option.
Step 4: Type out your post and add the video you want to upload.
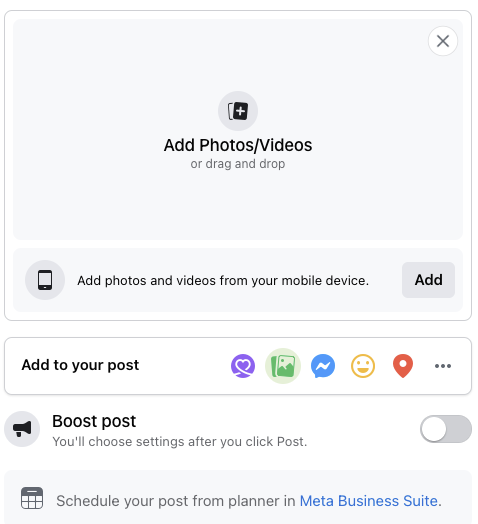
Step 5: After uploading your video, select Video Options and then Add Captions. You can choose to use auto-generated captions or upload your own SRT file.
Step 6: Select Save, then click Post when ready to Publish.
Add captions to video on your personal page using these steps:
Step 1: Navigate to the top of your Timeline or News Feed.
Step 2: Click Photo/Video in the ‘Whats on your mind…’ section.
Step 3: Choose the video you want to upload and click on the Edit button at the top of your video.

Step 4: Select the Add Captions option and then Upload Captions to choose and upload the SRT file you’ve created.
Step 5: Click Save and then post your video as usual.
4. How to Add Captions and Subtitles with Google Drive
Although Google Drive is more of a storage platform, you can still use it to share videos with a selected group of people. While it doesn’t offer automated captions and subtitles, you can add your own.
Follow these steps to add captions and subtitles to Google Drive videos:
Step 1: Create a transcript manually or through transcription software or services. Ensure it’s in a compatible format, such as an SRT. file.
Step 2: Log in to Google Drive and upload the video you’d like to add captions or subtitles to.
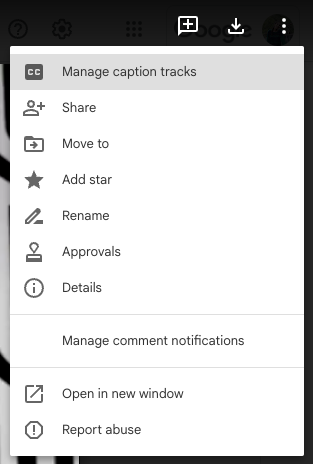
Step 3: Click on the video then on the top right, select the three-dot menu for More Actions.
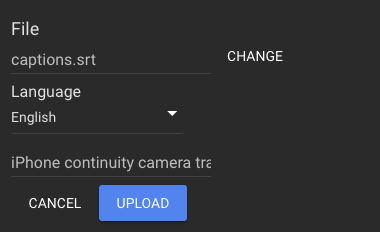
Step 4: Select Manage caption tracks, redirecting you to a new tab for editing and adding captions to your Google Drive videos.
Step 5: From the right menu, click Add new caption tracks
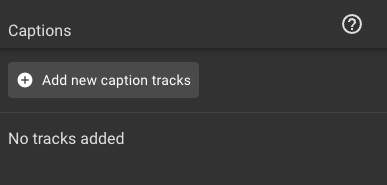
Step 6: Upload or select your caption or subtitle transcript and add them in.
Step 7: Choose the language of your captions and title it if you’d like, then select Upload to complete the process.
5. How to Add Captions and Subtitles to Videos on your Phone
If you’re on the go, you may want to add captions or subtitles to videos from your phone. If you’re working with closed captions or subtitles, simply use a transcription generator and upload it to your sharing platform along with your video. If you’re using open captions, try a video editor.
For iPhone users the obvious choice of editing software is iMovie. Although iMovie doesn’t have automated captioning, you’ll have to add in everything manually.
Either way, follow these steps to add open captions or subtitles to videos on your iPhone using iMovie:
Step 1: Open iMovie, and import the video to which you’d like to add captions or subtitles.
Step 2: Place the video in the timeline and find where you’d like to add captions or subtitles.
Step 3: Select the ‘T’ or text button to add in a textbox.
Step 4: Choose your style and format, then start typing out your captions or subtitles.
Step 5: Continue this process and finish editing your video before exporting.
Considering manual transcriptions take a long time, we suggest using a video editing app with built-in captioning. You can use these on both Android and iPhone. For example, you can try Capcut, a very popular video editing app.
Follow these steps to add automated captions or subtitles using Caption Cut:
Step 1: Add a New Project or select an existing video project to add captions or subtitles to.
Step 2: Upload your video, crop it if you wish, then select Add.
Step 3: Select the Text (T) button at the bottom of the screen. Then select Auto Captions.
Step 4: Select if you want to transcribe voiceover, original sound, or both. You can also choose your captions’ language and whether you want CapCut to delete filler words automatically.
Step 5: After adjusting settings, select Start, and captions will automatically generate.
Step 6: Edit and review your captions, then select Done and tick. You can Style your captions and change their font or give them effects to make them pop out.
Step 7: When you’ve edited enough, press the upward arrow on the top right to download your video.
Just like that, you can add captions to videos on your phone. You can also add captions directly on some social media apps such as Instagram and TikTok.
Conclusion
Most social platforms have features that make it easy to add subtitles and captions on their sites. When you add captions or subtitles to videos, you expand your audience and increase the reach of your content by improving its SEO. Make sure you know what SubRip files are and how they work to make adding captions and subtitles as easy as possible.
Adding Video Subtitles and Captions FAQs
Do you still have questions about adding subtitles and captions to your video content? Our FAQ section has answers for some of the most commonly asked questions about video captions and subtitles. Keep reading to learn more about captioning video content.
How Can I Add Captions to a Video for Free
You can add captions to a video for free on most video-sharing platforms. Some sites use AI technology to auto-generate captions for video content and others require you to upload a text file called a SubRip, or SRT, file. You can create an SRT file in any word processing program for upload. See the sections in the above article about SRT files and adding them to social sharing sites.
How Can I Add Subtitles to Video Without Any Software
Some social sharing sites like YouTube will automatically provide subtitles for videos. However, if you need to add them yourself, you can do so by typing them out and then uploading them alongside your video. You can do all of this without downloading any type of software. However, if you need help translating the text in your video, you’ll have to use additional software or a translation service.
How to Add Subtitles to a Video Permanently
You have to use video editing software to hardcode subtitles into your video file to permanently add subtitles. The below section explores how to do this to add captions permanently using VLC.
How to Add Subtitles to a Video in VLC
There are two ways to add videos in VLC. The first way lets you add them so that they’re only visible within the VLC program. The second way hardcodes them into the video file so that they will display no matter where you play or upload your video file. We’ll provide step-by-step instructions for how to add them in the second, more permanent way.
Step 1: Open VLC player.
Step 2: Select Media from the upper left corner of the screen and choose Stream from the dropdown menu.
Step 3: In the pop-up window, click the + Add button and select the video file on your computer.
Step 4: Click the Use a subtitle field in the popup window.
Step 5: Click browse and select the SRT file from your system.
Step 6: Click Stream and then Next.
Step 7: In the Stream Output window, choose File from the dropdown and then click the Add button.
Step 8: In the pop-up window, click Browse and create a name for your video. Be sure your file name ends with the file format type you prefer.
Step 9: Choose the folder where you want to save your video and click Save and then Next.
Step 10: Check the Activate Transcoding box and then click the Wrench icon.
Step 11: Navigate to the Subtitles tab and check the Subtitles and Overlay subtitles on the video boxes.
Step 12: Click Save and then Next.